O bloco GutenKit Donut Progress Bar permite que você dê facilmente uma aparência atraente aos seus dados no seu site WordPress usando o editor de blocos padrão. Você pode escolher exibir um número, ícone, imagem e conteúdo de suporte, e também personalizar o gráfico de pizza com opções de estilo extensivas.
Vamos aprender como adicionar o bloco de gráfico de pizza na área do editor Gutenberg.
Etapa 1: adicione o bloco de barra de progresso GutenKit Donut #
Instale o plugin GutenKit e vá para o painel do WordPress. Então, pegue uma nova página ou post e siga os passos abaixo:
- Habilitar o editor de blocos.
- Encontre o "+” ícone na parte superior da tela do editor.
- Clicar nele exibirá uma biblioteca de blocos.
- Procure pelo bloco Barra de Progresso Donut GutenKit.
- Depois de vê-lo, clique ou arraste e solte-o na tela do editor.
Etapa 2: Adicionar número e ícone do gráfico de pizza #
Agora, abra a configuração do bloco e vá até a aba de conteúdo.
Contente:

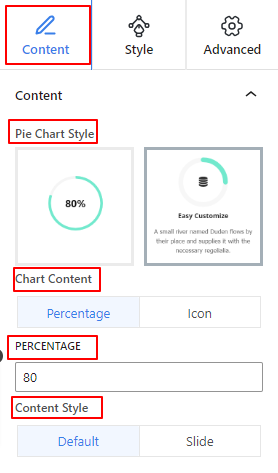
- Estilo de gráfico de pizza: Escolha exibir seu estilo de gráfico de pizza com ou sem texto.
- Conteúdo do gráfico: Mostra a porcentagem ou o ícone para o conteúdo do gráfico.
- Percentagem: Insira o número percentual nesta caixa.
- Ícone: Adicione um ícone ou imagem da biblioteca ou carregue-o do seu dispositivo.
- Estilo de conteúdo: Além do estilo padrão, você pode adicionar um efeito de animação de slide no estado de foco.
Etapa 3: Barra de progresso do estilo Donut #

Nesta etapa, passaremos para a guia Style para personalizar a seção do gráfico de pizza. Vamos ver como funciona:
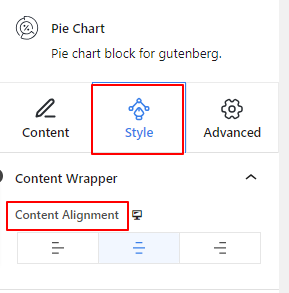
Conteúdo Wrapper:
- Alinhamento de conteúdo: Defina o posicionamento horizontal do gráfico de pizza. (Esquerda, Centro, Direita)
Se você escolher o segundo estilo de gráfico de pizza, verá a configuração Título e Conteúdo na aba Estilo. Além disso, ambos os recursos têm as mesmas configurações.
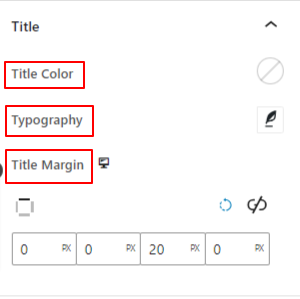
Título e conteúdo:

- Cor: Adicione cor ao título ou ao texto da descrição.
- Tipografia: Use esta área de configuração para personalizar o título ou o texto da descrição. Como chagrin, fonte, peso, estilo, etc.
- Margem: Insira um valor para adicionar margem.
- Margem do título: Defina o espaço entre o gráfico de pizza e o título.
- Margem de conteúdo: A partir daí, especifique o espaço entre o título e o conteúdo.
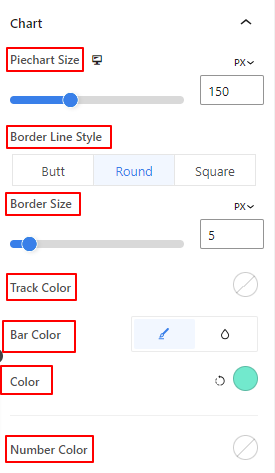
Gráfico:

- Tamanho do gráfico de pizza: Use o controle deslizante para determinar o tamanho do gráfico de pizza.
- Estilo de linha de borda: Escolha um estilo para a linha da borda. (Bumbum, Redondo, Quadrado)
- Tamanho da borda: Defina a espessura da borda usando o controle deslizante.
- Tamanho da imagem do gráfico de pizza: Determine o tamanho da imagem. (Esta configuração aparece somente se a imagem for selecionada na guia de conteúdo)
- Cor da trilha: Use o controle deslizante para adicionar uma cor à trilha do gráfico de pizza.
- Cor da barra: Dê cor à fatia do gráfico de pizza.
- Número Cor: Dê cor ao número percentual usando o seletor de cores.
É isso!
Abordamos todos os detalhes sobre como usar o bloco de gráfico de pizza GutenKit no seu site Gutenberg.
Espero que agora você possa adicionar um gráfico de pizza ao seu site Gutenberg.


