Have you ever browsed a store for a specific product but ended up buying more items than you expected from the “people also brought” section? This is what cross-sell product recommendations do—convincing customers to add more items to their carts.
Besides, cross-selling is not just about boosting average order value; it’s an effective way to improve the shopping experience that can convert casual shoppers into loyal and high-value customers.
Hence, in this guide, we’ll learn in-depth about cross-selling products and how to show cross-selling products in WooCommerce in the simplest possible way.
What is cross-selling in WooCommerce?
Cross-selling means suggesting relevant products that complement their add-to-cart items. The core purpose of displaying cross-sell products on WooCommerce is to raise order value that drives higher sales and profits.
An example of product cross-selling
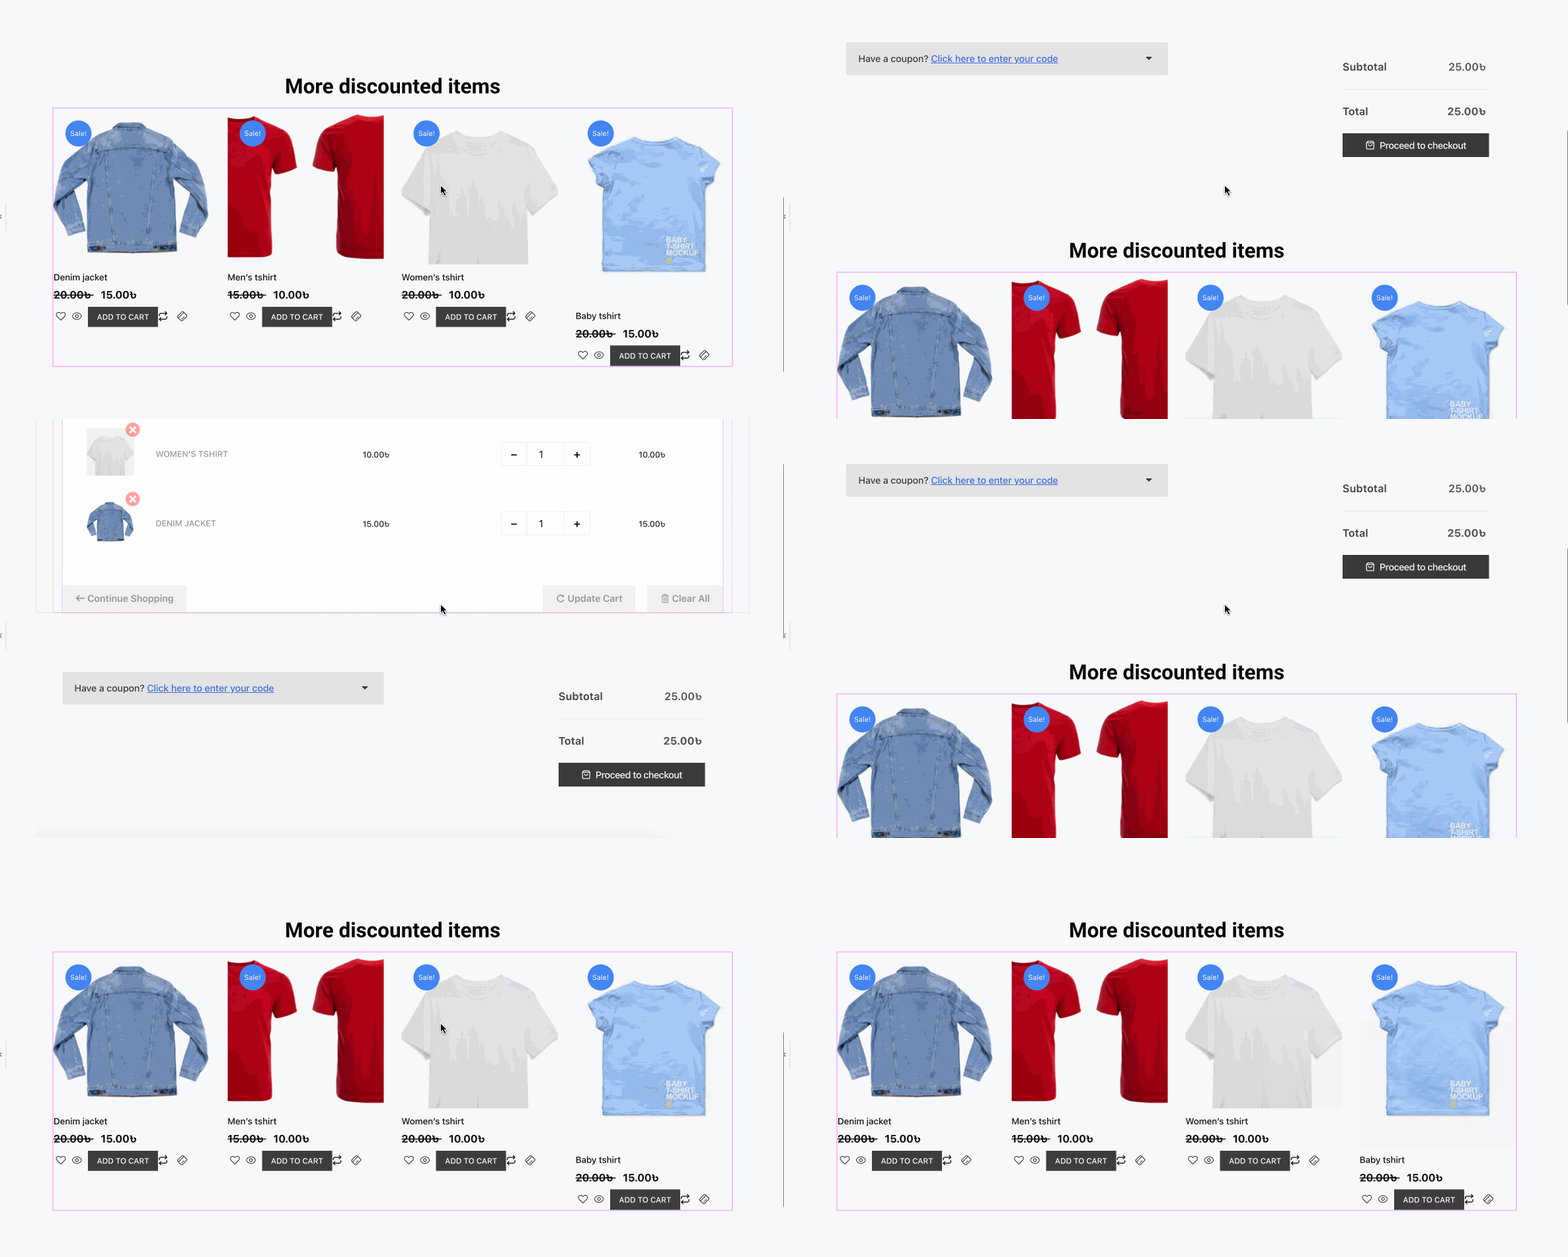
Cross-selling allows store owners to display recommended products in the cart, quick checkout, or other pages. Here is an example of how this product cross-selling displays on the cart page:

Ways to show cross-sell products in WooCommerce
Integrating cross-selling products to your WooCommerce store is a fruitful way to enhance cart value and increase profit. Here we’ll show two ways to promote cross-sell products on your WooCommerce store.
Since default WooCommerce doesn’t have the option to add cross-sell products section, you need to use a custom cross-sell plugin. For this tutorial, we’ll use ShopEngine, a WordPress cross-selling plugin as it includes this option along with other WooCommerce features.
To follow the guide below, you need to install the following plugins along with ShopEngine:
- Elementor (Gratis)
- WooCommerce (Gratis)
- TiendaMotor (Gratis)
Después installing and activating all the plugins, follow the below guide to learn how to show cross-sell products in WooCommerce:
Method 1: Cross-sell products on the cart page.
First, you have to enable the Cross-Sell widget to display cross-sell products on the cart page. For that, navigate to ShopEngine >> Widgets y encender the toggle button for the Cross-Sell widget. After that, Pulse “Guardar cambios” botón.
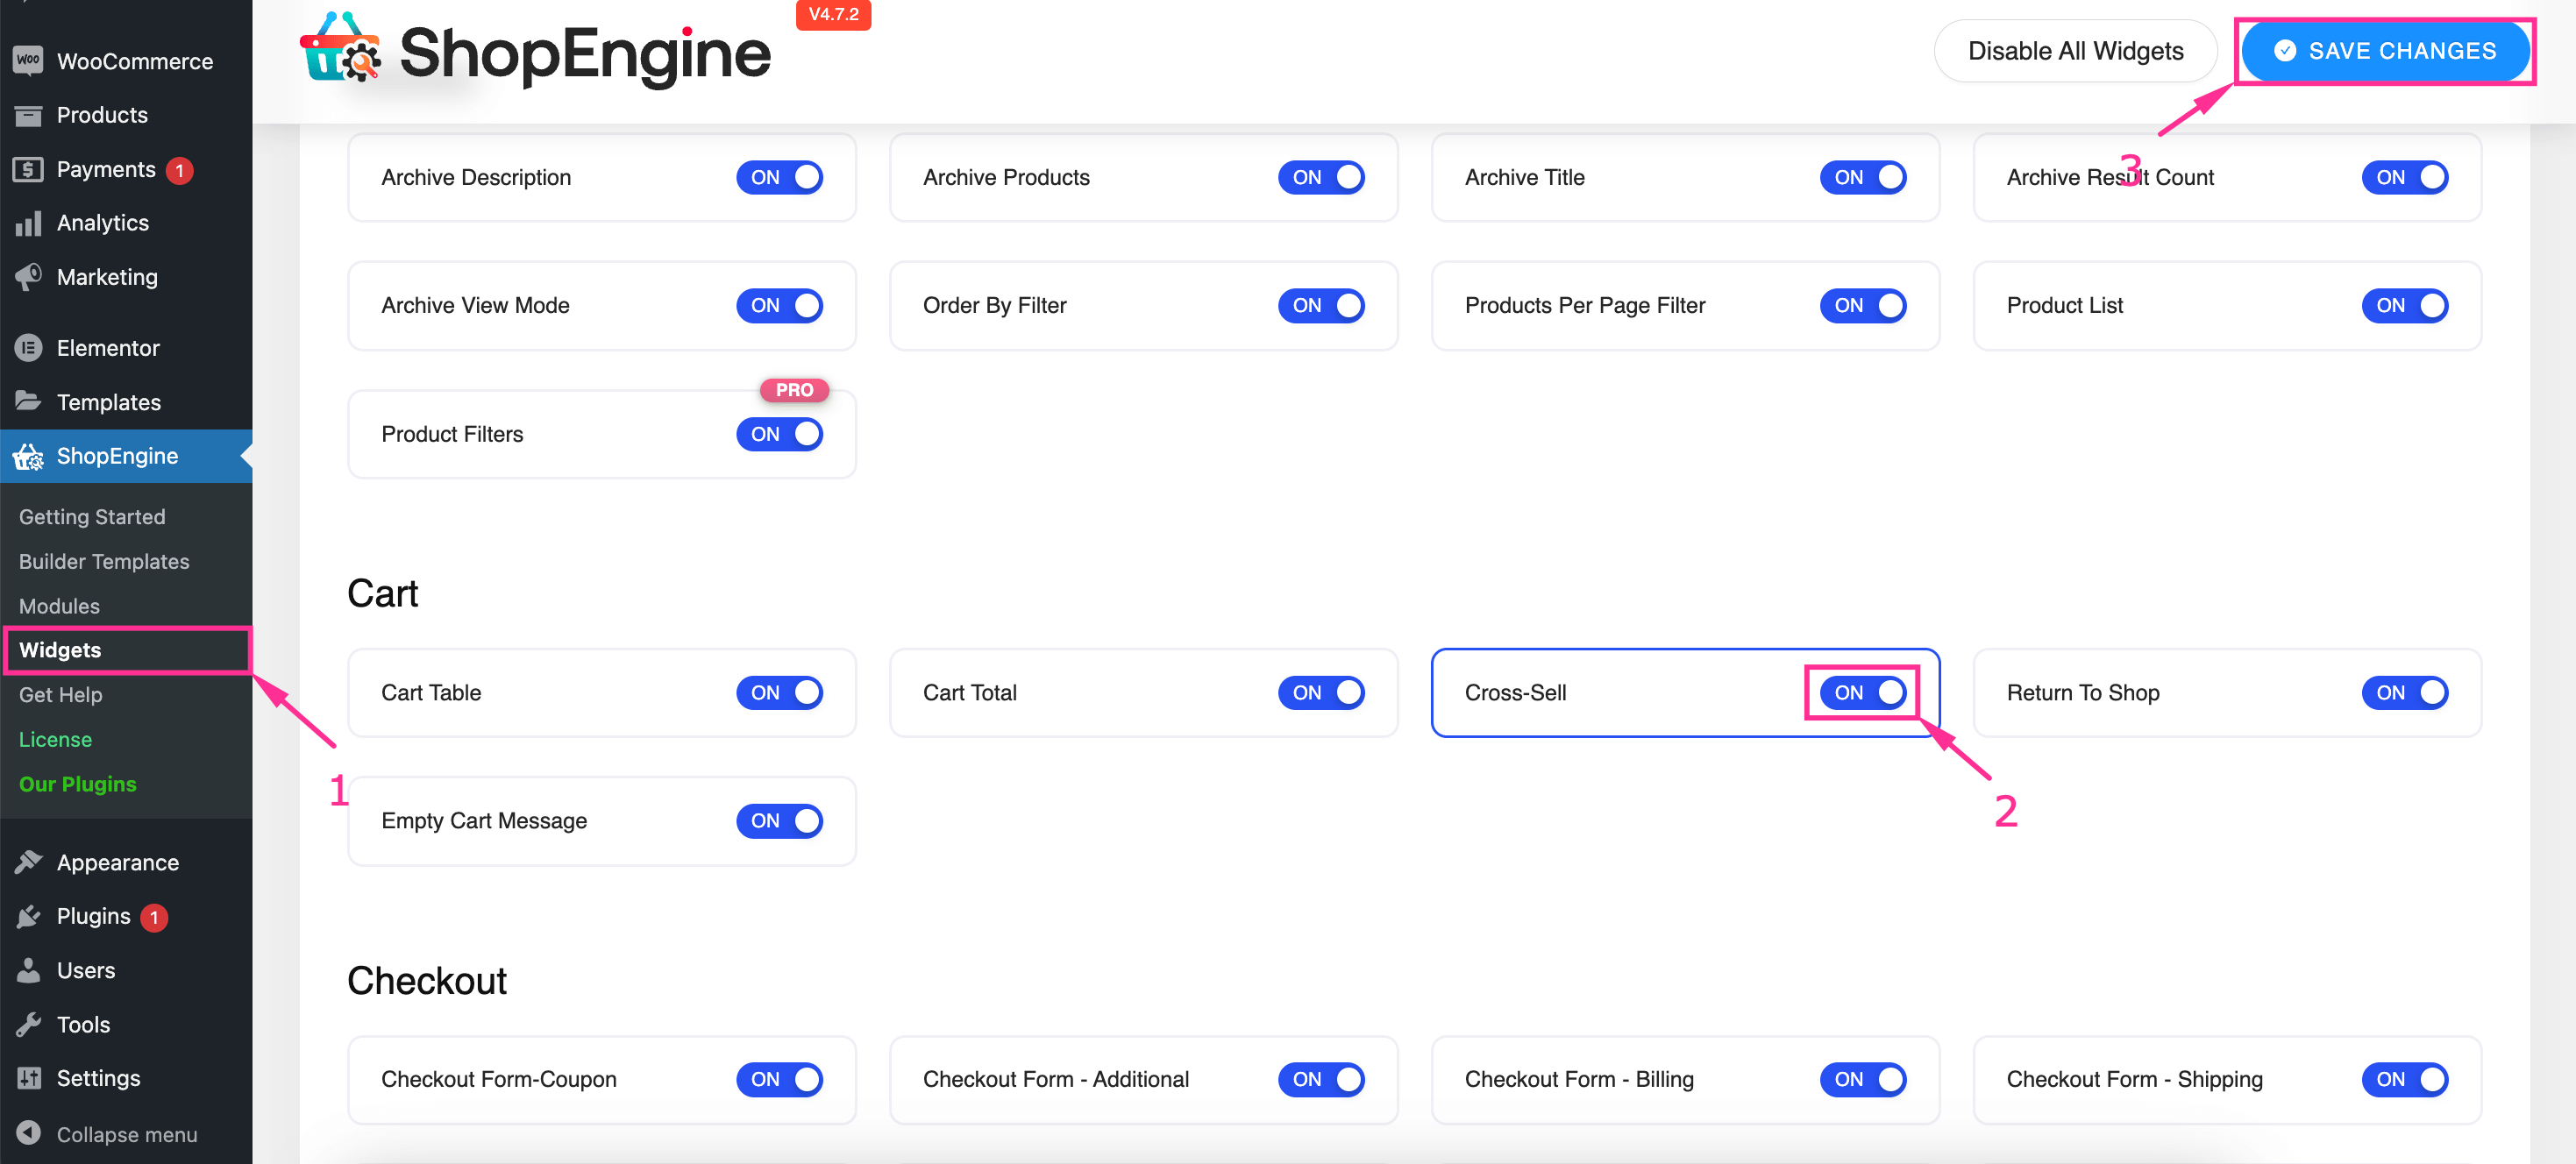

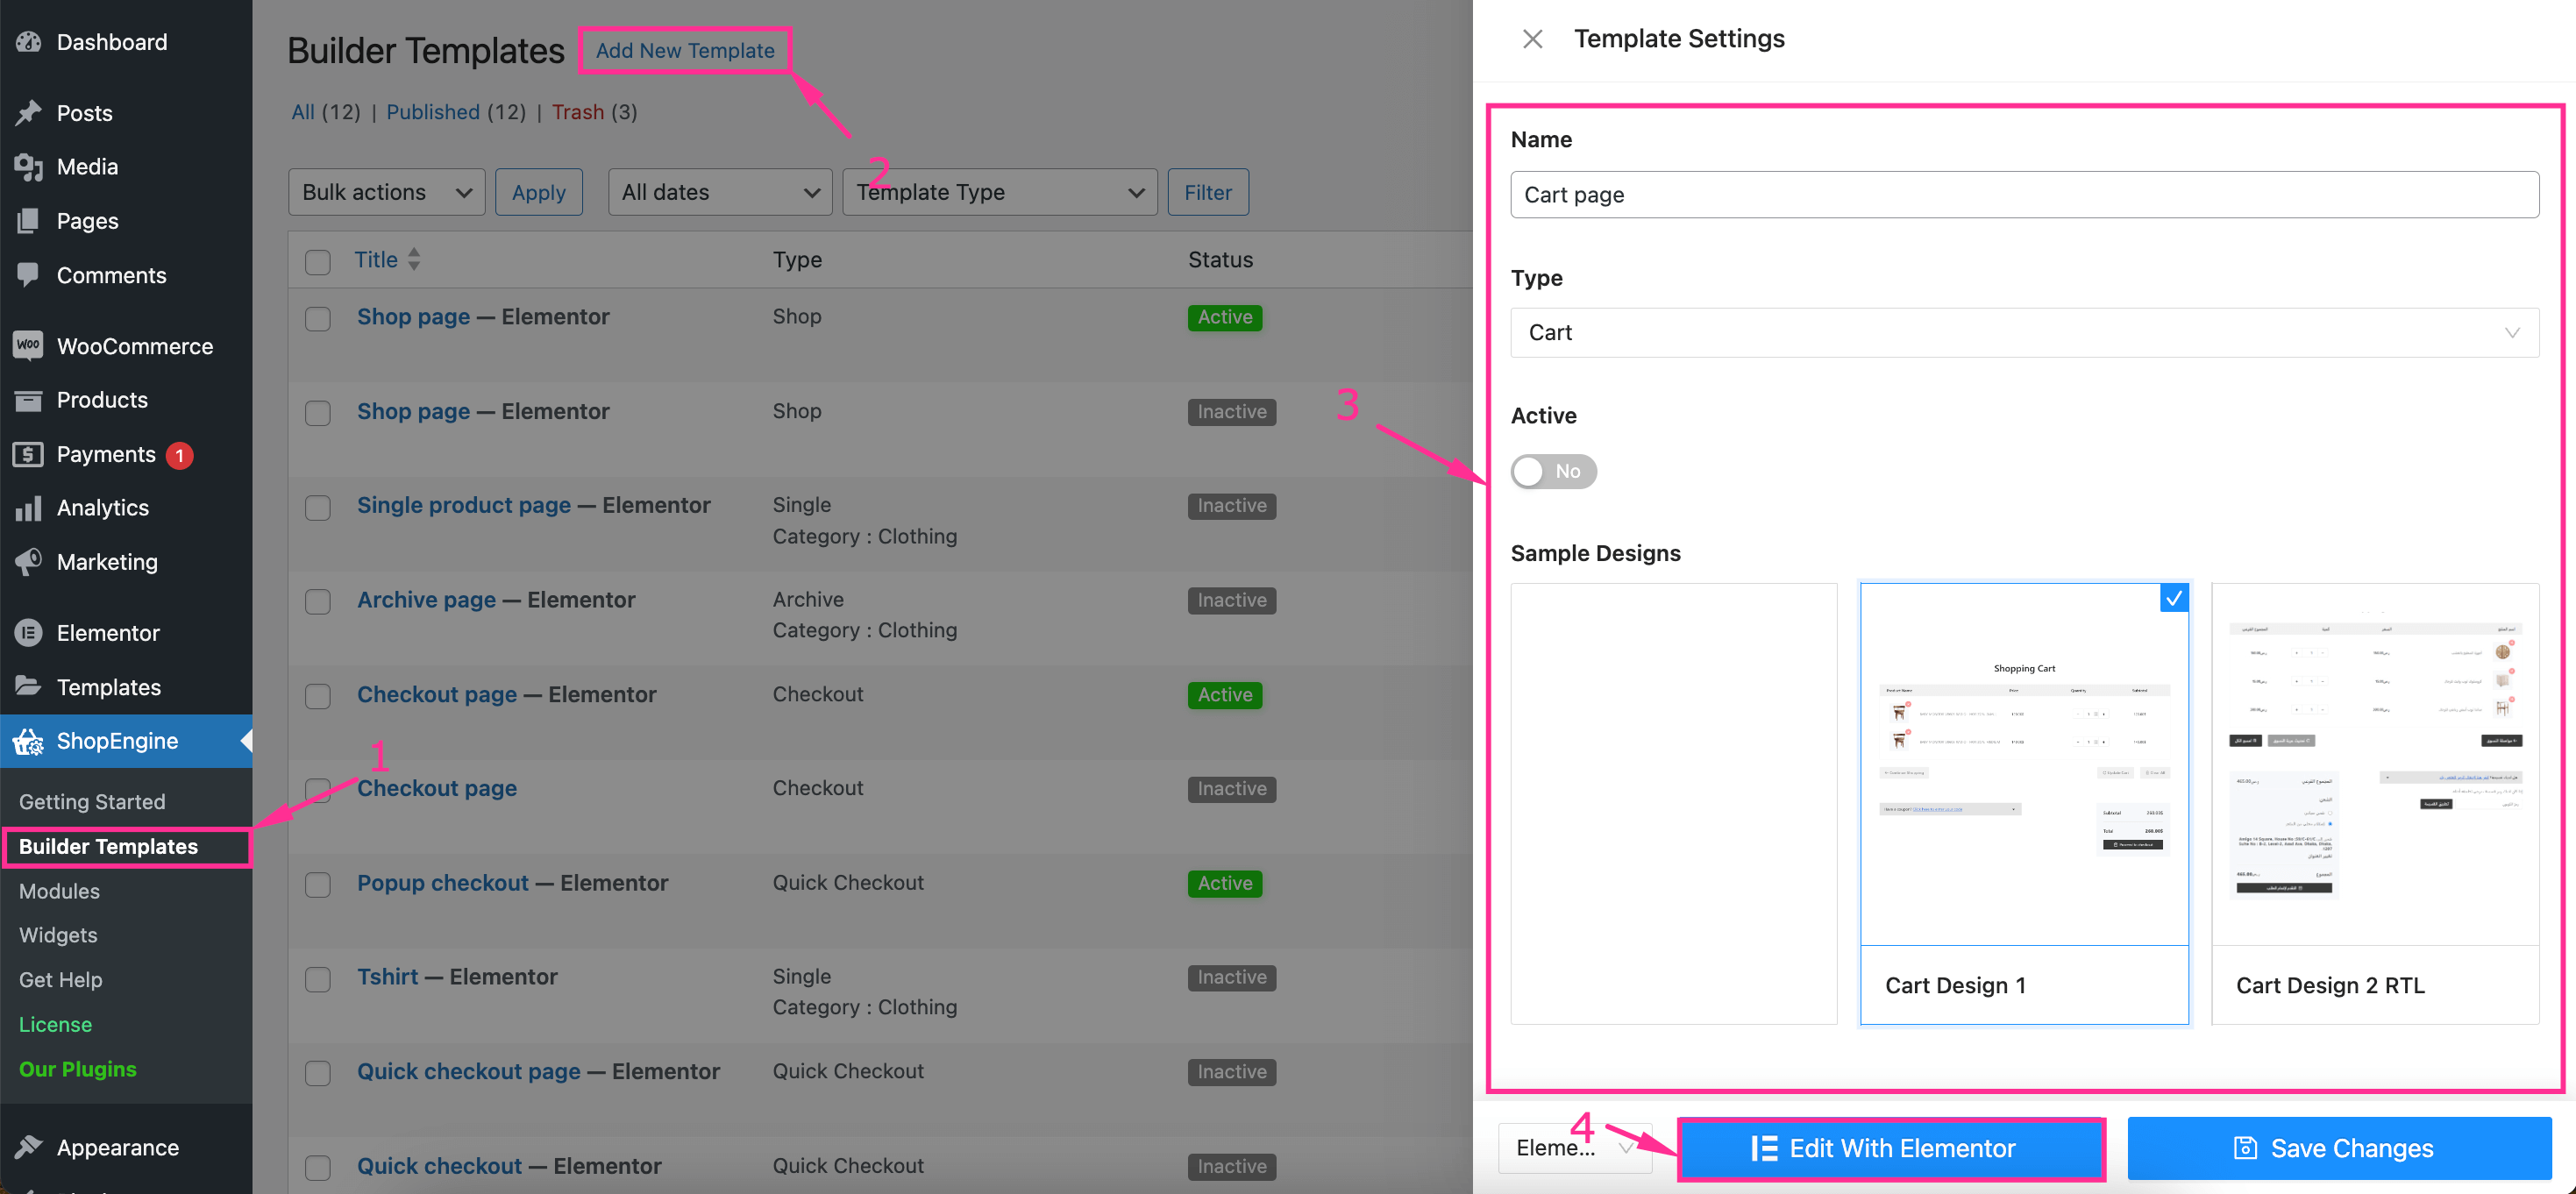
Next to enabling the Cross-Sell widget, you need to add a cart page template for showcasing WooCommerce cross-sell products. To do that, navigate to ShopEngine >> Plantillas de creación y press the “Add New Template” botón.
After pressing the “Add New Template” button, a Template Settings tab will open up from the right side. On that tab, you will find the following areas that need to be adjusted to add a cart page to your WooCommerce store:
- Nombre: Fill this field with “Cart page”.
- Tipo: Select cart from the drop-and-down menu.
- Activo: Enable the toggle button to make this cart page active.
- Diseños de muestra: Pick a suitable template for your cart page.
Después, presione "Editar con Elementor" button to visit Elementor editor for further cross-sell products configuration.

After being taken to the Elementor Editor, search for Cross-Sell widget in the search tab and drag-and-drop it to the plus icon. Thus, your cross-selling products will be displayed on your cart page.
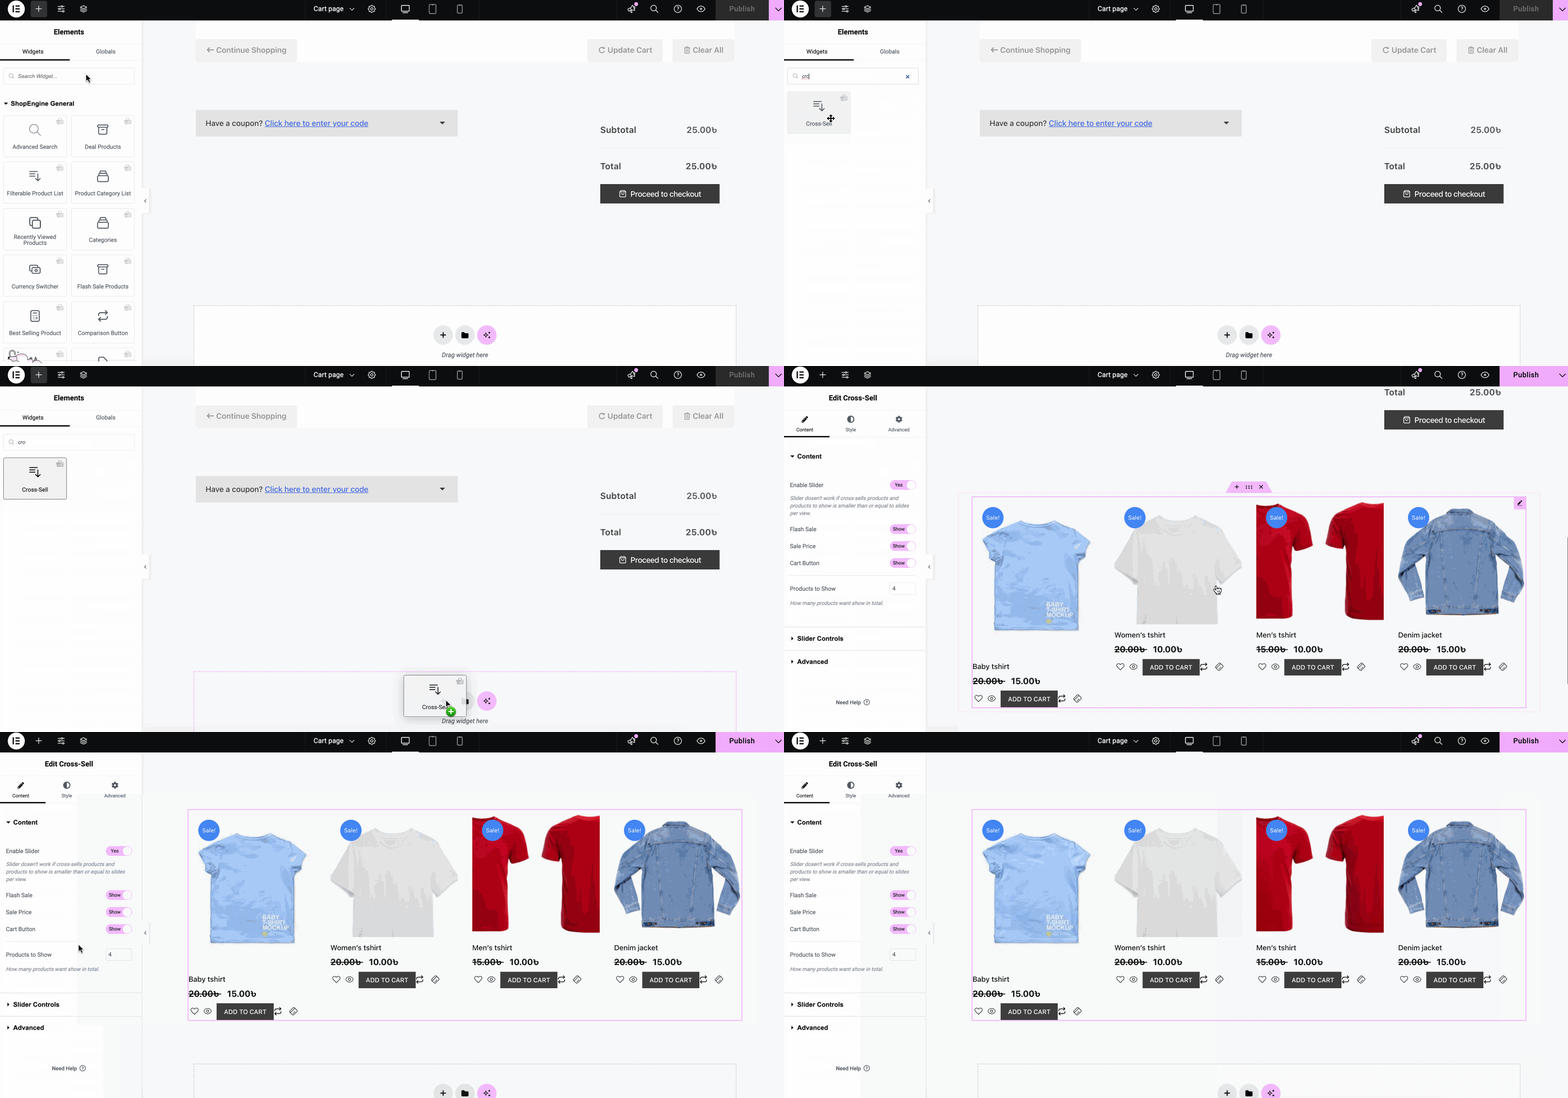

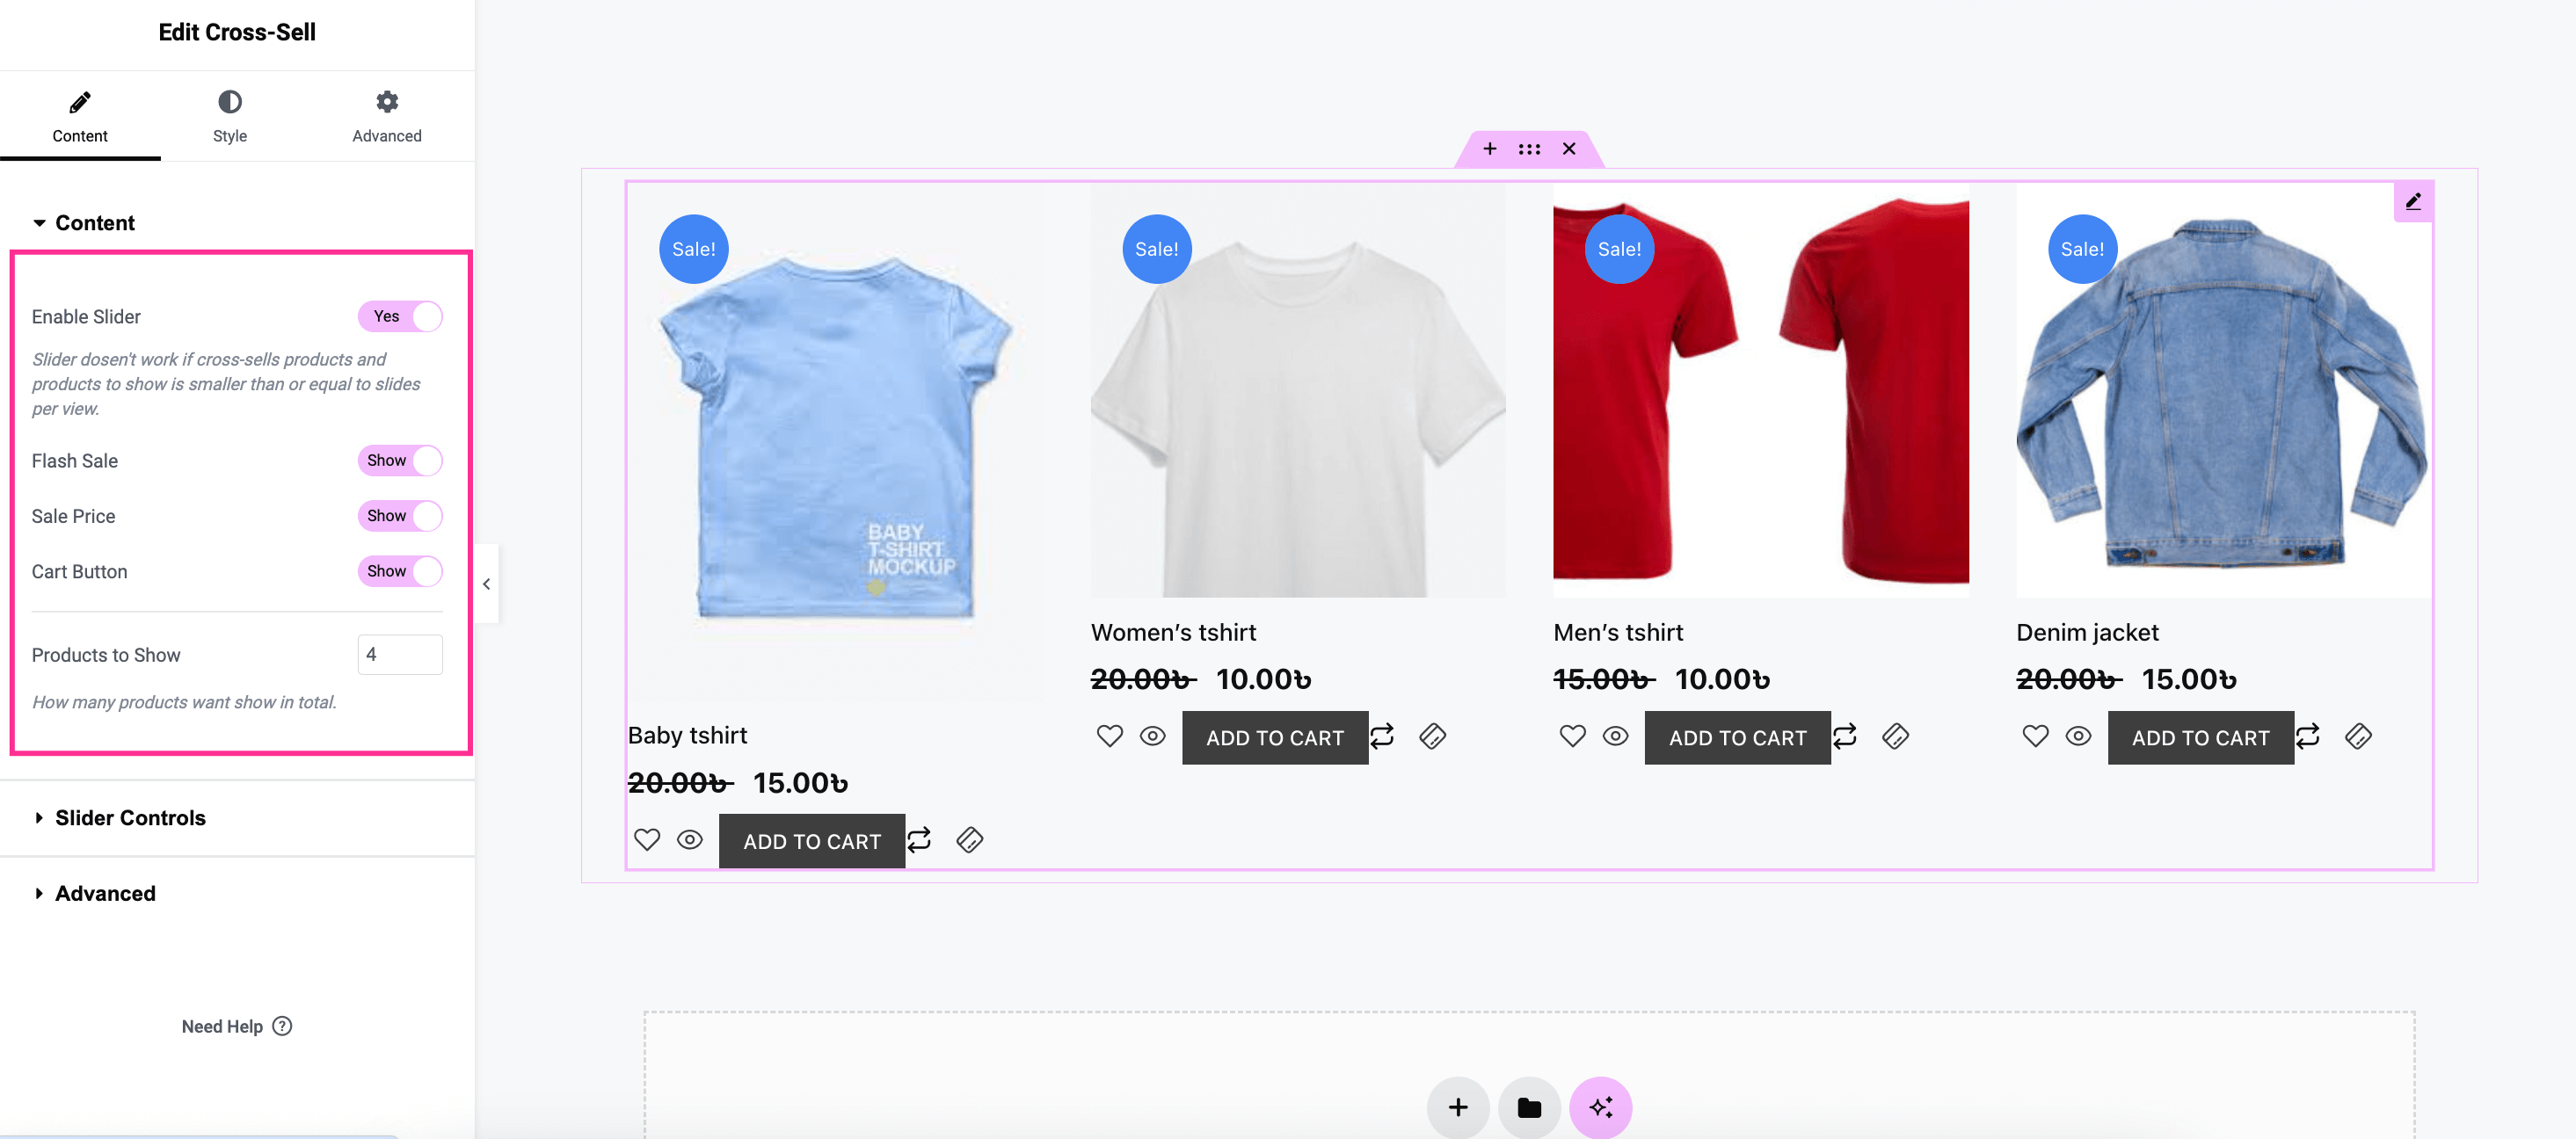
Now comes the WooCommerce cross-sell products’ layout and other customizations. Expand the Content tab and adjust the following fields:
- Habilitar control deslizante: enable this option to display on slide show.
- Venta express: Turn on this option to add a flash sale badge.
- Precio de venta: Display sale price with products.
- Botón del carrito: Activate this option to show the “Add to Cart” button.
- Productos para mostrar: Enter the number of products you want to show.

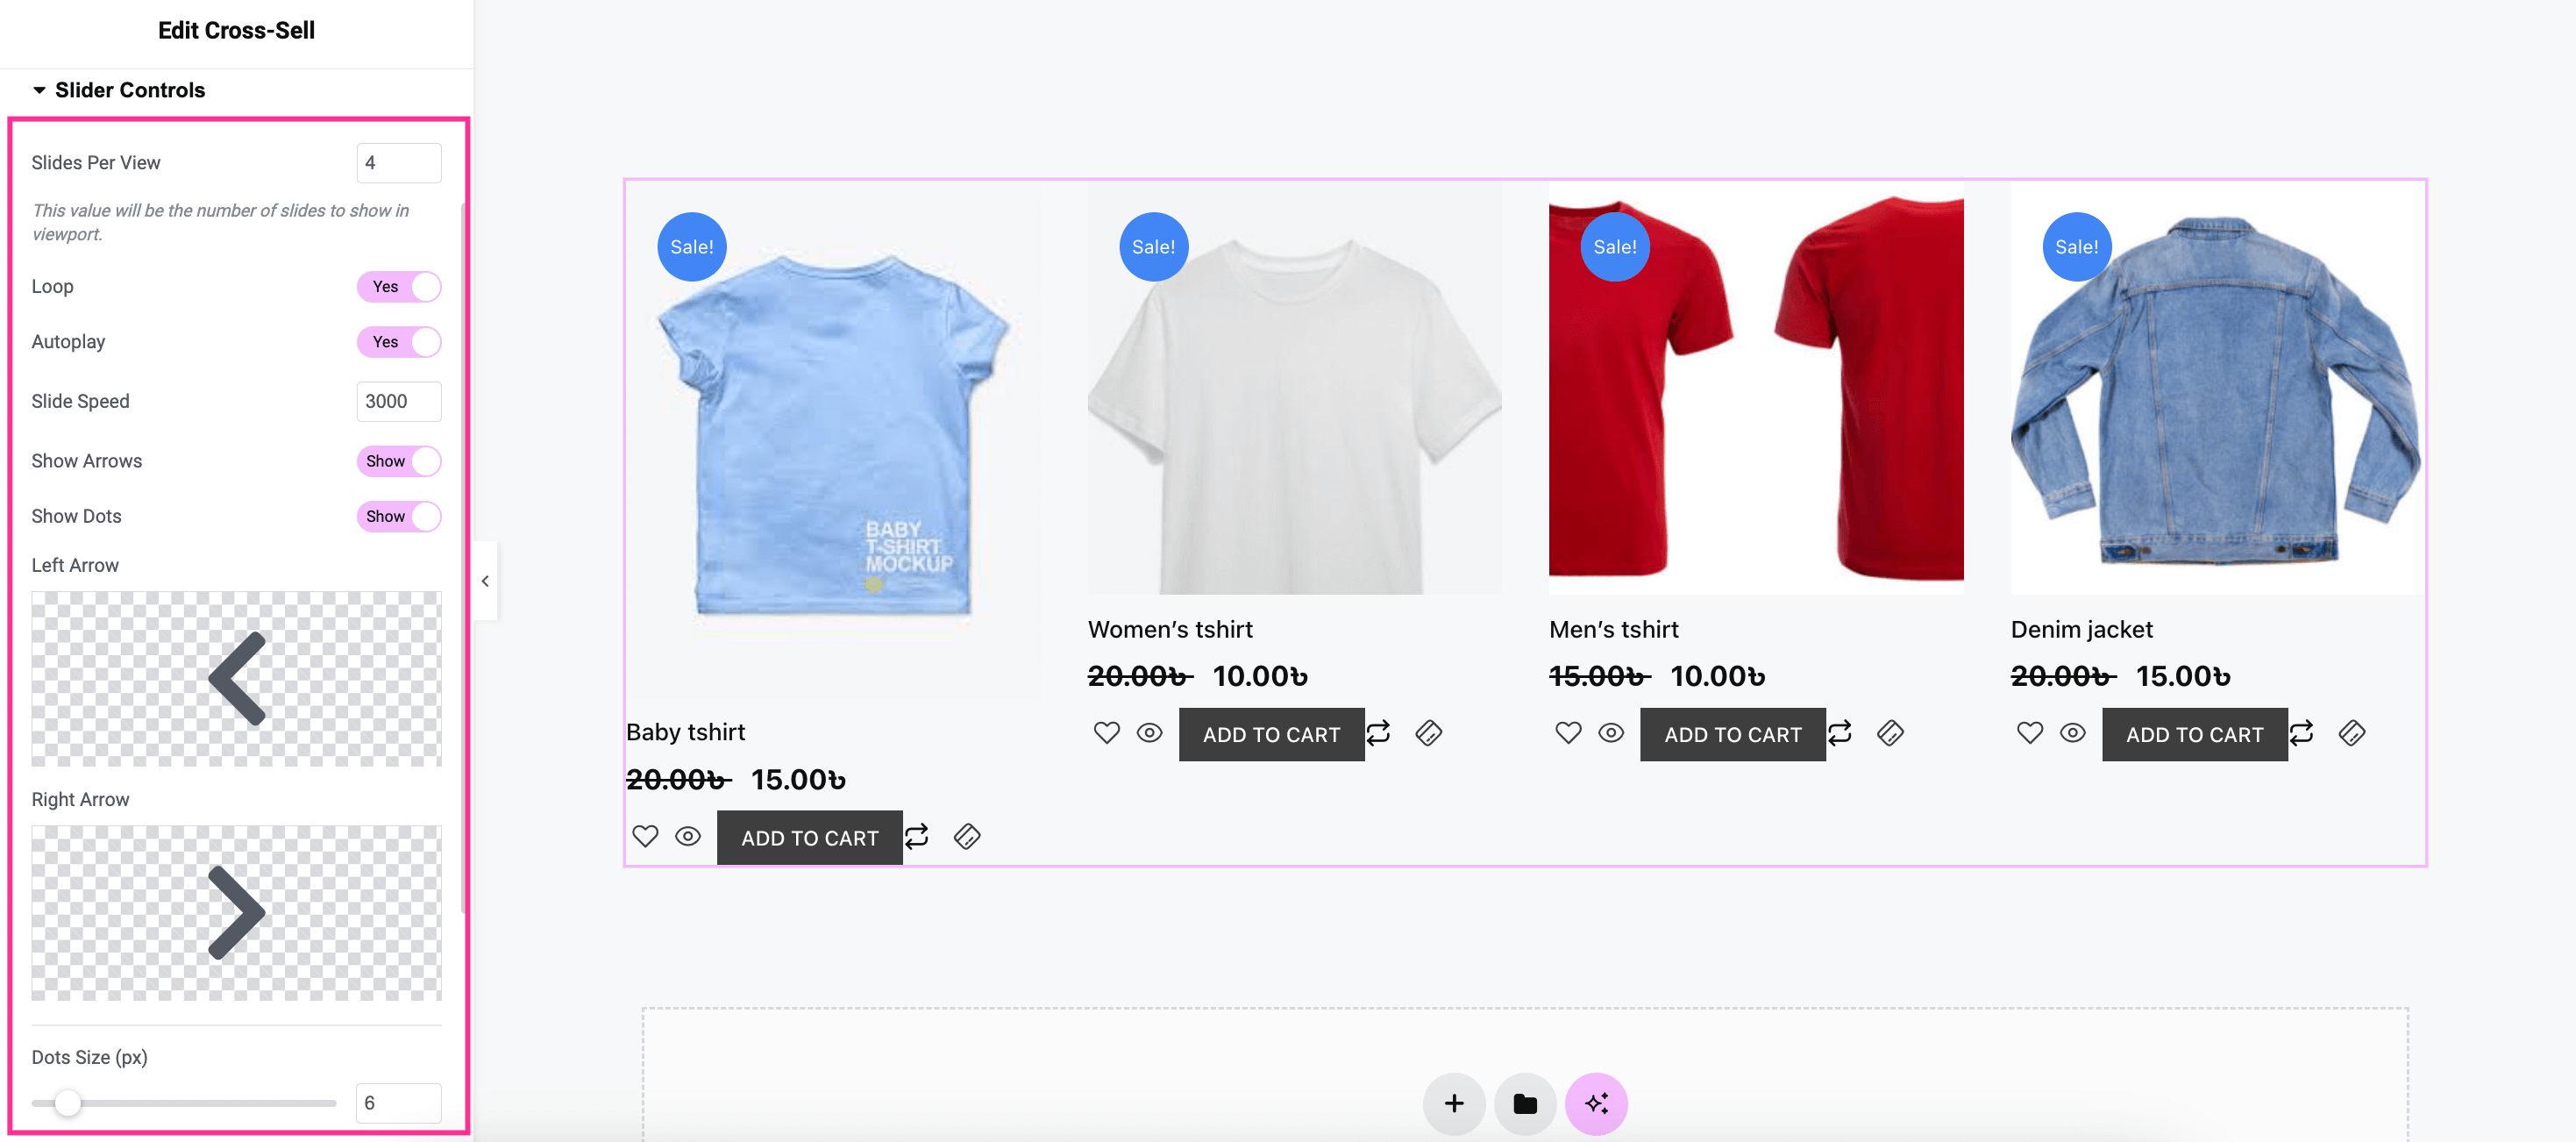
Próximo, expand the Slider Controls tab and customize the following areas for adjusting WooCommerce product recommendation section such as:
- Controles deslizantes por vista: Set the number of sliders you want to show per view.
- Bucle: Turn it on to enable loop for cross-selling product section.
- Auto-reproducción: Enable this option to set autoplay for slides.
- Velocidad de deslizamiento: Adjust speed for autoplay.
- Mostrar flechas: Show arrow for cross-sell products.
- Mostrar puntos: Enable this option to display dots.
- Flecha izquierda: Set left arrow.
- Flecha correcta: Set right arrow.
- Tamaño de los puntos: Adjust the size of dots.
- Tamaño de punto activo: Customize the size of active dot.

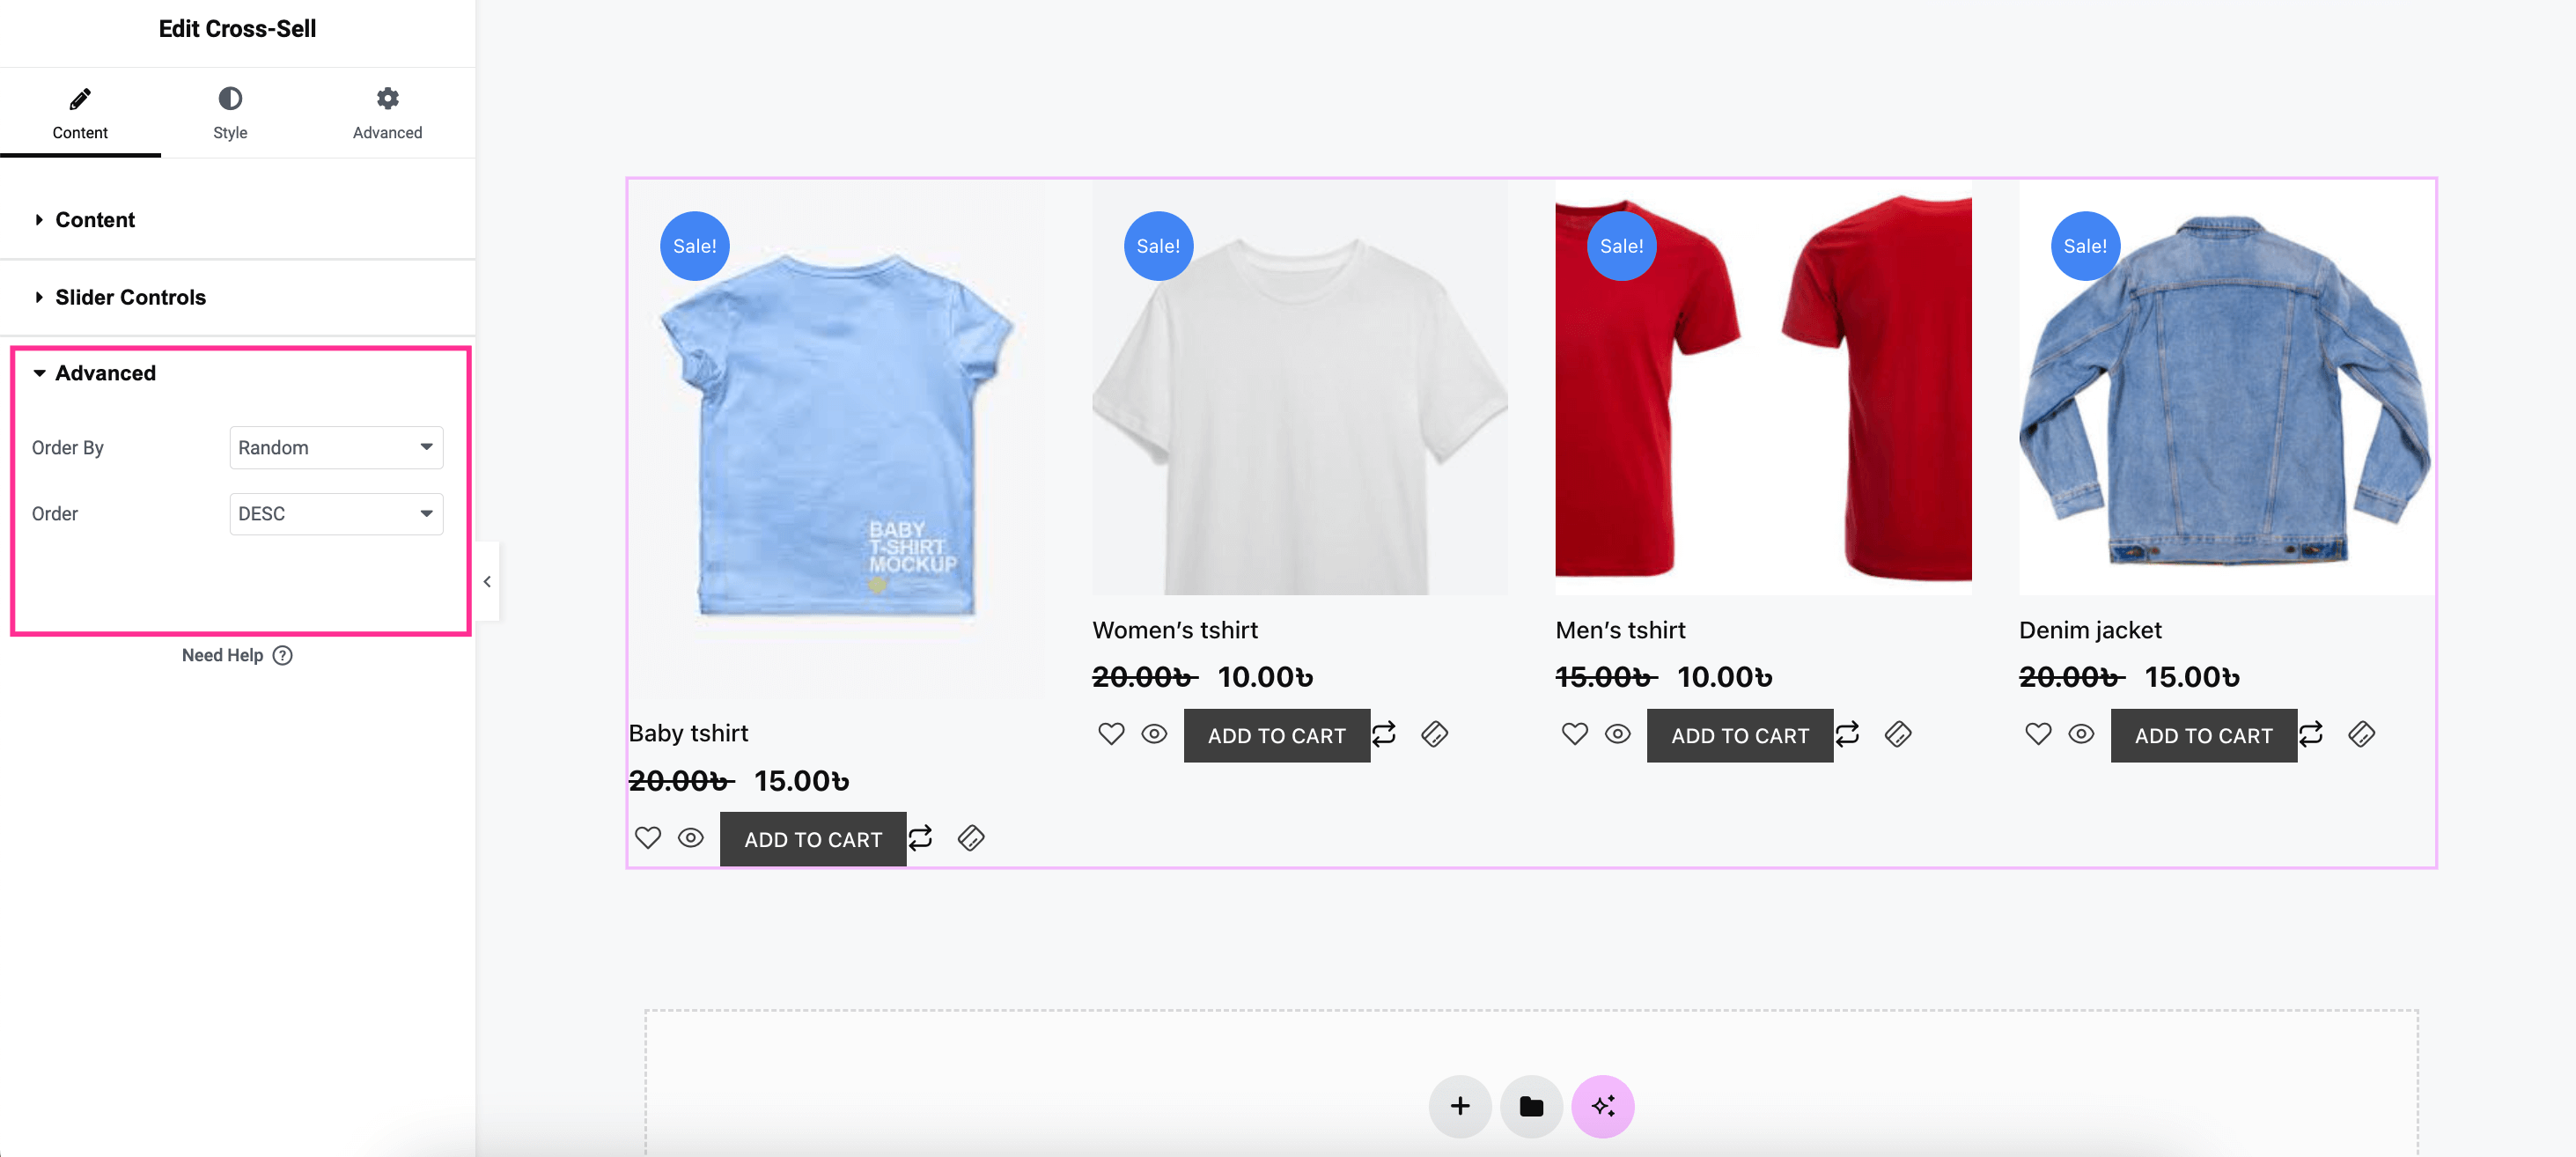
Afterward, open up the “Advanced” tab and adjust the following fields for customizing the order of showing cross-selling product recommendations:
- Ordenar por: Change the order by date, price, popularity, rating, etc.
- Orden: Set ascending or descending for order.

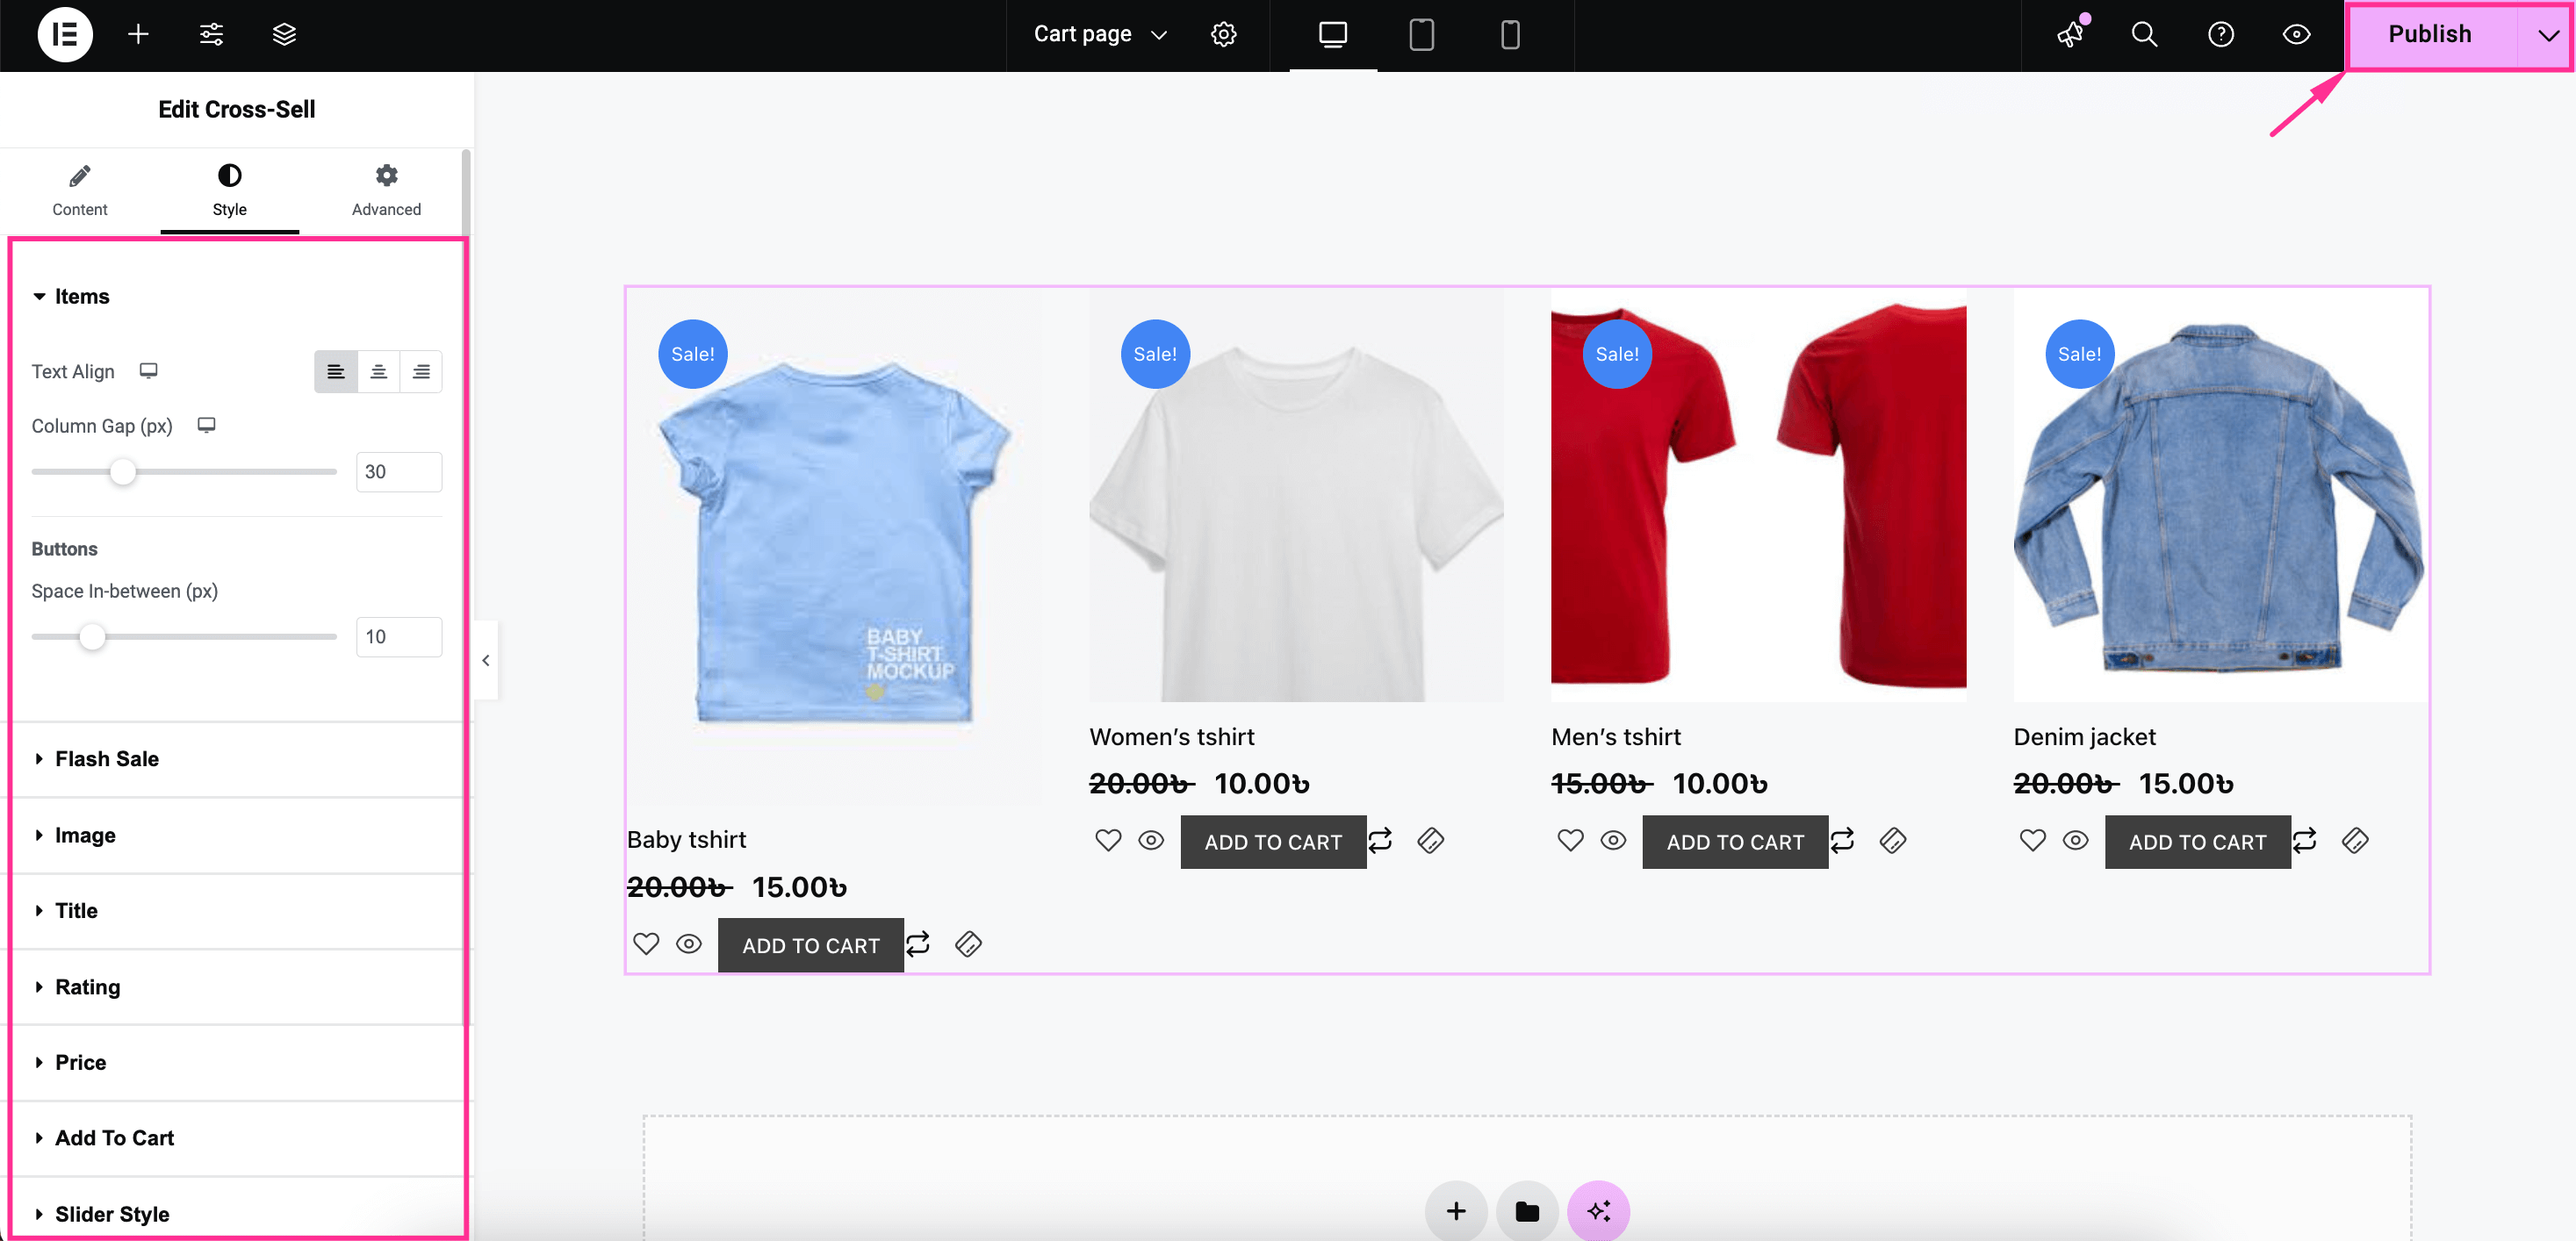
Now, visit the "Estilo" tab and configure style customization by adjusting Items, Flash Sale, Image, Title, Rating, Price, Add To Cart, etc. Finally, Pulsa “Publicar” button to make the Cross-Sell products section live.

Method 2: Cross-sell products on quick checkout page.
You can also display cross-sell products on a quick checkout page using ShopEngine. To boost sales with WooCommerce cross-selling, you need to create a quick checkout page first. Follow the guide on setting up WooCommerce one-click checkout to add a quick checkout page to your WooCommerce store.
To do that, visit ShopEngine >> Plantillas de creación, find your Quick checkout page, and presione "Editar con Elementor" button for it.
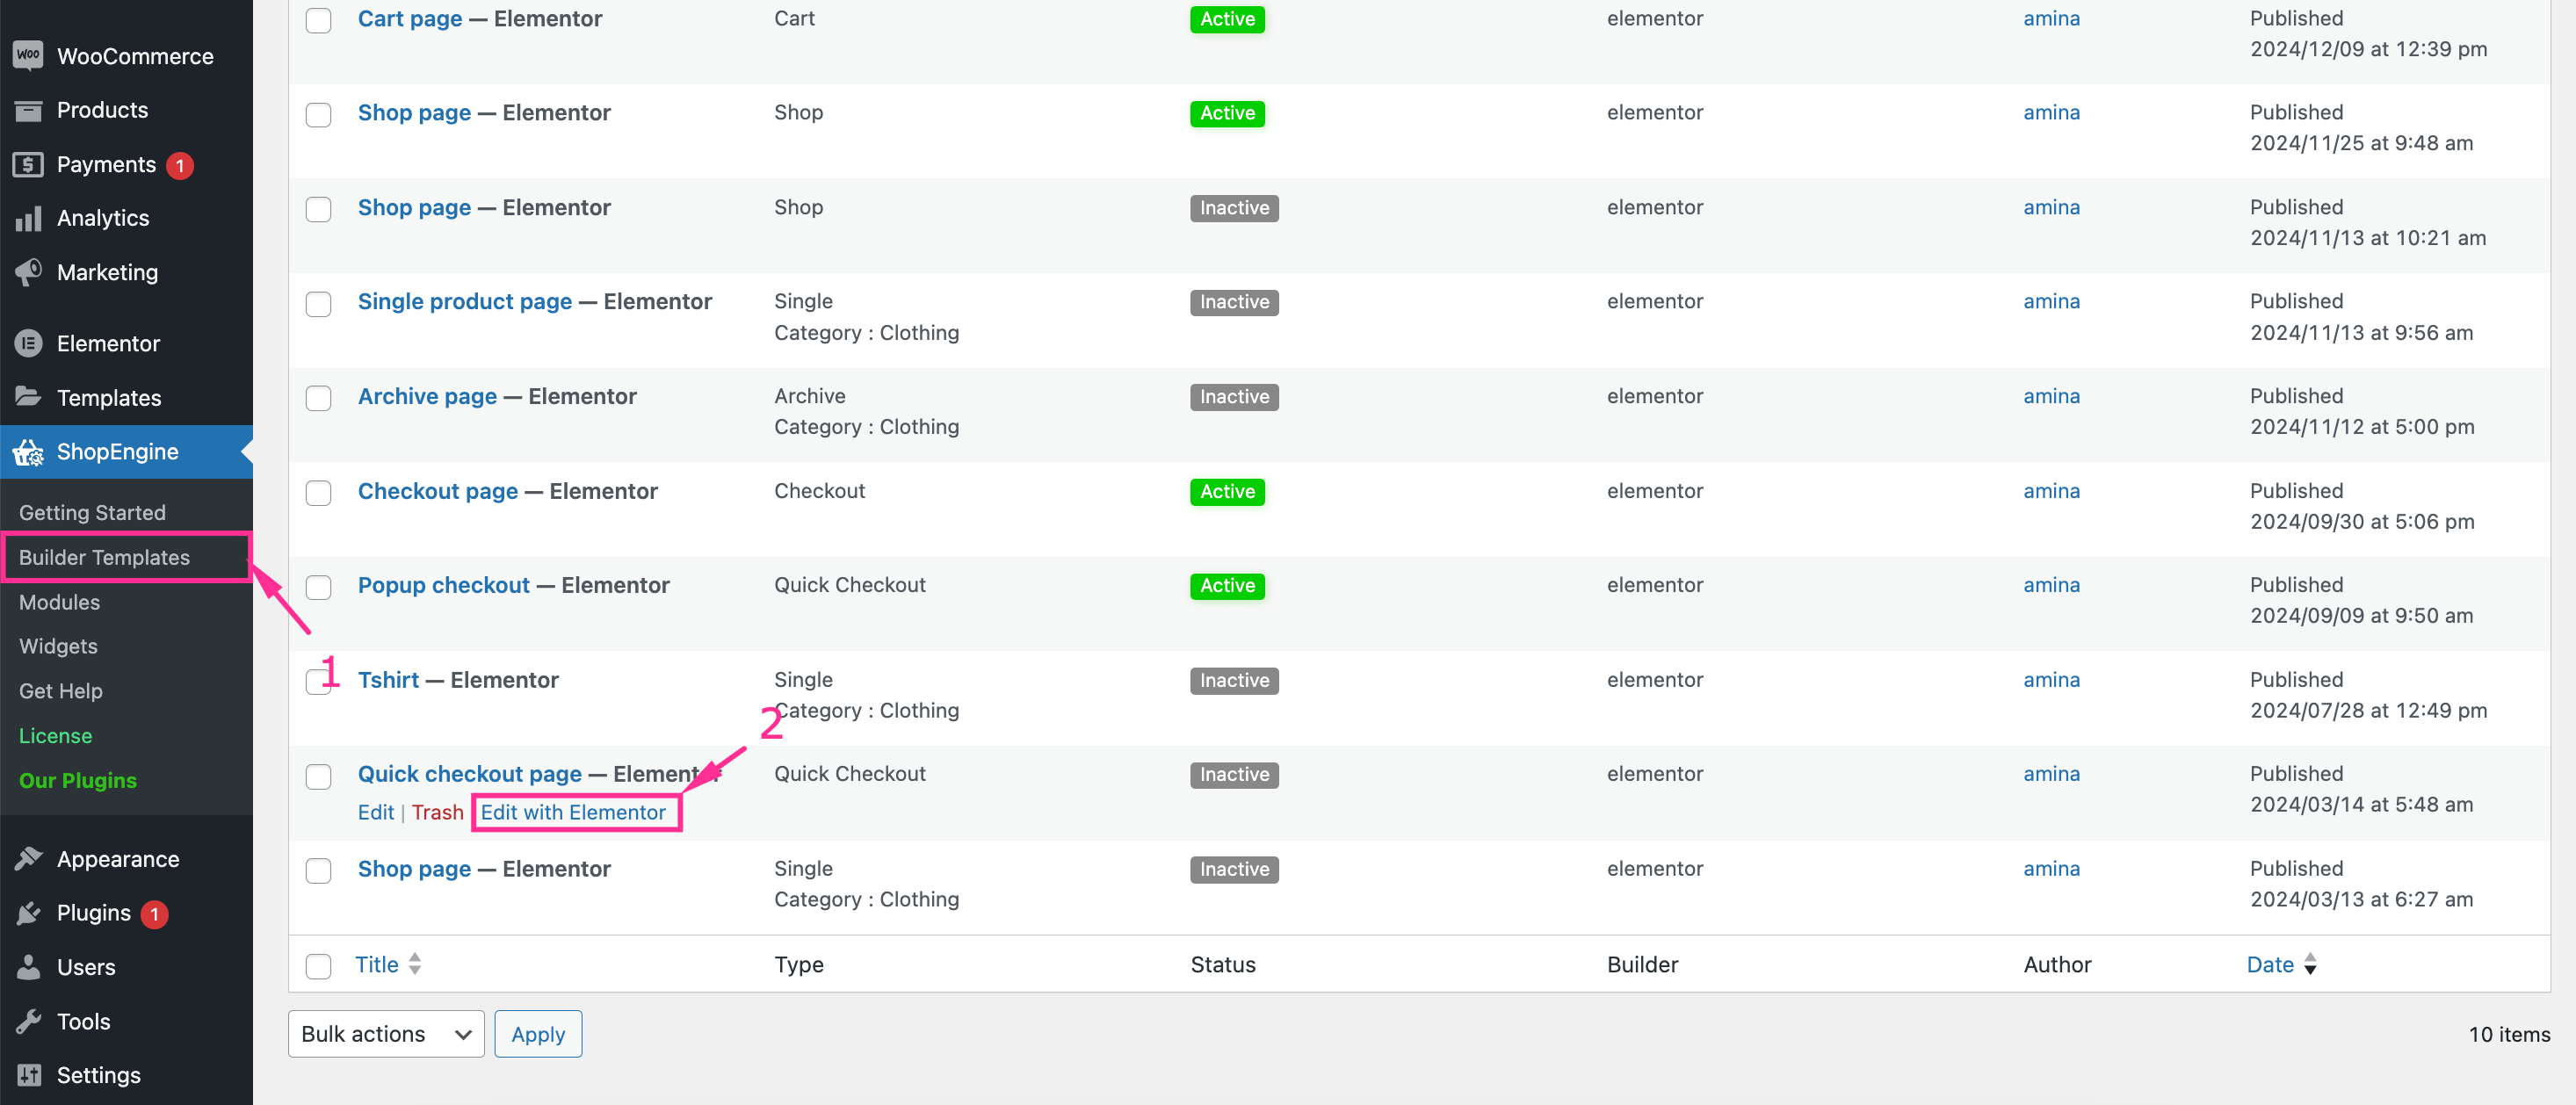

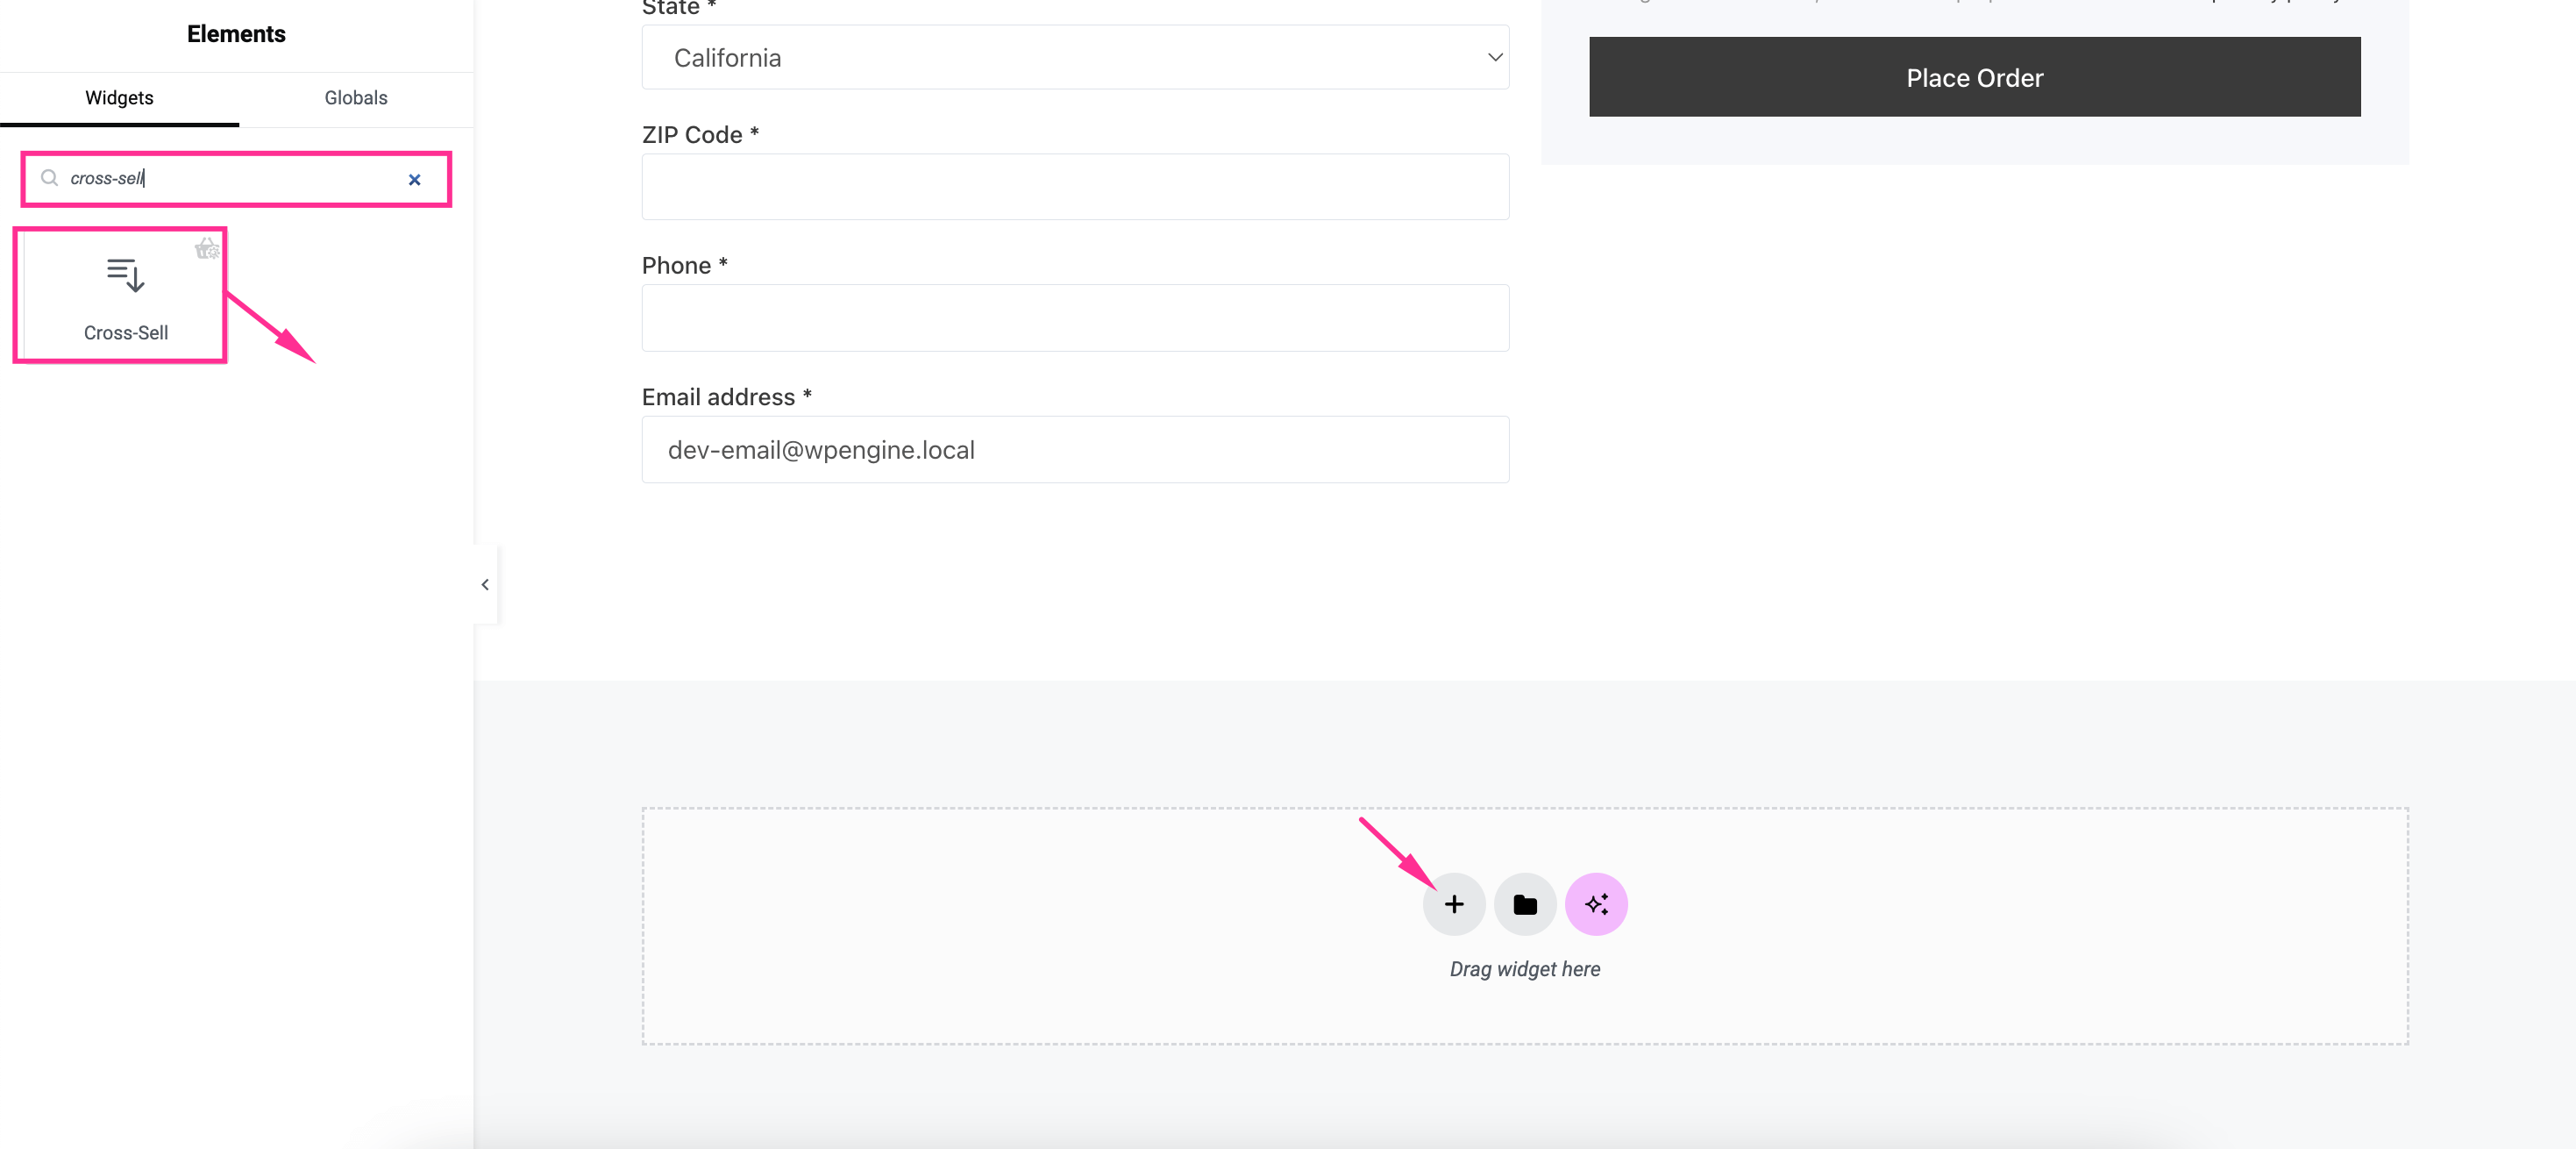
Now, after redirecting to the Elementor editor, search for “Cross-sell” and drag-and-drop it to the plus icon. Thus, a section for cross-selling products will be displayed on your quick checkout page.

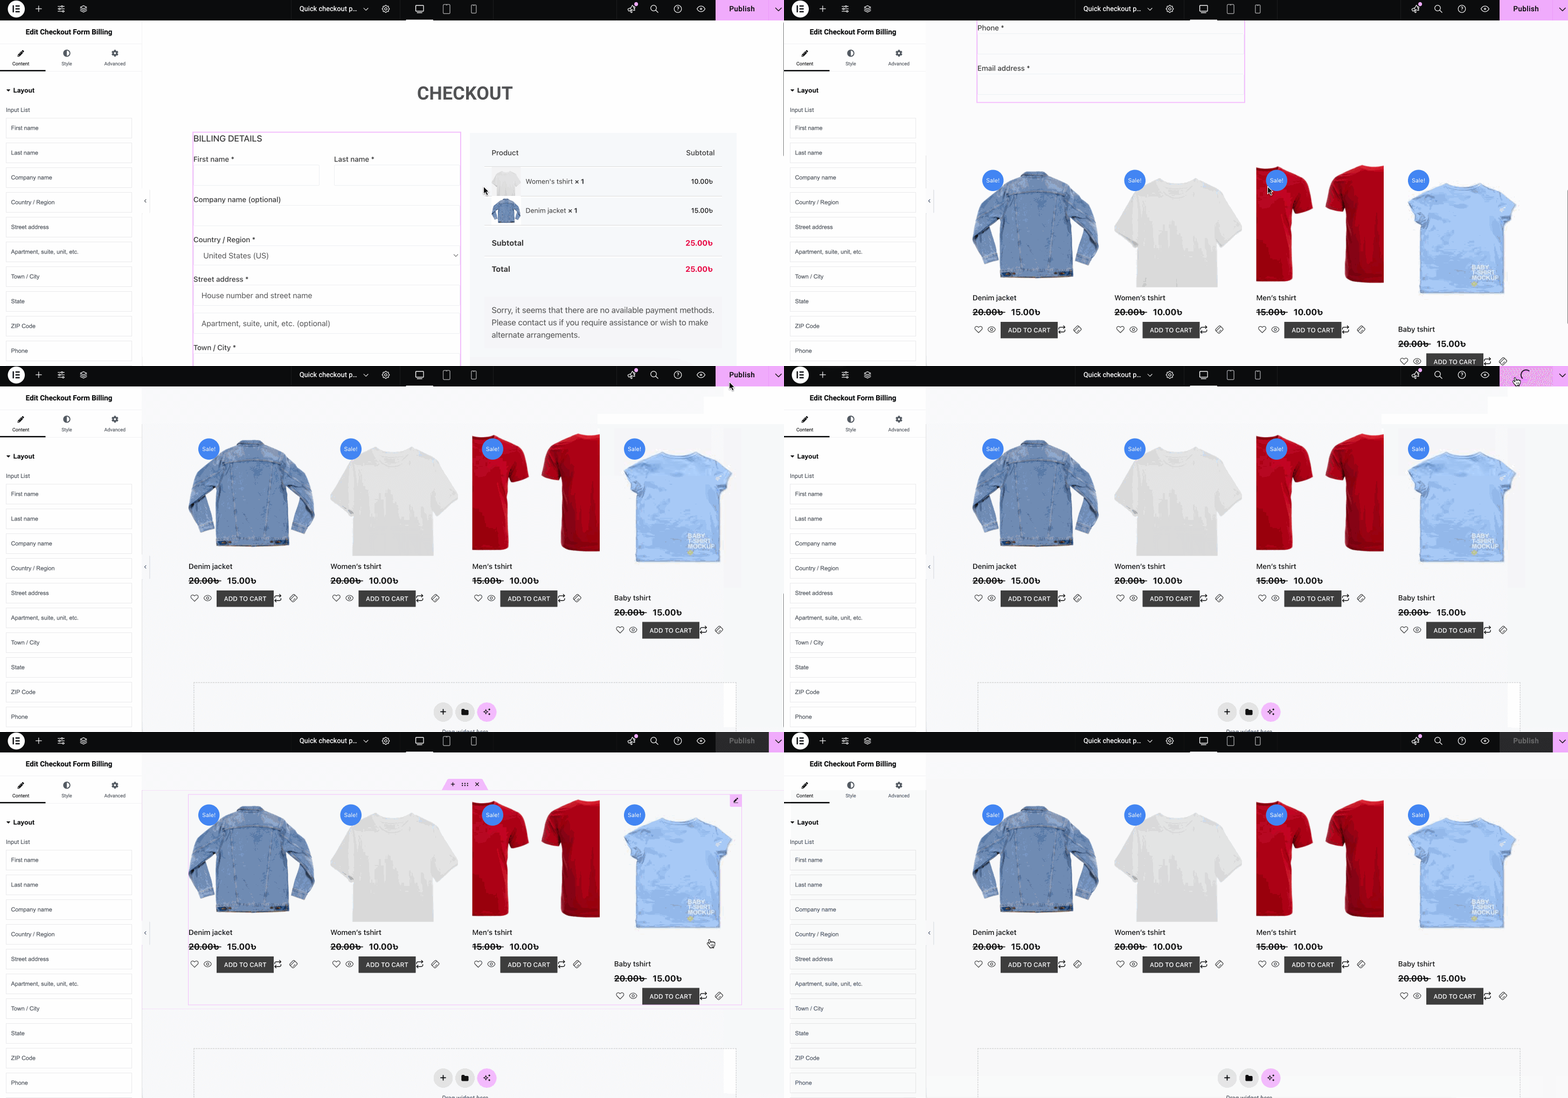
Next to adding the cross-sell section, customize and optimize the cross-sell placement using the options visible on the left side. Finally, after completing the customization, Pulsa “Publicar” botón.

Why display cross-selling products on your WooCommerce store?
Here are the reasons why promoting cross-selling items makes a big difference for your WooCommerce store:
- Higher sales and profit: Showcasing cross-selling products can increase average order value of your customers and increased average order value means higher sales and profit.
- Seamless shopping experience: Incorporating cross-sell items into your WooCommerce store boosts customer’s shopping experience by offering personalized product recommendations. It helps shoppers to easily shop from your store.
- Customers’ satisfaction: Since personalized cross-sell strategies provide smooth shopping experience, it increases overall customer satisfaction.
- Grow regular customers: Implementing cross-sell strategy not only boost sales and customers’ satisfaction but also raises regular customers as it simplifies online shopping.
- Customer engagement: It boosts customer engagement by suggesting related products in your WooCommerce store.
- Showcasing newly launched products: Cross-selling provides an opportunity to highlight store’s newly added products which increase the sales and conversions from those items.
⭐️ Concern about your stores’ conversion rate?
➡️ Check out “how to boost product page conversion rate" Blog.
Start showcasing cross-selling products
Enhancing cart value with cross-sell product recommendations drives your business to a profitable path by increasing overall sales and profit. This not only boosts sales but also redefines customers’ shopping experience. So, ignoring cross-sell product recommendations means leaving a big chunk of profit.
Compared to the benefits of cross-selling recommendations, incorporating it is very easy with the right plugin. The guide demonstrated above exactly gives you the right way to integrate cross-sell items into your online store which may take a few minutes. So, try it now and utilize every opportunity for better business growth and success.


Deja una respuesta