Quer fazer um título atraente com o editor de blocos Gutenberg? O bloco de títulos padrão não deixa você fazer muita coisa. No entanto, você pode usar o bloco de títulos GutenKit disponível com recursos extensivos.
Você pode adicionar um subtítulo, descrição do título, texto de sombra, separador e um título focado. Além disso, este bloco permite que você tenha controle completo sobre a personalização.
Portanto, você acabará criando um título estiloso para sua página ou post. Vamos ver como usar o bloco GutenKit Heading dentro do editor de blocos.
Como usar o bloco de título GutenKit? #
Siga os passos abaixo para aprender sobre o uso do bloco de título GutenKit.
Etapa 1: Adicionar bloco de título GutenKit #
- Você precisa ter o Kit Guten plugin instalado.
- Em seguida, adicione uma página ou postagem e entre no editor de blocos.
- Procure o "+” ícone na parte superior da tela do editor.
- Clique nele e o menu de blocos será exibido.
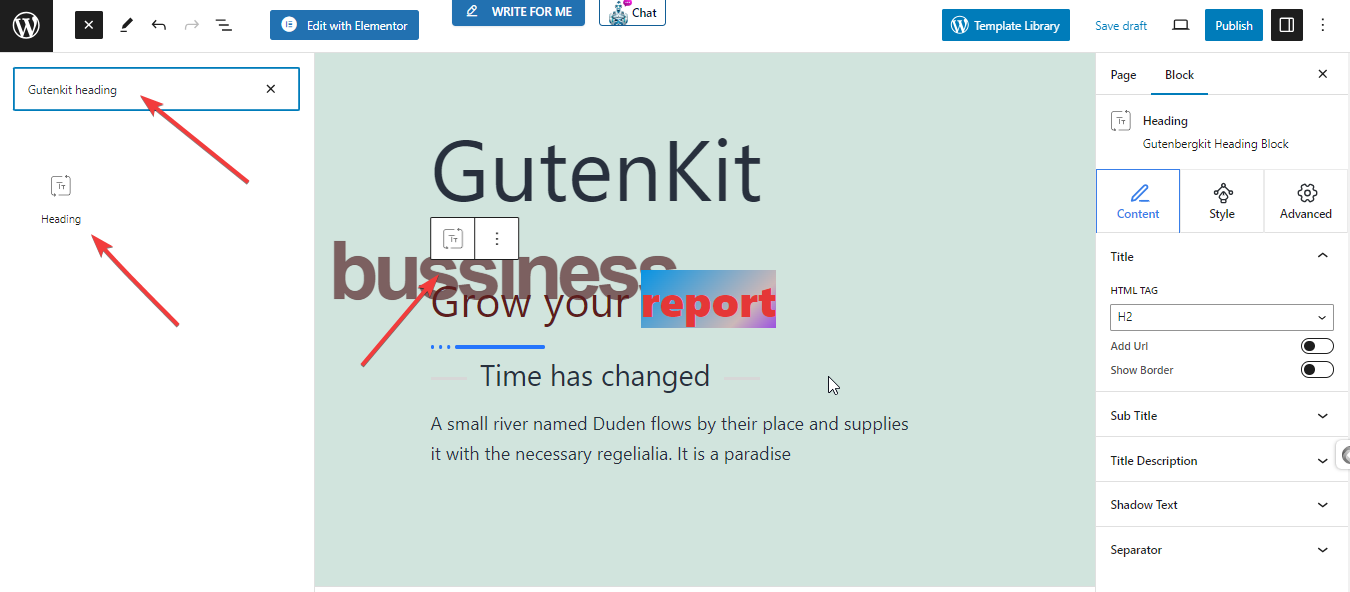

- Coloque o “Cabeçalho GutenKit” na barra de pesquisa.
- Depois de vê-lo, clique ou arraste e solte-o na tela do editor.
Assim que o bloco GutenKit Heading estiver na sua tela, clique nele. As configurações do bloco serão abertas na barra lateral direita, combinadas em Contente, Estilo, & Avançado abas. O Contente A tecla tab ajudará a adicionar título, subtítulo, descrição, separador, etc.
Etapa 2: Insira o título do título e o subtítulo #
Na aba de conteúdo:
Título: Você pode digitar o título diretamente na tela do editor.
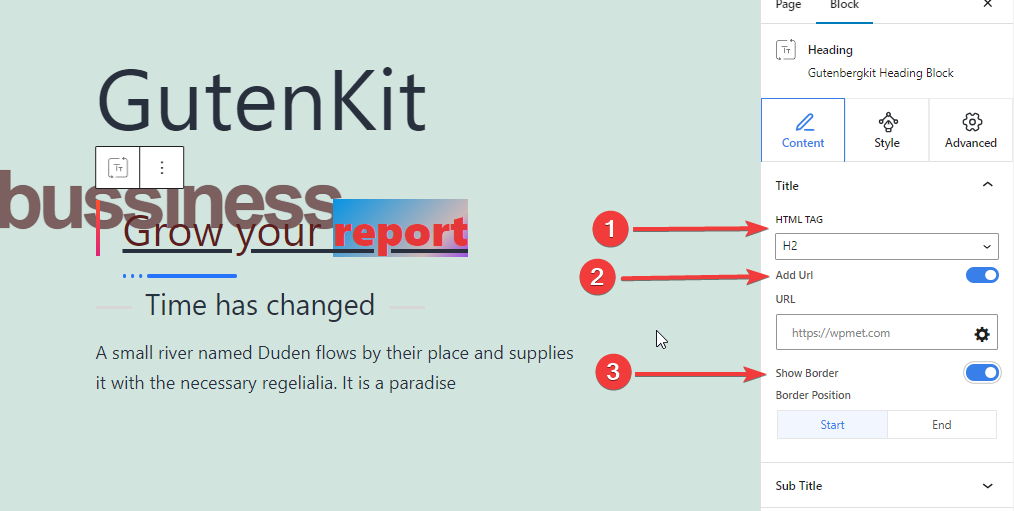

- MARCA HTML: Defina a tag HTML do título como H1- H6, Div, Span ou P.
- URL: Alterne este botão para adicionar um link ao título.
- Mostrar borda: Habilite este botão para mostrar a borda.
- Posição da borda: defina a borda para o início ou fim do título do título.
Legenda:A partir daqui, você adicionará seu subtítulo.
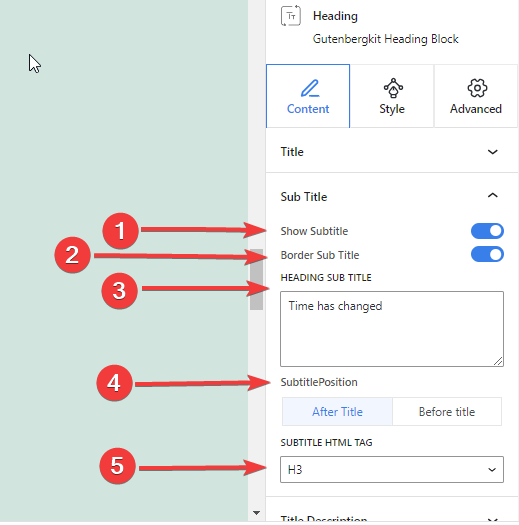

- Mostrar legenda: Clique no botão de alternância para inserir a legenda.
- Legenda de Borda: Alterne este botão para adicionar uma borda com uma legenda.
- Título Subtítulo: Escreva sua legenda nesta caixa.
- Posição da legenda: Mostrar o subtítulo antes ou depois do título do título.
- Tag HTML da legenda: Determine a tag do título da legenda para (H1- H6, Div, Span ou P)
Etapa 3: adicione a descrição do título, o texto de sombra e o separador #
Descrição do título: Este recurso permite que você controle a adição de uma descrição de título.
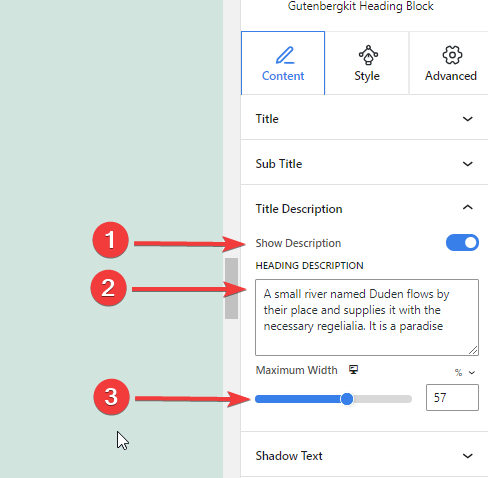

- Mostre a descrição: Clique neste botão para inserir a descrição do título.
- Descrição do título: Insira a descrição do seu título aqui.
- Largura Máxima: Defina a largura da descrição do título.
Texto de sombra: Aplique uma bela sombra de texto aos seus títulos.
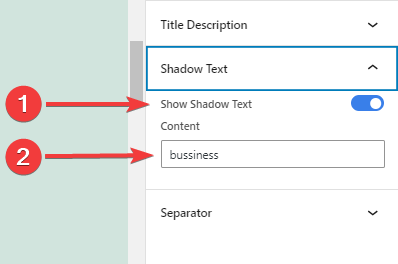

- Mostrar texto sombreado: Alterne este botão para habilitar o recurso de texto de sombra.
- Contente: Adicione o conteúdo que você deseja mostrar como texto sombra.
Separador:
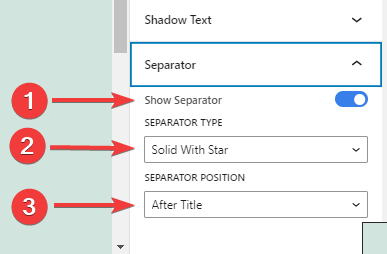

- Mostrar separador: Ative este botão para adicionar um separador.
- Tipo de separador: Escolha entre quatro tipos diferentes de separadores.
- Posição do separador: Escolha onde colocar o separador.
Etapa 4: Alinhar título do cabeçalho #
De Estilo aba, venha sob o Em geral configurações:
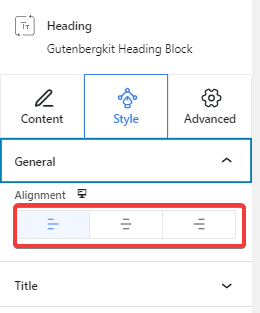

- Alinhamento: Alinhe seu estilo de título à Esquerda, Centro ou Direita.
Etapa 5: Estilo do título do cabeçalho #
Os seguintes recursos ajudarão você a estilizar o título do seu cabeçalho:
Título #
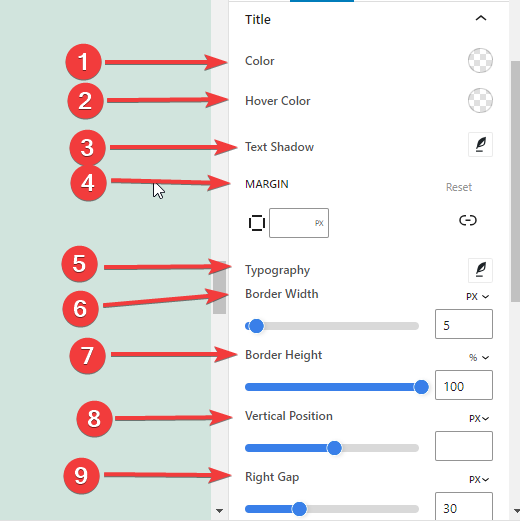

- Cor: Dê uma cor ao seu título.
- Cor do foco: Defina a cor do seu título ao passar o mouse.
- Sombra do texto: Adicione efeitos de sombra ao texto do seu título.
- Margem: Ajuste a margem do design do seu título.
- Tipografia: A partir daqui, você controlará todas as configurações de tipografia, como família da fonte, tamanho, espessura, transformação, estilo, decoração, altura da linha, espaçamento entre linhas, espaçamento entre palavras, etc.
- Largura da borda: Defina a largura da borda do título.
- Altura da borda: Insira a altura da borda do título.
- Posição vertical: Ajuste o posicionamento vertical da borda.
- Lacuna direita/esquerda: Defina o espaço entre o título e a borda.
*Observe que se você mostrar a borda no começo, você precisará definir o gap direito. E, enquanto mostra a borda no final, você precisa definir o gap esquerdo.
- Cor da borda: Selecione a cor para a borda.
Etapa 6: Crie o título de foco #
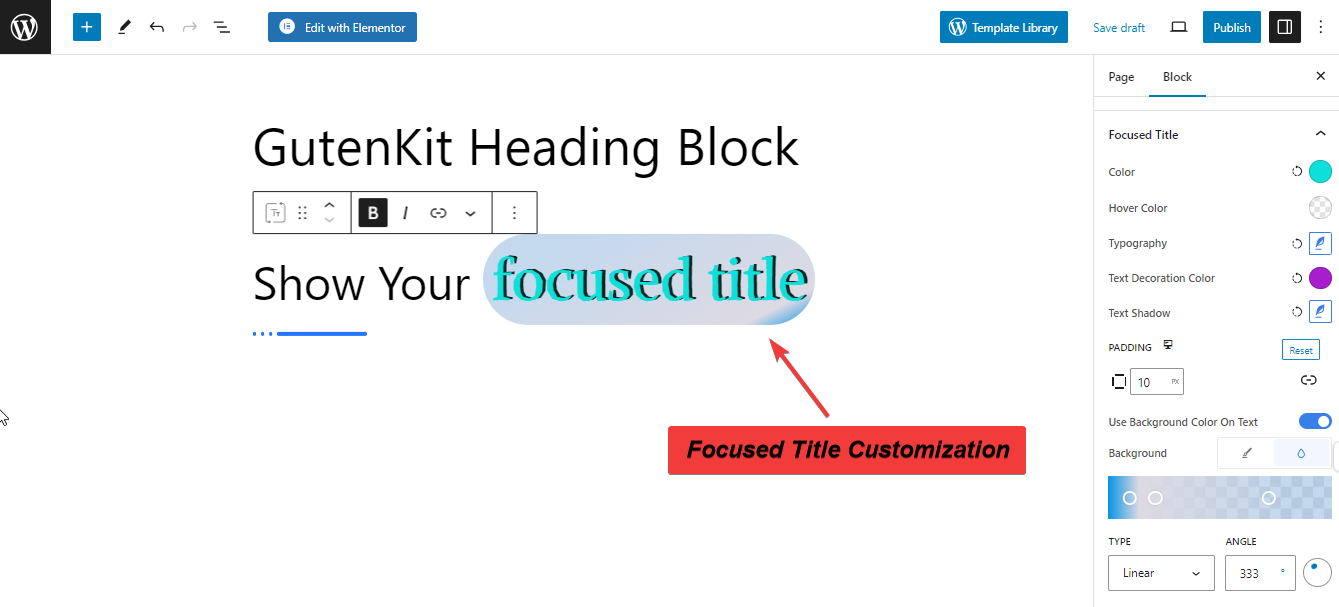
O recurso de título de foco torna uma parte importante do título do seu cabeçalho mais interessante e chamativa. Simplesmente coloque em negrito (Ctrl+B) a parte do título na qual você quer mais foco.
Na aba estilo, você obterá o Título Focado recurso. Veja sua configuração abaixo.
Título Focado: Você verá alguns recursos semelhantes (Cor, Cor do Hover, Tipografia, Sombra do Texto) à configuração Título. Outros recursos são:
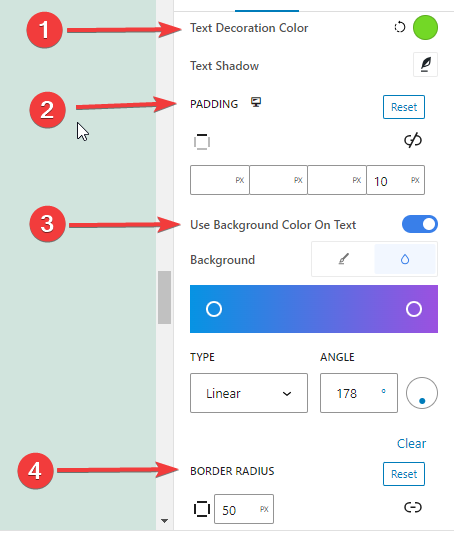

- Cor da decoração do texto: Especifique a cor da decoração do título em foco.
- Preenchimento: Defina o preenchimento ao redor do título em foco.
- Use cor de fundo no texto: Dê cor ao fundo do título em foco.
- Raio da Fronteira: Defina a redondeza da borda do título em foco.
Aqui está o nosso título focado:

Etapa 7: Personalize o subtítulo e a descrição do título, #
Agora, os seguintes recursos são aplicáveis ao Sub Title e ao Title Description. Vamos ver como usá-los:
- Cor:A partir daqui você escolherá a cor.
- Tipografia: Controle todas as personalizações relacionadas à tipografia, como família de fontes de texto, transformação, estilo, cor de decoração, espaçamento entre letras, espaçamento entre palavras e altura da linha.
- Margem: Expanda o espaço ao redor do texto.
- Usar preenchimento de texto: Dê cor ou imagem de fundo à sua legenda. (Este recurso se aplica somente ao Subtítulo.)
Etapa 8: Personalize o separador e o texto de sombra #
Agora, aprenderemos sobre o Separador e a personalização de texto.
Separador: #
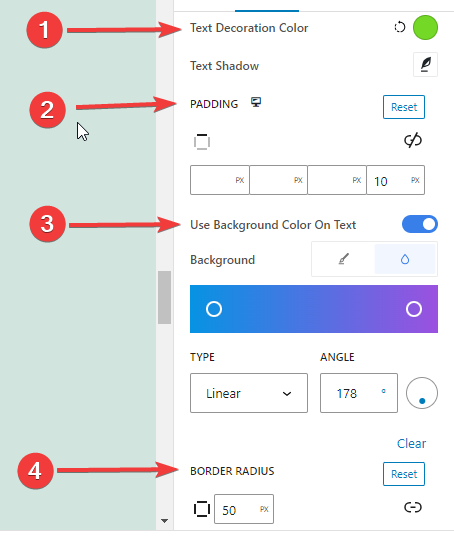

- Largura: Insira o valor da largura do separador nesta caixa em pixels.
- Altura: Defina a altura do Separator. Insira um valor em pixels.
- Margem: Defina o espaço com outros elementos em seu design.
- Separador de Cor: Escolha uma cor na paleta de cores para o separador.
Texto de sombra: #
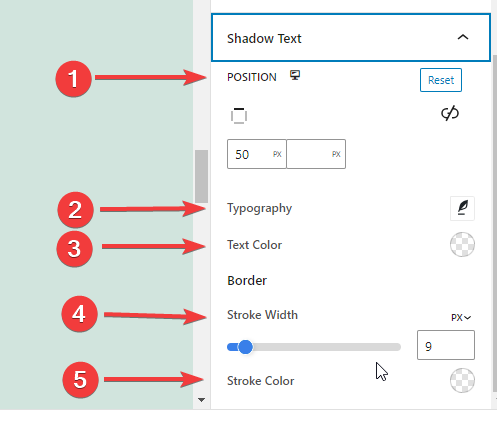

- Posição: Coloque o texto de sombra inserindo os valores superior e esquerdo em pixels.
- Tipografia: Obtenha todas as configurações de estilo tipográfico para texto de sombra.
- Cor do texto: Adicione cor ao texto de sombra.
- Largura do traço: Especifique a largura da linha que envolve o texto sombreado.
- Acidente Vascular Cerebralr: Escolha uma cor para o traço.
Etapa 9: Configurações avançadas #
Na guia Configurações avançadas, você pode configurar o layout do bloco de título GutenKit, o plano de fundo, os estilos de borda e controlar sua visibilidade.
Disposição, #
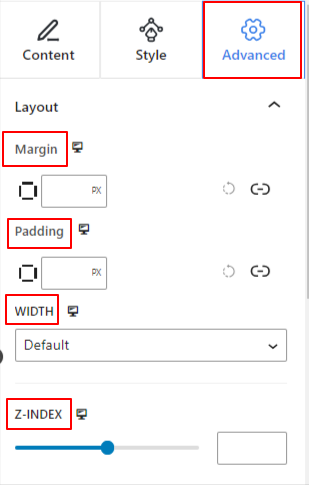

- Margem: Defina o espaço ao redor do layout do bloco. Ajuda a definir a lacuna entre outro bloco.
- Preenchimento: insira um valor para definir o espaço ao redor do bloco dentro de seu layout.
- Largura: Além de manter a largura padrão do layout.
- Largura completa: selecionar esta opção fará com que o layout ocupe toda a largura da tela.
- Em linha (automático): Aplicá-lo terá a mesma largura do elemento do bloco.
- Personalizado: Escolher esta opção revelará um controle deslizante para definir o espaço horizontal do layout do bloco.
- Índice Z: Use o controle deslizante para especificar a ordem da pilha do bloco com outros blocos.
Posição: #
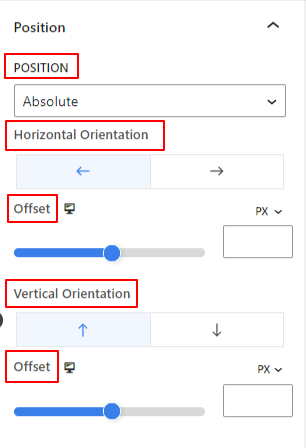

No menu suspenso, você verá três opções: Padrão, Absoluto, e Fixo.
- Absoluto: Selecionar esta opção lhe dará uma posição absoluta do bloco, o que significa que os elementos caberão em seu contêiner.
- Fixo: a opção Posição fixa permitirá que o elemento caiba em toda a viewport ou tela.
Ambas as opções Absoluta e Fixa têm configurações semelhantes às abaixo:
- Orientação horizontal: Escolha a direção de posicionamento entre esquerda e direita.
- Desvio: Use o controle deslizante ou coloque um valor manualmente para ajustar o posicionamento horizontal do bloco.
- Orientação Vertical: Selecione a direção de posicionamento entre para cima ou para baixo.
- Desvio: Use o controle deslizante ou coloque um valor manualmente para ajustar o posicionamento vertical do bloco.
Fundo: #
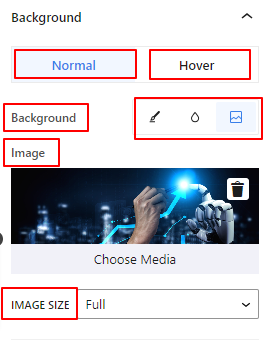

- Plano de fundo: escolha uma opção de plano de fundo entre cor sólida, gradiente ou imagem.
Na opção Hover:
- Imagem: Se você escolher a opção de imagem, serão abertas as seguintes opções:
- Imagem: escolha uma imagem da biblioteca de mídia ou carregue a sua própria.
- Tamanho da imageme: Selecione o tamanho da imagem entre Miniatura, Médio, Grande ou Completo.
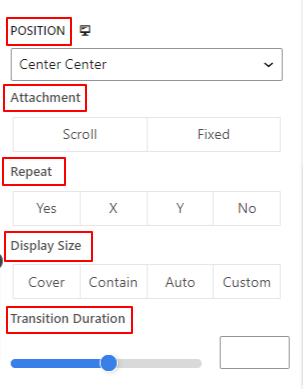

- Posição: Selecione a posição das 10 opções diferentes.
- Repita: selecione uma opção para definir como as imagens de fundo serão repetidas.
- Tamanho de exibição: selecione um tamanho de exibição entre quatro opções diferentes.
- Duração da transição: use o controle deslizante para ajustar a transição do plano de fundo do estado Normal para o estado flutuante.
Fronteira: #
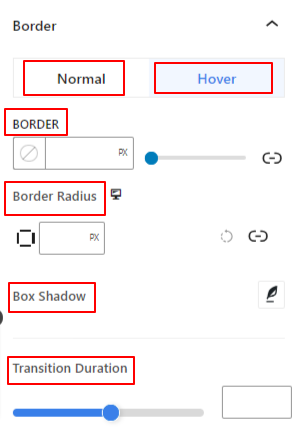

- Fronteira: Nesta opção de configuração, você obterá opções de configuração de borda como largura, estilo e cor.
- Raio da Fronteira: defina o arredondamento da borda inserindo um valor.
- Sombra da caixa: Obtenha todas as configurações como cor, horizontal/vertical, desfoque, propagação e muito mais para dar efeitos de sombra à borda.
Na opção Hover:
- Duração da transição: você pode adicionar um valor manualmente ou usar o controle deslizante para definir o tempo para alterar o design da borda no estado de foco.
Visibilidade: #
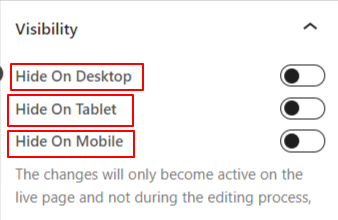

O módulo de visibilidade permite controlar a exibição de designs de blocos dependendo do tipo de dispositivo. Haverá três opções de dispositivos (Desktop, Tablet, Mobile) com um botão de alternância. Ative o botão de alternância para ocultar o design do bloco desse dispositivo.
No entanto, você ainda pode vê-lo na visualização do editor.
Avançado: #
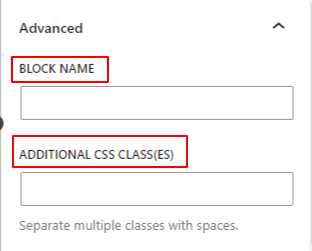

- Nome do bloco: forneça um nome para identificar este bloco exclusivamente ao vincular ou criar scripts para definir o estilo do bloco.
- Âncora HTML: adicione um URL para vincular uma página do site.
- Classes CSS adicionais: atribua classes CSS adicionais ao bloco, o que permitirá estilizar o bloco como desejar com CSS personalizado.
Observação: você pode adicionar várias classes separadamente com espaços.
Espero que este documento tenha ajudado você a usar o bloco GutenKit Heading. Agora, é sua vez de experimentar este bloco e criar títulos impressionantes para suas páginas.


