Blok GutenKit Donut Progress Bar pozwala łatwo nadać atrakcyjny wygląd Twoim danym na stronie WordPress za pomocą domyślnego edytora bloków. Możesz wybrać wyświetlanie liczby, ikony, obrazu i treści pomocniczych, a także dostosować wykres kołowy za pomocą rozbudowanych opcji stylizacji.
Dowiedzmy się, jak dodać blok wykresu kołowego z obszaru edytora Gutenberga.
Krok 1: Dodaj blok paska postępu Donut GutenKit #
Zainstaluj wtyczkę GutenKit i przejdź do pulpitu WordPress. Następnie utwórz nową stronę lub post i wykonaj poniższe kroki:
- Włącz edytor bloków.
- Znaleźć "+” ikonę u góry ekranu edytora.
- Kliknięcie spowoduje wyświetlenie biblioteki bloków.
- Wyszukaj blok GutenKit Donut Progress Bar.
- Po wyświetleniu pliku kliknij go lub przeciągnij i upuść na ekranie edytora.
Krok 2: Dodaj numer i ikonę wykresu kołowego #
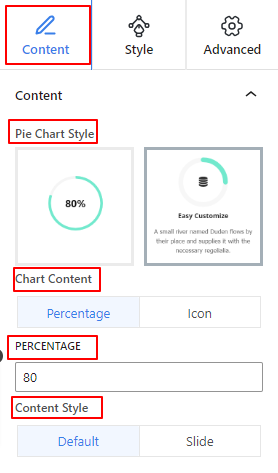
Teraz otwórz ustawienia blokowania i przejdź do zakładki zawartości.
Treść:

- Styl wykresu kołowego: Wybierz, czy chcesz wyświetlać wykres kołowy z tekstem, czy bez.
- Zawartość wykresu:Pokaż procent lub ikonę dla zawartości wykresu.
- Odsetek: Wprowadź wartość procentową w tym polu.
- Ikona: Dodaj ikonę lub obraz z biblioteki lub prześlij go ze swojego urządzenia.
- Styl treści:Oprócz domyślnego stylu możesz dodać efekt animacji slajdu po najechaniu kursorem.
Krok 3: Styl paska postępu Donut #

W tym kroku przejdziemy do zakładki Styl, aby dostosować sekcję wykresu kołowego. Zobaczmy, jak to działa:
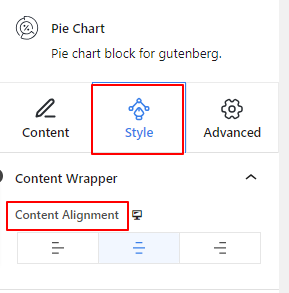
Opakowanie zawartości:
- Wyrównanie treści: Określ poziome pozycjonowanie wykresu kołowego. (Lewo, Środek, Prawo)
Jeśli wybierzesz drugi styl wykresu kołowego, zobaczysz ustawienie Tytuł i zawartość na karcie Styl. Ponadto obie funkcje mają te same ustawienia.
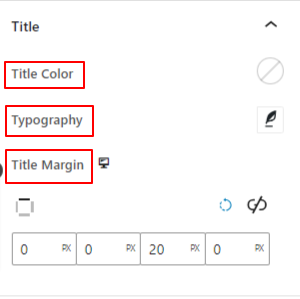
Tytuł i treść:

- Kolor: Dodaj kolor do tytułu lub tekstu opisu.
- Typografia: Użyj tego obszaru ustawień, aby dostosować tytuł lub tekst opisu. Jak np. czcionka chagrin, grubość, styl itp.
- Margines: Wprowadź wartość, aby dodać margines.
- Tytuł Margines: Określ odstęp między wykresem kołowym a tytułem.
- Margines zawartości:Następnie określ odstęp między tytułem a treścią.
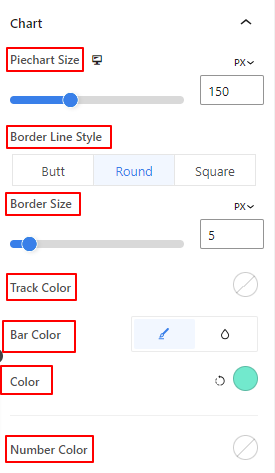
Wykres:

- Rozmiar wykresu kołowego: Użyj suwaka, aby określić rozmiar wykresu kołowego.
- Styl linii obramowania: Wybierz styl linii obramowania. (Pośladek, Okrągły, Kwadratowy)
- Rozmiar obramowania: Określ grubość obramowania za pomocą suwaka.
- Rozmiar obrazu wykresu kołowego: Określ rozmiar obrazu. (To ustawienie pojawia się tylko wtedy, gdy obraz jest zaznaczony na karcie zawartości)
- Kolor ścieżki: Użyj suwaka, aby dodać kolor do wykresu kołowego.
- Kolor paska:Nadaj kolor wycinkowi wykresu kołowego.
- Numer Koloru:Nadaj kolor liczbie procentowej za pomocą selektora kolorów.
Otóż to!
Opisaliśmy szczegółowo, jak używać bloku wykresu kołowego GutenKit na stronie internetowej Gutenberga.
Mamy nadzieję, że teraz możesz dodać wykres kołowy do swojej witryny Gutenberg.


