GutenKit Image Box to poręczny sposób na dodanie do Gutenberg Builder czegoś więcej niż tylko zwykłego obrazu.
Oprócz różnych stylów obszarów treści możesz dodać tekst i przyciski, aby wyświetlać obrazy interaktywnie na swojej stronie internetowej.
Dowiedzmy się, jak używać bloku Image Box GutenKit do dodawania obrazów o charakterze informacyjnym w Gutenberg Builder.
Jak korzystać z bloku Image Box GutenKit? #
Aby dodać blok obrazu GutenKit, wykonaj następujące czynności:
- Z pulpitu WordPress wstaw stronę lub wpis.
- Kliknij na "+” w lewym górnym rogu edytora bloków.
- Wchodzić "GutenKit Pole obrazu” w pasku wyszukiwania.
- Gdy już je zobaczysz, kliknij je lub po prostu przeciągnij i upuść na ekranie edytora.
Teraz jesteś gotowy do drogi. Wystarczy wykonać następujące kroki.
Krok 1: Dodawanie obrazu do Gutenberg Builder #
Najpierw zaczniemy od dołączenia naszego obrazu. W tym celu zobacz ustawienia poniżej:
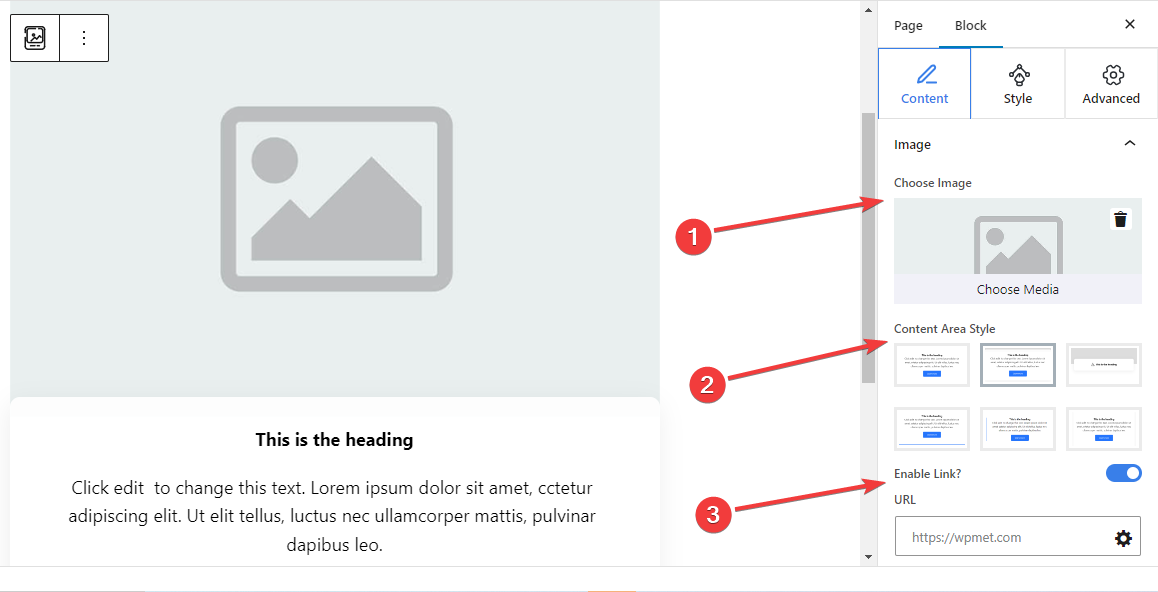

Obraz: #
- Wybierz Obraz: Wybierz obraz z biblioteki multimediów lub prześlij go ze swojego urządzenia.
- Styl obszaru zawartości: Wybierz preferowany styl spośród sześciu różnych stylów wyświetlania zawartości tekstowej z obrazem.
- 1.:Zawiera zwykłą sekcję tekstową bez żadnych opcji dostosowywania.
- 2.: Dodaj oddzielne pole o zakrzywionym kształcie na treść tekstową.
- 3.:Gdy przesuniesz kursor myszy na blok pola obrazu, pojawi się tekst opisu.
- 4.:Po najechaniu kursorem pojawia się dolna linia.
- 5.:Po lewej stronie tekstu wyświetlana jest linia boczna.
- 6.:Pokazuje linie cienia po prawej i lewej stronie zawartości tekstowej.
- Włącz łącze: Przełącz ten przycisk, aby włączyć link do obrazu.
- Adres URL: Dodaj adresy URL, które będą wyświetlane po kliknięciu obrazu.
Krok 2: Dodawanie tekstu z obrazem #
Następnie dodaj tekst opisujący sekcję obrazu.
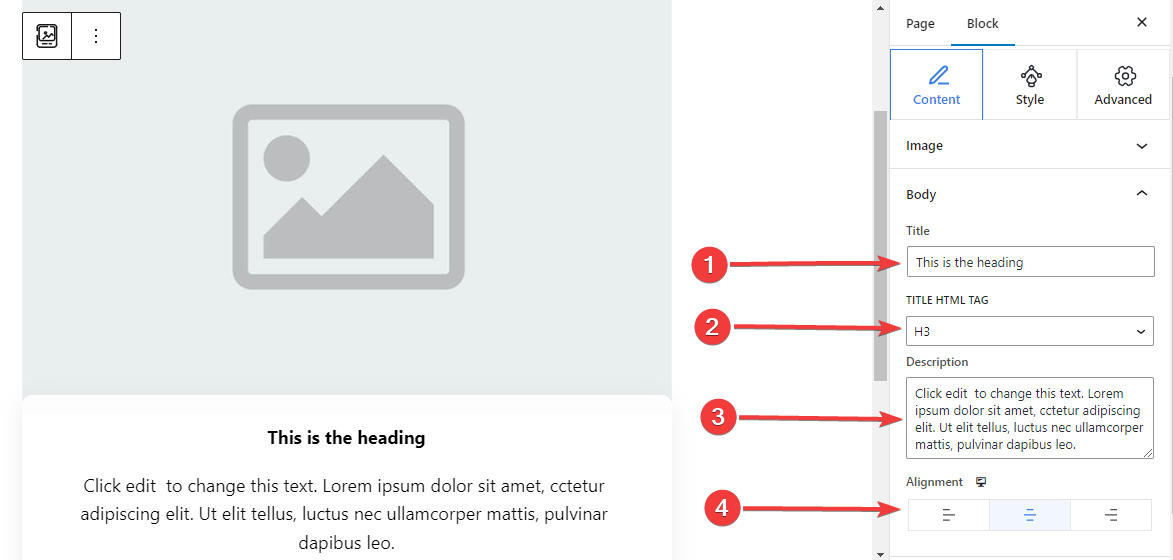

Ciało,
- Tytuł: Wpisz tytuł, który chcesz dodać do bloku obrazu.
- Tytułowy znacznik HTML: Wybierz znacznik HTML (H1-P) dla tytułu.
- Opis:Wpisz opis, który chcesz dodać do obrazka.
- Wyrównanie: Znajdź pozycję tekstu odpowiadającą Twojemu projektowi (po lewej/na środku/po prawej).
Krok 3: Zastosuj akcję przycisku z blokiem obrazu #
Możesz dodać przycisk z ikoną i tekstem, aby umożliwić użytkownikowi podjęcie działania.
Przycisk: #
- Włącz przycisk: Włącz ten przycisk przełączający, aby dodać akcję nawigacyjną przycisku.
- Etykieta: Edytuj lub wpisz tekst etykiety przycisku.
- Adres URL:Wpisz adres URL, który będzie kierował użytkowników do wybranej strony.
- Dodaj ikonę:Aktywuj ten przycisk, aby wyświetlić ikonę przy przycisku.
- Ikona: Wybierz ikonę z biblioteki lub prześlij swoją.
- Pozycja ikony: Wybierz, czy ikona ma być wyświetlana przed czy po tekście przycisku.
Krok 4: Dostosuj styl obszaru zawartości #
Jak już wiesz, ten blok jest dostarczany z 6 różnych stylów obszarów treści. Tutaj, poza pierwszym, wybranie pozostałych stylów doda nowe ustawienie w zakładce Styles. Ponadto ustawienia różnią się od siebie.
Dla 2. stylu obszaru treści: #
Klasyczne krzywe:
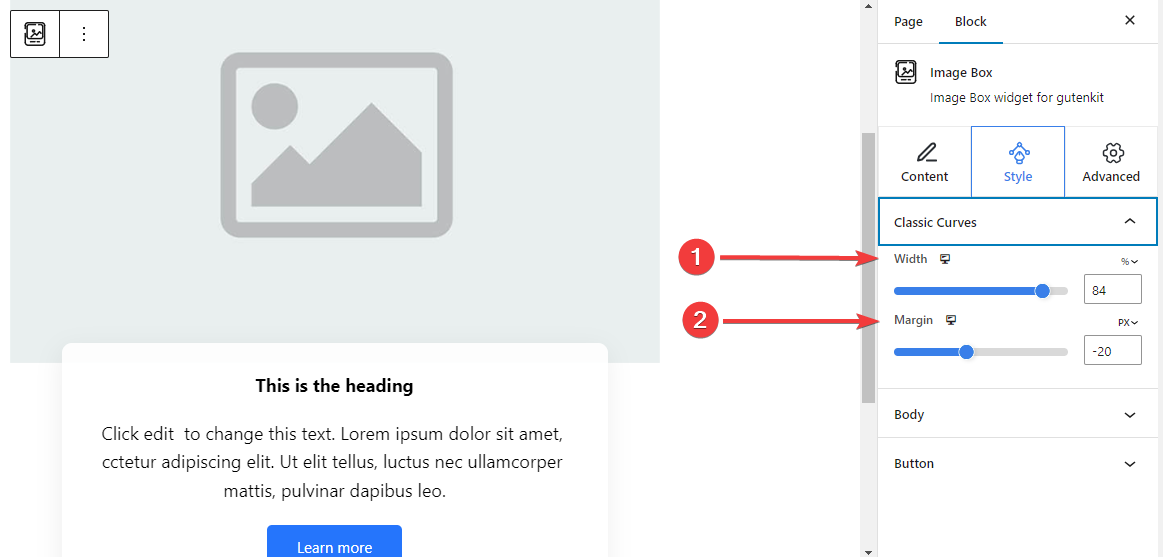

- Szerokość:Określ szerokość obszaru zawartości tekstowej.
- Margines: Ustaw odstępy między obrazem a obszarem zawartości.
Dla 3. stylu obszaru treści: #
Styl pływający: #
Poniższe ustawienia mają zastosowanie zarówno do etapu normalnego, jak i etapu najechania.
- Wysokość:Dostosuj wysokość pływającego paska.
- Kolor ikony: Wybierz kolor ikony.
- Rozmiar czcionki ikony: Ustaw rozmiar ikony.
- Margines górny: Dostosuj odstęp między obrazem a paskiem pływającym.
- Szerokość: Określ szerokość paska pływającego.
- Typ tła: Wybierz kolor lub tło gradientowe dla paska pływającego.
- Pudełko Cień:Dostosuj cień pola pływającego stylu.
Dla 4. stylu obszaru treści: #
Obramowanie na dole: #
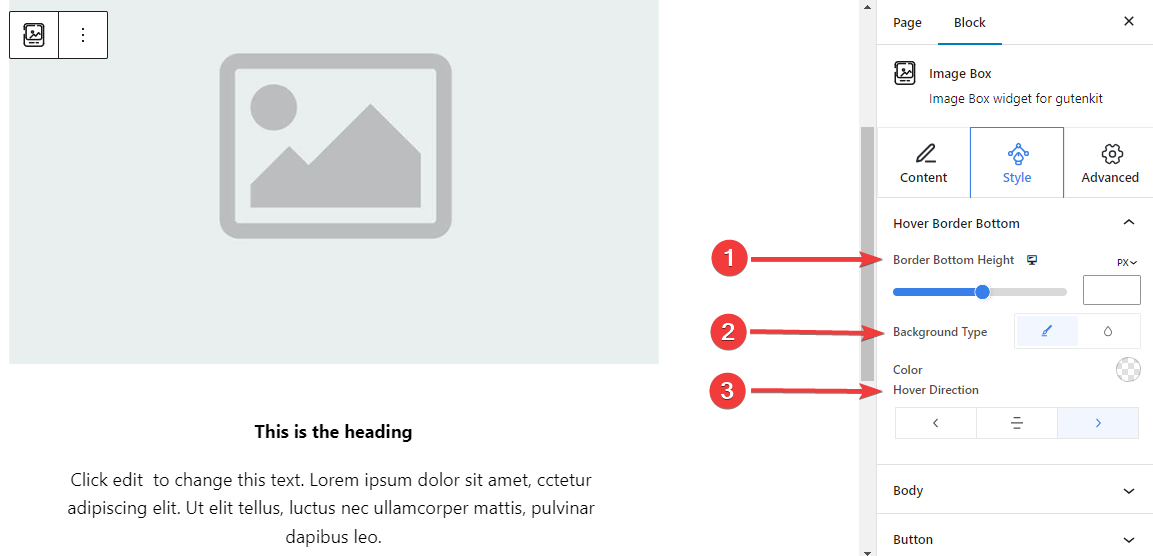

- Wysokość dolnej krawędzi: Dostosuj wysokość dolnej krawędzi za pomocą suwaka lub ręcznie wprowadzając wartość.
- Styl tła: Wybierz pomiędzy jednolitym kolorem a tłem gradientowym.
- Kierunek najechania: Ustaw kierunek najechania kursorem na dolną ramkę. Może być widoczna z lewej, środkowej lub prawej strony.
Dla 5. stylu obszaru treści:
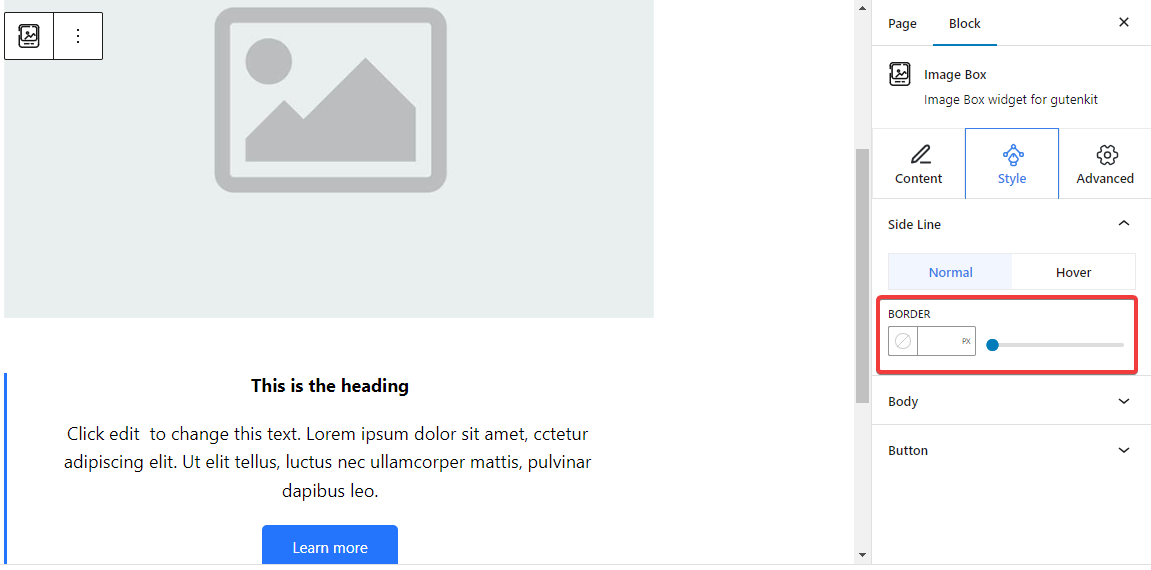

Linia boczna: Stąd dostosuj szerokość obramowania linii bocznej, wstawiając wartość lub używając suwaka. Wybierz również kolor i styl obramowania. A wszystkie te dostosowania można również zastosować po najechaniu kursorem.
Dla 6. stylu obszaru treści: #
Linia cienia: #
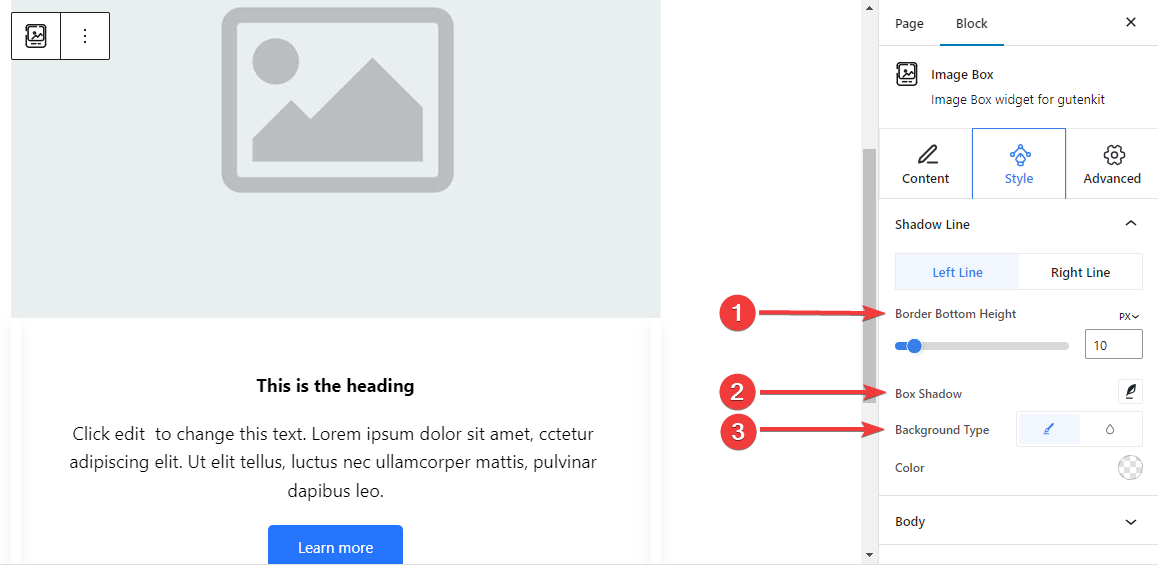

Poniższe ustawienia można regulować oddzielnie dla linii lewej i prawej.
- Wysokość dolnej krawędzi: Dostosuj wysokość dolnej krawędzi za pomocą suwaka lub podając wartość w polu.
- Pudełko Cień: Zastosuj efekt wizualny cienia pola za pomocą linii bocznej i dostosuj jego ustawienia.
- Typ tła: Wybierz pomiędzy jednolitym kolorem tła a kolorem gradientowym.
Krok 5: Stylizowanie tekstu #
Przedstawimy wszystkie funkcje stylizacji tekstu tego bloku.
Ciało: #
Ogólny: #
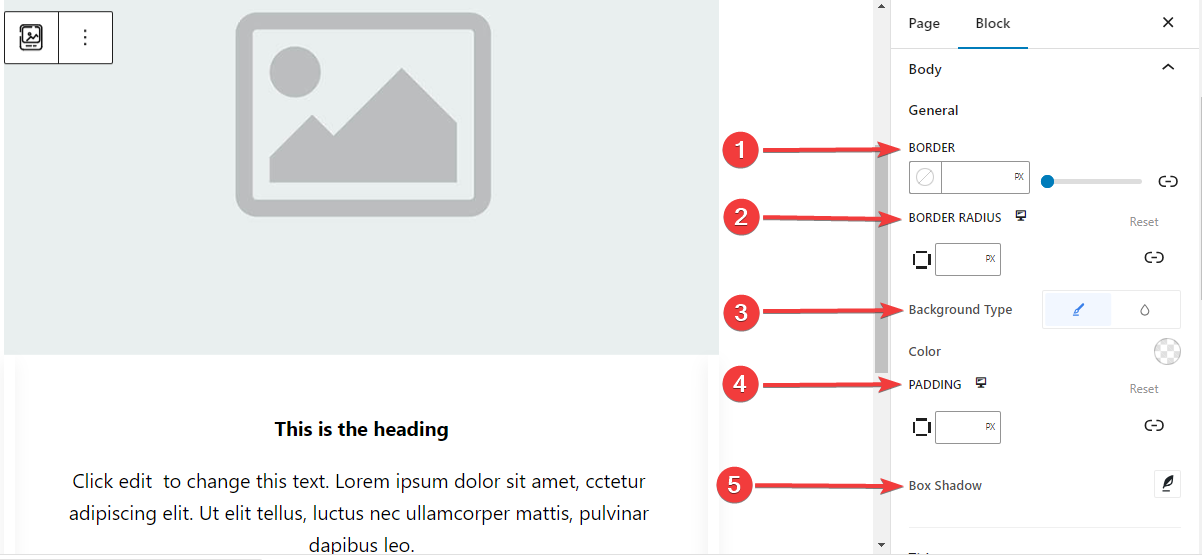

- Granica: Dodaj obramowanie wokół tekstu, wybierz styl i nadaj mu kolor.
- Promień granicy:Określ okrągłość obramowania.
- Typ tła: wybierz pomiędzy klasycznym jednolitym kolorem lub tłem gradientowym.
- Wyściółka: Dodaj dodatkowe odstępy wokół tekstu.
- Pudełko Cień: Dodaj efekty cienia do pola i zdefiniuj jego kolor, opcje poziome, pionowe, rozmycie, rozproszenie i położenie.
Tytuł: #
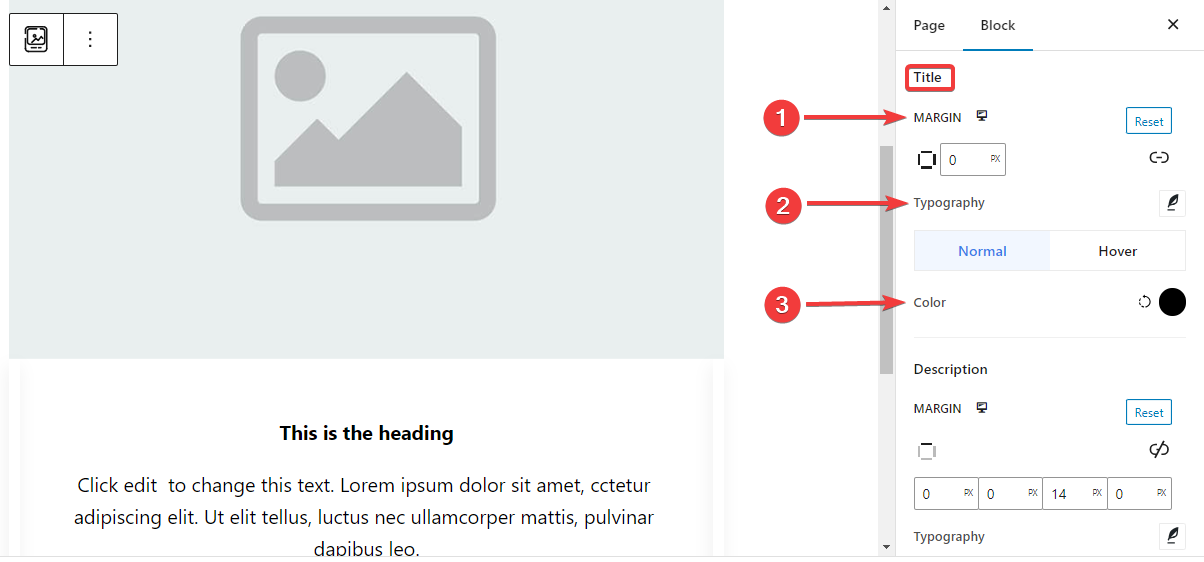

- Margines: Dodaj zewnętrzne spacje wokół obszaru tytułu.
- Typografia: Kontroluj wszystkie ustawienia typografii, takie jak rodzina czcionek, rozmiar, grubość, przekształcenie, styl, zdobienie, wysokość linii itp.
- Kolor: Wybierz kolor tekstu tytułu dla etapów normalnego i po najechaniu kursorem.
Opis: #
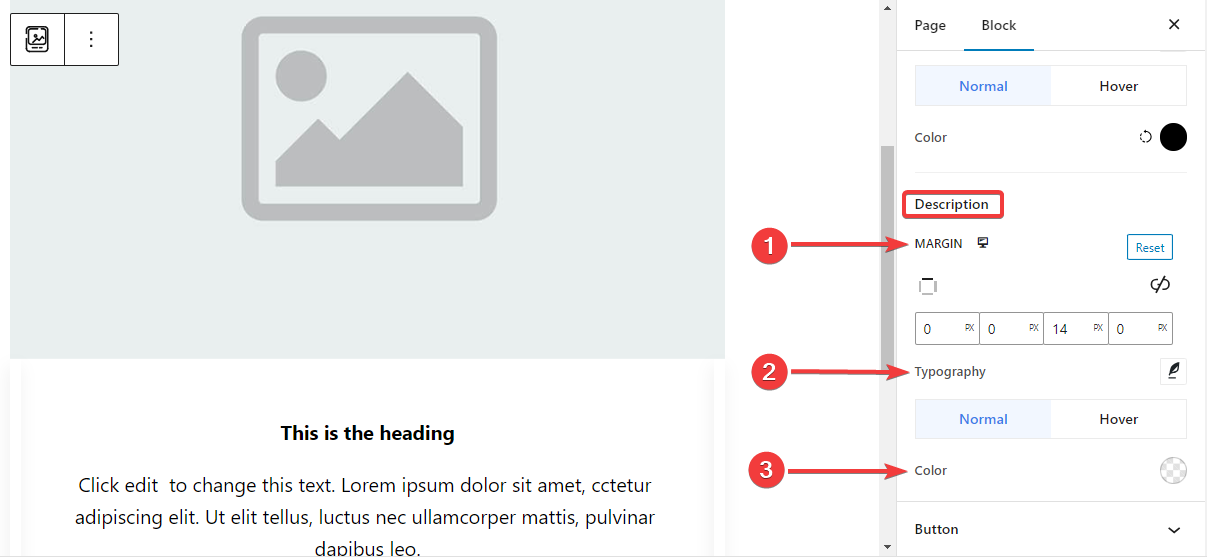

- Margines:Ustaw margines wokół obszaru tekstu opisu.
- Typografia: Tutaj możesz dokonać wszystkich ustawień typograficznych, w tym zmienić rodzinę czcionek, rozmiar, grubość, przekształcenie, styl, wysokość wiersza, odstępy między literami itd.
- Kolor: Wybierz kolor dla fazy normalnej i fazy najechania.
Krok 6: Stylizacja przycisku #
Oto ustawienia stylu przycisków.
Przycisk: #
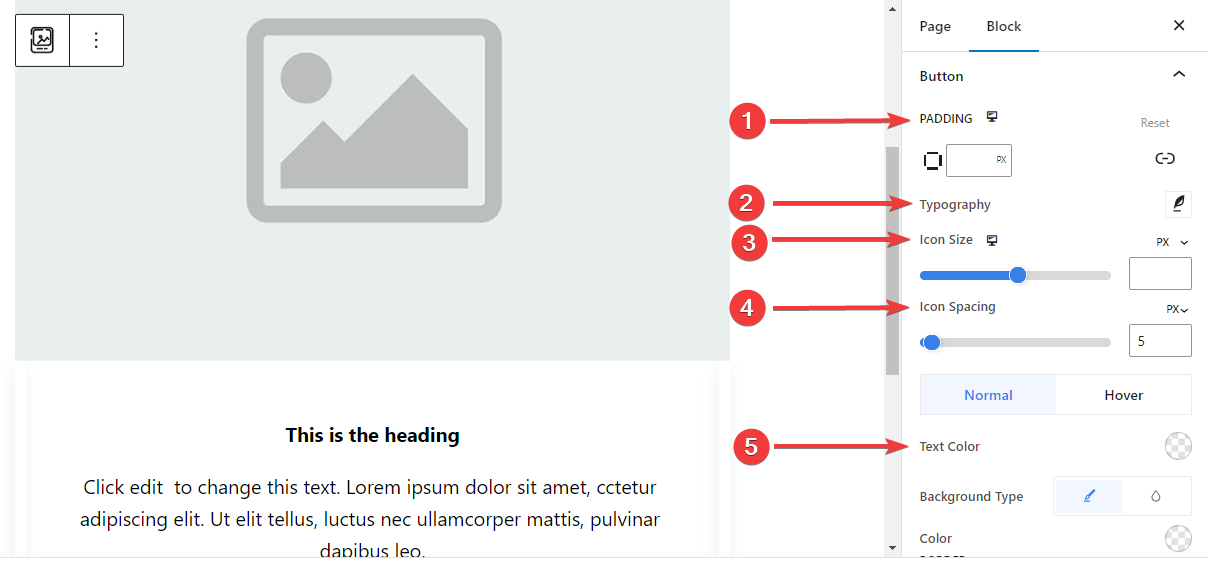

- Wyściółka: Ustaw wypełnienie przycisku.
- Typografia: Dostosuj tekst przycisku.
- Rozmiar ikony: Użyj suwaka lub wprowadź niestandardową wartość rozmiaru ikony.
- Odstępy między ikonami: Dodaj odstęp między ikoną a tekstem.
- Kolor tekstu: Zastosuj kolor tekstu przycisku dla etapów Normalnego i Najechania.
- Typ tła: Wybierz typ tła przycisku: jednolity kolor lub tło.
- Granica: Użyj suwaka lub wprowadź niestandardową wartość szerokości przycisku, wybierz kolor i styl obramowania.
- Promień granicy: Określ zaokrąglenie obramowania przycisku.
- Pudełko Cień: Uzyskaj pełną kontrolę nad efektami cienia pola, ustaw jego kolor, poziom, pion, rozmycie, rozprzestrzenianie i pozycję.
Krok 7: Ustawienia zaawansowane #
Na karcie Ustawienia zaawansowane możesz skonfigurować układ bloku Image Box, tło, style obramowania i kontrolować jego widoczność.
Układ, #
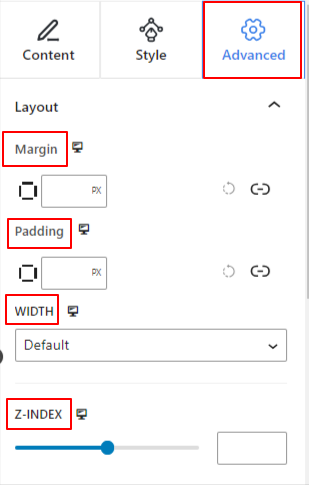

- Margines: Określ przestrzeń wokół układu blokowego. Pomaga ustawić odstęp między innym blokiem.
- Wyściółka: Wprowadź wartość, aby ustawić przestrzeń wokół bloku w jego układzie.
- Szerokość: Oprócz zachowania domyślnej szerokości układu.
- Pełna szerokość: wybranie tej opcji spowoduje, że układ będzie obejmował całą szerokość ekranu.
- W linii (automatycznie): Po zastosowaniu będzie miał taką samą szerokość jak element blokowy.
- Zwyczaj: Wybranie tej opcji spowoduje wyświetlenie suwaka umożliwiającego zdefiniowanie poziomej przestrzeni układu bloku.
- Indeks Z: Użyj suwaka, aby określić kolejność stosu bloku z innymi blokami.
Pozycja: #
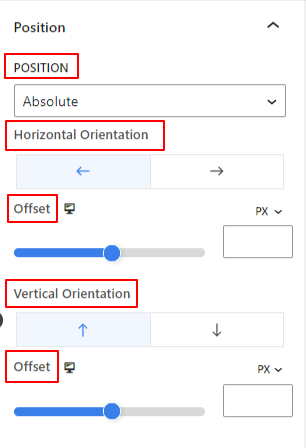

W menu rozwijanym zobaczysz trzy opcje: Domyślny, Absolutny, I Naprawił.
- Absolutny: Wybranie tej opcji zapewni Ci absolutną pozycję bloku, co oznacza, że elementy będą pasować do ich pojemnika.
- Naprawił: Opcja Stała pozycja pozwoli elementowi zmieścić się w całej rzutni lub ekranie.
Obie opcje, Absolutna i Stała, mają podobne ustawienia, jak poniżej:
- Orientacja pozioma: Wybierz kierunek pozycjonowania pomiędzy lewą i prawą stroną.
- Zrównoważyć: Użyj suwaka lub wprowadź wartość ręcznie, aby dostosować poziome położenie bloku.
- Orientacja pionowa: Wybierz kierunek pozycjonowania w górę lub w dół.
- Zrównoważyć: Użyj suwaka lub wprowadź wartość ręcznie, aby dostosować pionowe położenie bloku.
Tło: #
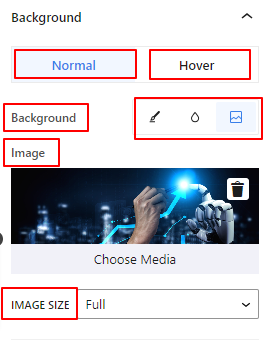

- Tło: wybierz opcję tła pomiędzy jednolitym kolorem, gradientem lub obrazem.
W opcji Najedź:
- Obraz: Jeśli wybierzesz opcję obrazu, pojawią się następujące opcje:
- Obraz: wybierz obraz z biblioteki multimediów lub prześlij własny.
- Rozmiar obrazue: Wybierz rozmiar obrazu pomiędzy Miniaturą, Średnim, Dużym lub Pełnym.
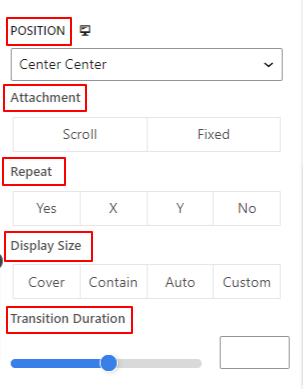

- Pozycja: Wybierz położenie 10 różnych opcji.
- Załącznik: Określ relację stałego lub przewijanego obrazu tła z resztą ekranu przeglądarki.
- Powtarzać: wybierz opcję, aby ustawić sposób powtarzania obrazów tła.
- Rozmiar wyświetlacza: Wybierz rozmiar wyświetlacza spośród czterech różnych opcji.
- Czas trwania przejścia: Użyj suwaka, aby dostosować przejście tła ze stanu normalnego do stanu najechania.
Granica: #
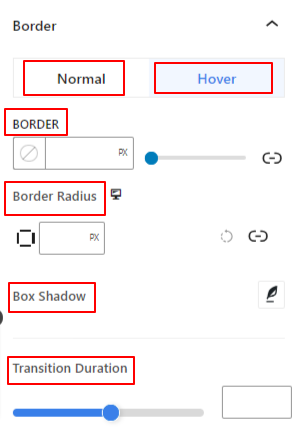

- Granica: w ramach tej opcji ustawień dostępne są opcje ustawień obramowania, takie jak szerokość, styl i kolor.
- Promień granicy: Ustaw okrągłość obramowania, wprowadzając wartość.
- Pudełko Cień: Uzyskaj wszystkie ustawienia, takie jak kolor, poziomo/pionowo, rozmycie, rozproszenie i inne, aby nadać obramowaniu efekty cienia.
W opcji najechania:
- Czas trwania przejścia: Możesz dodać wartość ręcznie lub użyć suwaka, aby ustawić czas zmiany projektu obramowania w stanie najechania.
Widoczność: #
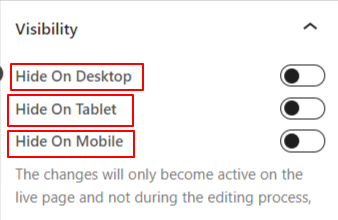

Moduł widoczności pozwala kontrolować wyświetlanie projektów bloków w zależności od typu urządzenia. Dostępne będą trzy opcje urządzeń (komputer stacjonarny, tablet, telefon komórkowy) z przyciskiem przełączania. Włącz przycisk przełączania, aby ukryć projekt blokowy tego urządzenia.
Jednak nadal możesz to zobaczyć w widoku edytora.
Zaawansowany: #
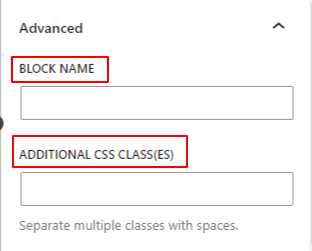

- Nazwa bloku: Nadaj nazwę, która będzie jednoznacznie identyfikowała ten blok podczas łączenia lub tworzenia skryptów stylizujących blok.
- Kotwica HTML: Dodaj adres URL, aby połączyć stronę internetową.
- Dodatkowe klasy CSS: Przypisz dodatkowe klasy CSS do bloku, co pozwoli Ci stylizować blok według własnego uznania za pomocą niestandardowego CSS.
Uwaga: Możesz dodać wiele klas oddzielnie ze spacjami.
Mamy nadzieję, że znasz już wszystkie ustawienia potrzebne do wstawienia bloku obrazu na swojej stronie internetowej.


