


Yes, discount offers do attract customers. But when you are running a business with a fleet of products, random discount offers only have a little impact on the long-term growth and revenue. What you need is a well-planned and properly executed sales campaign for your business.
To help WooCommerce users like you with your online business, we will draft a sample plan for your next sales campaign strategy in this article and show examples of implementing it.
Quick Overview
This tutorial discusses the ideas to run a sale campaign in WooCommerce.
Campaign goals: Increase sales, Branding and promotion, Attract new customers, Clear inventory, etc.
Campaign Type:
☑️ Flash sales
☑️ Buy-one-get-one
☑️ Seasonal sale
☑️ Recommendation bonus
☑️ Free shipping
How to implement?
✅ Set discounts for specific products.
✅ Use a sales pop-up notification.
✅ Offer discount coupon codes.
✅ Show flash sale countdown timer.
✅ Add a badge to highlight discounts.
Why sales campaigns matter for your WooCommerce store
In an already crowded eCommerce space, particularly if you’re running a WooCommerce store, having amazing product lines simply isn’t enough. To really grow, you need to be strategic about how you engage your customers and turn their interest into action.
This is where well-executed sales campaigns can come into play.
A sales campaign, when done right, can change the dynamics of your business; it drives traffic, boosts revenue, and strengthens your brand. Here are the key points
- Increase Revenue: The most obvious benefit is that sales campaigns directly boost the top line by encouraging immediate purchases.
- Attract New Customers: Special offers are a great way to attract first-time buyers who might be on the fence.
- Reward Loyal Customers: Exclusive WooCommerce discounts can make your existing customer base feel valued and encourage repeat business.
- Grow Brand Awareness: A successful campaign can generate buzz and get more eyes on your store.
- Gather Customer Data: Analyzing campaign performance provides valuable insights into customer behavior and preferences.
- Clear Excess Inventory: Got old stock taking up valuable warehouse space? A targeted sale can help you move it quickly.
Planning sales campaign strategies for WooCommerce
Let’s now map out a clear plan for your next sales campaign in WooCommerce. This includes setting clear, measurable goals to selecting the most effective type of sale and identifying the right products or categories to feature.
Set Clear Campaign Goals
Before you do anything else, define what you want to achieve. Are you aiming for a 20% increase in sales of a specific product? Do you want to reduce your inventory by 50%? Specific, measurable, achievable, relevant, and time-bound (SMART) goals will guide your entire campaign.
Choose the Type of Sale
Not every WooCommerce discount campaign works the same way. Some are great for creating urgency, others for boosting average order value, and some just make the buying decision easier for customers.
So, before you launch a sale, the first thing to figure out is what kind of offer will click with your customers.
- Flash sales: Limited-time, high-discount offers create urgency.
- Percentage-off sales: (e.g., up to 20% or flat 20%) are popular and straightforward.
- Dollar-off sales: (e.g., $10 off your order) can be effective for higher-priced items.
- Buy One Get One (BOGO): (e.g., Buy one, get one free/half price) is great for moving multiple items.
- Seasonal sales: (e.g., Black Friday, Christmas, Thanksgiving) utilize the popular shopping periods.
- Free shipping: Can significantly reduce cart abandonment.
Select Target Products or Categories
Instead of putting everything on sale, identify products that align with your campaign goals. For example, if you’re looking to attract new customers, highlight your most popular or introductory products. To clear inventory, focus on older stock.
Offer Bundle Packages
One smart sales strategy is to bundle up your best-selling product with items that are less popular or newly introduced.
Take this example: say you have an online beauty shop, where hair oil is your best-selling item, while products like hair serums, conditioners, or scalp oils aren’t getting much attention.
Instead of selling them separately, you can package the hair oil with less popular items as a bundle.
Most customers will be motivated to buy the bundle mainly because they already trust and love the hair oil. But at the same time, other products will also get exposure.
In the long run, this not only raises your average order value but also helps to build demand for the items that were previously overlooked.
How to Set Up a Sales Campaign in WooCommerce
WooCommerce offers a variety of built-in features and plugins to help you execute your sales campaigns effectively. Beyond that, plugins like ShopEngine extend WooCommerce’s capabilities to promote and execute sales campaigns.
Whether you’re running a seasonal WooCommerce discount, a flash sale, or a long-term promotional strategy, WooCommerce ecosystem provides the flexibility and tools to make your campaigns successful.”
☑️ Add discounts to individual products or pricing plans
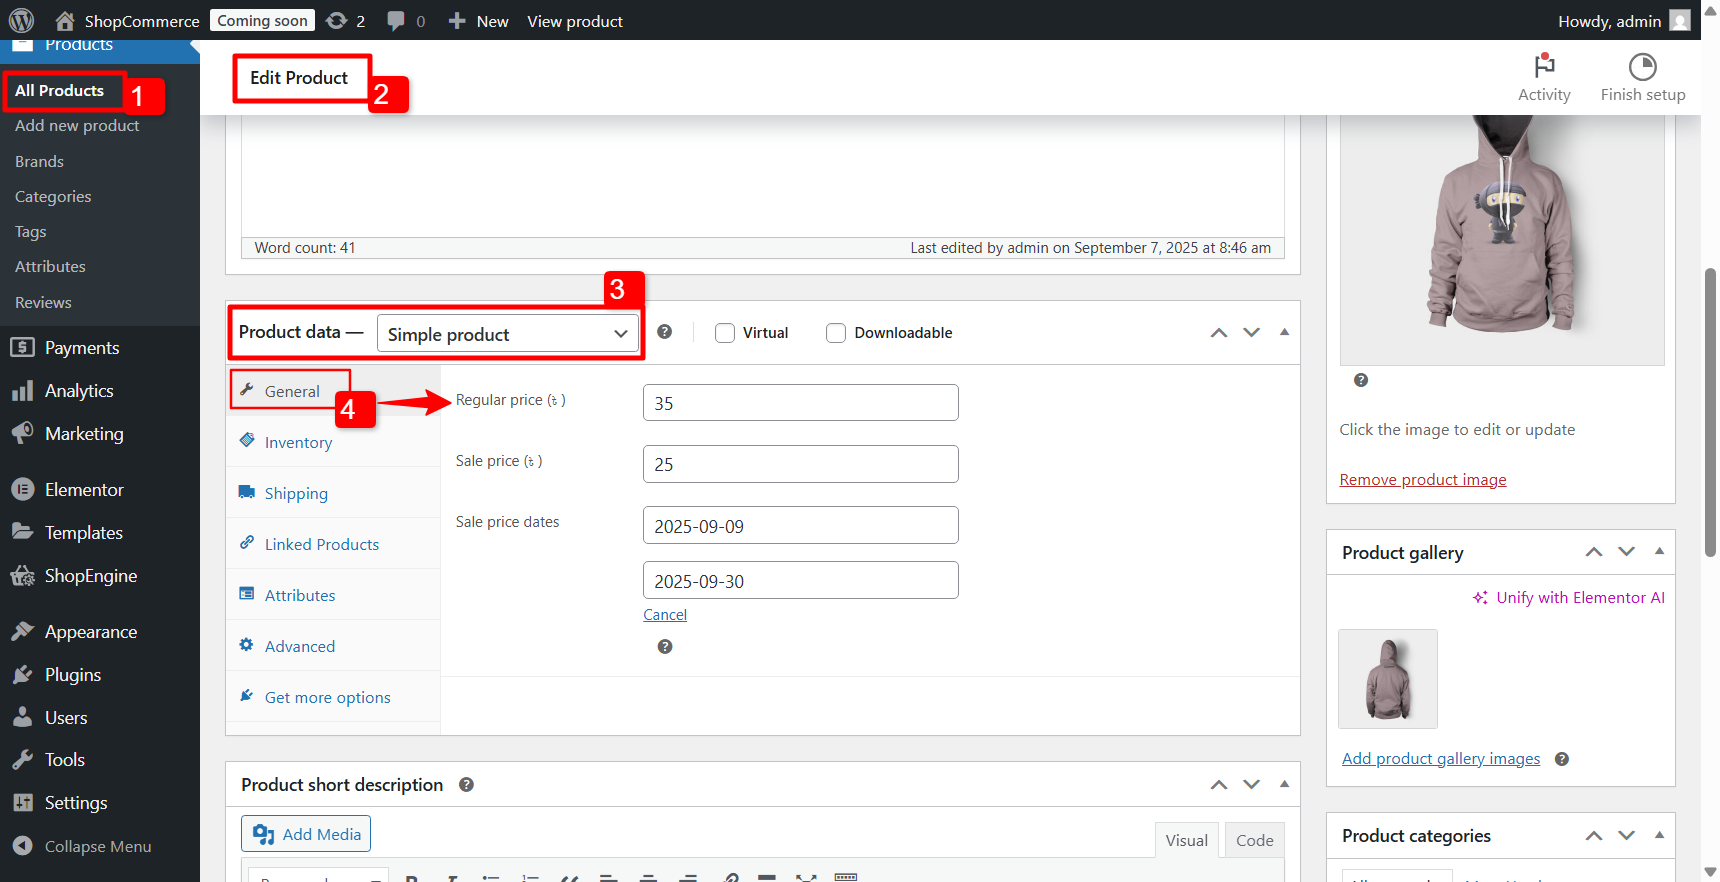
WooCommerce allows you to set regular prices and sale prices for individual products. To apply the discount price,
- 1 단계: 이동 Products → All Products WordPress 대시보드에서.
- 2 단계: Find the product (you want to add a discount to) from the list and click on the 편집하다 option to edit the product.
- 3단계: In the “Edit product” page, scroll down to the Product Data section. Make sure you choose Simple Product 드롭다운에서
- 4단계: 아래의 일반적인 tab, set the Regular Price and Sale Price. You can also schedule a discount offer duration by setting the start date and end date of the offer.
- 5단계: 마지막으로 업데이트 in the Publish section.
☑️ Promote the campaign with a sales pop-up notification on your website
A well-timed pop-up can immediately grab visitors’ attention and inform them about your ongoing sale. Ensure it’s visually appealing and clearly states the offer and call to action.
While creating a visually appealing pop-up notification, you can use ShopEngine’s Sales Notification 기준 치수.
To use the ShopEngine WooCommerce solution, you need to install the plugin first. Go to Plugin → Add Plugin and find ShopEngine. Then install and activate the plugin.
Learn more: How to install and get started with ShopEngine

Then, first, enter your admin dashboard and go to ShopEngine → modules.
그런 다음 모듈을 활성화하고 공백에 다음 정보를 삽입하십시오.
- 미리보기 이미지 표시: Here, you can set a user or product.
- 사용자: If you choose this option, then your visitors can see the picture of your customer who has recently purchased your product.
- 제품: 구매한 상품이 표시됩니다.
- 제품 한도: 알림 표시에 대한 제품 한도를 입력할 수 있습니다.
- Show notification again after user cancels: This defines the time of showing the notification after canceling it by site visitors.
- Show notification on every millisecond: Visitors will see the sales notification every 7000 milliseconds. You can customize it.
- Set rounded corners: You can set pixels for your sales notification. It will make your sales notification round or square.
- 기본 색상 설정: Set the color for your sales notification.
Finally, click the save changes button and make your notification live.
Now, visit your site and see how it works. Here is the outcome of using the sales notification module of ShopEngine.
☑️ Use badges to highlight products on sale
Visual cues are powerful. Adding “Sale,” “Discount,” or “Limited Stock” badges to your product thumbnails instantly draws attention to discounted items as customers browse your store.
You need to enable the WooCommerce Badges module for it to activate.
Step 1: Activate the WooCommerce badge module
To enable the module
- 이동 ShopEngine → Modules WordPress 대시보드에서.
- 찾기 배지 module and click on the Settings Icon.
- 켜다 Enable module 옵션.
Customize badge settings
After that, you can adjust the Badge Alignment (Horizontal and Vertical), Width for Single Product, Width for Loop Products, Gap for Single Product, and Gap for Loop Products.
Step 2: Configure the badge module
Click the + Create New Badge icon to get started. From there, fill out the details:
- 제목: Give your badge a name.
- 배지 유형: Choose between Attachment or Text. If you go with Attachment, upload a badge logo. If you pick Text, type in your badge text and customize it with text color, background color, font size (Px), border radius (Px), and padding.
- 위치: Select where the badge should appear from the following options: Top Right, Top Left, Bottom Right, or Bottom Left.
- 할당자: Decide whether you want to assign badges by categories or specific products.
- Applicable Products/Categories: Start typing the name of a category or product, then pick from the suggestions that appear.
당신은 또한 수 add more badges by clicking on the Create New Badges 단추.
When you’re done, hit Save Changes to apply your new badge.
[메모: You can edit or update any of the badge settings later. If you’d rather remove it completely, just click the X icon and save again to confirm.]
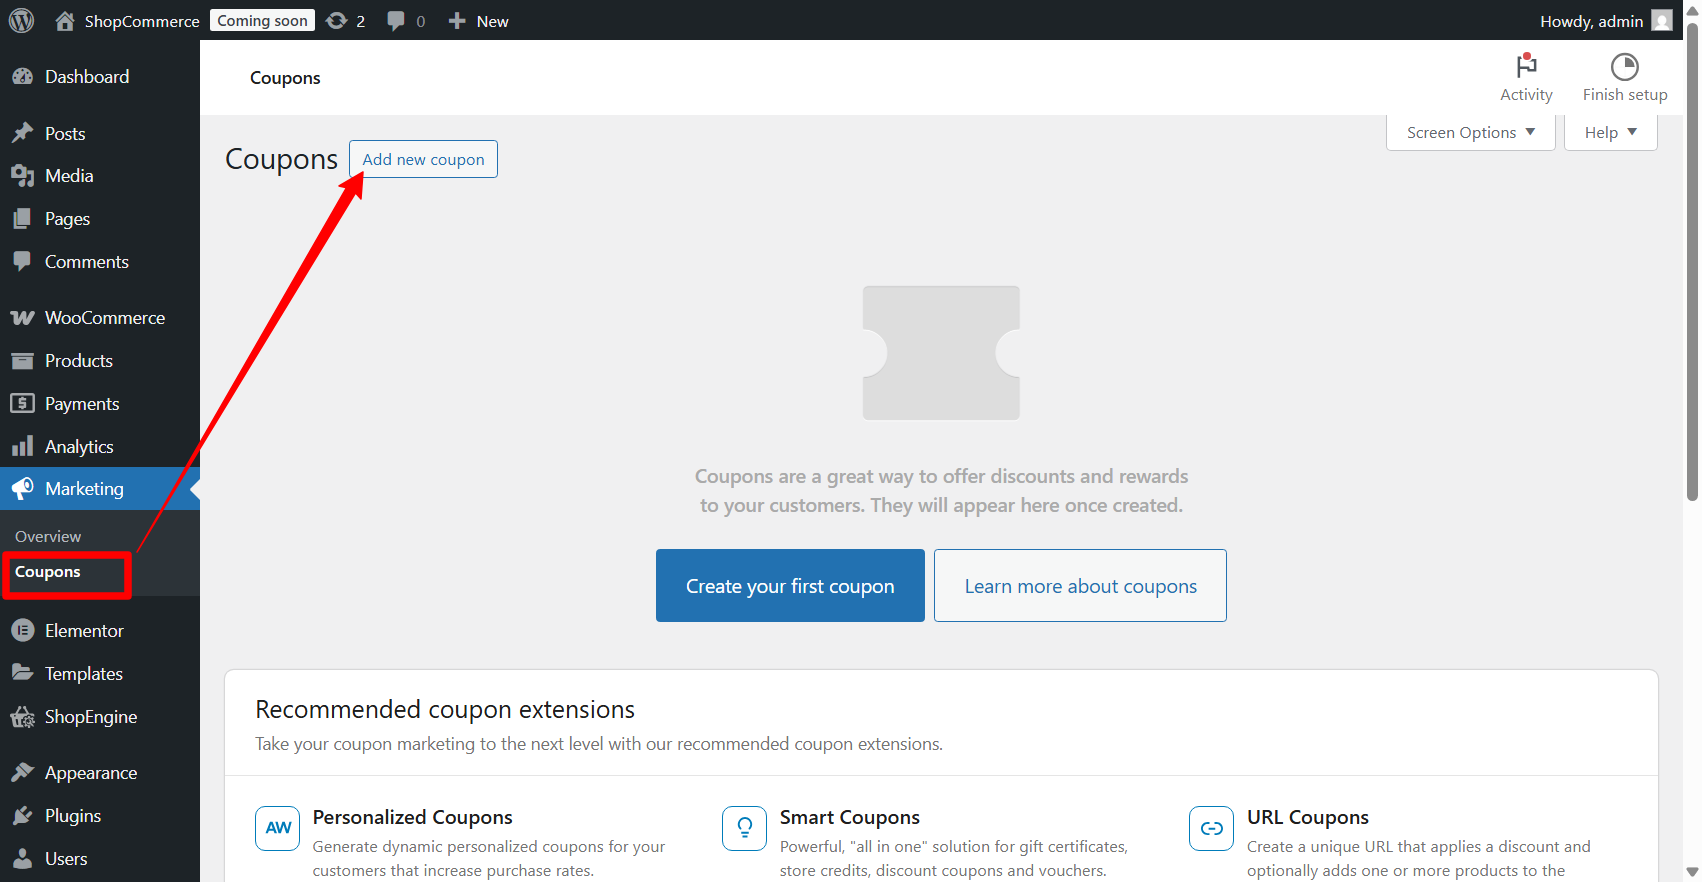
☑️ Create coupon codes for special WooCommerce discounts
Generate unique coupon codes for different segments of users, returning customers, or email subscribers. Promote them via email or social media to drive targeted traffic.
To add a coupon, go to Marketing → Coupons from the WordPress dashboard. Then click on the Add new coupon.
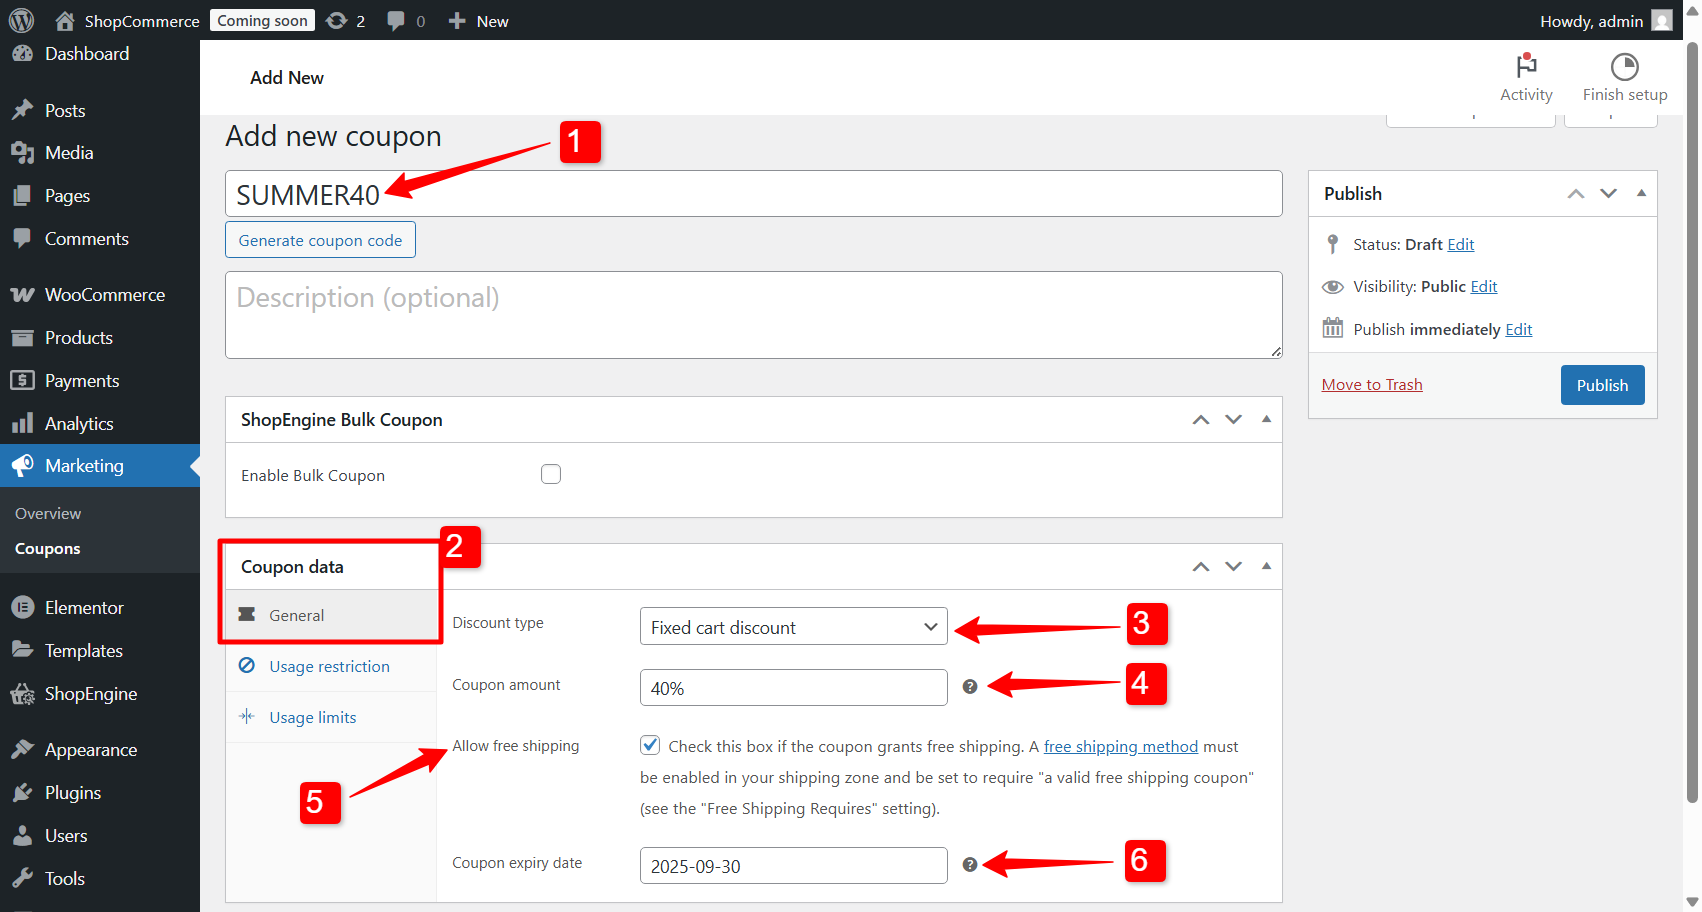
Now to configure an 우커머스 coupon code:
- 지금, 이름을 제공하다 그리고 설명 (optional).
- Then go the Coupon data section and open the 일반적인 탭.
- Here choose the Discount type.
- Set the discount percentage in the Coupon amount 필드.
- Also, check the Allow free shipping option if you want your customers to enjoy free shipping with this coupon.
- Finally, set the coupon expiry date.
다음으로 향하세요. User Restrictions tab and scroll down. You’ll see two new options added to the default WooCommerce coupon settings.
- Allowed – Country / Region (optional): Pick the country where you want the coupon to work.
- Allowed – State / Country (optional): Narrow it down even further by selecting specific states within a country. You can choose multiple states if you like. And if a country doesn’t have states listed, the coupon will simply apply to the entire country.
Once you’ve set everything up, just scroll back up and hit 게시 to save your changes and make the coupon live for your users.
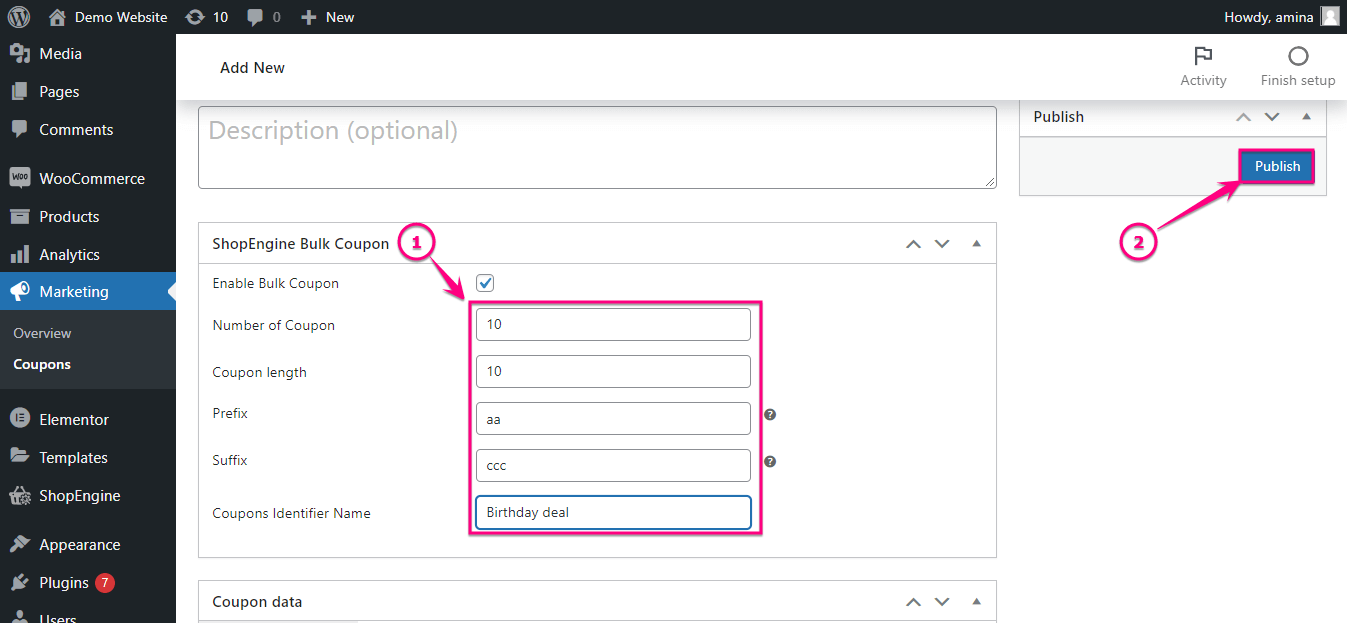
Add bulk coupons
Next, let’s create multiple coupons at once. Head over to Marketing → Coupons 그리고 클릭 Add Coupon, just like before. This time, make sure to enable the Bulk Coupon 옵션.

Now, fill in the fields to set up your batch of coupons:
- Number of Coupons – Enter how many coupons you want to generate.
- Coupon Length – Set the length of each coupon code.
- 접두사 – Add a prefix that will appear at the start of each code.
- 접미사 – Add a suffix for the end of each code. Keep in mind that the combined prefix and suffix length must be less than or equal to Coupon Length – 5. For example, if your coupon length is 10, the prefix and suffix can’t be more than 5 characters each.
- Coupon Identifier Name – Give your coupon group a name so you can easily identify them later.
- Once everything’s filled out, hit 게시, and your coupons will be ready.
Your bulk coupons are now ready! From this screen, you can edit individual coupons by clicking 편집하다, or export all of them by choosing a category and hitting 내보내다.
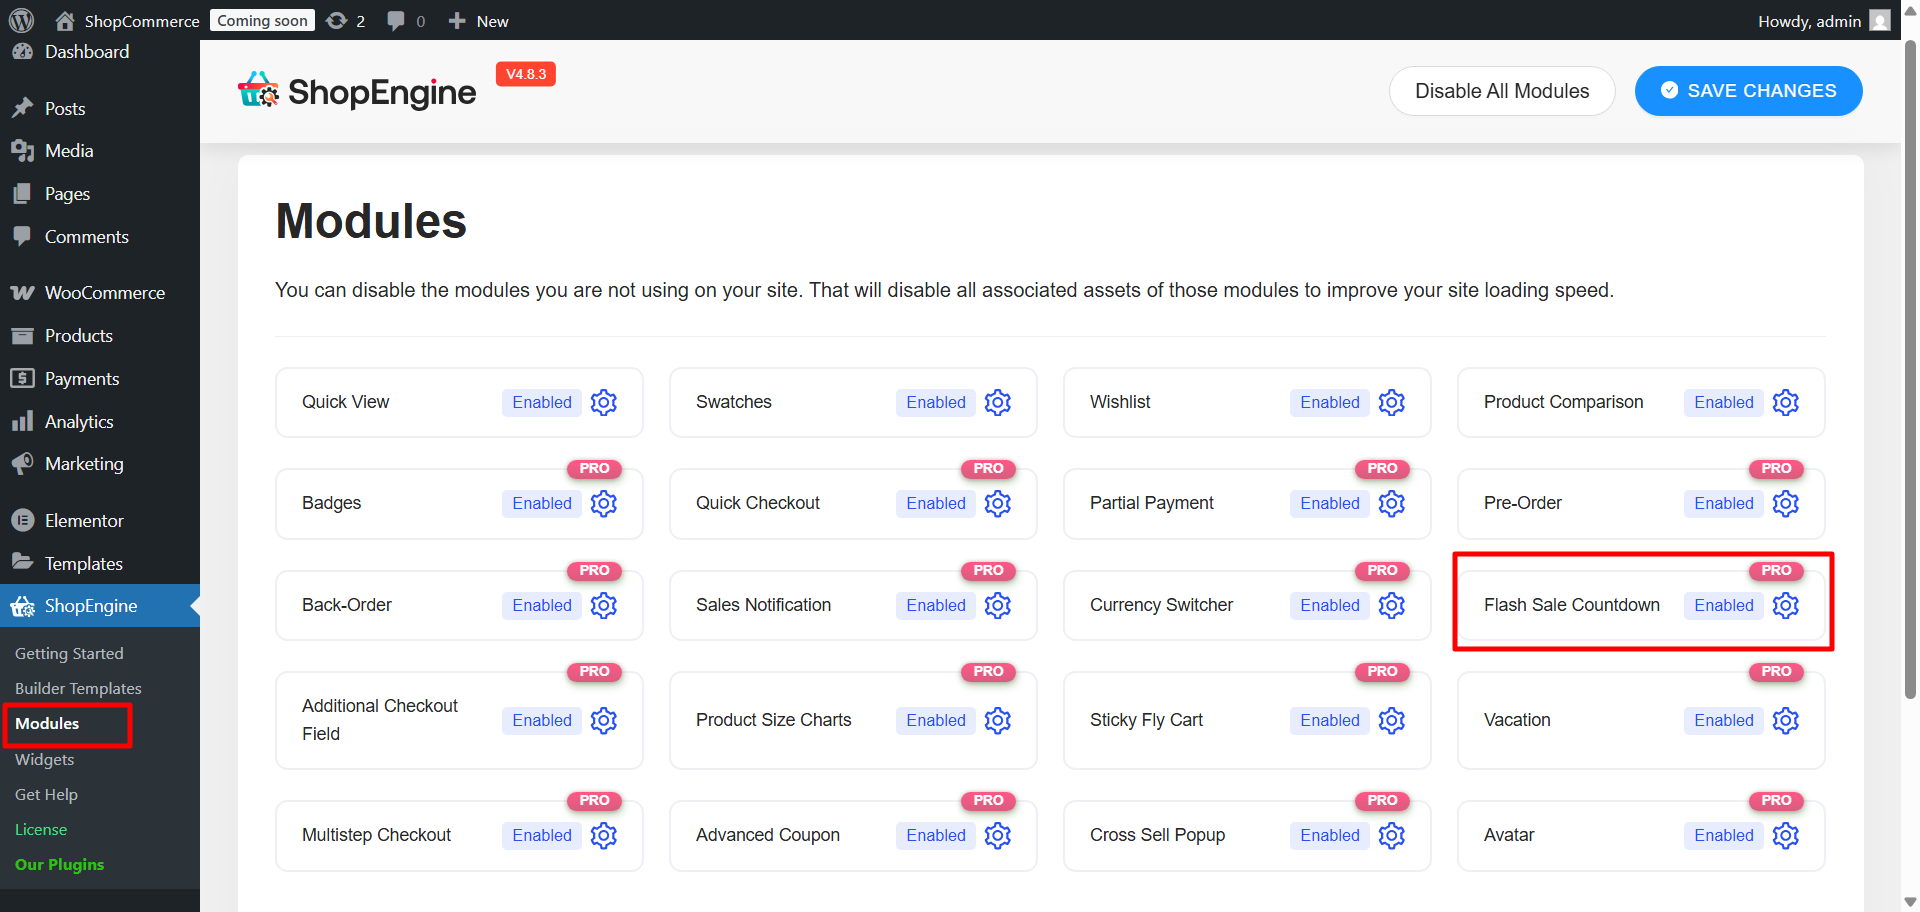
☑️ Promote with flash sales
Flash sales create a sense of urgency among customers due to the limited time offer. For flash sales, it’s crucial to clearly display a countdown timer to emphasize urgency. Promote them heavily across all your marketing channels, including social media and email, to ensure maximum reach within the limited timeframe.
You can run a successful WooCommerce flash sale campaign with ShopEngine on your WordPress website.
For that, firstly, head over to your WordPress dashboard, go to ShopEngine → Modules, and turn on the 플래시 세일 카운트다운 기준 치수.
Once it’s active, you’ll get a few options to set everything up:
- 을 추가하다 campaign title so you can easily identify it.
- Pick the start date for when the sale begins.
- 설정 end date for when it should wrap up.
- 다음을 선택하세요. 제품 카테고리 you want to run the sale on.
- 선택 discount type—either a fixed amount or a percentage.
- 들어가다 discount value you want to offer.
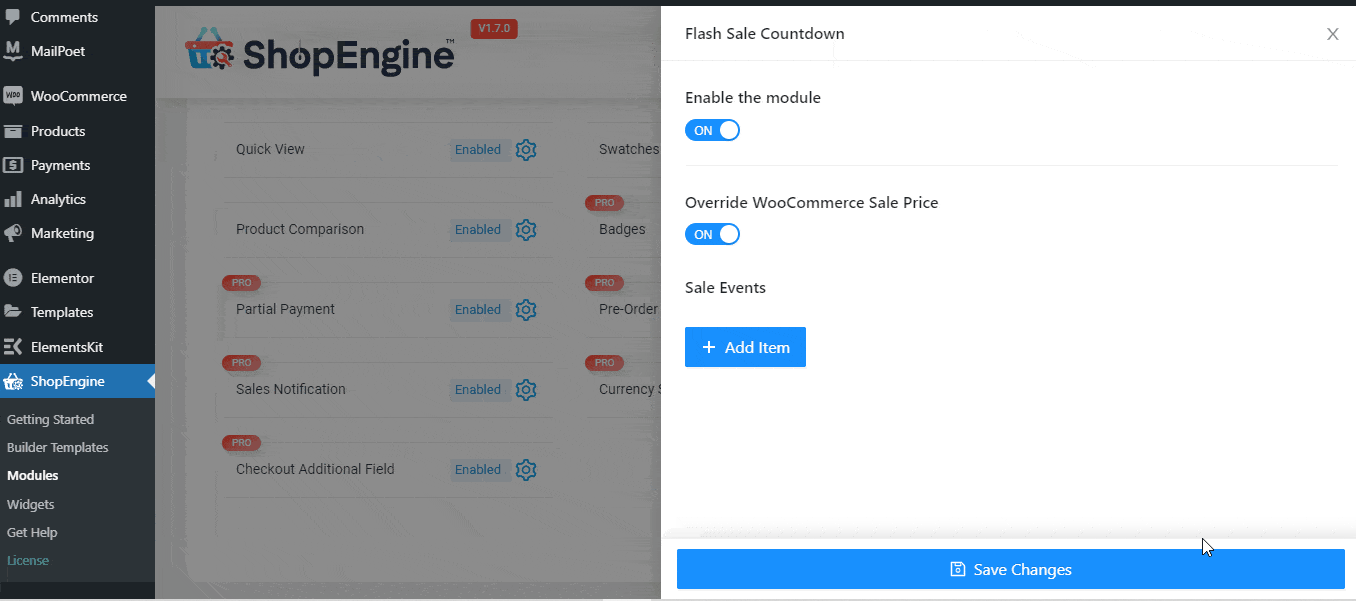
When you’re done, hit 변경 사항을 저장하다, and your flash sale countdown is ready to go.
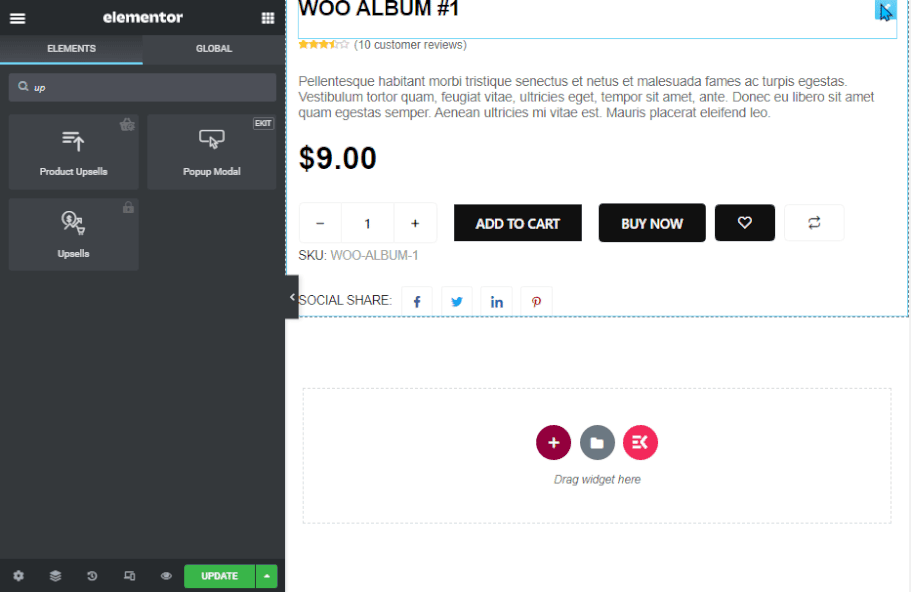
Add a flash sale countdown to a website page
In the Elementor editor, search for the “플래시 세일 제품” widget from the left side panel. Drag and drop the widget in the shop page. After that, select a campaign from the list.

After selecting the campaign, you will see the flash sale countdown for the product.
Customize the flash sale countdown style
You have the following options for the ShopEngine flash sale widget:
- 주문하다: 오름차순 또는 내림차순으로 제품 순서를 선택하세요.
- 주문: 날짜, 제품 ID, 가격 등을 기준으로 제품 주문을 선택하세요.
- 제품 보기: 표시하려는 제품 수를 선택하세요.
- 열과 행 간격: 필요한 경우 열과 행 간격을 사용자 정의하세요.
You also have the Style tab and the Advanced tab in the left bar. Check them out if you need to customize the shop page.
➕ Additional sales strategies to increase conversions
Beyond discounts campaigns, there are several several strategies in the sales playbook. If you really want to maximize conversions, it’s worth adding a few extra strategies that improve the shopping experience and encourage customers to buy more.
Promote relevant products with cross-sell / up-sell features
One of the easiest ways to grow your revenue is by making smart product suggestions. Cross-selling and upselling are two effective ways to maximize every sale.
👉 Cross-selling lets you recommend complementary products that pair well with what customers are already considering (e.g., “Customers who bought this also bought…”). Think of it like, “Buying a camera? You might also want a lens or a memory card.” These little tricks can often lead to extra purchases that customers didn’t even know they needed.
Most of the time, you’ll see cross-sell recommendations on the cart page. To add them there:
- Open your cart page template in the page editor, like Elementor or Gutenberg. (If you don’t have a template, here is how to create a cart page template in WooCommerce.)
- Inside the editor, search for the 교차판매 widget, and drag it to the design area. After a few adjustments and customization, you can show the cross-sell products on the cart page of your online store.
Learn more about how to show cross-sell products in WooCommerce
👉 Upselling is about offering the next best option, a more advanced or premium version of what’s in their cart. A simple prompt like, “Upgrade to the premium version for more benefits!” can tip a buyer toward a higher-value purchase. When done right, these tactics feel helpful rather than pushy, and they can noticeably increase your average order value.
Upsell suggestions usually show up on a single product page. To set them up,
- Open your product page template in the editor, like Elementor or Gutenberg. If you don’t already have a template, create a single product page template 첫 번째.
- In the editor, just search for the upsell widget and drag it into your layout.
Make sure you have enabled the ShopEngine upsell widget from your WordPress dashboard → ShopEngine → Widgets.
Learn more about how to do upsells in WooCommerce
While cross-sell and upsell product suggestion increases the revenue, it makes the shopping experience feel more personalized and valuable for the customers.
Provide a quick view of products
Allow customers to have a quick peek at product details without leaving the category or search results page with the WooCommerce 빠른 보기 option. This simplifies the browsing experience and reduces friction.
To use the feature, enable the ShopEngine Quick View module from the ShopEngine → Module WordPress 대시보드에서.
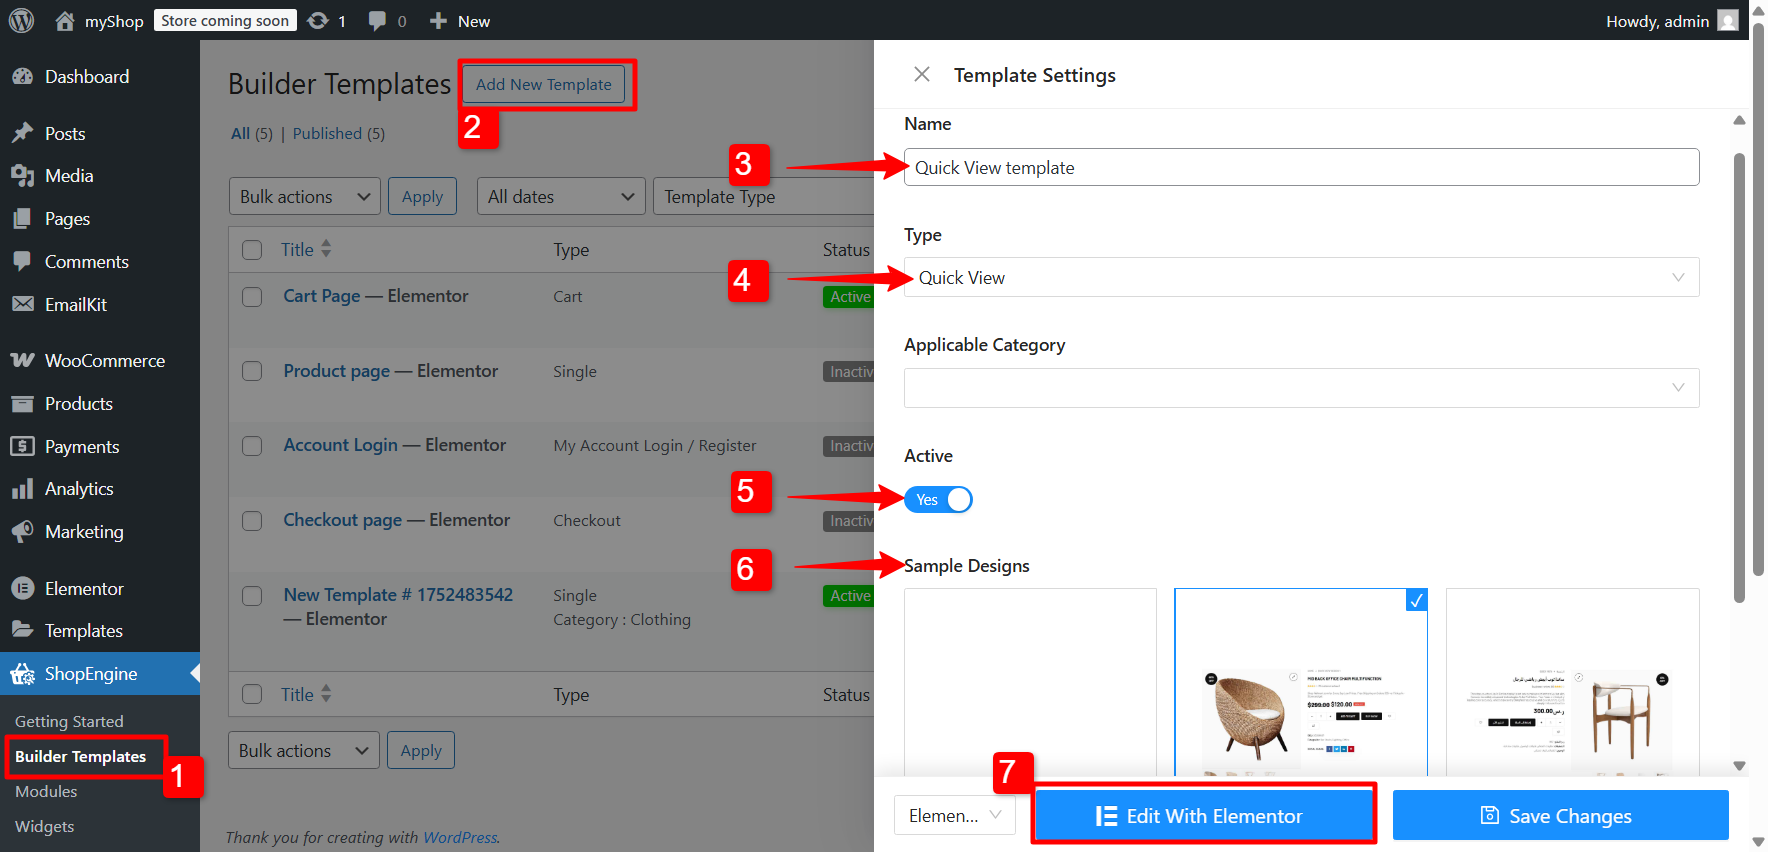
Now, to create a quick view layout:
- 로 이동 ShopEngine → Builder Templates.
- 클릭 Add New Template.
- 다음을 입력하세요. 이름 템플릿의 경우.
- 템플릿 설정 유형 에게 퀵뷰.
- 활성화 템플릿.
- Select a pre-designed template or blank template under 샘플 디자인.
- 마지막으로 Elementor로 편집 button to customize the template.
With that done, your store visitors can browse and shop more smoothly, which means a better shopping experience and more sales opportunities for you.
Learn more: How to enable product quick view in WooCommerce.
Include a quick checkout option
Minimize the steps required to complete a purchase. WooCommerce Quick Checkout ~이다 a simplified checkout process, ideally on a single page, that can drastically reduce cart abandonment rates.
Read the documentation for ShopEngine Quick Checkout module for WooCommerce
Use a sticky fly cart
A persistent, easily accessible shopping cart icon or mini-cart that “flies in” or sticks to the screen as the user scrolls. This 끈끈한 파리 카트 constantly reminds customers of their items and makes it easy to proceed to checkout at any point.
마무리
At the end of the day, running a sale campaign in WooCommerce is more than just offering discounts. It’s about being smart with strategic planning and targeting the right audience.
When you set clear goals, pick the right products, and use handy tools like ShopEngine for pop-ups, badges, coupons, and flash sales, you’re not just boosting sales, you’re creating a better shopping experience for your customers.
Do this consistently, and your campaigns won’t just bring in quick wins—they’ll also help build trust and long-term loyalty for your store.

답글 남기기