


What’s the very first thing you notice while visiting a website? The header, right? Yes! We’re all the same!
헤더는 사이트에서 방문자의 시선을 가장 먼저 사로잡는 요소입니다. 헤더를 모든 웹사이트의 백본으로 간주할 수 있습니다.
전자 상거래 사이트, 블로그 사이트, 소셜 미디어, 포럼 또는 개인 포트폴리오 사이트를 소유하고 있는지 여부는 중요하지 않으며 간단하고 탐색하기 쉬운 Elementor 투명 메뉴를 추가해야 합니다.
However, adding a simple header with the menu isn’t enough now! You must customize the header to provide the best user experience to your audience. And you can do that by making the Elementor transparent header background and sticky!
이 기사에서는 Elementor를 사용하여 WordPress에 투명한 고정 헤더를 추가하는 방법에 대한 가장 진보되었지만 시간을 절약하는 방법을 보여 드리겠습니다!
방문자가 첫눈에 귀하의 웹사이트를 좋아하게 만드는 Elementor 고정 헤더를 만들어 보겠습니다.
Elementskit을 사용하면 몇 분 안에 Elementor용 사용자 정의 Elementor 투명 헤더를 생성할 수 있다는 것을 알고 계셨습니까? 하자 Elementskit을 무료로 사용해 보세요
Quick Overview: How to Create a Sticky Elementor Transparent Header
Creating a sticky Elementor transparent header can easily be done with the use of a plugin like ElementsKit. You can build a header template, enable the sticky option so it stays at the top while scrolling, and remove the background color to make it transparent over page content.
Steps to Create a Sticky Elementor Transparent Header:
✅ Create a menu first – Go to Appearance → Menus in WordPress and create a primary menu.
✅ Create a header template in ElementsKit – Go to ElementsKit → Header Footer → Add New, choose “Header”, set its title and display condition, and activate it.
✅ Edit with Elementor – Click Edit with Elementor to start customizing the header.
✅ Choose a header design – Open the ElementsKit header library, pick a design, and insert it into your header.
✅ Stick the Elementor transparent menu – In the Advanced tab, open ElementsKit 스티커 and set the header to Sticky → Top.
✅ Make the header transparent over content – In the Style tab under Menu Wrapper, remove the background color (e.g., set to #00000000) and adjust header‑over‑content settings.
✅ Test the header – Add sections under the header and scroll the page to confirm it stays fixed and transparent.
예를 들어, you can design a homepage with a full‑width hero image, then build an Elementor sticky header using ElementsKit plugin, set it to stick at the top, remove its background color, and it stays fixed and transparent over the hero when scrolling.
요약
A sticky transparent header is a fixed, see-through navigation bar that improves usability while allowing page content to remain visible underneath.
WordPress의 고정 투명 헤더란 무엇입니까?
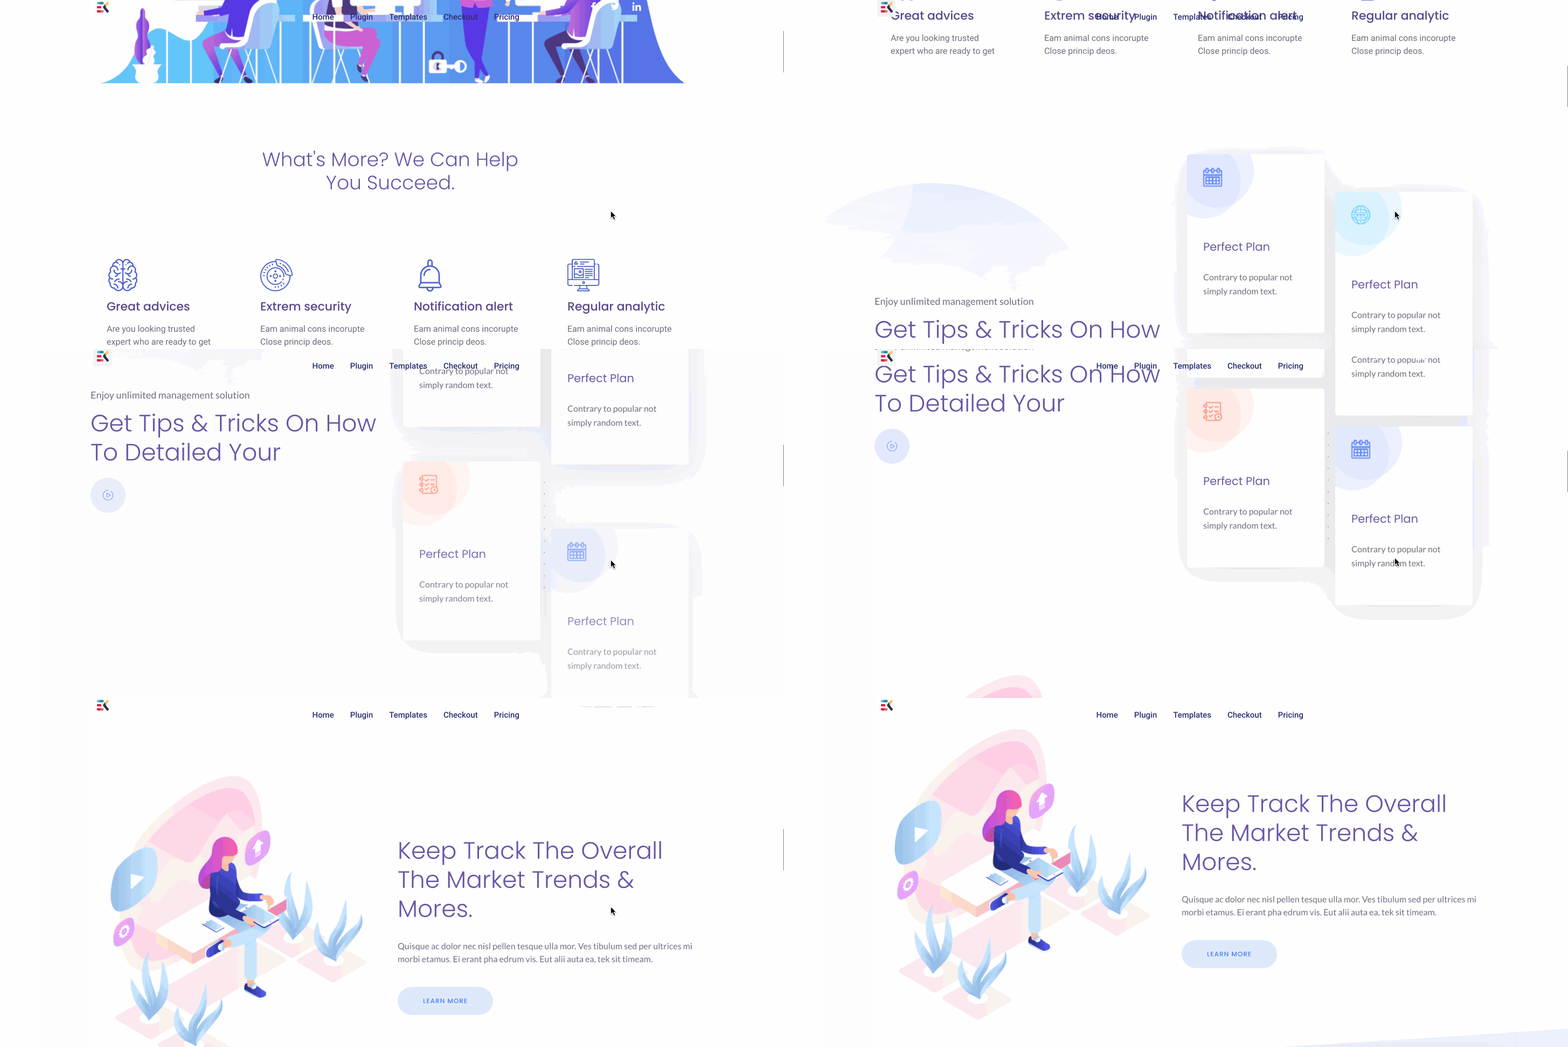
끈끈한 투명 헤더는 누군가가 아래로 또는 위로 스크롤할 때 고정되어 투명하게 유지되는 헤더를 정의합니다. 이 헤더를 사용하면 사이트를 스크롤할 때 사이트의 배경을 원활하게 볼 수 있습니다.
필요한 것
이 튜토리얼 블로그를 따라가려면 다음이 필요합니다.
- WordPress 사이트
- 요소 페이지 빌더
- ElementsKit, an Elementor sticky header plugin
- 5~10분의 시간을 투자하세요.
모든 것을 얻었나요? 좋습니다. 이제 갈 준비가 되었습니다.
Elementor 투명 헤더 배경을 디자인해 봅시다!
새 헤더 템플릿이나 새 페이지를 통해 헤더를 생성할 수 있습니다. 하지만 저는 항상 Elementor를 사용하여 투명한 고정 헤더를 디자인하기 위해 새 페이지를 만드는 것을 선호합니다.
헤더 디자인이 완료되면 템플릿을 헤더 템플릿에 복사하여 붙여넣기만 하면 됩니다. 쉽지요?
Elementor를 사용하여 WordPress에서 접착식 투명 헤더를 만드는 방법에 대한 가이드를 살펴보겠습니다.
#1단계: 먼저 메뉴 생성
Elementor 고정 헤더를 추가하려면 먼저 메뉴를 생성해야 합니다. 새 메뉴를 만들려면 wp-admin > 모양 > 메뉴로 이동하세요.
Once you’re done creating the menu, give the menu name “Primary” or anything you want and click on “Save Menu”. If you’ve created a menu already, It will look somewhat like this –
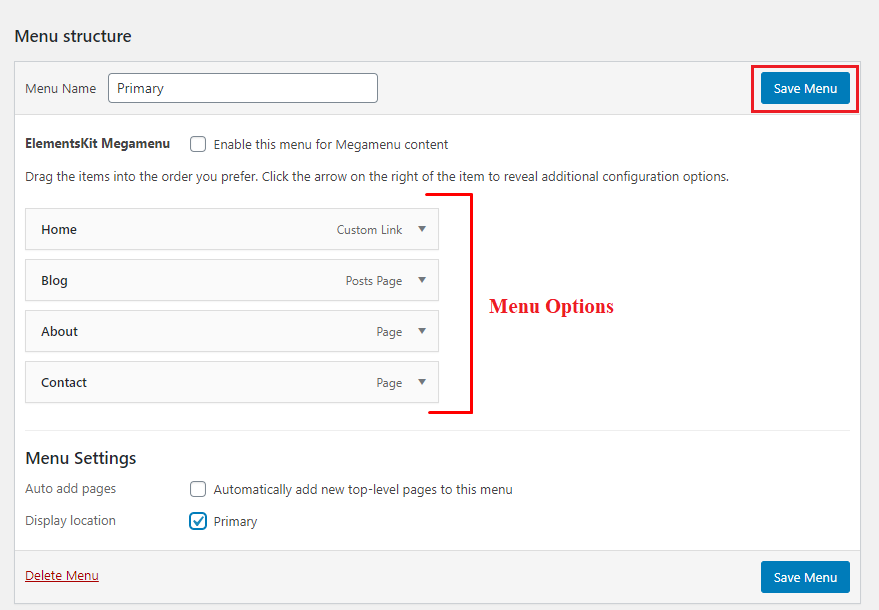
“메가메뉴” 섹션을 참조하세요. 기본적으로 이는 ElementsKit의 가장 유용한 기능 중 하나입니다. 메뉴 섹션에 많은 카테고리나 옵션을 추가하려는 경우 이 메가메뉴 기능을 사용할 수 있습니다.
⭐ ⭐ Check out a detailed guide on Elementor에서 메가메뉴를 만드는 방법.
Step#2: 헤더 템플릿 생성
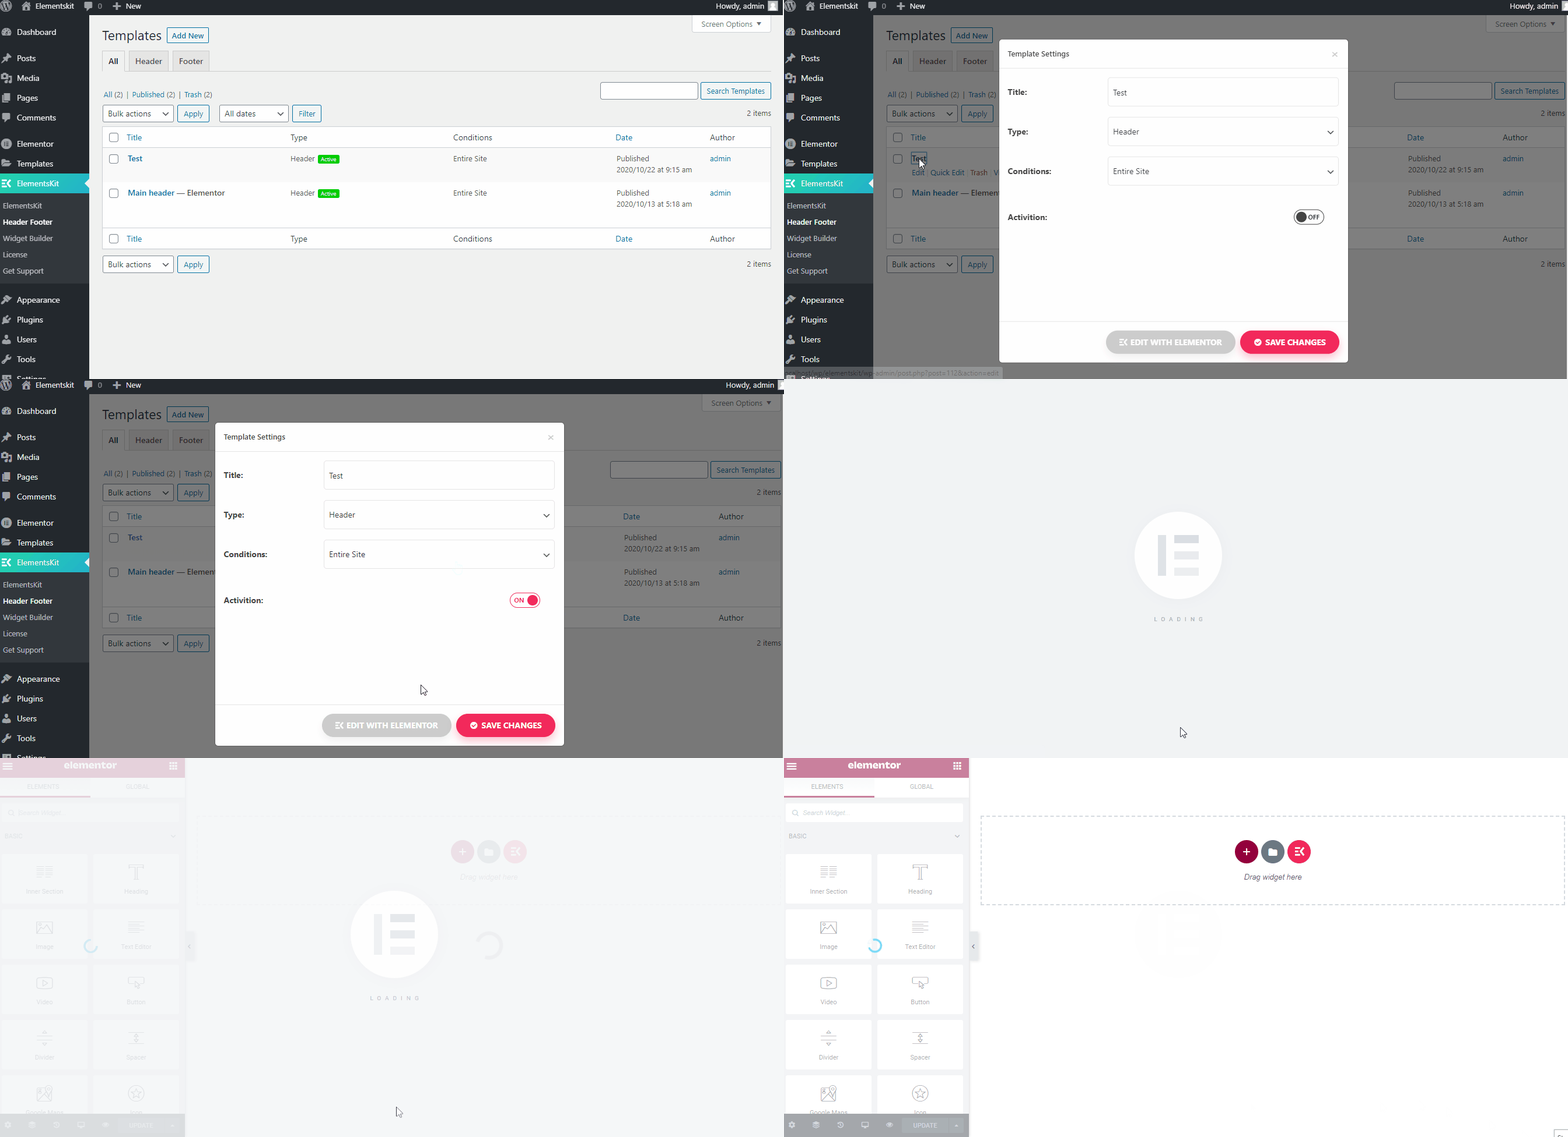
Go to the “머리글 바닥글” section of your ElementsKit. Add a New Header Template by clicking on “새로운 걸 더하다".
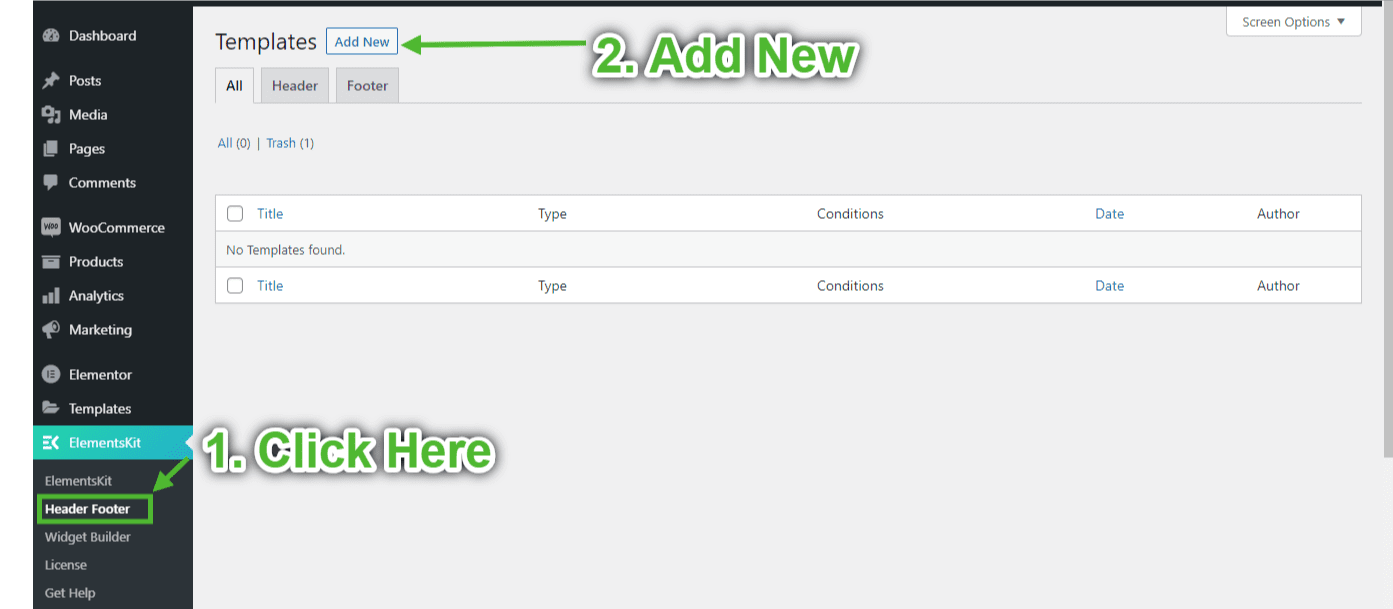
Now the template settings will appear. Here you have to do the following tasks:
- 헤더에 제목을 지정하세요.
- From the “유형” setting dropdown, choose “Header”
- 원하는 조건을 선택하세요. 저는 드롭다운에서 "전체 사이트"를 선택했습니다.
- 스위치를 켜서 헤더 템플릿을 활성화합니다.
#3단계: Elementor로 편집
위에서 언급한 모든 작업이 완료되면 왼쪽 아래에서 "Elementor로 편집" 버튼을 클릭하세요.
#4단계: 헤더 디자인 선택
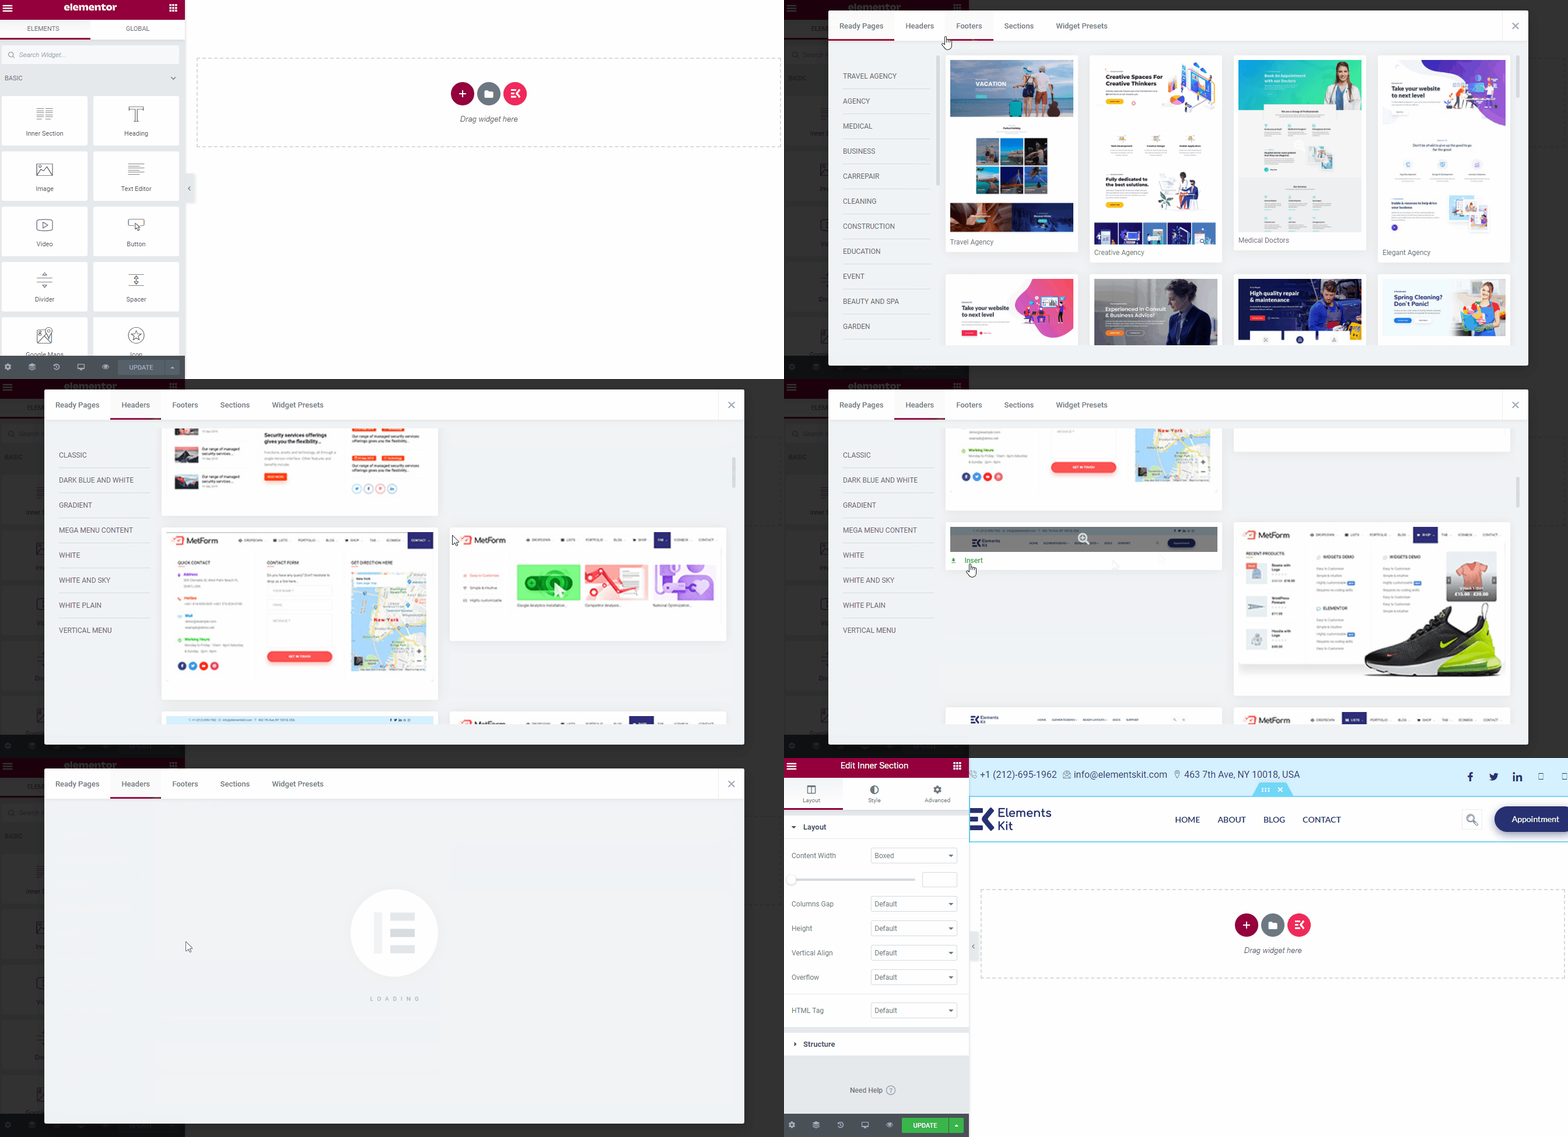
이 섹션에서는 ElementsKit의 내장 헤더 라이브러리에서 헤더 디자인을 선택할 수 있습니다.
To proceed, click on the ElementsKit icon, choose a beautiful design, and click the ‘끼워 넣다’ button to import the header in Elementor.
#5 단계: Elementor 투명 메뉴 고정
We’ve already selected our header design. Now, it’s time to stick the header on the top position. Browse the ‘Advanced’ tab of Elementor for this task. From the advanced tab, find “ElementsKit 스티커”. Make the menu Sticky at the Top from the dropdown.
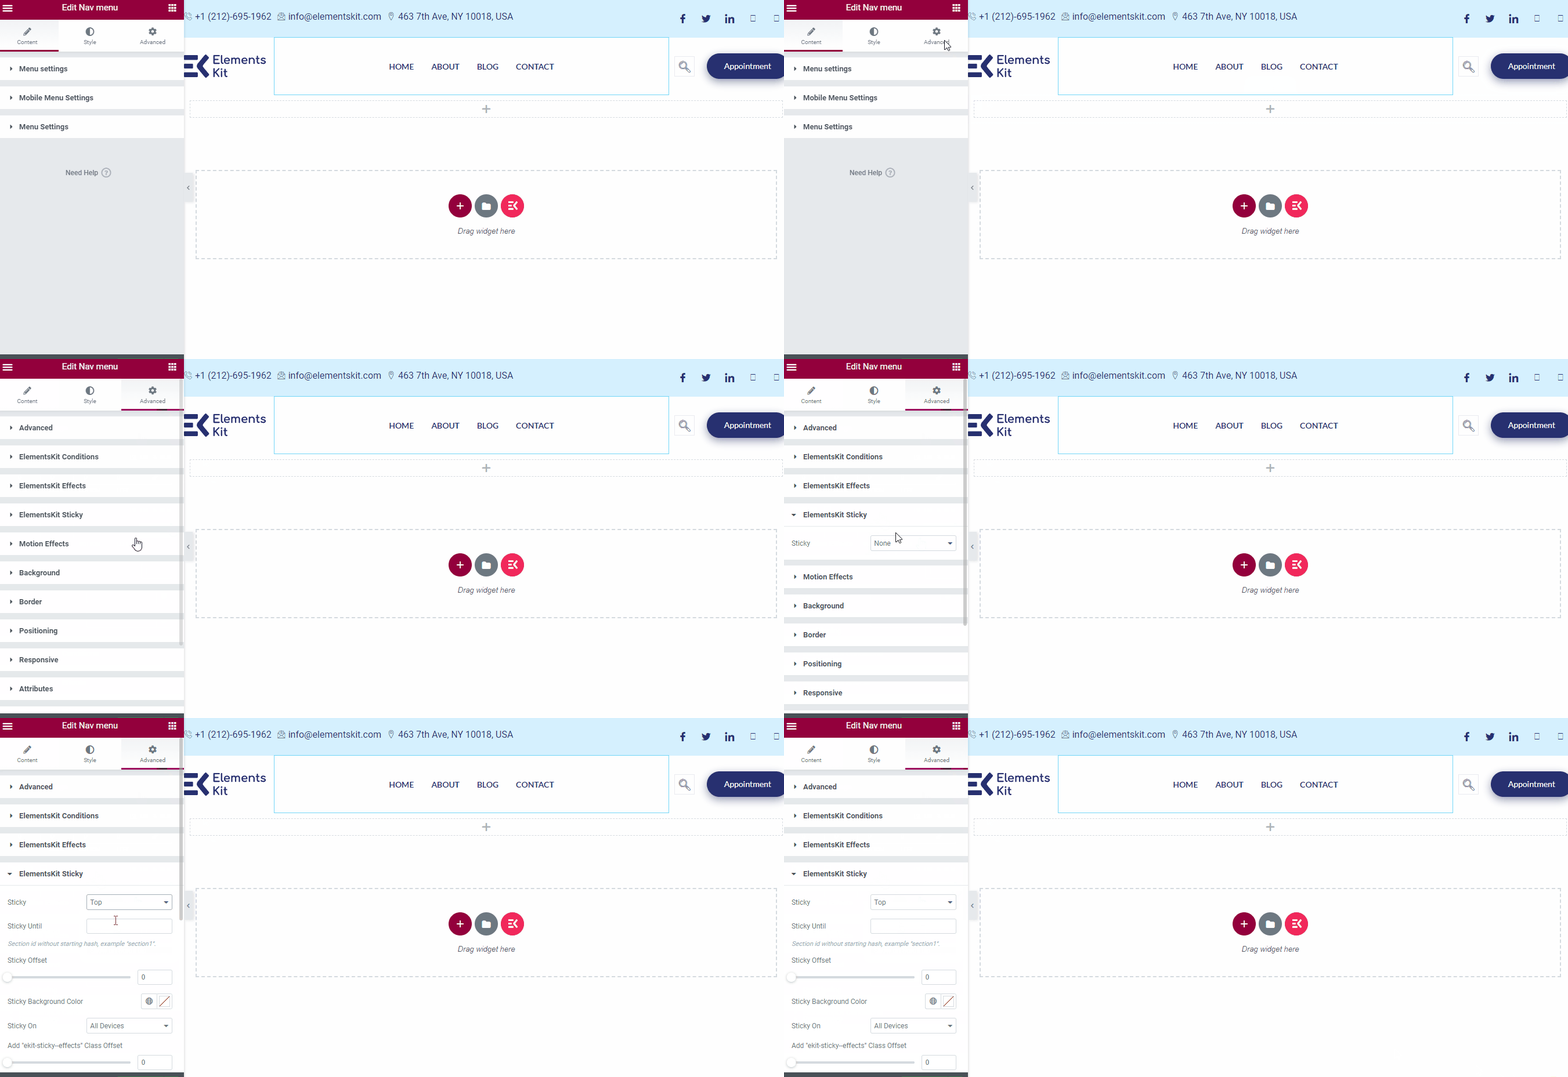
Note that you can choose to make the header sticky until a certain section. In that case, define the 끈끈한까지. You can also apply Sticky Offset to the header, ranging from 0 to 100.
Step #6: Make the Elementor Transparent header over the content
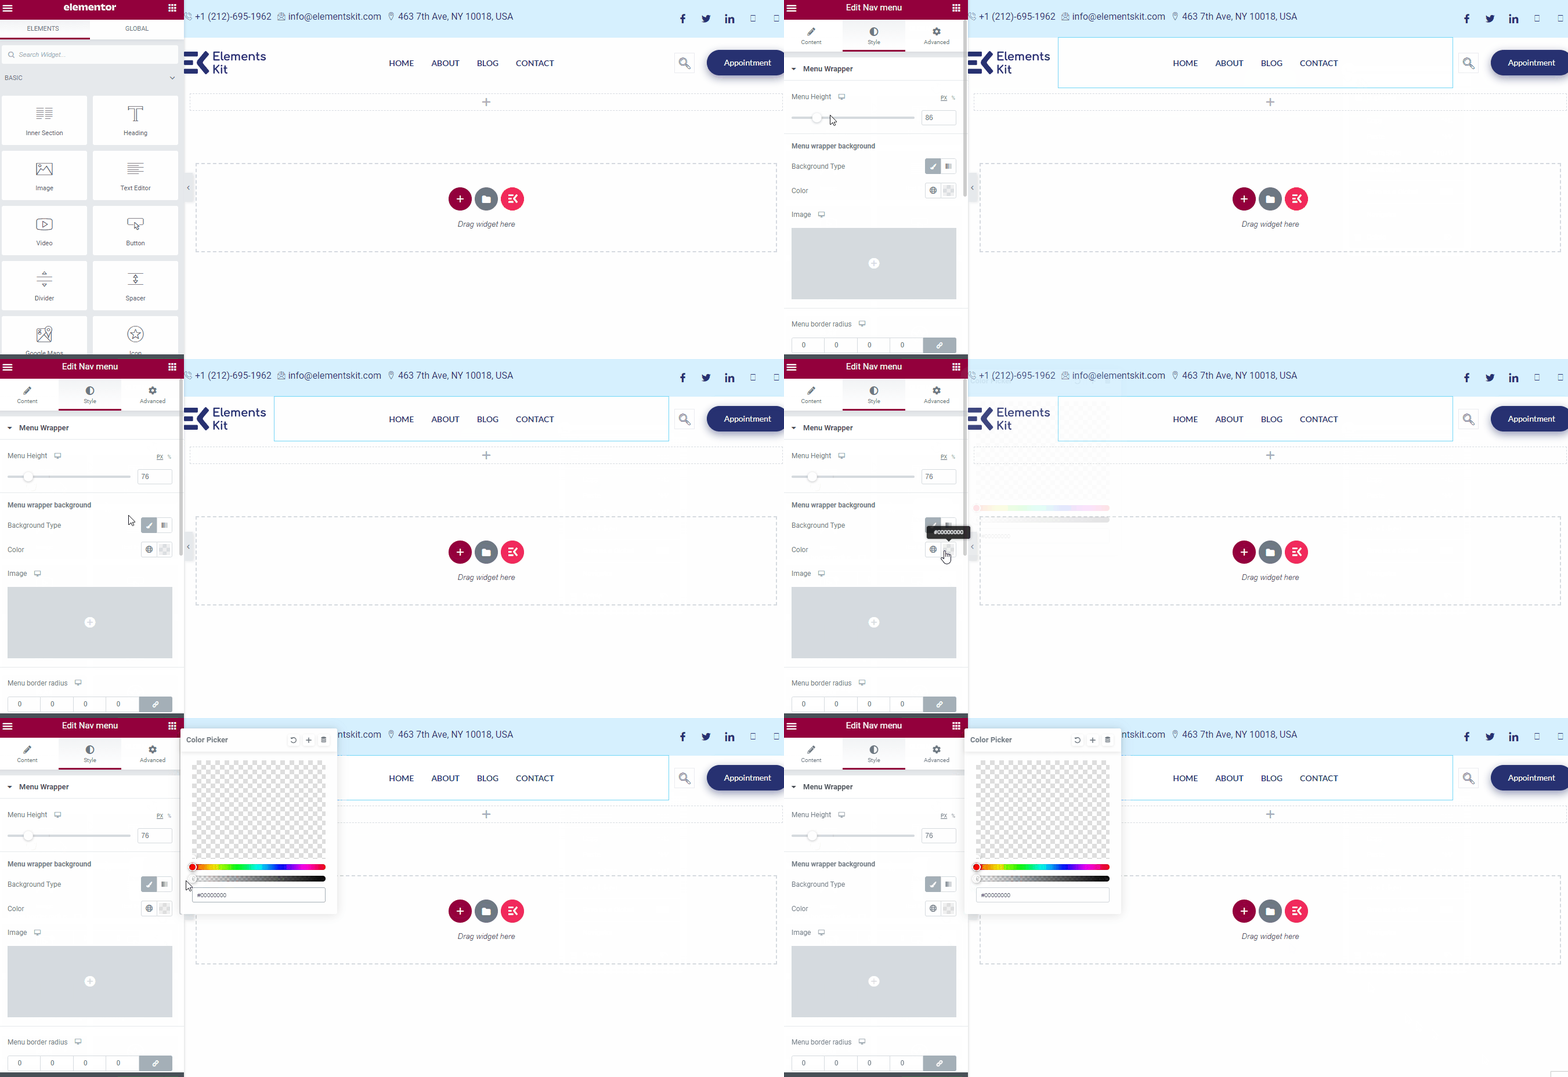
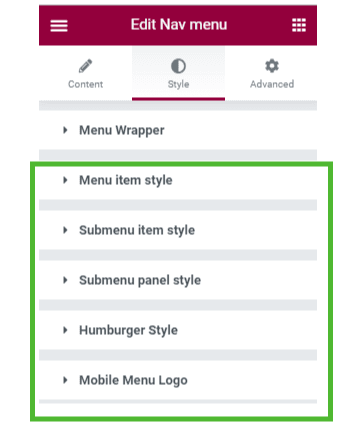
Now, hop into the ‘스타일’ tab. From the “Menu Wrapper” section, set the Elementor transparent menu height of your choice.
Choose the menu wrapper background type ‘Classic’ and remove color by using the slider to the left end. You can also put the color code manually. In that case, enter #00000000 to get a transparent background. Moreover, you can also adjust the Elementor header over content from the content tab.
헤더를 더욱 세련되고 매력적으로 만들기 위해 다음 설정 중 하나를 활용할 수도 있습니다.
#7단계: 테스트 Elementor 투명 헤더
글쎄, 우리는 Elementor와 다른 것을 사용하여 이 투명한 헤더를 디자인했습니다. Elementor 투명 헤더 애드온 플러그인 ElementsKit이라고 합니다. 이제 결과를 확인할 차례입니다.
투명성을 더 잘 이해하기 위해 헤더 아래에 몇 가지 섹션을 더 추가할 수 있습니다. 이 튜토리얼에서는 헤더 섹션 아래에 두 개의 이미지를 추가했습니다. 최종 출력은 다음과 같습니다.
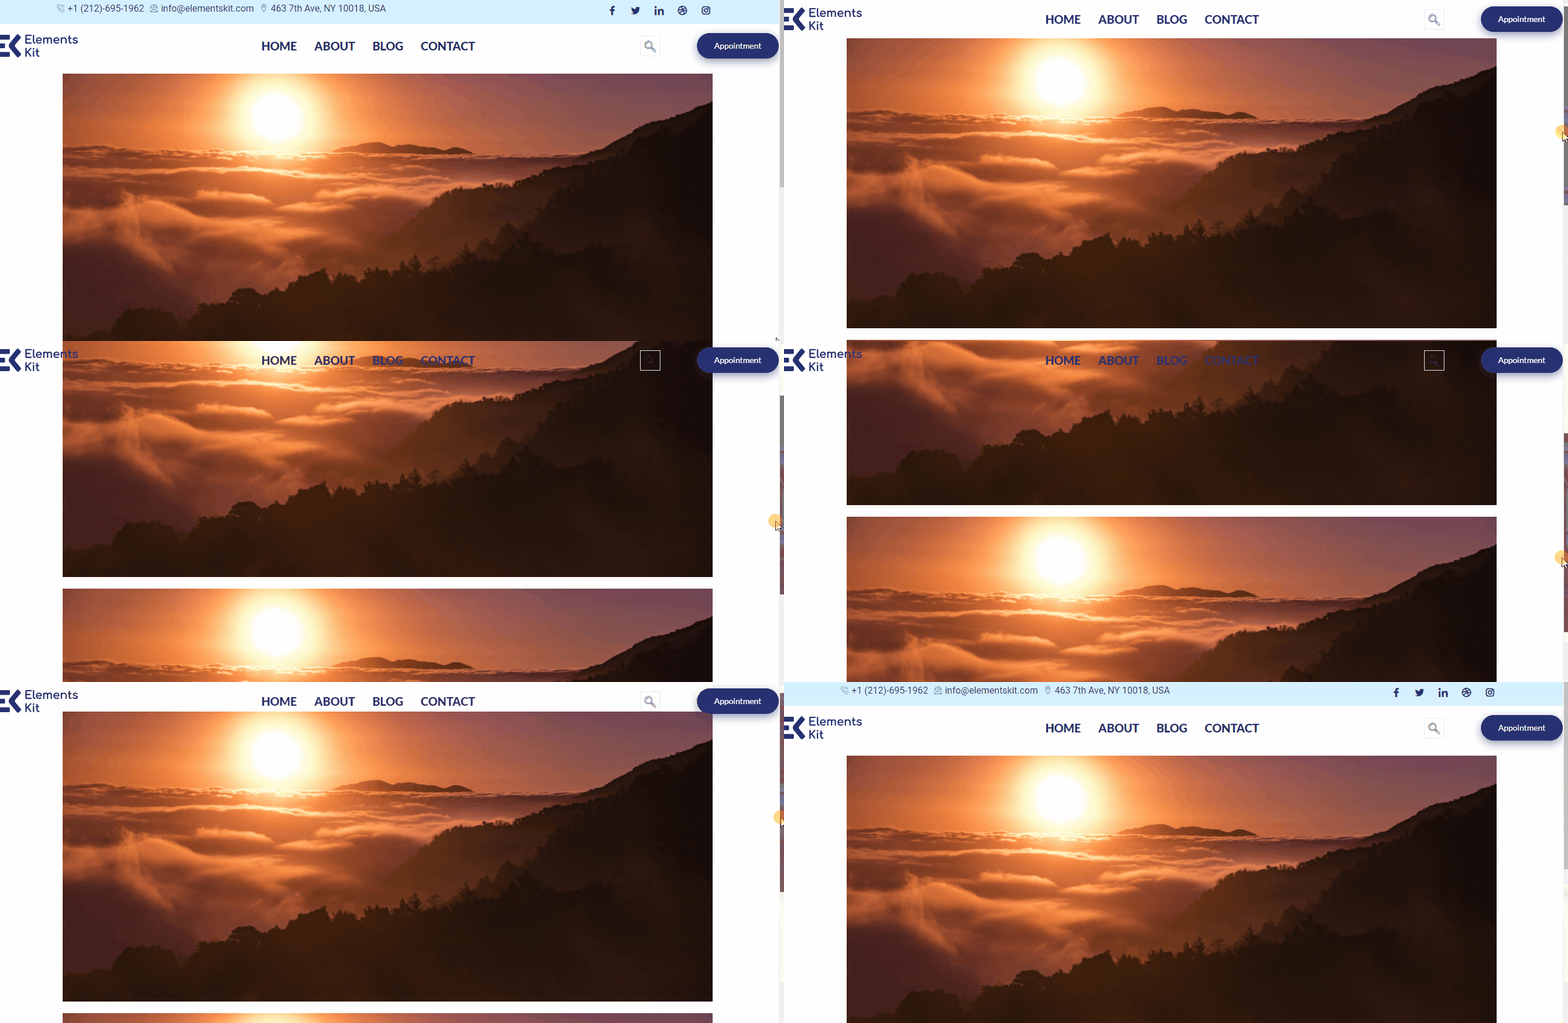
그게 다야! Elementor 투명 헤더 배경을 성공적으로 만들었습니다. 이제 이 헤더를 복사하여 웹사이트의 모든 페이지에 적용할 수 있습니다.
아직도 혼란스러워요? 이 튜토리얼 비디오를 확인하세요:
ElementsKit 사용자를 위한 다양한 헤더 디자인
ElementsKit comes with numerous built-in header designs out of the box. All of these are stylish, unique, and help the user to navigate throughout your entire website.
ElementsKit의 몇 가지 헤더 디자인을 살펴보세요.

그림 1 – Elementor 고정 헤더

그림 2 – Elementor 고정 헤더

그림 3 – Elementor 고정 헤더

그림 4 – Elementor 고정 헤더

그림 5 – Elementor 고정 헤더
Aren’t these designs awesome? Yes, you can access a huge list of premium Elementor stcky header designs like this by using ElementsKit 플러그인.
왜 사용해야합니까? 투명한 Elementor 고정 헤더?
Elementor용 끈끈한 투명 헤더가 마음에 들든 싫든 한 번 시도해 보세요. 이 멋지고 트렌디한 헤더는 귀하의 웹사이트에 큰 가치를 더해줍니다. 여기에서는 웹사이트에 투명 고정 헤더를 사용하는 네 가지 이유를 나열했습니다.
더 나은 브랜딩
수천 개의 회사가 기본 헤더에 로고를 넣었습니다. 그냥 우연이라고 생각하시나요?
아니요!
ㅏ Lucidpress의 보고서에 따르면 브랜드 로고의 일관된 표현이 증가하는 것으로 나타났습니다. 수익은 약 33% 증가했습니다. 이는 브랜드 로고를 청중에게 보여주어야만 회사의 수익을 높일 수 있다는 것을 의미합니다.
Elementor의 고정 헤더에 로고를 넣으면 웹사이트 전체에서 로고가 표시됩니다. 따라서 사람들은 귀하의 로고를 더 오랫동안 보게 될 것입니다. 귀하의 브랜드가 더 많은 사람들에게 친숙해지고 수익도 증대될 것입니다.
더 나은 사용자 경험
고정 헤더를 사용하면 사용자가 웹사이트를 더 빠르게 탐색할 수 있습니다. 최소한의 노력으로 원하는 정보를 찾을 수 있습니다.
반면 고정 헤더를 사용하면 사용자가 정보를 찾는 데 더 많은 시간이 필요합니다. 기본 헤더를 사용하기 위해 항상 맨 위로 스크롤하고 싶은 사람은 없습니다. 결과적으로 사용자는 귀하의 웹사이트를 떠납니다.
글쎄, 머리글을 맨 위에 붙일 수도 있습니다. 그러나 이것이 당신의 임무의 끝은 아닙니다. 요즘 대부분의 사람들은 모바일 기기를 통해 웹사이트를 탐색합니다. 헤더를 상단에 붙이면 공간이 줄어들고 내용이 적게 표시됩니다. 사용자 친화적이지 않습니다.
이 문제를 해결하려면 Elementor 투명 헤더를 사용해야 합니다. 따라서 헤더를 계속 표시할 수 있고 방문자에게 더 많은 콘텐츠를 표시할 수도 있습니다. 둘 다 윈윈(win-win) 상황인 것 아닌가요?
검색 엔진 순위 향상
웹마스터라면 검색 엔진이 사용자 경험에도 많은 관심을 갖고 있다는 사실을 알고 계실 것입니다. 이는 Google의 가장 중요한 순위 요소 중 하나입니다. 이는 고정 헤더만이 Google에서 귀하의 웹사이트 순위를 높이고 더 많은 잠재 고객을 유치하는 데 도움이 된다는 것을 의미합니다.
고객을 잃고 싶습니까? 나는 그렇게 생각하지 않는다!
웹사이트를 탐색하는 데 어려움을 겪은 적이 있습니까?
글쎄, 나는 그것을 많이 직면했습니다!
항상 맨 위로 스크롤하는 것은 웹사이트를 방문하는 동안 가장 지루하거나 지루한 일입니다. 청중에게 추가적인 번거로움을 주고 싶지 않다면 표준 헤더를 지금 당장 버려야 합니다.
그 대신 Elementor 맞춤형 투명 헤더를 디자인하고 고객에게 보다 원활한 탐색 경험을 제공하십시오. 게다가 다음을 사용하여 내비게이션을 매우 친숙하게 만들 수도 있습니다. 한 페이지 탐색 WordPress.
Expert Insights
Transparent sticky headers look great, but need careful design. Here are quick expert tips:
Ensure Readability
- Use contrasting text colors or subtle shadows so your menu is always visible.
- Adjust colors when the header overlaps different backgrounds.
Smart Transparency
- Use partial transparency (80–90%) instead of fully clear.
- Consider adding a subtle background when users scroll.
Test Responsiveness
- Check the header on desktop, tablet, and mobile.
- On mobile, use a smaller header or hamburger menu to save space.
Keep it Simple
- Limit menu items and highlight key links.
How to Change the Header Color on Scroll?
Transitioning a transparent header to a solid color as the user scrolls is one of the most effective ways to keep navigation readable against varying page content. You can achieve this dynamic effect natively within the ElementsKit ecosystem without writing custom CSS.
Follow these exact steps to apply the background color change:
Activate the Module: First, ensure the core functionality is active by navigating to ElementsKit > Modules in your WordPress dashboard and toggling the 끈적한 콘텐츠 module to ON.
Access the Header: Open your header template via “Edit with Elementor” and click the handle for the main header section or container.
Enable Sticky Top: 다음으로 이동하세요. 고급의 tab, expand the ElementsKit 스티커 panel, and select 맨 위 from the drop-down menu. This ensures the header remains fixed at the top of the viewport.

Set the Scroll Offset: Assign an 오프셋 value (for example, 50px). This dictates the exact scroll distance required before the transparent background switches to your new color.

Assign the New Color: Within the same ElementsKit Sticky panel, locate the background color option—typically found just under the 끈끈한까지 settings. Select the solid color you want the header to become once the offset distance is reached.
Publish and Test: Click update and test the live page. Your header will load completely transparent over your hero section, then seamlessly transition to the solid background color once the user scrolls past your designated offset point.
자주 묻는 질문(FAQ)
이상적인 헤더의 요소는 무엇입니까?
좋은 헤더에는 탐색을 원활하고 유연하게 만드는 몇 가지 필수 요소가 포함되어야 합니다. 이상적인 헤더의 필수 요소는 다음과 같습니다.
- 심벌 마크
- 검색 창
- 연락처
- 언어 토글
- 탐색 메뉴
- 소셜 미디어 아이콘
- CTA
- 장바구니 아이콘
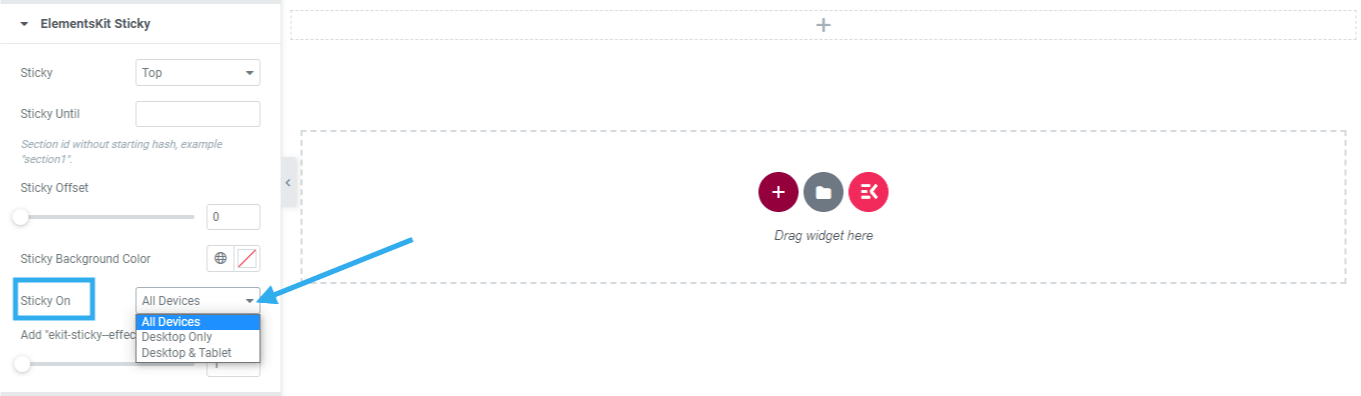
다양한 유형의 장치에 투명 헤더를 고정하려면 어떻게 해야 합니까?
운 좋게도 고정 헤더를 유지하려는 장치 유형을 선택할 수 있습니다. 모바일, 태블릿 또는 데스크톱 사용자를 위해 투명 고정 헤더를 설정할지 여부를 자유롭게 설정할 수 있습니다. 모든 유형의 장치에 투명 헤더 고정을 설정하려면 모든 장치에 고정을 설정했는지 확인하십시오.
좋은 헤더란 무엇입니까?
좋은 헤더는 읽기 쉬워야 하며 사이트의 모든 필수 페이지를 포함해야 합니다. 게다가 색상 대비와 글꼴도 눈에 띄게 만드는 데 중요한 역할을 합니다. 헤더에 너무 많은 항목을 포함하기보다는 확장 가능하게 만들어야 합니다. 필수 요소를 포함하면 브랜드 아이덴티티를 성공적으로 유지하고 손쉽게 탐색할 수 있는 좋은 헤더가 됩니다.
Elementor 고정 헤더를 설정하려면 사용자 정의 CSS를 사용해야 합니까?
No. If you use ElementsKit pro, you’ll get almost everything you want from the ElementsKit Sticky settings. You are not required to use any custom CSS to build a transparent sticky header for Elementor. However, if you still want to add custom CSS, just leverage “Add kit-sticky-effects Class Offset” and a functional theme to get your work done with CSS code.
고정되어 있지만 투명하지 않은 요소 헤더를 사용할 수 있습니까?
예, 그렇게 할 수 있습니다. 헤더를 투명하게 만들지 않고 고정되게 만들고 싶다면 고정 헤더를 '상단'으로 설정한 다음 "고정 배경색" 설정에서 배경색을 원하는 색상으로 변경하면 됩니다.
Elementor Sticky Header를 사용하려면 Elementor Pro가 필요합니까?
No, if you have the free version of Elementor with ElementsKit Pro, you are all set to make your Elementor header both transparent and sticky. Also, you can make any website element sticky.
그러니 서둘러서 ElementsKit을 사용하여 WordPress 사이트에 Elementor용 고정 헤더를 만드세요. 헤더를 고정성과 투명성을 동시에 만들 수 있는데 왜 기회를 놓칠까요?
최종 단어
지금까지 Elementor 투명 헤더 배경을 사용해야만 얼마나 많은 이점을 얻을 수 있는지 이해하셨을 것입니다. 지금 웹사이트에 투명한 고정 헤더를 추가하고 웹사이트를 최대한 활용하세요.
바라건대, 다음을 사용하여 맞춤형 투명 접착 헤더를 많이 디자인할 수 있기를 바랍니다. ElementsKit 요소 애드온 이 지침을 따라 Elementor를 실행하세요.
Elementor의 고정 투명 헤더에 관해 추가 문의사항이 있는 경우 댓글 섹션을 통해 알려주시기 바랍니다. 우리는 귀하의 문제가 해결되기를 간절히 기다리고 있습니다.
좋은 하루 보내세요!



답글 남기기