


Creating a mega menu in Elementor is easy with ElementsKit, and it doesn’t require Elementor Pro. ElementsKit offers a dedicated Mega Menu module that lets you design rich, multi-column menus using Elementor’s visual editor.
Steps to Create a Mega Menu Using ElementsKit:
- Save the menu and assign it to your site location.
- 설치 및 활성화 ElementsKit 플러그인.
- 이동 ElementsKit > Modules and enable 메가 메뉴.
- 로 이동 모양 > 메뉴 and create or edit a menu.
- 할 수 있게 하다 메가 메뉴 for a menu item and choose the layout.
- 딸깍 하는 소리 Elementor로 편집 to design the menu content.
그만큼 ElementsKit의 메가 메뉴 모듈 plugin is a powerful feature in WordPress that allows you to create a category-based expandable WordPress dropdown menu with flexible layouts. Elementor Mega menus are easy to use and can be a great way to show the multi-level website menu in an organized way.
Watch our video guide on Elementor Mega Menu Building:
또는 Elementor에서 메가 메뉴를 만드는 방법에 대한 단계별 지침을 따르세요.
전제 조건: #
- Elementor, a page builder plugin (Free version is enough)
- ElementsKit 프로, a WordPress mega menu plugin for Elementor
WordPress 메가 메뉴를 만드는 방법 엘레멘터 #
우선, 그 전에 WordPress에서 Elementor 메가 메뉴 만들기 ElementsKit을 활성화하세요 메가 메뉴 기준 치수.
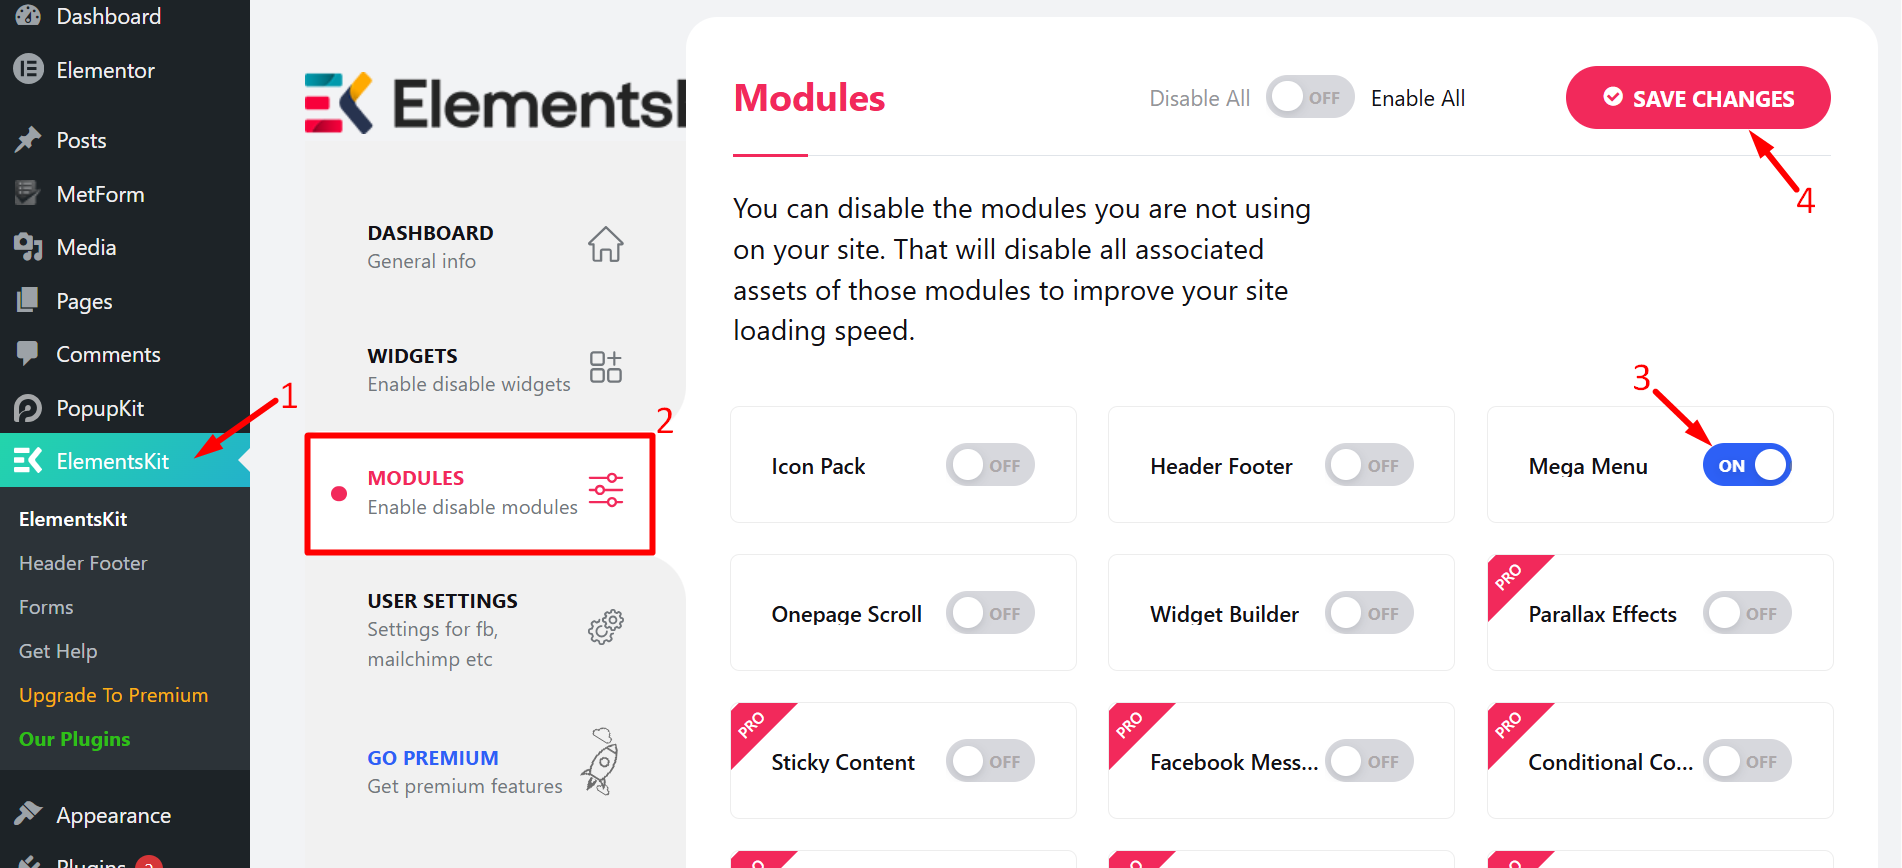
- 로 이동 ElementsKit on your WordPress dashboard
- 이동 모듈
- Find and turn ON Mega Menu
- 구하다 변화들
Step #1: Configure WordPress Menu #
에게 워드프레스 메가 메뉴 만들기 on your website –
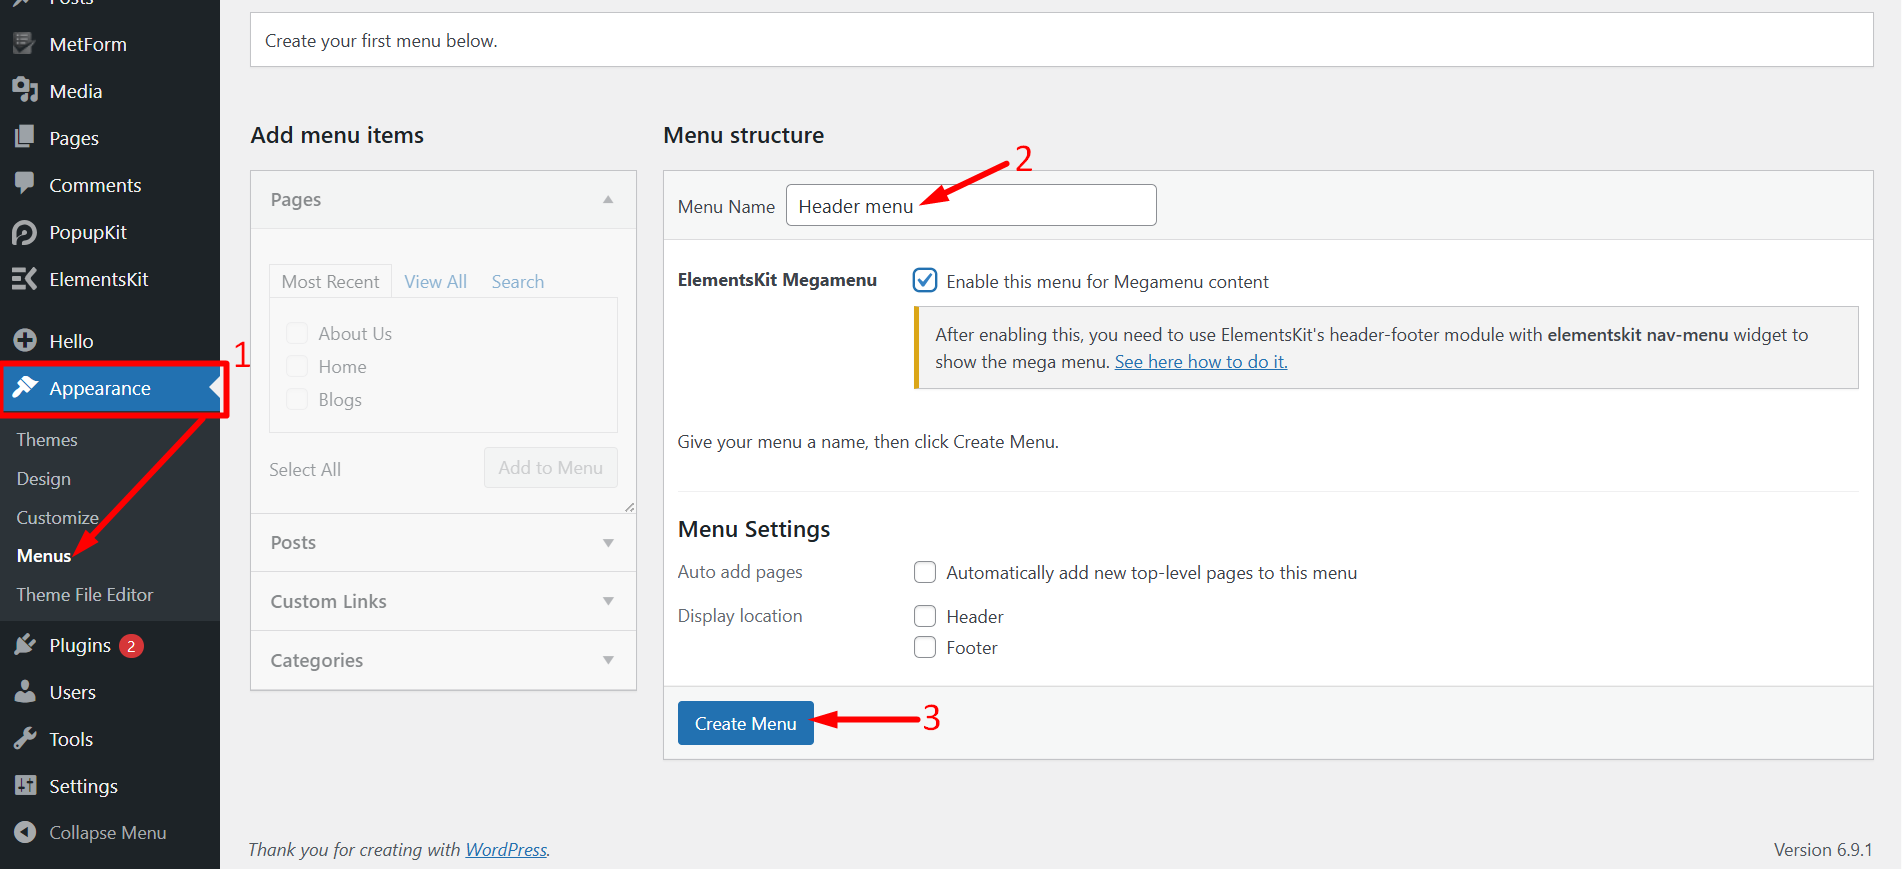
- 로 이동 Appearance > Menus WordPress 대시보드에서.
- 다음을 입력하세요. 메뉴명.
- 다음을 클릭하세요. 메뉴 생성 단추.
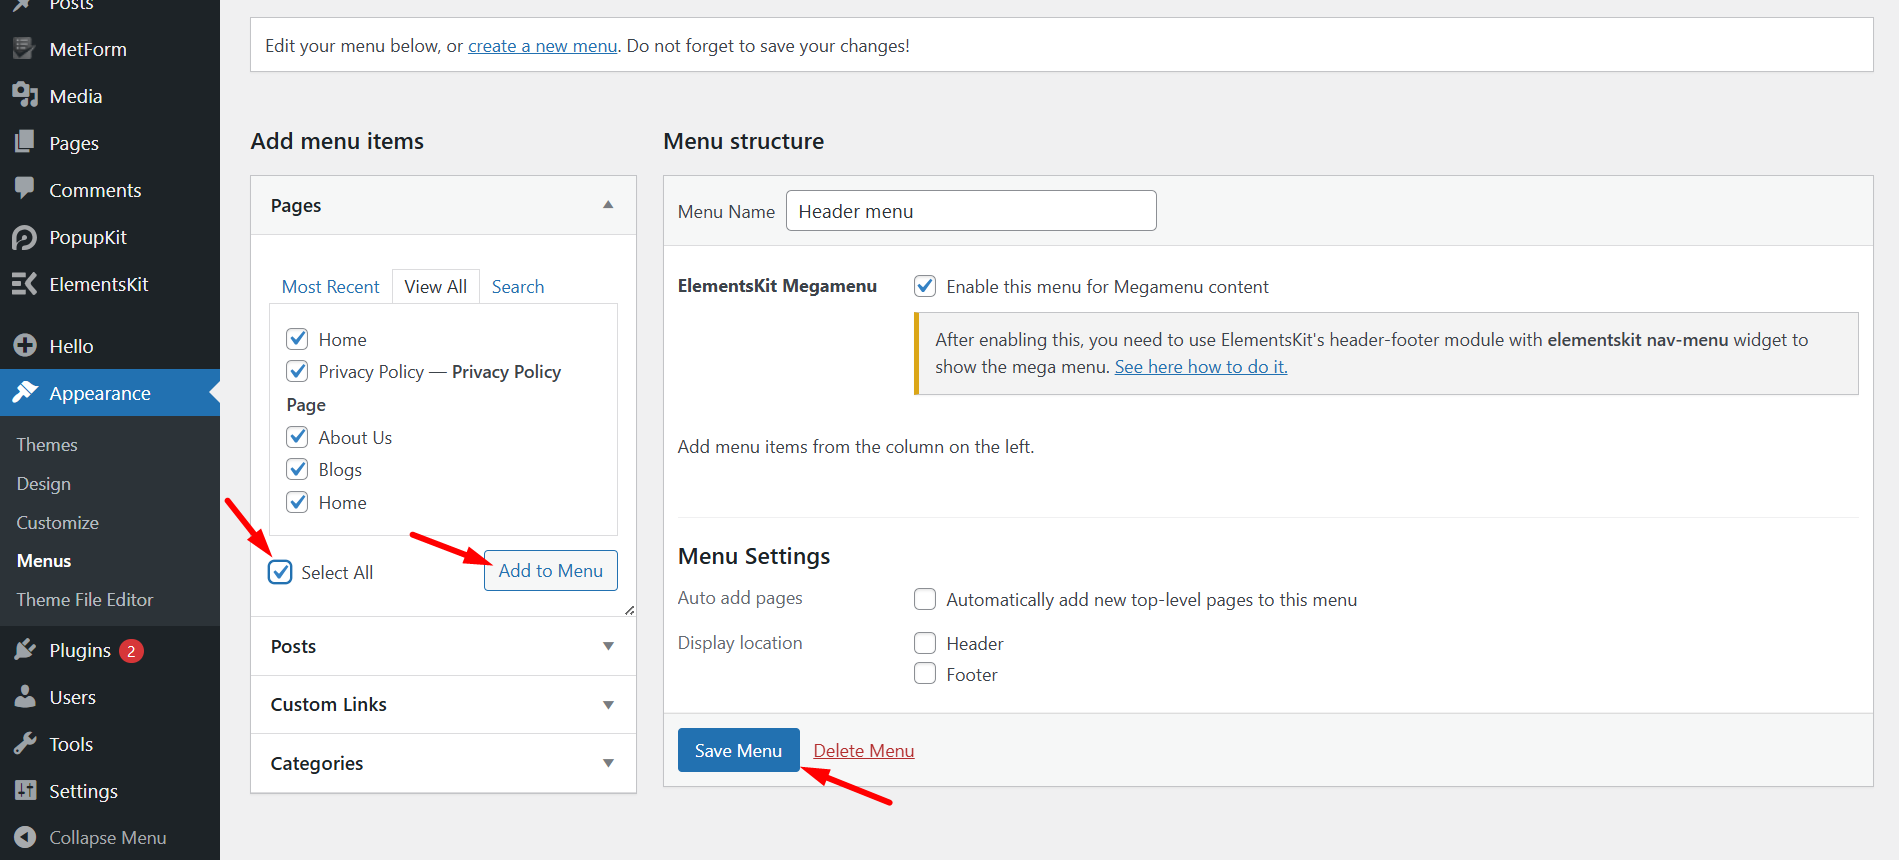
Add pages to the mega menu 변경 사항을 저장합니다.
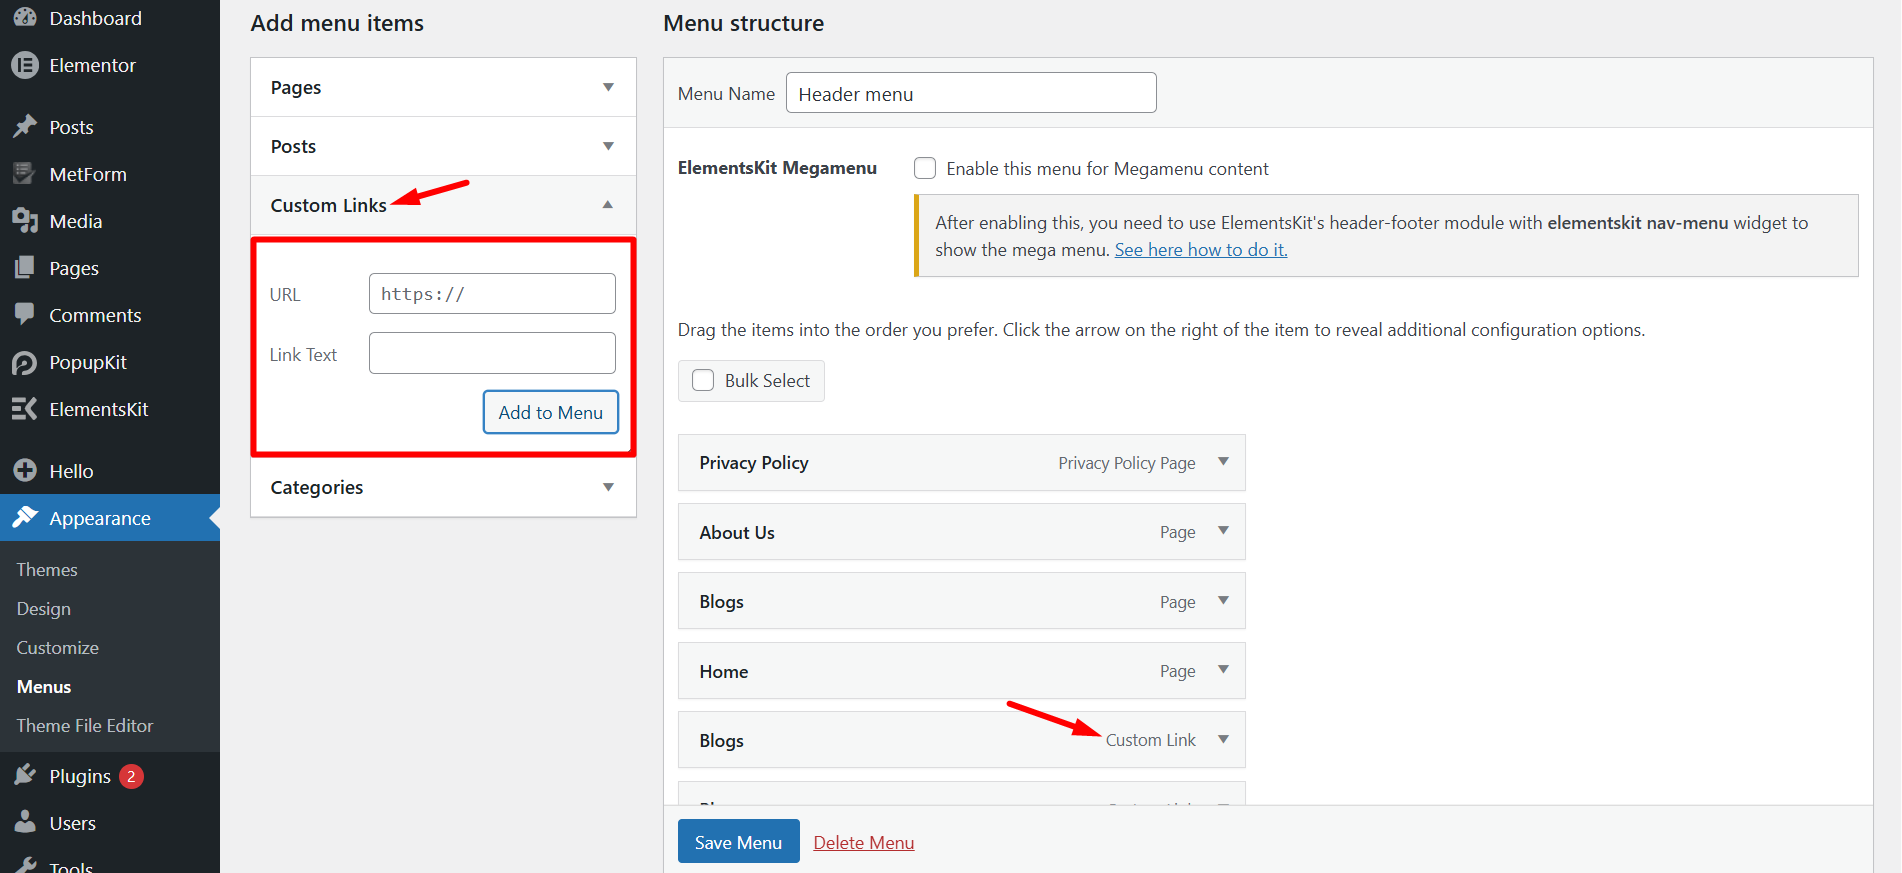
Now, you can 메가 메뉴에 항목 추가. 그에 대한,
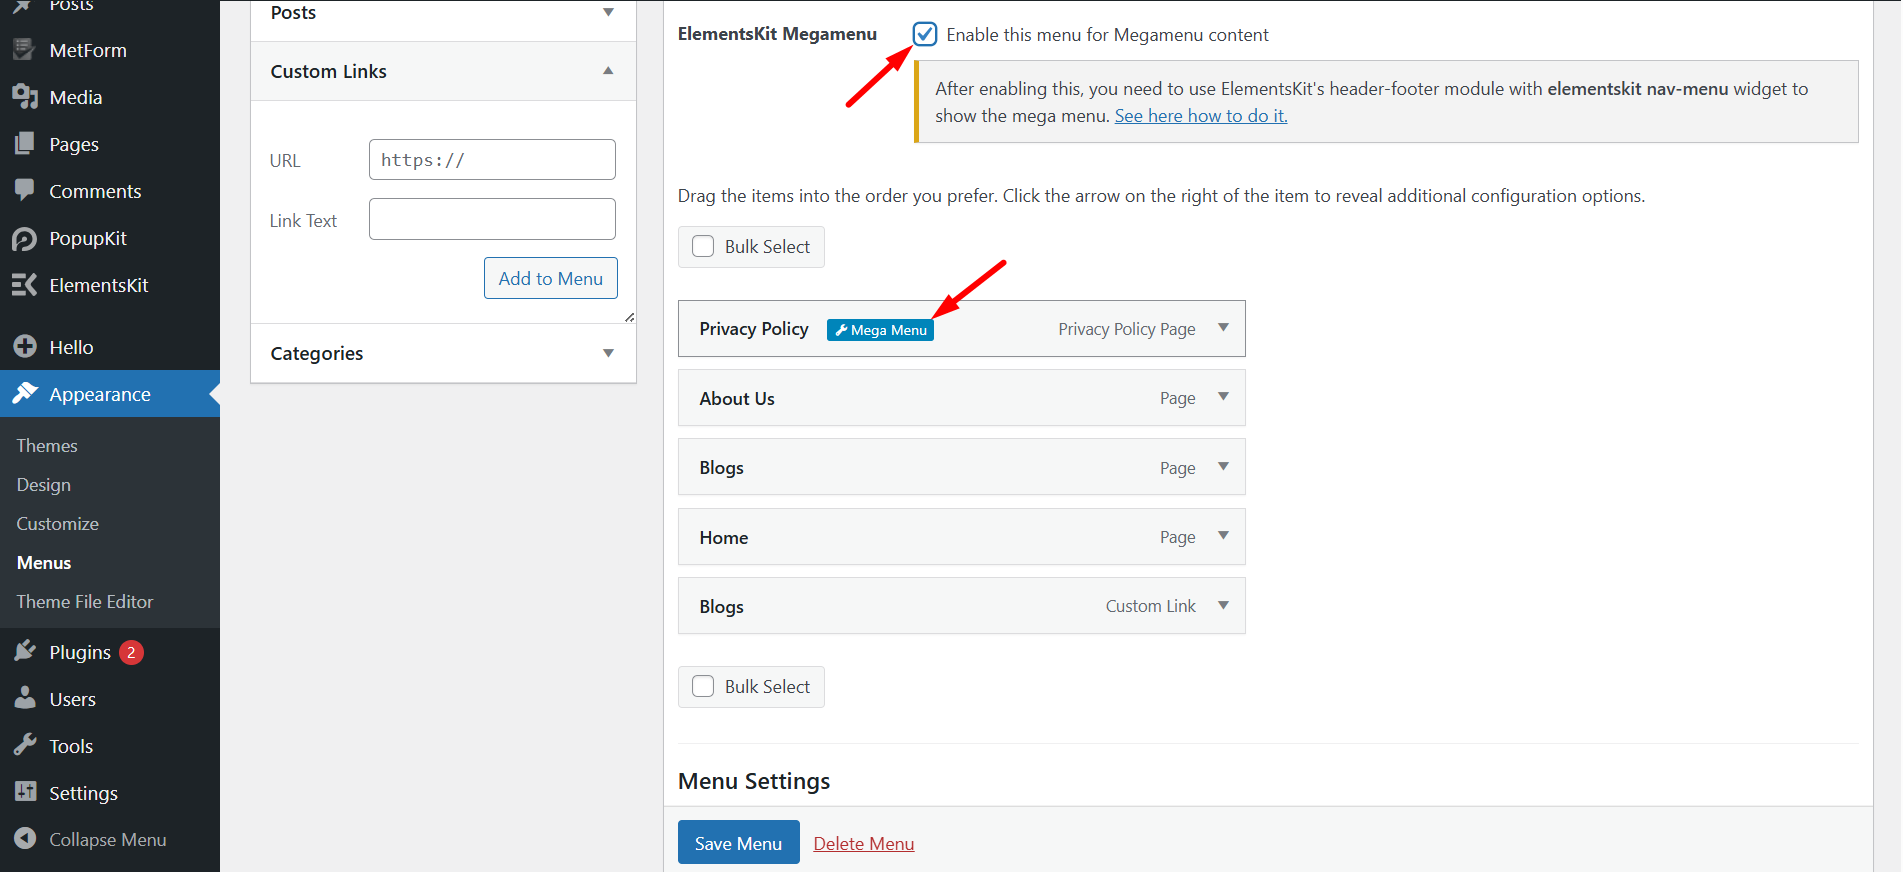
- 확장하다 맞춤 링크 on the “Add menu item” on the right column.
- 다음을 입력하세요. URL 그리고 링크 텍스트.
- 클릭 메뉴에 추가.
Then add other menu items in the same way with this WordPress menu customizer, ElementsKit.
이후, make sure you’ve checked the checkbox for “Megamenu 콘텐츠에 대해 이 메뉴를 활성화하세요”. When the mega menu is enabled, you will click the 메가 메뉴 설정 아이콘 메뉴 항목에 마우스를 올려 놓으면
1단계TP8T2: Elementor Megamenu 콘텐츠 사용자 지정 With ElementsKit #
메가 메뉴 설정 아이콘을 클릭하면 팝업이 열립니다. 팝업에서,
- 메가 메뉴를 활성화하려면 버튼을 토글하세요.
- 다음을 클릭하세요. 구하다 단추.
- 그 후에 클릭하세요 메가메뉴 콘텐츠 편집 버튼을 클릭합니다. Elementor 편집기 버튼으로 이동합니다.

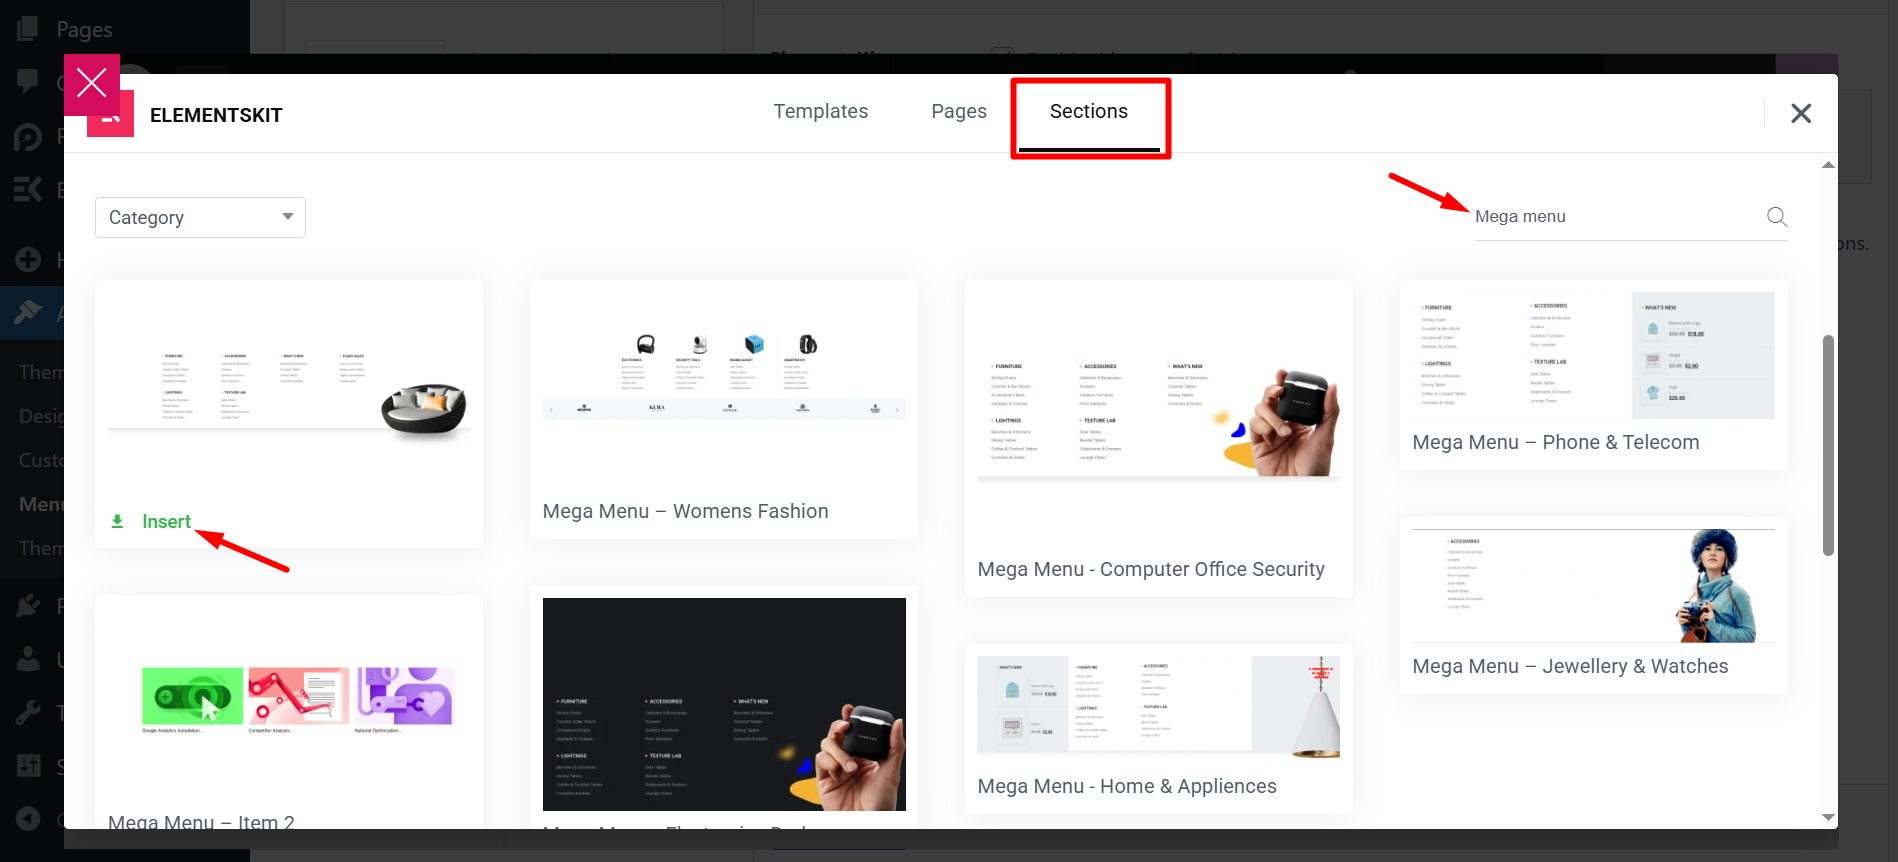
In the next step, a window will appear where you need to click on the ElementsKit 템플릿 라이브러리 아이콘.
- 섹션으로 이동
- Search mega menu
- 선택 메가메뉴 template from the list and insert
You’ll see that your inserted pre-designed mega menu template item will display. 내부 섹션 편집 점선 섹션을 클릭하면 됩니다.
컨테이너
Container Layout: Select the structural system, like Flexbox, to organize your elements.
Content Width: Choose between 전체 넓이 또는 박스형 for your horizontal boundaries.
너비: Set the specific horizontal percentage or pixel size.
Min Height: Set the minimum vertical space the container must fill.
Items Management
Wrap: Allow items to move to a new line when they run out of space.
방향: Stack items vertically in a column or horizontally in a row.
콘텐츠 정당화: Distribute items along the main axis, such as center or spaced out.
항목 정렬: Position items along the cross axis for consistent vertical or horizontal alignment.
Gaps: Define the exact pixel spacing between individual items.

스트레치 섹션 #
Toggle this button to turn the Elementor mega menu to full-width, which spans from right to left of the screen’s width.
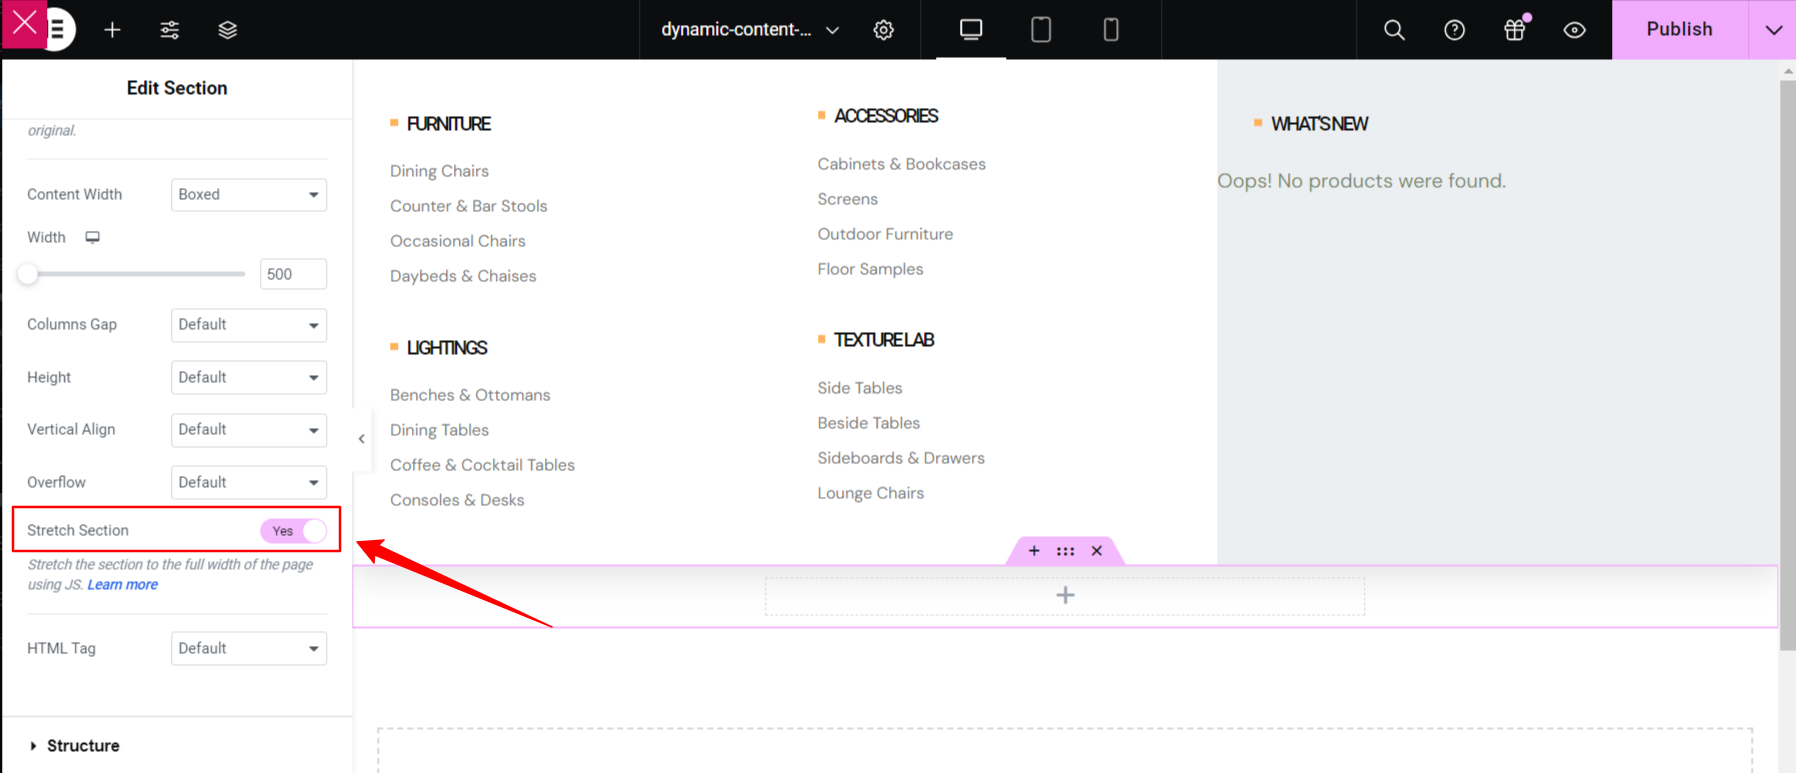
HTML 태그 선택 #
- 선택하세요 HTML 태그 ~에서 쓰러지 다 to create custom WP menu.
실제로 보고 싶다면이 영상을 시청하고 몇 분 안에 직접 해보세요.
메가 메뉴 제목 텍스트 사용자 정의 #
- 아이콘 유형 선택.
- 아이콘 추가 활성화.
- 헤더 아이콘 업로드.
- 제목 추가 또는 편집.
- 편집 설명 추가.
텍스트 사용자 정의 #
- 추가 또는 편집 텍스트.
- 추가 또는 편집 부제.
- 활성화 라벨 표시.
- 추가 또는 편집 상표.
- 사용자 정의 배경색, 타이포그래피, 패딩, 정렬, 반경.
- 완료되면 업데이트를 클릭하고 창을 닫습니다.
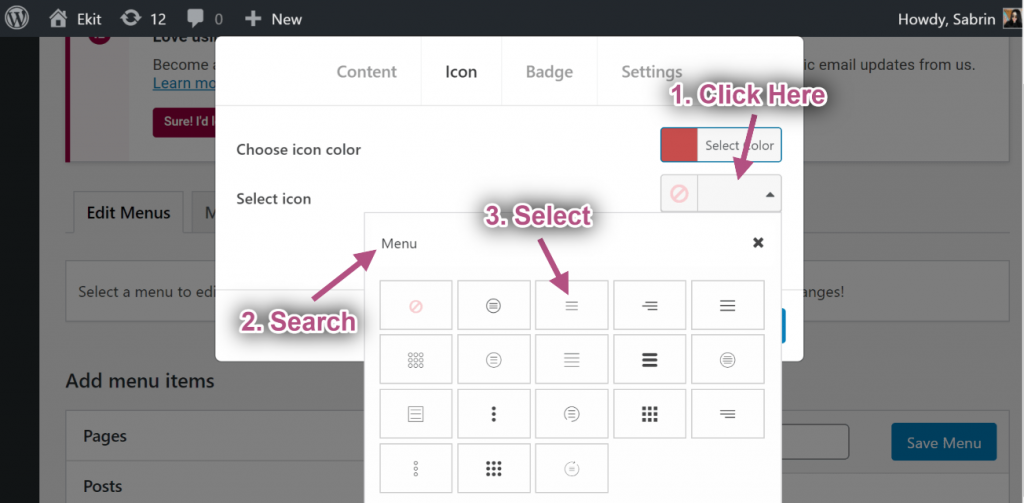
1단계TP8T3: 아이콘 사용자 지정 #
- 이제 다음으로 이동하세요. 아이콘 탭=> 다음에서 색상을 선택하세요. 색상 팔레트.
- 선택하다 상 ~로부터 아이콘 라이브러리.
1단계TP8T4: 배지 사용자 지정 #
- 텍스트 추가 또는 편집.
- 선택하다 배지 색상.
- 선택하다 배지 배경 색상.
- 딸깍 하는 소리 구하다.
1단계TP8T5: 설정 #
기본 너비 #
- 메가 메뉴 너비 선택: 기본.
- 메가 메뉴 위치 선택: 기본.
- 구하다 창문.
- 사이트 보기: 기본 위치와 기본 너비를 표시합니다.
기본 상대 #
- 메가 메뉴 너비 선택: 기본.
- 메가 메뉴 위치 선택: 상대적인.
- 딸깍 하는 소리 구하다.
- 사이트 보기: 상대 위치와 함께 기본 너비를 표시합니다.
기본 전체 너비 #
- 메가 메뉴 너비 선택: 전체 넓이.
- 메가 메뉴 위치 선택: 기본.
- 딸깍 하는 소리 구하다.
- 사이트 보기: 기본 위치로 전체 너비를 표시합니다.
전체 폭 상대 위치 #
- 메가 메뉴 너비 선택: 전체 넓이.
- 메가 메뉴 위치 선택: 상대적인.
- 딸깍 하는 소리 구하다.
- 사이트 보기: 표시 상대 위치가 포함된 전체 너비.
사용자 정의 기본 너비 #
- 메가 메뉴 너비 선택: 사용자 정의 너비.
- 사용자 정의 너비를 제공하지만 기본적으로는 750px.
- 메가 메뉴 위치 선택: 기본.
- 딸깍 하는 소리 구하다.
- 사이트 보기: 표시 기본 위치의 사용자 정의 너비.
사용자 정의 기본 너비 상대적인 #
- 메가 메뉴 너비 선택: 사용자 정의 너비.
- 사용자 정의 너비를 제공하지만 기본적으로는 750px.
- 메가 메뉴 위치 선택: 상대적인.
- 딸깍 하는 소리 구하다.
- 사이트 보기: 표시 상대 위치에 따른 사용자 정의 너비.
#6 단계: 헤더 템플릿 만들기 #
여기에서 다음을 사용할 수 있습니다. 요소 헤더 템플릿 또는 당신은 사용할 수 있습니다 ElementsKit 헤더 템플릿. 추가해 보도록 하죠.
- 로 이동 ElementsKit→ 헤더 푸터→ 그리고 클릭 새로운 걸 더하다.
- 옵션이 포함된 팝업 상자가 열립니다.
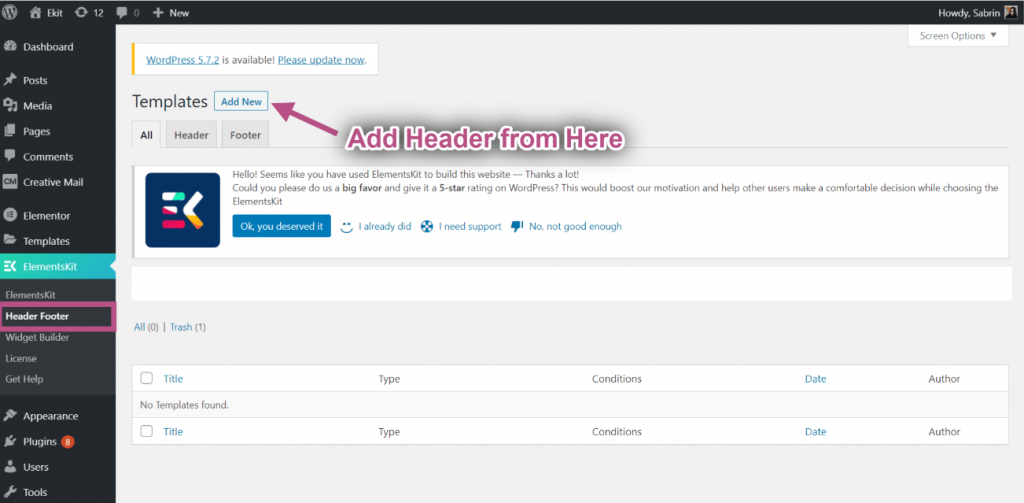
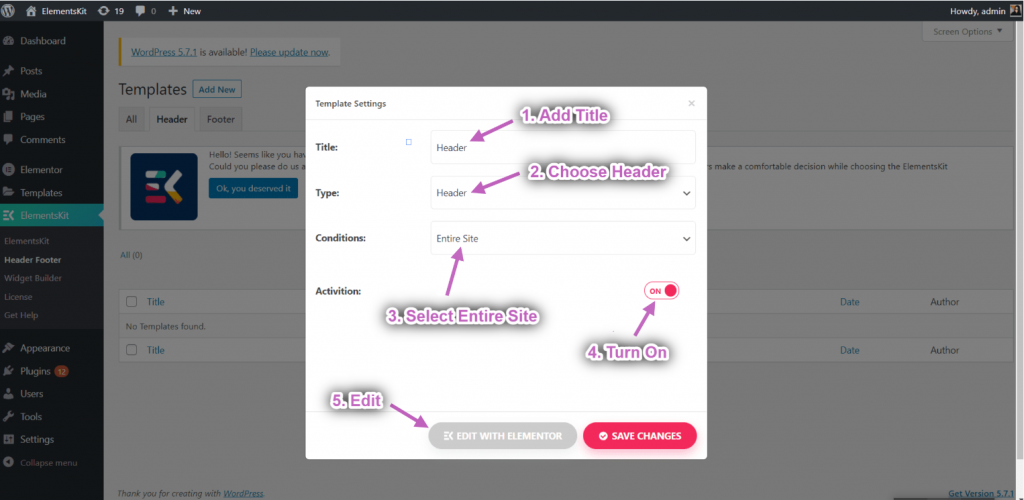
- 팝업 상자에 다음을 입력하세요. 제목, 선택하세요 유형→ 머리글.
- 선택 조건→ 전체 사이트.
- 토글 활성화 옵션을 클릭하고 Elementor로 편집.
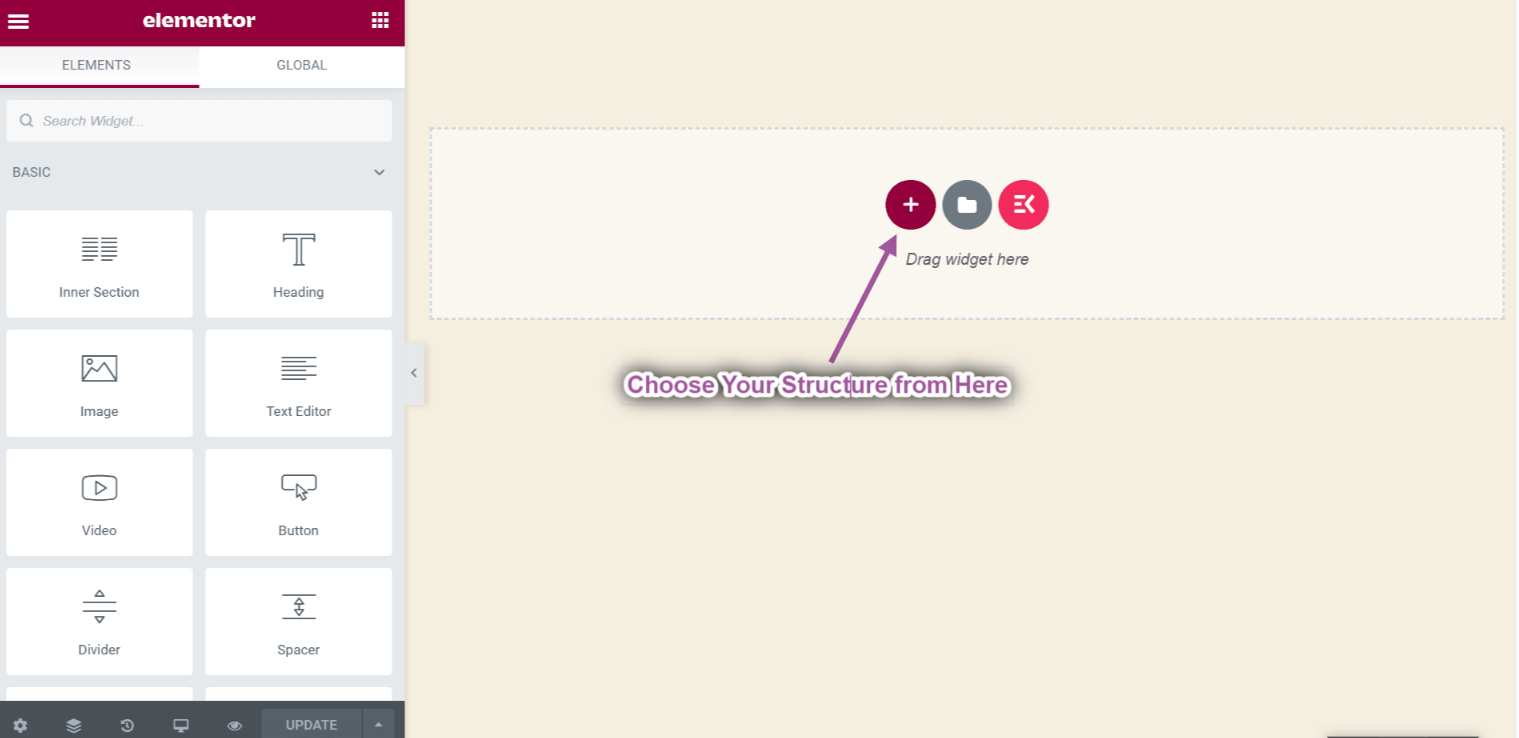
- 선택하세요 구조 선택한 지역에서.
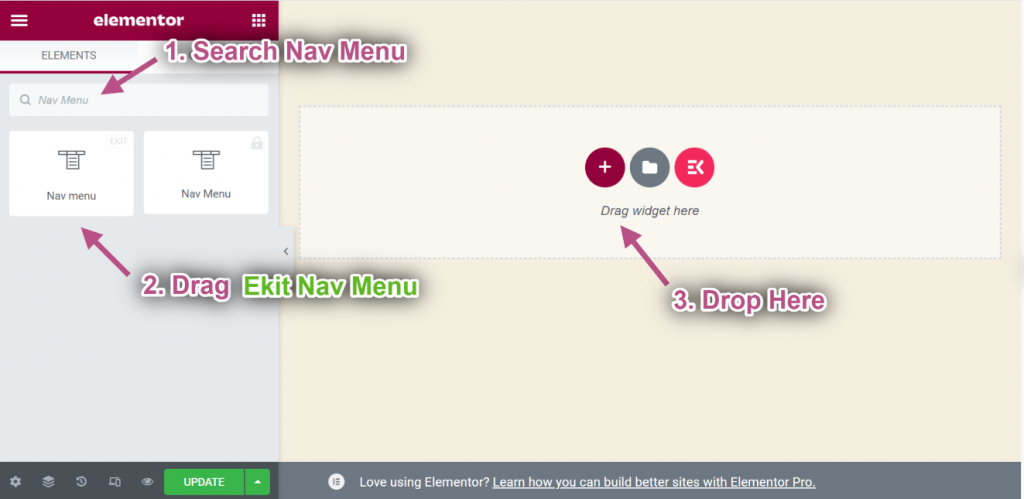
- 지금 검색 탐색 메뉴=> 드래그 에킷 내비 메뉴 그리고 떨어지다 선택한 영역에.
** 참고: ElementsKit Nav 메뉴를 드래그해야 합니다. 그렇지 않으면 생성한 Megmenu가 나타나지 않습니다.
- 이제 다음으로 이동하세요. 메뉴 설정=> 생성된 항목을 선택하세요. 헤더 메뉴 드롭다운에서
- 여기에서 모든 유형의 위젯을 추가하여 헤더 템플릿을 사용자 정의할 수 있습니다.
최종 출력 #
완료되면 업데이트 button to save the menu created with the best mega menu plugin for Elementor.
이제 귀하의 사이트로 이동하면 선택한 Elementor Mega 메뉴가 해당 사이트에 표시되는 것을 볼 수 있습니다.
Quick Recap
So overall, what we’ve done throughout this WordPress mega menu tutorial is:
Tools Used: Elementor & ElementsKit 요소 애드온
✅ Install and activate a mega menu plugin, in our case, it’s the ElementsKit 메가 메뉴 plugin for WordPress.
✅ Then, navigate to Appearance> Menu and configure our site’s menu.
✅ After setting all dropdown menu items, click the 메가 메뉴 button to start creating an Elementor mega menu with ElementsKit.
✅ 활성화 메가 메뉴 toggle button and hit the 메가메뉴 콘텐츠 편집 옵션.
✅ You’ll get the Elementor visual interface as your mega menu builder, with drag-and-drop controls to design it effortlessly.
✅ Insert a mega menu template or use Elementor widgets to build from scratch.
✅ In the ElementsKit mega menu editor, you can add rows, columns, and content to your submenus.
✅ Customize background, heading, layout, icon, badge, and other content elements without writing any code.
✅ Lastly, see the preview and make it live. And, with ElementsKit, you can apply conditions for header navigation.
So, this was the easiest way to build Elementor mega menu in your WordPress website.


