


첫 번째 웹사이트를 만드는 것은 다소 어렵게 느껴질 수 있습니다. 특히 기술에 정통한 사람이 아닌 경우에는 더욱 그렇습니다.
글쎄요, 당신은 혼자가 아니니 걱정하지 마세요!
여기 우리가 만들었어요 처음부터 WordPress 웹사이트를 구축하는 방법에 대한 가장 자세한 단계별 튜토리얼 코딩하는 방법을 모르면서.
우리는 이 튜토리얼이 첫 번째 웹사이트를 만드는 여러 사람들에게 큰 도움이 될 것이라고 진심으로 믿습니다!
다음은 이 과정에서 수행하게 될 모든 단계에 대한 요약입니다., 처음부터 끝까지:
- 무료로 도메인 이름 찾기 및 등록
- 무료 호스팅 제공업체 이용
- 워드프레스를 설치하는 방법
- 템플릿 설치 및 웹 사이트 모양 수정
- 확장 기능과 애드온을 사용하여 WordPress 개인화하기
- WordPress를 이해하고 사용하는 데 도움이 되는 리소스
시작하려면 개인화된 웹사이트는 웹 개발자가 될 것을 요구하지 않습니다. 기술적인 내용이 아닌 사용자 가이드에서는 코드 없이 WordPress 웹 사이트를 구축하는 방법을 보여줍니다.
❗❗ WordPress가 인터넷의 유일한 CMS 플랫폼인지 궁금하실 겁니다.
대답은 '아니오'입니다!
인터넷에는 여러 가지 CMS(콘텐츠 관리 플랫폼)가 있지만 그중에서도 WordPress가 최고로 눈에 띕니다 물론 세계에서 가장 인기 있는 CMS이기도 합니다.
How to build a WordPress website for free
Learning how to build a WordPress website from scratch empowers you to create a fully customized, scalable online presence without writing complex code. Whether you are launching a simple blog or a high-end, conversion-driven marketing platform, mastering 워드프레스 gives you complete ownership and control over your digital assets.
Core steps to build a free WordPress website:
✅ Secure Domain & Hosting: Purchase a memorable domain name and a reliable web hosting plan to store your site’s files and database.
✅ Install the Core Software: Most modern hosting providers offer a seamless, one-click installation process to get WordPress running instantly.
✅ Select a Foundation: Choose a lightweight, native-first theme to ensure optimal performance, fast loading speeds, and a clean structural foundation.
✅ Design and Expand: To truly WordPress 웹사이트 구축 that stands out, install advanced site-building tools like the Gutenberg Block Editor (using add-ons like GutenKit) or Elementor (using ElementsKit).
예를 들어, imagine you are launching a new SaaS product and need to figure out how to build a WordPress website that functions as a highly optimized Answer Engine for your customers. By starting with a clean WordPress installation, applying a flexible block-based toolkit, and structuring your landing pages with clear, declarative answers and organized layouts, you create an environment that both users and AI crawlers can effortlessly navigate and extract value from.
Ultimately, understanding how to build a WordPress website is about much more than just getting pages online; it is about utilizing the right ecosystem of plugins and native tools to construct a fast, visually stunning, and highly functional digital experience that drives real results.
🙄 WordPress 사이트를 만들려면 무엇이 필요합니까?
WordPress 사이트를 시작하려면 다음 3가지 요구 사항을 충족해야 합니다.
- 도메인 이름(예: google.com)은 웹사이트의 주소입니다.
- 귀하의 웹사이트 파일이 보관될 호스팅 제공업체입니다.
- 약 60분 동안 완전한 주의를 기울이십시오.
이제 시작해보자! ✨
하지만 먼저 간단한 소개부터 살펴보겠습니다.
🧐 여안녕 워드프레스?
워드프레스는 근본적으로 웹사이트를 시작하는 가장 간단하고 선호되는 방법입니다. 또는 블로그. 실제로 WordPress는 여러 곳에서 사용됩니다. 42% of websites on the Internet. Yes, WordPress is probably used by more than a half of the websites you visit.
좀 더 기술적으로 말하자면, WordPress는 GPLv2 라이선스를 받은 오픈 소스 콘텐츠 관리 시스템입니다., 누구나 무료로 WordPress 소프트웨어를 사용하거나 수정할 수 있습니다. ㅏ 콘텐츠 관리 시스템은 본질적으로 웹사이트의 중요한 요소를 간단하게 관리할 수 있게 해주는 도구입니다.프로그래밍 지식이 없어도 콘텐츠 등을 사용할 수 있습니다.
결과적으로 WordPress를 사용하면 프로그래머가 아닌 사람도 누구나 웹사이트를 만들 수 있습니다.
WordPress has two versions such as WordPress.org (Free) & WordPress.com (Pro). Which one you will choose completely depends on your needs. For Example, if you want full access or control use WordPress.org and if you want to stick with the premium one use WordPress.com.
Here is a brief comparison:
| 특징 | WordPress.org | WordPress.com |
|---|---|---|
| 호스팅 | You choose | Included |
| Plugin access | Full control | Depends on plan |
| 테마 | Full control | Depends on plan |
| 유지 | You manage | More managed |
| 맞춤화 | 높은 | Plan-dependent |
| 가장 좋습니다 | Businesses, blogs, stores, full control | Beginners wanting managed hosting |
⭐ Step-by-step: How to create a WordPress website from scratch
Here is the step by step process on how to build a wordpress website from scratch in just seven simple steps!
⚡ #1단계: 도메인 및 호스팅 계획 설정
웹사이트를 구축하는 것은 집을 짓는 것과 거의 같습니다 🏠
당신은 땅을 가지고 있습니다 호스팅 제공업체에는 파일을 보관하고 저장할 수 있는 여러 서버가 있습니다. 다음으로 사람들이 귀하를 찾을 수 있는 주소가 있습니다. 도메인 이름.
Please try to follow the advice listed below while selecting a domain name for your website:
- 기억하고 선언하기 쉽게 유지하세요.
- 이름은 최소한으로 구체적으로 유지하세요(예를 들어 www.wpmet.com)
- 하이픈이나 숫자가 없는지 확인하세요.
다음은 상위 3개 호스팅 제공업체 다음 중에서 선택할 수 있습니다.
이제 우리는 당신이 선택할 것을 제안하고 싶습니다 블루호스트 귀하의 호스팅 공급자로서!
그 이유는 간단합니다. 왜냐하면:
✅ 확고한 호스팅 회사입니다.
✅ 훌륭한 고객 지원을 받고 있습니다
✅ WordPress.org 조직의 공식 추천자
✅ 70% 할인 및 무료 도메인 받기
계속해서 시작하려면 아래 파란색 버튼을 클릭하세요.
그리고 당신은 아래와 같은 Bluehost의 착륙을 견뎌낼 것입니다. 이제 파란색 버튼을 다시 클릭하기만 하면 됩니다. 시작하기.
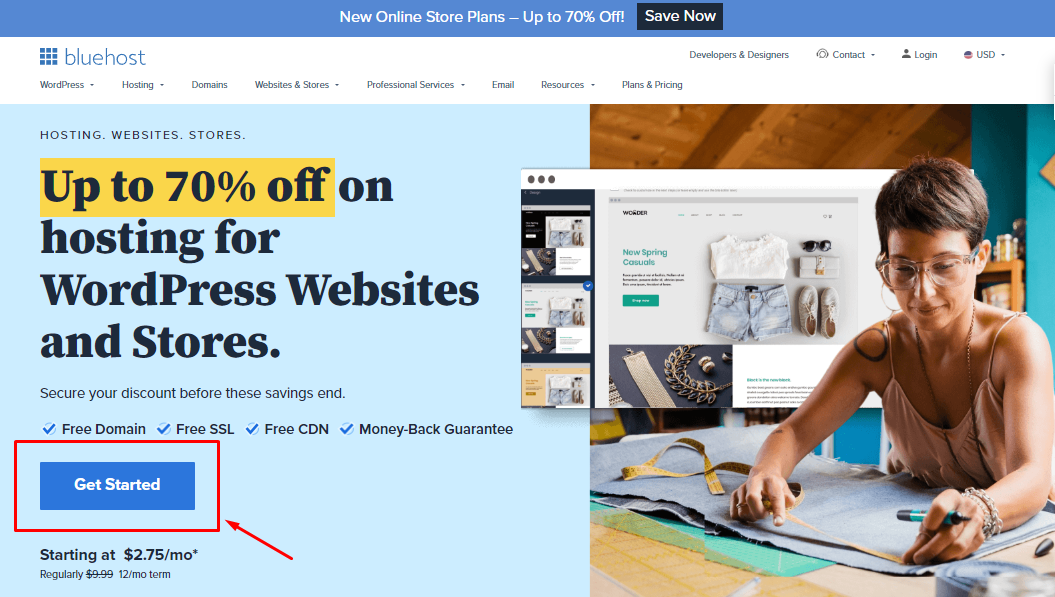
그것은 당신을 데려 갈 것입니다 계획을 선택하세요 페이지에서 아래 이미지처럼
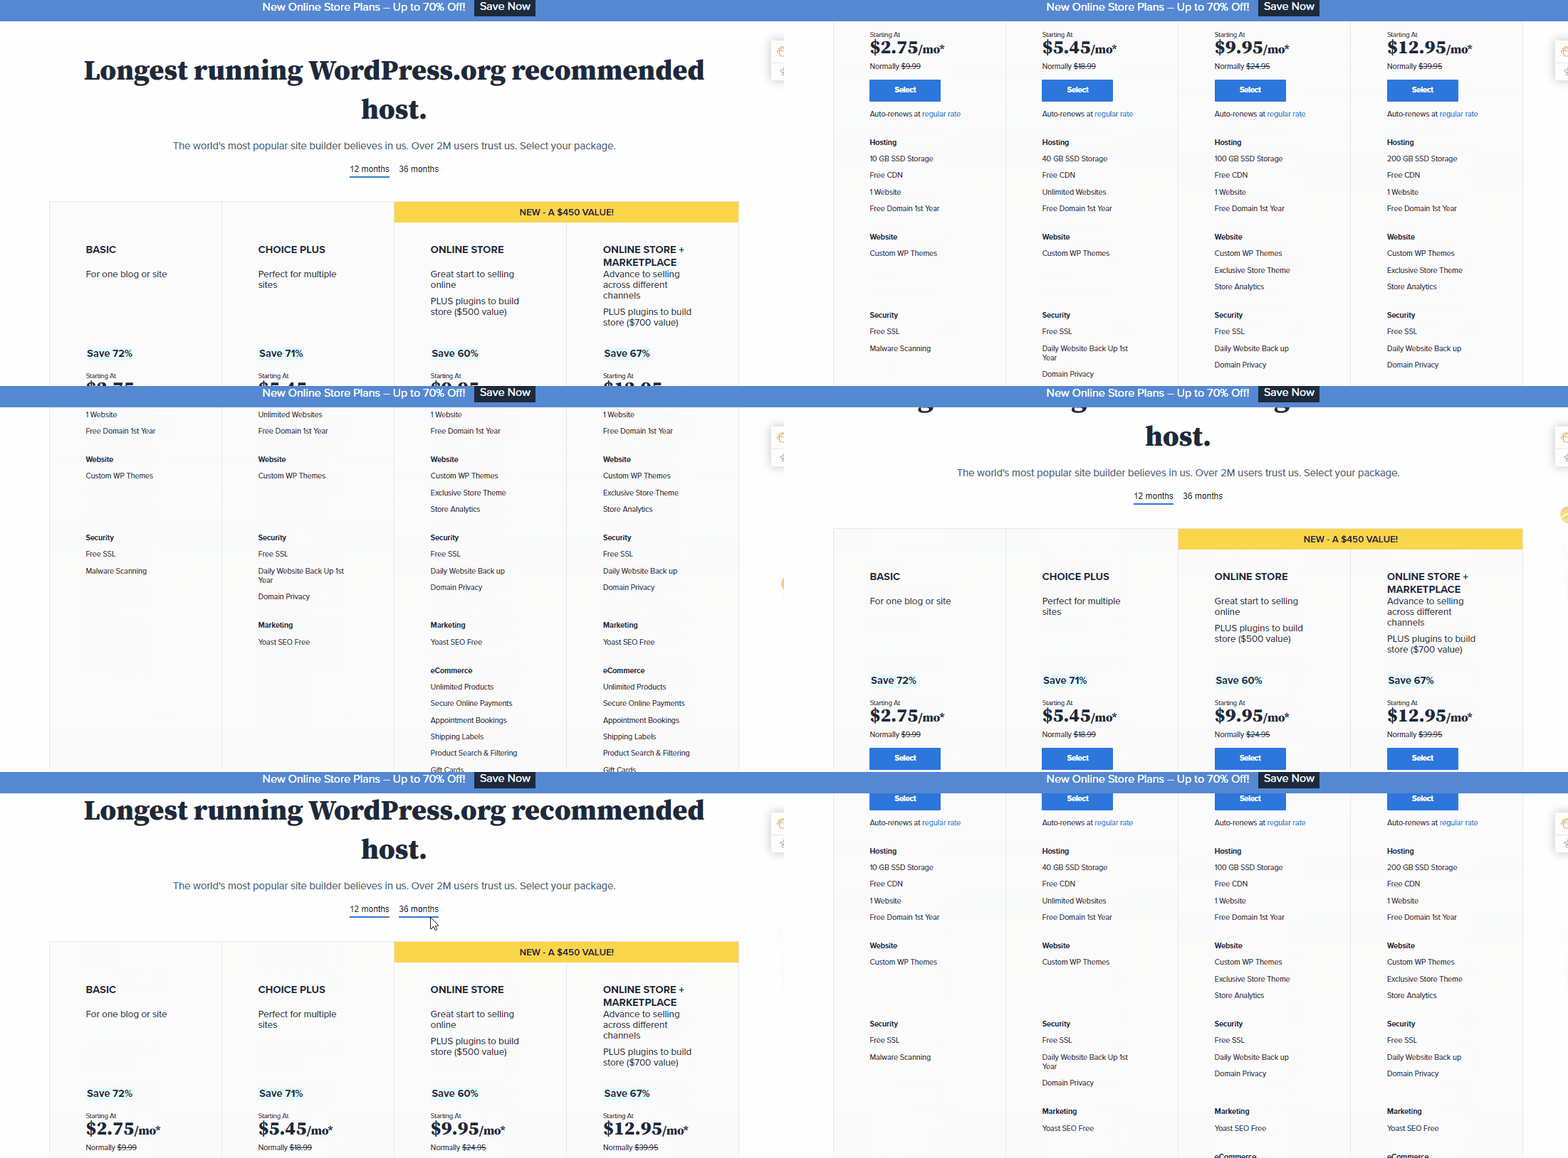
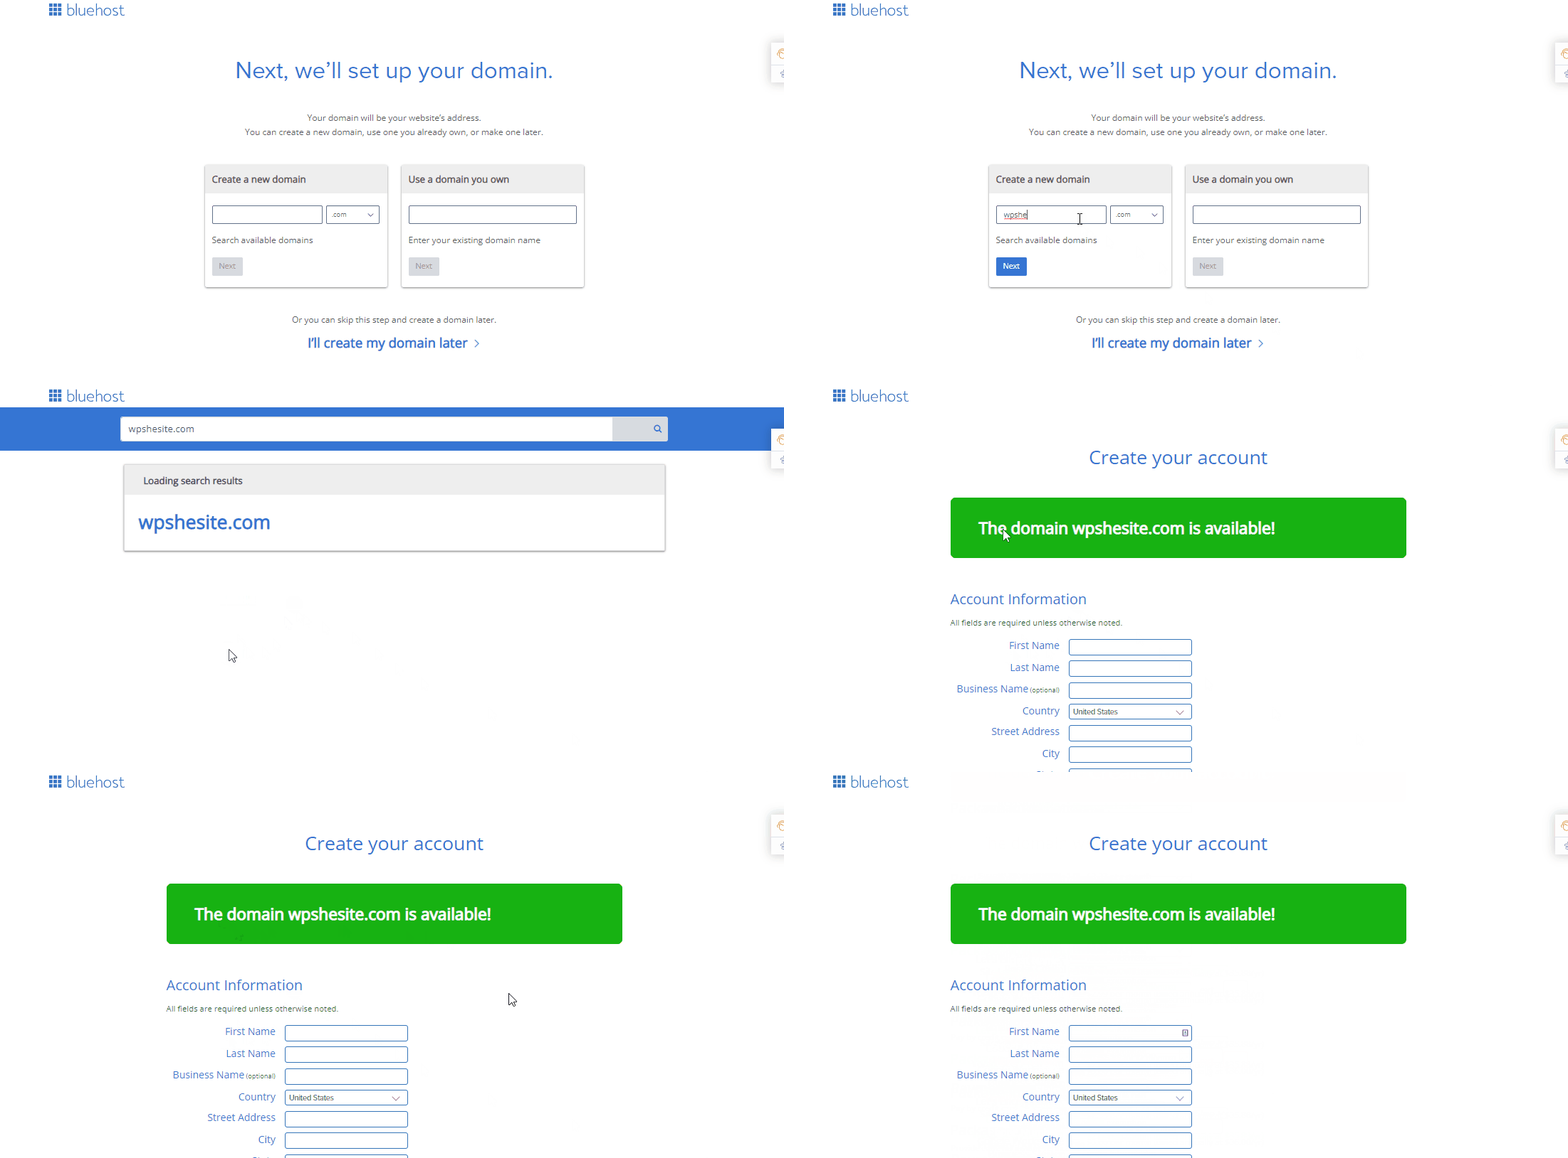
원하는 설정을 선택한 후 다음으로 가입하세요. create a new domain 원하는 이름을 입력하고(무료로 제공되므로) 클릭하세요. 다음. 그리고 도메인이 사용 가능한지 확인해보세요!
도메인 사용 가능이라는 녹색 메시지가 나타나면 여기에서 도메인 정보를 입력해야 합니다. 계정 정보.
아래에서 귀하의 정보를 확인할 수 있습니다. 패키지 정보, 우리는 당신에게 제안할 것입니다 선택 해제 그만큼 도메인 개인정보 보호 + 보호. We normally just turn that off.
그리고 다음과 같은 것들은 코드가드 베이직 그리고 사이트 잠금 보안 WordPress에는 사용할 수 있는 플러그인과 기능이 많이 있으므로 그것들도 필요하지 않습니다!
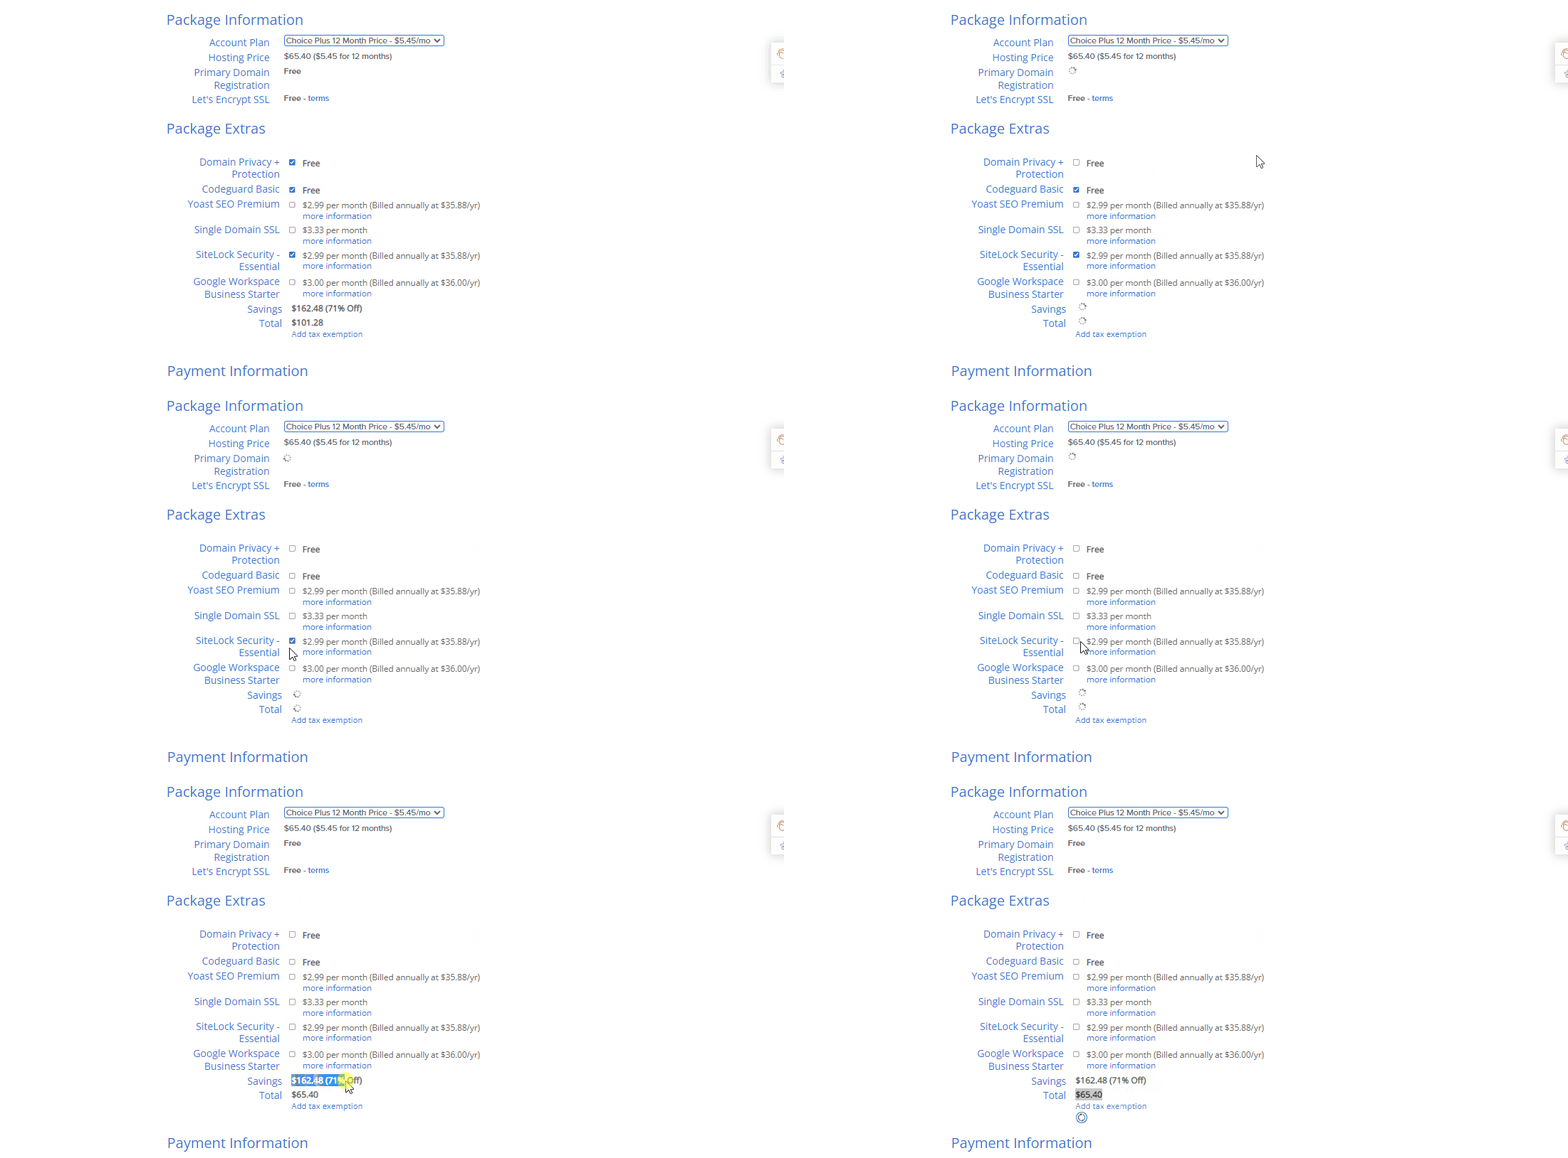
Once you configure all the information you’ll see the amount is been discounted. Then, fill in your 결제 정보, 제출하다 버튼을 누르면 호스팅 계정이 완성되었습니다!
가입 후 화면에 축하 메시지가 표시됩니다. 그런 다음 클릭하세요. 비밀번호 만들기 단추. 이 비밀번호는 귀하의 호스팅 계정을 관리하는 데 사용됩니다.
⚡ #2단계: WordPress에 오신 것을 환영합니다!
Bluehost의 가장 큰 장점 중 하나는 이제 WordPress를 더욱 쉽게 설정할 수 있다는 것입니다. 만약 너라면 건너뛰다 테마 선택 부분(아래에서 살펴보겠습니다)을 클릭하면 WordPress가 자동으로 설정되어 있는 것을 볼 수 있습니다.
모든 것이 설정되면 다음을 클릭하십시오. 건축 시작 버튼을 누르세요. 그러면 WordPress 계정의 백엔드로 이동하게 됩니다.
WordPress에 오신 것을 환영합니다 🎉

계속해서 다음 중 하나를 선택해 보겠습니다. 주제 다음 단계에서 귀하의 웹사이트를 확인하세요.
⚡ #3단계: 완벽한 테마 선택
A WordPress theme is in charge of your WordPress site’s visual design, that should complement your brand logo. You can download/purchase themes from Envato and ThemeForest too.
WordPress 테마는 전문적으로 제작되었으며 단 한 번의 클릭으로 설치할 수 있는 템플릿입니다.
먼저 마우스를 올려보세요. 모습 그리고를 클릭하세요 테마.

여기에는 사전 설치된 몇 가지 테마가 있습니다. 하지만 왼쪽 상단의 새로 추가 버튼을 클릭하면. 선택할 수 있는 수많은 테마가 표시됩니다.
🤔 WordPress 무료 테마를 설치하는 방법은 무엇입니까?
간단합니다. 원하는 테마에 커서를 놓으면 두 개의 버튼이 표시됩니다. 설치하다 그리고 시사. 우리는 당신이 확인하는 것이 좋습니다 시사 먼저 디자인이 만족스러우면 다음을 클릭하세요. 설치하다 이제 모든 준비가 완료되었습니다!

또는 이미 가지고 있는 경우 무료 또는 유료 테마 PC에서 다운로드하고, 클릭하여 업로드하세요. 테마 업로드 버튼을 누른 다음 파일을 선택하고 업로드하세요.

이제 웹 사이트 품질을 향상시키고 사이트를 더 빠르게 만드는 데 도움이 되는 몇 가지 매력적인 WordPress 추가 기능을 추가할 차례입니다.
⚡ #4단계: 기본 WordPress 사용자 정의 페이지
새 테마를 추가한 후 새 WordPress 웹사이트와 함께 제공되는 기본 웹페이지를 살펴봐야 할 수도 있습니다. 그러나 언제든지 해당 페이지를 사용자 정의하고 편집할 수 있습니다!
그냥 네 집으로 가 WordPress 대시보드 그리고 그 위로 마우스를 가져가세요 모습 > 선택 사용자 정의.
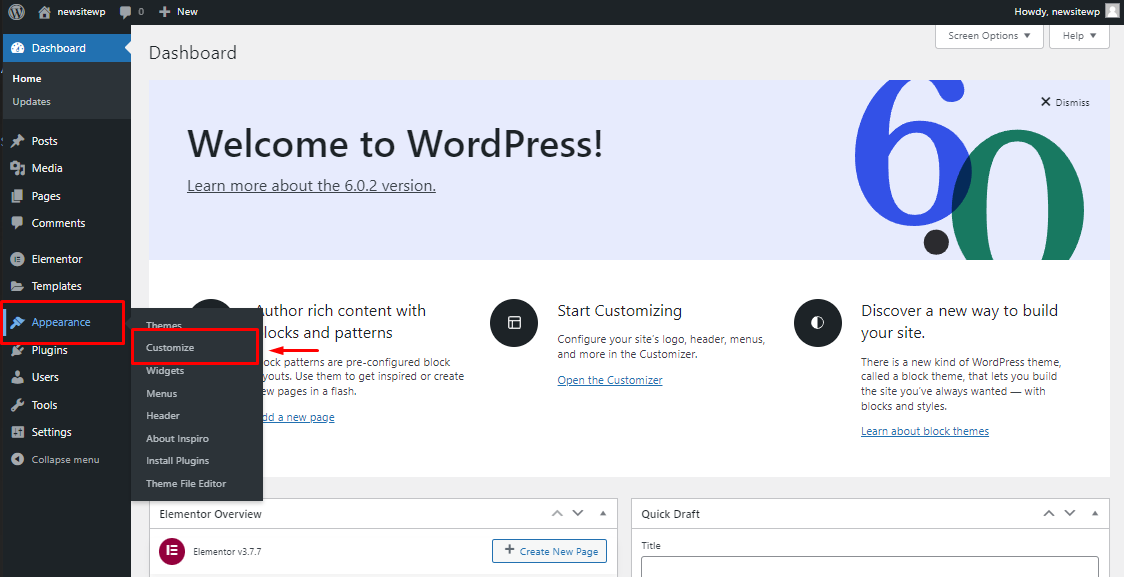
Then it will take you to your default WordPress website pages, where you can customize and overlook any aspects of your website. By clicking on the Pencil icon blue circle, you will be able to edit content.
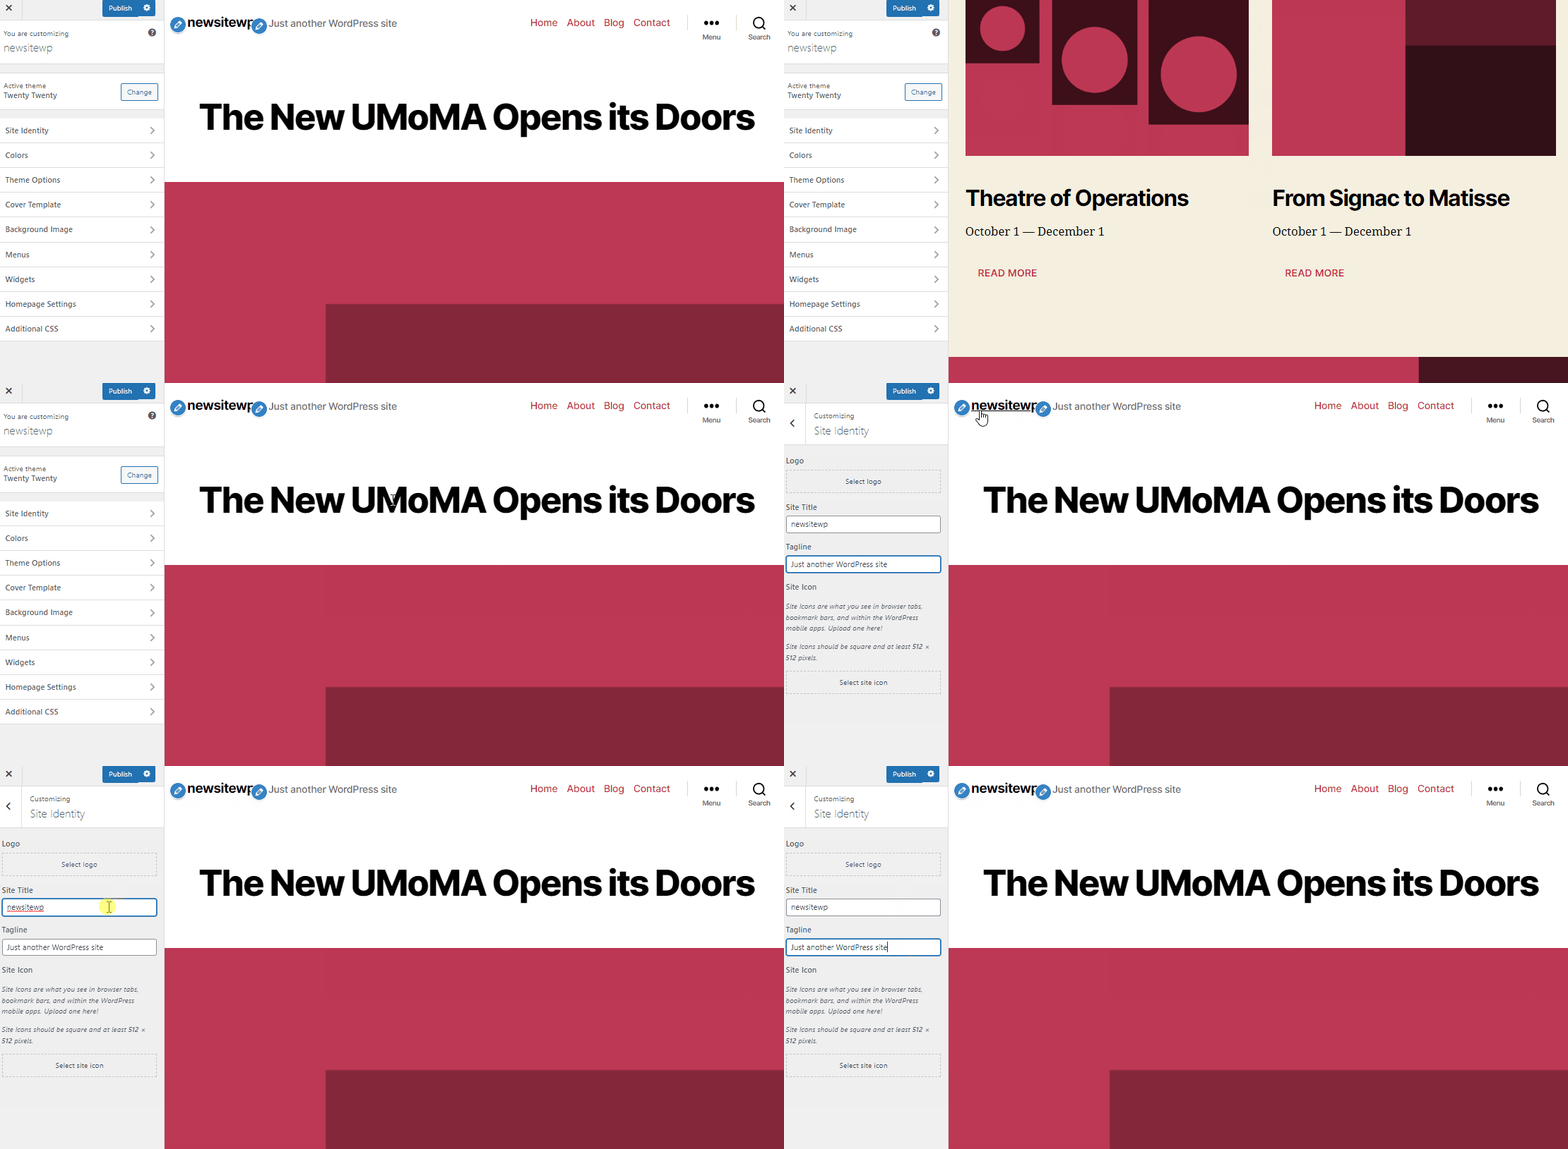
이제 WordPress 버전이 얼마나 발전했는지 놀라게 될 것입니다!
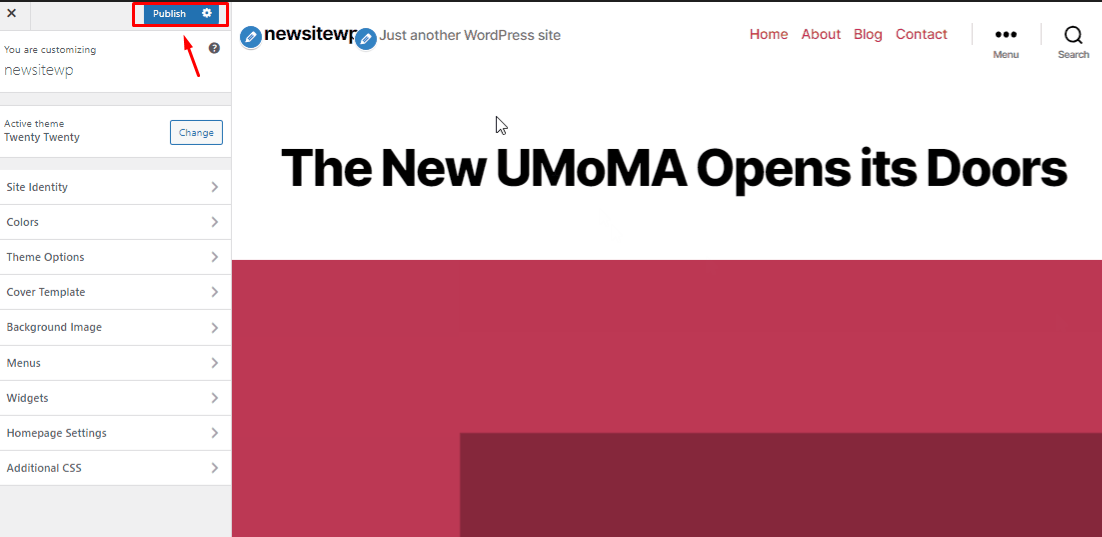
테마와 통합된 일련의 페이지를 찾을 수 있으며, 해야 할 일은 게시 버튼을 클릭하여 사이트의 해당 페이지를 업데이트하세요.
🧐 나중에 웹사이트 페이지를 편집할 수 있나요?
물론, 언제든지 사이트의 모든 페이지를 원하는 대로 추가, 편집 및 사용자 정의할 수 있습니다.
이에 대해서는 아래에서 살펴보겠습니다!
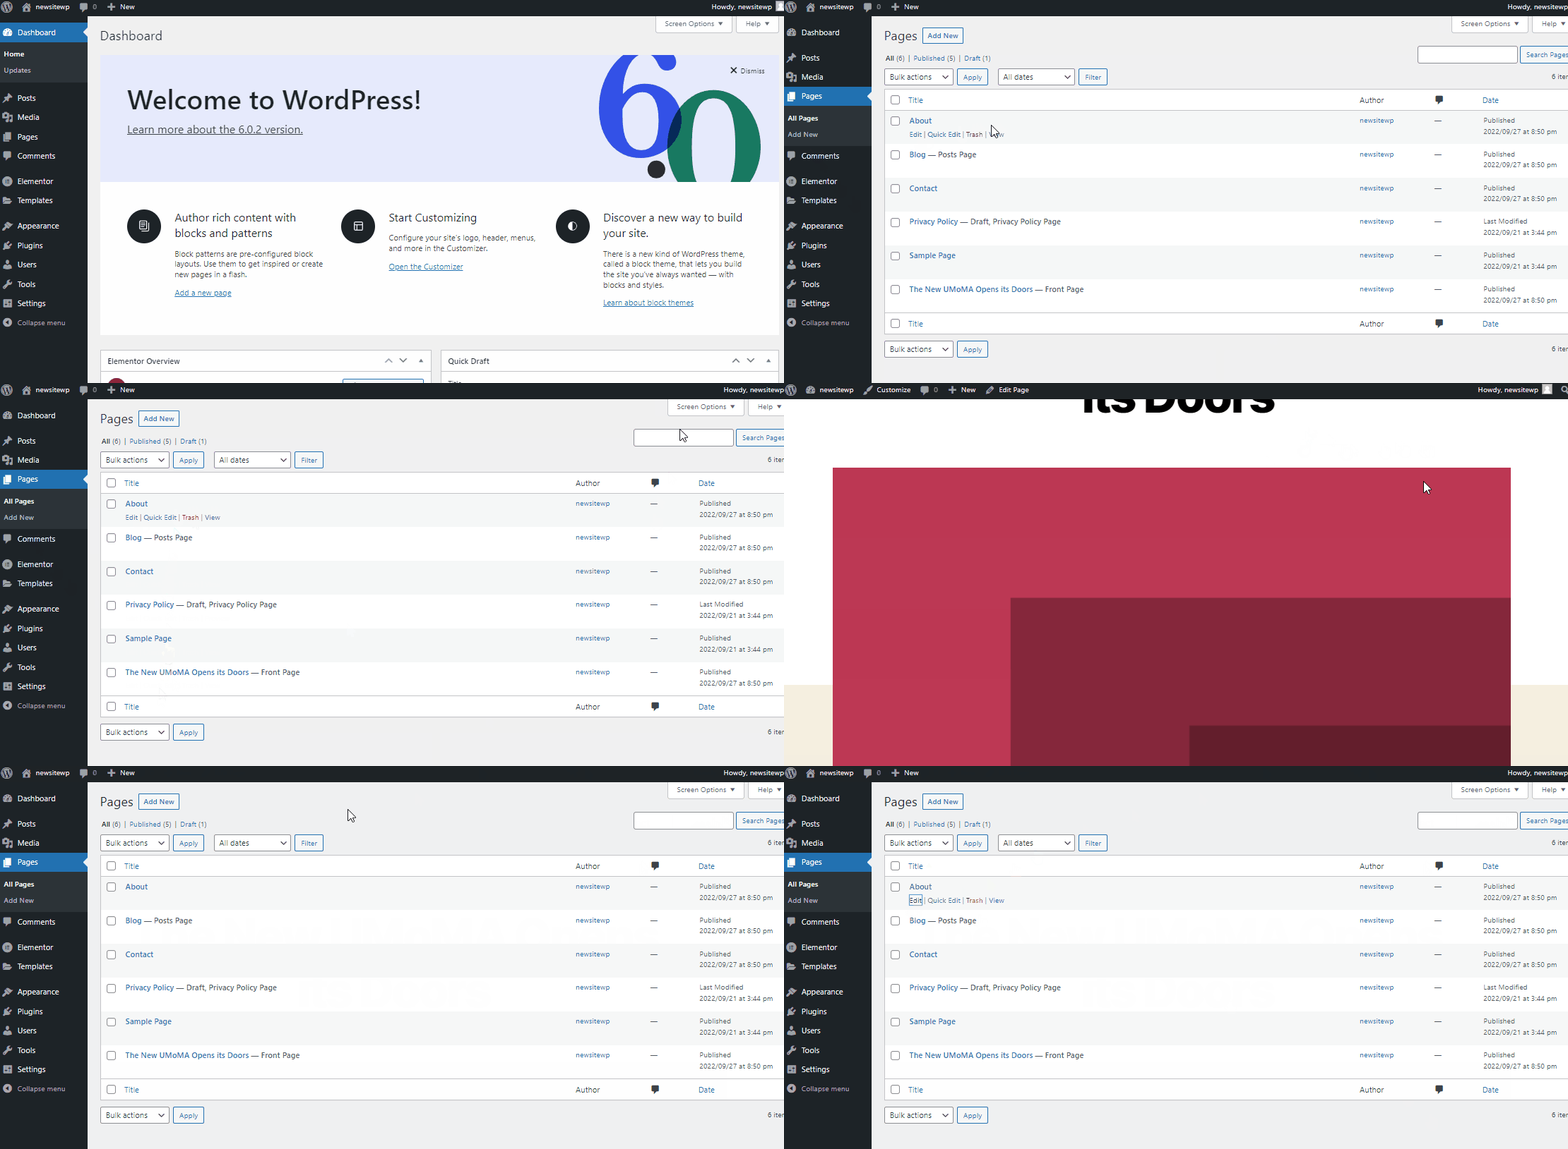
이제 페이지가 추가되었으므로 해당 페이지를 개별적으로 편집할 차례입니다. 그러기 위해서는 당신의 원래 상태로 돌아가야 합니다. WP 관리자 계기반 그리고 그 위로 마우스를 가져가세요 페이지 > 모든 페이지.
모든 페이지가 별도로 표시됩니다. 클릭하세요. 편집하다 아래 옵션에서
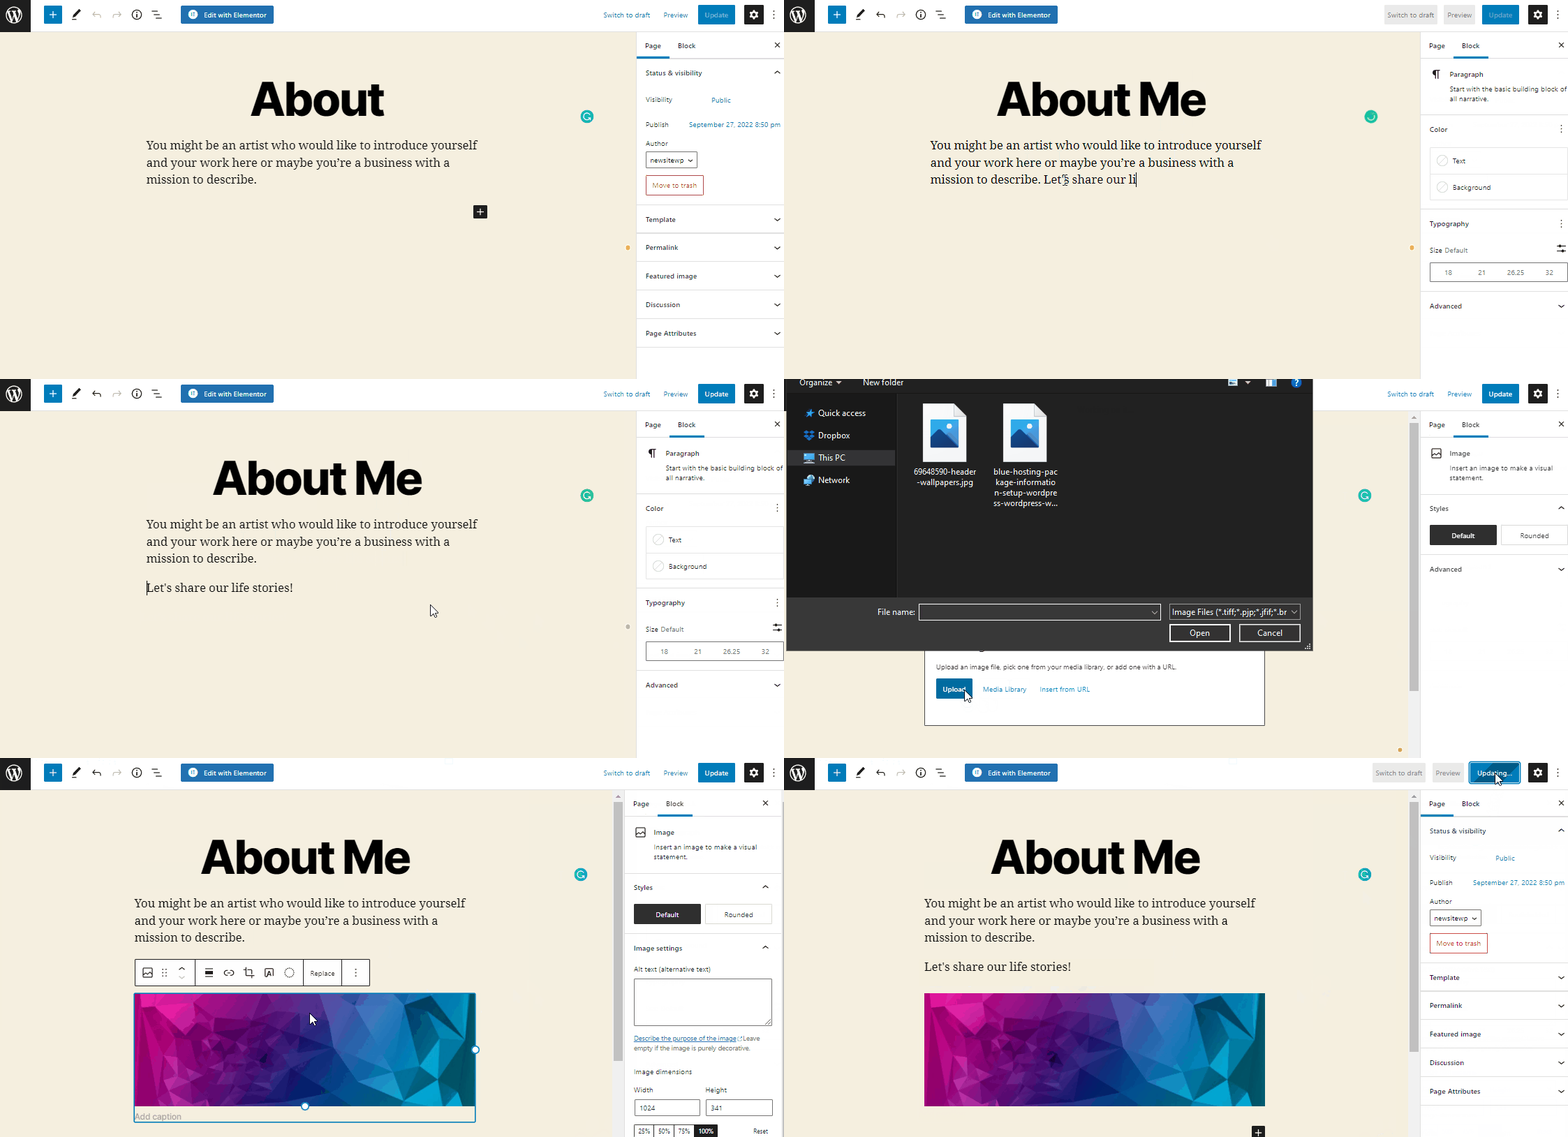
여기서 말 그대로 모든 것을 쉽게 편집, 추가 및 사용자 정의할 수 있습니다! 더하기 기호를 클릭하면 여러 기능을 사용할 수 있으며 마지막에는 업데이트.
그런 다음 사이트를 방문하여 프런트엔드 출력을 확인하세요!
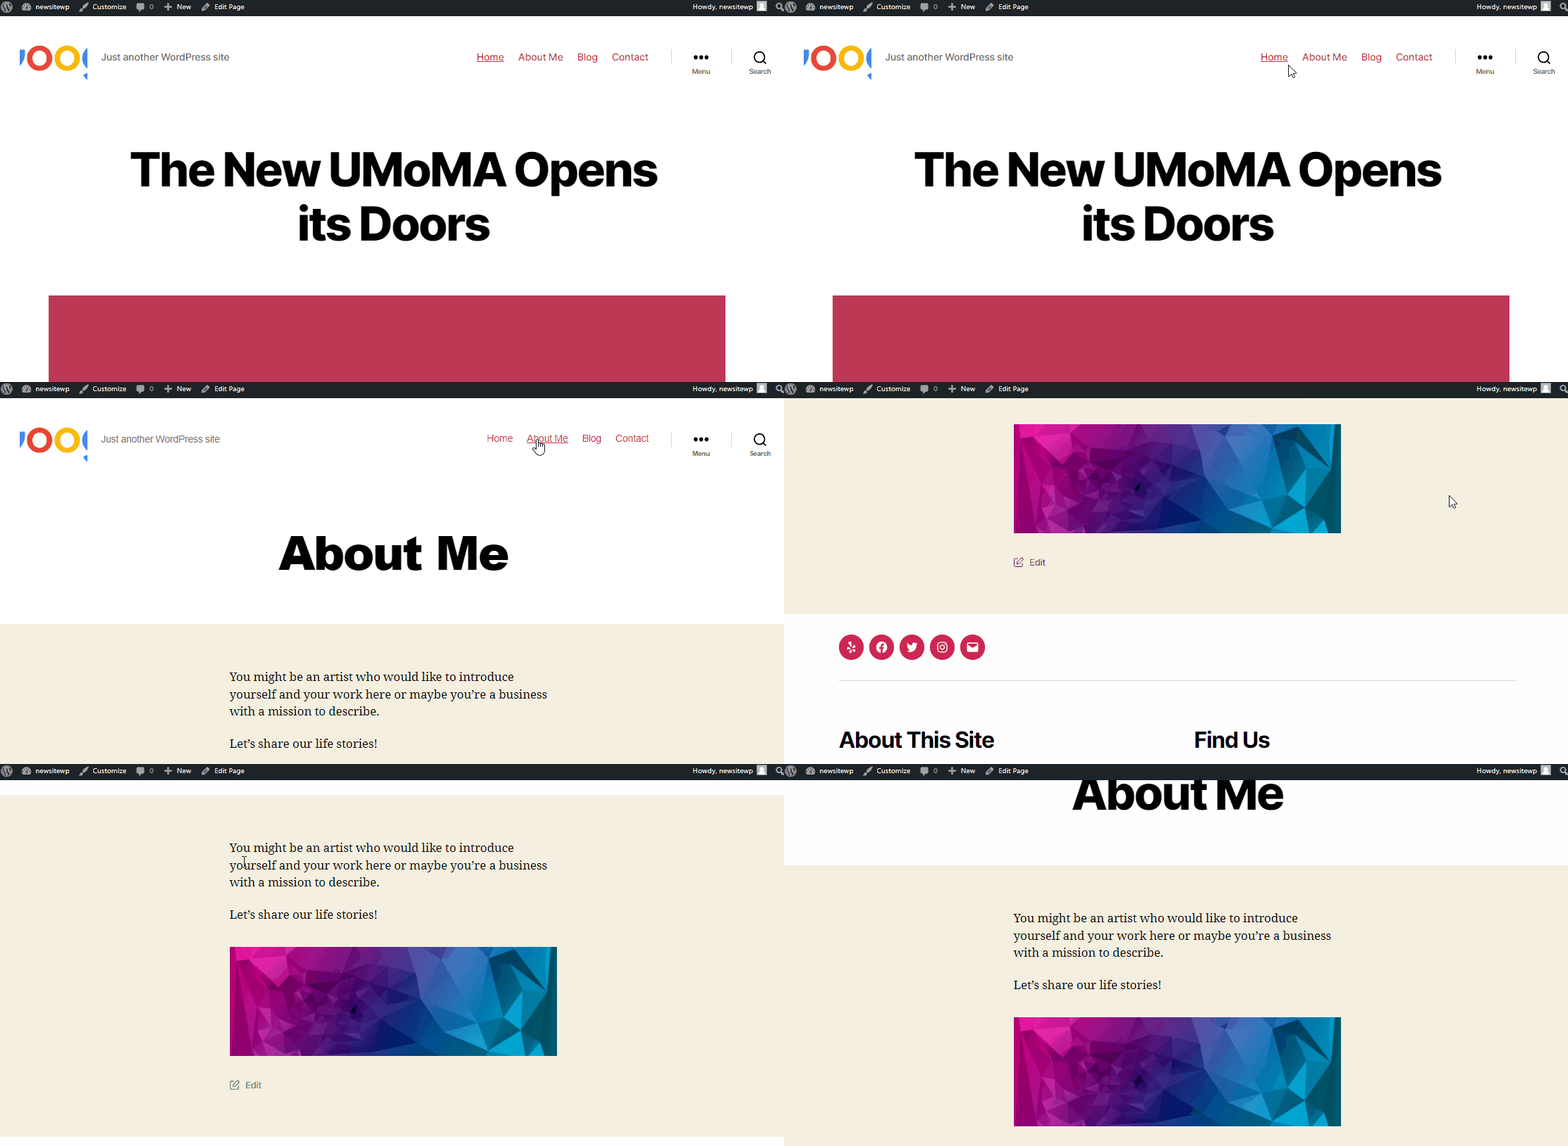
그리고 거기에 아주 쉬운 일이 있죠, 그렇죠? 👌
이와 마찬가지로 사이트의 모든 WordPress 사이트 페이지를 개별적으로 여러 기능과 사용자 정의를 사용하여 편집할 수 있습니다.
List of the essential pages that you can include in WordPress website
Here are the pages that you can consider while creating your WordPress website:
- 집
- 에 대한
- Services / Products
- 연락하다
- 블로그
- 개인 정보 정책
- 이용약관
- FAQ Portfolio / Case Studies
🔔 팁:
무제한 기능, 모듈 및 사전 구축된 테마를 쉽게 추가할 수 있습니다. ElementsKit 귀하의 올인원 애드온 엘레멘터.
이 애드온에 대한 자세한 내용은 아래를 참조하세요 👇
⚡ #5단계: WordPress에 플러그인 설치
WordPress 사이트의 앱에 해당하는 것은 플러그인입니다. 기능을 추가하고 이를 통해 WordPress 사이트를 조정할 수 있습니다. 문의 양식이나 사진 갤러리도 고려해 볼 수 있습니다.
그냥 마우스를 올려보세요 플러그인 그리고를 클릭하세요 새로운 걸 더하다 WordPress 대시보드의 옵션을 사용하면 모든 플러그인을 추가할 수 있습니다.

💪 워드프레스 사실!
WordPress에는 현재 more than 60,000 free plugins available. Additionally, some developers and websites sell paid plugins. But to start building your site, you first need to have a page builder plugin:
워드프레스는 사용자 친화적인 CMS (컨텐츠 관리 시스템) 또한 매우 효과적입니다. 때때로 즉각적인 WordPress 지원이 필요할 수 있습니다.
일부 놀라운 WordPress 애드온 플러그인을 사용하면 최소한의 노력과 시간을 투자하여 모든 사이트를 구축할 수 있습니다(무료 및 프리미엄 버전 모두에서 사용할 수 있음).
⚡ Step #6: Which WordPress Website Builder Should You Use?
Once WordPress is installed, you’ll need a website builder to actually design your pages, and in 2026, there are two main paths to choose from, depending on how you want to work.
Path 1: Elementor + ElementsKit (Classic Page Builder)
엘레멘터 is the most popular WordPress website builder. It replaces the default editor with a visual drag-and-drop interface where you design pages in real time – what you see while editing is exactly what visitors see on the front end.
WordPress 사이트에 Elementor를 설치하려면 플러그인 위로 마우스를 가져가세요 그리고를 클릭하세요 새로운 걸 더하다.

그런 다음 검색 엘레멘터 검색창에. 클릭 설치하다 그리고 나서 활성화 그것.

ElementsKit extends Elementor further with 100+ widgets, a Mega Menu builder, a Header & Footer builder, 1000+ ready-made section templates, and advanced features like parallax effects, Apple Liquid Glass Effect, sticky content, and conditional display. Together, Elementor + ElementsKit is the most complete classic page builder setup available for WordPress.
Best for: Beginners who want a familiar drag-and-drop experience, designers who need advanced styling controls, and anyone building complex multi-section pages like landing pages, agency sites, or portfolio sites.
Path 2: GutenKit (Native Block Editor Builder)

GutenKit is a modern page builder plugin that extends the native WordPress block editor. This is the one most important website-building tool that comes built into WordPress by default – into a full visual design system with 90+ blocks, 1000+ pre-built patterns, motion effects, a 메가 메뉴 빌더, and Full Site Editing support.
Unlike Elementor, GutenKit doesn’t replace the editor, it enhances it. This means your site uses the native WordPress architecture, which produces cleaner code, faster load times, and better Core Web Vitals scores out of the box.
Best for: Users who prefer staying inside the native WordPress editor, developers who prioritize performance and lean code output, and anyone building on a modern block theme.
Which one should you pick?
| Website Building Features | ElementsKit | 구텐킷 |
|---|---|---|
| Editor type | Separate visual editor | Native block editor |
| 가장 좋습니다 | Design-heavy, complex layouts | Performance-first, modern sites |
| Page builder experience | Classic drag-and-drop | Block-based drag-and-drop |
| 무료 버전 | ✅ Both have free tiers | ✅ Free on WordPress.org |
| FSE support | Partial | ✅ Full |
If you’re just starting and want the most beginner-friendly experience with the most resources, tutorials, and community support, Elementor + ElementsKit is the easier path. If you want a faster site built natively inside WordPress with less plugin overhead, 구텐킷 is the smarter long-term choice.
Either way, both are no-code tools; you won’t need to write a single line of HTML or CSS to build a professional WordPress website with either one.
확인해 보세요 👉 WordPress에서 여행 예약 사이트를 만드는 방법.
⚡ Step #7: Customize header footer and mega menu
웹 사이트의 머리글 바닥글을 만들려면 ElemntsKit을 설치해야 합니다(Elementor를 설치한 것과 동일한 방법).
Elementor용 ElementsKit 올인원 애드온 포함 수많은 요소 위젯, 모듈 및 기능이 포함되어 있습니다. 이는 지금까지 경험해 본 것 중 가장 발전하면서도 사용자 친화적인 사이트 제작 경험을 제공하기에 충분합니다.
🤷♀️ 내 웹사이트에 머리글 바닥글이 필요한 이유는 무엇입니까?
머리글과 바닥글은 모든 웹사이트 디자인의 필수 구성 요소입니다. 했다고 해도 과언이 아니다. 긍정적인 사용자 경험을 구축하는 데 중요한 역할을 합니다. 웹사이트 탐색을 용이하게 함으로써. 그뿐만 아니라 웹사이트 브랜드를 홍보하고 CTA | 자세히 알아보기 👉 여기
귀하의 웹사이트에 가장 적합한 메가 메뉴를 만들려면 이 비디오를 확인하십시오. 단계별 튜토리얼:
Do keep in mind, that with Elementor’s free version you can create and customize your WordPress website! However, with Elementor용 ElementsKit 올인원 애드온 귀하의 WordPress 웹사이트를 고급 전문가 수준으로 끌어올리는 데 도움이 될 것입니다. 아래에서 ElementsKit에 대해 자세히 알아보세요.
⚡ Step #8: Want to take a step further
지금까지 WordPress 웹사이트를 만들고, 새 테마를 추가하고, 필요한 플러그인을 설치하는 방법을 설명했습니다.
조금 더 나아가고 싶나요?
WordPress를 사용하면 훨씬 더 많은 기능을 갖춘 강력한 전문 웹사이트를 구축할 수 있습니다. 아래의 관련 튜토리얼 블로그를 읽어보세요.
읽다 👉 WordPress에서 WooCommerce를 설정하는 방법
읽다 👉 WordPress 메모리 제한을 늘리는 방법
읽다 👉 WooCommerce 대 Shopify
읽다 👉 모금 웹사이트를 만드는 방법
읽다 👉 WooCommerce 내 계정 페이지를 사용자 정의하는 방법
읽다 👉 머리글-발을 만들고 사용자 정의하는 방법어
읽다 👉 TablePress로 테이블을 만드는 방법
Essential Free Plugins to Build Your WordPress Website
WordPress plugins are what turn a basic installation into a fully functional website. Here are the Wpmet plugins that cover every layer of your site – from design and forms to pop-ups, email, and e-commerce, all available with a free version to get started.
🔷 ElementsKit: All-in-One Addon for Elementor The most complete Elementor addon with 90+ widgets, a Mega Menu builder, Header & Footer builder, and 500+ ready section templates. Everything you need to design a professional WordPress website inside Elementor.
🔷 구텐킷: Page Builder for Gutenberg. Extends the native WordPress block editor with 90+ advanced blocks, motion effects, a Mega Menu builder, and Full Site Editing support, without adding a separate page builder to your stack.
🔷 MetForm: Elementor Form Builder The most flexible form builder for Elementor, with multi-step forms, conditional logic, 30+ input fields, and integrations with Mailchimp, HubSpot, and other popular tools.
🔷 ShopEngine: WooCommerce Builder for Elementor. A complete WooCommerce solution for Elementor that lets you design every page of your store: product pages, cart, checkout, and archive, with dedicated WooCommerce widgets and templates.
🔷 팝업킷: WordPress Popup Builder. Build high-converting popups, slide-ins, floating bars, and spin-the-wheel campaigns using Gutenberg blocks, with advanced trigger and targeting options and built-in analytics.
🔷 이메일 키트: WooCommerce Email Customizer. Design beautiful, branded WooCommerce transactional emails — order confirmations, shipping updates, invoices – visually inside WordPress, no HTML coding required.
🔷 TableKit: WordPress Table Builder. Create responsive, filterable, and sortable tables natively inside the block editor, with CSV/Google Sheets import, WooCommerce product tables, and full pagination support.
🔷 GetGenie AI: AI Content & SEO Assistant. Write blog posts, product descriptions, and SEO meta directly inside WordPress using AI with keyword research, competitor analysis, and one-click content generation built in.
🔷 WP 소셜: Social Login & Feed Plugin. Add social login buttons (Google, Facebook, Twitter), display social feed widgets, and show social share and follow counts, all from a single plugin.
🔷 WP 궁극적인 검토: Review & Testimonial Plugin. Collect, display, and manage customer reviews and testimonials on your WordPress site with customizable review forms and structured data support for Google rich snippets.
Step 9: Optimize Your WordPress Website for SEO
Now, you have to optimize your website for search engines to crawl and understand. For that, you need to set
- SEO-friendly permalinks
- An SEO plugin such as Rank Math or Yoast SEO
- Your website to Google Search Console.
- Page titles
- Meta descriptions
- 제목
- Images
- Internal links.
Step 10: Improve Your Website Speed
A fast website provides a better user experience and can support better search performance. To maintain smooth speed:
- Optimize images
- Use a lightweight theme
- Remove unnecessary plugins
- And enable caching.
You can also use Google PageSpeed Insights to check your website speed and Core Web Vitals.
Step 11: Secure Your WordPress Website
First, make sure your website uses HTTPS with a valid SSL certificate. Most quality WordPress hosting providers include SSL certificates with their hosting plans.
You should also use a strong, unique password for your administrator account and enable two-factor authentication when possible. Keep WordPress, your theme, and all plugins updated because outdated software can contain known security vulnerabilities.
Regular backups are equally important. Set up automatic backups so you can restore your website if something goes wrong. You can also use a reputable WordPress security plugin to add features such as login protection, malware scanning, and firewall rules.
Step 12: Make Your Website Mobile-Friendly
약 51.4% of visitors visits websites using mobile device, so your website should work properly on smartphones and tablets as well as desktop computers.
If you’re using a page builder such as Elementor or a block-based solution, check how each section looks at different screen sizes. Pay attention to text size, spacing, images, buttons, columns, and navigation. A layout that looks perfect on a desktop screen may need adjustments on mobile.
Your navigation should also be easy to use on smaller screens. Before launching, test your website on several screen sizes.
🤔 자주 묻는 질문(FAQ)
우리는 수천 명의 사람들이 웹사이트를 만들 수 있도록 지원한 후 몇 가지 질문에 대한 답변을 제공했습니다. 웹 사이트 구축에 대한 가장 일반적인 질문은 아래에 설명되어 있습니다.
🔍 WordPress에서만 무료 웹사이트를 만들 수 있나요?
예! 우리는 이미 위의 전체 프로세스를 시연했습니다.
Though there are many more website builders available, including Web.com, HubSpot, Wix, GoDaddy, and others. But we think WordPress is the greatest and most straightforward platform for creating a website that functions on both desktop and mobile platforms.
그러나 인터넷상의 웹사이트 중 43%는 실제로 WordPress로 만들어졌습니다.
🔍 내 WordPress 사이트 PHP 버전을 어떻게 확인할 수 있나요?
호스팅 관리 대시보드에 로그인하면 PHP 버전을 몇 분 안에 확인하고 업데이트할 수 있습니다. 우리 블로그를 확인해 보세요. WordPress에서 PHP 버전을 확인하고 업데이트하는 방법.
🔍 최고의 호스팅 제공업체는 어디에서 찾을 수 있나요?
유료 호스팅 제공업체가 여러 곳 있습니다. 여기 이 블로그에서 우리는 최고의 호스팅 제공업체 7곳 자세한 정보에요. 꼭 확인해보세요!
🔍 내 WordPress 웹사이트에 블로그를 어떻게 게시할 수 있나요?
귀하의 웹사이트에 블로그 게시물 목록을 쉽게 표시할 수 있습니다. 블로그 게시물 위젯을 페이지로 드래그하면 위젯에 게시된 모든 블로그 게시물이 자동으로 표시됩니다. 다음에 대한 독점 문서를 확인하세요. 사이트에 블로그를 추가/표시하는 방법.
🔍 내 WordPress 사이트에 Instagram 피드를 어떻게 추가할 수 있나요?
브랜드 인지도를 높이고 판매를 늘리면 소셜 피드가 증가할 수 있습니다. WordPress 웹 사이트에 Instagram 피드를 표시하면 사람들이 두 플랫폼 모두에서 귀하와 연결하는 데 항상 도움이 될 수 있습니다. 당사의 전용 블로그를 확인해 보세요. 사이트에 Instagram을 삽입하는 방법.
🔍 WordPress 직송 웹사이트를 만들 수 있나요?
다른 비즈니스와 마찬가지로 생산자 직송 웹사이트를 시작하는 방법을 배우는 것은 간단하지 않습니다. 그러나 이는 여전히 기업가 정신의 영역으로 들어가는 중요한 첫 단계입니다. 우리는 다음에 대한 자세한 내용을 담은 블로그를 운영하고 있습니다. 직송 웹사이트를 만드는 방법.
🔍 내 WordPress 사이트에서 양식을 만들 수 있나요?
물론 당신은 할 수. WordPress 저장소에는 다양한 양식 작성 플러그인이 있습니다. WordPress 양식 빌더에 대해 자세히 알아보려면 다음 블로그를 방문하세요. 최고의 WordPress 문의 양식 플러그인.
귀하의 WordPress 및 해당 플러그인에 대한 자세한 내용과 업데이트를 보려면 다음을 참조하세요. 방문하다 Wpmet 그리고 구독하다 우리 뉴스레터에.
결론
We hope and truly believe that this tutorial has shown you how to create a free WordPress website without overspending or employing a web designer. Now, you can create any WordPress website like 비영리 웹사이트.
문의사항이나 혼란스러운 점이 있으면 아래 댓글 섹션에 알려주시기 바랍니다.



답글 남기기