

WordPress メニューに WooCommerce 製品カテゴリを追加する方法 (2 つの方法)

How to Add WooCommerce Product Category in WordPress

顧客を希望の商品に誘導することは、eコマース ウェブサイトの所有者にとって最優先事項です。このプロセスを効率化する最も効果的な方法の 1 つは、WordPress メニューに WooCommerce 製品カテゴリを追加することです。

訪問者が製品カテゴリにリンクされたメニュー項目にマウスを合わせると、サブカテゴリがすぐに表示され、コンパクトなスペース内で製品カテゴリをより効果的に紹介できます。この方法により、サイトのナビゲーションが改善されるだけでなく、全体的なショッピング体験も向上します。

このガイドでは、WordPress メニューに WooCommerce 製品カテゴリを追加して、ユーザーフレンドリーで効率的なショッピング環境を作成する方法を説明します。

コンテンツ 見せる

Quick Overview
To add WooCommerce product categories to your WordPress menu, you must first enable product categories in your menu screen options or directly link to the category URLs using a site navigation block. By utilizing page builder plugins like ElementsKit (for Elementor) or GutenKit (for Gutenberg), you can transform these simple text links into highly visual, multi-level dropdown menus.

How to Add Product Categories to Your Navigation:
✅For Classic Themes: 案内する 外観 > メニュー WordPress ダッシュボードで。
✅ Enable Categories: Click the “Screen Options” tab at the top right of the screen and check the “Product Categories” box to reveal them in the left-hand items list.
✅ Add to Menu: Check your desired WooCommerce categories (e.g., “Clothing”, “Accessories”) and click “Add to Menu,” then drag them into your preferred dropdown hierarchy.
✅ For Block Themes: Open your Gutenberg site editor, add the GutenKit Nav Menu block, click the “Add Link” button, and manually paste the live URL of your WooCommerce product category.
✅ Gamify & Style: Use the ElementsKit Mega Menu toggle or GutenKit styling tabs to upgrade the standard text links by adding custom icons, sale badges, or rich-media dropdown panels.

例えば、 if you run an online electronics store, standard navigation forces users to click a generic “Shop” link and dig through sidebar filters. By adding specific product categories directly to the header menu, a customer can hover over the navigation bar to immediately reveal direct links to “Laptops,” “Smartphones,” and “Audio,” alongside a highlighted “Clearance Sale” badge, getting them to their desired product in a single click.

Embedding WooCommerce categories directly into your site’s primary navigation drastically reduces user friction. This strategic placement ensures a smoother shopping experience, prioritizes key sales pages for search engine indexing, and is vital for keeping mobile visitors engaged without forcing them to scroll extensively.

WordPress メニューに WooCommerce 製品カテゴリを追加する必要がある理由

WooCommerce 製品カテゴリを Web サイト メニューに追加することは、売上を伸ばすために重要です。 

この機能により、ウェブサイト上のどこにいても、買い物客が希望する商品をメニューのどこで見つけられるかが明確に示されます。ナビゲーションが簡単なため、顧客は希望する商品を選択する際に何の抵抗も感じません。

メニュー項目に WooCommerce カテゴリを追加したら、その下にサブカテゴリのサブメニューを複数含めることもできます。たとえば、衣料品ブランドの Web サイト ナビゲーションには、男性用の WooCommerce カテゴリがあり、その中にトップスやボトムスなどのサブカテゴリがある場合があります。

この方法により、検索エンジンは重要なページを優先してインデックス化できるため、Web サイト全体の SEO が向上します。WooCommerce 製品カテゴリをナビゲーション メニューに追加する主なメリットは、モバイル ユーザーにとってです。ユーザーは、広範囲にスクロールする代わりに、ヘッダー領域から直接製品にすばやくアクセスできます。

方法 1: クラシック WordPress テーマを使用してメニューに WooCommerce 製品カテゴリを追加する

最初の部分では、クラシック WordPress テーマに製品カテゴリを追加する方法を説明します。ただし、Gutenberg ブロックベースのテーマを使用している場合は、この部分をスキップして方法 2 に進むことができます。

一般的に、従来のテーマのユーザーは、ページ ビルダーを組み込んで、Web サイトに追加の機能やカスタマイズを追加します。 

このチュートリアルでは、次のテーマとプラグインを使用します。このガイドに従って、それらをインストールして有効化してください。

WPメニューに製品カテゴリと製品タグを追加する

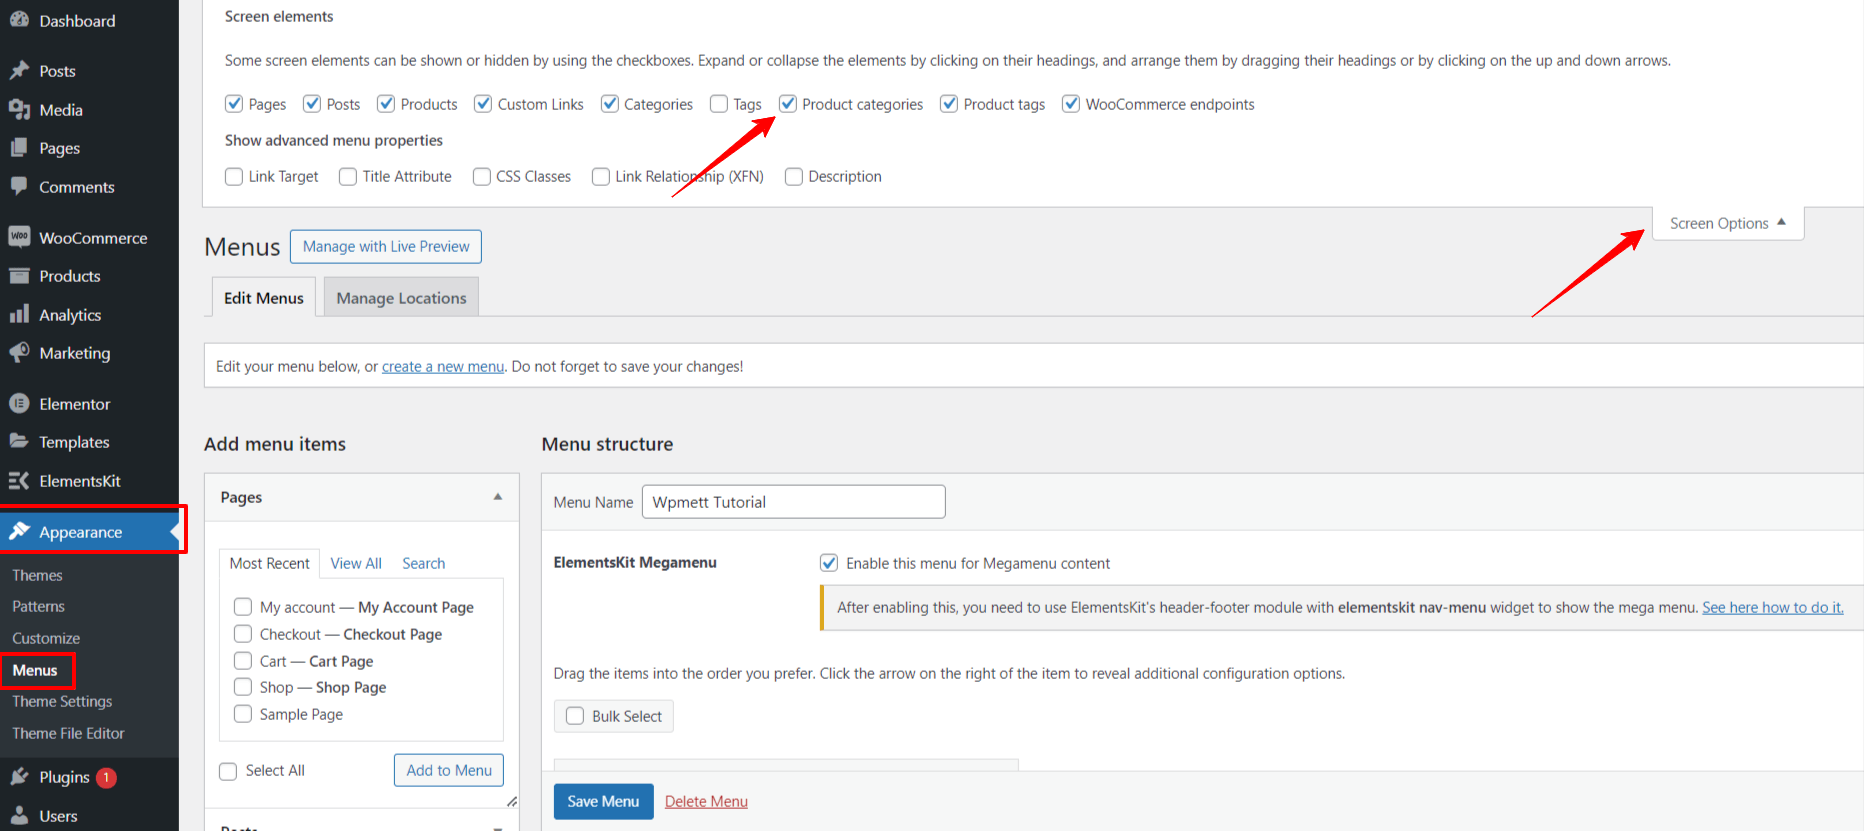
開始するには、 外観 > メニュー WordPressダッシュボードから. ウェブサイトにメニューがない場合は、まずメニューを作成してください。次に、メニューエディタページの右上にある 「画面オプション」.
WordPress メニューに WooCommerce 製品カテゴリを追加する方法

メニューを追加するためのさまざまな要素を含む領域が拡張されます。 「製品カテゴリー」。 これを行うと、すべての製品カテゴリとタグをメニュー オプションに追加できるようになります。 

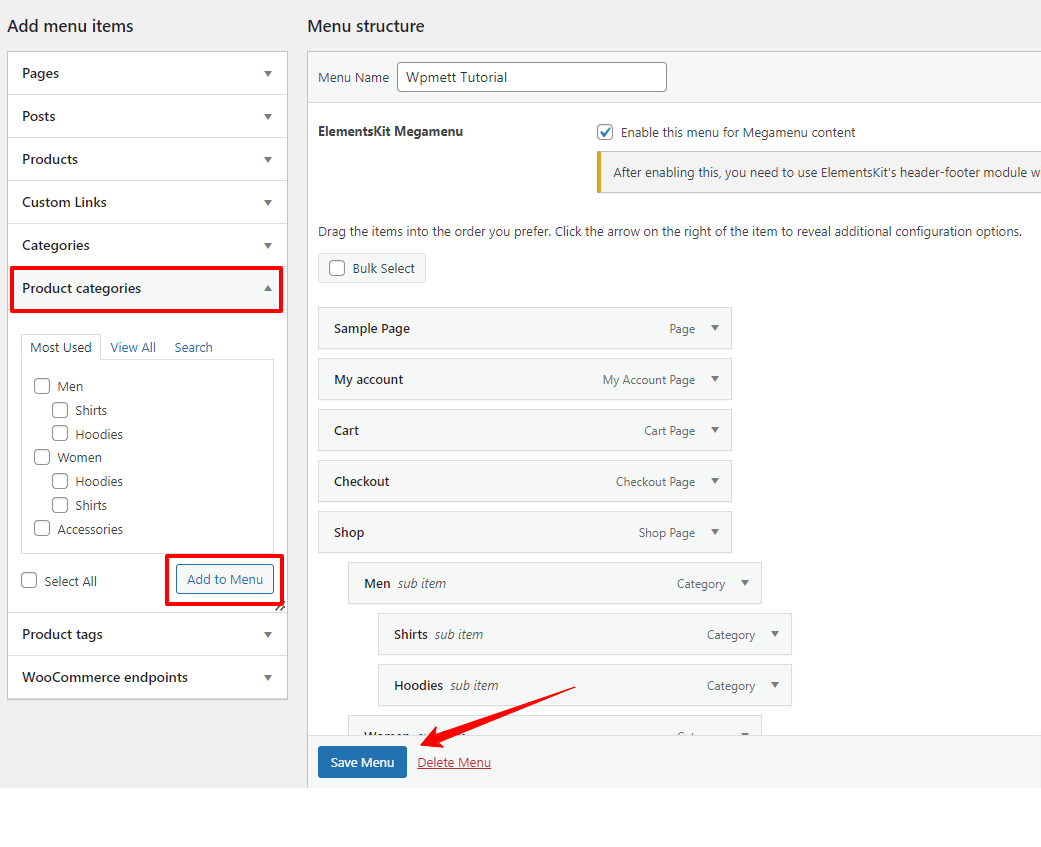
ここでは、いくつかのクリック作業のみが残っています。画面の左側の列には、次のような新しいオプションがあります。 製品, 製品タグ、 そして 製品カテゴリドロップダウンを展開し、ウェブサイトのナビゲーション メニューに含める項目のチェックボックスを選択します。
WordPressウェブサイトメニューの設定

次に、 「メニューに追加」 ボタンをクリックします。お好みに応じてメニュー階層を調整します。完了したら、 「メニューを保存」 ボタン。 

現在、WordPress ウェブサイトのナビゲーション メニューをプレビューまたは確認すると、整理されておらず、応答性も高くないことがわかります。訪問者は、希望する製品カテゴリに移動できません。 

それで、ここでの解決策は何でしょうか? 

さまざまなメニュー要素をシンプルかつインタラクティブな方法で表示するには、メガメニュープラグインを使用するのが最適です。 ElementsKit メガメニュー クラシックテーマユーザー向けのビルダー。 

このフル機能のElementorアドオンを使用すると、 見事な水平および垂直メガメニュー コーディングの手間をかけずにディスプレイに表示できます。

ElementsKit メガメニューウィジェットを使用して WP メニューの製品カテゴリをゲーム化します
ElementsKitメガメニューが有効

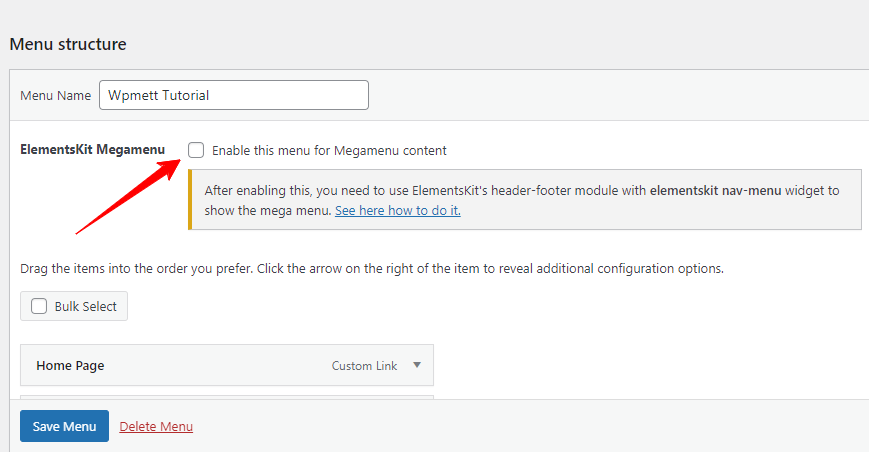
ElementsKitメガメニュー機能を使用するには、「メガメニューコンテンツのメニューを有効にする次に、メニュー エディター領域の任意の項目にマウスを移動すると、メガ メニュー設定アイコンが表示されます。それをクリックします。 
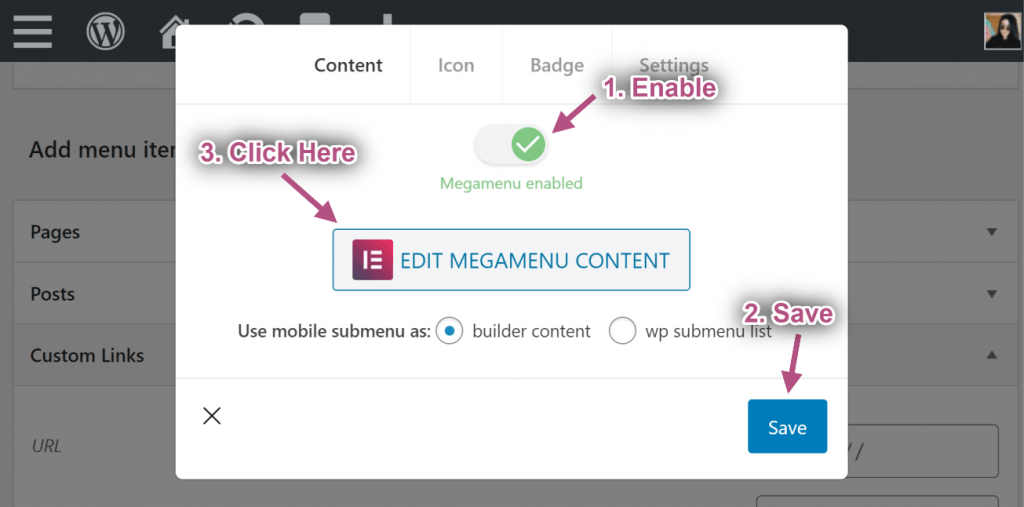
WordPress メニューに WooCommerce 製品カテゴリを追加する方法

この時点で、画面にポップアップが表示されます。ここで、 メガメニュー ボタンをクリックしてください。これにより、「: メガメニューコンテンツの編集” オプションがあります。それをクリックするだけです。 

次に、ElementsKit メガ メニュー ビルダー ダッシュボードが起動します。これで、Elementor と ElementsKit のコントロール全体を使用して、イメージ メニューを作成およびカスタマイズできるようになります。 
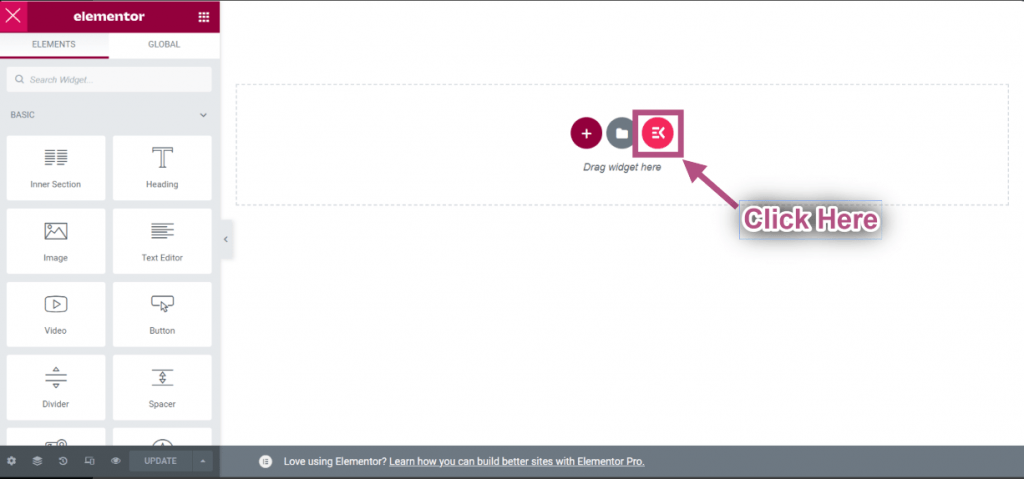
ElementsKit メガメニューの既成テンプレート

このチュートリアルでは、最も簡単な方法を紹介します。ElementsKit テンプレート アイコンをクリックします。多数のテンプレートが表示された画面がポップアップ表示されます。 
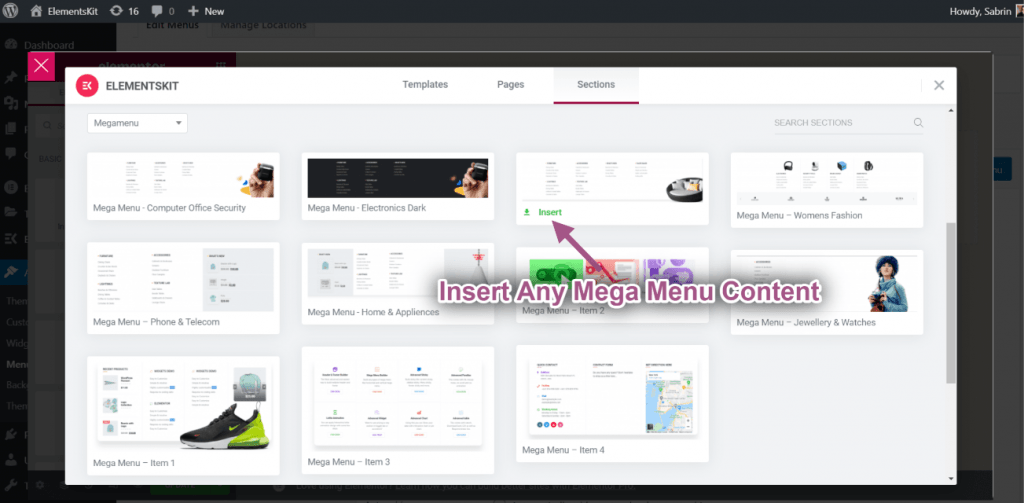
WordPress メニューに WooCommerce 製品カテゴリを追加する方法

まず、「セクション”オプションを選択します。次に、 "カテゴリ”ドロップダウンから メガメニュー" オプション。 

WooCommerceウェブサイトの商品カテゴリーを紹介するメガメニューに適したテンプレートを選択したら、 入れる そしてしばらく待ちます。 
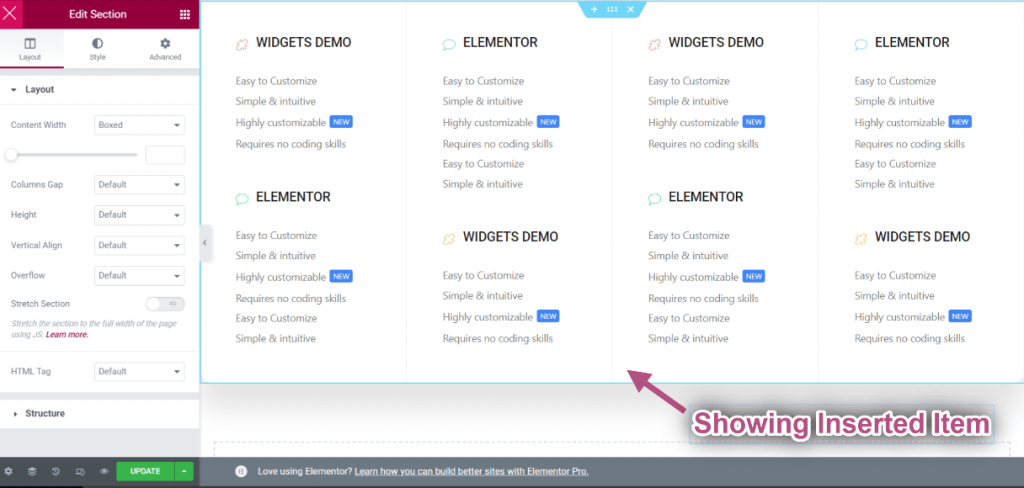
ElementsKitの編集メニューテンプレート

挿入したアイテムが正常に読み込まれたら、列またはウィジェットの設定に移動します。

ここでは、ブランド スタイルに合わせて、あらかじめ作成されたレイアウトのコンテンツとデザインを調整します。完了したら、更新ボタンをクリックしてウィンドウを閉じます。

次に、アイコンとバッジのカスタマイズ、およびヘッダー設定の調整に焦点を当てます。[アイコン] タブに移動して、アイコンとその色を設定します。また、バッジ テキストのカスタマイズについても同じ操作を行います。 

このタブの最後のタブは「設定" メガメニューの位置と幅を設定し、Ajax読み込みを有効にします。そして、すべての設定が完了したら、 "保存" ボタンをクリックします。このポップアップを終了するには、「バツ”アイコンをクリックします。そして、「クラシックテーマのメニューにWooCommerce製品カテゴリを追加する」という旅は、「保存メニュー" オプション。

方法2: ブロックベースのテーマメニューにWooCommerce製品カテゴリを追加する

このチュートリアルの2番目の方法は、WooCommerceの商品カテゴリーをGutenbergブロックベースのテーマに追加する方法を紹介します。この部分では、 GutenKitプラグインブロック エディター領域内でのメガ メニューの作成とカスタマイズが簡単になります。 

GutenKit は、Gutenberg ユーザーの面倒な技術的作業の必要性を排除する強力なメガ メニュー ブロックをサポートしています。ユーザーは、他の柔軟なページ ビルダー プラグインと同様に、デザイン要素をドラッグ アンド ドロップするだけです。 

実際のシナリオを見てみましょう:

ブロックエディターメニューに製品カテゴリと製品タグを追加する

GutenKit または Gutenberg では、メニュー項目は内部または外部の Web ページにリンクすることによって追加されることを理解することが重要です。したがって、WooCommerce 製品カテゴリまたはタグを Web サイトのナビゲーション メニューに追加するには、それらの特定の製品カテゴリとタグの URL が必要になります。
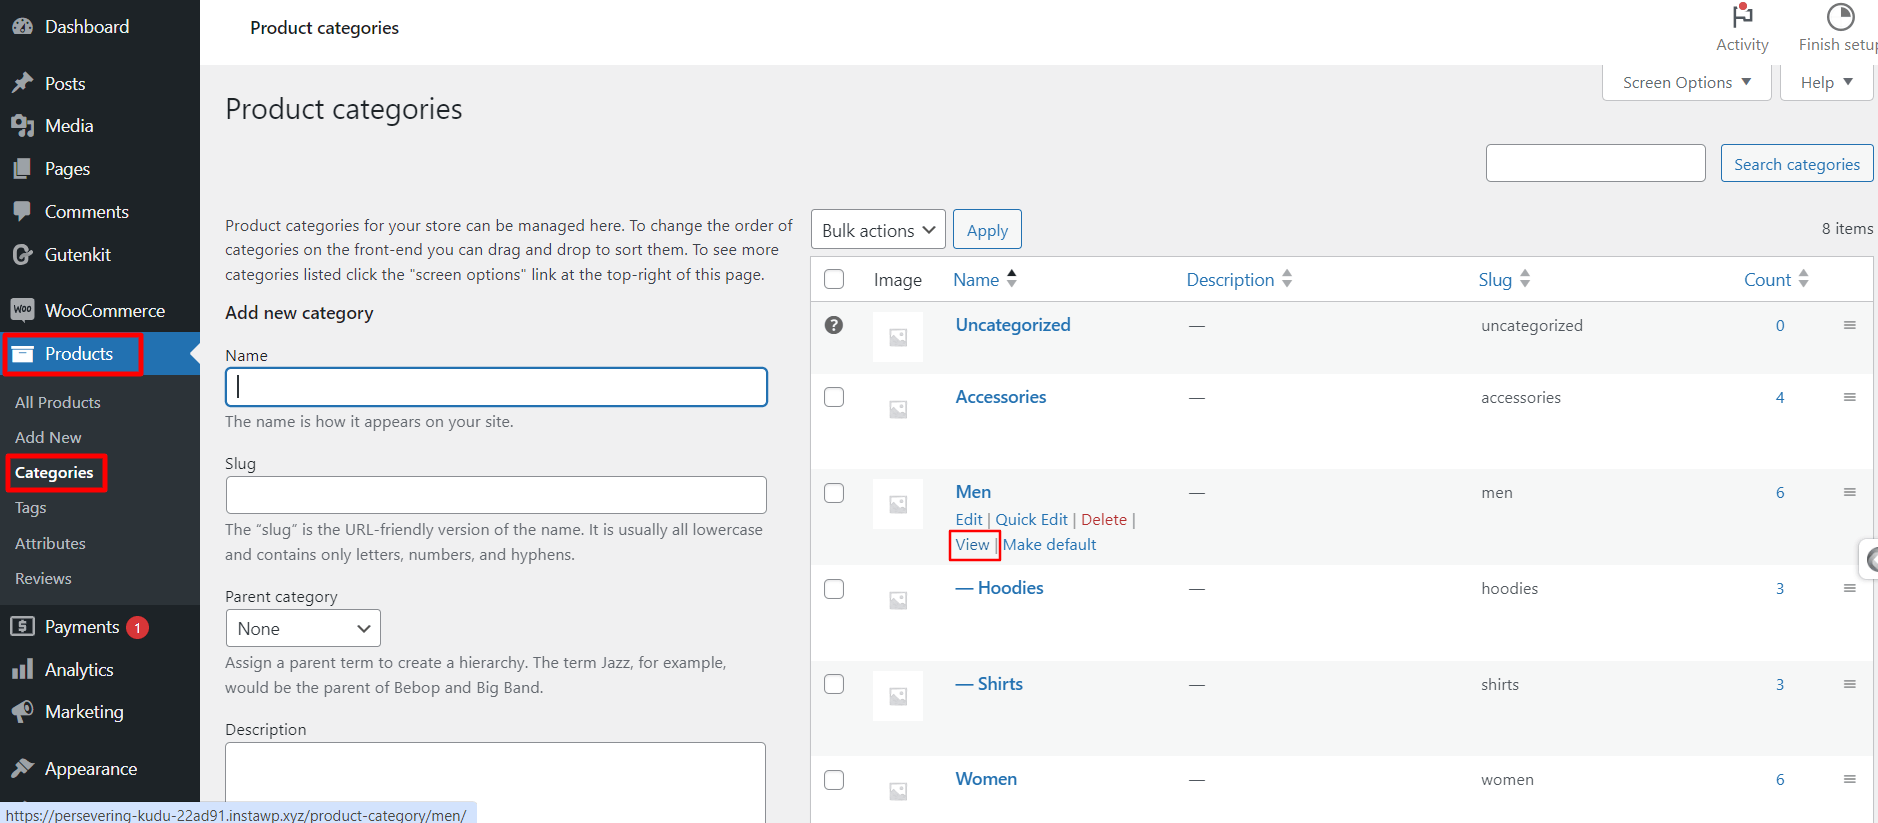
WordPress メニューに WooCommerce 製品カテゴリを追加する方法

これを行うには、Gutenbergウェブサイトのダッシュボードから、 製品 > カテゴリWooCommerceウェブサイトのすべての商品カテゴリーが表示されます。このページから、 "ビュー" 任意のカテゴリのオプションを選択すると、ブラウザの新しいタブにページが読み込まれます。

次に、ブラウザの検索バーから、 URL 後で、以下に示すように、GutenKit ナビゲーション メニュー ブロック設定にそれらを追加します。

ここで、WordPress ウェブサイト メニューに WooCommerce 製品カテゴリを挿入する方法を説明します。

WordPressダッシュボードに移動し、新しいページを挿入するか、既存のページにアクセスします。 ”+” アイコンをクリックしてブロックを追加し、GutenKit ナビ メニュー ブロックを検索します。 

表示されたら、クリックするか、エディター領域にドラッグします。 GutenKit ナビメニューブロック 2 つのオプションが読み込まれます。あらかじめ用意されたパターンを選択するか、Gutenberg の Web サイト メニューを最初から構築することができます。 
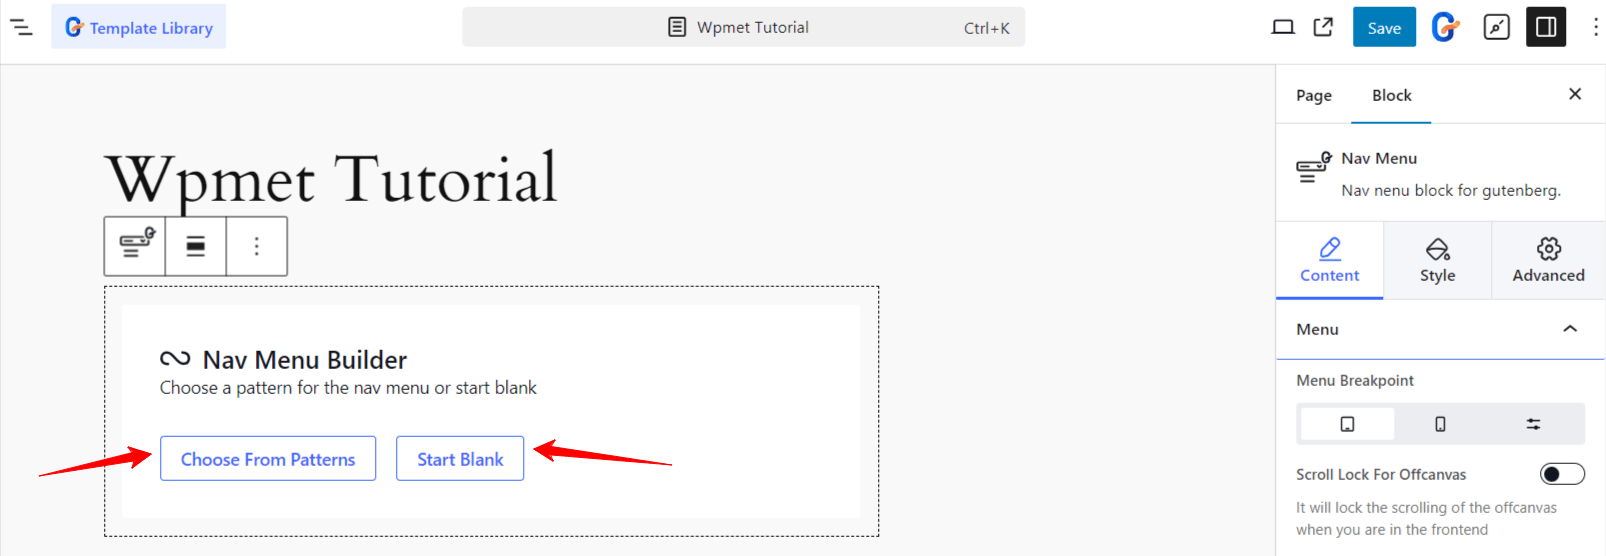
GutenKit ナビメニューの操作

最も簡単な方法は、あらかじめ用意されたヘッダーテンプレートを使用することです。「パターンから選択「」ボタンをクリックすると、利用可能なすべての GutenKit ヘッダー パターンがポップアップに表示されます。 
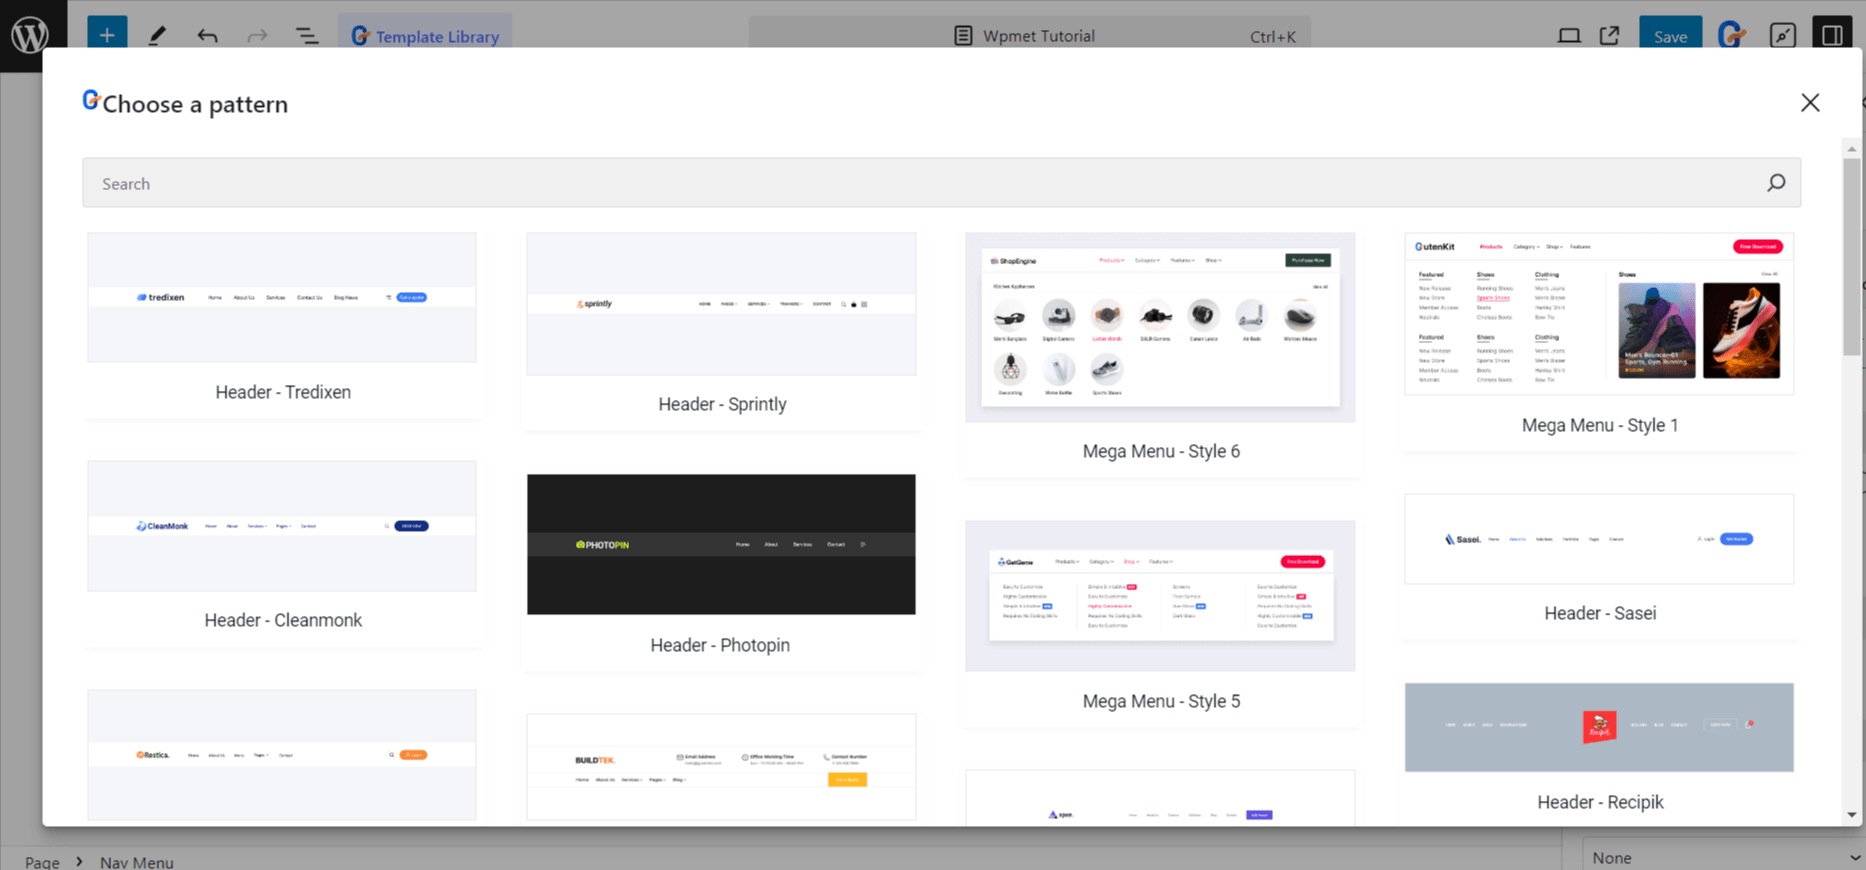
メガメニューのGutenKitパターンを選択

次に、お好みのメニュー パターンをインポートします。その後、ナビゲーション バーに WooCommerce 製品カテゴリ リンクを挿入できます。さらに、Web サイトのナビゲーションに基づいて他のメニュー項目を調整します。

一方、最初からやり直したい場合は、 「白紙から始める」 ボタン。すると、GutenKit ナビ メニュー ブロックに、Web サイトの公開ページに基づいていくつかのメニュー項目が読み込まれます。これらを保持するか、削除することができます。
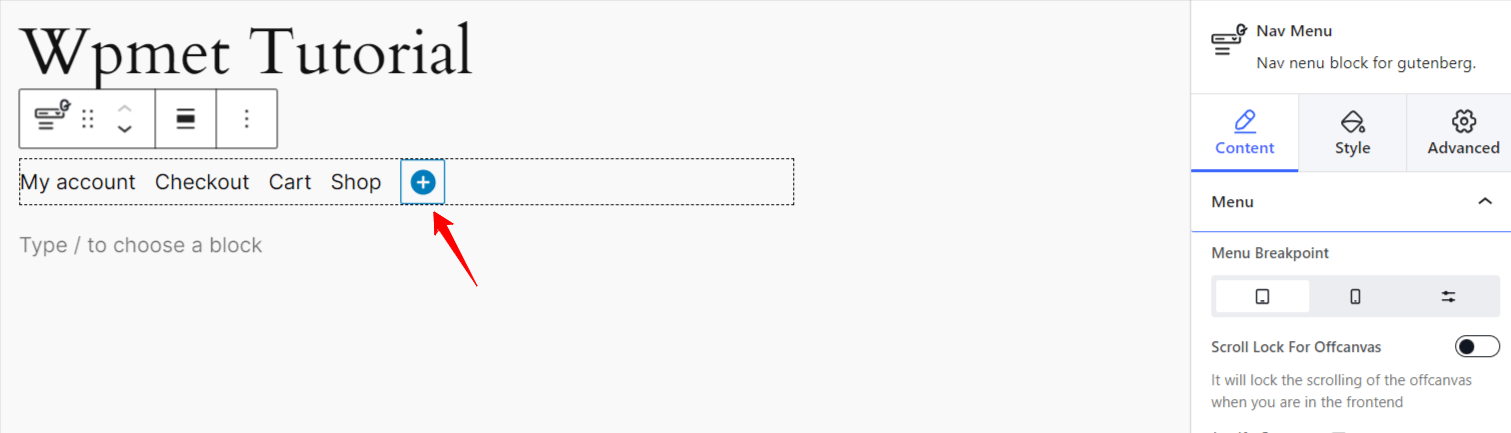
GutenKIt ナビゲーション メニューの設定

新しいメニュー項目を追加するには、 「青い丸で囲まれた+」 アイコンをクリックします。これにより、既存の公開ページまたは URL を Web サイトに追加できます。製品カテゴリの URL を挿入し、メニュー ラベルを定義するだけです。これが、WooCommerce 製品カテゴリを Gutenberg のナビゲーション メニューに追加する方法です。  

GutenKit ナビメニューブロックを使用して WP メニューの製品カテゴリをスタイル設定する

GutenKit ナビ メニュー ブロックは、Web サイトのメニューをカスタマイズするための強力なソリューションです。メガ メニューを使用して製品カテゴリを表示することもできます。
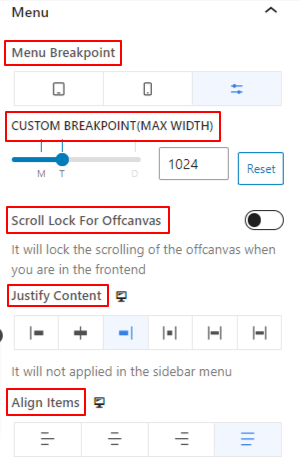
GutenKit ナビメニューのスタイル設定

GutenKitナビゲーションメニューブロックの設定から、 「親に行く」 オプション。WordPressナビゲーションメニューのスタイルを設定するためのさまざまなカスタマイズ設定が表示されます。 "コンテンツ" タブでは、カスタム ブレークポイントを設定したり、サブメニューを表示するアニメーションを定義したり、スクロール時にオフキャンバス メニューを表示したりできます。

さらに、メニュー ラッパーとメニュー項目をカスタマイズして、製品カテゴリの視覚的に魅力的なナビゲーション メニューを作成することもできます。

モバイルメニューでは、GutenKitのナビメニューブロックで別のロゴを選択できます。そして最も重要なのは、サポートされている大きなアイコンライブラリからハンバーガーアイコンを挿入できることです。 「素晴らしいフォント」 そして 組み込みのGutenKitアイコン または、SVG ファイルをアップロードします。次に、ハンバーガー アイコンを独自の方法でスタイル設定します。

WordPress メニューに WooCommerce 製品カテゴリを表示するためのボーナスヒント

ウェブサイトのメニューに商品カテゴリを追加するのは簡単ですが、訪問者にとって視覚的に魅力的なものにするのは難しい場合があります。チュートリアルでは商品カテゴリの表示のカスタマイズとスタイル設定についてすでに説明しましたが、以下に挙げるように、さらに留意すべき点がいくつかあります。

👉 First things first, decide which product category you want to add to the navigation menu. You should highlight popular and best-selling categories in your top menu to attract customers.

👉 また、色、アイコン、バッジを使用してメニュー項目をよりインタラクティブにします。ブランドを表すカスタマイズされたアイコンを表示します。チュートリアルで使用したプラグインは、プラグイン用の SVG ファイルのアップロードをサポートしています。

👉 オファーや割引商品を紹介するには、顧客がそれらのページに直接移動できるようにクイックリンクを追加します。

👉 メガメニューカードまたはナビゲーションバーのラッパー領域をカスタマイズして、見た目を美しくします。

👉 メニューのレスポンシブ設定を構成して、モバイルや小型デバイスで製品カテゴリを正確に表示します。

👉 コード不要のプラグインを使用して、ナビゲーション メニューに表示される製品カテゴリを簡単に構成およびカスタマイズします。

WooCommerce Product Categories Not Showing in Menu? Here’s How to Fix It

If your WooCommerce product categories aren’t appearing in the WordPress menu builder, it’s almost always one of these five causes. And, the good thing is I am also giving a quick fix for each issue.

✅ Fix 1: Enable Product Categories in Screen Options

This is the most common cause. By default, WordPress hides WooCommerce product categories from the Appearance > Menus panel.

に行く 外観 > メニュー, click 画面オプション in the top-right corner, and check 製品カテゴリ. They’ll immediately appear in the left panel. From here,  check the ones you want, click メニューに追加, and save.

✅ Fix 2: The Category Has No Published Products

WooCommerce can automatically hide empty categories. If a category has no published products assigned to it, it may not appear or will link to a blank archive page.

に行く WooCommerce > Settings > Products > Display and review the “Hide categories with no products” setting. Either assign a published product to the category or disable that setting.

✅ Fix 3: You’re Using a Block Theme (FSE)

Block themes like Twenty Twenty-Four don’t have an Appearance > Menus screen at all. Navigation is managed through the block editor’s Navigation block instead.

に行く Appearance > Editor > Navigation, add a Custom Link pointing to your category archive URL (e.g., yoursite.com/product-category/shoes). For a styled mega menu with category images and subcategory columns, GutenKit’s Mega Menu block handles this visually without any code.

✅ Fix 4: The Category Was Created After the Menu Was Saved

WordPress menus are static. Therefore,  new categories don’t appear automatically. Return to 外観 > メニュー, add the new category, and save again. If you want categories to populate dynamically as they’re created, ElementsKit’s WooCommerce category menu widget handles this automatically.

✅ Fix 5: A Caching Plugin Is Serving an Old Version

If you’ve saved the menu but changes aren’t showing on the front end, your caching plugin is likely serving a stale version of your header. Purge all cache from your caching plugin dashboard, then check in an incognito window to confirm the update is live.

FAQs on Adding WooCommerce Product Categories in Menu

Why are my WooCommerce product categories not showing up in the Appearance > Menus list? 

By default, WordPress hides specific custom taxonomies to keep the menu interface clean. To fix this, go to 外観 > メニュー, click the “Screen Options” tab at the very top right of the screen, and check the box next to “Product Categories.” They will instantly appear in the left-hand column, ready to be added.

Can I show product images next to the category name in the menu? 

Yes. While the default WordPress menu only supports plain text, using a mega menu plugin like ElementsKit or a block builder like GutenKit allows you to design custom dropdown panels. Inside these panels, you can drag and drop image widgets right next to your category text links.

 How do I link a menu item to a specific product tag instead of a broad category? 

The process is identical to adding a category. In the menu editor, open “Screen Options” and check “Product Tags.” You can then add specific tags (e.g., “Summer Collection”) directly to your navigation bar, guiding users to highly specific, filtered product groupings.

 Will adding a lot of product categories slow down my WordPress site?

Adding standard text links to your menu will not slow down your site. However, if you use a mega menu builder and fill multiple dropdowns with heavy, uncompressed product images or complex dynamic product queries, it can impact page load times. Always optimize your images and use caching.

Can I create a dropdown hierarchy for parent and child product categories? 

Absolutely. Once you have added your parent category (e.g., “Men’s Clothing”) and child categories (e.g., “Shirts”, “Pants”) to the menu structure, simply drag the child items slightly to the right underneath the parent item. WordPress will snap them into place as a sub-menu dropdown.

How do I highlight a specific WooCommerce category, like “Sale”, so it stands out in the menu? 

You can draw attention to a specific menu item by using the CSS Classes feature in the WordPress menu editor to change its text color, or by utilizing plugins like ElementsKit to add an eye-catching “Badge” (like a red “Hot” or “Sale” sticker) directly attached to the category name.

 Is it possible to hide certain product categories in the menu from logged-out users? 

Native WordPress does not offer visibility control for menu items out of the box. To restrict menu items based on user login status (e.g., hiding a “Wholesale Products” category from regular guests) or user roles, you will need to utilize a dedicated menu visibility plugin or advanced conditional display features within your builder addon.

Can I add WooCommerce product search to my navigation menu?

 Yes. In Gutenberg themes, use the Search block inside the Navigation block. In Elementor with ElementsKit, you can add a WooCommerce product search widget directly inside a mega menu column. For classic themes without a page builder, you can add a search widget to a header widget area instead.

Can I show category images in my WooCommerce menu?

Not with the native WordPress menu builder. It only supports text links. To show category images inside a dropdown or mega menu, you need a plugin like ElementsKit (for Elementor) or GutenKit (for Gutenberg). Both allow you to add images, icons, and styled category cards inside your navigation menu.

How do I hide certain WooCommerce categories from the menu for logged-out users?

Native WordPress doesn’t have built-in menu visibility controls. To restrict WooCommerce menu categories based on login status or user role. For example, to hide a Wholesale category from non-registered visitors, you need a conditional menu visibility plugin or the advanced display conditions available inside ElementsKit.

Can I add subcategories as dropdown items under a parent WooCommerce category in the menu?

Yes. In the native WordPress menu builder, add the parent category first, then add subcategories and drag them slightly to the right underneath the parent to nest them as dropdown items. With ElementsKit or GutenKit, you can build multi-column mega menu dropdowns that group subcategories visually with images and descriptions.

まとめ!

Since the navigation menu appears at the top of the web page, visitors can easily access the most important pages and links. eCommerce owners want to insert their main pages like blog, shop, my account, and product categories, into the website navigational menu.

このガイドでは、WooCommerceの商品カテゴリーをメニューに追加する2つの方法を概説しました。さらに、次のような便利なプラグインも紹介しました。 グーテンキット そして ElementsKit, which allow you to implement this functionality and customize your menu with ease, no coding required.

時間をかけてこれらのオプションを調べ、WooCommerce 製品カテゴリの魅力的でユーザーフレンドリーな外観を作成してください。



Moinのアバター

モイン

Moin is an Elementor and Gutenberg specialist who partners with you to build professional, end-to-end WordPress sites that turn aesthetic design into conversion-driven results.

コメント

コメントを残す

メールアドレスが公開されることはありません。 が付いている欄は必須項目です

目次