




 Japanese
  English
  German
  Spanish
  Italian
  French
  Danish
  Portuguese
  Swedish
  Polish
  Korean
Web サイトにアクセスしたときに最初に気づくことは何ですか?
ヘッダーですよね?
はい!私たちは皆同じです!
ヘッダーは、サイト訪問者の目に最初に目を引くものです。ヘッダーは Web サイトのバックボーンと考えることができます。
電子商取引サイト、ブログ サイト、ソーシャル メディア、フォーラム、または個人のポートフォリオ サイトを所有しているかどうかは関係なく、シンプルでナビゲートしやすい Elementor の透明なメニューを追加する必要があります。
ただし、メニューに単純なヘッダーを追加するだけでは十分ではありません。視聴者に最高のユーザー エクスペリエンスを提供するには、ヘッダーをカスタマイズする必要があります。 Elementor のヘッダー背景を透明にしてスティッキーにすることで、それを実現できます。
この記事では、Elementor を使用して WordPress に透明なスティッキーヘッダーを追加する最も高度かつ時間を節約する方法を紹介します。
訪問者があなたの Web サイトを一目で気に入るような Elementor スティッキー ヘッダーを作成しましょう。
Elementskit を使用すると、Elementor 用のカスタム Elementor 透明ヘッダーを数分以内に作成できることをご存知ですか?しましょう Elementskit を無料で試してみる
WordPress のスティッキー透明ヘッダーとは何ですか?
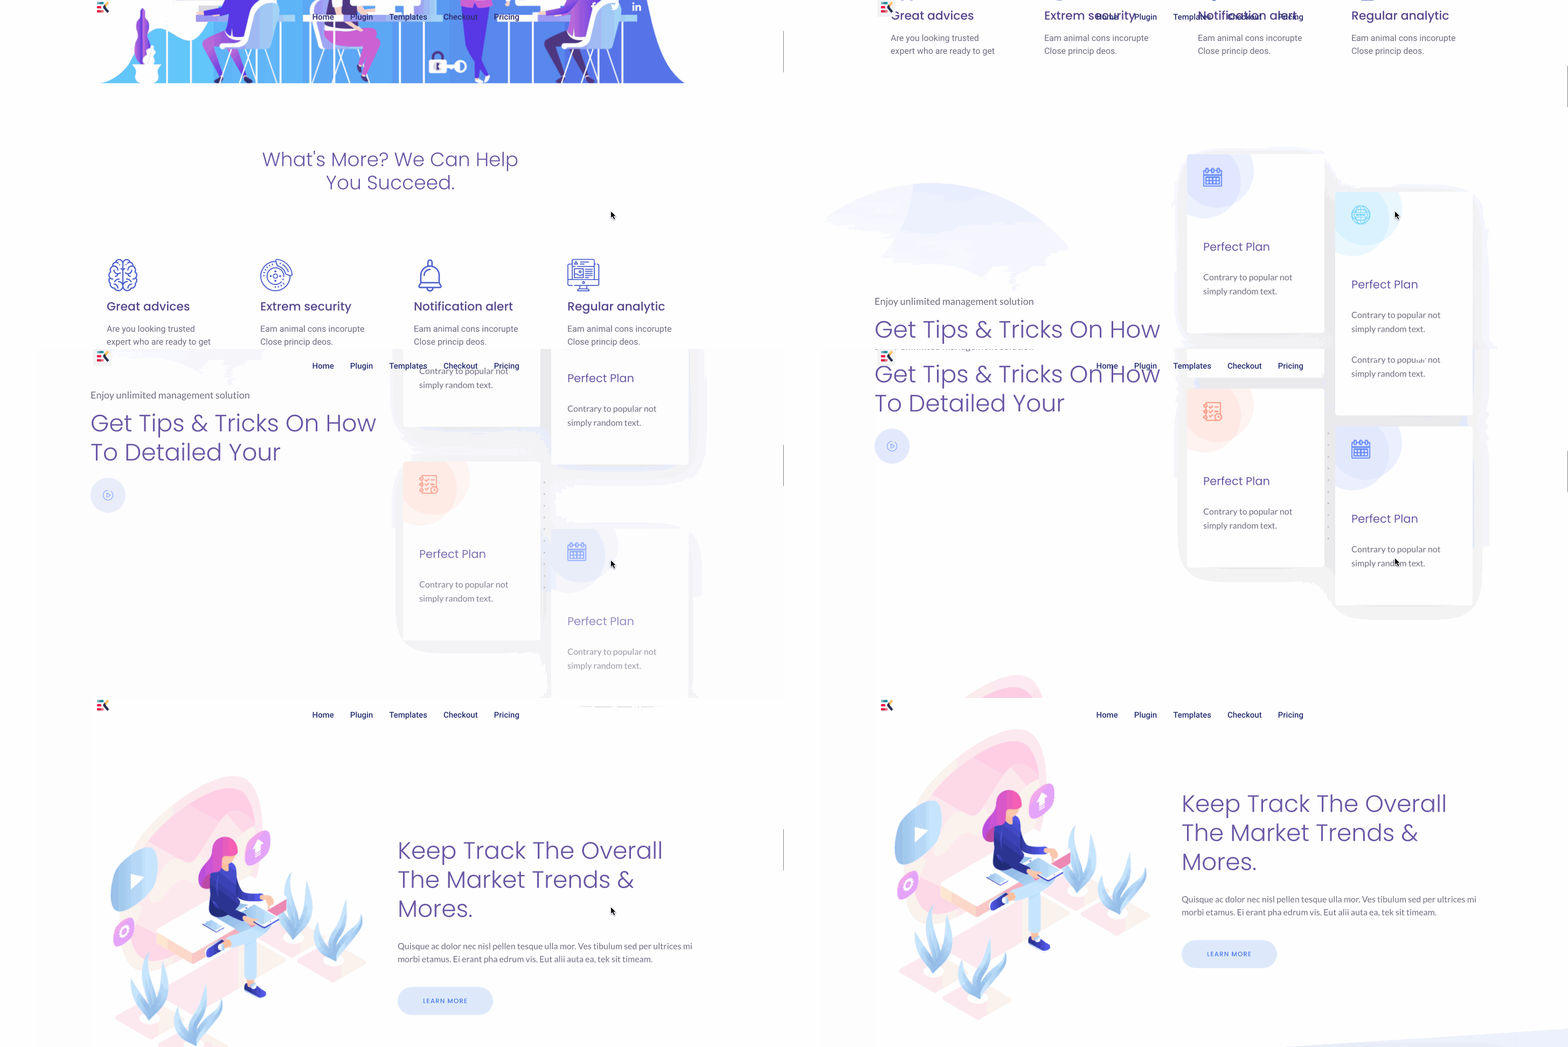
粘着性のある透明なヘッダーは、ユーザーが上下にスクロールしても固定されたまま透明になるヘッダーを定義します。このヘッダーを使用すると、サイトをスクロールするときにサイトの背景をシームレスに表示できます。
必要なもの
このチュートリアル ブログに従うには、次のものが必要です。
- WordPress サイト
- Elementorページビルダー
- ElementsKit
- 時間は 5 ~ 10 分です。
全部わかりましたか?準備は完了です。
Elementorの透明ヘッダー背景をデザインしてみよう!
新しいヘッダー テンプレートまたは新しいページを使用してヘッダーを作成できます。ただし、私は常に、Elementor を使用して透明なスティッキー ヘッダーをデザインする新しいページを作成することを好みます。
ヘッダーのデザインが完了したら、そのテンプレートをコピーしてヘッダー テンプレートに貼り付けるだけです。簡単、簡単ですよね?
Elementor を使用して WordPress で粘着性のある透明なヘッダーを作成する方法のガイドに移りましょう。
ステップ #1: 最初にメニューを作成する
Elementor スティッキー ヘッダーを追加するには、まずメニューを作成することから始める必要があります。新しいメニューを作成するには、[wp-admin] > [外観] > [メニュー] に移動します。
メニューの作成が完了したら、メニュー名に「Primary」を付け、「メニューを保存」をクリックします。すでにメニューを作成している場合は、次のようになります –
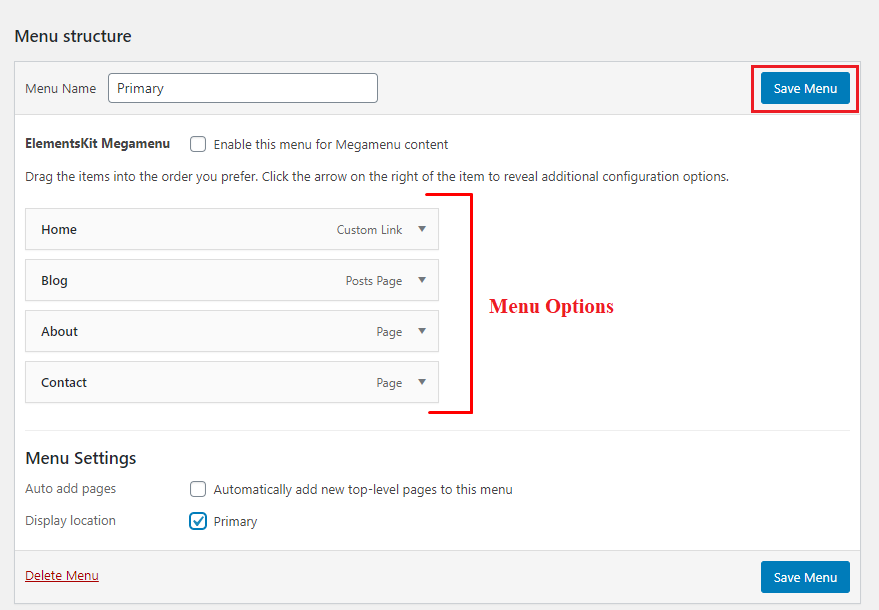
「」に気づくかもしれません。メガメニュー」のセクションを参照してください。基本的に、これは ElementsKit の最も便利な機能の 1 つです。メニュー セクションに多くのカテゴリやオプションを追加したい場合は、この Megamenu 機能を使用できます。
⭐⭐ 詳細なガイドをご覧ください Elementorでメガメニューを作成する方法.
ステップ#2: ヘッダーテンプレートを作成する
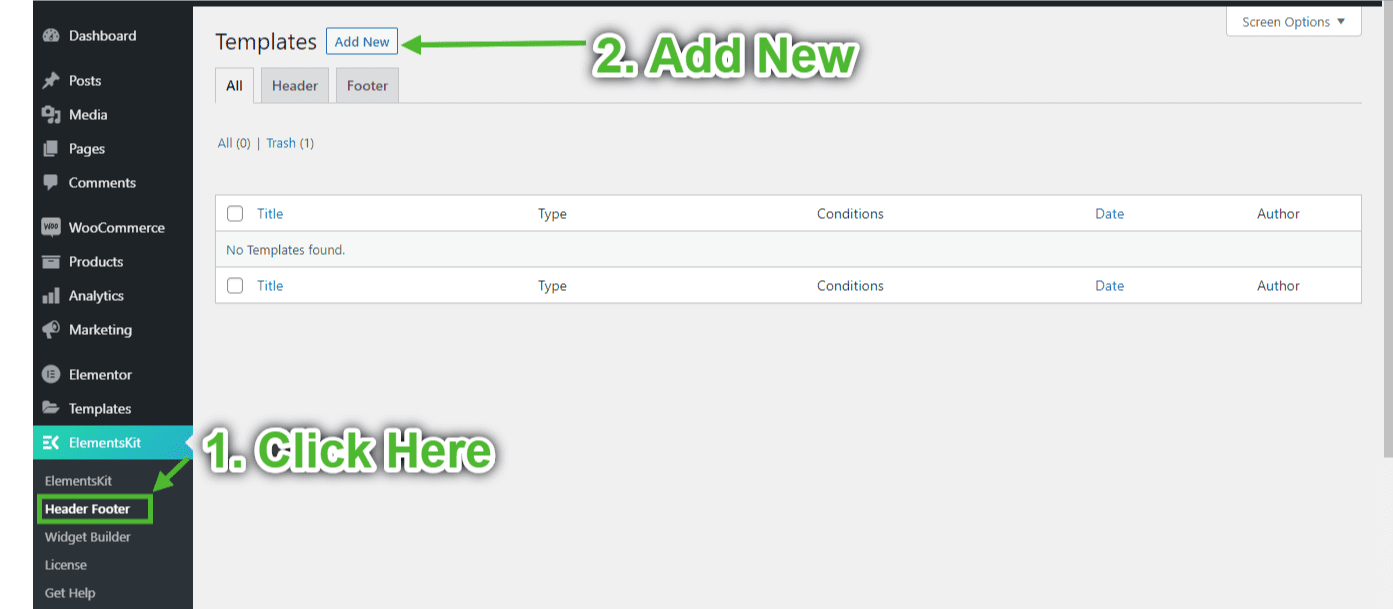
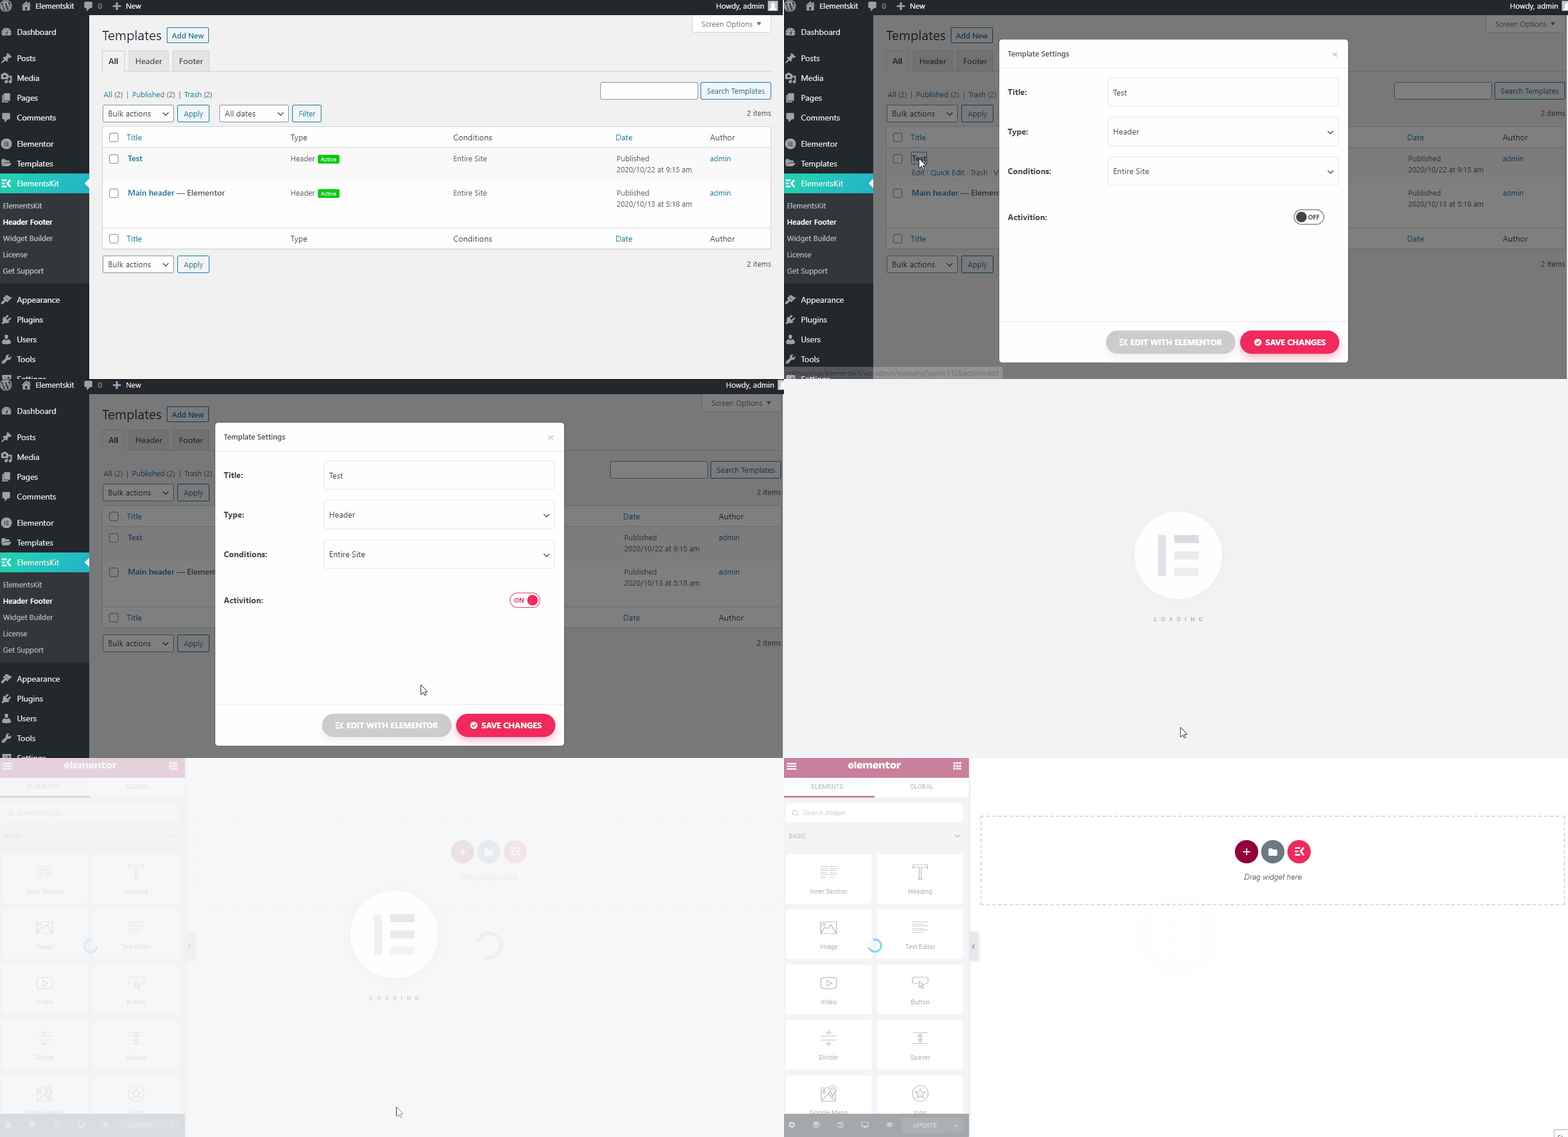
ElementsKit の「ヘッダー フッター」セクションに移動します。 「新規追加」をクリックして、新しいヘッダーテンプレートを追加します。
テンプレート設定が表示されます。ここでは次のタスクを実行する必要があります。
- ヘッダーにタイトルを付けます。
- 「タイプ」設定ドロップダウンから「ヘッダー」を選択します
- お好みの条件をお選びください。ドロップダウンから「サイト全体」を選択しました。
- スイッチをオンにしてヘッダー テンプレートをアクティブにします。
ステップ #3: Elementor で編集する
上記のすべての作業が完了したら、左下の「Elementor で編集」ボタンをクリックします。
ステップ #4: ヘッダーのデザインを選択する
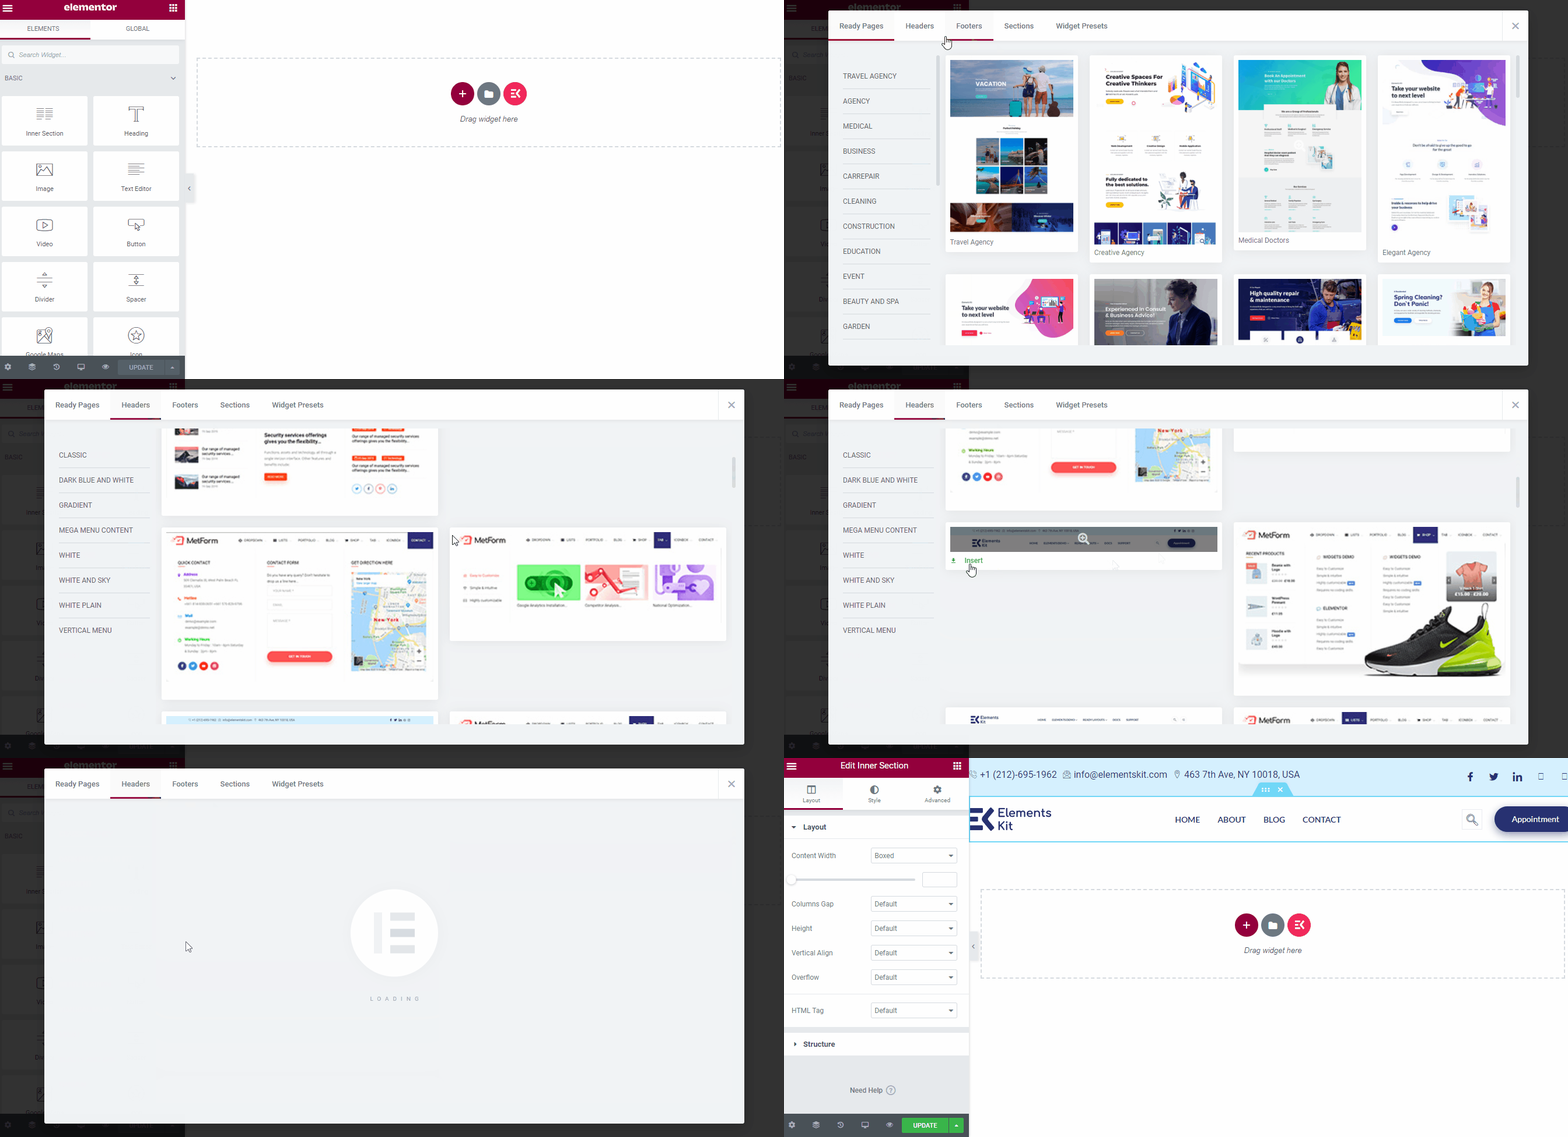
このセクションでは、ElementsKit の組み込みヘッダー ライブラリからヘッダー デザインを選択できます。
次に進むには、ElementsKit アイコンをクリックし、美しいデザインを選択し、「挿入」ボタンをクリックしてヘッダーを Elementor にインポートします。
ステップ #5: Elementor の透明なメニューを貼り付ける
ヘッダーのデザインはすでに選択されています。次に、ヘッダーを上部の位置に貼り付けます。このタスクについては、Elementor の「詳細」タブを参照してください。詳細タブから「ElementsKit Sticky」を見つけます。ドロップダウンからメニューを「上部に固定」にします。
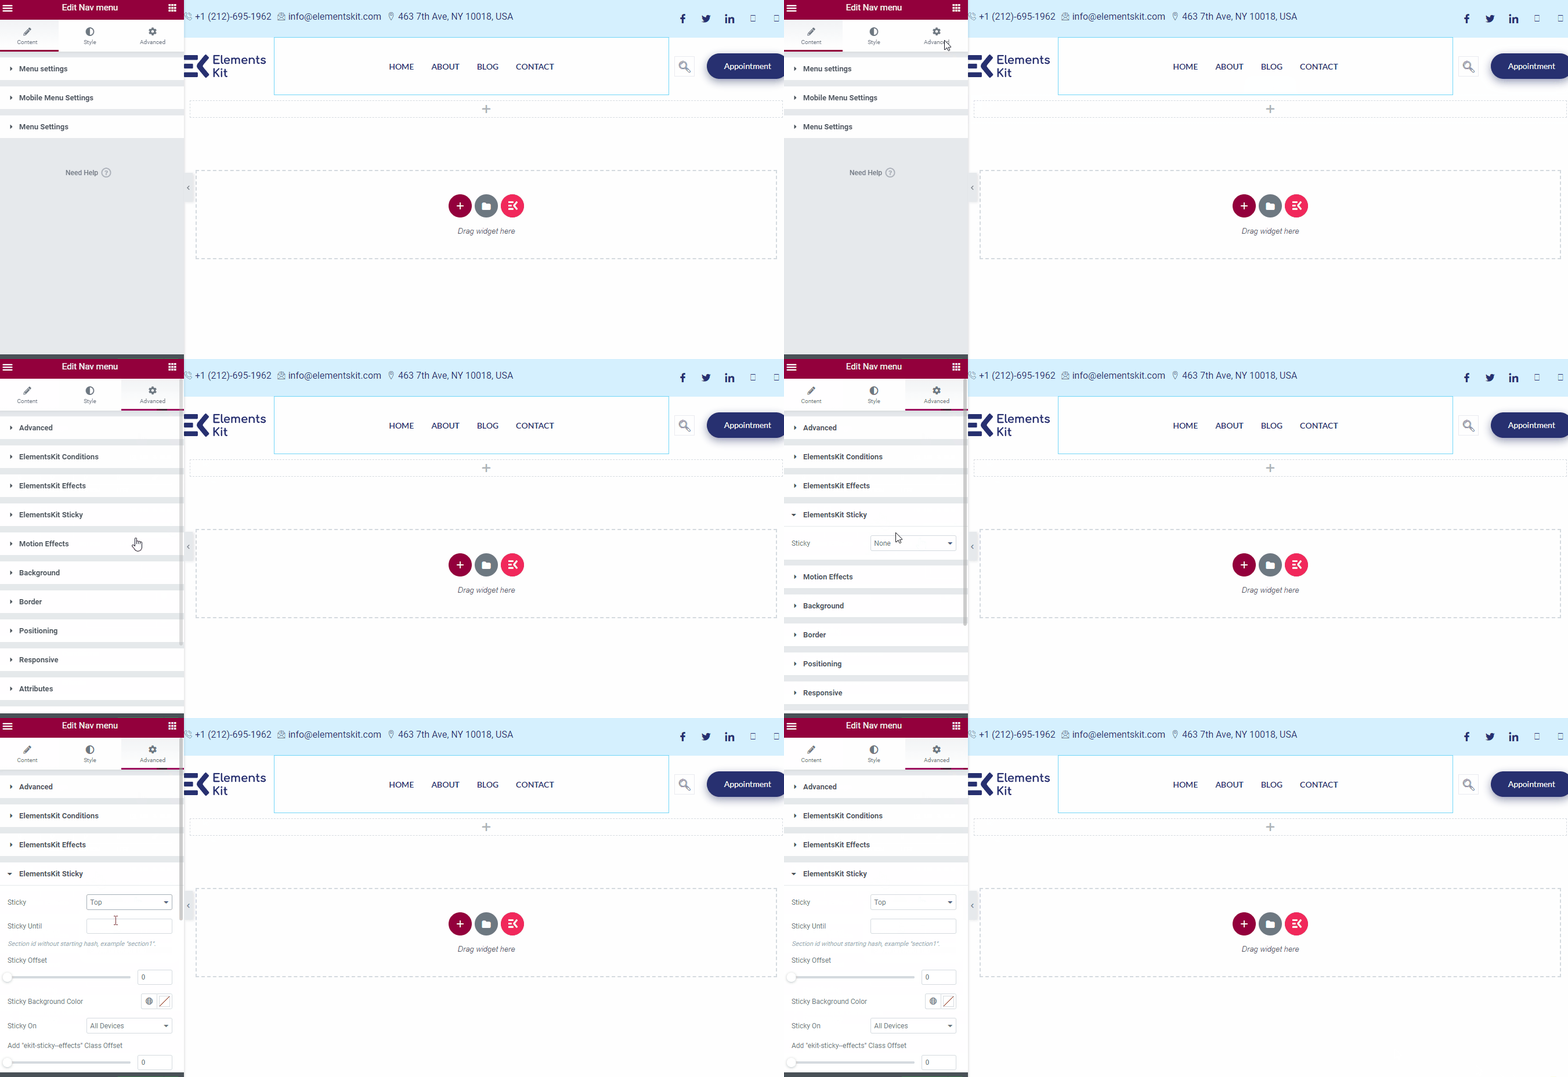
特定のセクションまでヘッダーを固定するように選択できることに注意してください。その場合は、Sticky until を定義します。 0 ~ 100 の範囲でヘッダーに Sticky Offset を適用することもできます。
ステップ #6: Elementor のヘッダーをコンテンツの上に透明にする
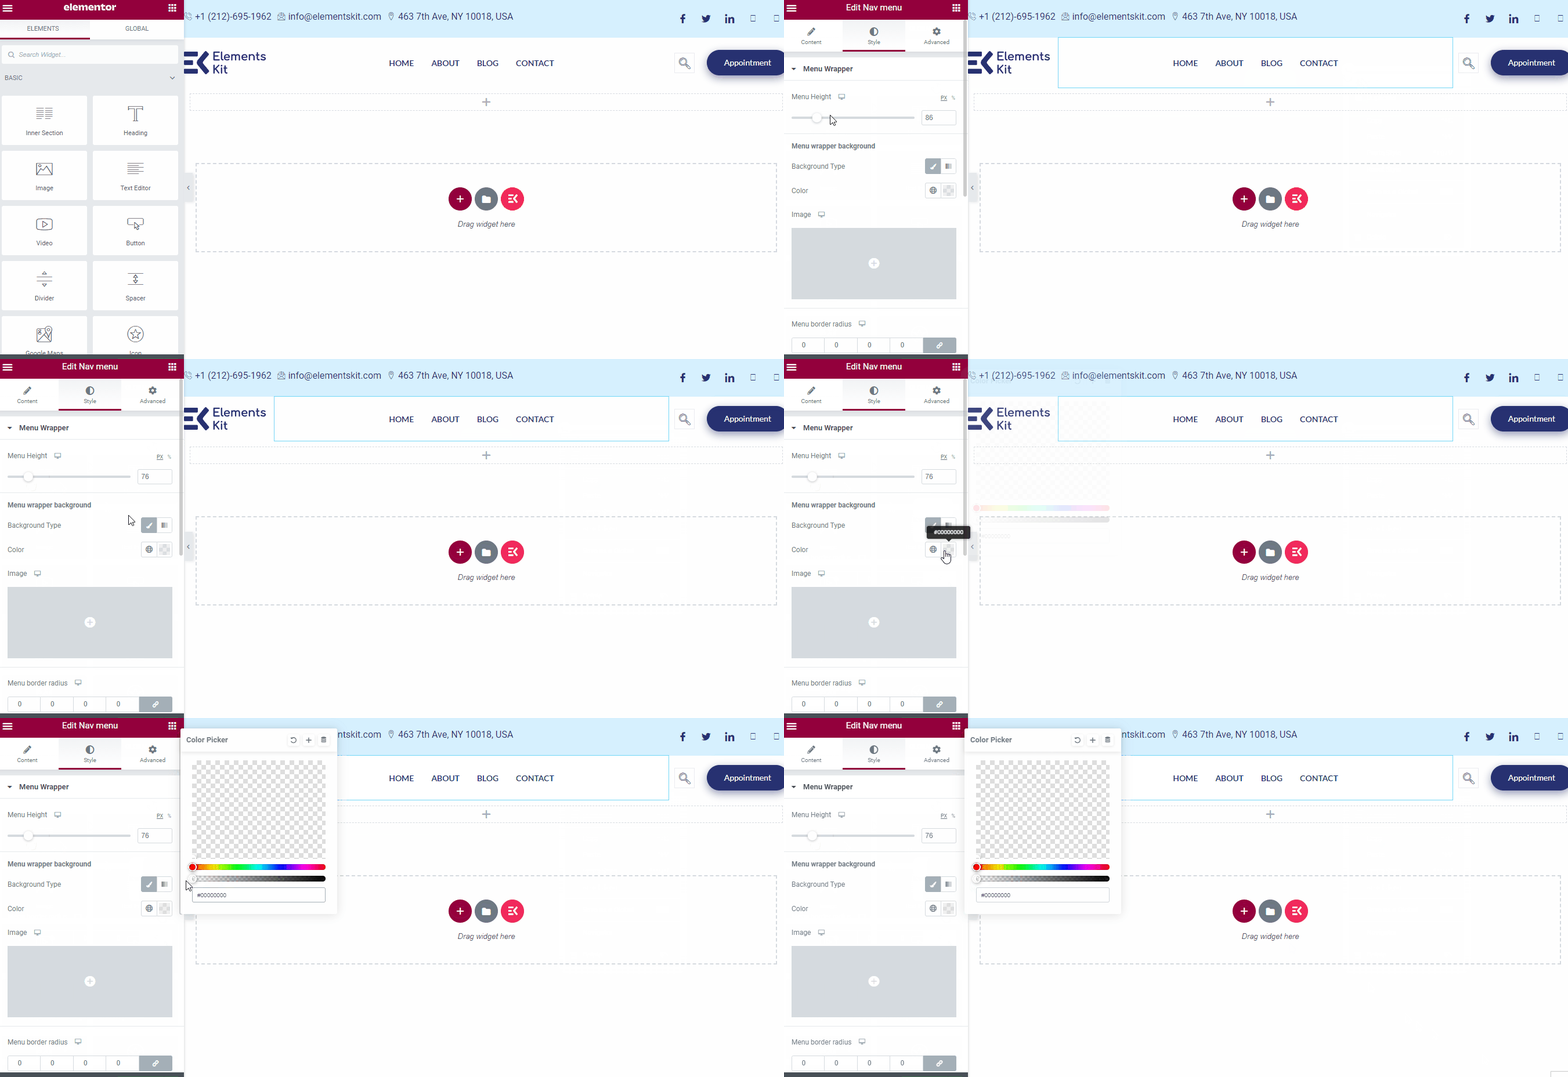
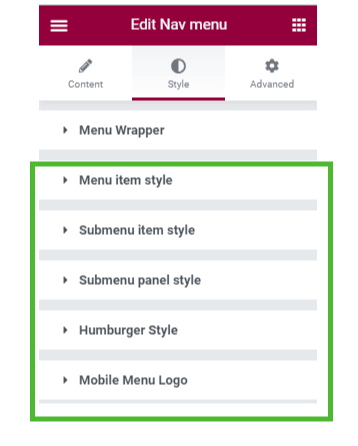
次に、「スタイル」タブに移動します。 「メニュー ラッパー」セクションから、選択した Elementor の透明なメニューの高さを設定します。
メニュー ラッパーの背景タイプ「クラシック」を選択し、左端のスライダーを使用して色を削除します。カラーコードを手動で入力することもできます。その場合は、「#00000000」と入力すると背景が透明になります。さらに、コンテンツ タブからコンテンツ上の Elementor ヘッダーを調整することもできます。
ヘッダーをより洗練された魅力的なものにするために、次の設定のいずれかを利用することもできます。
ステップ #7: テスト Elementor の透明ヘッダー
さて、この透明ヘッダーはElementorと別のものを使用して設計しました。 Elementor 透明ヘッダー アドオン プラグイン ElementsKitと呼ばれます。さて、結果を確認してみましょう。
透明性をより深く理解するために、ヘッダーの下にさらにいくつかのセクションを追加できます。このチュートリアルでは、ヘッダー セクションの下に 2 つの画像を追加しました。最終的な出力は次のとおりです。
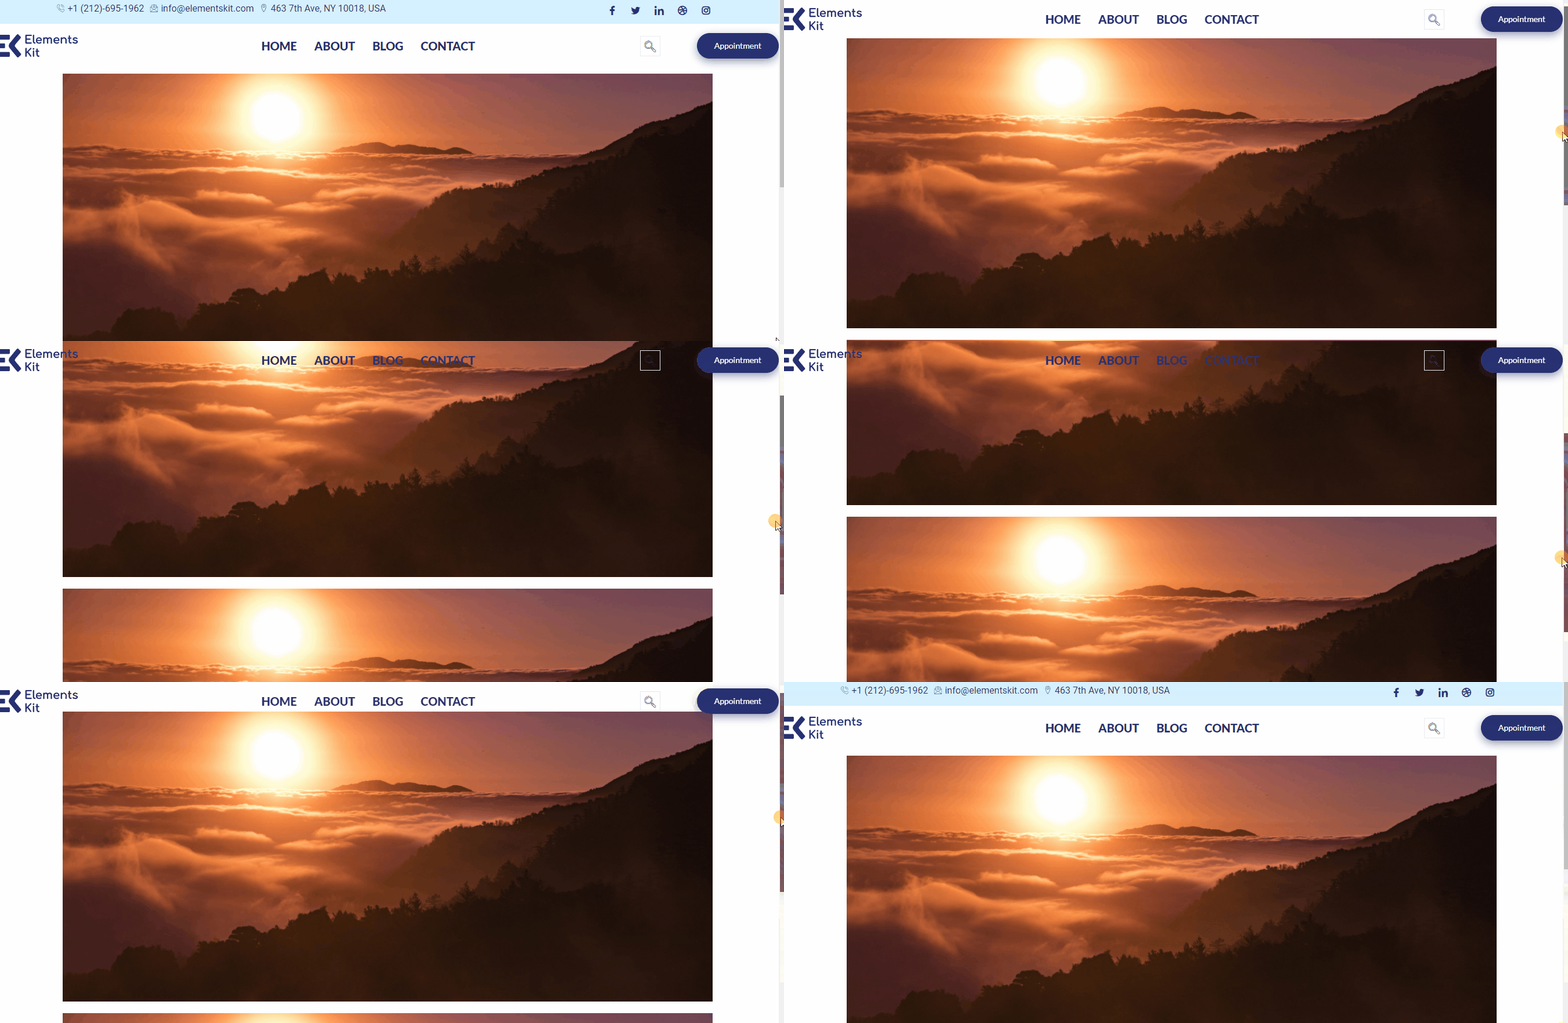
それでおしまい! Elementor の透明なヘッダー背景が正常に作成されました。これで、このヘッダーをコピーして、Web サイトの任意のページに適用できます。
まだ混乱していますか?このチュートリアルビデオをご覧ください:
ElementsKit ユーザー向けのさまざまなヘッダー デザイン
ElementsKit には、すぐに使用できる多数の組み込みヘッダー デザインが付属しています。これらはすべてスタイリッシュでユニークで、ユーザーが Web サイト全体をナビゲートするのに役立ちます。
ElementsKit のヘッダー デザインをいくつか見てみましょう。

図 1 – Elementor スティッキー ヘッダー

図 2 – Elementor スティッキー ヘッダー

図 3 – Elementor スティッキー ヘッダー

図 4 – Elementor スティッキー ヘッダー

図 5 – Elementor スティッキー ヘッダー
これらのデザインは素晴らしいと思いませんか?はい、次を使用すると、このようなプレミアム デザインの膨大なリストにアクセスできます。 ElementsKit.
なぜ使用する必要があるのか 透明 Elementor スティッキーヘッダー?
Elementor の粘着性のある透明なヘッダーが気に入るかどうかに関係なく、ぜひ試してみてください。これらのゴージャスでトレンディーなヘッダーは、Web サイトに大きな価値をもたらします。ここでは、Web サイトに透明なスティッキー ヘッダーを使用する理由の上位 4 つをリストしました。
より良いブランディング
何千もの企業がプライマリヘッダーに自社のロゴを掲載しています。それはただの偶然だと思いますか?
いいえ!
あ Lucidpress のレポートによると、ブランド ロゴの一貫した表示が増加している 収益は約 33% 減少しました。つまり、視聴者にブランドロゴを表示するだけで会社の収益を増やすことができます。
Elementor の粘着ヘッダーにロゴを配置すると、Web サイト全体で表示されます。したがって、人々はあなたのロゴに長い間注目するでしょう。あなたのブランドがより多くの人に知られるようになり、収益も増加します。
ユーザーエクスペリエンスの向上
スティッキーヘッダーを使用すると、ユーザーは Web サイトをより速く閲覧できるようになります。最小限の労力で必要な情報を見つけることができます。
一方、固定ヘッダーを使用すると、ユーザーが情報を見つけるのに時間がかかります。プライマリヘッダーを使用するために常に一番上までスクロールしたいと思う人はいません。その結果、ユーザーはウェブサイトから離れてしまいます。
まあ、ヘッダーを上部に貼り付けることもできます。しかし、これであなたの義務は終わりではありません。現在、ほとんどの人がモバイルデバイスを介してウェブサイトを閲覧しています。ヘッダーを上部に貼り付けると、スペースが消費され、表示されるコンテンツが少なくなります。ユーザーフレンドリーではありません。
この問題を解決するには、Elementor の透明ヘッダーを使用する必要があります。したがって、ヘッダーを表示したままにして、訪問者により多くのコンテンツを表示することができます。それはまさに双方にとってwin-winの状況ですよね?
検索エンジンのランキングを向上させる
ウェブマスターであれば、検索エンジンもユーザー エクスペリエンスを非常に重視していることをご存じかもしれません。これは Google の最も重要なランキング要素の 1 つです。つまり、粘着ヘッダーだけが Google でのウェブサイトのランキングを向上させ、より多くの潜在的な顧客を呼び込むのに役立つことを意味します。
顧客を失いたいですか?私はそうは思わない!
ウェブサイトのナビゲーションに問題が発生したことがありますか?
まあ、私はたくさんそれに直面しました!
Web サイトにアクセスしているときに常に一番上までスクロールすることは、最も面倒な、または非常に退屈な作業です。視聴者に余計な迷惑をかけたくない場合は、今すぐ標準ヘッダーを破棄する必要があります。
その代わりに、Elementor のカスタム透明ヘッダーを設計し、よりスムーズなブラウジング エクスペリエンスを顧客に提供します。さらに、ナビゲーションを非常に使いやすくすることもできます。 1 ページのナビゲーション WordPress.
最後の言葉
ここまでで、Elementor の透明なヘッダー背景を使用するだけでどれほどのメリットがあるか理解できたはずです。今すぐあなたの Web サイトに透明なスティッキー ヘッダーを追加して、Web サイトを最大限に活用してください。
できれば、カスタマイズされた透明なスティッキー ヘッダーをたくさんデザインできると思います。 ElementsKit エレメント アドオン このガイドラインに従って、Elementor を使用してください。
Elementor のスティッキー透明ヘッダーに関してさらに質問がある場合は、コメント セクションでお知らせください。私たちはあなたの問題を解決することを楽しみにしています。
良い一日を!
よくある質問 (FAQ)
理想的なヘッダーの要素は何ですか?
優れたヘッダーには、ナビゲーションをスムーズかつ柔軟にするための重要な要素が含まれている必要があります。理想的なヘッダーに必要な要素は次のとおりです。
- ロゴ
- 検索バー
- 連絡先詳細
- 言語切り替え
- ナビゲーションメニュー
- ソーシャルメディアアイコン
- CTA
- ショッピングカートのアイコン
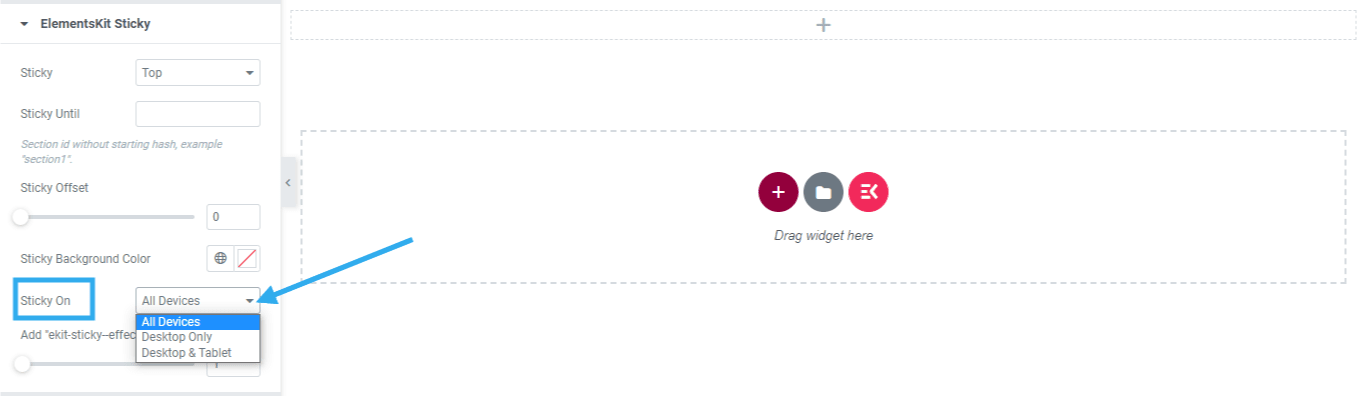
さまざまなタイプのデバイスに透明ヘッダーを固定するにはどうすればよいですか?
幸いなことに、スティッキー ヘッダーをオンにしておくデバイスのタイプを選択できます。モバイル、タブレット、またはデスクトップ ユーザーに対して透明なスティッキー ヘッダーを設定するかどうかは、完全に自由に設定できます。すべてのタイプのデバイスに対して透明ヘッダー スティッキーを設定する場合は、すべてのデバイスに対してスティッキーを設定していることを確認してください。
良いヘッダーとは何でしょうか?
優れたヘッダーは読みやすく、サイトの重要なページがすべて含まれている必要があります。さらに、色のコントラストとフォントも、見やすさに重要な役割を果たします。ヘッダーにあまりにも多くの項目を含めるのではなく、拡張可能にする必要があります。重要な要素を含めることで、ブランド アイデンティティを適切に保持し、簡単なナビゲーションを確立する優れたヘッダーも作成できます。
Elementor Sticky ヘッダーの設定にカスタム CSS を使用する必要がありますか?
いいえ。ElementsKit pro を使用すると、ElementsKit Sticky 設定から必要なものをほぼすべて入手できます。 Elementor の透明なスティッキー ヘッダーを構築するためにカスタム CSS を使用する必要はありません。ただし、それでもカスタム CSS を追加したい場合は、「Add kit-sticky-effect Class Offset」と機能テーマを利用して、CSS コードで作業を完了します。
粘着性はあるが透明ではない Elementor ヘッダーを使用できますか?
はい、できます。ヘッダーを透明にせずにスティッキーにしたい場合は、スティッキーヘッダーを「top」に設定し、「スティッキー背景色」設定から背景色を希望の色に変更します。
Elementor Sticky Header を使用するには Elementor Pro が必要ですか?
いいえ、Elementor の無料版と ElementsKit Pro をお持ちの場合は、Elementor ヘッダーを透明かつスティッキーにする設定がすべて完了しています。
したがって、急いで、ElementsKit を使用して WordPress サイトに Elementor 用のスティッキー ヘッダーを作成してください。ヘッダーを粘着性と透明性の両方を一度に作成できるのに、このチャンスを逃す必要はありません。



コメントを残す