


Creating a mega menu in Elementor is easy with ElementsKit, and it doesn’t require Elementor Pro. ElementsKit offers a dedicated Mega Menu module that lets you design rich, multi-column menus using Elementor’s visual editor.
Steps to Create a Mega Menu Using ElementsKit:
- Save the menu and assign it to your site location.
- をインストールしてアクティベートします ElementsKit プラグイン。
- に行く ElementsKit > Modules and enable メガメニュー.
- 案内する 外観 > メニュー and create or edit a menu.
- 有効にする メガメニュー for a menu item and choose the layout.
- クリック Elementorで編集する to design the menu content.
の ElementsKitのメガメニューモジュール plugin is a powerful feature in WordPress that allows you to create a category-based expandable WordPress dropdown menu with flexible layouts. Elementor Mega menus are easy to use and can be a great way to show the multi-level website menu in an organized way.
Watch our video guide on Elementor Mega Menu Building:
または、Elementor でメガメニューを作成する方法についてのステップバイステップの指示に従ってください。
前提条件: #
- Elementor, a page builder plugin (Free version is enough)
- ElementsKit プロ, a WordPress mega menu plugin for Elementor
WordPressメガメニューを作成する方法 エレメンター #
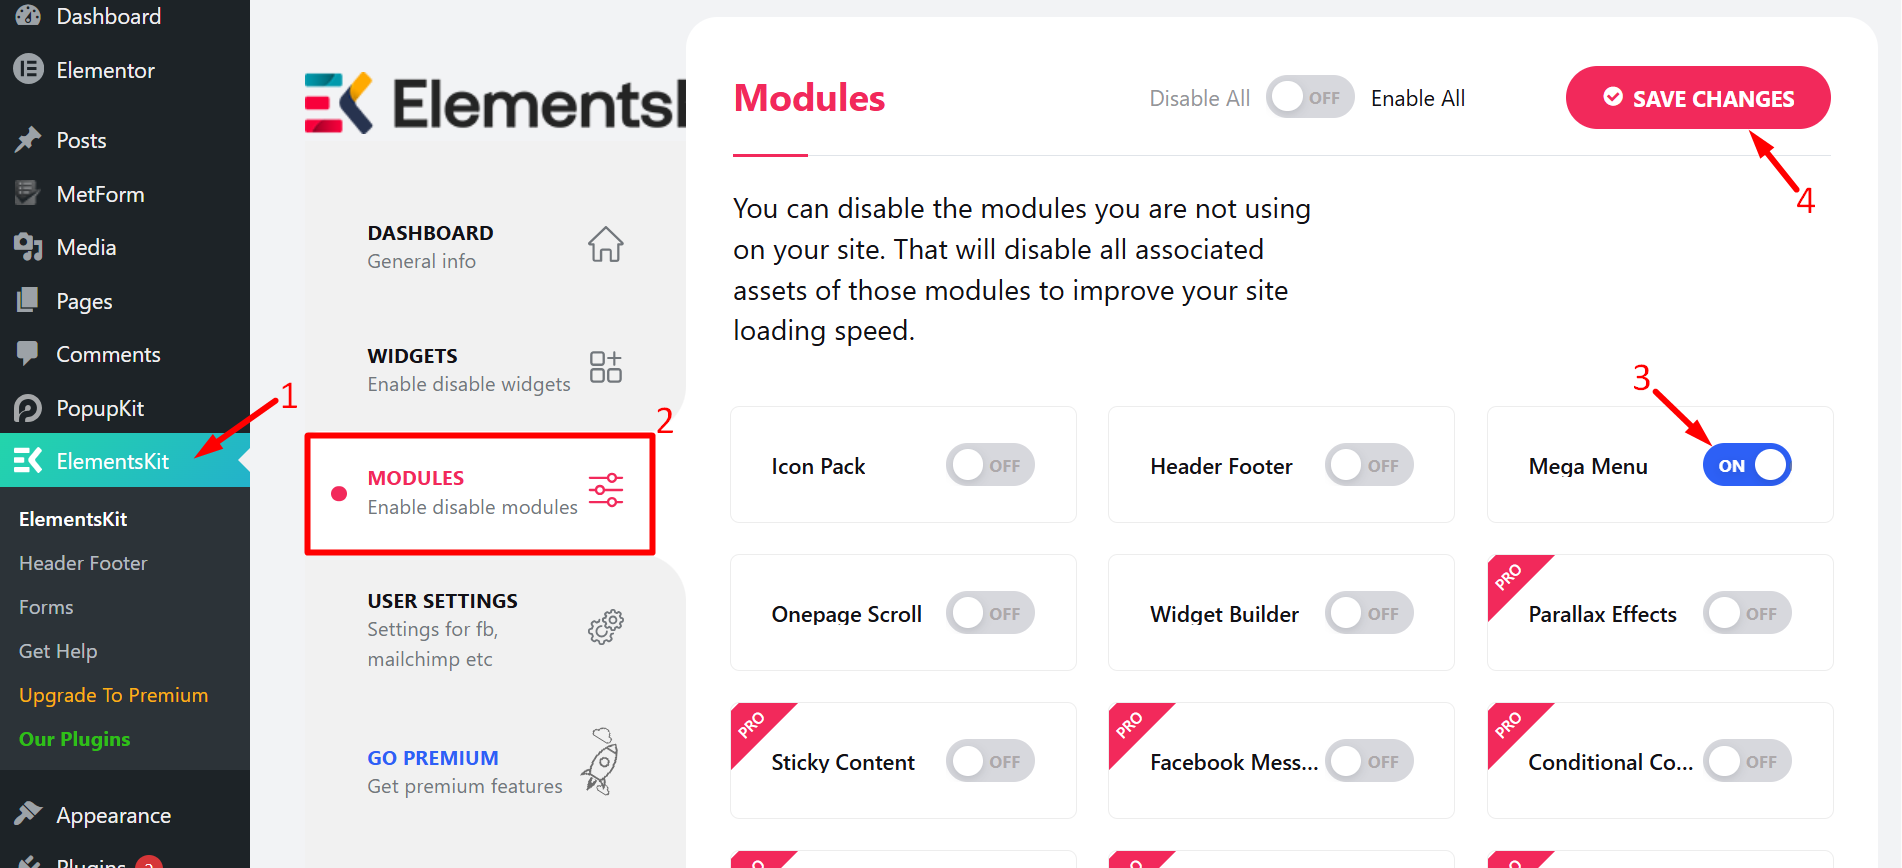
まず、 WordPressでElementorメガメニューを作成する ElementsKitを有効にしてください メガメニュー モジュール。
- 案内する ElementsKit on your WordPress dashboard
- に行く モジュール
- Find and turn ON Mega Menu
- 保存 変更
Step #1: Configure WordPress Menu #
に WordPressメガメニューを作成する on your website –
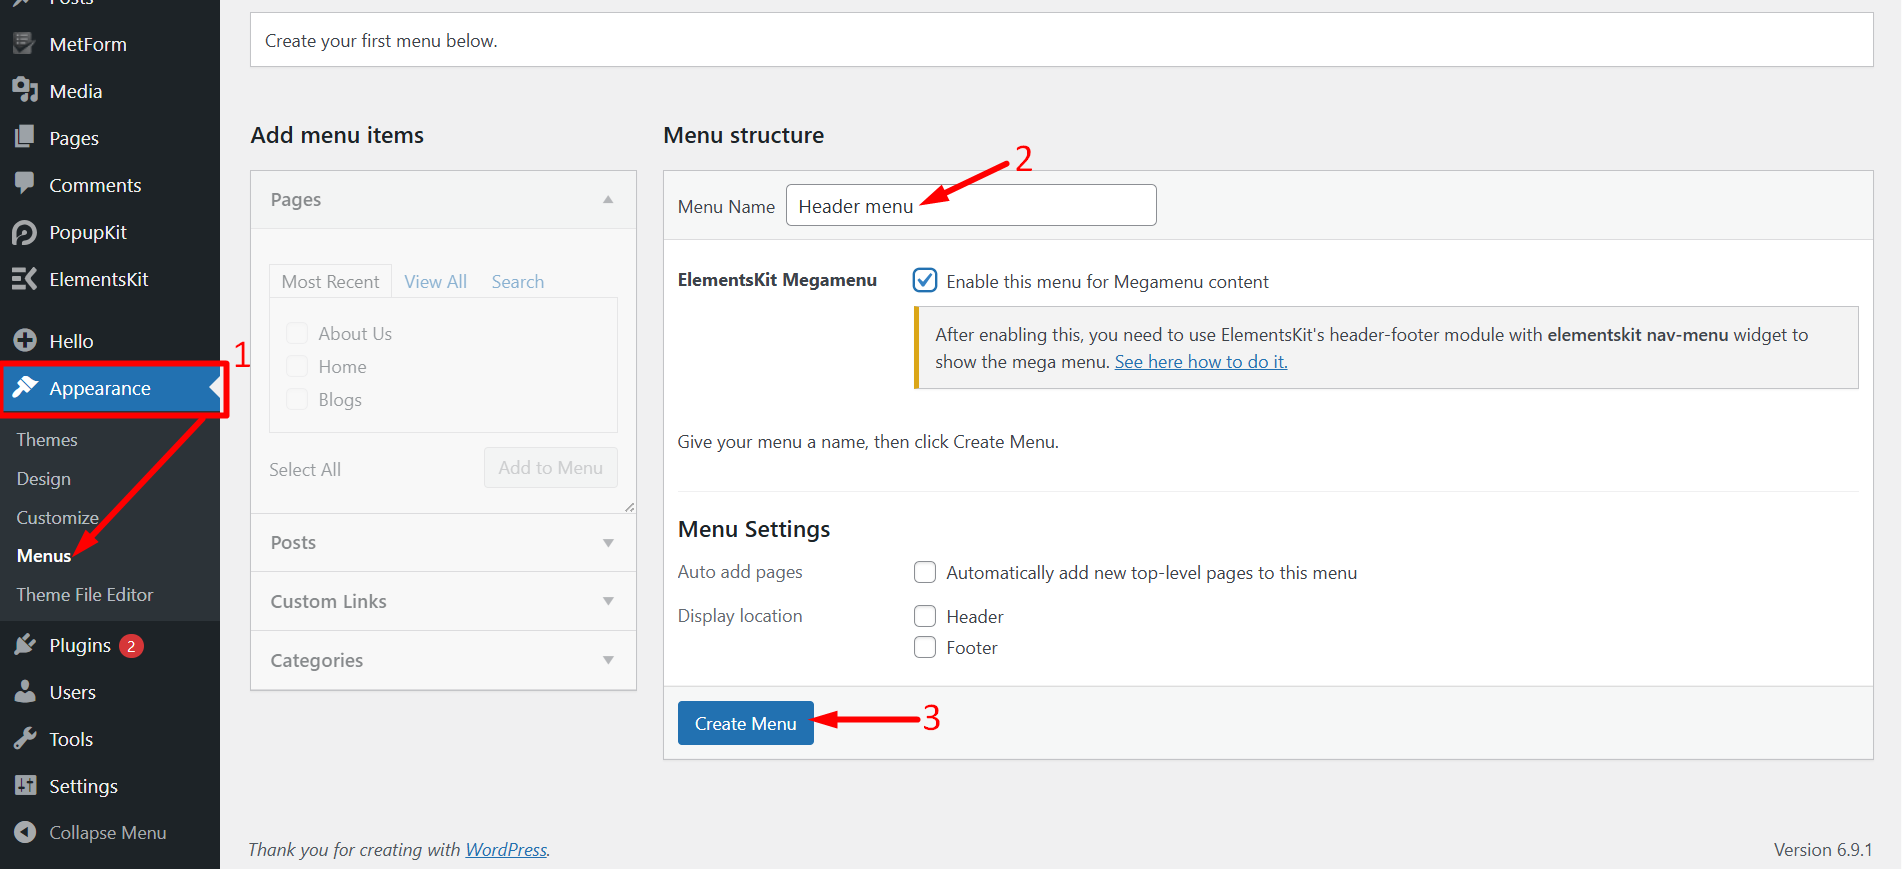
- 案内する Appearance > Menus WordPress ダッシュボードから。
- 入力します メニュー名.
- クリックしてください メニューの作成 ボタン。
Add pages to the mega menu そして変更を保存します。
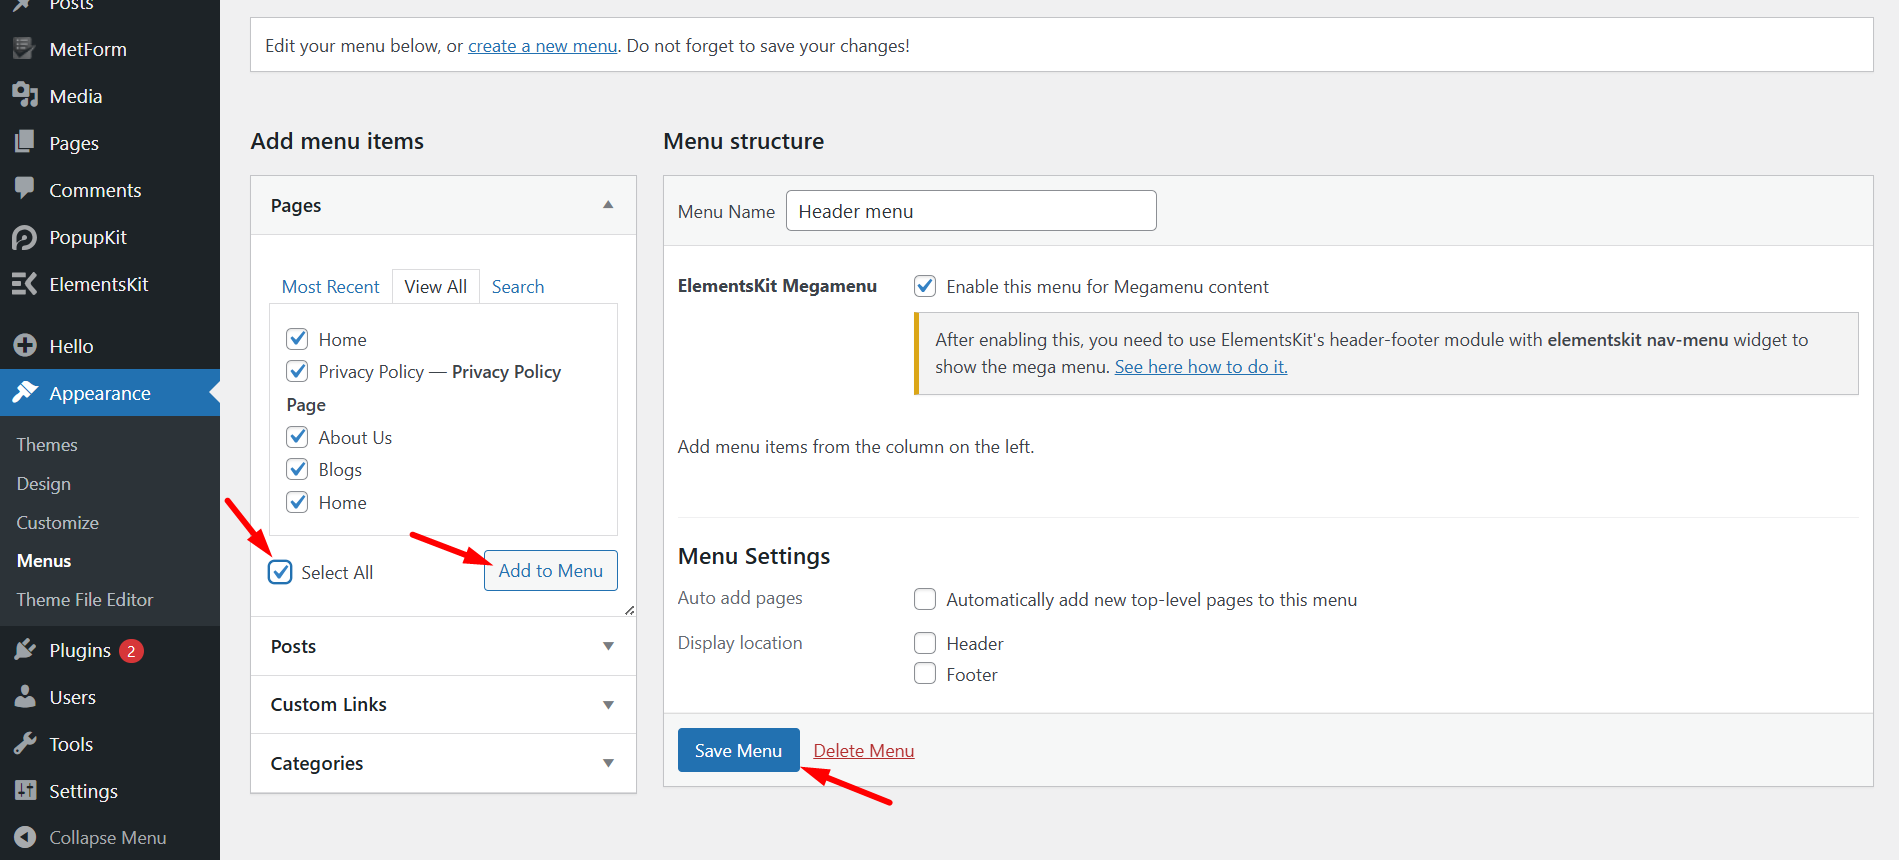
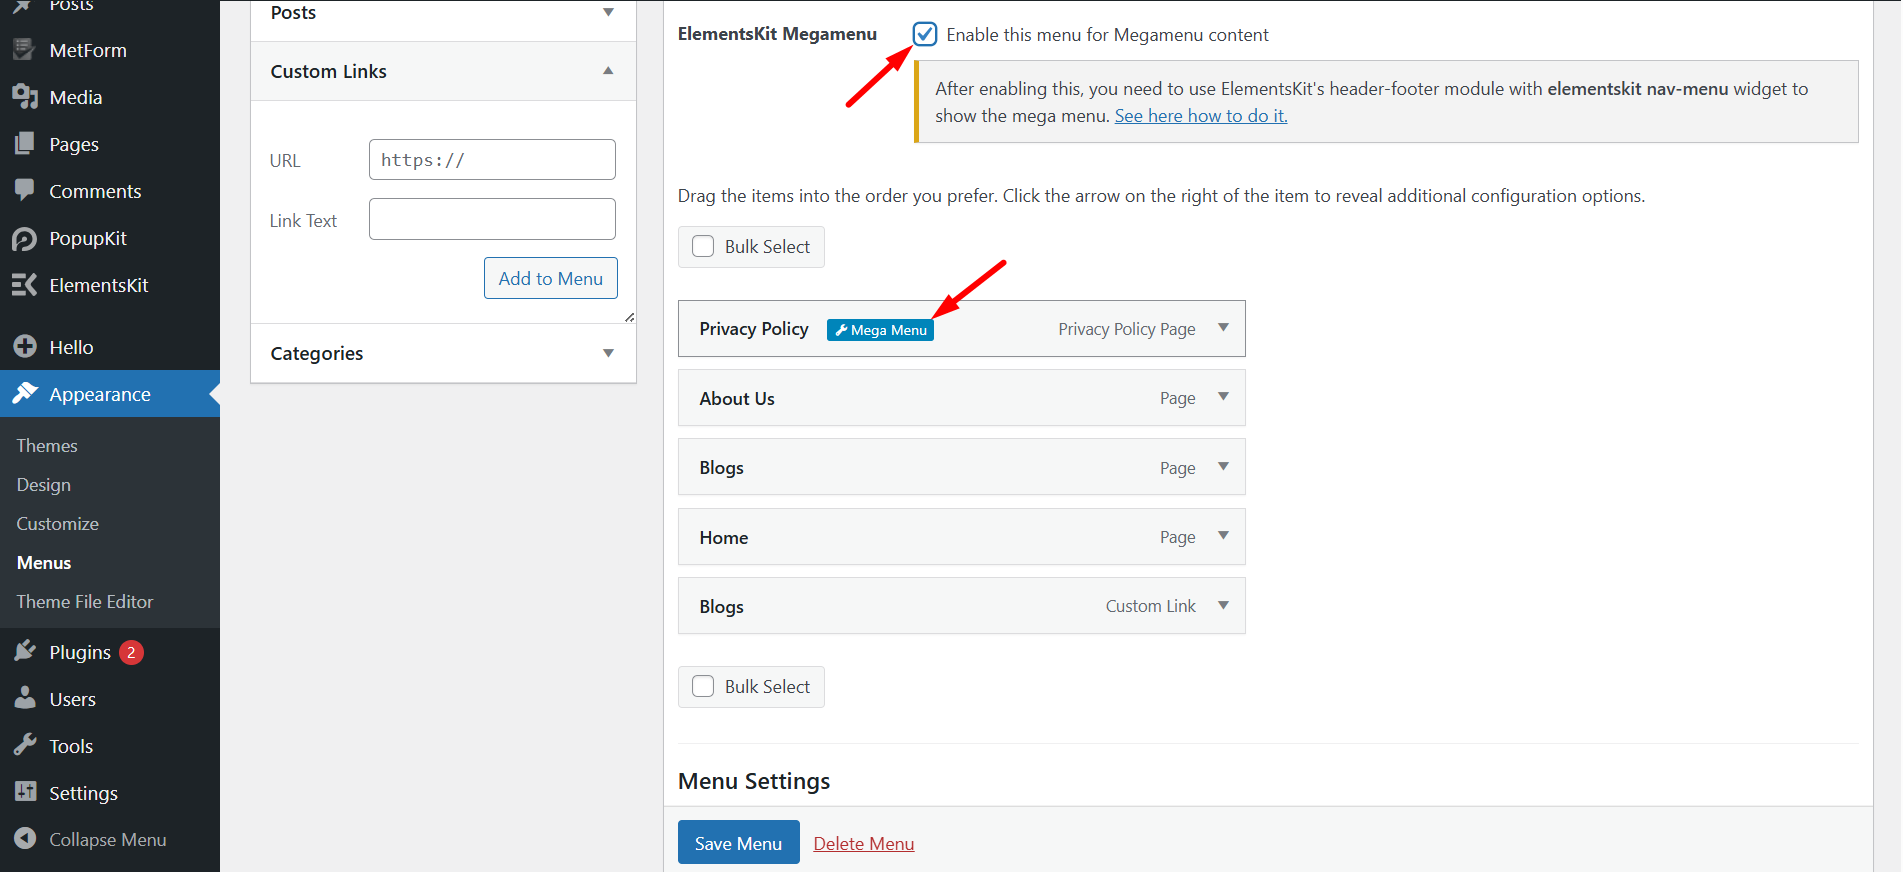
Now, you can メガメニューにアイテムを追加する。そのために、
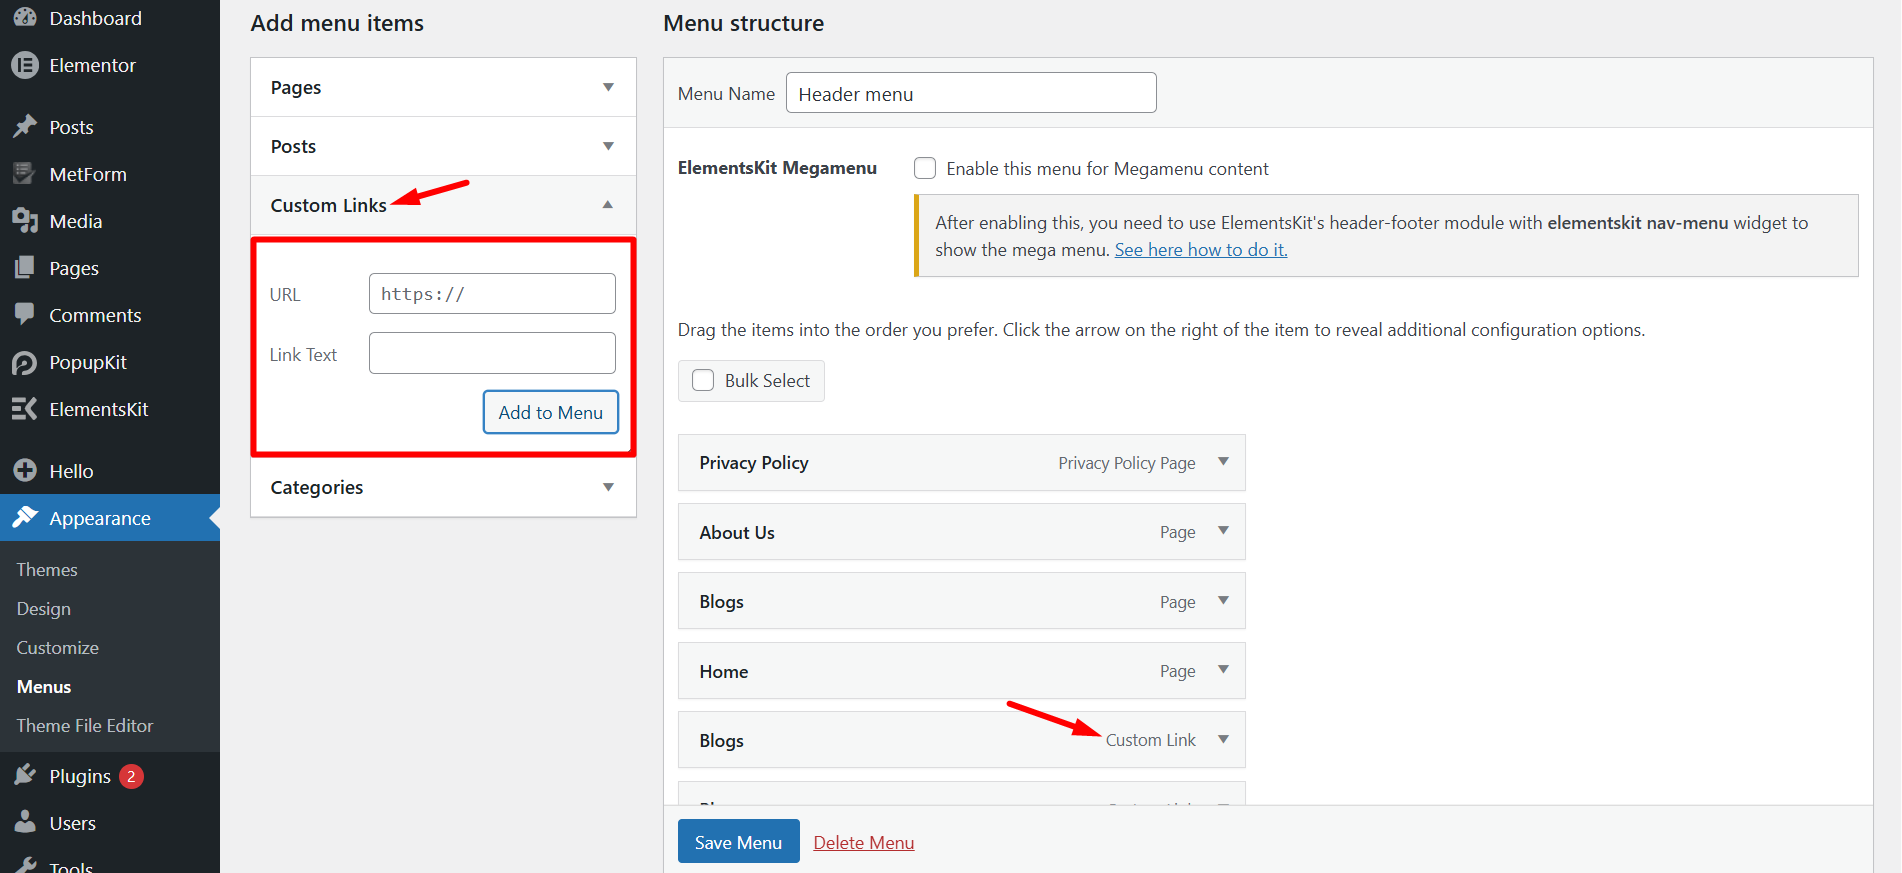
- 拡大する カスタムリンク on the “Add menu item” on the right column.
- 入力します URL そして リンクテキスト。
- クリック メニューに追加.
Then add other menu items in the same way with this WordPress menu customizer, ElementsKit.
その後、 make sure you’ve checked the checkbox for “メガメニューコンテンツにこのメニューを有効にする”. When the mega menu is enabled, you will click the メガメニュー設定アイコン メニュー項目にマウスを移動したとき。
ステップ #2: Elementor メガメニューのコンテンツをカスタマイズする With ElementsKit #
メガメニューの設定アイコンをクリックすると、ポップアップが開きます。ポップアップで、
- メガメニューを有効にするにはボタンを切り替えます。
- クリックしてください 保存 ボタン。
- その後、 メガメニューコンテンツの編集 ボタン。Elementor エディター ボタンに移動します。

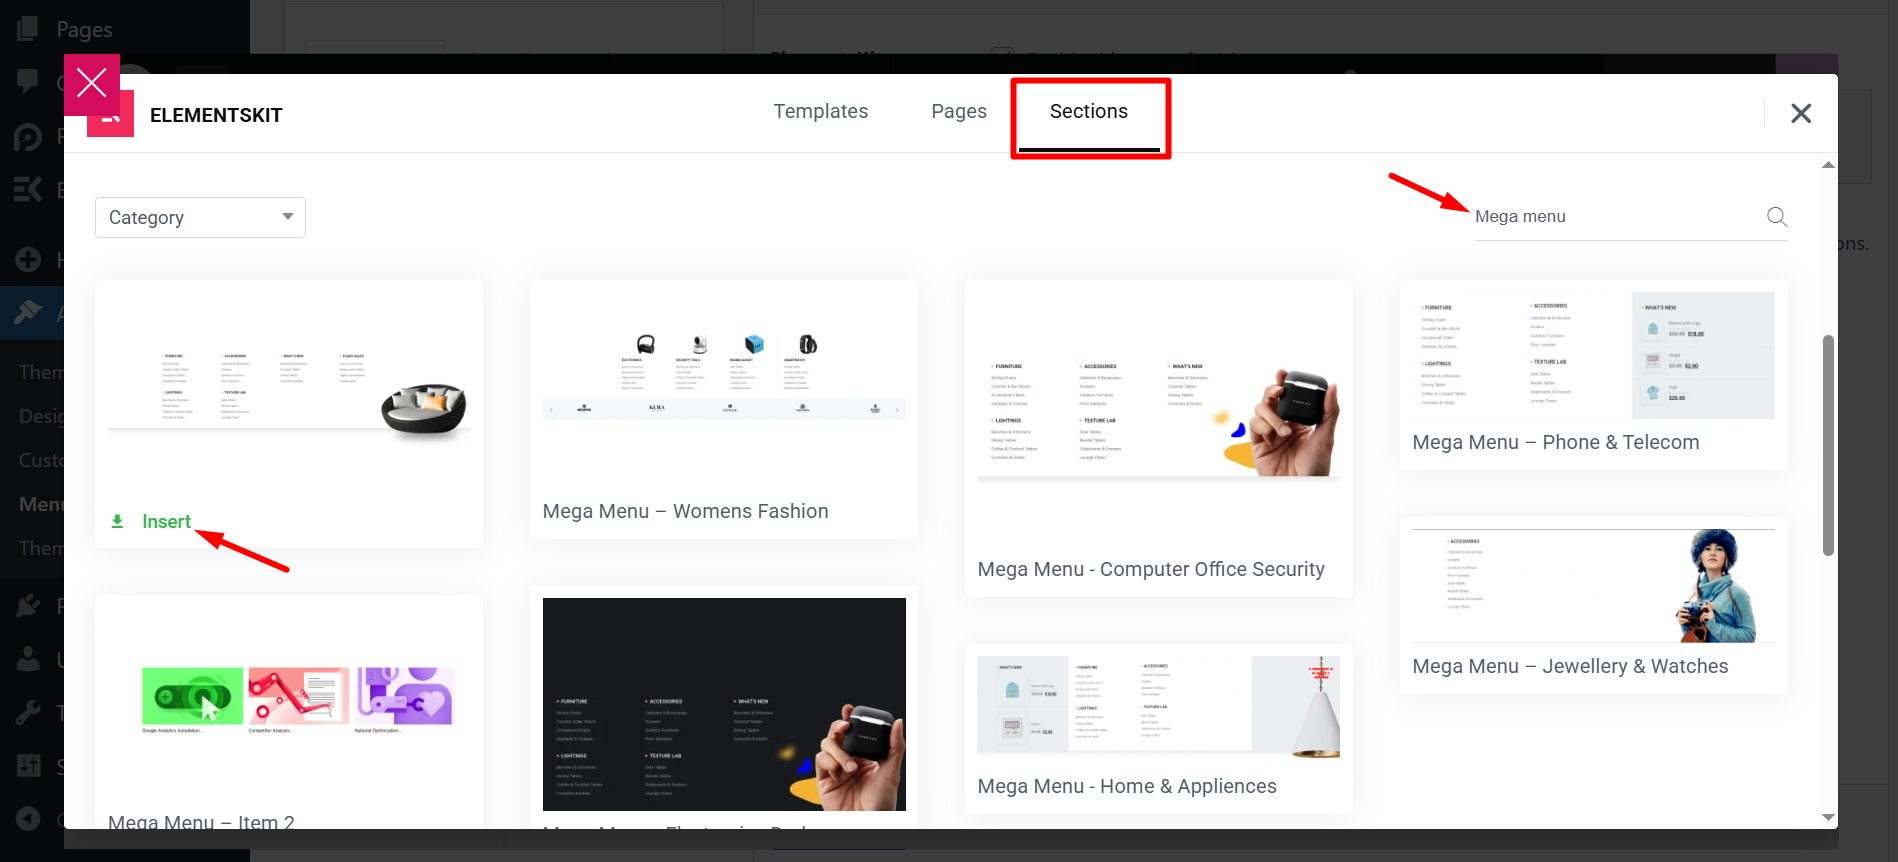
In the next step, a window will appear where you need to click on the ElementsKit テンプレート ライブラリ アイコン.
- セクションへ移動
- Search mega menu
- を選択 メガメニュー template from the list and insert
You’ll see that your inserted pre-designed mega menu template item will display. 内部セクションを編集する 点線のセクションをクリックします。
容器
Container Layout: Select the structural system, like Flexbox, to organize your elements.
Content Width: Choose between 全幅 または 箱入り for your horizontal boundaries.
幅: Set the specific horizontal percentage or pixel size.
Min Height: Set the minimum vertical space the container must fill.
Items Management
Wrap: Allow items to move to a new line when they run out of space.
方向: Stack items vertically in a column or horizontally in a row.
コンテンツを正当化する: Distribute items along the main axis, such as center or spaced out.
アイテムを揃える: Position items along the cross axis for consistent vertical or horizontal alignment.
Gaps: Define the exact pixel spacing between individual items.

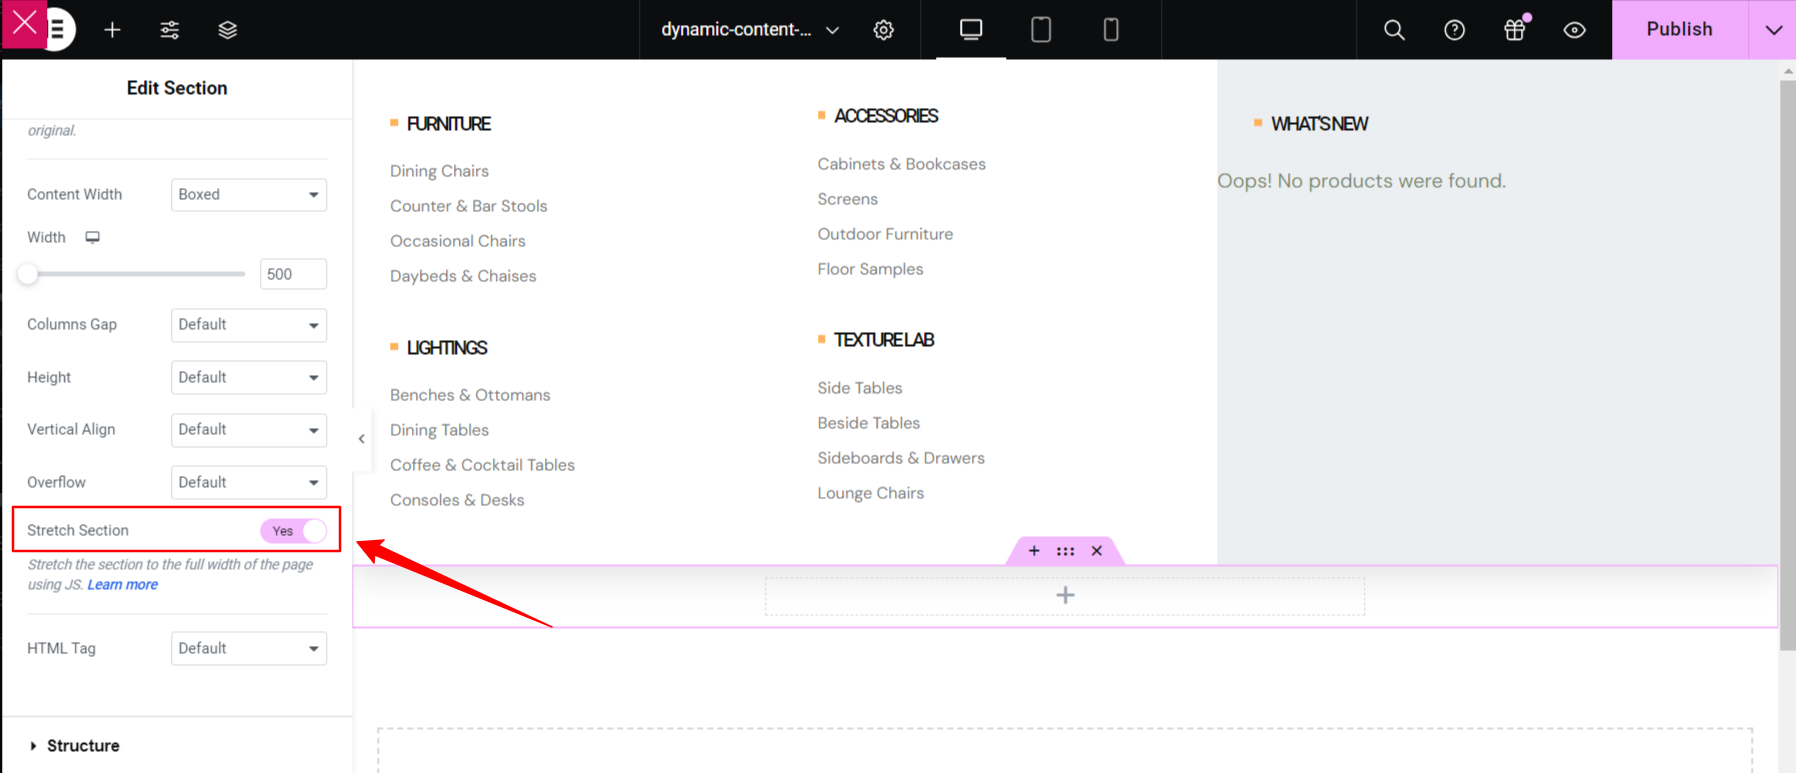
ストレッチセクション #
Toggle this button to turn the Elementor mega menu to full-width, which spans from right to left of the screen’s width.
HTMLタグを選択 #
- を選択してください HTMLタグ から 落ちる to create custom WP menu.
実際に動作を確認したい場合はこのビデオを見て、数分以内に自分でやってみてください。
メガメニューの見出しテキストをカスタマイズする #
- アイコンの種類を選択.
- アイコンの追加を有効にする.
- ヘッダーアイコンをアップロード.
- タイトルの追加または編集.
- 編集の説明を追加.
テキストのカスタマイズ #
- 追加または編集 文章.
- 追加または編集 字幕.
- に有効 ラベルを表示.
- 追加または編集 ラベル.
- カスタマイズ 背景色、タイポグラフィー、パディング、配置、半径.
- 完了したら、「更新」をクリックしてウィンドウを閉じます。
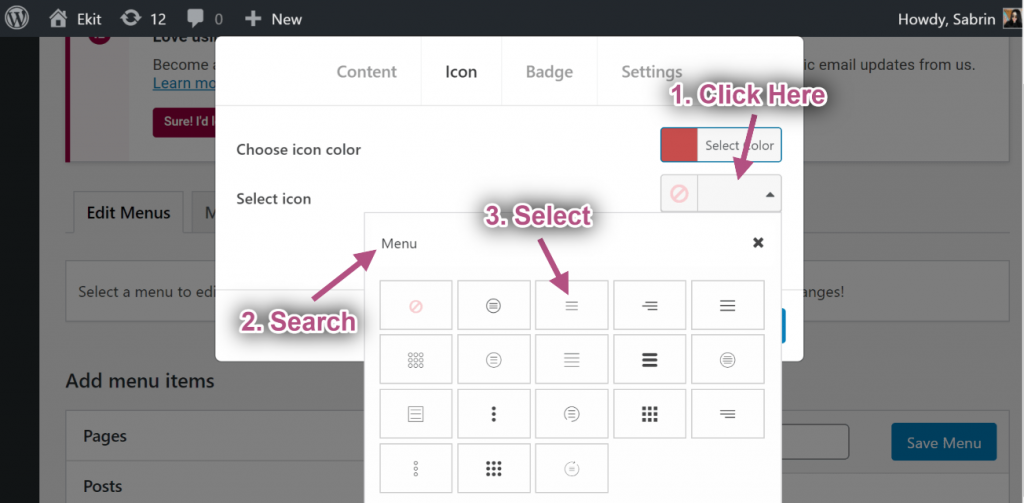
ステップ #3: アイコンをカスタマイズする #
- 今すぐに行きます アイコンタブ=> から任意の色を選択してください カラーパレット.
- 選択する アイコン から アイコンライブラリ.
ステップ #4: バッジをカスタマイズする #
- テキストの追加または編集.
- 選ぶ バッジの色.
- 選ぶ バッジの背景色.
- クリック 保存.
ステップ#5: 設定 #
デフォルトの幅 #
- メガ メニューの幅を選択します: デフォルト.
- メガ メニューの位置を選択します: デフォルト.
- 保存 窓。
- サイトビュー: デフォルトの幅とデフォルトの位置を表示します。
デフォルトの相対 #
- メガ メニューの幅を選択します: デフォルト.
- メガ メニューの位置を選択します: 相対的.
- クリック 保存.
- サイトビュー: デフォルトの幅と相対位置を表示します。
デフォルトの全幅 #
- メガ メニューの幅を選択します: 全幅.
- メガ メニューの位置を選択します: デフォルト.
- クリック 保存.
- サイトビュー: デフォルトの位置で全幅を表示します。
全幅の相対位置 #
- メガ メニューの幅を選択します: 全幅.
- メガ メニューの位置を選択します: 相対的.
- クリック 保存.
- サイトビュー: 表示中 全幅と相対位置.
カスタムのデフォルト幅 #
- メガ メニューの幅を選択します: カスタム幅.
- 任意のカスタム幅を指定しますが、デフォルトでは 750ピクセル.
- メガ メニューの位置を選択します: デフォルト.
- クリック 保存.
- サイトビュー: 表示中 デフォルトの位置でのカスタム幅.
カスタムのデフォルト幅 相対的 #
- メガ メニューの幅を選択します: カスタム幅.
- 任意のカスタム幅を指定しますが、デフォルトでは 750ピクセル.
- メガ メニューの位置を選択します: 相対的.
- クリック 保存.
- サイトビュー: 表示中 相対位置を使用したカスタム幅.
ステップ #6: ヘッダーテンプレートを作成する #
ここで使用できるのは、 Elementor ヘッダー テンプレート または、 ElementsKit ヘッダー テンプレート。 追加してみます。
- 案内する ElementsKit→ ヘッダー フッター→ そしてクリックしてください 新しく追加する.
- ポップアップ ボックスが開き、オプションが表示されます。
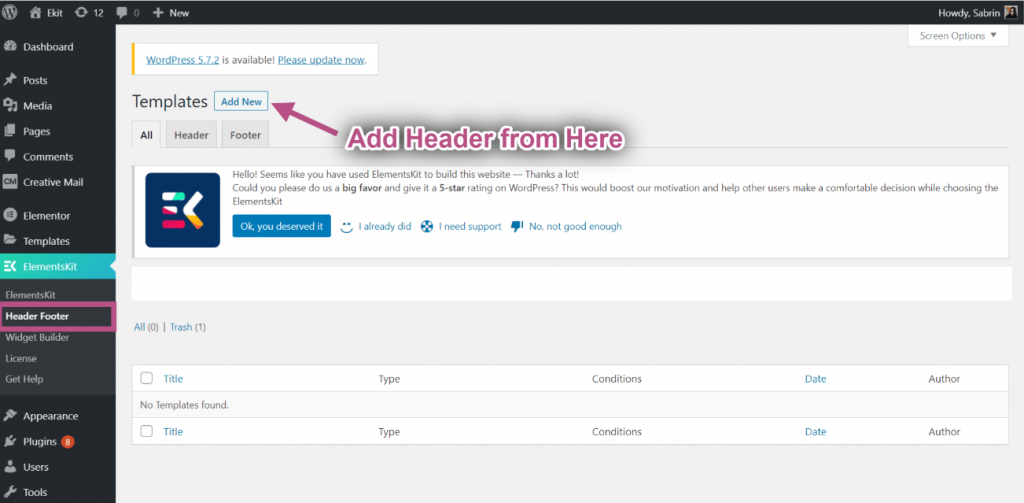
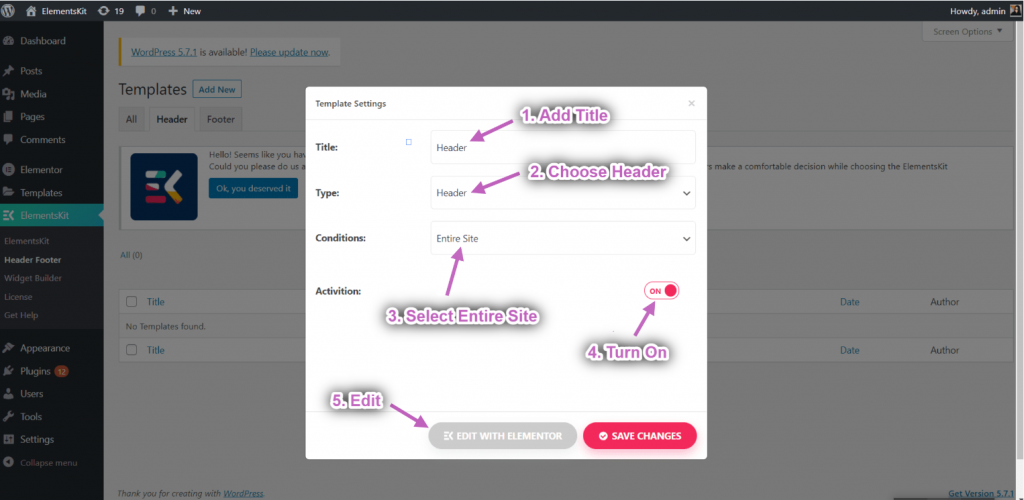
- ポップアップボックスに次のように入力します。 タイトル、 を選択 種類→ ヘッダ.
- を選択 条件→ サイト全体.
- を切り替えます アクティベーション オプションを選択してクリックします Elementorで編集する.
- を選択してください 構造 選択したエリアから。
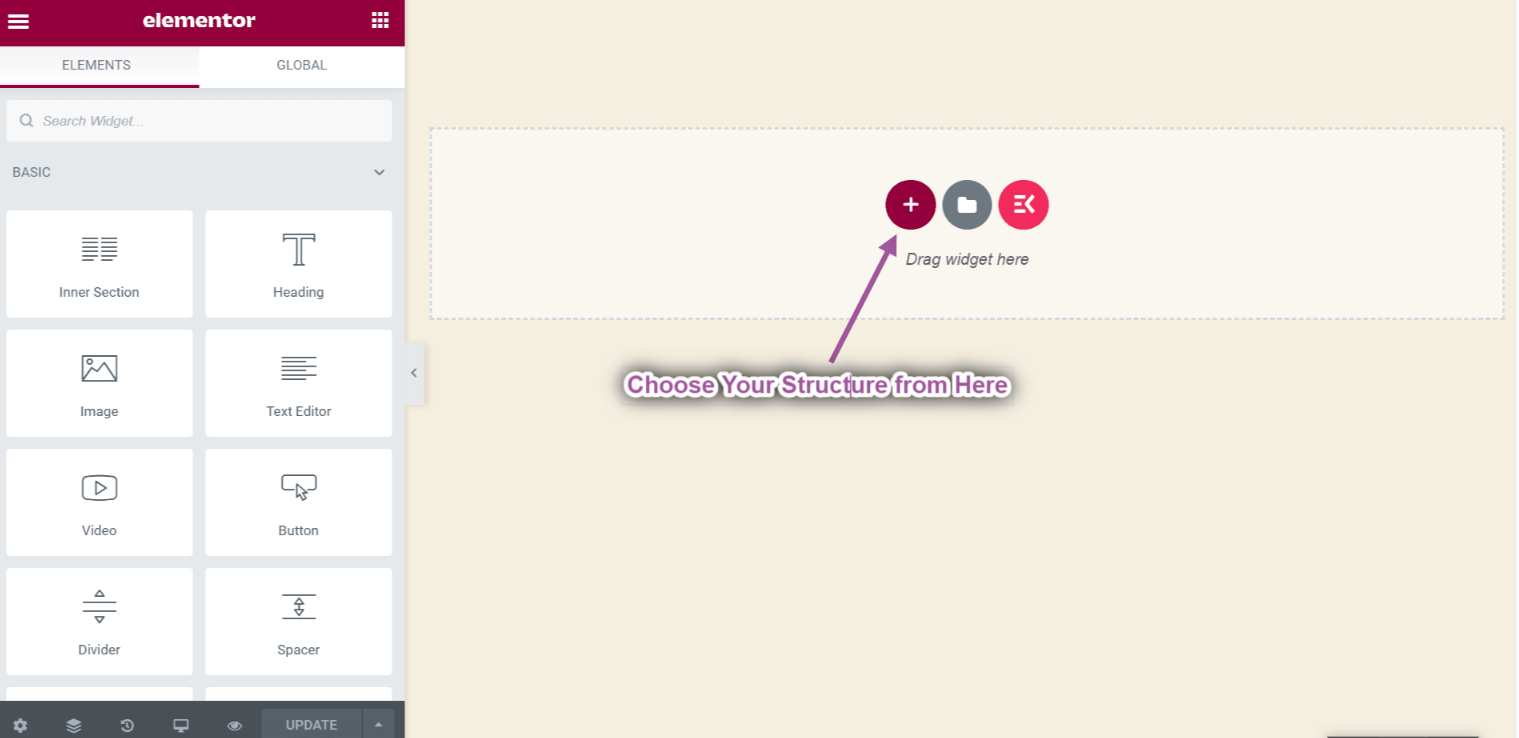
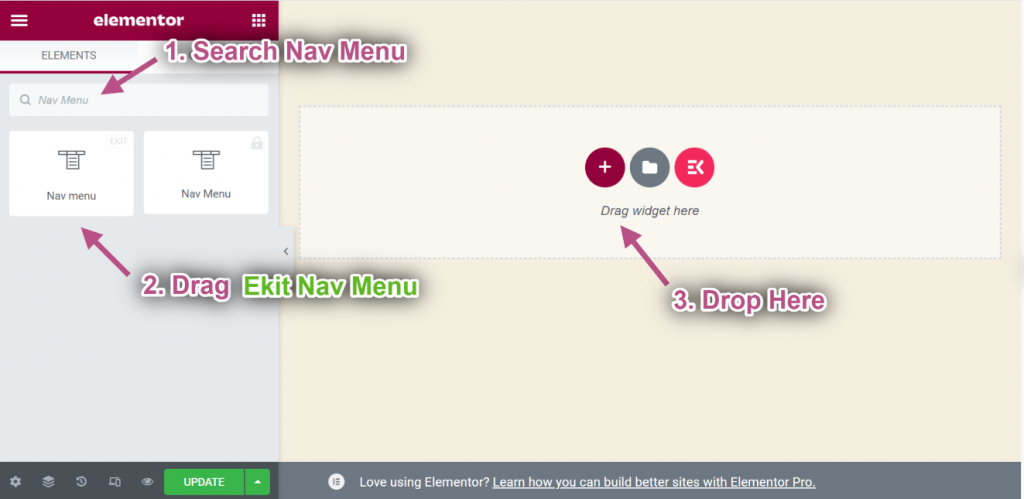
- 今すぐ検索 ナビメニュー=> をドラッグします。 駅ナビメニュー そして 落とす 選択した領域で。
** 注意: ElementsKit ナビ メニューを必ずドラッグしてください。そうしないと、作成した Megmenu が表示されません。
- 今すぐに行きます メニュー設定=> 作成したものを選択します ヘッダーメニュー ドロップダウンから。
- ここから任意のタイプのウィジェットを追加して、ヘッダー テンプレートをカスタマイズできます。
最終出力 #
完了したら、 アップデート button to save the menu created with the best mega menu plugin for Elementor.
次に、サイトにアクセスすると、選択した Elementor Mega メニューが適切に表示されていることを確認できます。
Quick Recap
So overall, what we’ve done throughout this WordPress mega menu tutorial is:
Tools Used: Elementor & ElementsKit エレメント アドオン
✅ Install and activate a mega menu plugin, in our case, it’s the ElementsKit メガメニュー plugin for WordPress.
✅ Then, navigate to Appearance> Menu and configure our site’s menu.
✅ After setting all dropdown menu items, click the メガメニュー button to start creating an Elementor mega menu with ElementsKit.
✅ 有効にする メガメニュー toggle button and hit the メガメニューコンテンツの編集 オプション。
✅ You’ll get the Elementor visual interface as your mega menu builder, with drag-and-drop controls to design it effortlessly.
✅ Insert a mega menu template or use Elementor widgets to build from scratch.
✅ In the ElementsKit mega menu editor, you can add rows, columns, and content to your submenus.
✅ Customize background, heading, layout, icon, badge, and other content elements without writing any code.
✅ Lastly, see the preview and make it live. And, with ElementsKit, you can apply conditions for header navigation.
So, this was the easiest way to build Elementor mega menu in your WordPress website.


