GutenKit FAQ ブロックを使用すると、デフォルトのブロック エディターを使用して、WordPress Web サイトに魅力的で完全に機能する FAQ セクションを追加できます。Web サイトでよくある質問をどのように配置し、カスタマイズするかを簡単に制御できます。
このドキュメントでは、Gutenberg エディターで GutenKit FAQ ブロックを使用する方法について説明します。
まず、GutenKit プラグインをインストールします。次に、WordPress ダッシュボードにログインします。そして、以下の手順を 1 つずつ実行します。
GutenKit FAQブロックの使い方 #
ステップ1: GutenKit FAQブロックを追加する #
- 新しいページを作成して、ブロック エディターを有効にします。
- 「+エディター画面の上部にある「 」アイコンをクリックします。
- それをクリックすると、ブロック ライブラリが表示されます。
- 「よくある質問検索バーに「」と入力します。
- 表示されたらクリックするか、エディター画面にドラッグ&ドロップします。
ステップ2: FAQ項目を追加する #
ブロック設定を開き、FAQ のタイトルと説明を入力します。
FAQオプション: #
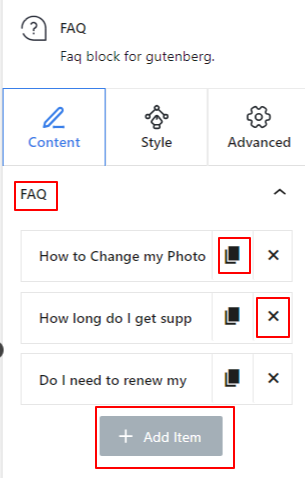
FAQブロックはデフォルトで3つの項目で読み込まれます。いずれかの項目をクリックして編集します。 タイトル そして 説明 テキスト。さらに、「アイテムの追加「 」ボタンをクリックして新しい FAQ 項目を追加します。
「アイテムの複製”アイコンをクリックします。アイテムを保存したくない場合は、単に「バツ" ボタン。
ステップ3: FAQ項目のスタイル設定 #
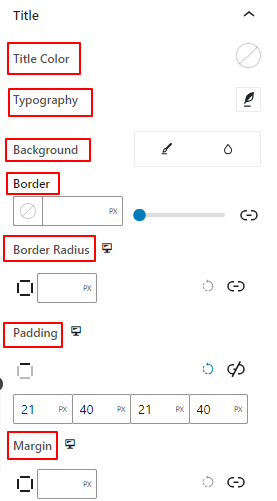
スタイル タブには、タイトルとコンテンツの 2 つの設定オプションがあります。どちらのオプションにも、タイトルと説明テキストをカスタマイズするための同様の設定があります。
タイトルとコンテンツのオプション:
- 色: タイトルと説明テキストの色を選択します。この設定は タイトルの色 タイトルオプションの下にあります。
- タイポグラフィ: この設定領域を使用して、テキストのフォント ファミリ、太さ、トランジション、行の高さ、文字間隔などを変更します。
- 背景: 単色とグラデーションの中間の背景タイプを追加します。
- 国境: この設定を使用して、境界線の色、幅、スタイルを追加します。
- 境界半径: 境界線の丸みを指定する値を入力します。
- パディング: タイトルと説明の周囲の内部スペースを定義します。
- マージン: タイトルと説明の外側のスペースを決定します。
ステップ4: 詳細設定 #
[詳細設定] タブでは、FAQ ブロックのレイアウト、背景、境界線のスタイルを構成し、その表示を制御できます。
レイアウト: #
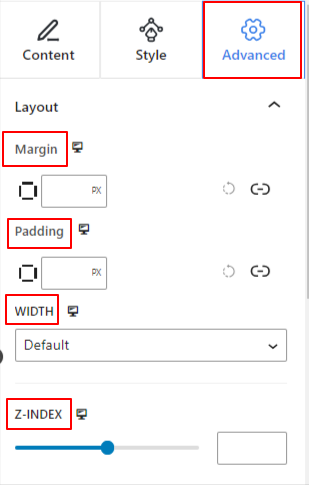
- マージン: ブロックレイアウトの周囲のスペースを定義します。他のブロック間のギャップを設定するのに役立ちます。
- パディング: レイアウト内のブロックの周囲のスペースを設定する値を入力します。
- 幅: デフォルトのレイアウト幅を維持すること以外は。
- 全幅: これを選択すると、レイアウトが画面の幅全体に広がります。
- インライン(自動): 適用するとブロック要素と同じ幅になります。
- カスタム: このオプションを選択すると、ブロック レイアウトの水平方向のスペースを定義するスライダーが表示されます。
- Z インデックス: スライダーを使用して、ブロックと他のブロックのスタック順序を指定します。
位置: #
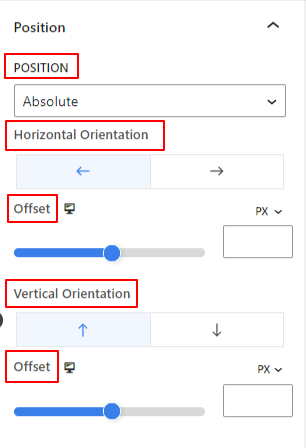
ドロップダウンの下に、3 つのオプションが表示されます。 デフォルト, 絶対、 そして 修理済み.
- 絶対: このオプションを選択すると、ブロックの絶対位置が指定され、要素がコンテナー内に収まるようになります。
- 修理済み: 固定位置オプションを選択すると、要素がビューポートまたは画面全体に収まります。
絶対オプションと固定オプションの両方に、以下のような同様の設定があります。
- 水平方向: 配置方向を左または右から選択します。
- オフセット: スライダーを使用するか、手動で値を入力して、ブロックの水平位置を調整します。
- 垂直方向: 配置方向を上または下から選択します。
- オフセット: スライダーを使用するか、手動で値を入力して、ブロックの垂直位置を調整します。
背景: #
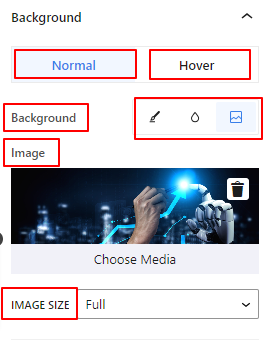
- 背景: 背景オプションを単色、グラデーション、または画像から選択します。
ホバーオプションの下:
- 画像: 画像オプションを選択すると、次のオプションが開きます。
- 画像: メディア ライブラリから画像を選択するか、独自の画像をアップロードします。
- 画像サイズe: サムネイル、中、大、フルの中から画像サイズを選択します。
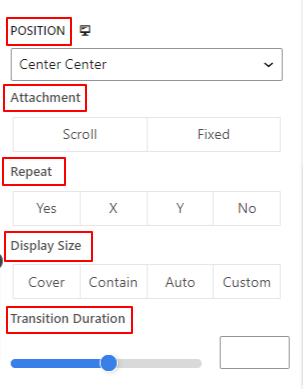
- 位置: 10 種類のオプションから位置を選択します。
- アタッチメント: ブラウザ画面の残りの部分と固定またはスクロール背景画像の関係を指定します。
- 繰り返す: 背景画像の繰り返し方法を設定するオプションを選択します。
- ディスプレイサイズ: 4 つの異なるオプションから表示サイズを選択します。
- 移行期間: スライダーを使用して、背景の遷移を通常状態からホバー状態まで調整します。
国境: #
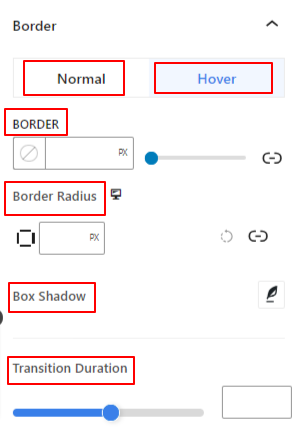
- 国境: この設定オプションでは、幅、スタイル、色などの境界線の設定オプションが表示されます。
- 境界半径: 値を入力して境界線の丸みを設定します。
- ボックスシャドウ: 色、水平/垂直、ぼかし、広がりなどのすべての設定を取得して、境界に影の効果を与えます。
ホバーオプション:
- 移行期間: 手動で値を追加するか、スライダーを使用して、ホバー状態の境界線のデザインを変更する時間を設定できます。
可視性: #
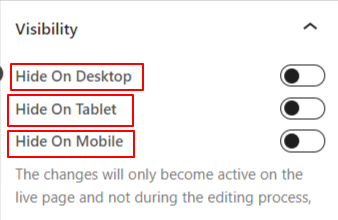
表示モジュールを使用すると、デバイスの種類に応じてブロック デザインの表示を制御できます。トグル ボタン付きの 3 つのデバイス オプション (デスクトップ、タブレット、モバイル) があります。トグル ボタンをオンにすると、そのデバイスのブロック デザインが非表示になります。
ただし、エディター ビューでは引き続き表示されます。
高度な: #
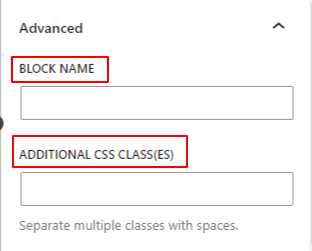
- ブロック名: ブロックにリンクしたり、スクリプトを実行してスタイルを設定するときに、このブロックを一意に識別するための名前を付けます。
- HTML アンカー: ウェブサイトのページにリンクする URL を追加します。
- 追加の CSS クラス: ブロックに追加の CSS クラスを割り当てると、カスタム CSS を使用してブロックを希望どおりにスタイル設定できるようになります。
注意: スペースを使用して複数のクラスを個別に追加できます。
そこで、WordPress ウェブサイトのブロック エディターで美しい FAQ セクションを作成するために必要なことをすべて説明しました。ぜひ試してみてください。


