Want to show a dual button with two different links, labels, icons, and separator text on your WordPress website? The GutenKit Dual Button block helps you easily add and customize the dual button right in your Gutenberg (block) editor without any shortcode.
Go through this documentation to learn how to create a dual button in the Gutenberg editor. Make sure you have installed the GutenKit plugin before diving into the tutorial.
How to Add Fun Fact Counter on WordPress Block Editor? #
Let’s start by adding the GutenKit Dual Button block.
Step 1: Add GutenKit Dual Button Block #
Log in to your WordPress dashboard, then
- Add a page or post and head to the block editor.
- Drücke den "+” icon at the top of the editor screen.
- You will see a block library will reveal.
- Use the search bar to find the “Doppeltaste” block.
- When it appears, click or drag & drop it to the editor screen.
Step 2: Add Button Text, Icon, Link #
Open the Dual button settings and go to the dual button. Then,
Under Dual Button: #
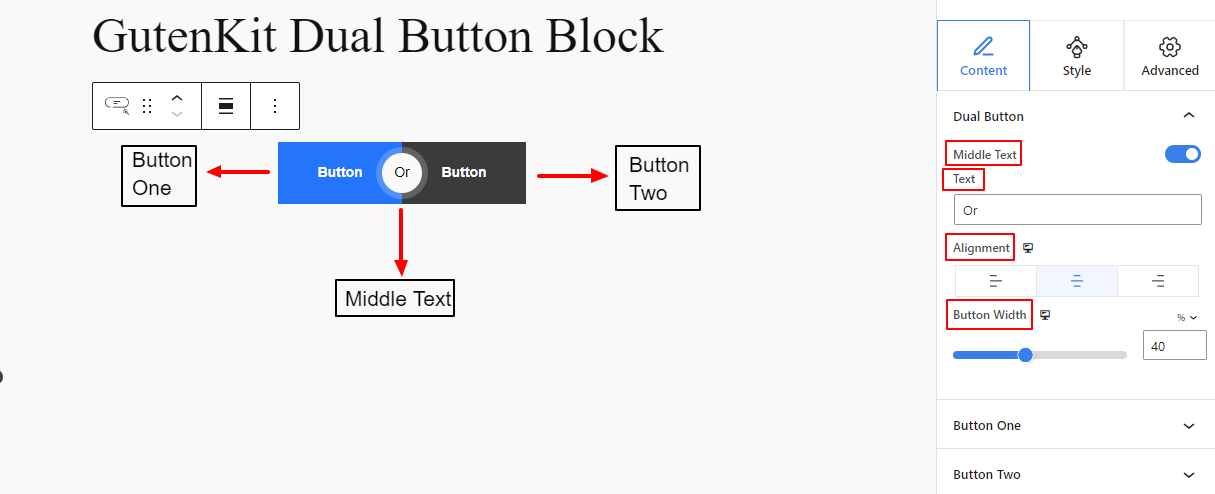

- Middle Text: This button is enabled by default, disable it to hide the middle text.
- Text: Enter the middle text in this box.
- Ausrichtung: Define the entire dual button position. (Left, Center, Right)
- Button Width: Use this slider to determine the thickness of both button sides.
Next, you will see Button One and Button Two settings. Both options have the same features:
Under Button One & Two: #
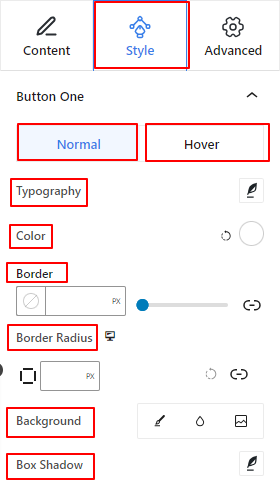

Typografie: Control all the typography-related customization of buttons like font family, size, weight, style, line & letter spacing, and more.Farbe: Use this color picker to set the button text color.Grenze: From here you will set the border style, thickness, and color.Border Radius: Enter a value in the box to determine the roundness of the button border.Hintergrund: Select a background type for the button between classic, gradient, and image.Box Schatten: Clicking it will open settings to add shadow effects around the border.
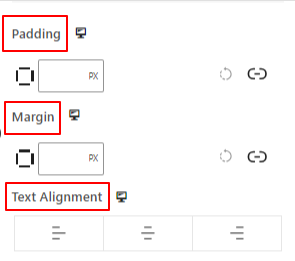

- Polsterung: Enter a value to add inner space around the button.
- Marge:
- Textausrichtung: Position the button text to the left, center, or right.
Below, you’ll see the customization options for the middle text.
Mittlerer Text: #
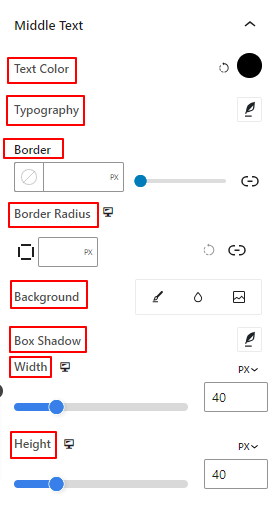

- Typografie: Get all the typography settings like
- Farbe: Use this color picker to add color to the middle text.
- Grenze: Get all the border settings like border styles, thickness, and color.
- Grenzradius: Define a value to set the roundness of the border.
- Hintergrund: Add a background color to the middle text.
- Box Schatten: This setting area allows you to apply shadow effects to the middle text.
- Breite: Define the horizontal size of the middle text area.
- Höhe: Like the previous setting, this feature allows you to measure the vertical size of the middle text.
Schritt 4: Erweiterte Einstellungen #
From the Advanced Settings tab, you can configure the block layout, background, border styles, and control its visibility.
Layout, #
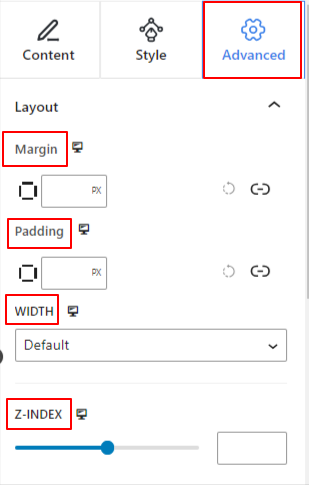

- Marge: Definieren Sie den Raum um das Blocklayout. Dies hilft, Lücken zwischen anderen Blöcken festzulegen.
- Polsterung: Geben Sie einen Wert ein, um den Abstand um den Block innerhalb seines Layouts festzulegen.
- Breite: Abgesehen von der Beibehaltung der Standardlayoutbreite.
- Gesamtbreite: Wenn Sie diese Option auswählen, wird das Layout über die gesamte Bildschirmbreite ausgerichtet.
- Inline (Auto): Beim Anwenden hat es die gleiche Breite wie das Blockelement.
- Brauch: Wenn Sie diese Option wählen, wird ein Schieberegler angezeigt, mit dem Sie den horizontalen Bereich des Blocklayouts definieren können.
- Z-Index: Verwenden Sie den Schieberegler, um die Stapelreihenfolge des Blocks mit anderen Blöcken festzulegen.
Position: #
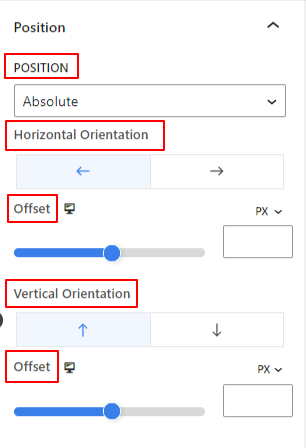

Unter der Dropdown-Liste sehen Sie drei Optionen: Standard, Absolut, Und Fest.
- Absolut: Wenn Sie diese Option auswählen, erhalten Sie eine absolute Position des Blocks, d. h. die Elemente passen in ihren Container.
- Fest: Mit der Option „Feste Position“ passt das Element das gesamte Ansichtsfenster oder den gesamten Bildschirm an.
Sowohl die Option „Absolut“ als auch die Option „Fest“ haben ähnliche Einstellungen wie die folgenden:
- Horizontale Ausrichtung: Wählen Sie die Positionierungsrichtung zwischen links und rechts.
- Versatz: Verwenden Sie den Schieberegler oder geben Sie manuell einen Wert ein, um die horizontale Positionierung des Blocks anzupassen.
- Vertikale Ausrichtung: Wählen Sie die Positionierungsrichtung zwischen nach oben oder nach unten.
- Versatz: Verwenden Sie den Schieberegler oder geben Sie manuell einen Wert ein, um die vertikale Positionierung des Blocks anzupassen.
Hintergrund: #
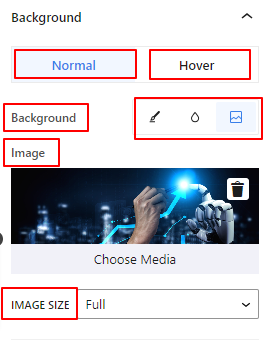

- Hintergrund: Wählen Sie als Hintergrundoption eine Volltonfarbe, einen Farbverlauf oder ein Bild.
Unter der Hover-Option:
- Bild: Wenn Sie die Bildoption wählen, werden die folgenden Optionen geöffnet:
- Bild: Wählen Sie ein Bild aus der Medienbibliothek oder laden Sie Ihr eigenes hoch.
Bildgrößee: Wählen Sie die Bildgröße zwischen Miniaturansicht, Mittel, Groß oder Vollbild.
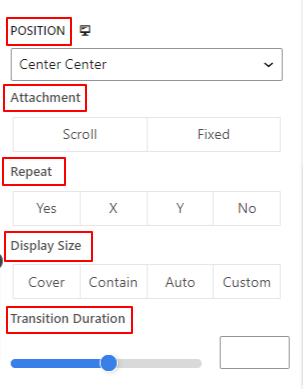

- Position: Wählen Sie die Position der 10 verschiedenen Optionen aus.
- Wiederholen: Wählen Sie eine Option, um festzulegen, wie Hintergrundbilder wiederholt werden.
- Bildschirmgröße: Wählen Sie eine Anzeigegröße aus vier verschiedenen Optionen.
- Übergangszeit: Verwenden Sie den Schieberegler, um den Übergang des Hintergrunds vom Normal- zum Schwebezustand anzupassen.
Grenze: #
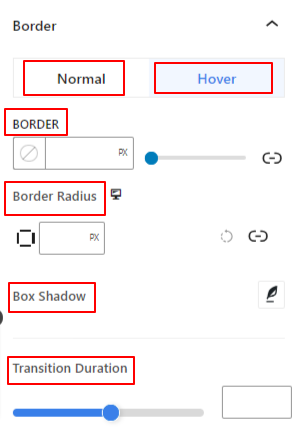

- Grenze: Unter dieser Einstellungsoption erhalten Sie Rahmeneinstellungsoptionen wie Breite, Stil und Farbe.
- Grenzradius: Legen Sie die Rundung des Rahmens durch Eingabe eines Wertes fest.
- Box Schatten: Holen Sie sich alle Einstellungen wie Farbe, horizontal/vertikal, Unschärfe, Ausbreitung und mehr, um dem Rand Schatteneffekte zu verleihen.
Unter der Hover-Option:
- Übergangszeit: Sie können manuell einen Wert hinzufügen oder mit dem Schieberegler die Zeit für die Änderung des Rahmendesigns im Schwebezustand festlegen.
Sichtweite
#
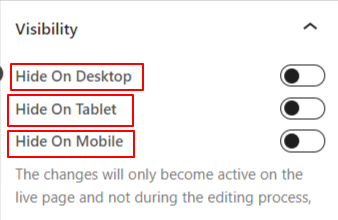

The visibility module allows you to control the display of block designs depending on the device type. There will be three device options (Desktop, Tablet, Mobile) with a toggle button. Turn on the toggle button to hide the block design of that device.However, you can still see it in the editor view.Now that you’ve learned about all the settings of the GutenKit Dual Button block. Try adding an eye-catching and functional block to your Gutenberg block editor.


