


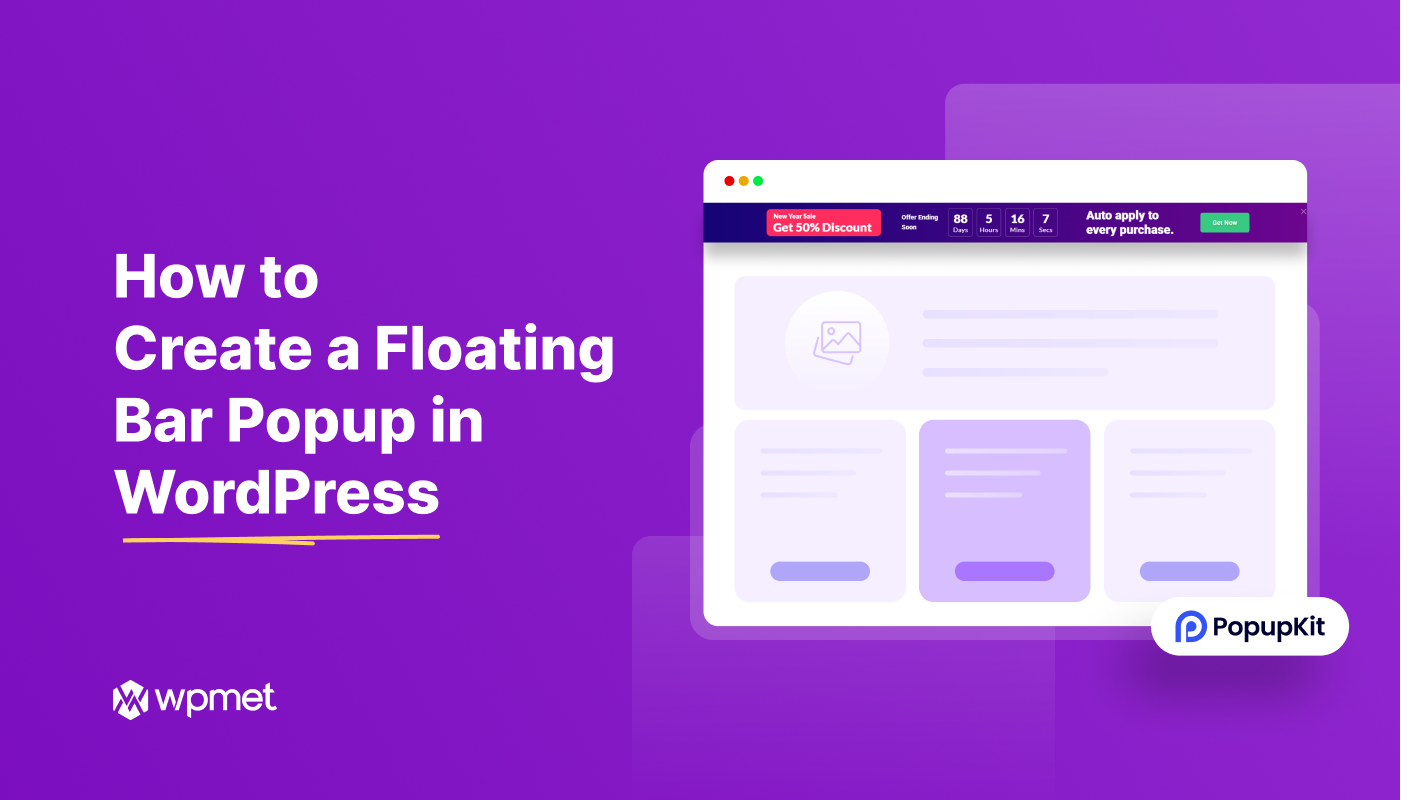
A floating bar popup in WordPress, also known as a sticky bar, is a slim, persistent banner that remains visible at the top or bottom of a webpage as users scroll. These WordPress popup bars add call-to-actions (CTAs) for signups, promotions, discounts, announcements, etc. These popups float at the top as header bars ou sticky footer bars, without interrupting the browsing experience, when the user navigates.
We’ll walk through how to create a floating bar popup in WordPress using Kit pop-up, a powerful floating bar WordPress plugin that lets you create popups without any coding. We’ll start from scratch with a blank floating bar template, then show you how to use PopupKit’s ready-made templates. Let’s begin!
| SHORT OVERVIEW Create a Floating Bar in WordPress easily by setting up your tool correctly, creating or customizing templates the right way, following UX guidelines, ensuring display conditions are user-friendly, scheduling popups accordingly, and tracking campaigns continuously. Keep abreast with the best practices to get the best results. |
Creating a Floating Bar Popup in WordPress
We’ll create a floating bar step-by-step using PopupKit. Follow these steps to build a custom WordPress lead generation popup in the form of a sticky bar.
Step 1: Installing the Right Plugin on WordPress
First, you need to install and activate the PopupKit plugin on your WordPress site. There are two ways to go about it.
Process 1:
As PopupKit is available for free in the WordPress CMS, go to the WordPress Dashboard > Plugins > Add New Plugin. Search for PopupKit. Install and activate the plugin.

OR
Process 2:
Vou ao https://wordpress.org/plugins > Type in “PopupKit” in the search bar > Select PopupKit > Click “Download” on the page.
Then, go to WordPress Dashboard > Plugins> Add New > Upload Plugin and upload the PopupKit plugin file.

After successful installation, just click on the “Activate” button to activate PopupKit. You can go to the WordPress dashboard page and navigate to “PopupKit”.
⚠️ Make sure you’re running WordPress 6.1+ with the Gutenberg block editor (which is the default in modern WordPress) since PopupKit works entirely within the block editor.
Step 2: Creating a Floating Bar Popup from a Blank Template
With PopupKit installed, we can create a new popup campaign from scratch. In your WordPress dashboard, go to PopupKit > Campaigns. At the top of the Campaigns page, click on the Add New Campaign button to start a blank popup template. This opens the PopupKit editor interface under the WordPress block editor.

Now, you can start by naming your plugin. At the top where it says “Add Title,” enter a descriptive name for your floating bar. For this guide, we’ll use the name “Promo Banner”. After naming it, you’ll see an empty design area. This is where we’ll build the content of the floating bar using PopupKit blocks.

You may also customize Prebuilt Templates by selecting PopupKit > Campaign > Choose From Template.
(Observação: By default, the campaign type will be “Popup,” which you can later adjust in settings to function as a floating bar. The key difference for a floating bar will be how we style and position it.)
Step 3: Adding WordPress Blocks to the Floating Bar
Next, we’ll design the content of your floating bar using WordPress Gutenberg blocks. Inside the PopupKit editor, click the (+) plus icon to insert blocks into your popup. You can add any content you want.
For example, a Cabeçalho for a catchy title, a Parágrafo for a brief message, an Imagem (or logo), and a Botão block for your call-to-action. PopupKit provides its own set of block elements (like advanced heading, image, button, forms, etc.), and you can also use core Gutenberg blocks, giving you a lot of flexibility.
Since space is limited in this type of bar, try to keep your copy concise. You can arrange blocks horizontally, if needed, using a Columns or Container block. This will help make your headline and a signup button sit side by side in the bar. Feel free to add any other design elements that fit.
Step 4: Customizing the Floating Bar Template
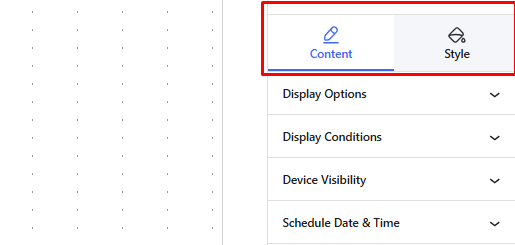
Once you’ve added the necessary blocks and content, you’ll want to customize the look and behavior of the floating bar. PopupKit’s editor provides a sidebar on the right with two tabs: Contente e Estilo. Using these, you can customize the popup’s settings and appearance.
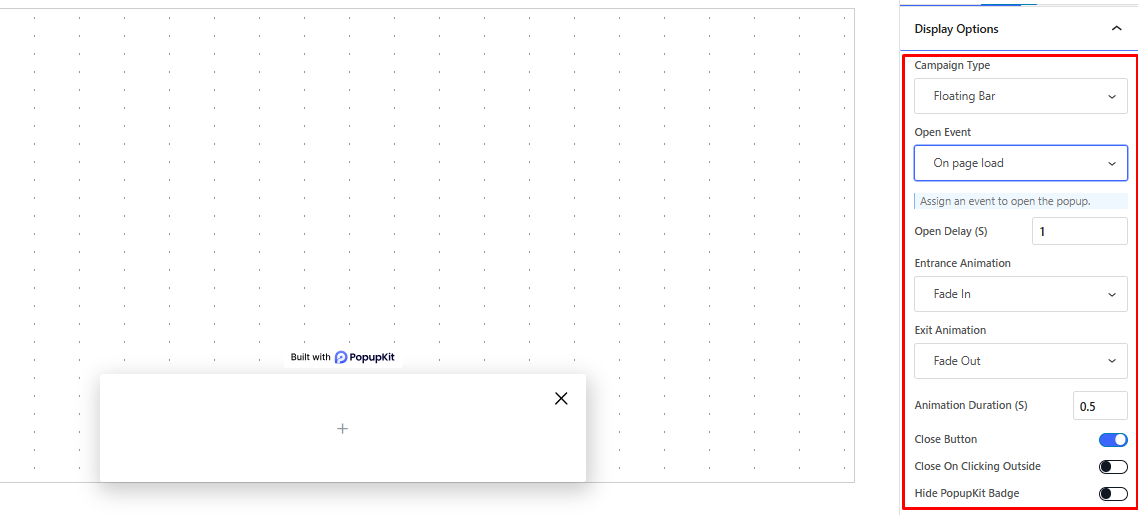
Debaixo de Contente tab, with the popup’s container block selected, you can set the Display Options for this campaign. For instance, ensure the Campaign Type is set to “Floating Bar”. You can also choose an Open Event, e.g., to show the bar on page load, after a time delay, on scroll, etc. And also pick entrance/exit animations, if you want.
Then, switch to the Estilo tab to adjust the design of the floating bar’s container. Here you can set the largura e height of the popup, its posição, background color, and other stylistic details.

To make it a true full-width floating header or footer bar, set the container’s width to 100% (full width) and position it fixed at the top or bottom of the screen. We suggest you set a relatively short height, too, so it appears as a slim banner.
Choose colors and fonts that stand out but match your website’s style. A contrasting background color so that the popup bar is noticeable.
PopupKit also lets styling of the Sobreposição, or the background overlay behind the popup, and the Close button in this Style tab. You can adjust the close button icon, size, position, border, and color as needed to make it user-friendly.
Step 5: Adding an Image to the Popup
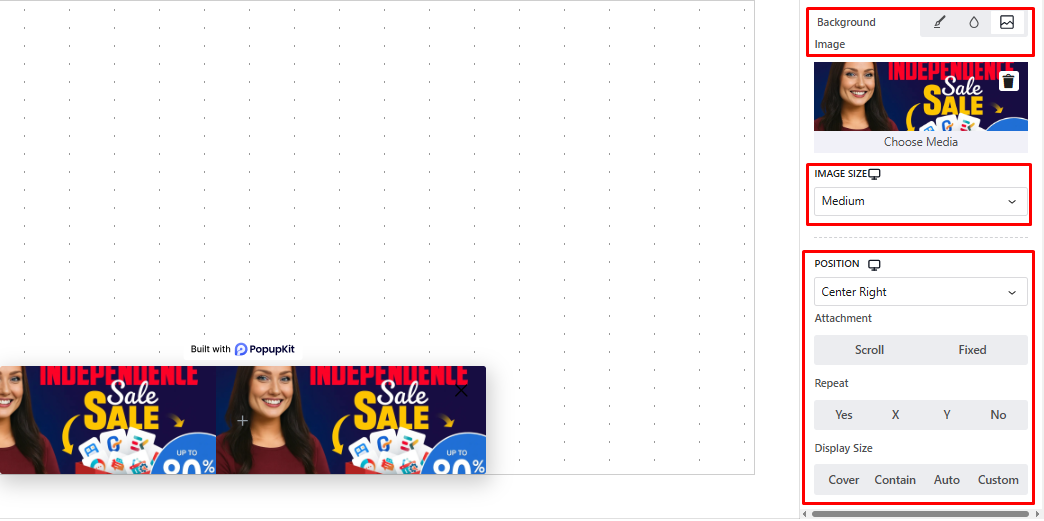
To include an image like a product photo or a small graphic in your popup bar, simply insert an Imagem block wherever it fits. Perhaps an icon next to the text, or a small product thumbnail beside a promo message.
You can upload a new image or pick one from the WordPress Media Library. Once added, use the customization options on the block toolbar and sidebar to adjust the image’s size e alinhamento as needed.
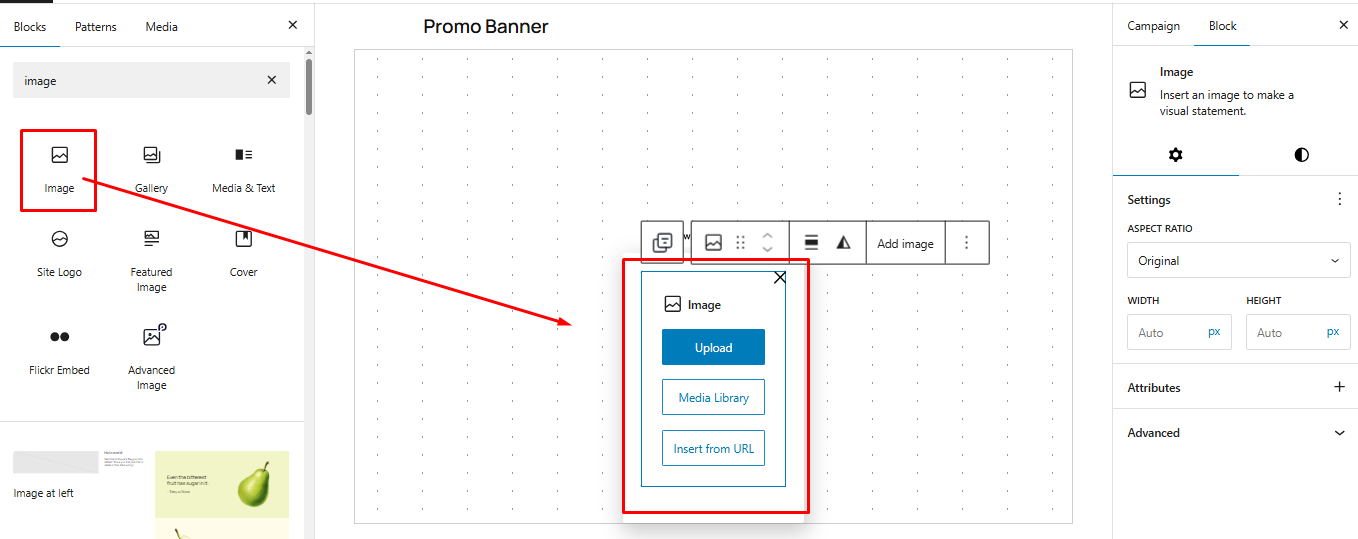
For instance, you might set a max-width or a specific pixel width so the image remains a subtle enhancement rather than the main focus.
Step 6: Setting the Display Conditions
One of the most important aspects of any popup campaign is determining when e where it appears. PopupKit provides robust Condições de exibição and trigger settings so your floating bar shows at the right time to the right audience.
In the PopupKit editor’s Content settings, look for Condições de exibição. Here, you can specify on which pages or content the floating bar should appear, or not appear.
You might include the entire site so the bar shows on every page, or target specific pages, like only the homepage, or only blog posts, etc. You can mix and match multiple rules, like include or exclude pages, categories, post types, etc., to direct where the popup runs.
Next, configure Open Event or the “trigger” under Display Options. Common trigger options include: On page load (immediately or after a few seconds), On scroll (e.g., after the user scrolls 30% down), After inactivity, or even On click of a specific element.
Make sure to time it strategically so that it catches attention but doesn’t feel jarring. Say, you add, “Show on scroll 20% down,” which can ensure the user is engaged before the bar slides in.
PopupKit also allows setting Device Visibility. This lets you choose if the bar should show on all devices or only on desktop/mobile. If your floating bar has a lot of text, you might choose to hide it on mobile and use a different approach for mobile users, or design a more compact version for phones.
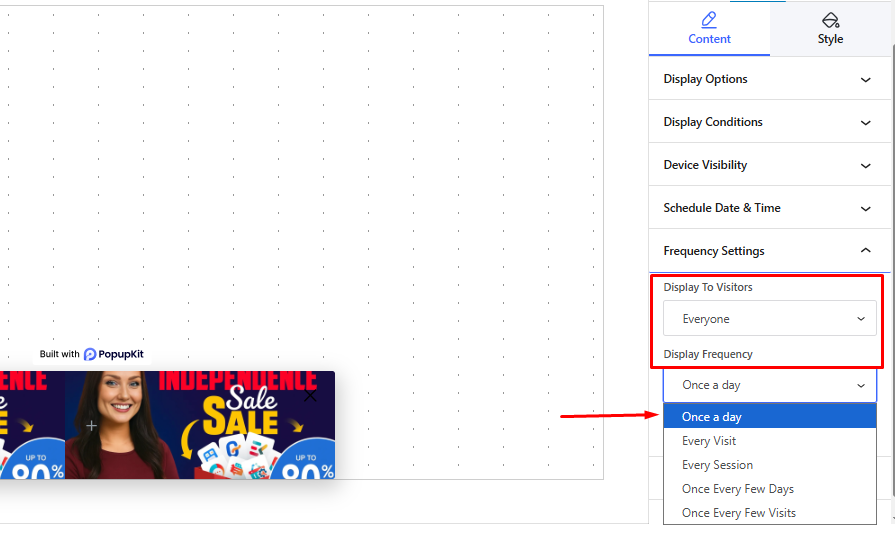
There are also Schedule options, which let the campaign run only between certain dates, useful for limited-time offers. And Frequency Settings to control how often the same visitor sees the popup. You might show it only once per user or once per session to avoid spamming repeat visitors.
Finally, ensure your floating bar follows any targeting rules you need. PopupKit even offers advanced targeting, like geolocation or IP filters, to display your floating bar only when relevant. This improves user experience and conversion rates by showing the right message at the right time.
Step 7: Checking for Floating Bar Popup UX Guidelines
Before you hit publish, take a moment to review your design against general floating bar popup UX guidelines. The goal of a floating bar is to be noticeable yet user-friendly.
A major advantage of floating bars is that they don’t interfere too much with user experience. Make sure your bar isn’t too long or flashy.
You must also check if the popup looks good on smaller screens (mobile-optimized popup design). A bar that’s 50px tall on a desktop might consume a larger chunk of a phone’s screen. You might need to adjust font sizes or hide certain elements on mobile.
We’ll cover some important popup UX best practices in a bit.
Step 8: Publishing and Tracking Performance
If you’re satisfied with your floating bar’s design, content, layout, and settings, it’s time to publicar the popup. In the PopupKit editor, click the Publicar button. Please note that if you make changes to an existing template, then click Atualizar.
After publishing, your floating bar campaign is live. Visit your site (in an incognito window or a test browser) to see if the bar appears as expected. Check it on different pages and devices if applicable.
Tools like PopupKit come with a built-in Analytics Dashboard to help track your popup’s performance. You can access it via PopupKit > Analytics in your dashboard. Here, you’ll find metrics such as Total Views e Conversions for each campaign.
The plugin even calculates a taxa de conversão for you, and provides breakdowns by device, time period, etc. These insights help measure the floating bar’s effectiveness. A good example would be that if you see a low conversion rate, you might experiment with changing the CTA button text and see if that improves responses.
Using Ready-made Floating Bar Templates
Using a template can significantly cut down design time. The structure and styling are already done by professionals. It’s also a great way for non-designers to get a floating bar template that looks good out of the box.
PopupKit offers ready-made floating bar templates to speed things up. These are categorized by goal, industry, feature, and season to help you find something relevant. If you prefer to start with a ready-made layout, go to WordPress Dashboard > PopupKit > Templates.
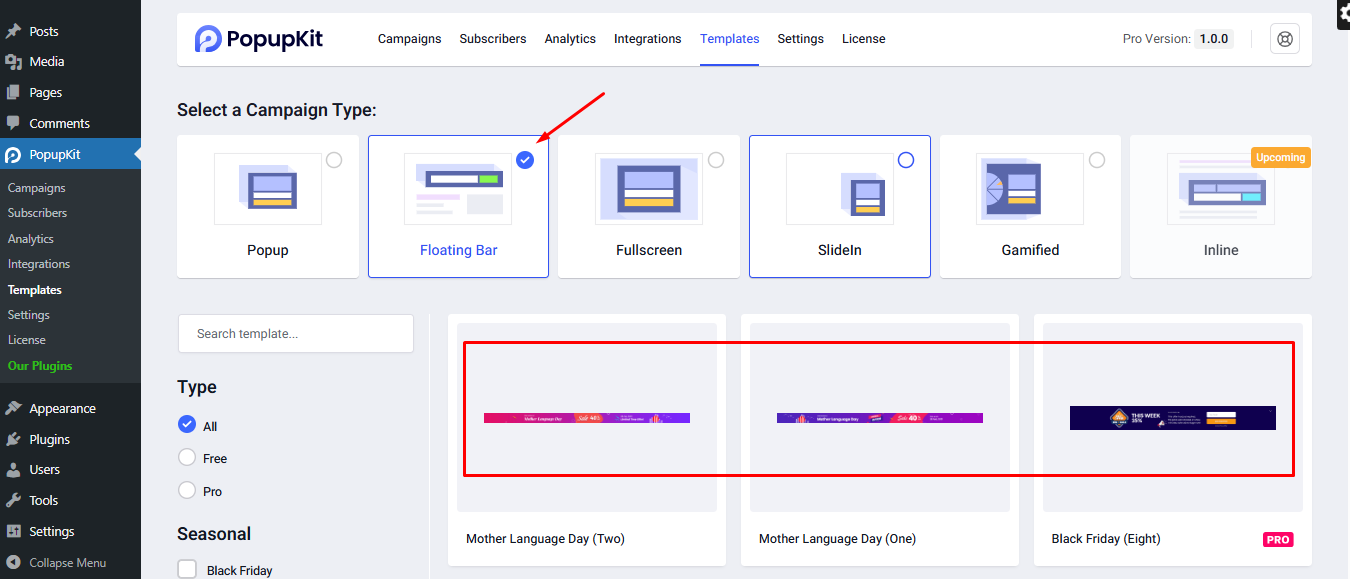
In the Templates library, you can filter by campaign type – select “Floating Bar” to view all the pre-built floating bar templates available. For example, you’ll find templates for New Year discounts, Black Friday sale banners, Christmas Special Offers, and more.
Once you find one you like, click the “Use Template” button on it. You’ll be prompted to name your campaign, then click Import. PopupKit will take you to the editor and load with the template ready to customize. From here, you can edit the text, colors, images, etc., to match your branding.
LEARN IN DETAILS ABOUT USING POPUPKIT FOR CREATING POWERFUL POPUPS
Benefits of Using Floating Bar Popups for Lead Generation
Floating bar popups offer several advantages for lead generation and conversions on your website. If designed and created accurately, these popups attract users for lead generation.
- They are full-width banner strips that remain visible as the user scrolls, allowing continuous messaging.
- These popups stick to the edge of the screen, resulting in higher engagement rates.
- Floating popups help increase lead generation by appearing on every page, potentially boosting subscription rates.
- You can make them mobile-friendly, working on all devices and screen sizes if customized well.
- These popups strike a balance between visibility and user-friendliness, helping increase email subscribers and conversions while respecting the user’s journey on the site.
Tips for Creating Floating Bar Popups
Creating an effective floating bar requires balancing attention-grabbing elements with a smooth user experience. Here are some top tips and best practices for creating a high-converting floating bar popup in WordPress:
- Keep it small and simple: A floating bar should be a thin strip, not a huge banner. Keep it small but not too small. It must be visible and not annoying. Use a short message and maybe one image or icon. And a CTA.
- Use urgency and action-oriented CTAs: Adding a sense of urgency can boost conversion. You might include a temporizador de contagem regressiva for a limited-time offer on your floating bar (e.g., “Sale ends in 24 hours!”) to tap into FOMO. Plus, write a compelling call-to-action button text; something like “Claim Your Discount” rather than “Submit”..
- Personalize and target smartly: Whenever possible, tailor your floating bar to your audience. Show different messages to new visitors versus returning visitors. PopupKit’s conditions allow this kind of targeting
- Choose the right timing (smart triggers): Don’t feel obliged to display the bar immediately on page load for everyone. Depending on context, it might perform better if triggered after the user scrolls a bit or after a few seconds of reading.
- Ensure it’s easily dismissible: Always respect user choice. Even though floating bars are relatively unobtrusive, a clear and visible close button is a must. Also, configure frequency capping. Don’t show it on every page multiple times if the user closed it once already. A best practice is to maybe hide it for that user for some days after they dismiss it.
- Keep the design and copy clear: Use a readable font and a concise message. The content should be simple and direct, like: “ Get 20% Off Your First Order – Sign Up Now.” Also, choose colors wisely. The bar should contrast with your site enough to stand out, but it should still complement your site’s look.
👉 Read the tips and tricks for popup marketing.
| Perguntas frequentes |
| 1. What are the top tools for creating Floating Bar popups? There are some powerful tools you can use to create popups for WordPress. PopupKit is a great tool for creating popups from scratch as well as customizing pre-built templates. Other WordPress tools include OptinMonster or Elementor Pro, which let you design floating header/footer bars entirely through visual editors. |
| 2. Can I create a floating bar popup using Gutenberg? Yes, you can. Gutenberg, the default WordPress block editor, works effectively with plugins like PopupKit, which let you build a floating bar using blocks directly. No coding needed. |
| 3. Is coding needed to create a floating bar popup? No coding is needed if you use advanced tools like PopupKit or OptinMonster that add blocks or elements, style them, and set display conditions without touching code. |
Summing Up
Floating bar popups are a fantastic addition to any WordPress site’s marketing arsenal. They provide a sticky yet subtle way to highlight your offers and capture leads, striking a nice balance between visibility and user experience.
As you implement your own WordPress floating bar popup, keep our tips in mind: focus your message, design it cleanly, target the right audience at the right time, and always keep the user’s experience a priority.
A well-crafted floating bar can significantly boost your email list signups, sales promotions, or whatever CTA you choose. With tools like PopupKit, customizing floating bars in WordPress is easier than ever, so you can experiment and refine to find what works best for your site.
Happy converting leads!
Deixe um comentário