


To add a multi-step popup in WordPress requires a plugin that supports sequential screens. You can launch a campaign using a multi-step template or the native “Steps” block. Strategically, you should hook visitors with a low-commitment questions or “Yes-ladder” prompt before asking for user details or revealing a discount.
Quick Overview
Tools Used: WordPress & PopupKit
Actionable Steps to Add Multi-Step Popups
✅ Install a Popup Builder Plugin that allows you to insert sequential popup screens without any coding, such as Kit pop-up.
✅ Create your multi-Step popup with a ready-made template or use the PopupKit Step block to create a multi-step popup from scratch.
✅ Create the multi-step flow: drag the PopupKit Step block to the editor or alter your selected template’s content as needed.
✅ Yes/No Buttons: Enable a “Yes/No” ladder.
✅ Form Fields: Add specific fields (email, name) to each step to keep them simple.
✅ Reveal Offer or Details: The last step discloses offers, discounts, coupon code, or any other type of content.
✅ Configure display rules and triggers for the popup to determine exactly when the popup fires. Set up rules for page-level targeting, device visibility, and frequency to prevent user fatigue.
✅ Preview & Publish the popup after testing the step-by-step user journey across different device types.
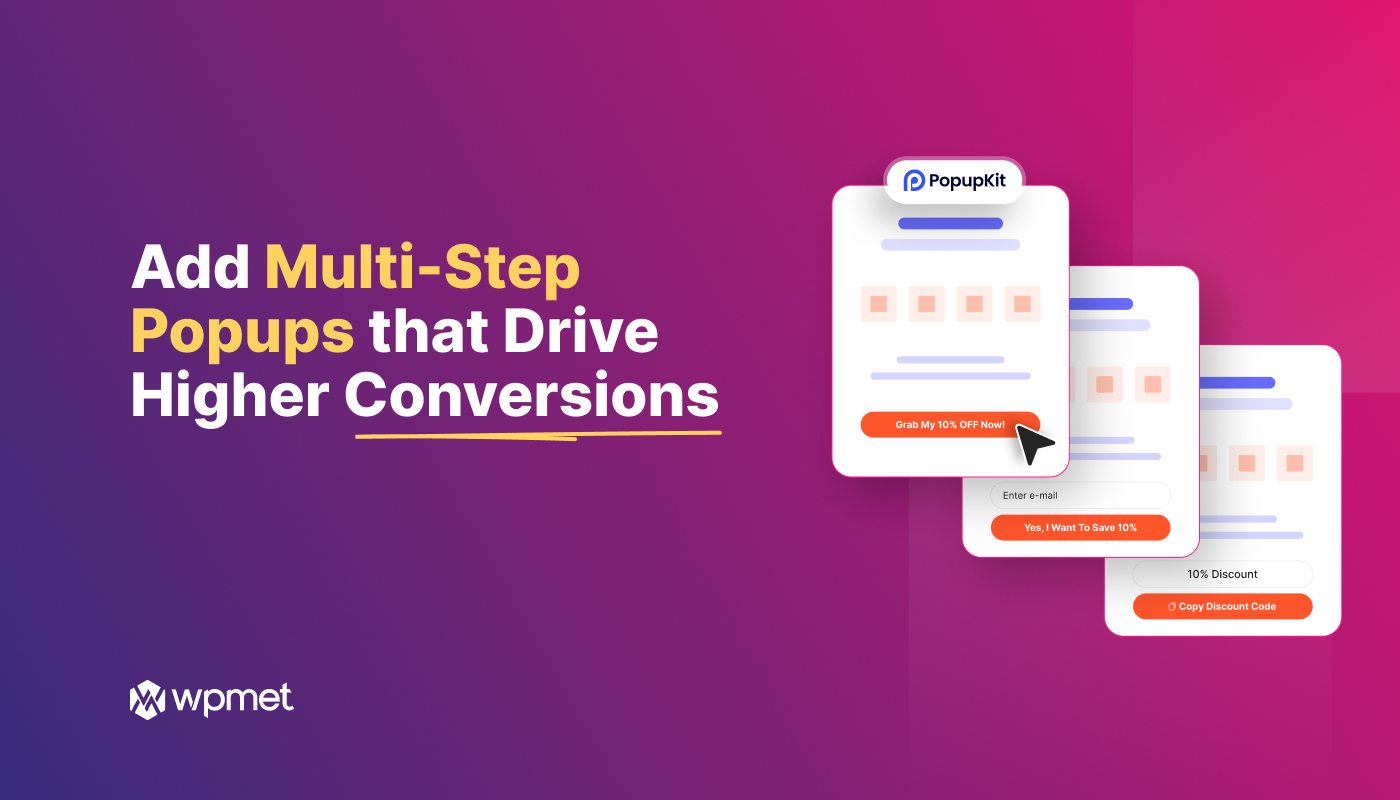
Do you want to remove annoyance and build interest and visitor engagement with a sequence of steps? In this guide, you’ll learn how to add multistep popups in WordPress websites and explore the key mechanics behind boosting conversions.
What are multistep popups?
In short, a multi‑step popup is a popup campaign composed of multiple sequential screens or blocks, each step guiding the visitor deeper into engagement. For example, the first step might ask for a simple trigger like “Yes, I want to learn more,” the second step asks for an email, and the third delivers the offer or coupon.
It’s not like traditional popup, where campaigners are dumping a long form on visitors all at once, multi-step popups guide them through a smooth, step-by-step flow. Each stage delivers bite-sized content that’s easier to process and act on.
So, you might understand, the power of multi-step popups lies in reducing friction. Long forms can intimidate visitors, but breaking them into smaller, guided steps makes people more willing to begin and more likely to finish.
How to Add Multi-step Popups to Boost Your Conversions?
Let’s begin the main part. First things first, you need to have a popup builder plugin. And, our recommended one is Kit pop-up. It helps with a no-code popup editor that lets you customize your branded popup.
Apart from the customization part, this popup campaign plugin also helps with comprehensive campaign data. Makes everything nice and easy to build popup campaign strategy.
Step 1: Install & Activate the PopupKit Plugin
To install & activate the Kit pop-up, go to your WordPress dashboard. Then, do the following things:
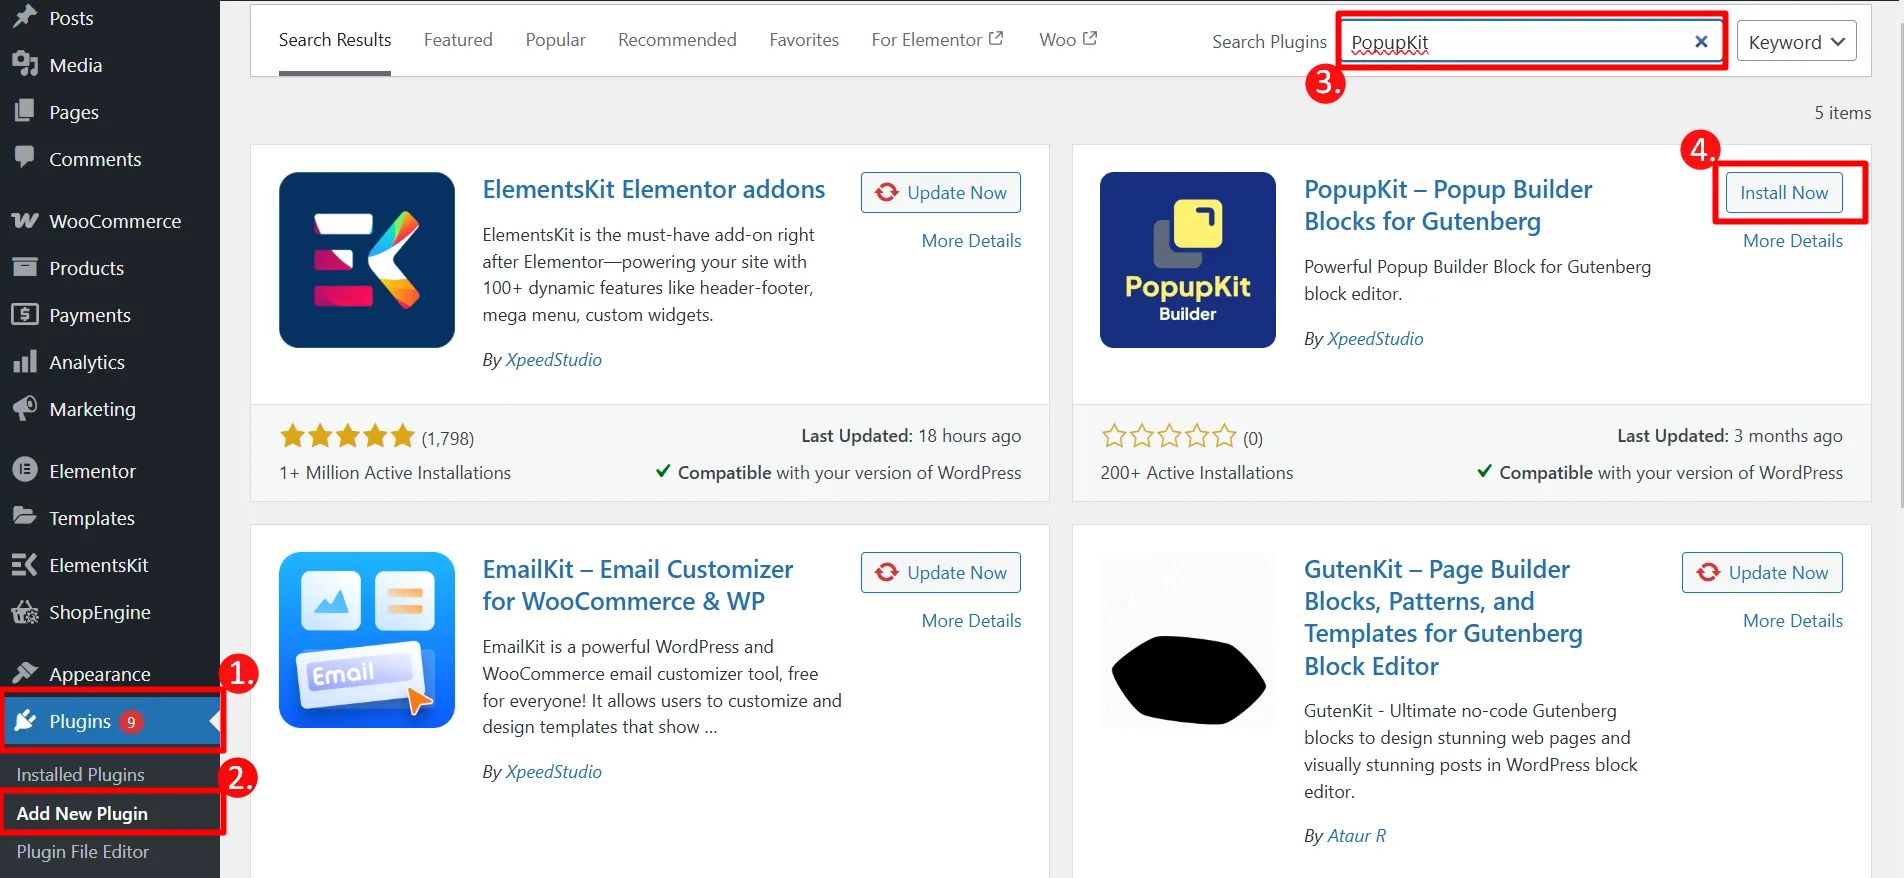
- Navegar para Plug-ins → Adicionar novo.
- Search for PopupKit.
- Instale e ative o plugin.
Once activated, access PopupKit from the left sidebar to start building your popup campaign.
Step 2: Add Steps for Multi-step Popup Campaigns
Once your plugin is active, it’s time to build the campaign sequence. PopupKit offers you two distinct workflows to create multi-step popups: you can either launch quickly using a pre-made, conversion-optimized template, or design a completely custom flow from scratch.
Let’s see them one by one:
Build With Multi-Step Templates (Fastest Route)
Usando a pre-designed template is the quickest way to get your multi-step campaign up and running.
From your WordPress dashboard, go to PopupKit > Templates.
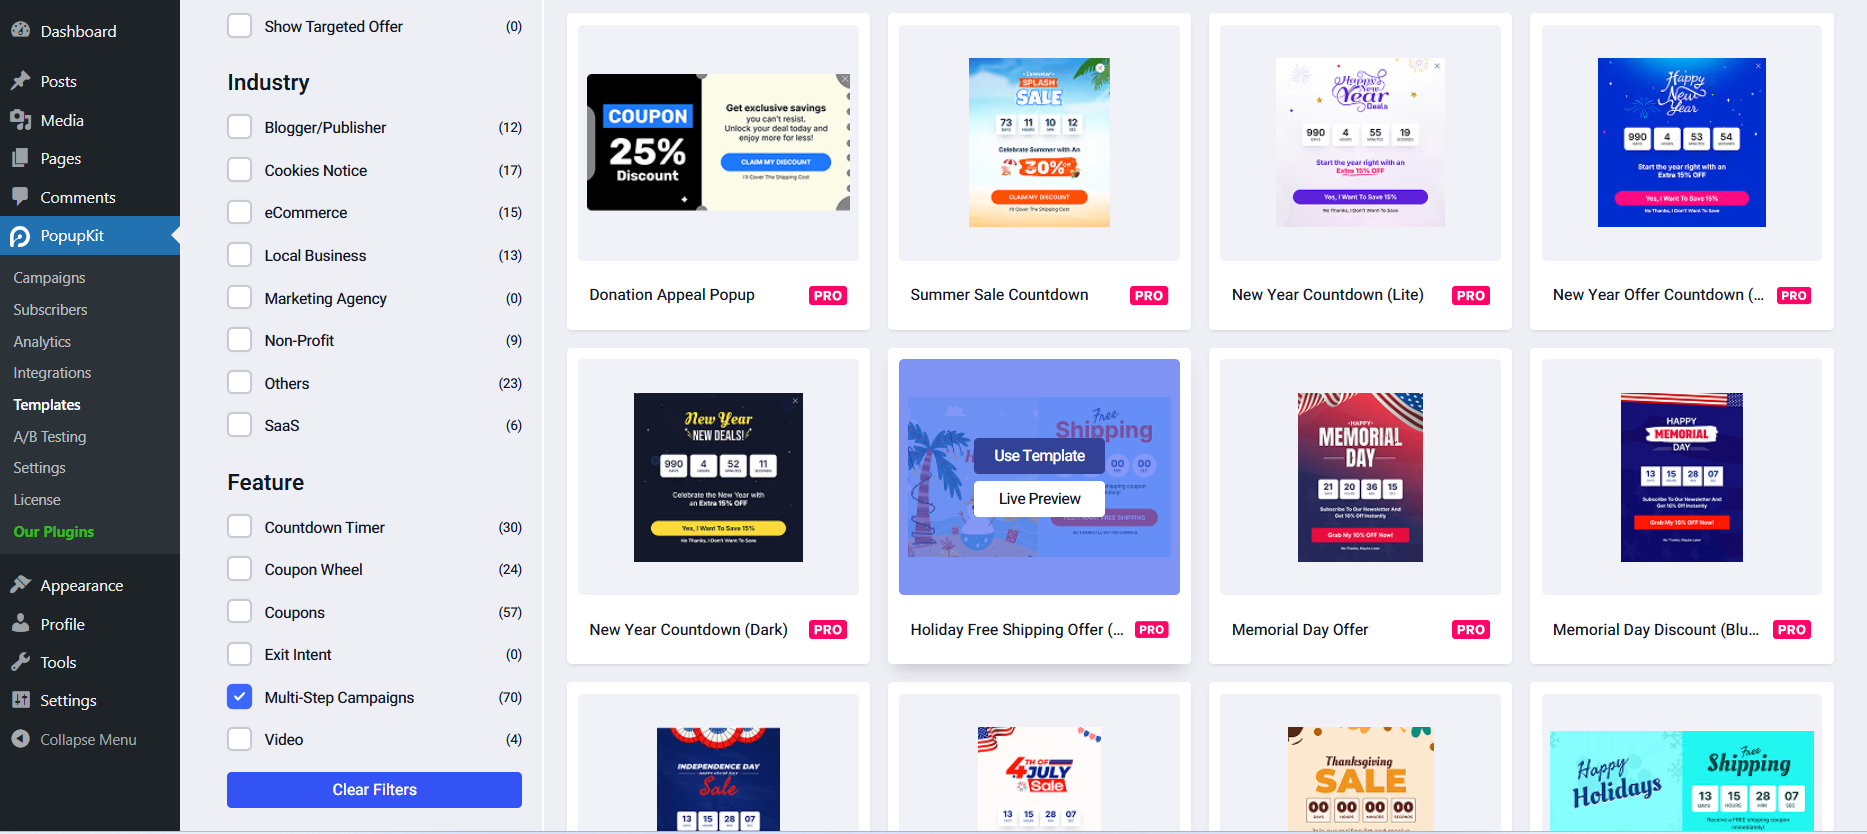
Então, Clique no Multi-step campaigns category to view all available sequenced layouts.
Choose a design you like; you can preview it as well.
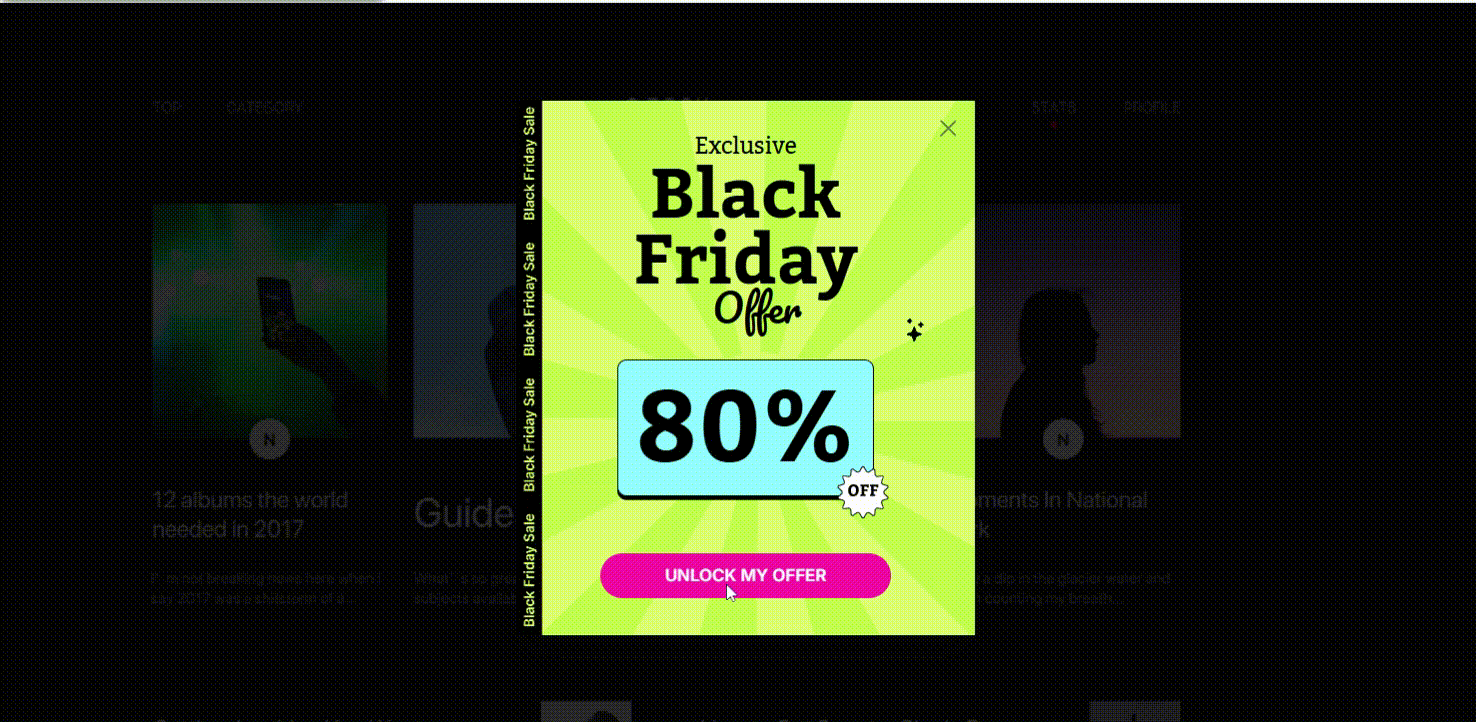
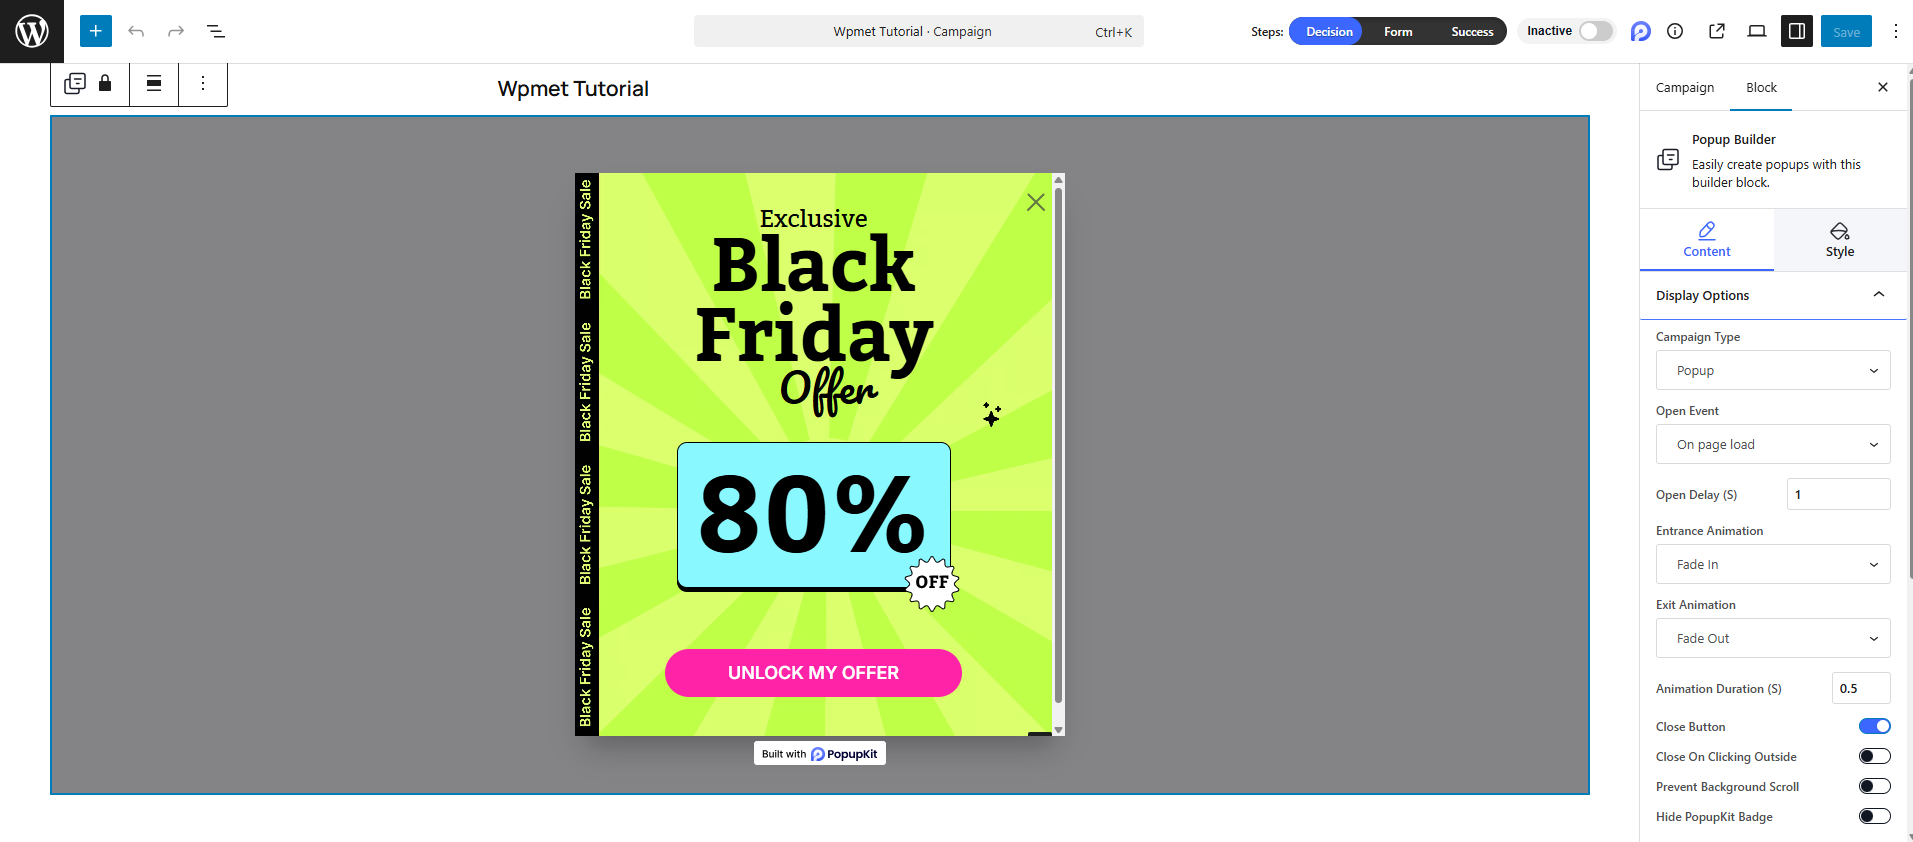
For our tutorial, I will be using the Black Friday multi-step template, which will ask my visitor if they want to take the offer, enter their name if they want to, and the last step will reveal the coupon code.
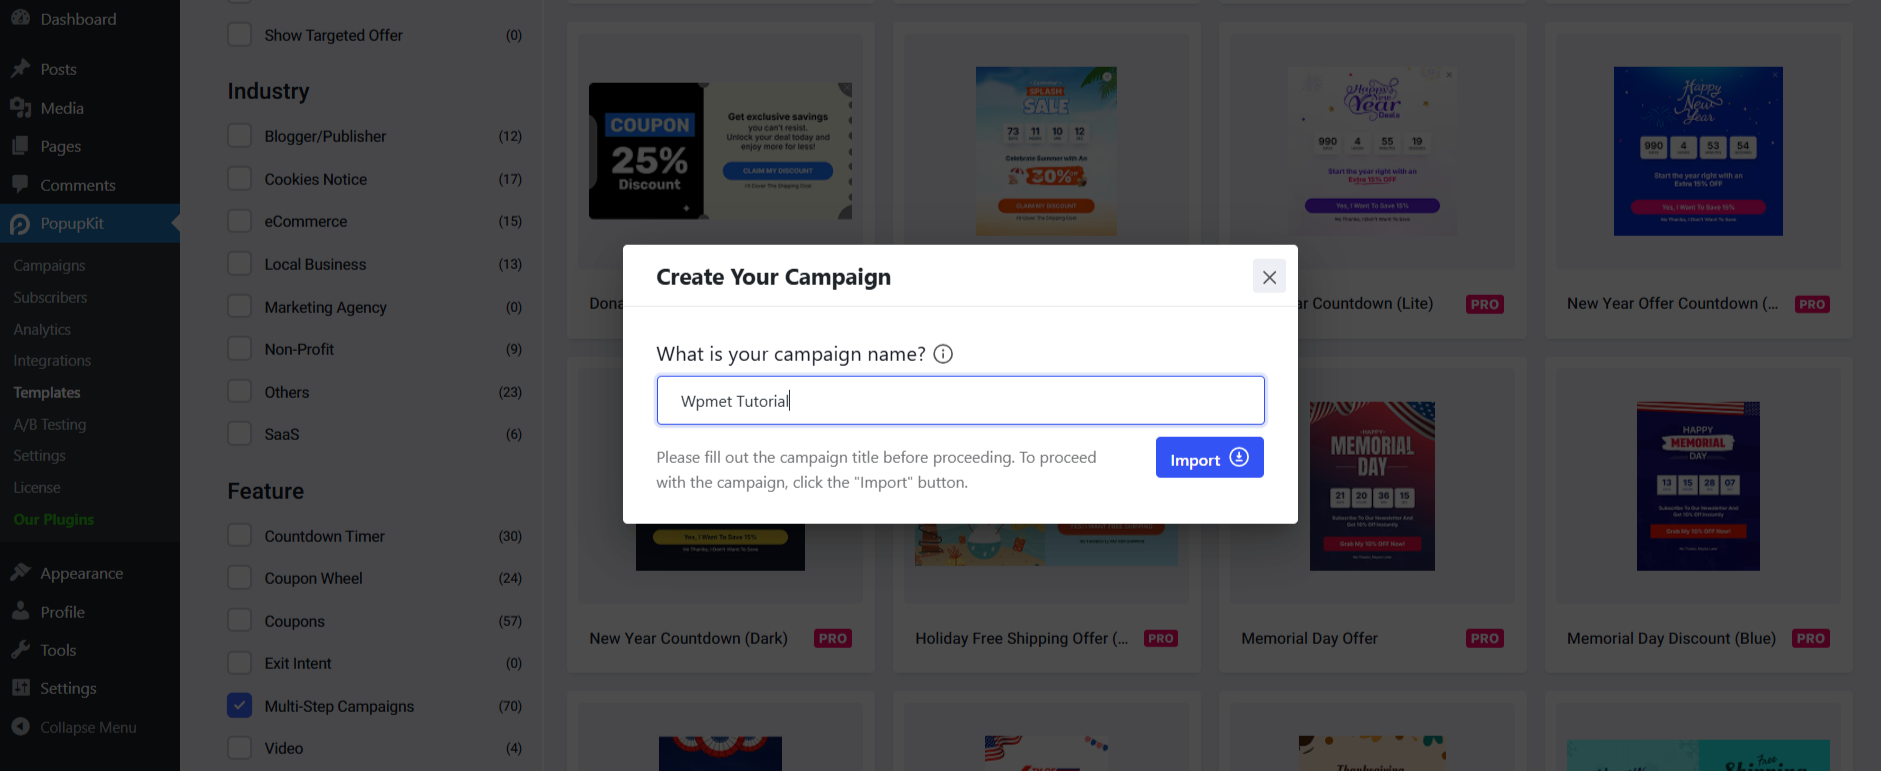
A seguir, clique Use Template. Enter a name for your popup, then click the Import botão.
Customize Your Campaign: The template will automatically load in your dashboard editor. Simply tweak the text, colors, and form fields as needed, and you are ready to publish!
Create Multi-Step Popups From Scratch
If you have a highly specific vision for your campaign, building a multi-step popup from scratch gives you complete creative freedom.
The best part?
PopupKit enables a visual editor to build your popup, you won’t need to write a single line of code to bring it to life.
Let’s see how to build multistep popups from scratch. And, the good thing is, you don’t need to give any coding efforts.
No painel do WordPress, navegue até PopupKit > Campaign > Add New Campaign > Create From Scratch. And, you’ll land in the editor dashboard.
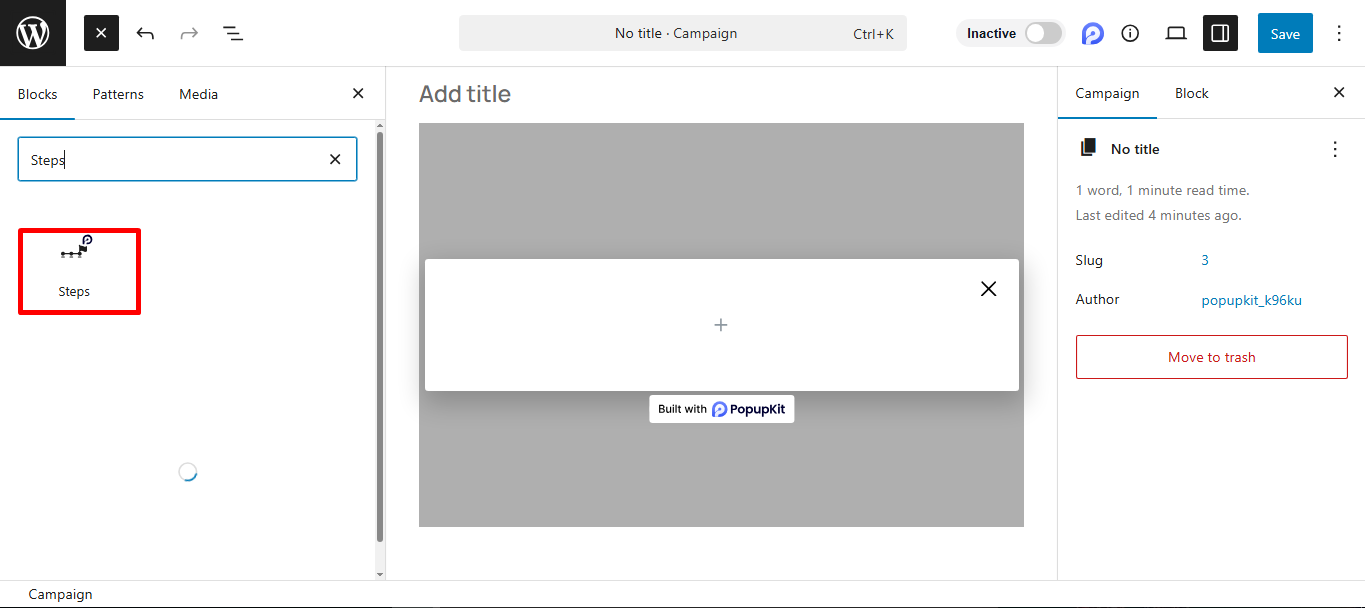
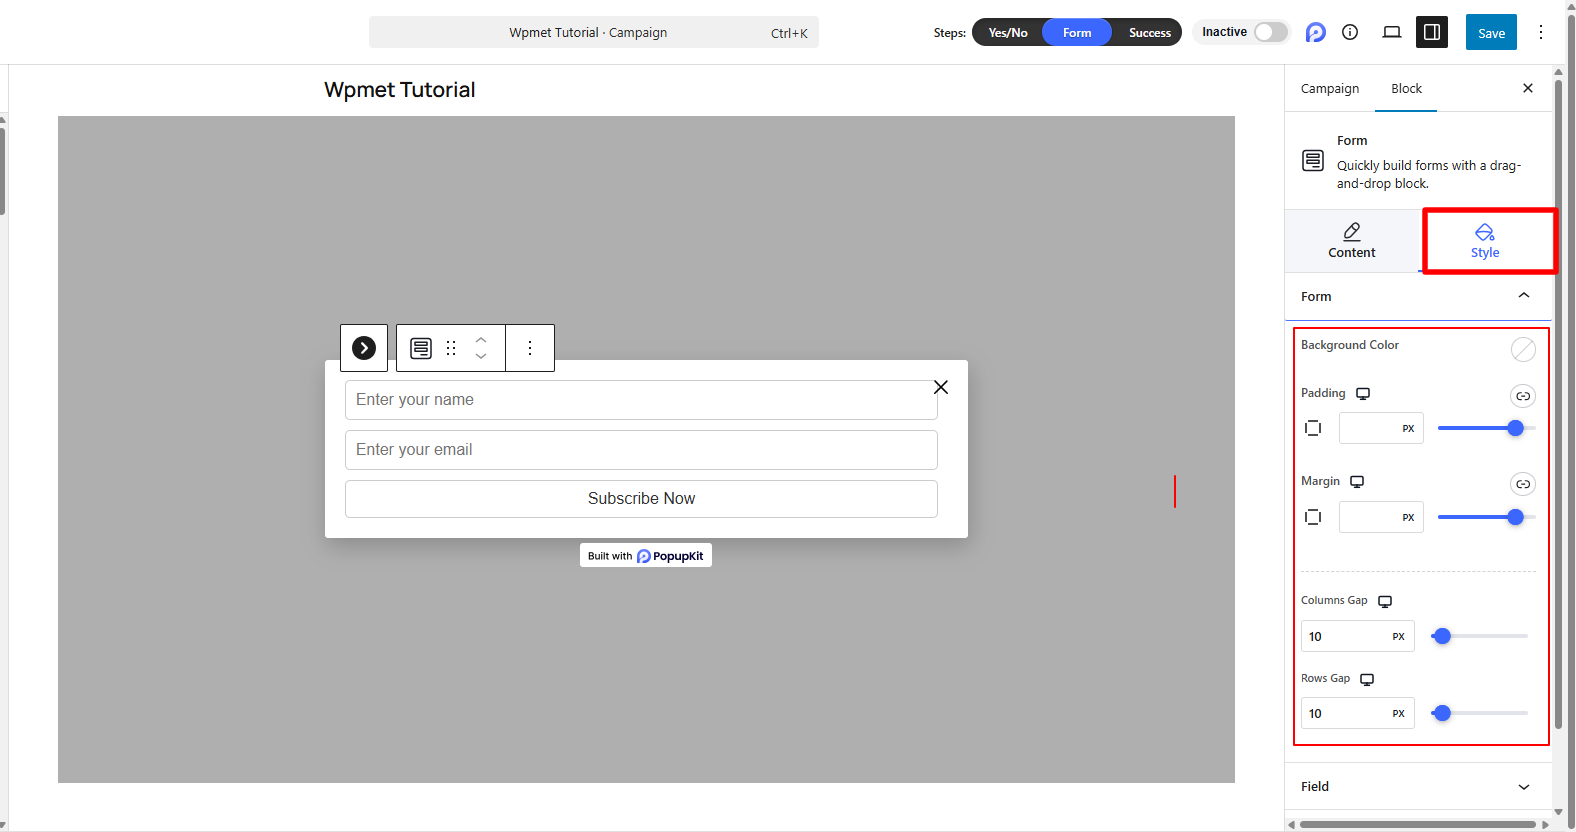
In the editor, use the “PopupKit Steps” block: search for “Steps” in the block inserter and drag it into your popup. This block acts as the structural foundation for your entire multi-step sequence.

Add or remove individual steps as needed to fit your strategy. Within each step’s container, you can freely insert buttons, lead capture forms, compelling headings, and images.
Customize the look and feel of each step to match your brand. You have full control over the background colors, precise width and height dimensions, margins, and visual effects like box shadows.
This structure helps you guide the user’s journey instead of asking for everything upfront.
Step 3:Choose When & Where to Shop Multistep Popups
PopupKit lets you control exactly who sees your popup and when. Use these advanced targeting features:
Once your steps are in place, you need to define who sees the popup, when, where, and how often. PopupKit gives a rich set of options.
Add display conditions.
Under Display Conditions, you control where the popup will show. You can include or exclude based on the entire site vs specific pages, posts, categories, WooCommerce, etc. You can also combine multiple display rules for precision targeting.
Examples: show popup only on blog posts, or exclude it from checkout pages.
Set device visibility.
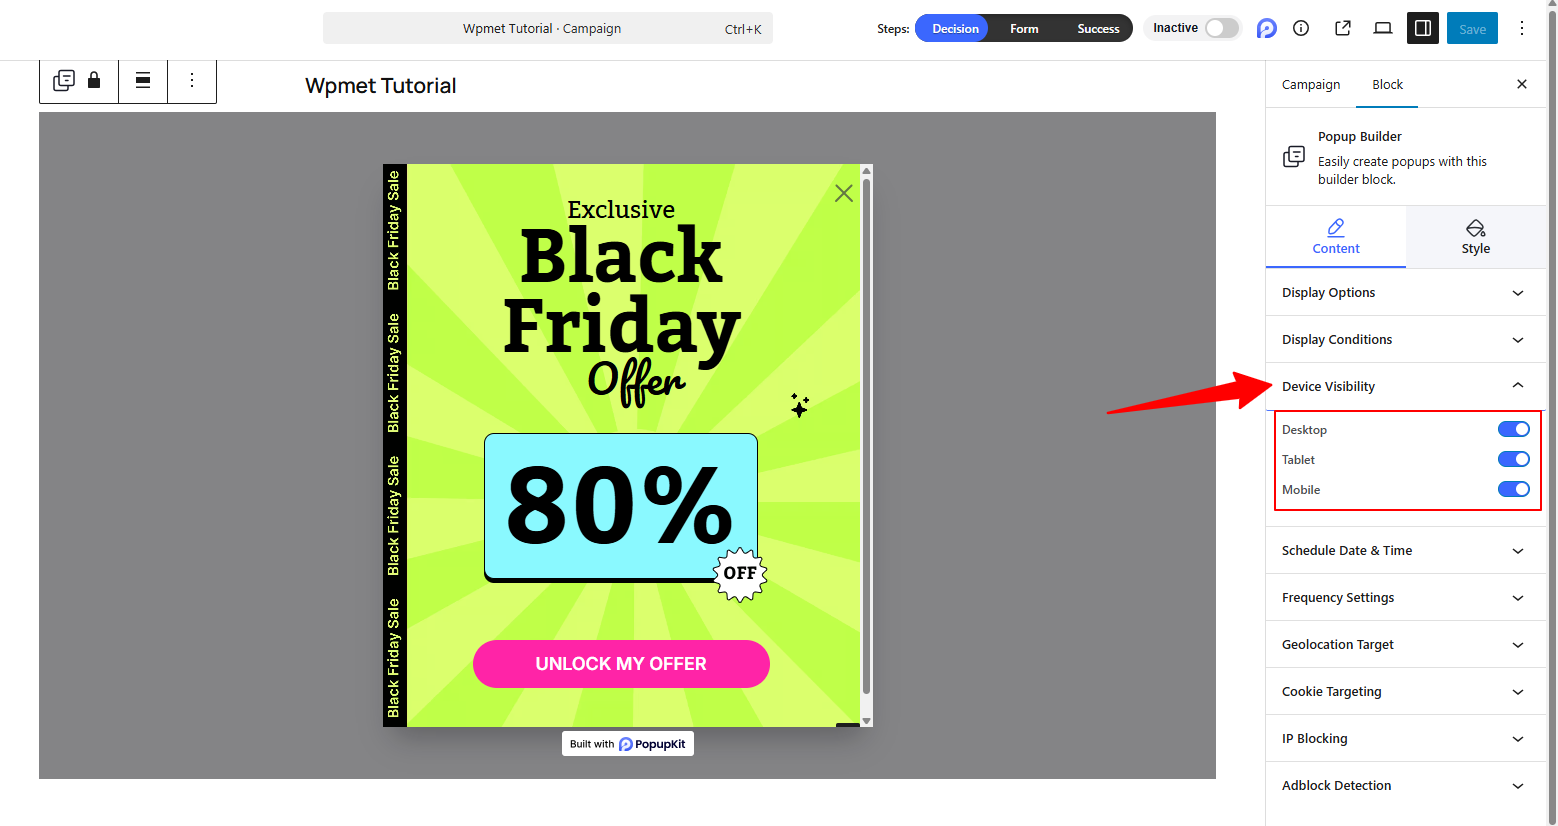
Choose whether the popup should display on: Desktop, Tablet, or Mobile. You can customize the design for each device if needed.
For example, maybe your multi‑step campaign works best on desktop, but you skip mobile or tailor a simpler version for mobile.
Schedule Popup Campaign
You can set start and end dates to automate the visibility of your popup. This is useful during promotions, limited‑time offers, events, or seasonal campaigns.
Frequency Settings
This controls how often the popup is shown to the same visitor:
- Display to Visitors: Everyone / New / Returning
- Display Frequency: Once a day / Every visit / Every session / Once every X days / Once every X visits.
- Don’t show to converted visitors: Those who already completed your form or after a defined number of views.
Geo-location Targeting
You can display or hide popups based on target users based on their location, such as: Country, City, Region, Zip code. Perfect for localized offers or regional promotions.
For example, show a special regional offer only to visitors in a certain country.
Cookie Targeting
PopupKit supports IP blocking (enabling you to exclude specific IPs) and cookies (for managing frequency / revisit behavior) as part of advanced targeting.
- Hide popup if a user has already subscribed
- Show popup if a user has visited a page multiple times
- Ip Blocking
Step 4: Customize Multi-step Popups
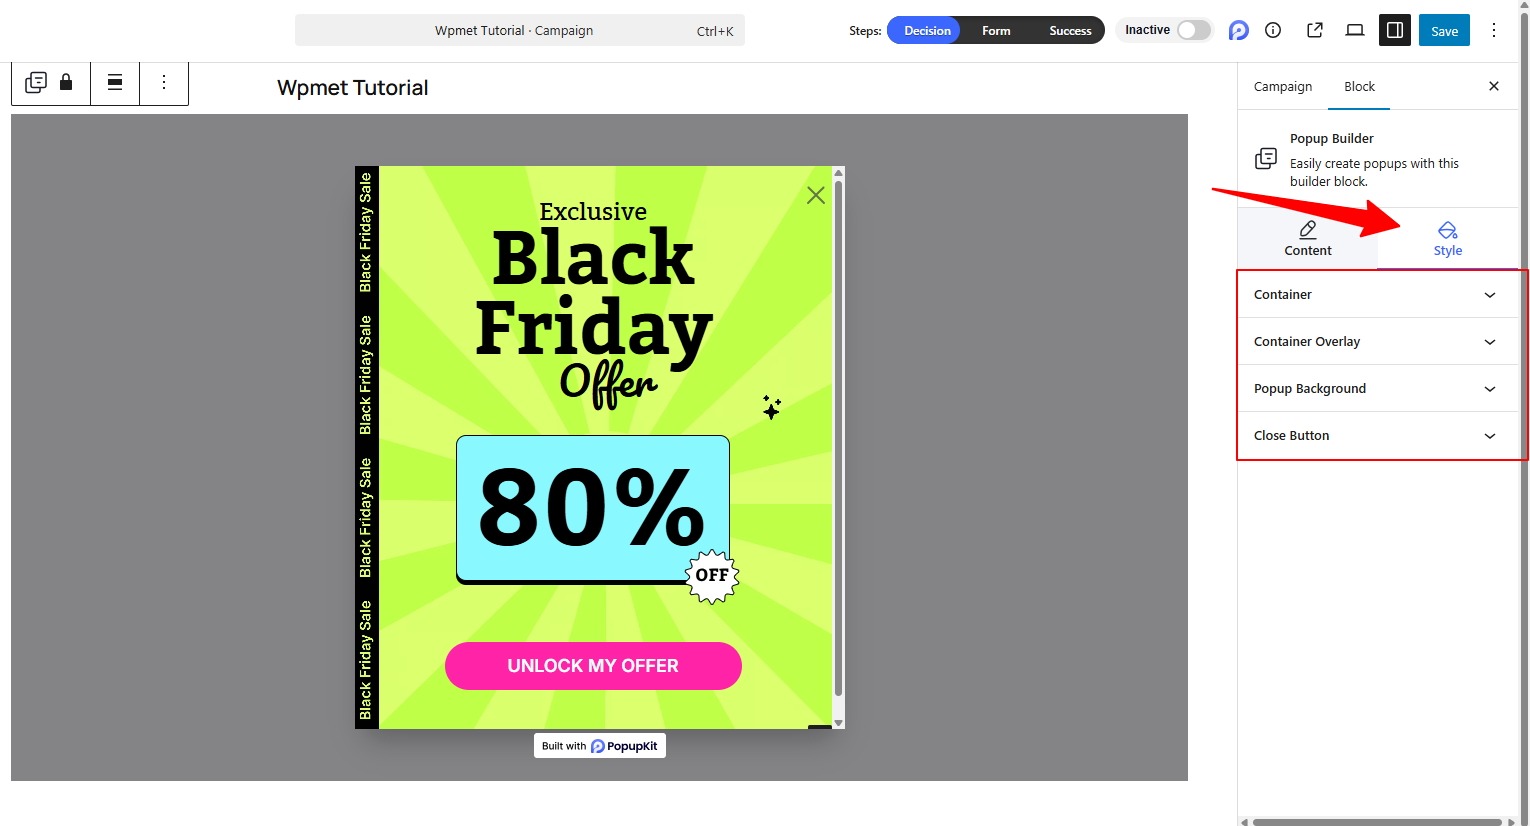
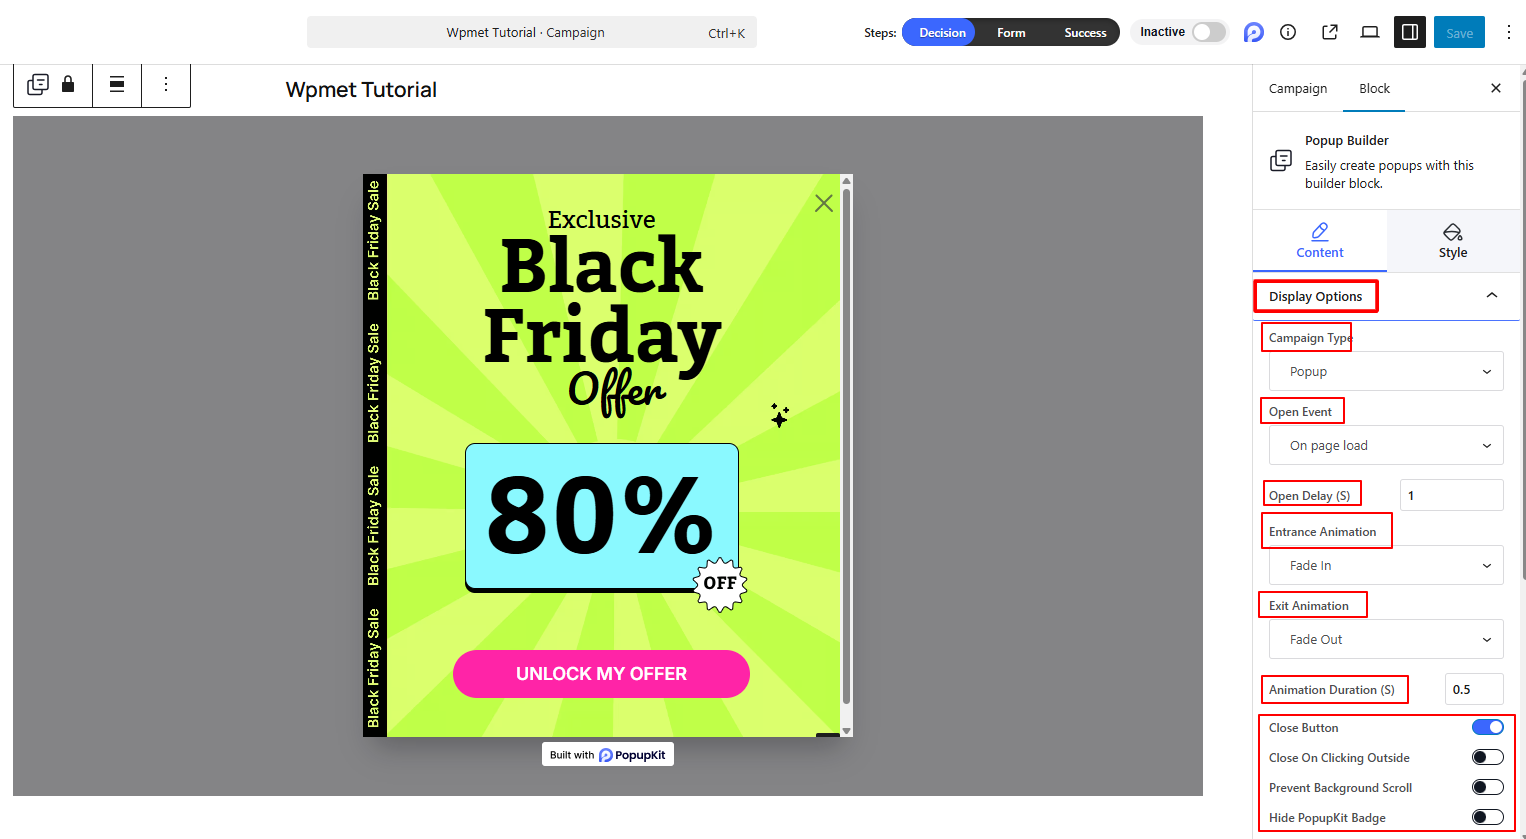
In the PopupKit editor, choose the Aba Estilo: adjust container width/height, background, overlay, close button, positioning, box shadow, etc.
For each step in the multi‑step flow, design the heading, visuals, button CTAs, and form fields.
Make sure the flow is logical: e.g., Step 1 gets attention → Step 2 asks for input → Step 3 delivers value. Every step can have its own layout, giving you full design flexibility.
Step 5: Preview, Test, Publish Popup Campaign
Before making your multi-step popups live:
- Use the preview function in PopupKit to test how the popup appears on desktop/mobile, and test each step of the flow.
- Test your display rules (pages, devices, geo, frequency) to ensure the popup shows when and where you expect.
- Once you are satisfied, publish your campaign and monitor the results.
Your multi-step popup will now appear based on the targeting and trigger settings you configured.
Best Practices to Design a Multi-step Popups
Here are some key practices I’ve found strongly effective in multi-step popup building strategy. Anyone can follow them to make their multi-step popup fruitful.
Keep step 1 simple and compelling: The first step should quickly gain interest (“Want 20% off?”, “Get free shipping?”, “Try our tool free?”)
Logical progression: Make sure each step leads naturally to the next. Don’t jump from “Yes” to “mega form” without transition.
Clear CTAs: Each step should have a clear action (“Start now”, “Enter email”, “Claim coupon”).
Mobile‑friendly: Multi‑step popups must work smoothly on mobile, since more users browse on mobile. Use Device Visibility settings to adapt.
Don’t over‑show popups: Use frequency rules so you don’t annoy repeat visitors.
Target precisely: Use display conditions, geo‑targeting, and device visibility so the popup appears where it makes sense.
Test and optimize: Monitor performance (views → steps completed → conversion) and tweak the flow, copy, design, and timing.
Value up front: Make sure you convey value in the first step; otherwise, users will drop off before reaching step 2.
When to Use Multi-Step Templates
You should use multi-step popup templates when you need to capture complex visitor data without causing form fatigue. They are highly effective for segmenting audiences, offering progressive discounts, or capturing leads during high-traffic sales events where a single, massive form would immediately kill your conversion rates.
Here are some examples:
- Audience Segmentation & Lead Routing: Don’t just ask for an email. Use the first step to ask, “What best describes you?” (e.g., Agency vs. Freelancer). Once they click their persona, Step 2 captures their email, allowing you to send highly targeted Product-Led Growth (PLG) nurture campaigns.
- High-Traffic Sales Events: During massive site-wide sales (like a Black Friday or a tech festival campaign), attention spans are incredibly short. A template that starts with a massive, clickable “Claim My 80% Off” button will always outperform a static email field.
- Content Upgrades & Lead Magnets: If a user is reading a blog post, interrupting them with a full form is jarring. A two-step template allows you to show a simple “Download the Ultimate Guide” button first. The form only appears once they have explicitly decided they want the resource.
- Progressive Profiling: If you already have a user’s email, use multi-step popups to collect secondary information over time, such as their phone number, company size, or specific product interests, without overwhelming them all at once.
FAQs on Multi-step Popups
Why should I use a multi-step popup instead of a standard one?
Do I need to know how to code to build a multi-step popup in WordPress?
What is the best trigger to use for a multi-step campaign?
Do multi-step popups work well on mobile devices?
Will adding multi-step popups slow down my WordPress site?
Conclusão!
Multi-step popups are an effective way to increase conversions by guiding visitors through a simple, step-by-step flow rather than hitting them with everything at once. With PopupKit, creating them is straightforward: just install the plugin, build your multi-step campaign, set your display rules, customize the design, test the experience, and publish.
And, following our tutorial, you’ll be able to create high-converting marketing campaigns that allow you to generate both sales and leads.
So, are you ready to try them on your WordPress site? Grab Kit pop-up now.

Deixe um comentário