These days, using custom fields is an essential part of modern web content organizing. WordPress users are looking for a way to add custom fields to Gutenberg websites.
Custom fields allow you to add extra metadata to your posts and pages, going beyond the default options like title, date, or author. They are especially useful for managing niche-specific or industry-focused content seamlessly.
Read this in-depth tutorial guide on how to add custom fields to Gutenberg websites without adding any coding and configuring the theme file.
What are Custom Fields in WordPress?
Custom fields are a great way to integrate dedicated metadata into posts that WordPress can store. They allow you to customize website content based on your visitors’ specific needs and display unique field values tailored to each post, like author bio, ratings, product reviews, helpful messages, etc.
For instance, if you’re building a real estate listing website, you might need custom fields like bedrooms, bathrooms, square footage, price, and other property details to showcase apartments effectively.
Another advantage of using custom fields is the ability to view all posts associated with specific metadata. Take this scenario for an example, if a visitor to your website wants to filter apartments by a certain price range or square footage, they can easily find exactly what they need.
How to Create a Custom Field Group Using a WordPress Plugin?
In the first part of this tutorial, we’ll help you learn how to create a custom field group using a plugin. For a user-friendly experience, my pick is the Advanced Custom Field (ACF) plugar.
Step 1: Install and Activate ACF
Get started with installing the “ACF (Advanced Custom Field)” plugin from the WordPress repository. To do this:
- Faça login no seu painel do WordPress.
- Navegar para Plug-ins > Adicionar novo
- From the WordPress repository, search for “Advanced Custom Fields.
- Once it appears on your screen, instalar & activate it.
Step 2: Create a New Field Group
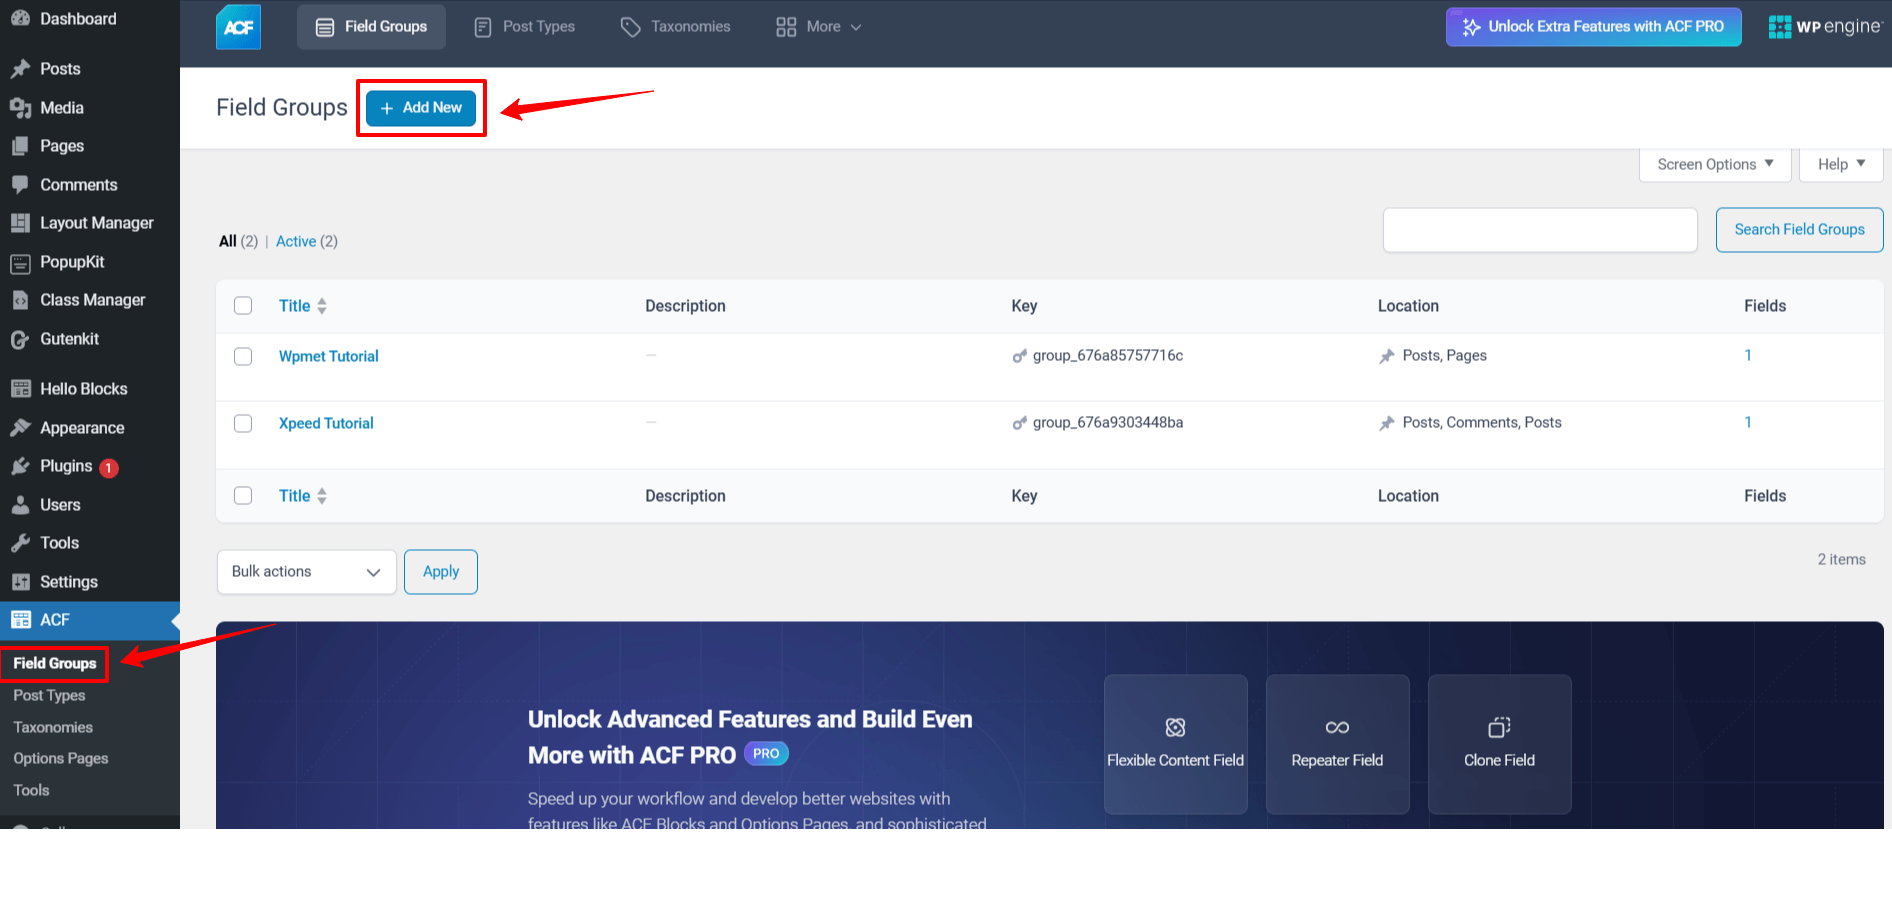
Now, you can see the ACF plugin on the WP dashboard. Hover over it and click on “Field Groups”. On the next screen, click on the "Adicionar novo" button and it will take you to the form editor page.
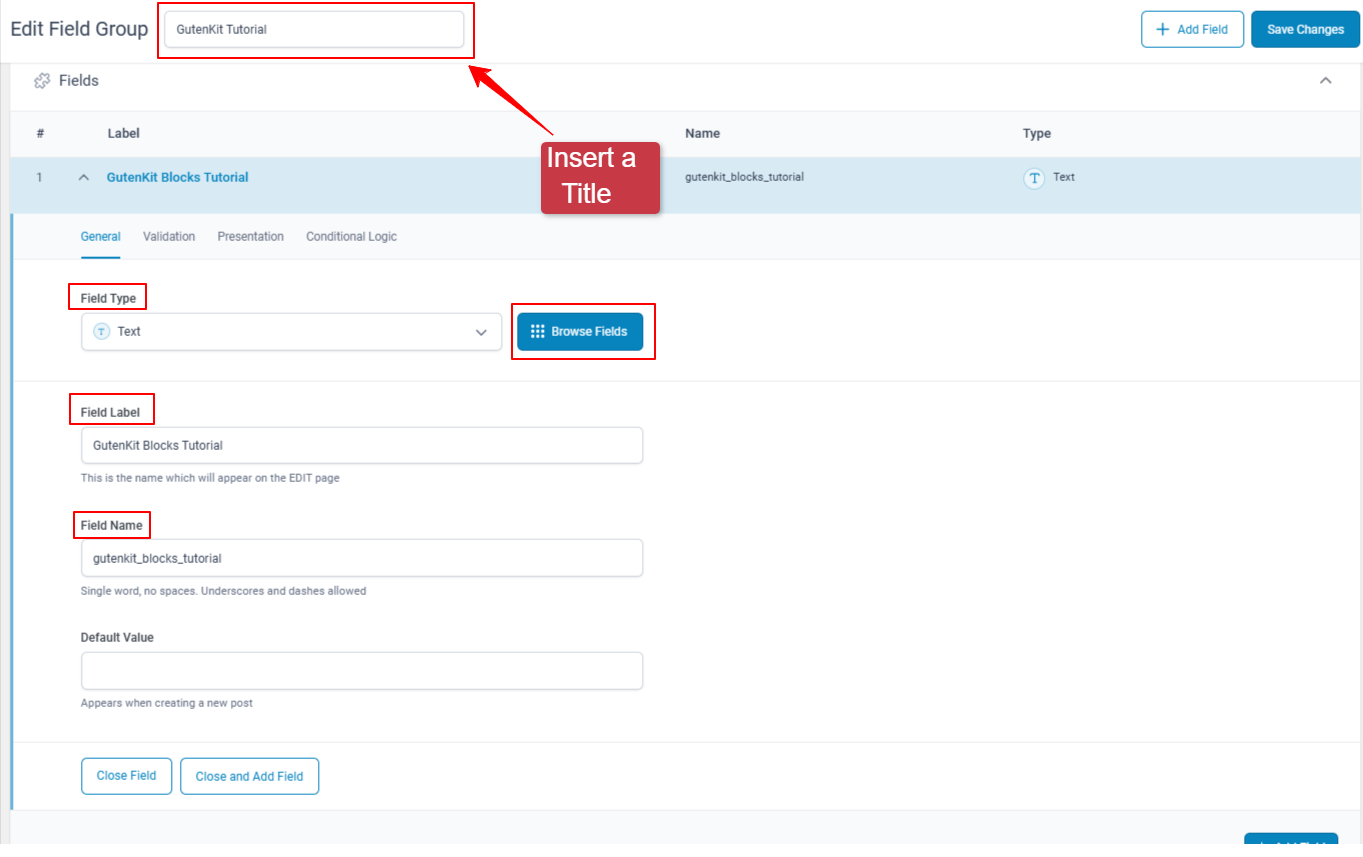
The first thing you need to do on this screen is give a title for the field group. Then, you will start to register your first field. Select a Field Type from the dropdown. You can even browse for more field types by hitting the “Browse Fields" botão.
Then, write the name of the individual field label in the Field Label box. However, the next option “Field Name” is generated automatically from the field label. You can fill in the “Valor padrão” box to specify more custom fields.
Further, you’ll see other settings tabs like Validation, presentation, e condicional to append crucial instructions on your custom fields. Plus, you can add multiple fields by clicking the “+ Add Field” botão.
Step 3: Set Field Group Location
Up next, we’ll be configuring the settings tab. One notable function is the location box. It lets users define rules to show custom fields to only a particular scenario.

For instance, if you want to add a custom field specifically to the header area, you can set a rule like “Page – Equals – Header Template.” This ensures the custom field appears only on pages using the header template.
Clique no "e” button at the sharp right to make a more specific targeting. Next, you can also set multiple rule groups by clicking the “Add rule group”.
Step 4: Adjust Additional Settings
The Settings tab offers options to enable or disable the field group and customize its appearance. You can adjust the layout to be vertical or horizontal and apply styling to the custom fields.
Step 5: Save Your Work
After configuring all the settings in the ACF plugin, be sure to click the “Salvar alterações” button to preserve your work.
That’s it. You have successfully added a custom field to your Gutenberg website. Now, we’ll show you the practical way of using custom fields and organizing them within the block editor.
How to Add & Display Custom Fields on Gutenberg Websites?
One way to display custom fields on your Gutenberg website is by using the dynamic content functionality. Some Gutenberg-based page builders, like Kit Guten, support blocks that integrate the dynamic content feature.
Below, we’re showing a real workaround for it:
To follow this tutorial, you must install and activate the Kit Guten plugin on your website. Then, take a new page or post from your WordPress dashboard or edit any existing one.
Once the page gets fully loaded on your screen with the block editor interface, search for the GutenKit blocks that are available with the text component, like Cabeçalho, Capitular, Guia Avançado, etc.
In this tutorial, I’m showing it with the Bloco de título GutenKit, we’ll try to show some personalized blog posts depending on ACF Group & Fallback.
So, I proceed with the GutenKit Heading block to make sure it is enabled in the blog settings. Drag and drop the block to the editor area, then change its content as preferred way.
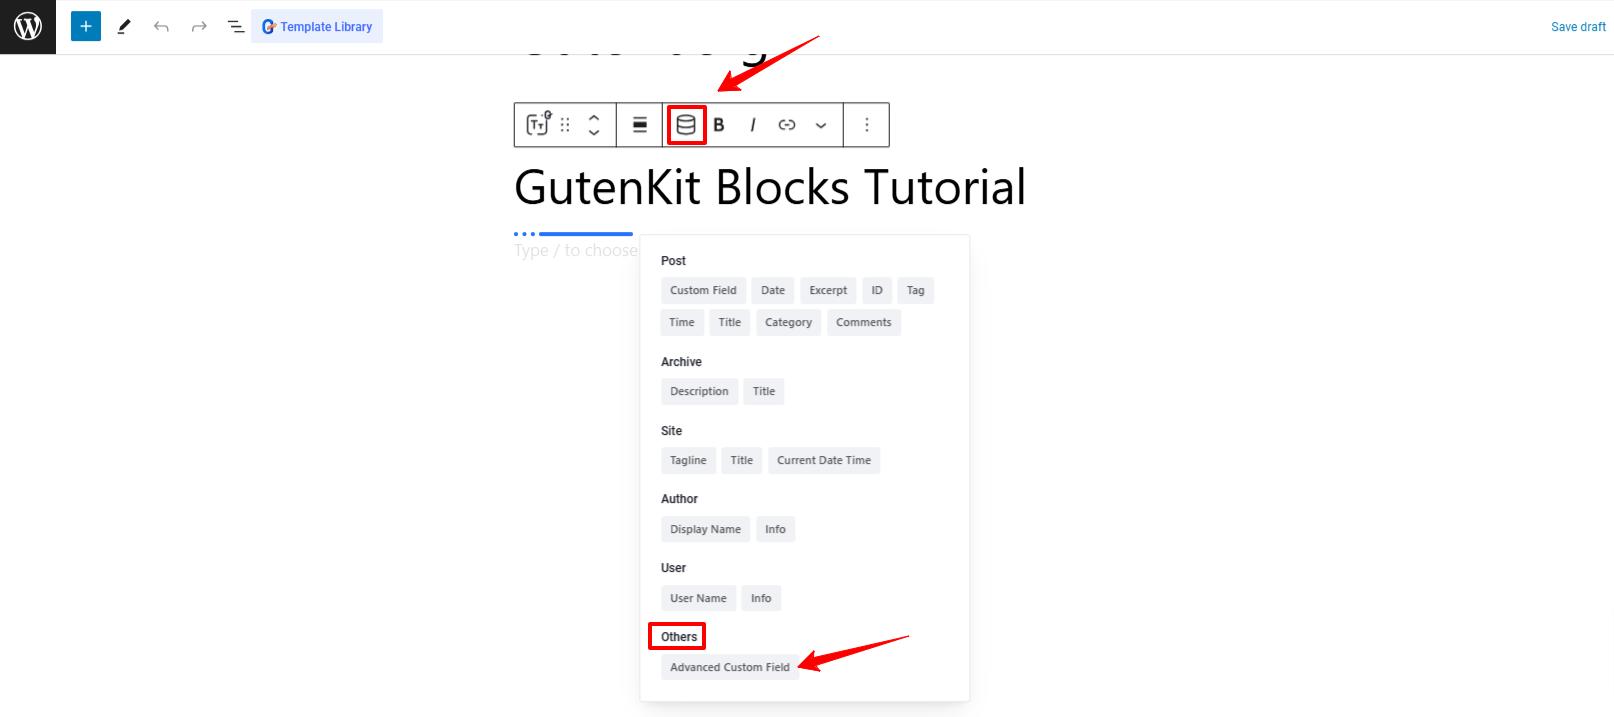
Up next, select the block and click the dynamic content icon within the block’s settings toolbar. Doing this will pop up a mini layout with various field options and look for the Others at the bottom. And, you’ll see the Advanced Custom Field option within it.
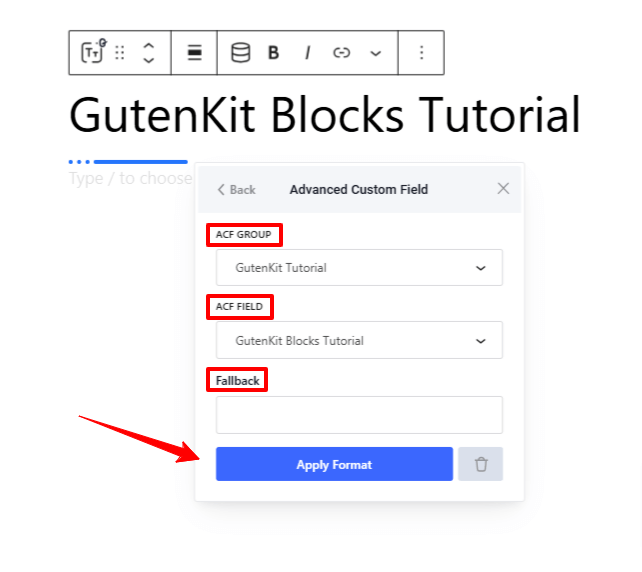
Clicking the ACF option will open its settings, and here users are required to select the ACF Group, then the ACF Field option. For this tutorial, the ACF Group is the GutenKit Tutorial and the ACF Field is the GutenKit Blocks Tutorial.
After choosing the selection, I just need to hit the Apply Format button. That’s it! Now, like the regular way, I need to save my page draft and check the page or post’s preview in a new browser tab.
Further, you can also change these settings any time you want, just change the ACF Group & Field or anything you want. Then, simply hit the “Update Format" botão.
Configuring The WordPress Default Custom Fields Settings (Manually)
Above we’ve shown how to add and show custom fields within the block editor using plugins. But, you can also do it manually by editing your core theme file which is absolutely not recommended for non-techy or beginner-level WordPress users.
Any wrong attempt you make to your theme file can leave you with heavy costs like you might lose your website content. Anyway, we’re also going to educate you on how to configure the WordPress default custom field settings.
Generally, WordPress stores all the essential metadata of your posts and pages. And, you can also create your own one as custom field.
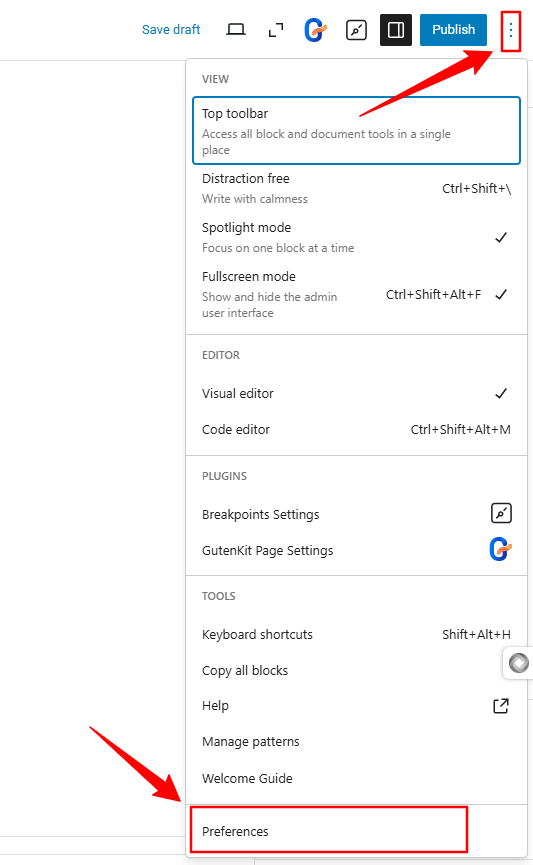
To access the native custom fields of the Gutenberg WordPress website, insert to a new post or existing one. Click on the três pontos icon at the top-right. Then, look at the bottom, you’ll see the “Preferências” option, hit it.
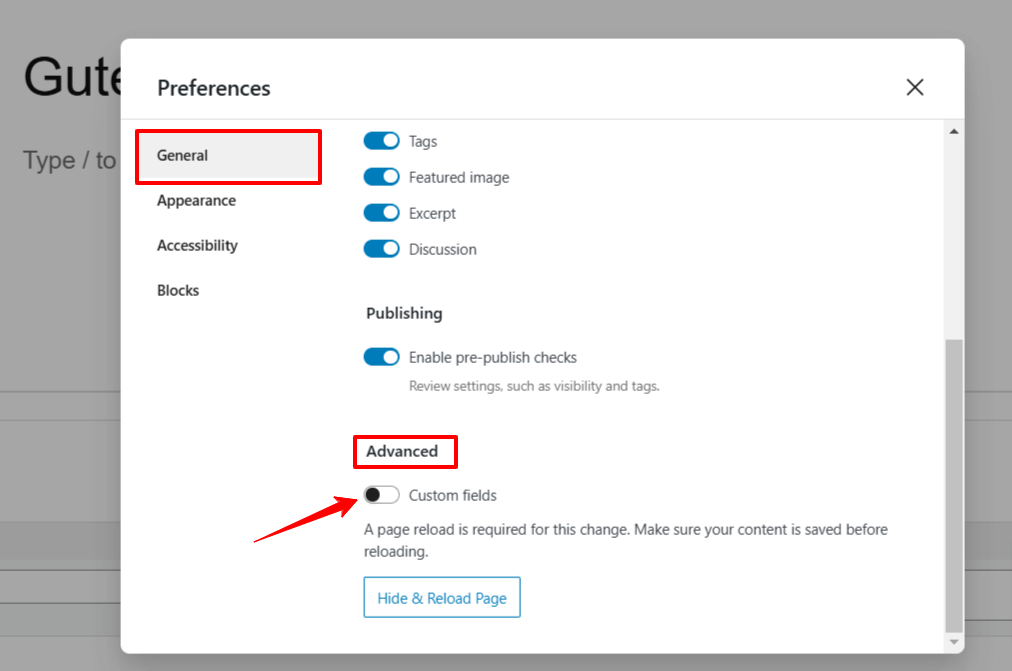
Doing this will reveal a popup with a different settings tab, enter the first tab “Em geral”. Go down and enable the “Os campos personalizados” option under the Avançado opção.
Then, you need to click the “Enable & Reload” button and it will reload the post editor. And, you will see the new Custom Fields Panel underneath the post editor.

Insert the custom field name and value. Afterwards, you can add multiple custom fields by clicking hte “Adicionar campo personalizado" botão.
The main disadvantage of this process is that if you want to display these custom fields within your theme, you will need to configure the theme file. Beginner WP users won’t find it an easy task to do.
Perguntas frequentes
How to Add Custom Meta Fields in WordPress Without any Plugin?
How to Add Custom User Meta Fields in WordPress?
How Do You Add Multiple Values to a Custom Field?
How to Display a Sidebar Using Custom Fields?
Conclusão!
That’s my thorough tutorial on how to add custom fields to Gutenberg websites. I keep in my mind the beginner users who don’t want to go through any coding hassles and configuring the theme files. The plugins I recommended are capable of applying various custom fields with multiple rules and conditions.
ACF is a reliable option with the most user-friendly way to build custom field groups in WordPress. On the other hand, the Kit Guten page builder for Gutenberg is an efficient option with the dynamic content feature. You can assign the custom fields to any text you add with this page builder.


Deixe um comentário