


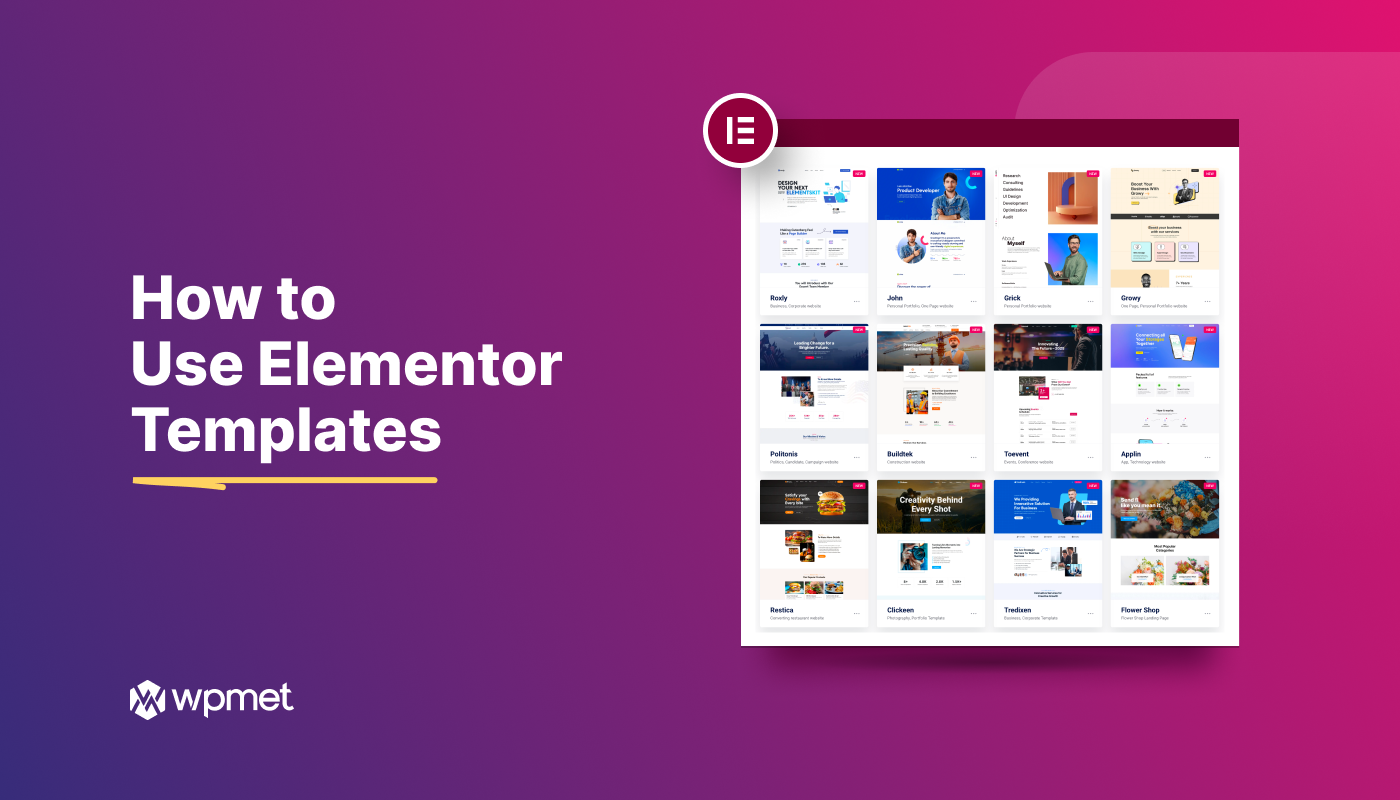
Do you want to speed up your Elementor website creation workflow? Using Elementor templates eliminates the need to design a website from scratch. If you have a professional website layout pack for your Elementor website, you can launch a website in a flexible way in record time.
No matter what part of your website you’re looking for, you’ll find great pre-made templates created by experienced designers. But first, you need to know how to use Elementor templates.
In this guide, we’ll explain everything you need to know about using Elementor templates effectively, which will significantly increase your productivity and creativity.
Quick Overview
This tutorial includes comprehensive overview on how to use different types of pre-designed Elementor templates.
Tools Used: WordPress, Elementor, ElementsKit, ShopEngine, MetForm.
Using these tools you can easily learn:
✅ How to use Elementor templates.
✅ How to add Elementor templates to create an entire website.
✅ How to apply pre-made Elementor WooCommerce templates to create e-Commerce sties.
✅ How to easily create forms using templates in Elementor website.
✅ How to save, import, export, and covers various pre-designed Elementor templates.
And, you don’t have to be expert on any coding knowledge or use other tools apart from mentoned above.
What is Elementor Template Library Kit?
The Elementor template library kit is like any other pre-made template collection for WordPress websites. To build your entire Elementor website, you will have complete sets of pages like home, product, post, about, contact, and many more, designed to match your theme or niche.
Elementor templates set the appearance of your website. These design assets are customized to align with the functionality of Elementor widgets, modules, and functionalities. You can achieve the design of an Elementor template by using Elementor elements and features.
Users can access the Elementor template library within the drag-and-drop dashboard. You can also upload Elementor templates by importing JSON files directly from your device. And, after uploading one, you can easily customize it with ease.
How to access Elementor Template Library?
Log in to your WordPress dashboard and start editing any page or post with Elementor.
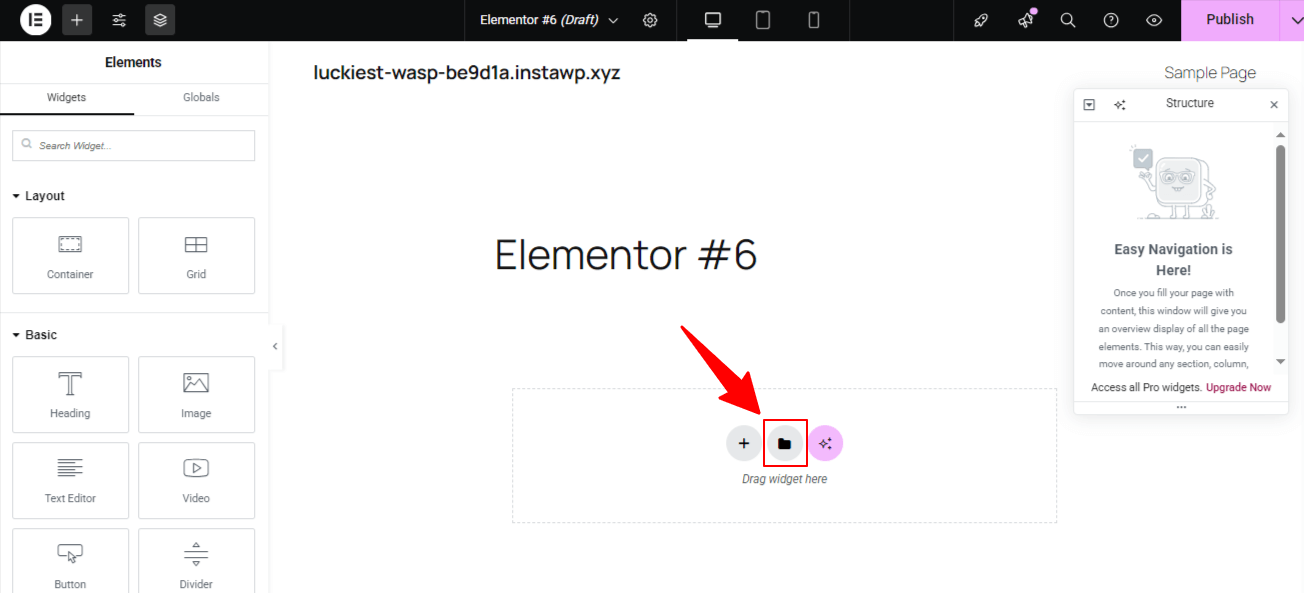
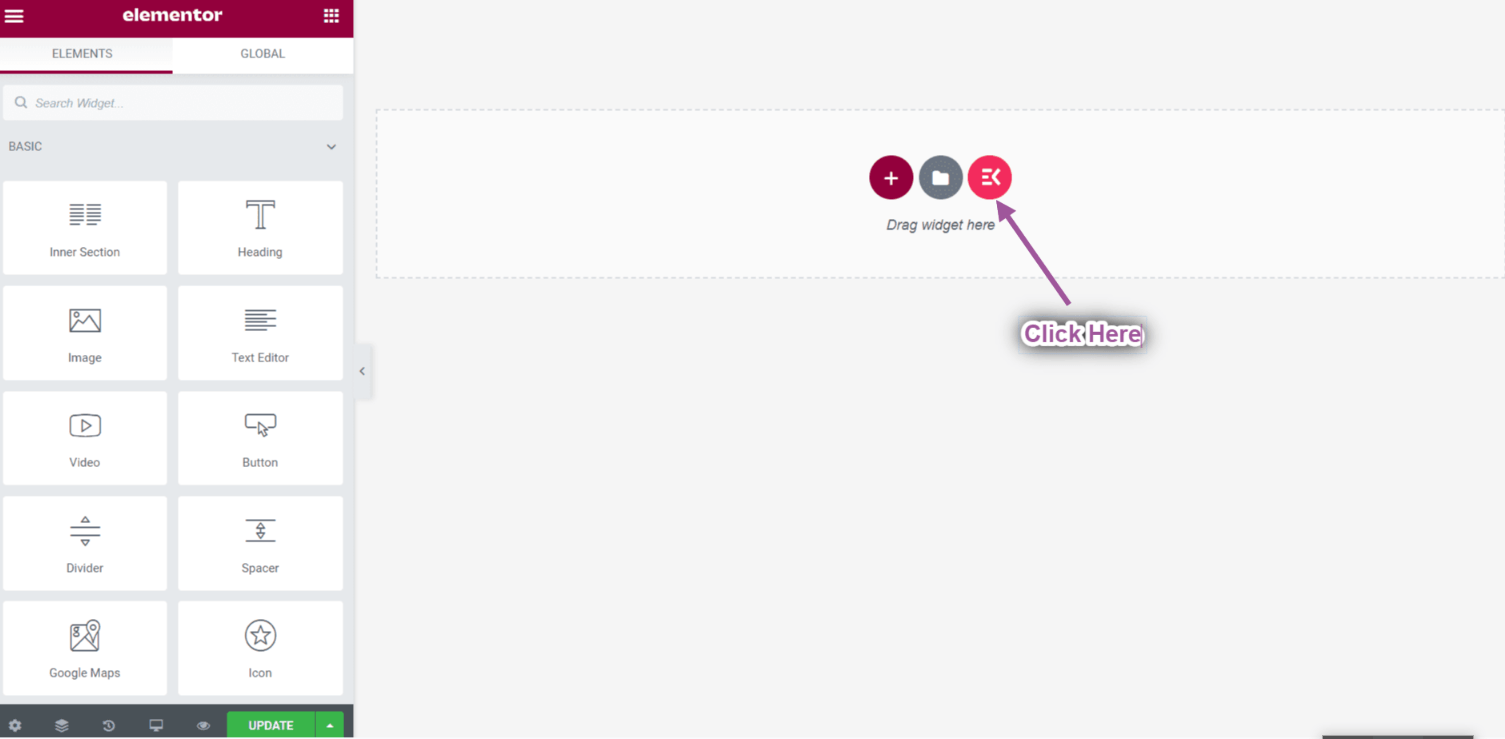
Once the Elementor editor dashboard loads successfully, look for the folder “📁” icon in the middle and click on it. This will open a new screen with Elementor templates.
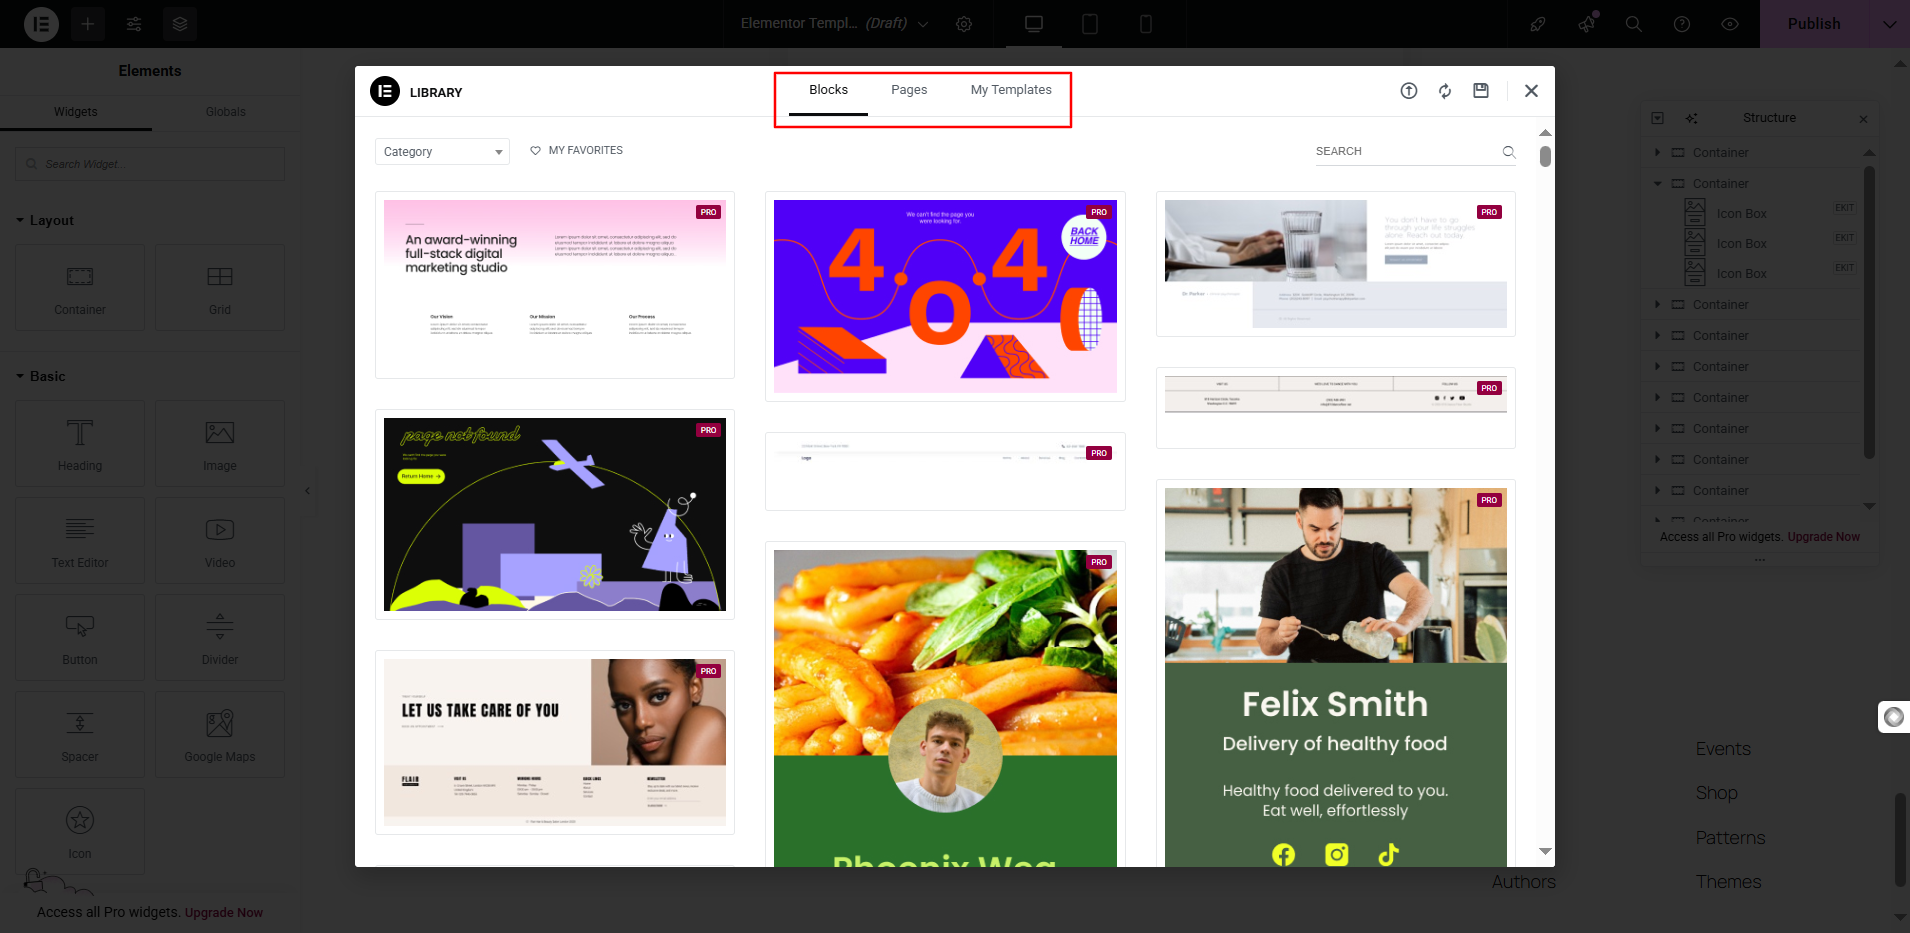
Through this new popup window, you can browse for different template categories. Generally, templates are divided into Page, Blocks, and My Templates categories. So, you can browse your preferred ones as needed.
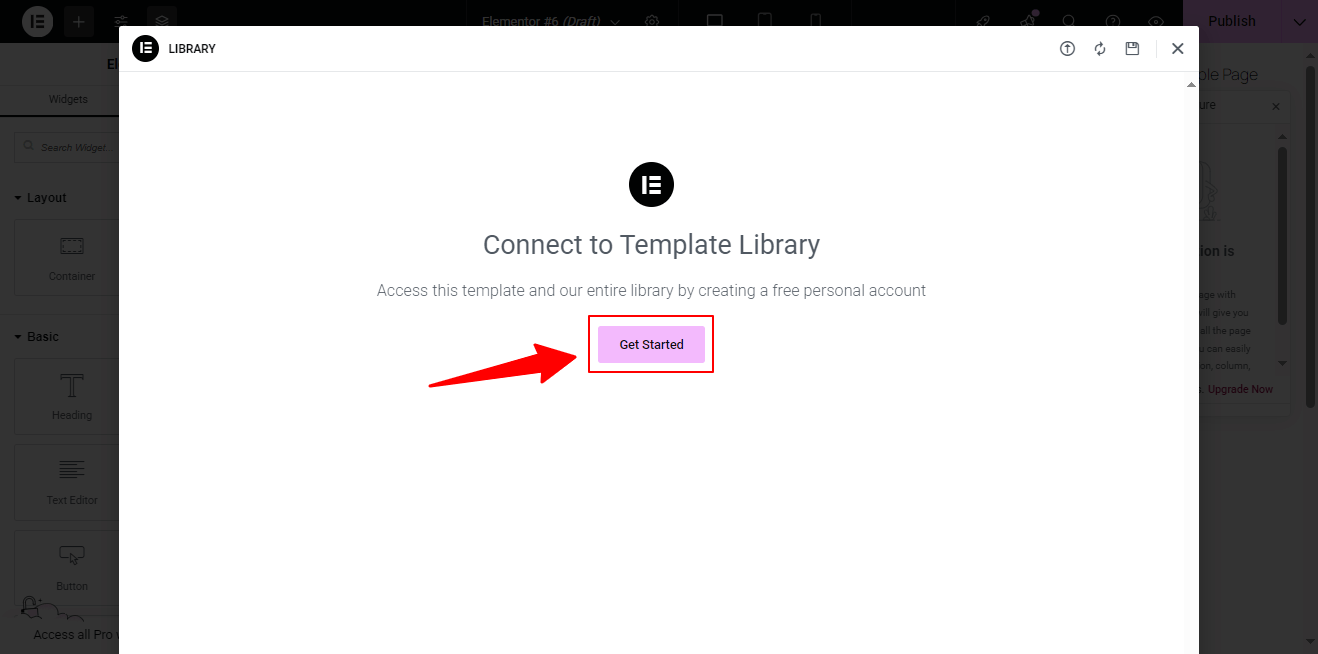
Now, to insert a template library for the first time (even the free one), you must connect to an Elementor account. Hit the 시작하다 button, and a new browser tab will open up to proceed with the signup for an Elementor account. Or, you can log in with your existing account.
Connecting to an Elementor account lets you select your favorite Elementor templates or view recently used Elementor templates.
You can also go for free third-party templates. For example, ElementsKit and MetStarter have a good number of free Elementor templates.
What are Premium Elementor Templates?
Premium Elementor templates are professionally designed, high-quality pre-made website layouts, header templates, and sections that you must purchase to use. Along with Elementor Pro, many third-party add-ons and bundles come with premium Elementor templates..
Unlike basic templates, these are built with a high level of design consistency, responsive layout control, and unique visual styles tailored for specific industries or purposes. Moreover, they include advanced features, such as custom widgets, dynamic content, attractive animations, animated backgrounds, and complex design elements that enhance both functionality and user experience.
We can take ElementsKit as an example, it’s an all-in-one Elementor solution. The expert web designer team behind this plugin is continuously adding professional-grade Elementor templates. From empowering you to create an entire website with pre-made templates, it also has a huge library of sections that you’ll find helpful for designing any part of your website.
This addon ships with:
⭐ 40+ Elementor full-website layout packs
⭐ 98+ Ready Elementor Pages
⭐ 45+ pre-designed Header & Footer Elementor Templates
⭐ 791+ Pre-made Elementor sections
The most appreciated part of ElementsKit is its responsive header-footer template collections. This means you can create a beautiful header and footer for your website, which is considered one of the most difficult challenges in creating a website. And, inserting a polished and ready-to-use Elementor template from ElementsKit requires no additional learning. Let’s see how:
How to Use Premium Elementor Templates?
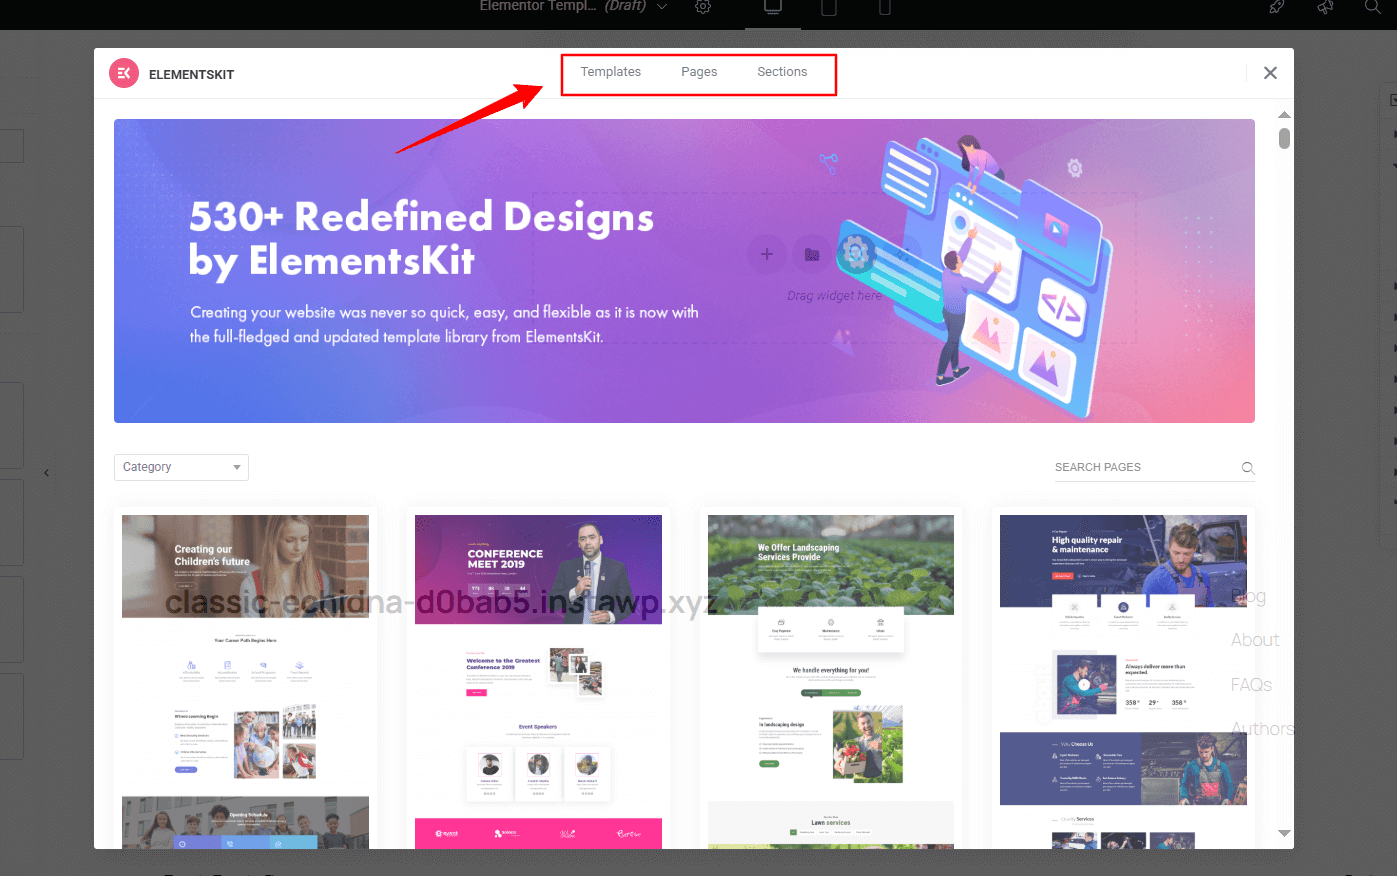
First, complete the purchasing and activation of the ElementsKit license. Then, enter the Elementor dashboard and find the “Folder” icon as shown in the above part. Besides the folder icon, you’ll see the ElementsKit icon. Hit this icon to open the ElementsKit template library.
In the next screen, you can browse ElemensKit’s layouts for different niches like agencies, freelancers, mobile apps, gyms, SaaS, entrepreneurs, startups, and many more. Clicking the 부분 tab will give you access to its widgets & modules dependent sections. The 페이지 tab provides awesome design inspiration for creating your web pages.
Once you insert an ElemensKit pre-made template, you can tweak its content and styling to match your brand. However, you won’t lose the professional look and feel.
How to Use WooCommerce Elementor Templates?
To build your eCommerce website with Elementor, you can use specialized WooCommerce templates. However, to get the most benefit of Elementor WooCommerce templates, you mostly need to be dependent on third-party addons. There are also dedicated WooCommerce add-ons available that integrate seamlessly with Elementor.
For example, ShopEngine is a WooCommerce addon for Elementor that provides important pre-made templates for ecommerce pages like shop, single product, cart, checkout, quick view, my account, etc. These templates load with all the functions, and you require no additional tools. Further, you can customize and change the content of these templates from a visual builder interface.
Here’s a usual scenario of adding a WooCommerce template in Elementor. Install and activate the ShopEngine on your Elementor website.
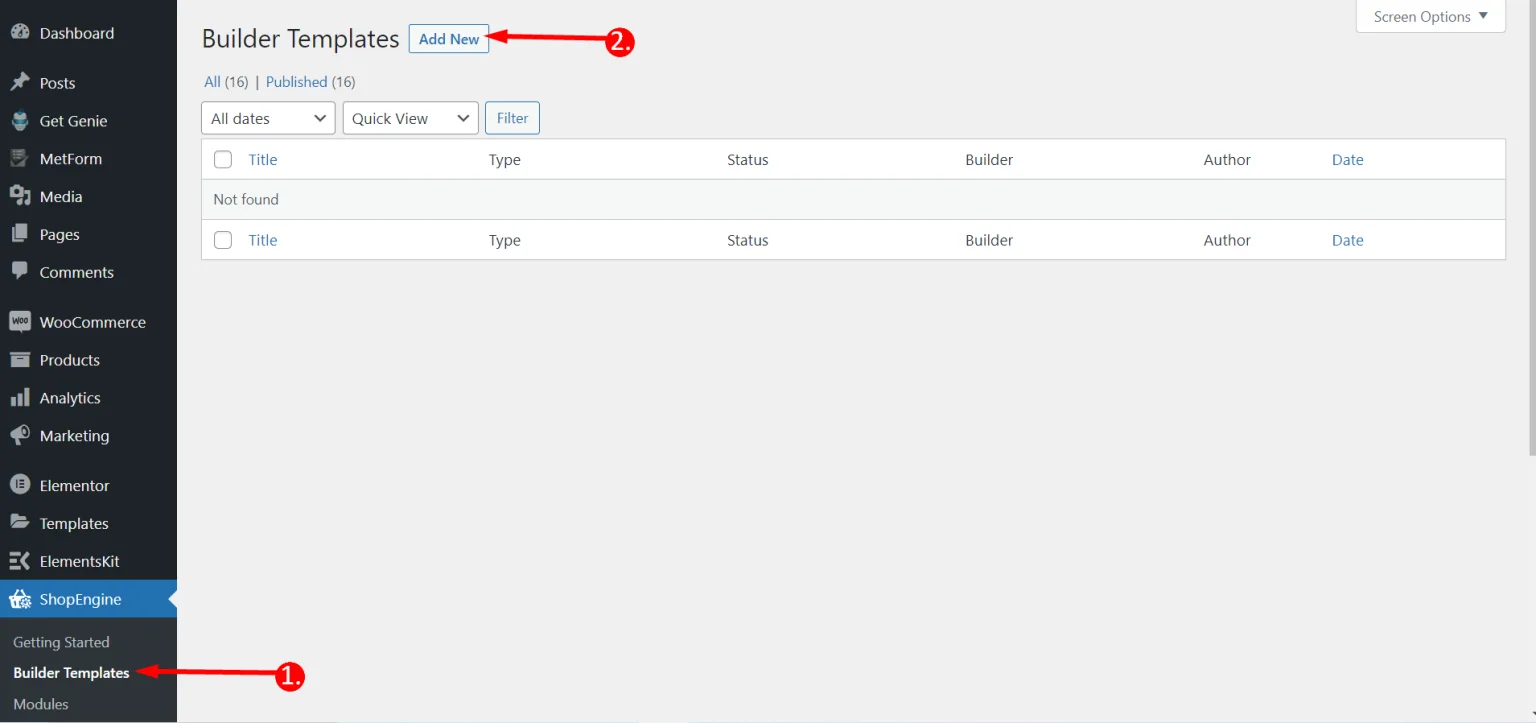
Once done, navigate to ShopEngine > 빌더 템플릿 from your WP dashboard. Next, select a template type from the dropdown, and you’ll see the pre-made design.
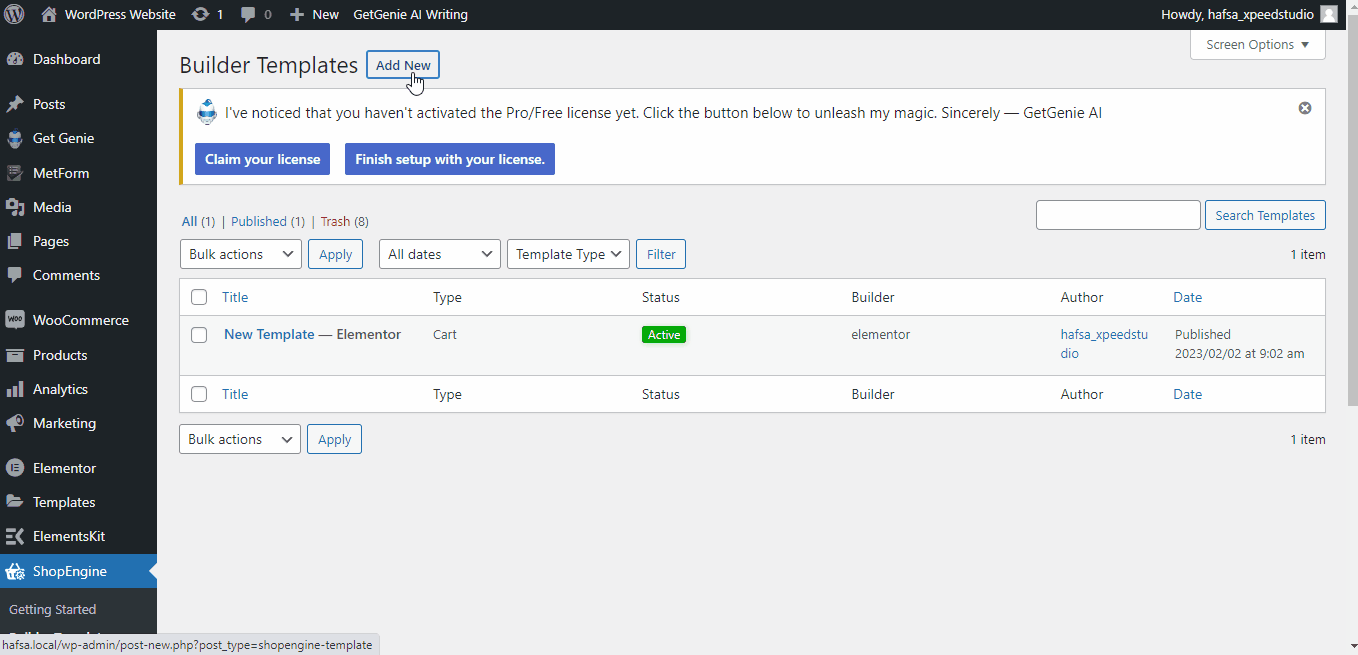
You can see a detailed view of a WooCommerce template by hovering over one. Mark one and proceed with clicking “Edit With Elementor.”
Now, you can change and customize the template from the same drag-and-drop dashboard as Elementor. And, one by one, publish all the WooCommerce pages of your Elementor website within a very short time.
와 함께 상점 엔진, you’ll have premade templates like:
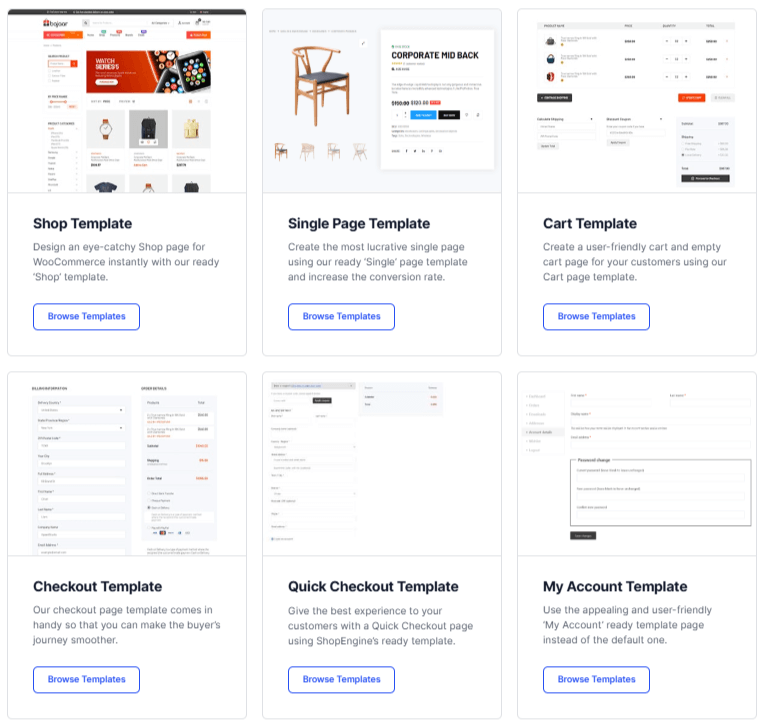
- 아카이브 페이지
- 장바구니 페이지 템플릿
- 체크아웃 양식 – 청구
- 결제 페이지 만들기
- 조건부 템플릿 생성
- 주문 생성/감사 페이지
- 단일 제품 페이지 생성
- 빈 카트 템플릿
- 내 계정 페이지
- 주문 감사합니다
- 빠른 결제 템플릿
- 빠른 보기 작성기 템플릿
- 비밀번호 템플릿 재설정
- 쇼핑 페이지
Plus, they’re publishing new templates regularly for advanced e-commerce functionalities.
How to Use Form Elementor Templates?
Elementor users often require various types of forms based on their website needs, such as contact forms, multi-step forms, conditional logic forms, sign-up forms, and interactive quizzes or surveys. The quickest and most efficient way to add these forms is by inserting a pre-designed template.
Fortunately, there are free options for adding such templates. Like MetForm, a dedicated Elementor form builder addon. It ships with 30+ different form templates. Upon installation, there will be ready-to-use, fully functional form templates with advanced features and conditions.
Let’s see how to create a contact form for your Elementor website.
- First, install and activate the MetForm add-on.
- Then, go to your WordPress dashboard and navigate to MetForm > Forms.
You will see a new screen with the form list. Since you are starting for the first time, you’ll see no forms.
- To create one, click the "새로운 걸 더하다" 옵션.
There will be a new popup screen,
- Enter a name for your form, and select a form type.
Depending on the form selection type, pre-designed form templates will appear.
- Select one and hit the 양식 편집 옵션.
And, you’ll find a drag-and-drop builder interface similar to Elementor.
Make changes to the template according to your needs and insert it into the page where you want to place it. To do this,
Start to edit a page with Elementor and look for the MetForm widget.
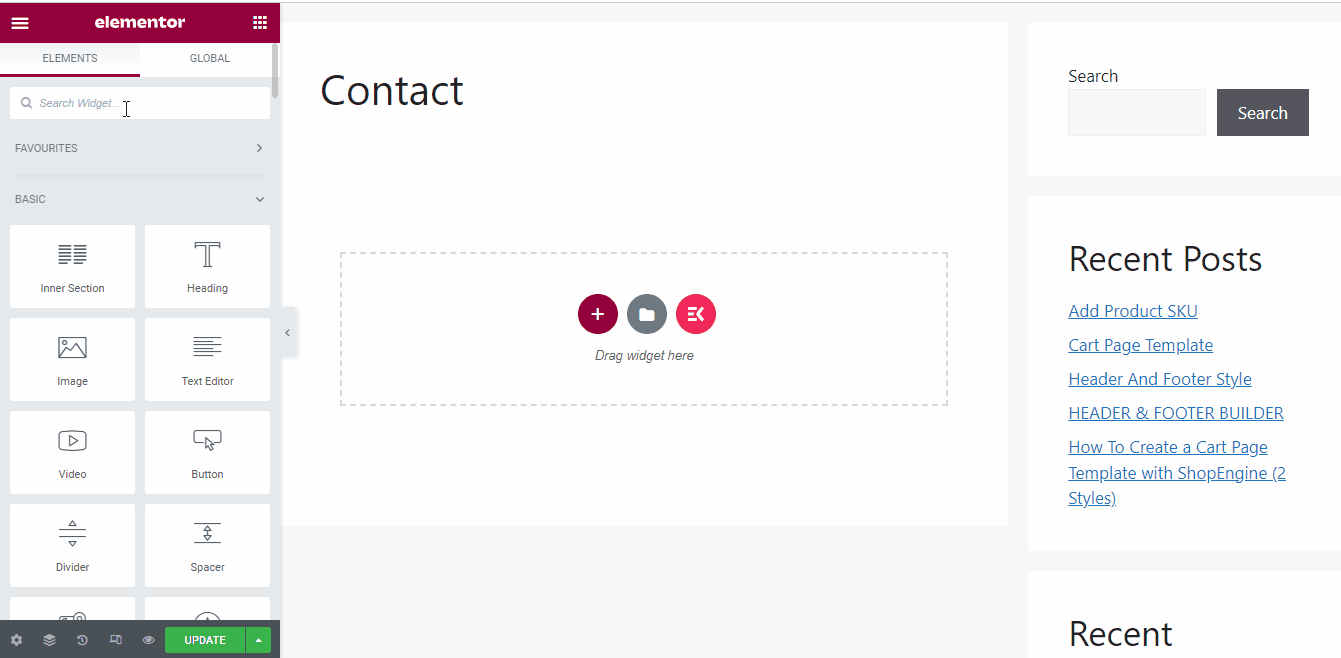
Once you see it, drag and drop it to the editor area. Then,
- 다음을 클릭하세요. 양식 편집 옵션.
- From the next screen, browse the dropdown and add the form you want to insert.
- Next, click the 저장 후 닫기 옵션.
- Then, tap on the 업데이트 button in the bottom right.
All done, make your page live.
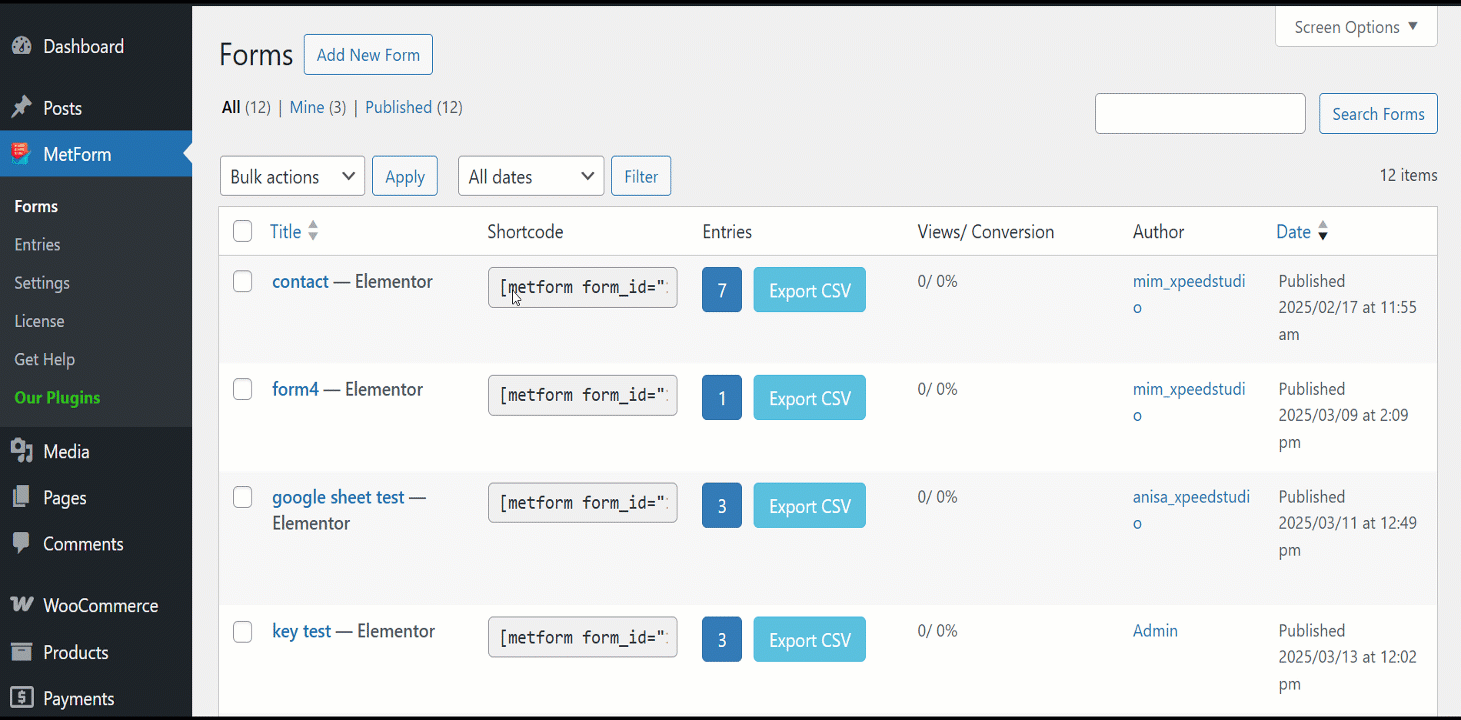
Further, you can also add the form with a shortcode. Follow MetForm > Forms, you will see a shortcode assigned with every form. Copy it and paste the form shortcode on the page where you want to insert the form. Lastly, publish your page.
How to Use Elementor Header Templates?
Elementor header templates are pre-designed header sections. With ElementsKit, you can easily create your custom header section using pre-made layouts. Not only does it build a header, but this Elementor addon also provides Elementor footer templates. So, you can design an amazing footer section with a few clicks only.
Now, I will show you how to create a mega menu for your header navigation in your Elementor website.
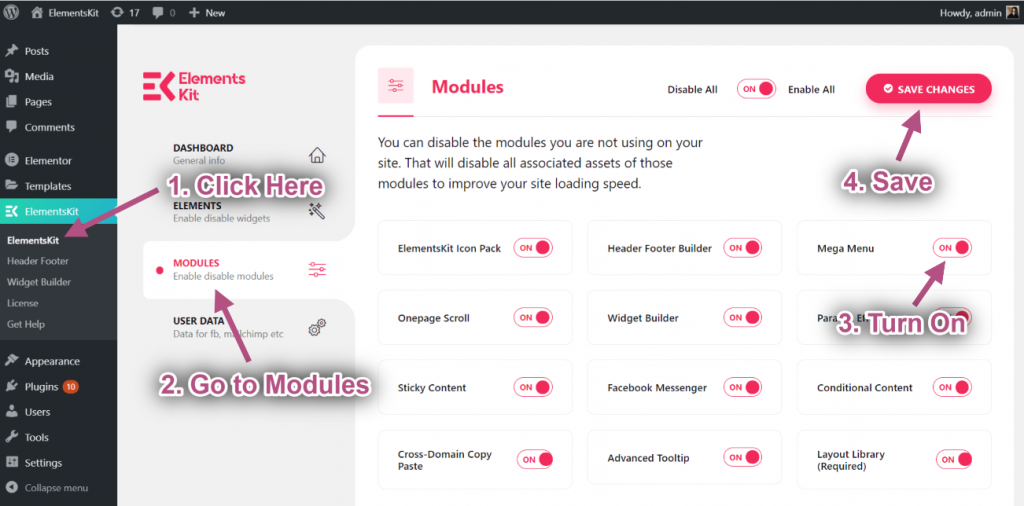
First things first, activate the ElementsKit plugin and enable the ElementsKit 메가 메뉴 기준 치수.
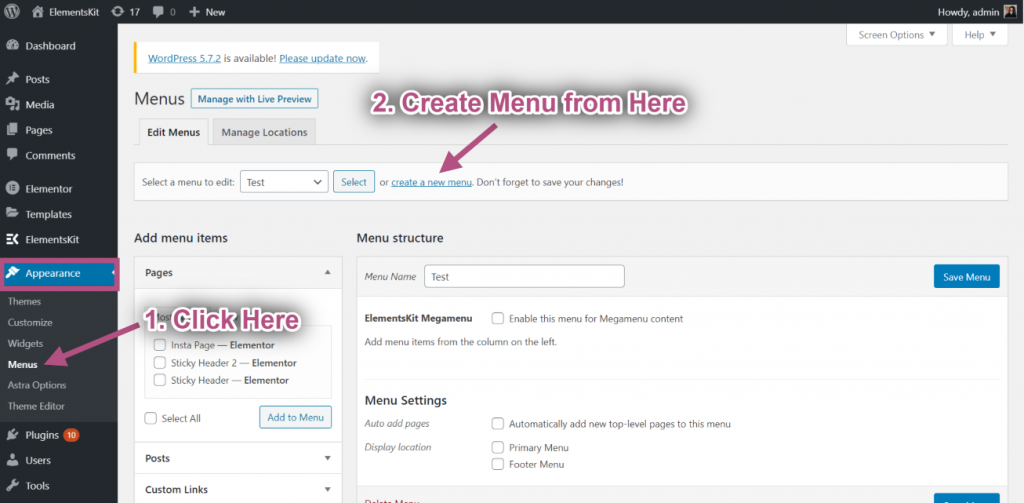
그런 다음 WordPress 대시보드에서 다음으로 이동합니다. Appearance> Menus and follow the steps below:
“를 찾으세요.create a new menu” option and click on it.
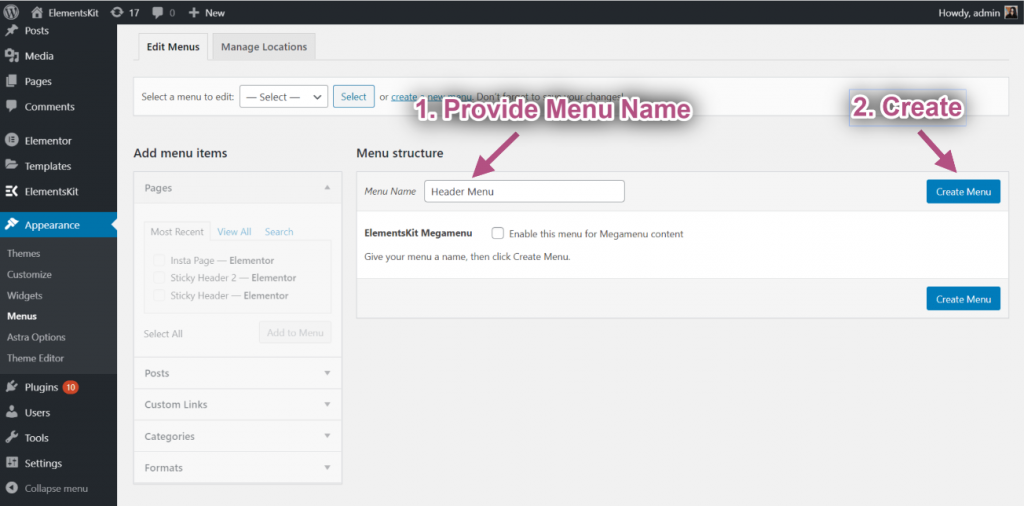
Now, give a name to your menu and hit the “Create Menu” button to start.
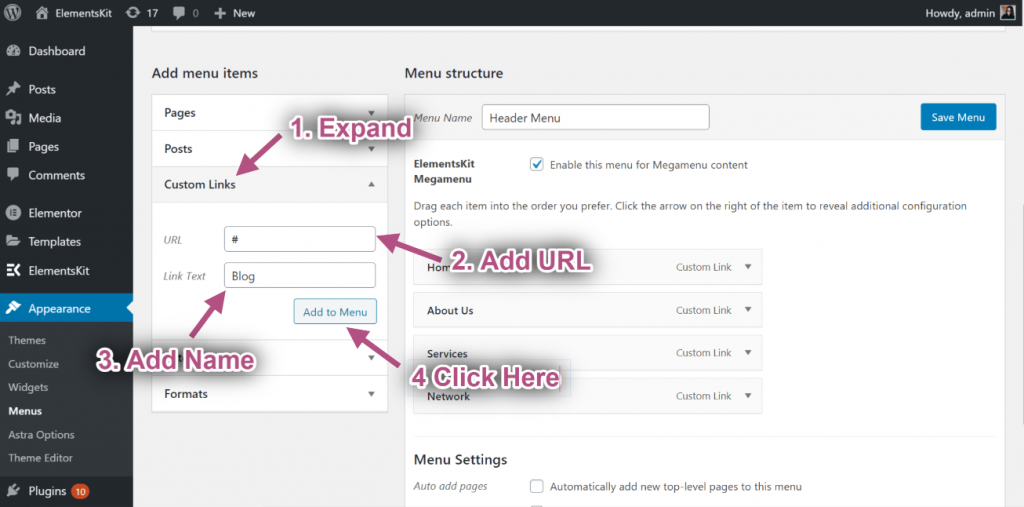
Then, add all the menu items by inserting pages, posts, & custom links.
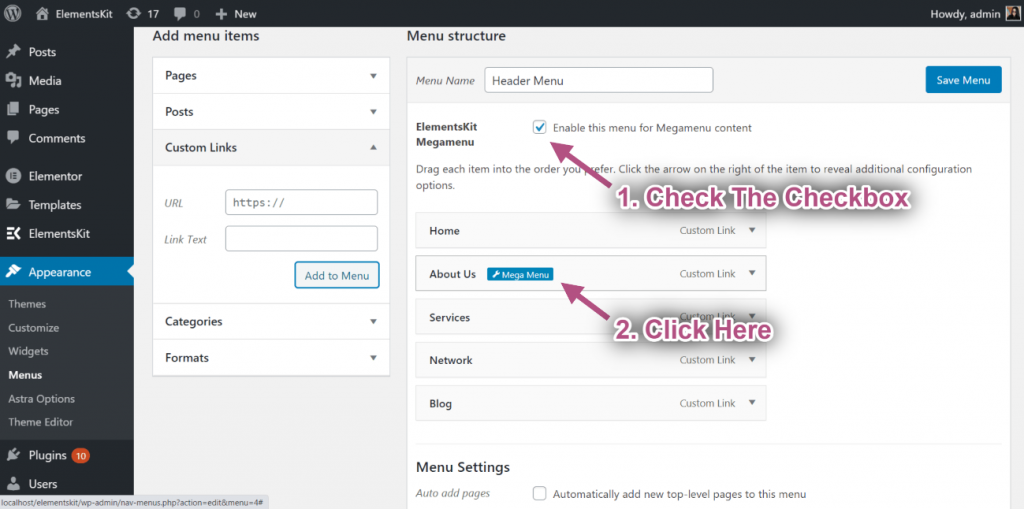
- You’ll see an ElementsKit check box in your menu builder interface with text “Enable the menu for Megamenu content”. Check the box.
- Now, hover over any menu items and you’ll see the 메가 메뉴 settings icon. Hit on it.
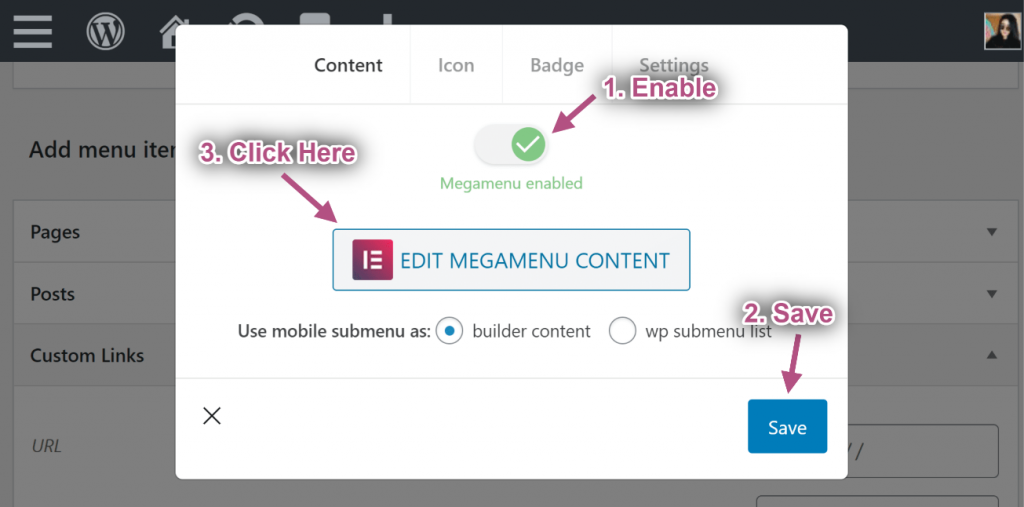
- A popup will appear; here, toggle the Megamenu activated option and hit the 구하다 단추.
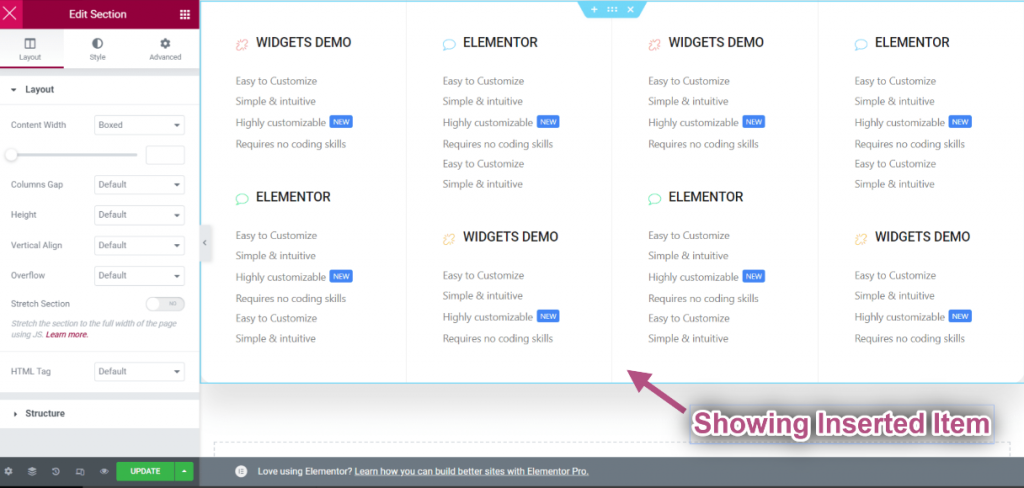
- Now, click on EDIT MEGAMENU CONTENT. Doing this will load an Elementor editor dashboard.
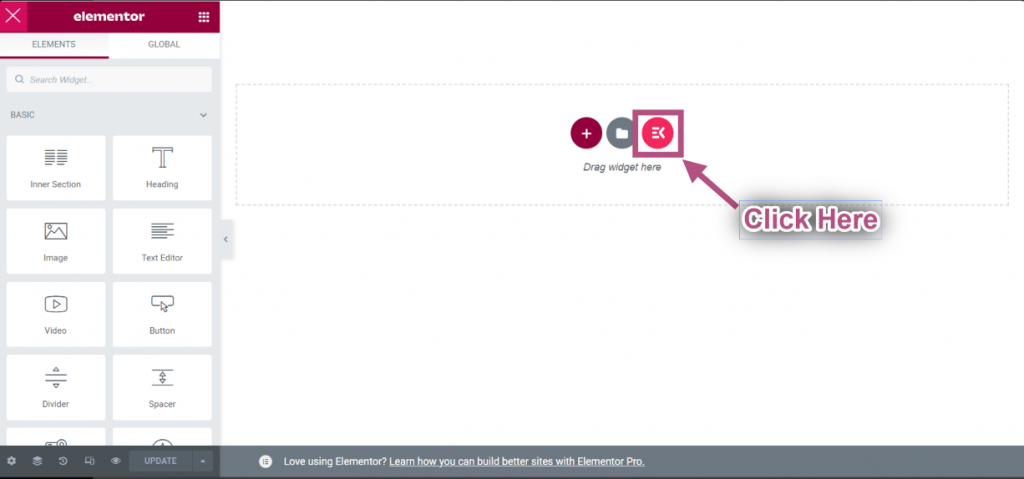
Now, click on the ElementsKit Template Library icon.
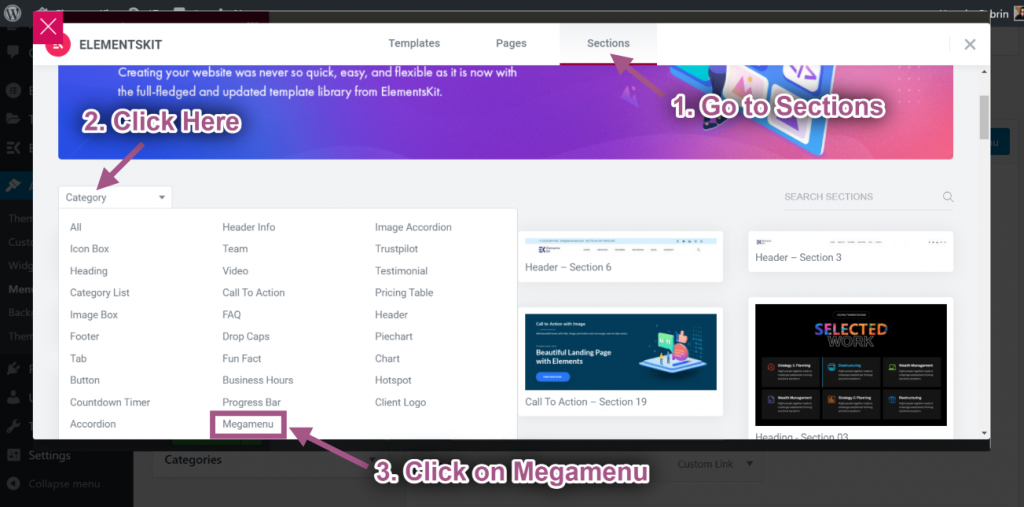
입력하다 Sections > 다음을 클릭하세요. Category > 선택하다 메가메뉴 from the dropdown list.
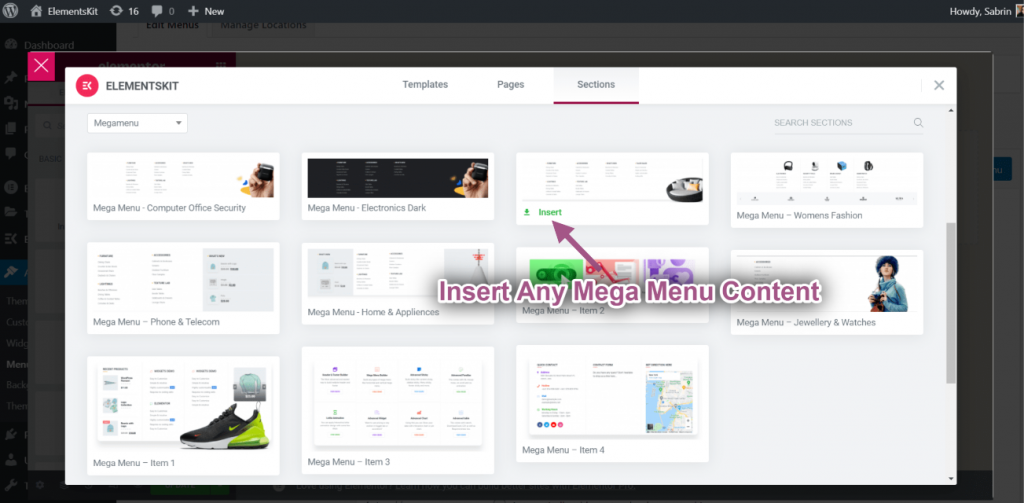
At this moment, you’ll see many megamenu pre-designed templates for a functional header area of your Elementor website. Insert any template that suits your needs. That’s it.
ElementsKit also allows you to control the entire megamenu layout and customization. Check this 선적 서류 비치 자세한 내용은.
Similarly, you can also use an ElementsKit footer template to build a footer area without relying on the default footer functionality.
How to Save an Elementor Template?
Saving an Elementor template is easy. Let’s see how to save different types of Elementor templates:
Save Elementor Page as Templates
Here’s how to save a page template:
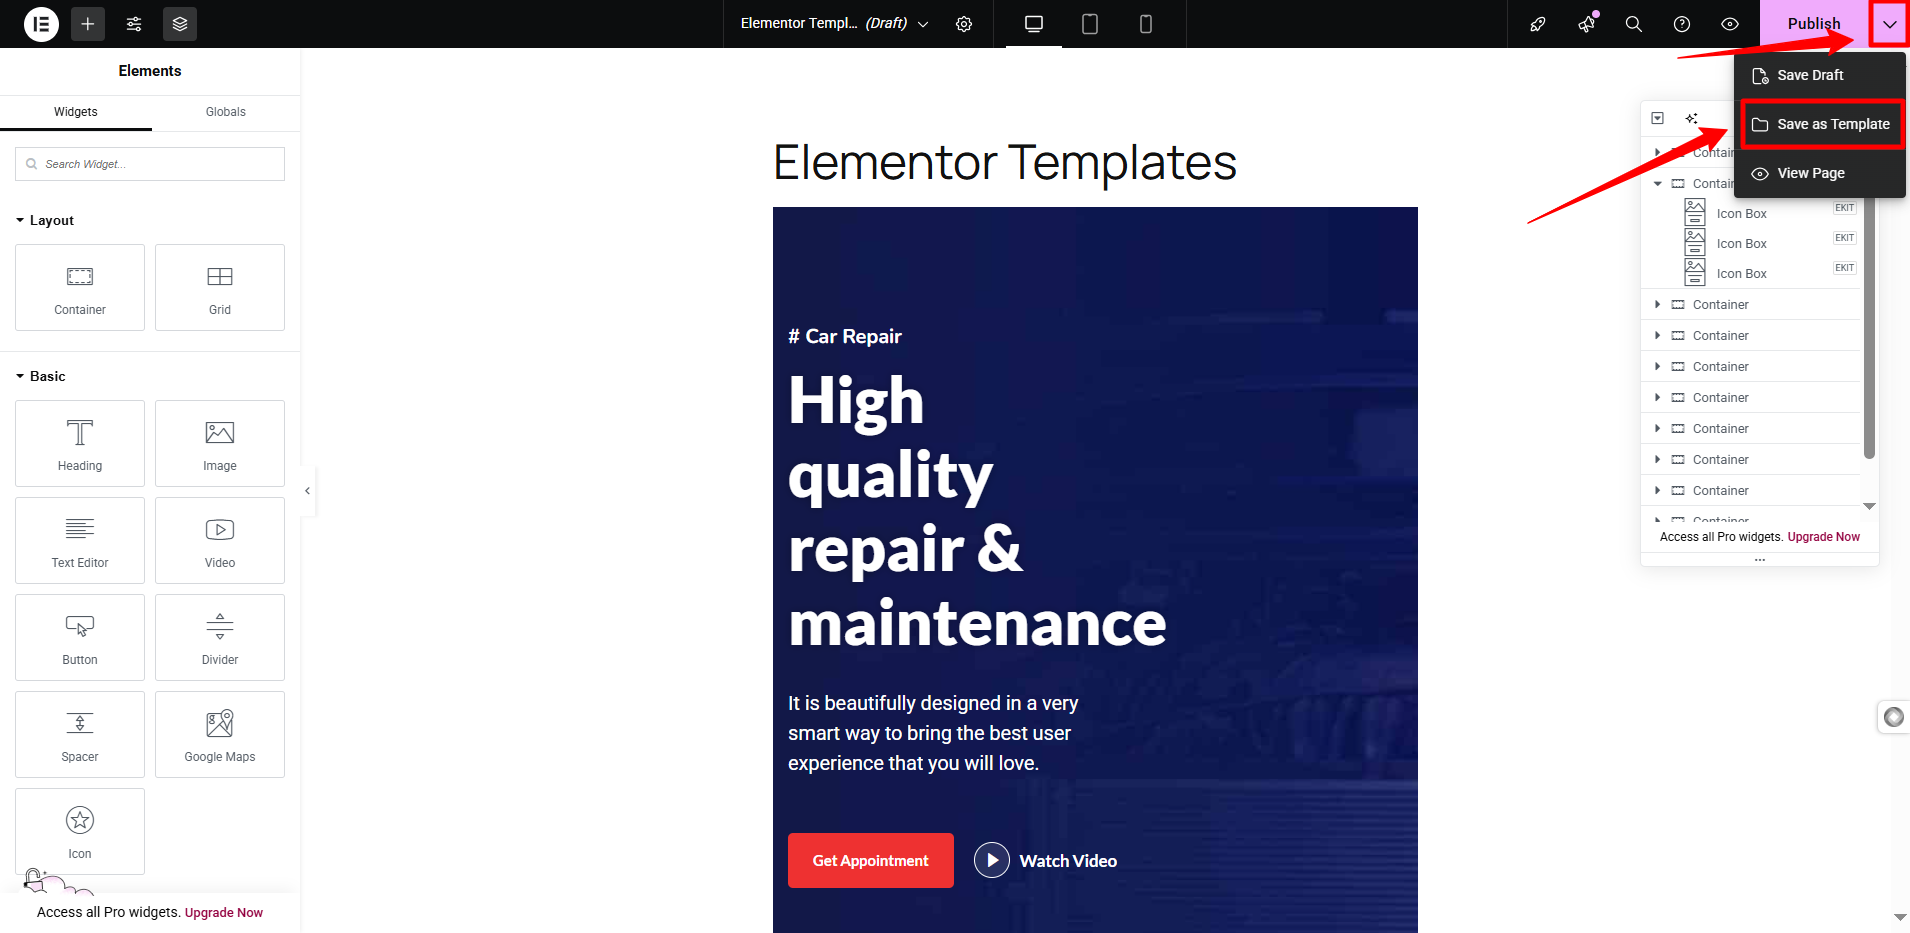
Complete your design work for that particular page template. Look for the arrow icon at the top right. Click the icon and select the “Save as Template” option. A new popup screen will appear asking for a name for the template.
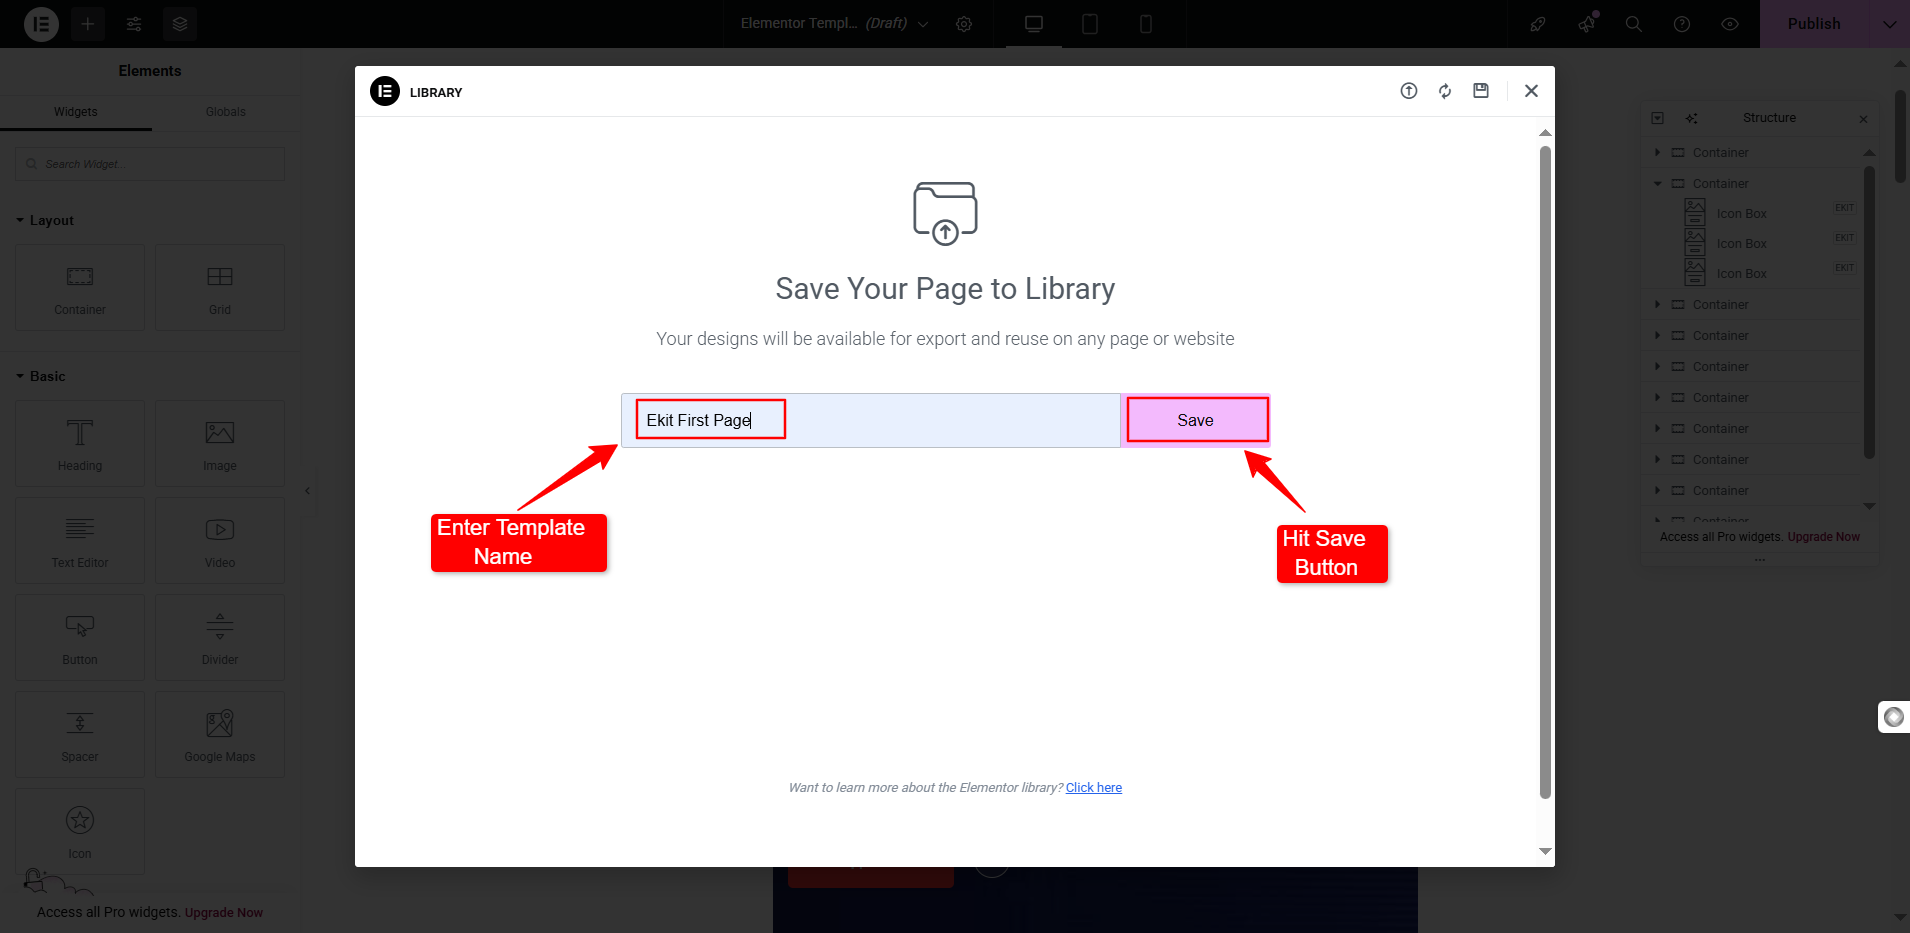
Give a name and hit the 구하다 option. That’s it! You have saved an Elementor page as your template.
Save an Elementor Section as a Template
To save an Elementor section as a template, open the Elementor editor and determine which section you want to save. Select a section and locate the dotted icon in the container toolbar.
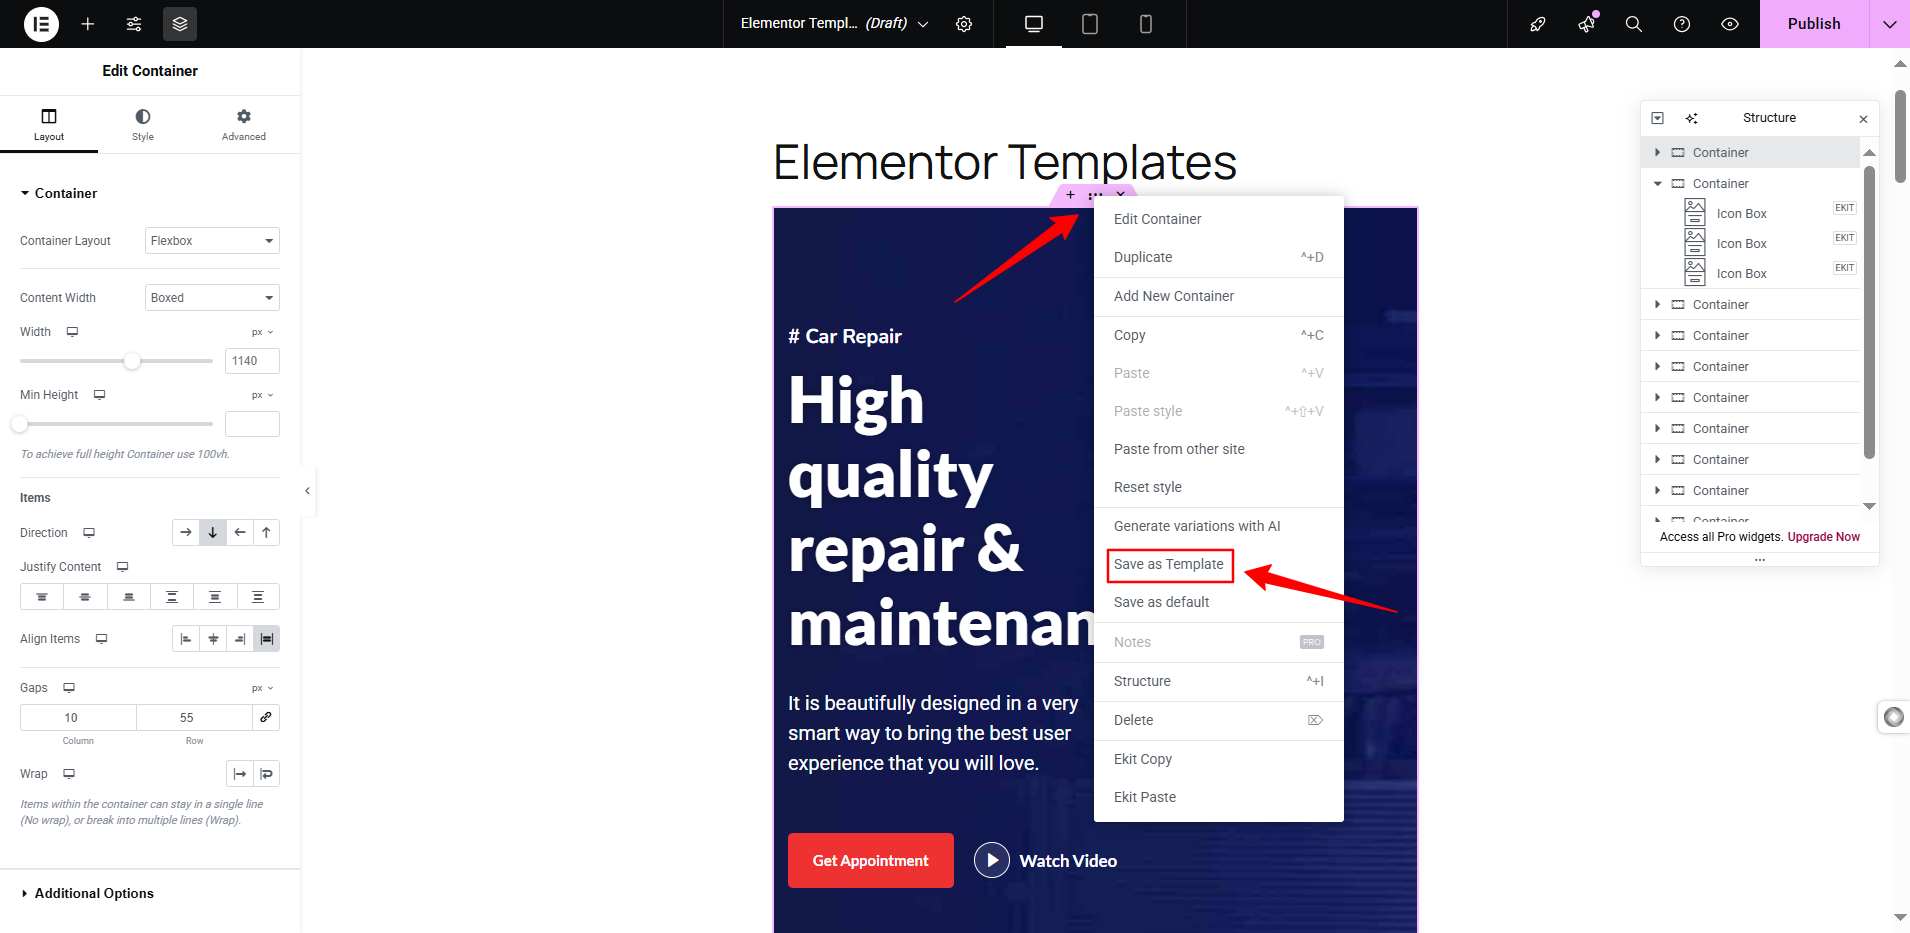
Take your mouse cursor on it and do a right-click. A list of different options will reveal, from here, choose the “Save as Template” 옵션.
Next, enter a name for your saved template and hit the 구하다 button. For better, you can check the media library in another browser tab.
How to Use Saved Templates in Elementor?
All your saved Elementor templates are stored in the Template library. You just need to access the Template library by navigating to Media Library > select the 내 템플릿 옵션.
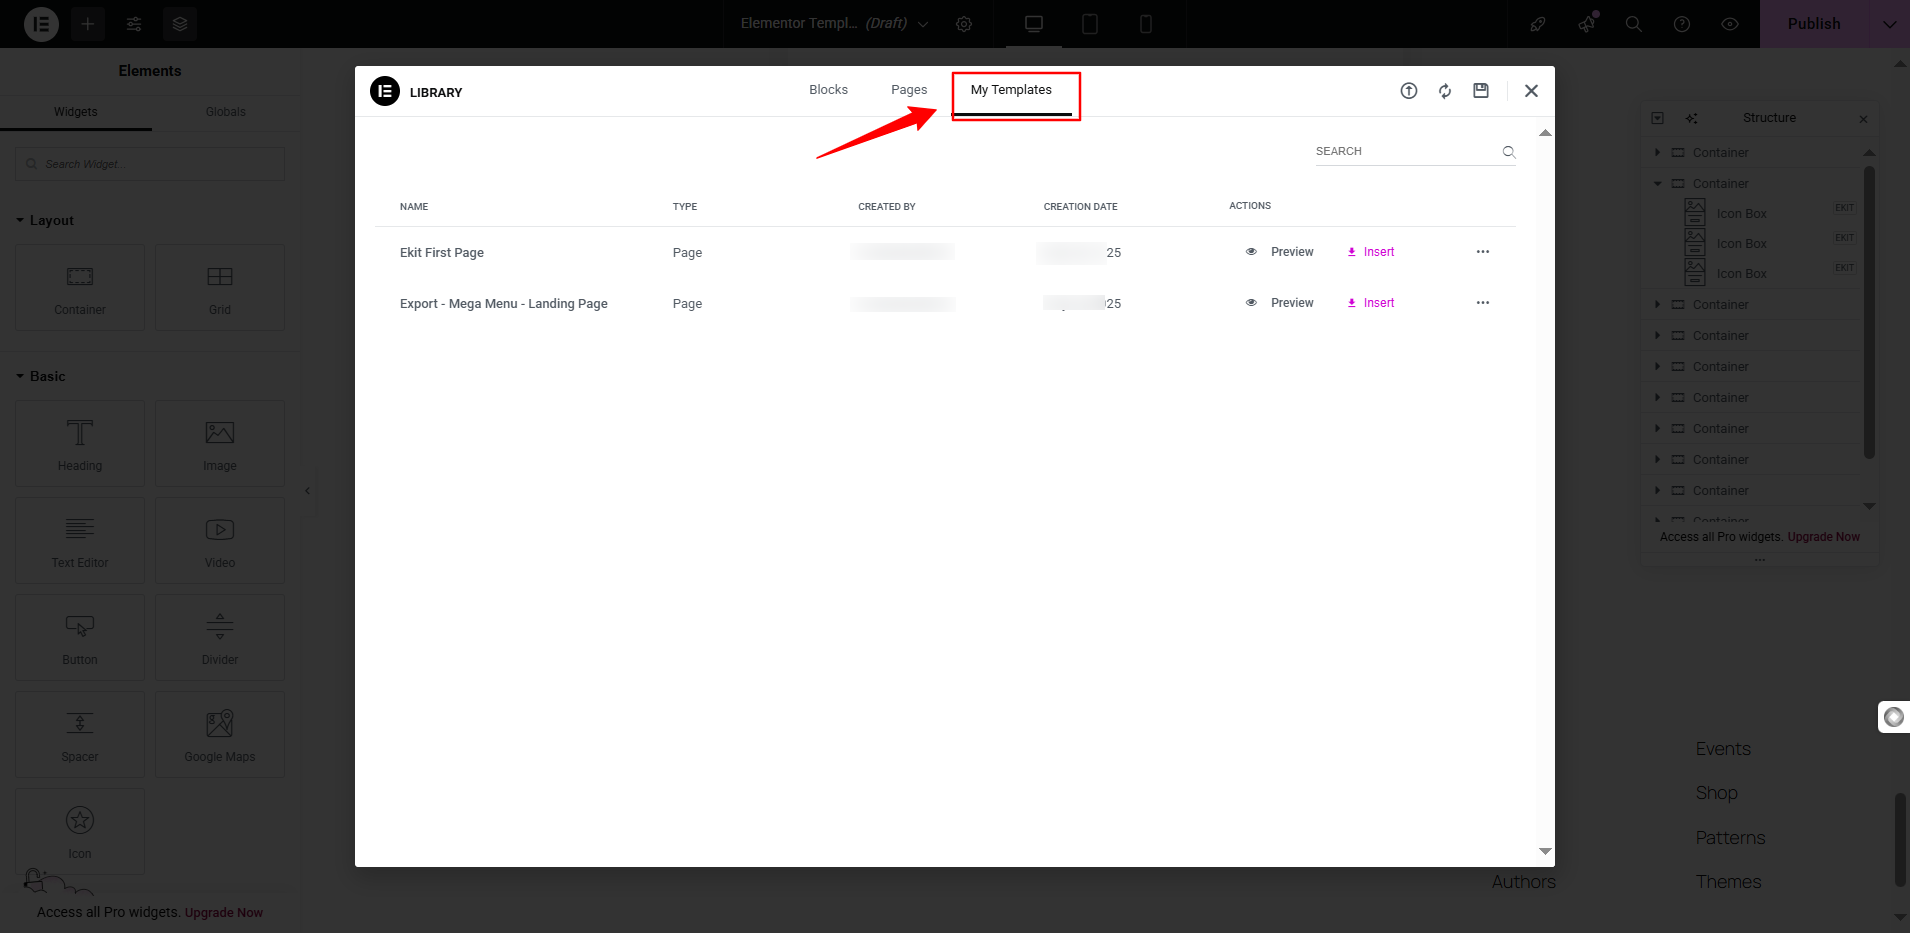
All your saved templates will be listed here, along with details such as the creator and the date they were saved. You can also preview each template directly from this section for a quick look before using or editing it. You can even find all your saved third-party templates in this list.
How to Import & Export Elementor Templates?
First, see how to import an Elementor template:
- Start from the Elementor editor dashboard.
- Click the folder icon to open the template library.
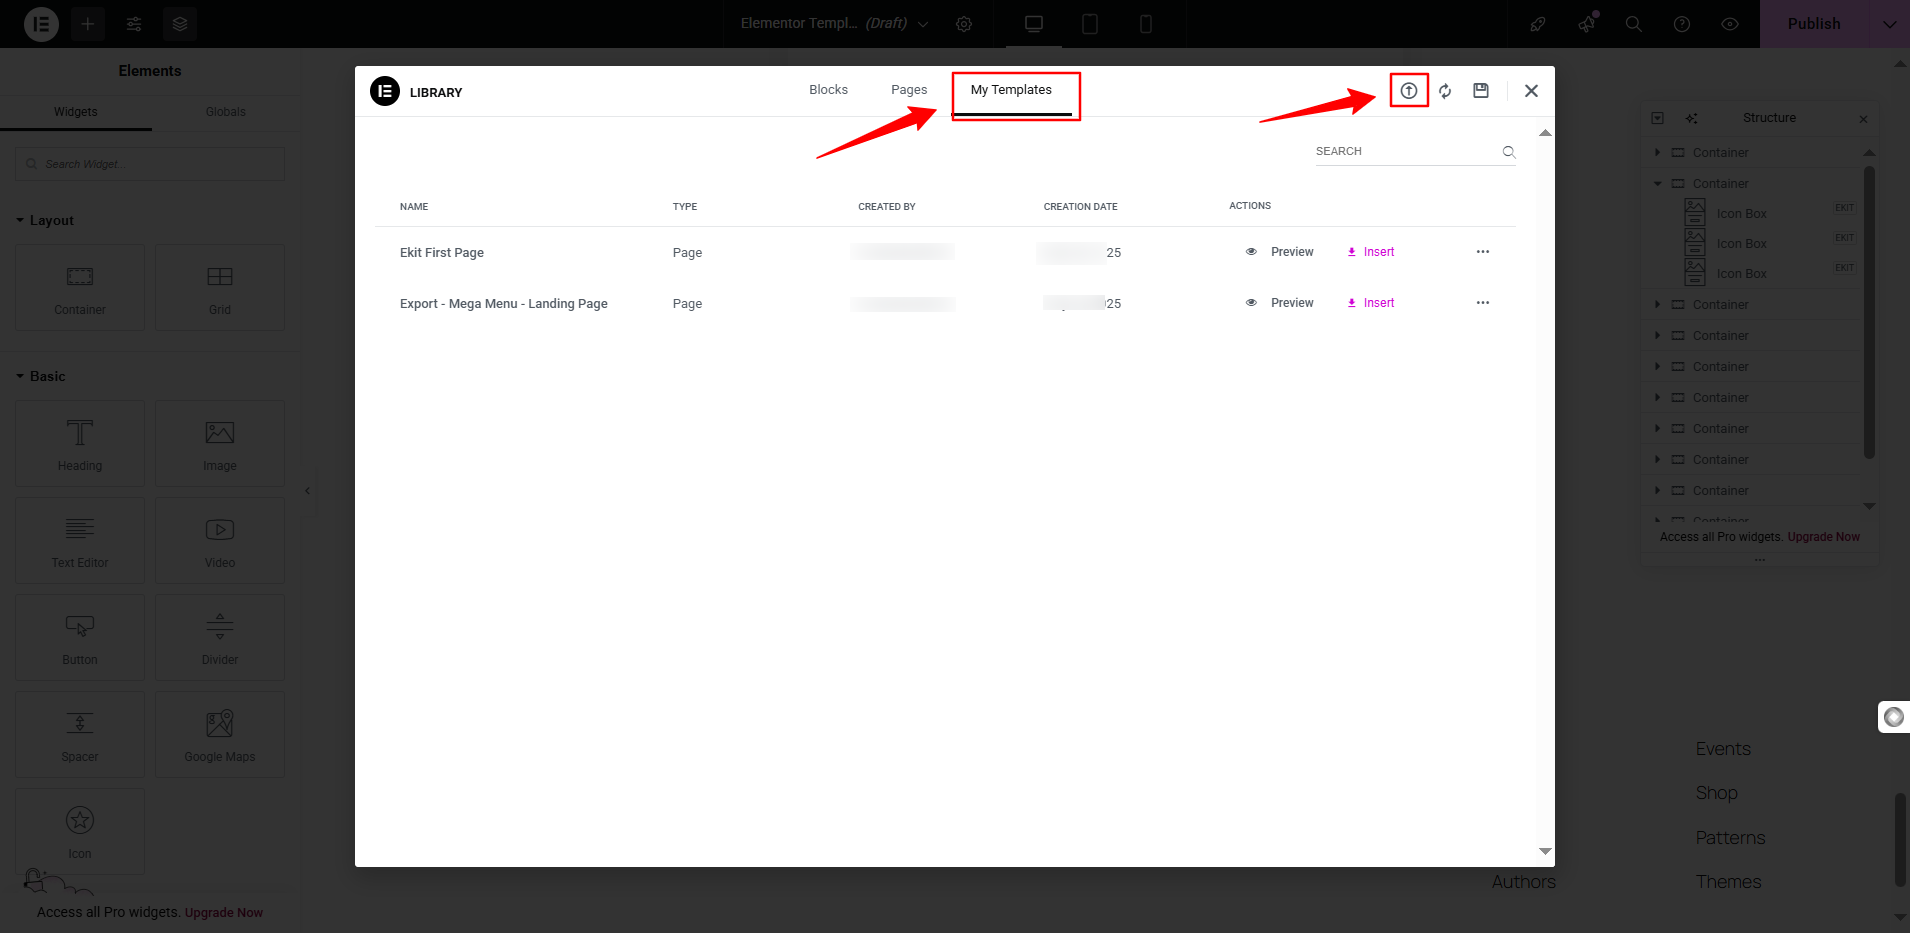
- Look for the up-arrow icon at the top right.
- In the next screen, you can drag & drop a JSON or ZIP file. Further, you can also click the “Select File” option and locate the file you want to import from your device.
- Uploading a JSON File may show a warning message; click 계속하다 to pass it.
That’s it, the imported template will be saved to your Elementor template library.
Now, you’ll learn how to export an Elementor template:
You can export any previously saved Elementor templates. Go to your media library, you’ll see a three-dot icon at the right end of each saved media template.
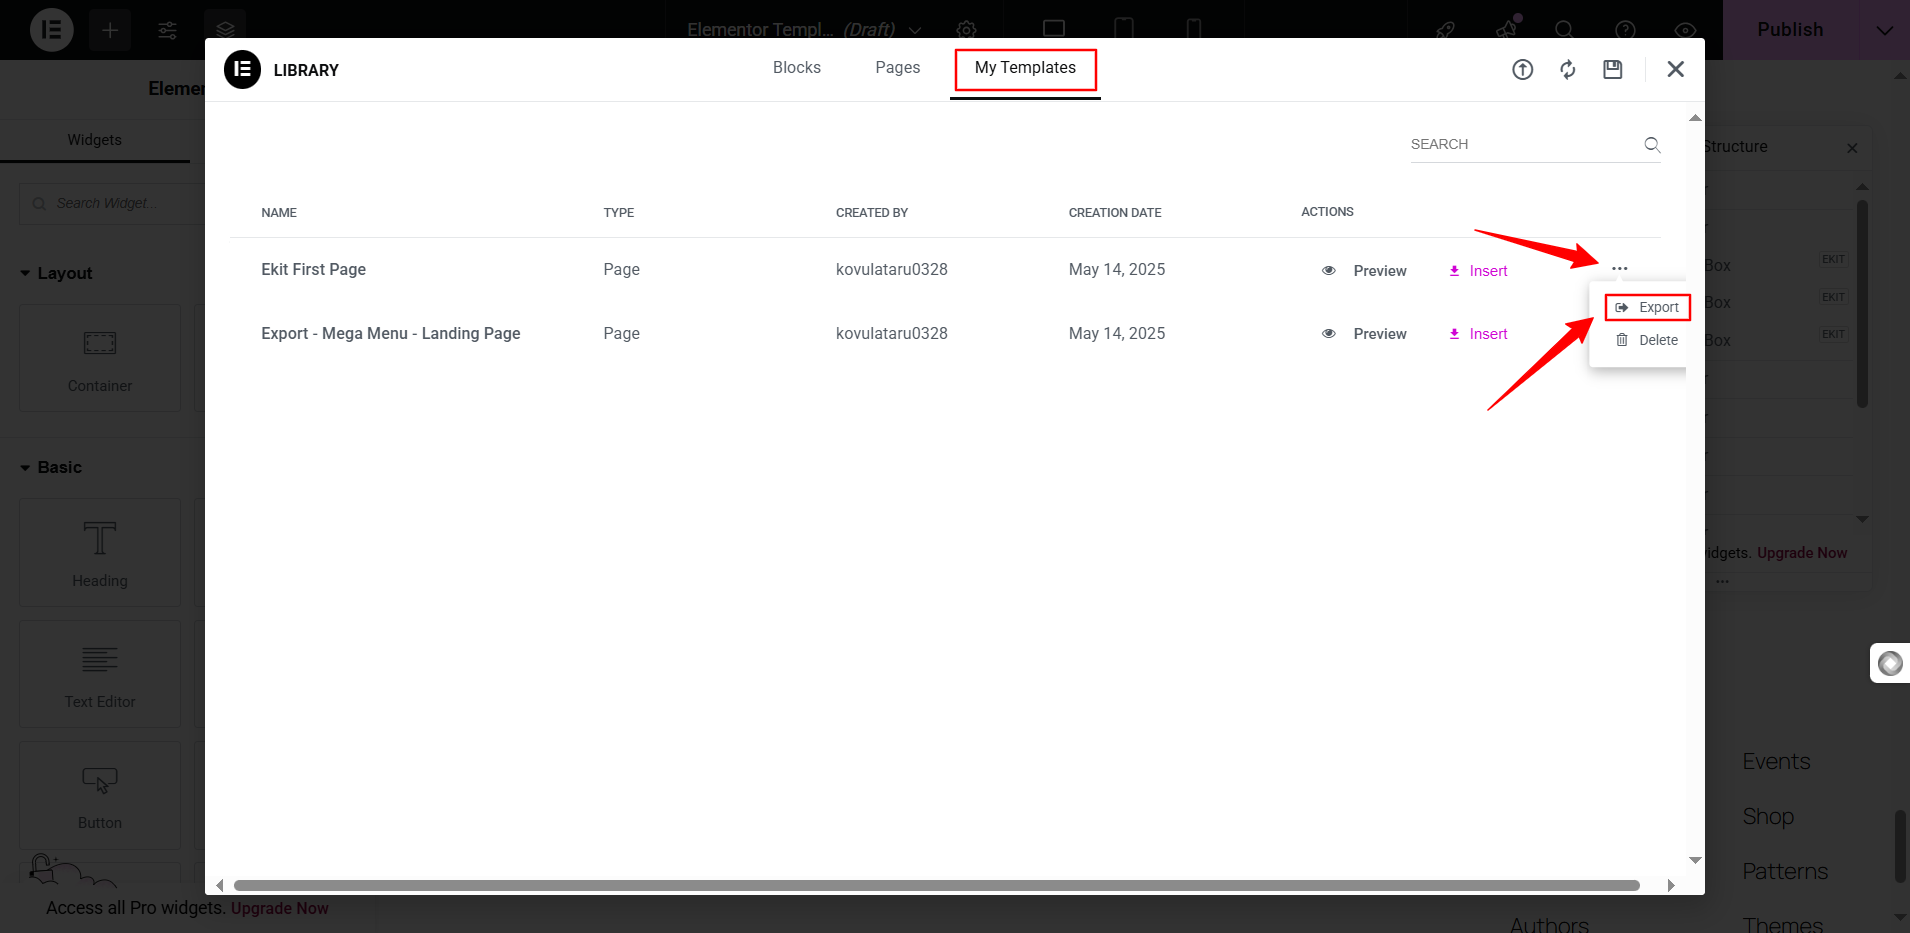
Click the three-dot icon, and you’ll see the “Export” option. And, the template will be downloaded automatically.
How do Elementor Templates Make Web Design Faster?
One-click insertion of templates: Think about doing long hours of work within a minute. You can insert an Elementor template to your website and make necessary changes to the content and images within no time.
Instant design inspiration: Templates are great resources for design ideas and trends. Many publishers regularly come with Elementor templates. Following them, you can keep up with the trend and get to know futuristic design ideas.
No responsive issues: Using templates minimizes the hassle of responsiveness. Ready-made templates are already crafted by expert designers. So, you won’t have to get much for configuring responsive work.
Consistency across pages: Another benefit of inserting templates is that you can maintain design consistency throughout the website. You can use a full-website layout designed by experts. Their layout structure and color choices result in an effective user experience for visitors.
Drag-and-drop changes: When you make changes in templates, you can do it from a drag-and-drop visual builder interface. Even third-party addons like ElementsKit allow their users to change the template’s content from the same Elementor interface.
Integrated with this-party products: Templates are also built with third-party plugins and services. For example, you can see form templates from MetForm integrated with different products.
마무리!
This was my inclusive guide on using Elementor templates. You don’t only get the simple answer on how to use Elementor templates. This guide also focuses on other related queries from Elementor templates.
So, from inserting Elementor templates to exporting one, everything is included in this tutorial article. Hopefully, you can now streamline your web design process and save significant time.

답글 남기기