


When you’re running a WooCommerce store, sending invoices is more than just sharing order details. It is a great chance to show professionalism and strengthen your brand.
Though WooCommerce has a default invoice email, let’s be honest, it looks pretty basic. If you really want your customers to remember you, a customized, well-designed WooCommerce customer invoice email will make all the difference.
In this guide, I’ll walk you through how to send customer invoice emails in WordPress, starting with WooCommerce’s built-in option and then stepping up to beautifully branded emails using EmailKit.
Quick Overview
This tutorial includes process to build a customer invoice email for WooCommerce.
Tools Used: 이메일 키트
어떻게?
Method 1: Use a pre-designed template by EmailKit.
Method 2: Build from scratch.
Customer invoice email includes:
Heading, Note for Customer, Order Item, Billing, and Shipping Address.
왜?
For Personalized Content and Design, more Flexible Layout, and Easy navigation.
Why customize the customer invoice email in WooCommerce?
Here’s a quick comparison of the default WooCommerce email versus a custom one created with EmailKit:
| 특징 | Default WooCommerce Invoice Email | Custom Email with EmailKit |
|---|---|---|
| 설계 | Fixed, single-column layout. | Fully customizable with your brand’s colors, fonts, and logo. |
| 공들여 나열한 것 | 편집 및 사용자 정의는 웹사이트 전체에서 자동으로 업데이트됩니다. | Flexible, multi-column layouts with drag-and-drop elements. |
| 콘텐츠 | Limited to basic order details. | Can include custom notes, social icons, related products, and more. |
| 사용의 용이성 | Simple but limited customization options. | Visual, no-code drag-and-drop builder. |
| 전문 직업 의식 | Functional but lacks a professional touch. | Polished and professional, enhancing brand image. |
Customizing your invoice emails goes far beyond just aesthetics. It’s a strategic move that enhances your brand and customer relationships.
- Brand Consistency: Make sure every email you send reflects your brand identity.
- Improved Professionalism: A clean, well-designed invoice gives off credibility and makes your business look polished.
- 더 나은 고객 경험: When invoices are easy to read and understand, customers can quickly review their purchase without needing extra help.
- Marketing Opportunity: You can include links to related products, social media, or a “leave a review” button, turning a transactional email into a marketing tool.
Send default WooCommerce invoice emails (order details)
WooCommerce comes with a default option to send a customer invoice email. If you prefer a simple and basic email, you can simply edit the emails here.
To set up the customer invoice email in WooCommerce,
- Log in to your WordPress account and go to WooCommerce → Settings.
- 다음으로 전환하세요. Emails tab, where you will find the list of WooCommerce emails.
- Now, find the 주문 세부정보 email and click the “관리하다” button for it.
Why this one? Because the “Order details” is basically the customer invoice email in WooCommerce.
For this email, you have the following options:
- 주제
- Email heading
- Additional content
- 이메일 유형: Plain text, HTML, and Multipart.
- Cc(s)
- Bcc(s)
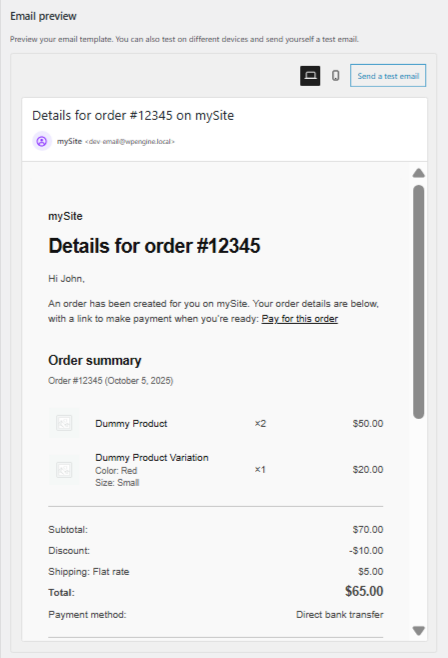
You can also see the preview of the email. For the HTML template, you can see the template code.
마지막으로 변경 사항을 저장하다.
If you’re just starting or prefer a simple solution, WooCommerce’s built-in email system is a great place to begin.
How to send custom-designed WooCommerce customer invoice emails
While the default WooCommerce emails are functional, they are not visually impressive. To create a professional and branded experience, you need a dedicated email customizer plugin for WordPress. For this guide, we’ll use a plugin like EmailKit, which offers a powerful drag-and-drop builder.
Prerequisite: Install EmailKit
First, you’ll need to install the plugin. From your WordPress dashboard, go to Plugins > Add New and search for “EmailKit.” Install and activate the plugin.
더 읽어보세요: How to install EmailKit email customizer for WordPress
Once activated, you’ll find the EmailKit dashboard where you can start creating stunning, branded email templates. The plugin provides a visual editor that allows you to see real-time previews of your design as you build it.
With EmailKit, you can use pre-built email templates or start building layouts from scratch.
Method 1: Design invoice emails with EmailKit templates
EmailKit comes with a variety of pre-designed templates that are fully customizable. This is the fastest way to get a professional-looking WooCommerce customer invoice email.
To import a template:
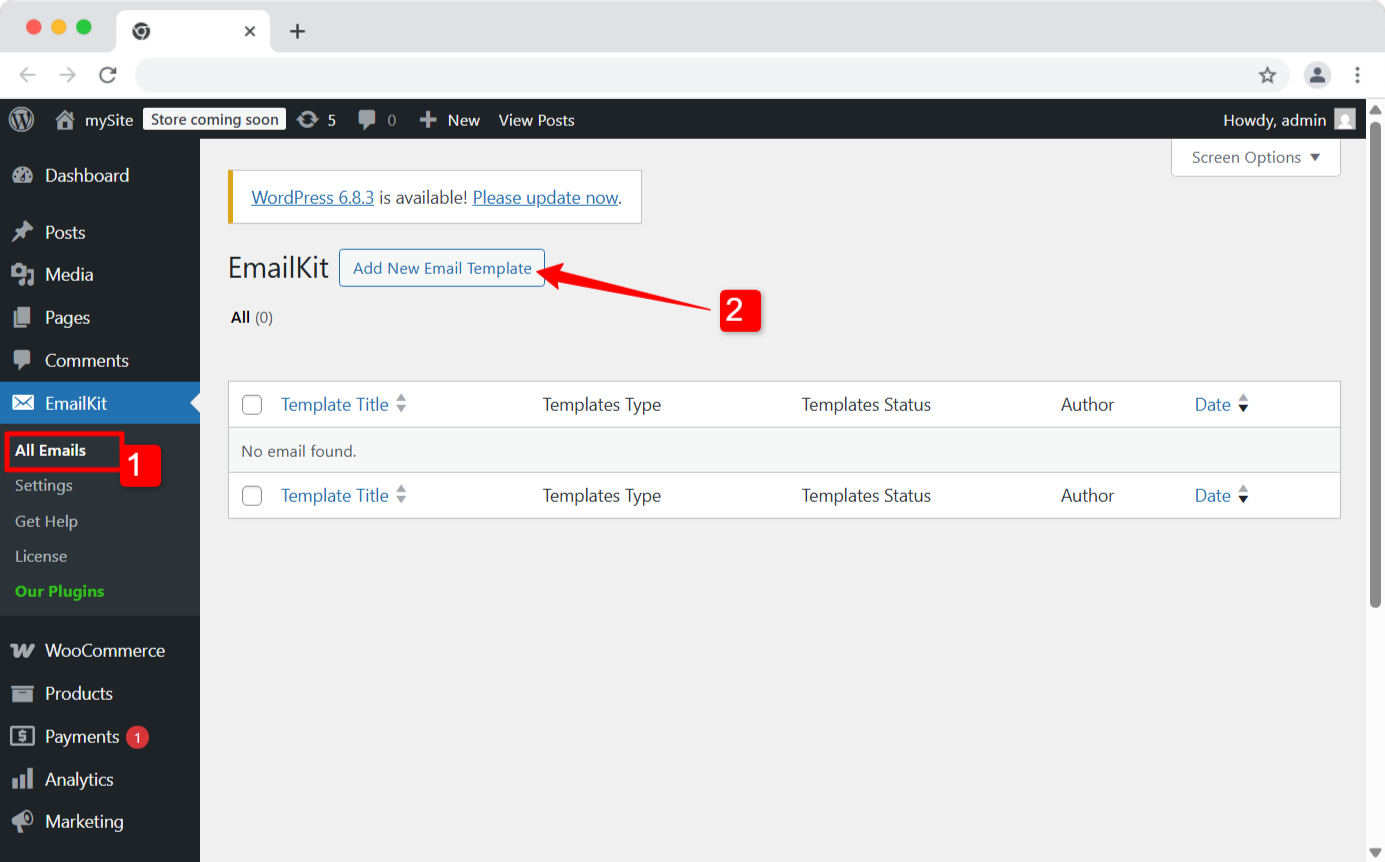
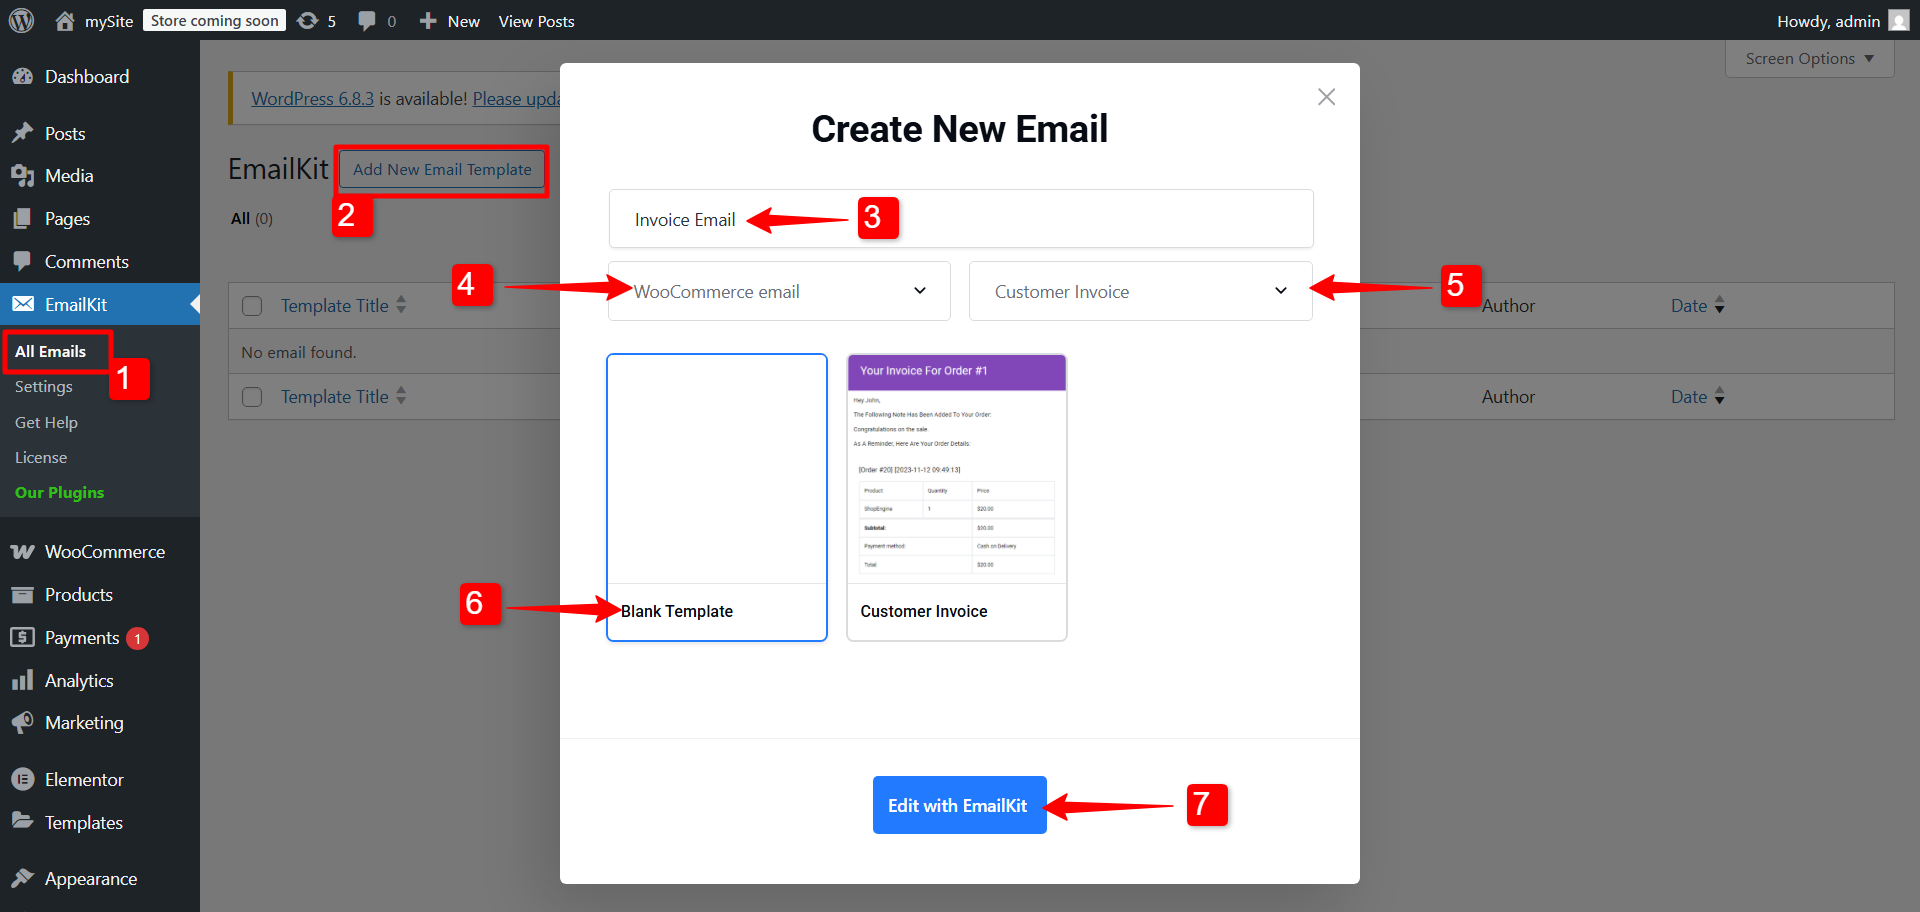
- 로 이동 EmailKit → All Emails WordPress 대시보드에서.
- 그런 다음 Add New Email Template button. A pop-up will appear to create a new email template.
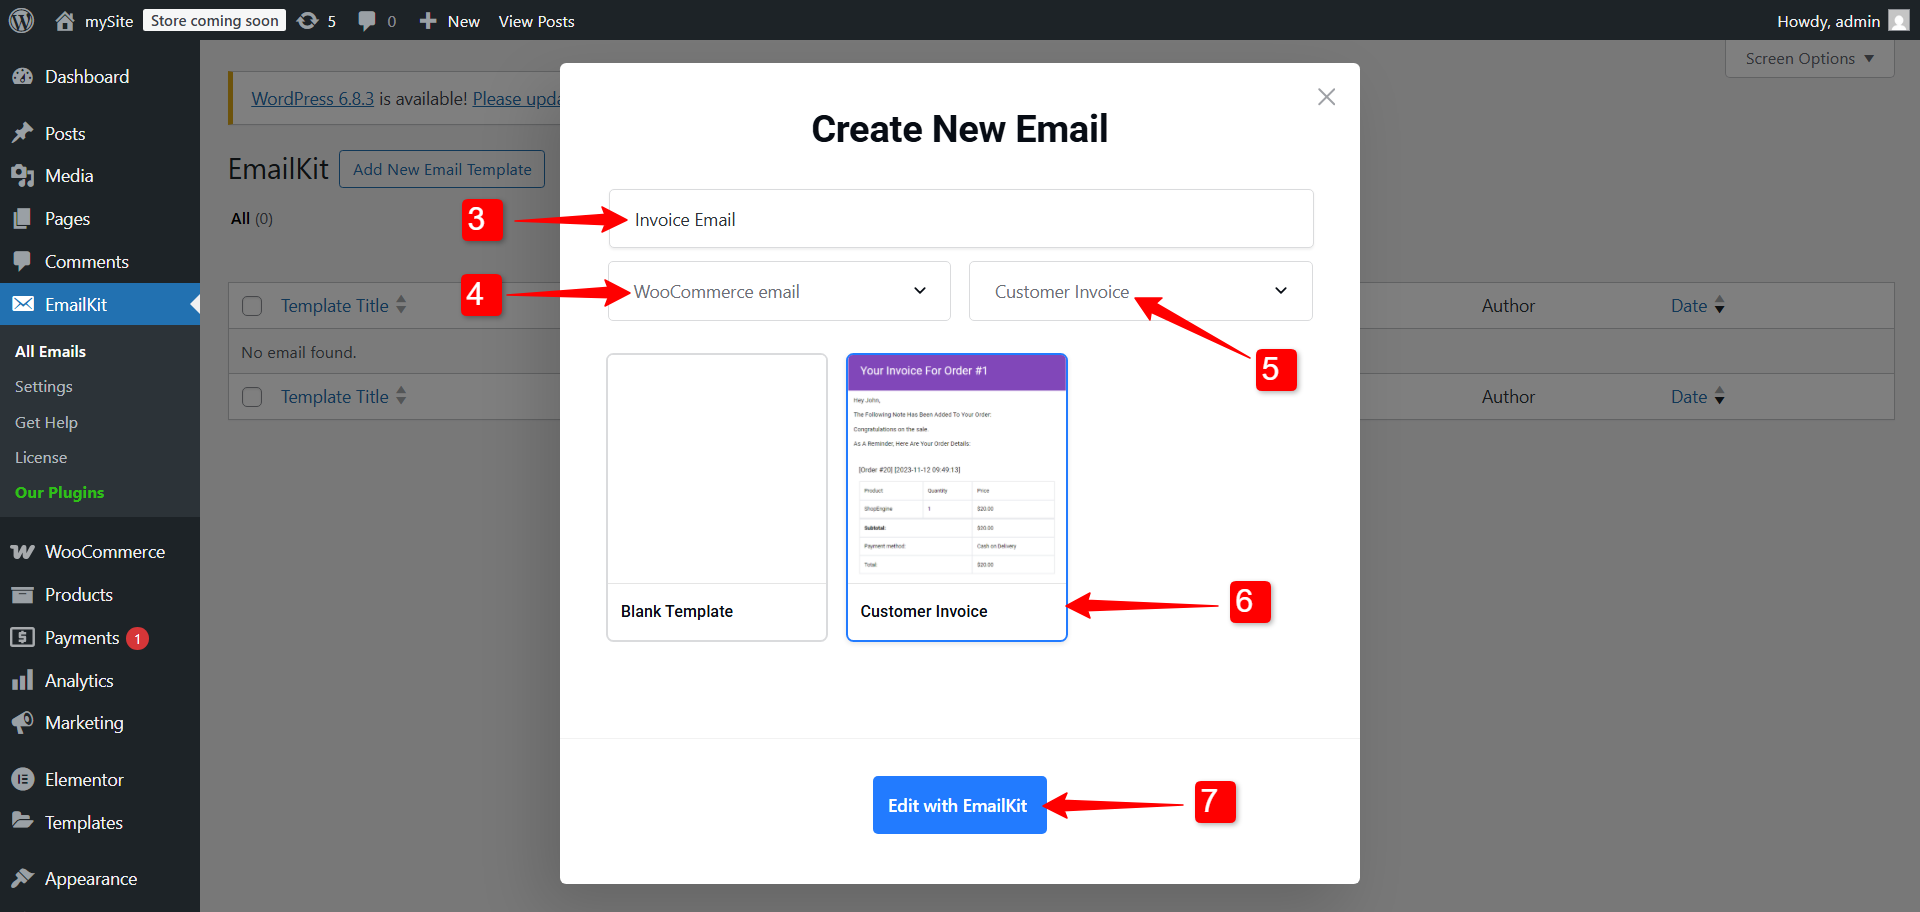
To create a new email template, you have the following options:
- 다음을 입력하세요. 템플릿 이름 for the invoice email.
- 설정 email type 에게 WooCommerce 이메일.
- Select the WooCommerce email you want to customize. In this case, select “고객 송장".
- 다음을 선택하세요. pre-designed template.
- 마지막으로 EmailKit으로 편집 단추.
After that, you will be redirected to the editor. EmailKit’s drag-and-drop interface makes it simple to add, remove, or rearrange sections.
Method 2: Create WooCommerce customer invoice emails from scratch
If you have a very specific design in mind, you can build your invoice email from a blank canvas. This gives you complete creative control.
Step 1: Create a new email blank template
Creating a new email template in this step is almost similar to the previous methods. Go to EmailKit → All Emails 그리고 Add New Email Template. Then enter the template name, set the email type to WooCommerce emails, and select the Customer Invoice template.
Now, this time, we will be selecting the Blank Template to start building the email template from the ground up. Finally, click on the EmailKit으로 편집 button as usual.
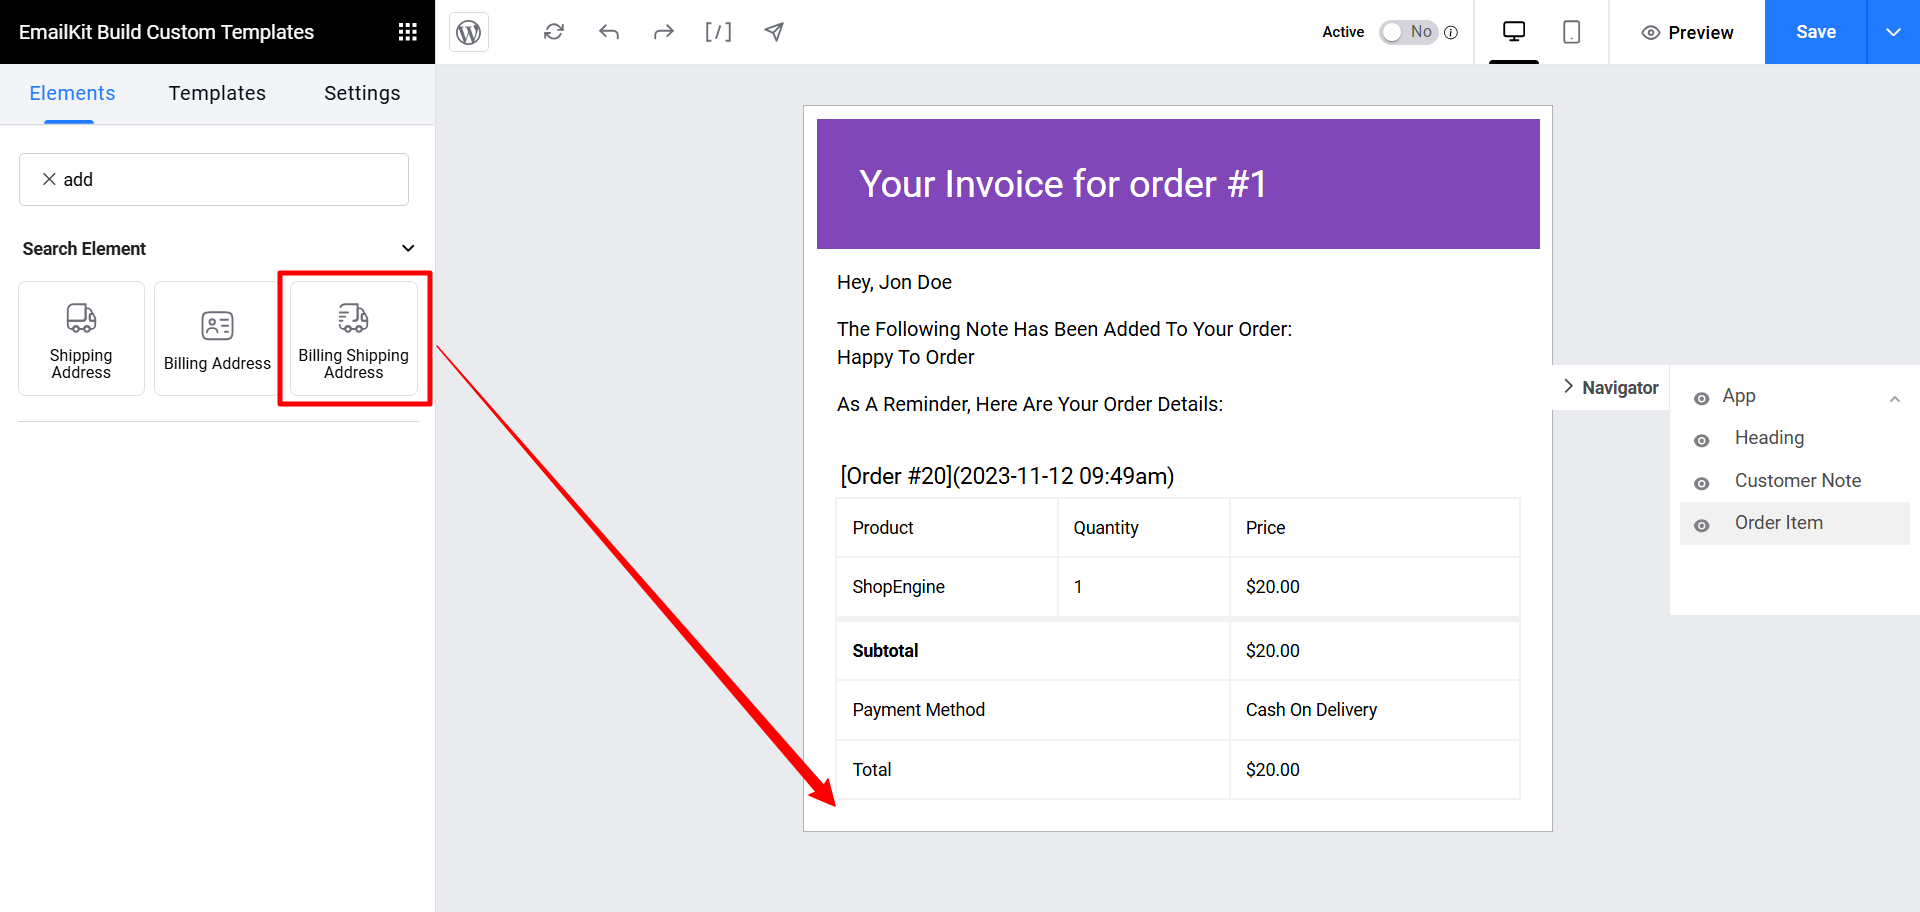
Step 2: Add elements to the invoice email
The EmailKit editor has a wide range of drag-and-drop elements. For the customer invoice email, we will be adding the following:
- 표제
- 고객 참고 사항
- 주문 항목
- 청구서 수신 및 배송 주소
On the right sidebar, you can search for the elements and drag & drop them into the design area.

Step 3: Edit the email header of the invoice
A professional header instantly communicates your brand identity. To add a header, drag in the header element.
Under the Content section, you can enter the header text and add a URL link to the header.
In the Style sections, you can customize the background color, title text color, typography, padding, margin, and border styles.
Step 4: Write a message for the customer.
To give a better experience, you can send a personalized message to the customer. To add a message, you can use the 고객 참고 사항 element. Drag and drop the Customer Note elements.
Here you can:
- 들어가다 greetings text, usually it addresses the customer with a Hey/ Hello, etc, with the customer’s name. You can add the [청구_이름], which will automatically pick the customer’s billing name while sending the email.
- 추가하다 body text for the message.
- Also, enter the 보행인 text for the email.
While sending the message, make sure to write a brief, friendly message to your customer.
Step 5: Add the “Ordered Item” table
This is the core of your invoice. EmailKit offers a dedicated element for this.
- “를 찾으세요.주문 항목” element in the panel and drag it onto the canvas.
- The plugin will automatically pull the customer’s order details, including product names, quantities, and prices.
- You can customize the appearance of this table, including column colors, font styles, and padding.
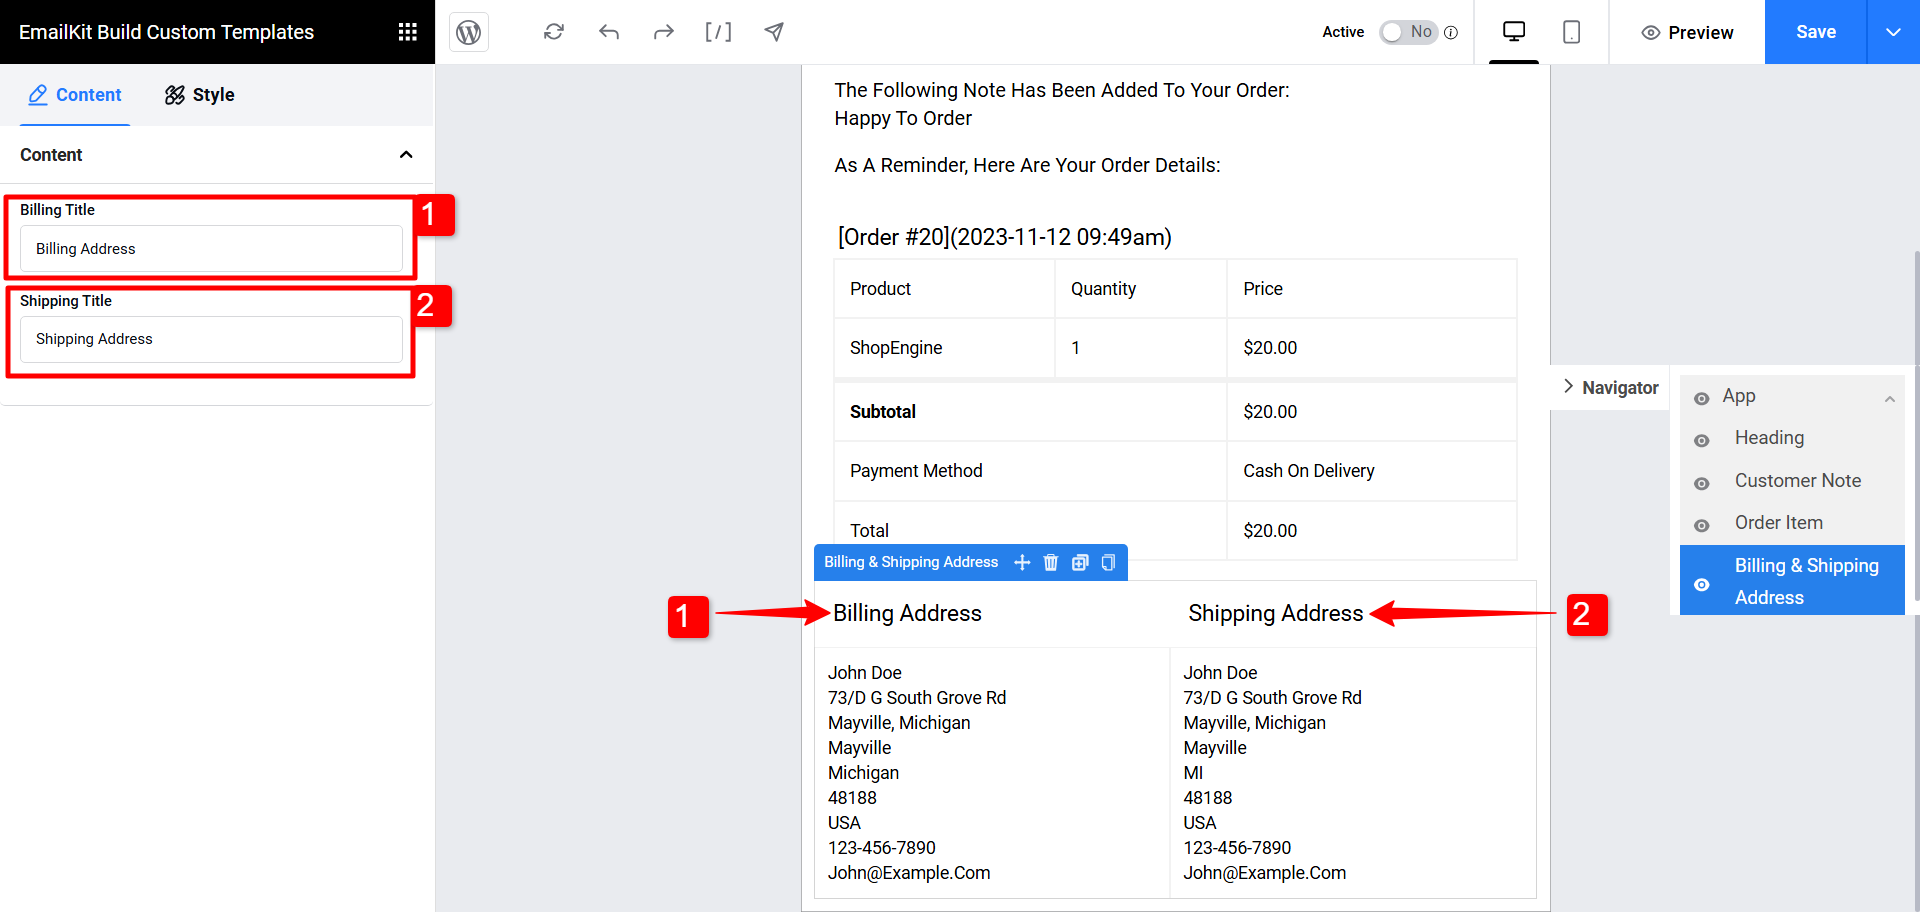
Step 6: Show Billing and Shipping Address
Accurate address details are crucial for any invoice.
- Drag the “청구서 수신 및 배송 주소” element onto your template.
- These elements will dynamically populate the customer’s information from the order. You can adjust the heading and styling to match your design.
For this section, you can change the 청구 제목 그리고 Shopping Title. You can also customize this section by switching to the 스타일 탭. There, you can customize the Wrapper, Title, and Info for the WooCommerce customer invoice email.
마무리
And that’s it! Sending WooCommerce customer invoice emails in WordPress doesn’t have to be complicated. While you can stick with the default option if you just need something quick, taking it a step further with a customized, branded design using EmailKit can make a significant difference.
A well-designed invoice email not only looks professional but also gives your customers a smoother experience and keeps your brand top of mind. Now, it’s your turn to make those routine emails work harder for your business.

답글 남기기