


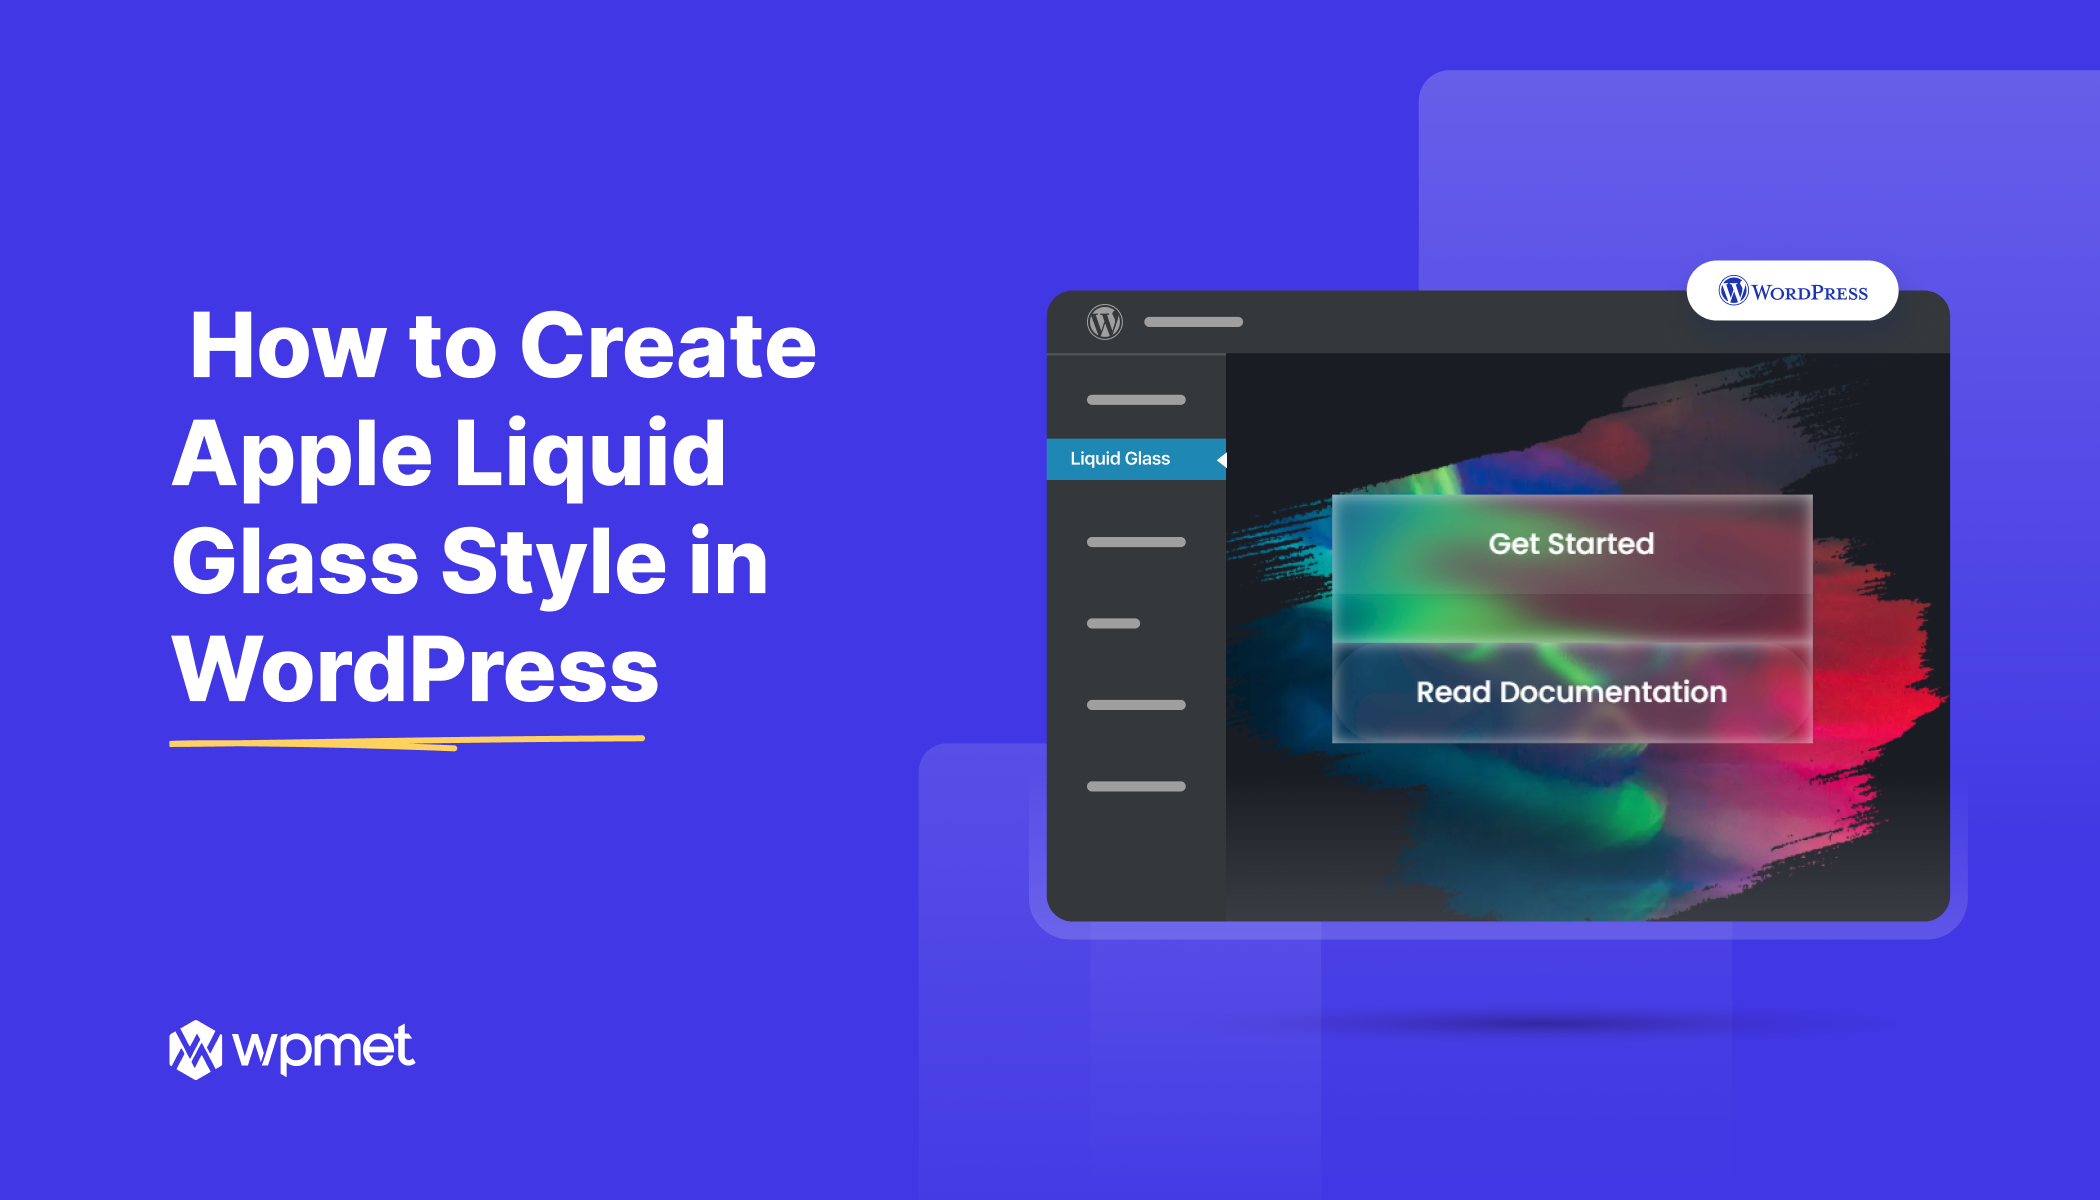
Liquid Glass became a rising web design trend after Apple introduced it in iOS 16. It can be a great way to refresh your website design. You may mix the liquid glass effect with glass morphism. But there are differences between these two animated effects.
Yet both mimic the look of glass. However, Liquid Glass steps ahead with dynamic lighting refraction and fluid appearance. Plus, the liquid glass surface shows movements while visitors make interactions. Overall, you can give a new, fresh look to your website with this trendy effect.
In this blog post, I am discussing how to create liquid glass effects on WordPress websites. Let’s start by understanding what liquid glass design actually means.
Quick Overview
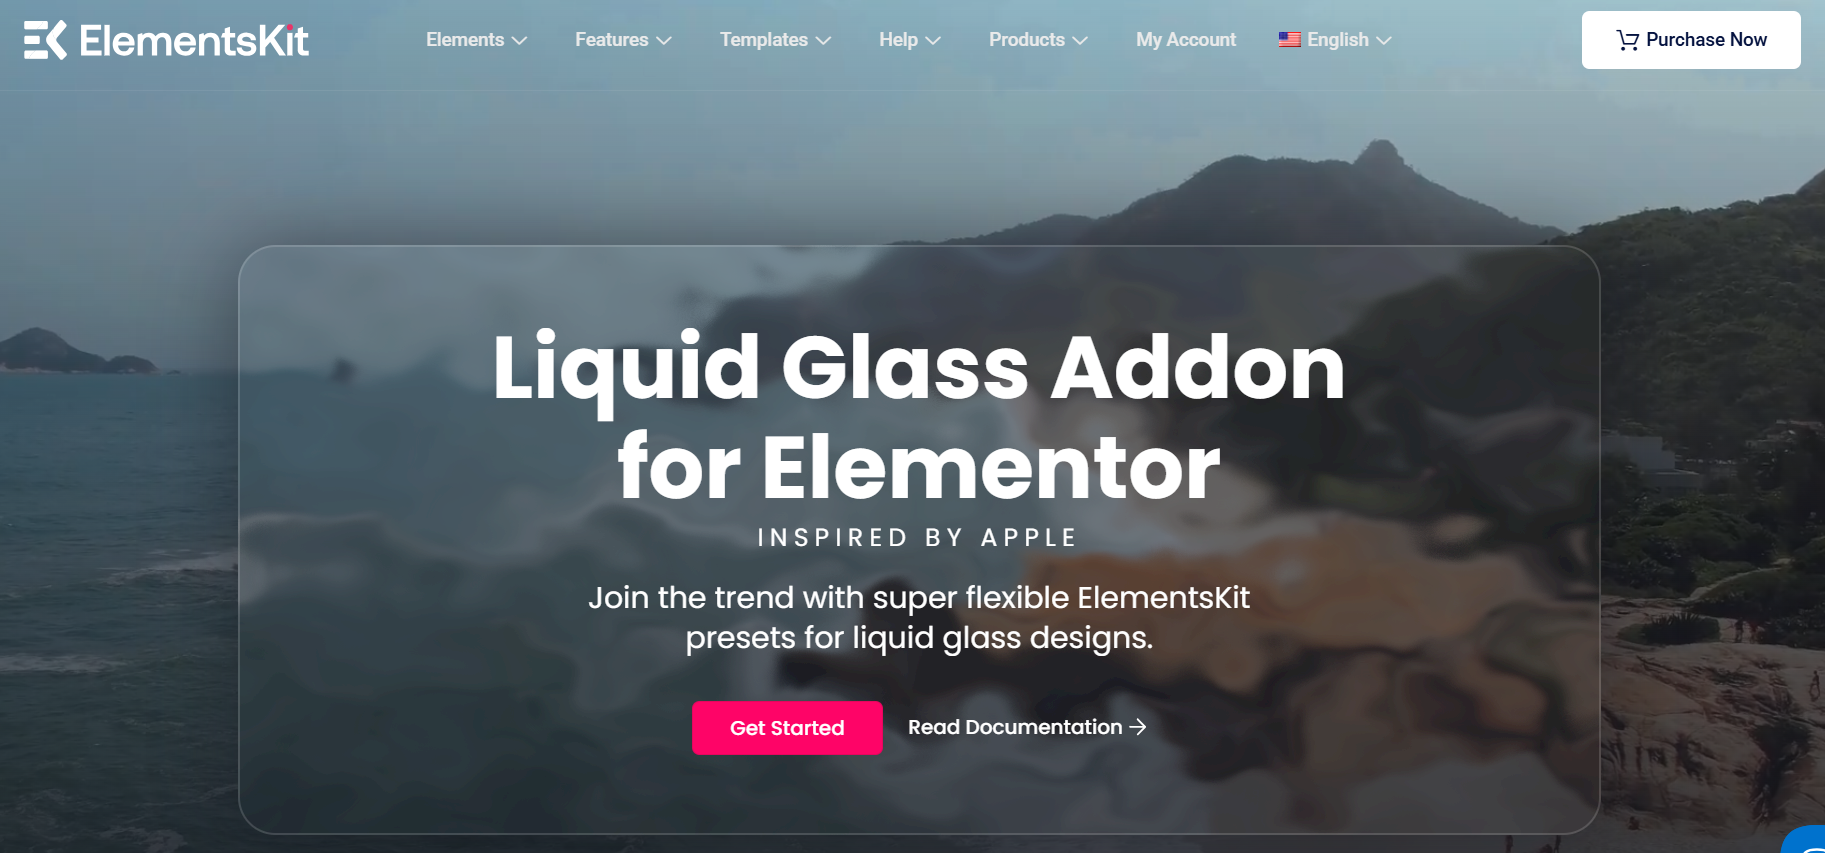
Apply Trendy Apple Liquid Design Effects on WordPress websites.
Tools Used: ElementsKit, Elementor (Free Version), WordPress
You don’t need to know code or recurit a professional designer to add liquid glass design in Elementor websites. Because ElementsKit take care of eye-catching apple liquid glass design with:
✅ Various presets of Apple-inspired liquid effects.
✅ A controler for defining the blur strength.
✅ Choose from pre-made shadow effects or customize your own to add a realistic, depth-enhancing touch.
✅ Everyting available in the Elementor drag-and-drop page builder.
ElementsKit Glass Liquid Module is competible with any types of Elementor widgets & sections.
What is Liquid Glass Design?
In simple words, liquid glass is a dynamic web design material that blurs background content and brings more focus to the foreground elements. And, the entire surface is affected by the reflection of the surrounding light. This design is made up of layers, and both layers are visible because there is a shiny crystal surface between the layers.
When your visitors interact by hovering or clicking on the liquid glass surface, movements like waves or melting effects appear. This type of reaction creates a vibrant display by changing light and color. And when you match the perfect shadow effects in the liquid design, everything gets realistic. Thus, visitors get easily attached, and you can easily achieve your goal.
That’s why Apple recently introduced the liquid glass effect. And, you can apply it to your WordPress website as well.
If you’re still confused about using liquid glass effects in your website design, don’t worry. In the next part, I will discuss whether the liquid glass effect is right for you.
How to Create Liquid Glass Effects on WordPress Websites?
In this “how to apply liquid glass effect on WordPress websites” blog, I will proceed with the Elementor page builder. And, the free version is enough.
Then, you need to utilize an Elementor addon to obtain the liquid glass functionality, as Elementor doesn’t support this feature. And my recommendation is ElementsKit, an all-in-one Elementor 애드온 that extends your Elementor functionality with state-of-the-art features.
It also covers the new trendy liquid glass effect as a module that can be applied in any Elementor widget and section. Yes, including the third-party addon as well. ElementsKit ships with various presets for liquid glass and shadow effects. You just need to select one that suits your design.
And, the best thing is that it allows you to control the blur strength of your liquid glass design effect. You won’t find this personalized functionality on other Elementor 애드온.
Now, we know why ElementsKit is the best Elementor liquid glass addon. Next, We will show you how to use this addon to give your website the revolutionary liquid glass effect.
Step 1: Activate ElementsKit Liquid Glass Module
You may find the ElementsKit module inactive by default, so you have to enable it first. For this go to, ElementsKit > Modules. Then, look for the Liquid Glass module and set the toggle button within it.

Once done, navigate to ElementsKit > Modules, and you may find the Liquid Glass module inactive. Click the toggle button next to it. Then, hit the 변경 사항을 저장하다 button at the top right of your screen.
Now, you’re ready to go! Add a new page or post and start editing with the Elementor page builder.
Step 2: Add a Liquid Glass Preset
After entering the Elementor dashboard, insert a section or widget according to your design needs. Then, enter the 고급의 tab of that widget or container. Scroll down and look for the ElementsKit Liquid Glass 옵션.
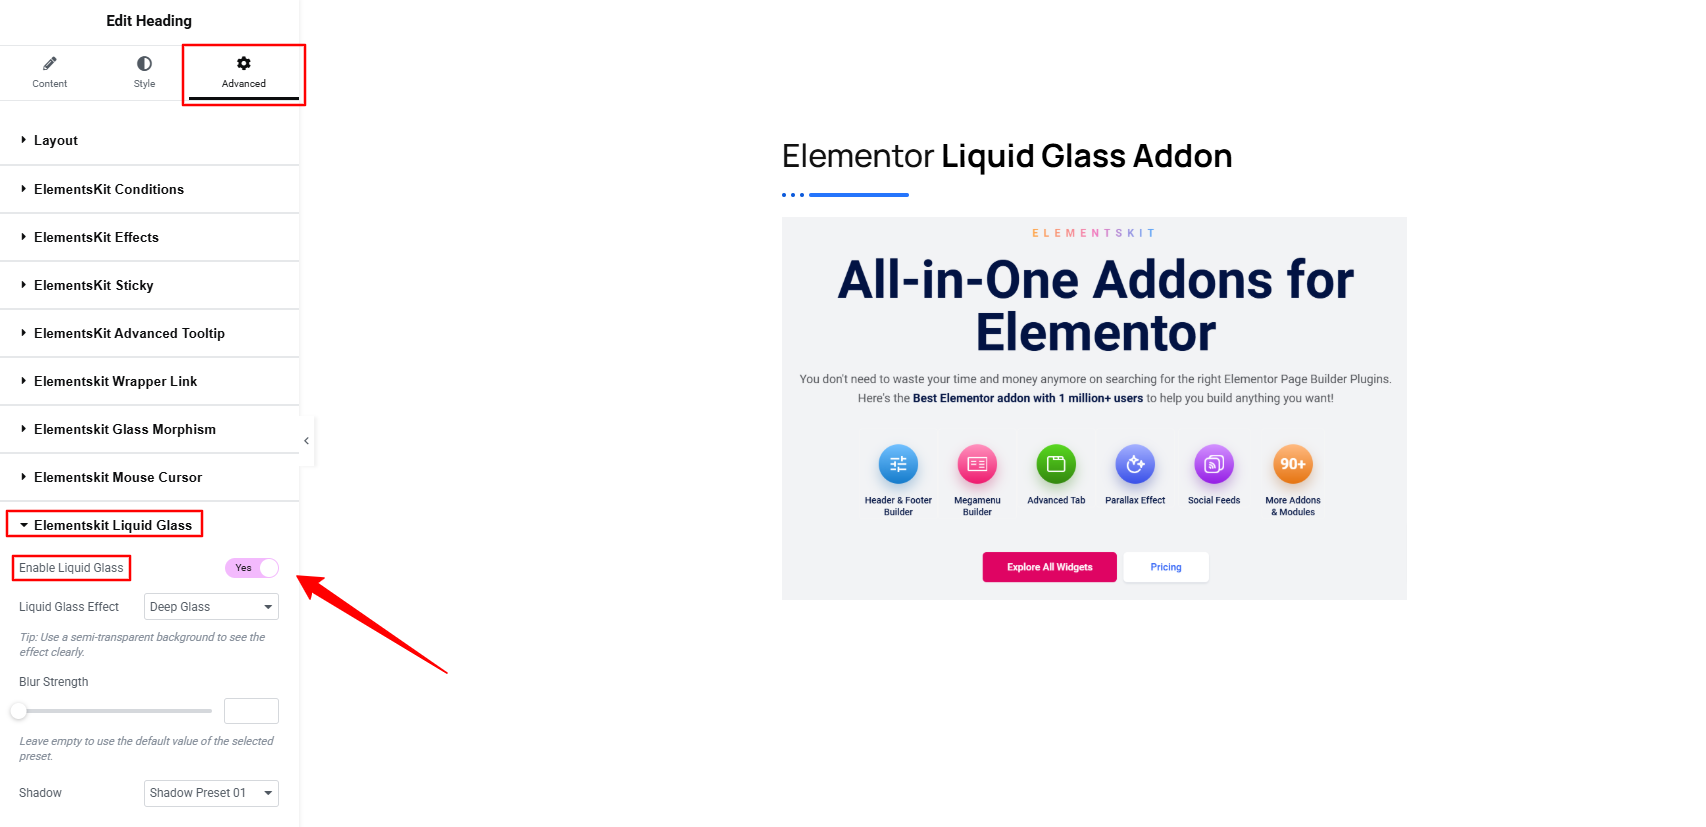
Open this option and 토글 버튼을 활성화하다. Doing this will reveal liquid glass functionalities for your Elementor website. Start with choosing a liquid glass preset. This is actually the main part; here you’ll define what kind of fluidity and transparency you want in your design.
From the dropdown, you’ll find different professionally designed presets. Let’s know about them:
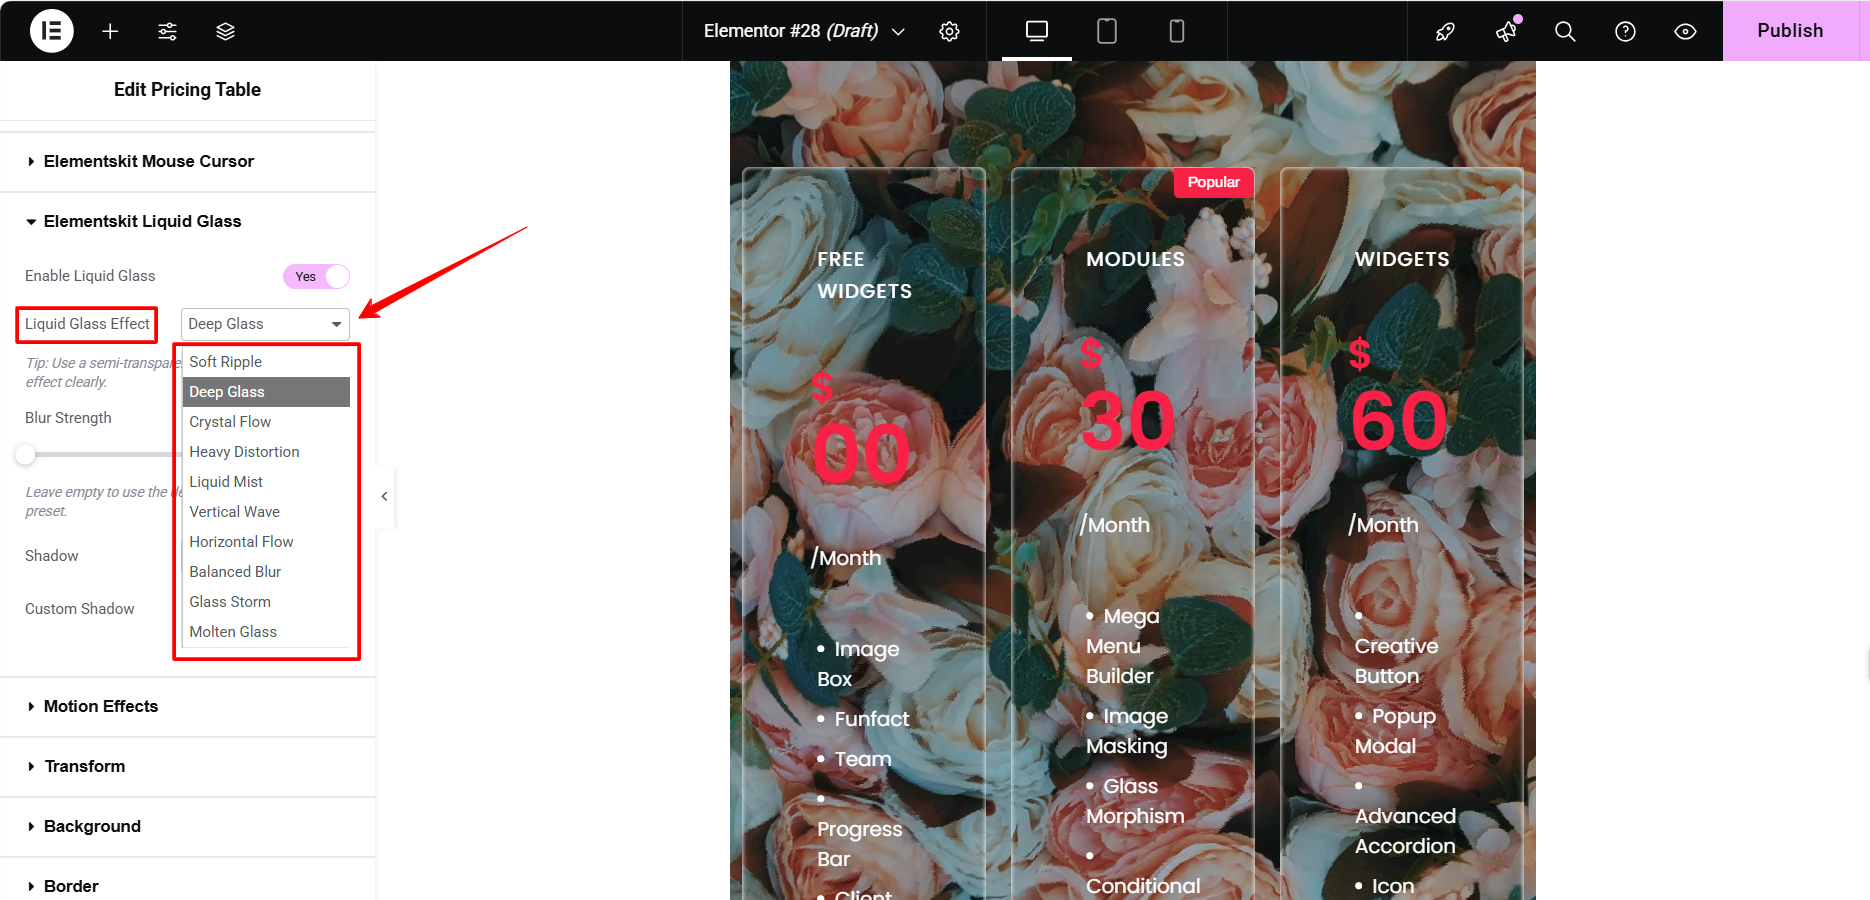
- Soft Ripple: Adding this preset will create wave-like distortions or animated ripples that smoothly move across the glass surface while visitors make interactions with a click or hover. It often combines with light reflections and subtle shadows to give a semi-transparent, frosted look.
- Deep Glass: As its name it gives a rich or heavy layered glass appearance that can highly separate the background from the foreground UI elements. Therefore, it is often used where you want to immediately draw the user’s attention to something.
- Crystal Flow: Insert this liquid glass preset to give an elegant vibe to users. A dynamic appearance evolves due to crystal-clear transparency with fluid movement. This liquid glass design is perfect for a hero section where you want to accommodate different interactive components with clarity and motion.
- Heavy Distortion: Another useful liquid glass effect when you want to create an intense and bold background with exaggerated wrapping, blurring, and rippling. This preset works best where you want to give a bold statement with hover effects and dramatic UI elements.
- Liquid Mist: Want to apply a foggy glass effect. This preset consists of subtle diffusion and low-opacity blurs to showcase a mist look.
- Vertical Wave: Apply a wave-like glass background that distorts vertically, maintaining the transparency of the glass. You can use it for a full-height section to give an elegant background.
- Horizontal Flow: Go for a motion effect that reveals from side to side with a horizontally flowing glass surface. You will end up with a seamless, fluid look with soft glass reflections.
- Glass Storm: This preset enables a storm-like environment where the surface appears to be chaotic. It results from the combination of dynamic particles or fragmented distortions and helps you to create interactive design elements with attention-grabbing backgrounds.
- Molten Glass: It’s a slow, distorted environment with high transparency to state the surface as molten. This melting glass effect creates a semi-liquid look for a smooth visual interface.
Whatever your design style, these liquid effects perfectly combine the effect of glass with the subtlety of transparency and fluidity. And, it doesn’t matter you’re using Elementor, ElementsKit, or any third-party addons or widgets to achieve. Now, we’ll focus on controlling the blur strength of the liquid glass.
Step 3: Set Liquid Glass Transparency
Bring the accuracy when setting the softness or transparency of the liquid design. ElementsKit facilitates the blur strength control. You can easily use the Blur Strength slider or give a numeric value manually to get the optimum transparency.
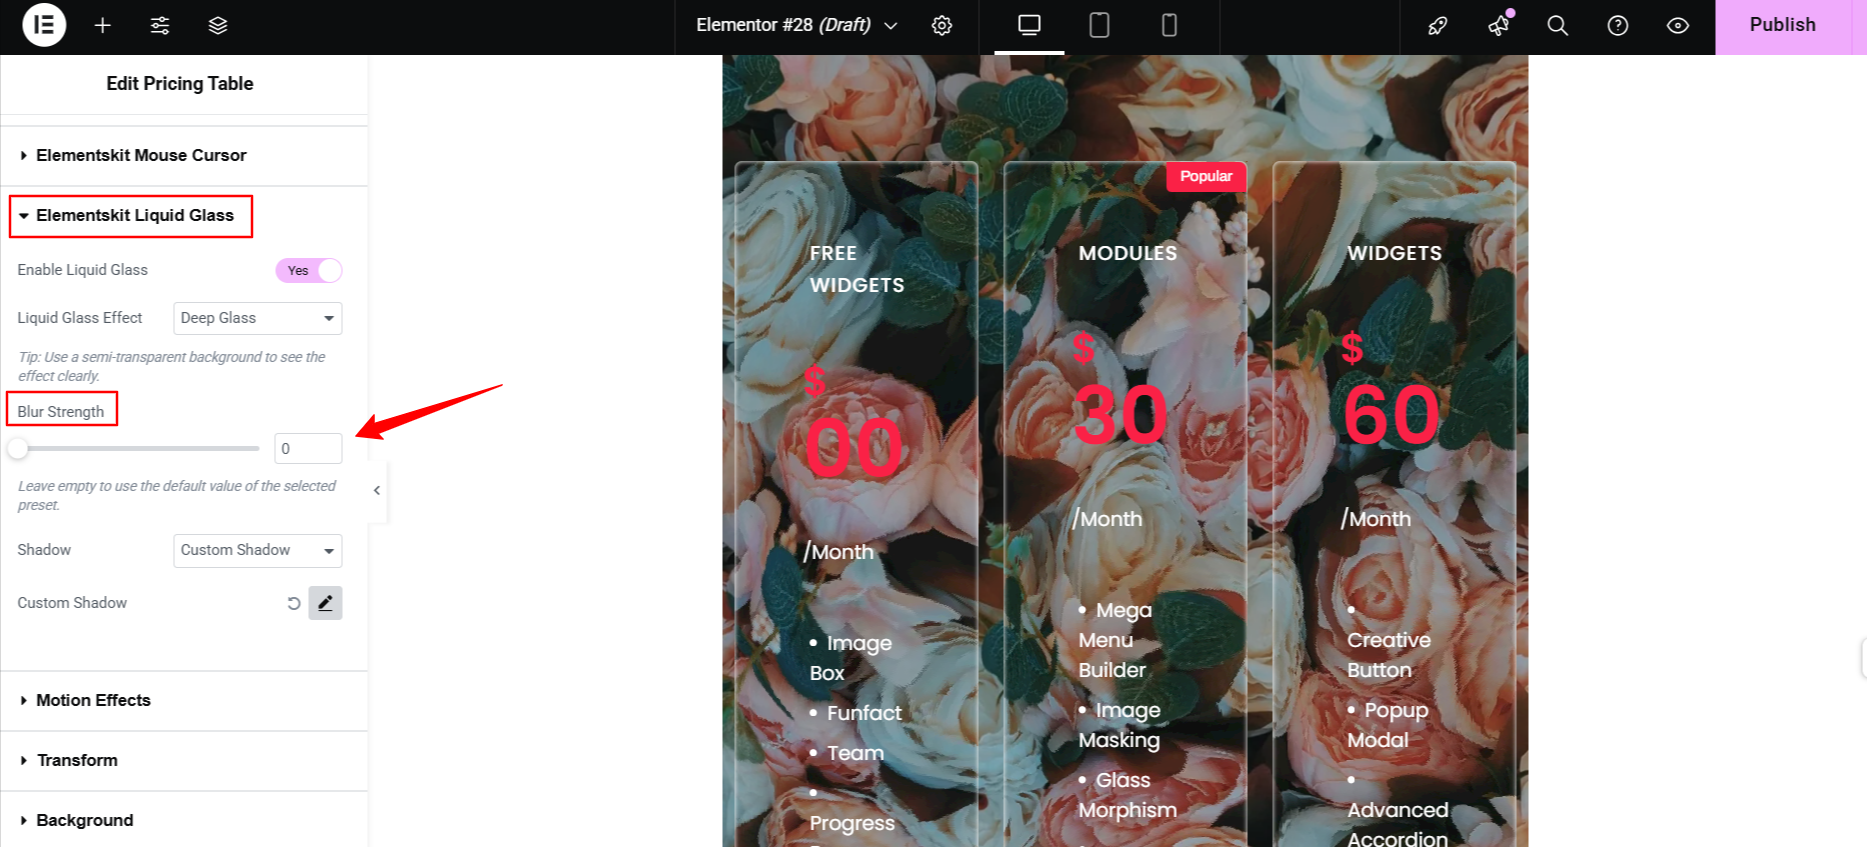
When choosing a higher blur strength value, increase the depth of the gloss and opacity of the glass layer, which means background elements will be less visible. On the other hand, if you opt for a lower value, there will be a softer, more crystalline glass surface, allowing the background to remain more in focus.
But if you’re happy with your applied liquid glass preset, just keep this option empty.
Step 4: Get Realistic with Shadow Effects
At this stage, your liquid glass effect is ready. But why stop here? To add a more realistic and polished look, ElementsKit includes 10 built-in shadow presets specifically designed to complement your glass effect.
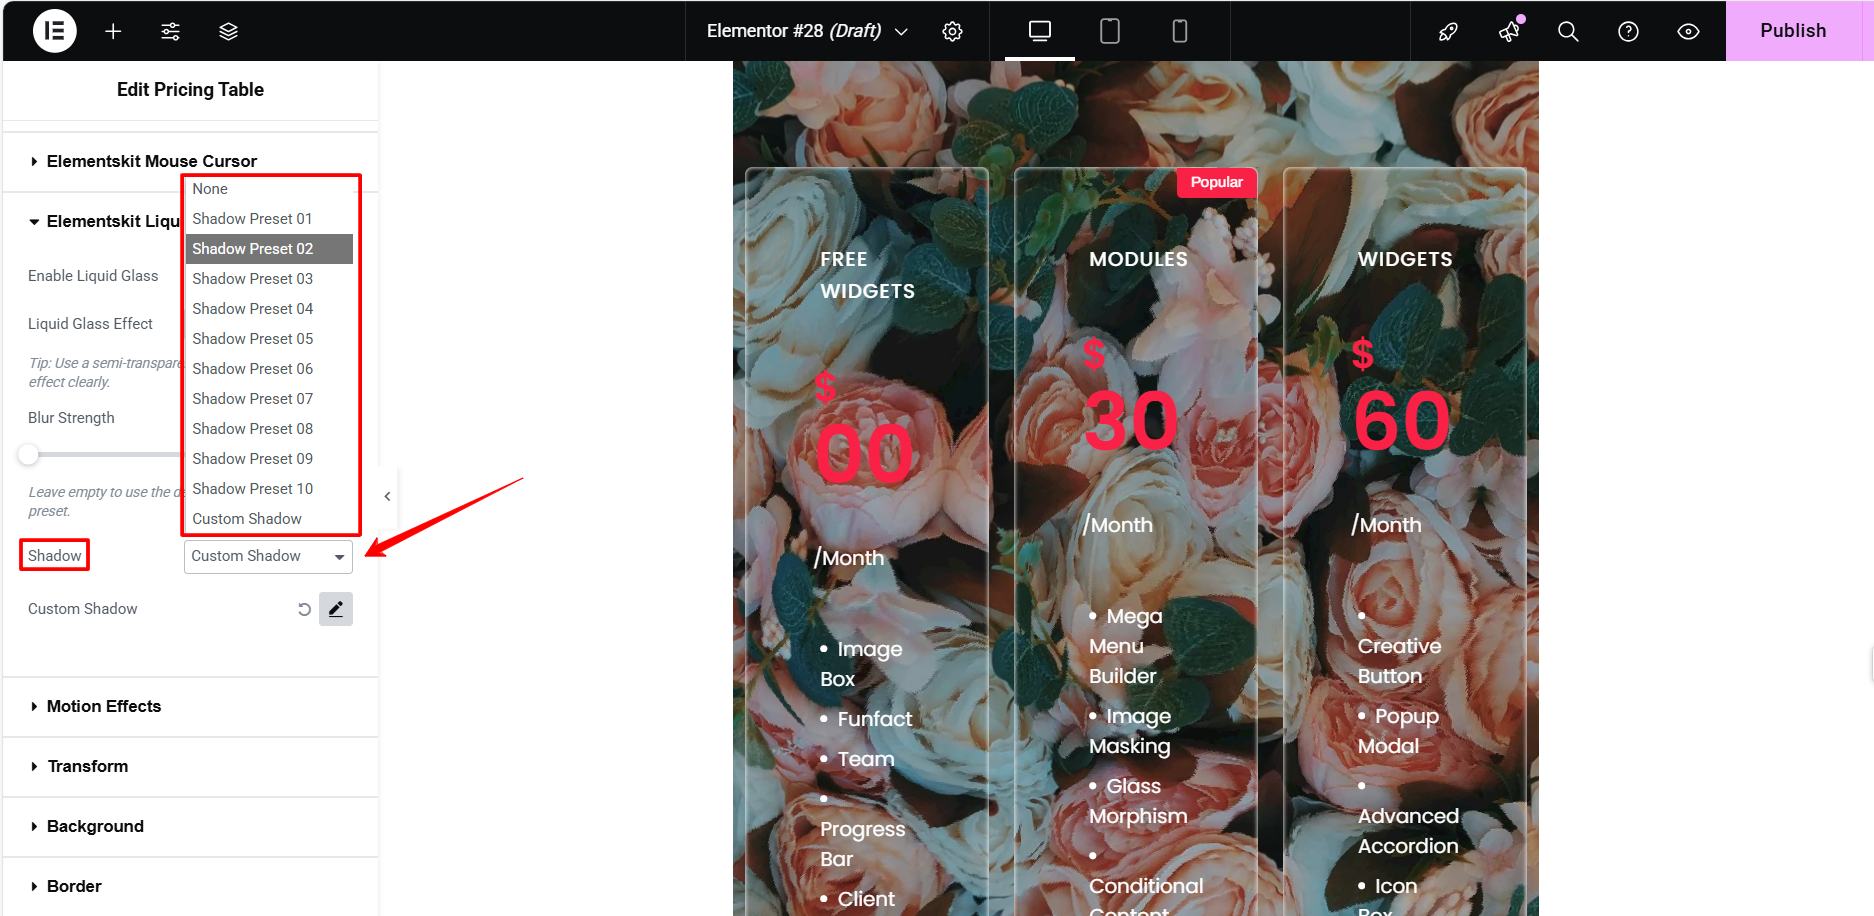
Applying a shadow is easy! Simply pick a preset that best matches your design to instantly enhance depth and contrast.
And, you can even enjoy more control? Choose the Custom Shadow option from the dropdown. You’ll unlock a range of manual settings to fine-tune and create your own unique shadow effect with precision.
Step 5: See the Final Look
Now, you’re done with designing a liquid glass effect on your WordPress website. Here’s a preview of our liquid glass design:
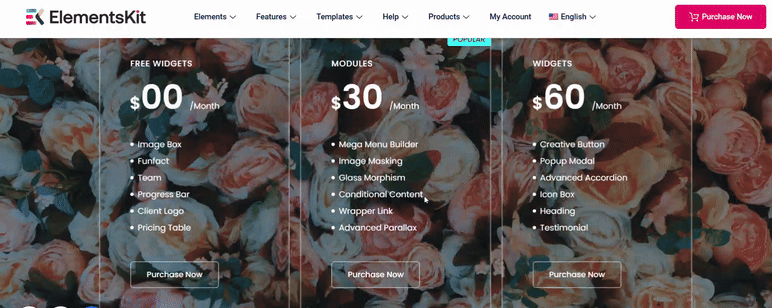
Always check the preview before publishing your content. To better your liquid glass effect, you can add a scrolling animation to glue your visitor’s eye.
Is the Liquid Glass Effect Right for Your Website?
Liquid glass isn’t only a fancy term. Rather, this concept is a practically applicable dynamic user experience that can transform how users interact with your site. Beyond its sleek, futuristic appearance, Liquid Glass helps you establish a clear visual hierarchy, separating content layers while maintaining an elegant, modern aesthetic.
Adding the Liquid Glass effect to your website can subtly guide visitors toward their next action. For instance, a semi-transparent navigation bar can elegantly separate your menu from the header, creating a modern, blended look.
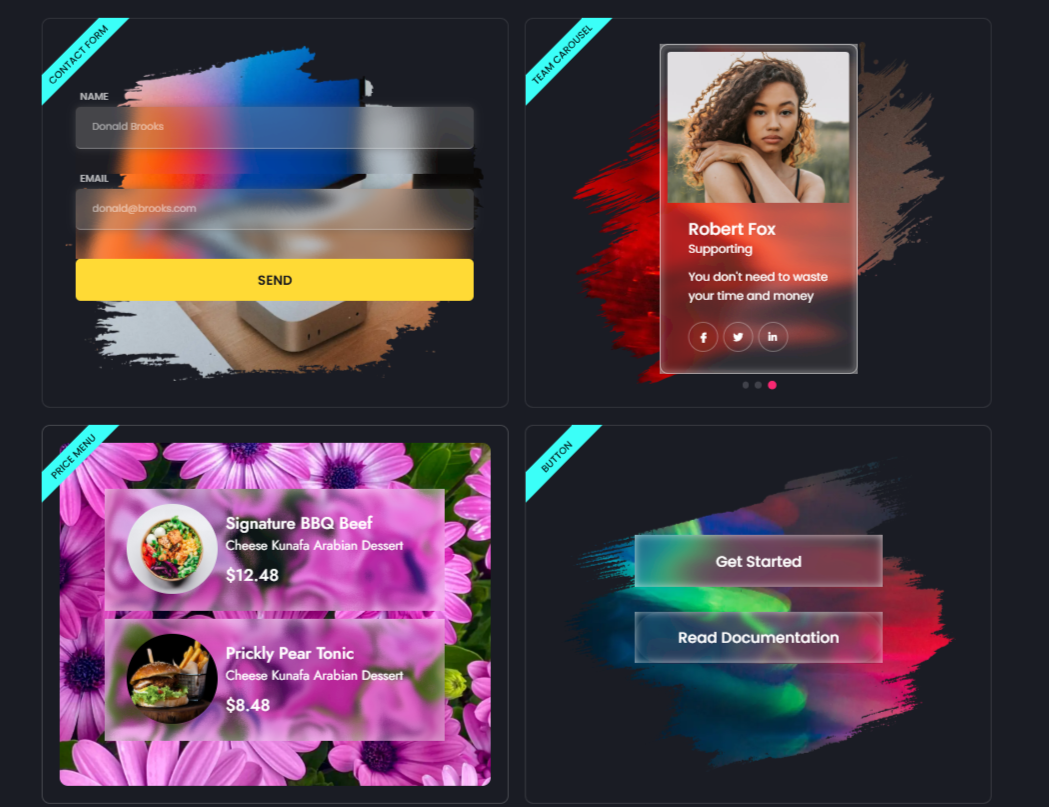
Some of the most popular use cases include mega menus, feature boxes, pricing tables, testimonials, team profiles, and service sections. It’s also perfect for areas where the background needs to shine through, like form fields, dropdowns, or search bars, while keeping the foreground content easily readable.
An interactive header is essential in today’s web design. With ElementsKit’s Liquid Glass module, you can seamlessly blend text and buttons into a glass-style panel layered over dynamic visuals for a futuristic, high-impact design.
Actually, this effect can be applied to virtually any section of your Elementor website. And, ElementsKit gives you the flexibility to do it with ease, no coding required.

마지막 생각들
Now you know how to apply stunning Liquid Glass effects to your WordPress website, no coding required. With our step-by-step guide, even beginners can follow along with ease.
The ElementsKit Liquid Glass module offers powerful design capabilities wrapped in a user-friendly interface, enabling the creation of modern, immersive UI elements with ease.
Ready to bring your design to life? Try it out, and if you run into any issues, we’re here to help. Let us know how your experience goes!
Does ElementsKit support a Liquid Glass Widget?
What is the No-code way to Add Liquid Glass to WordPress Website?

답글 남기기