


File upload forms in WordPress allow users to submit documents, images, or other files directly through a form. Using MetForm, you can create a file upload form, connect it with Dropbox or Google Drive, add a File Upload field, and automatically store submitted files in cloud storage instead of your server.
This setup removes the need for email attachments and keeps all uploaded files organized in one place. It is especially useful for job applications, support tickets, contact requests, or any form that requires users to share supporting documents securely.
In this guide, you’ll learn what a file upload form is, why it’s necessary, and how to create a WordPress form with file upload using MetForm.
Quick Overview
You can create a WordPress file upload form and store uploaded files in cloud storage using MetForm. Here are the step-by-step methods for both Dropbox and Google Drive integrations.
Steps to create a file upload form
- 추가하다 file upload form with template.
- Drag-and-drop file upload 필드.
- 사용자 정의 the form.
- 게시 file upload form.
Method 1: Share Dropbox file links directly in form
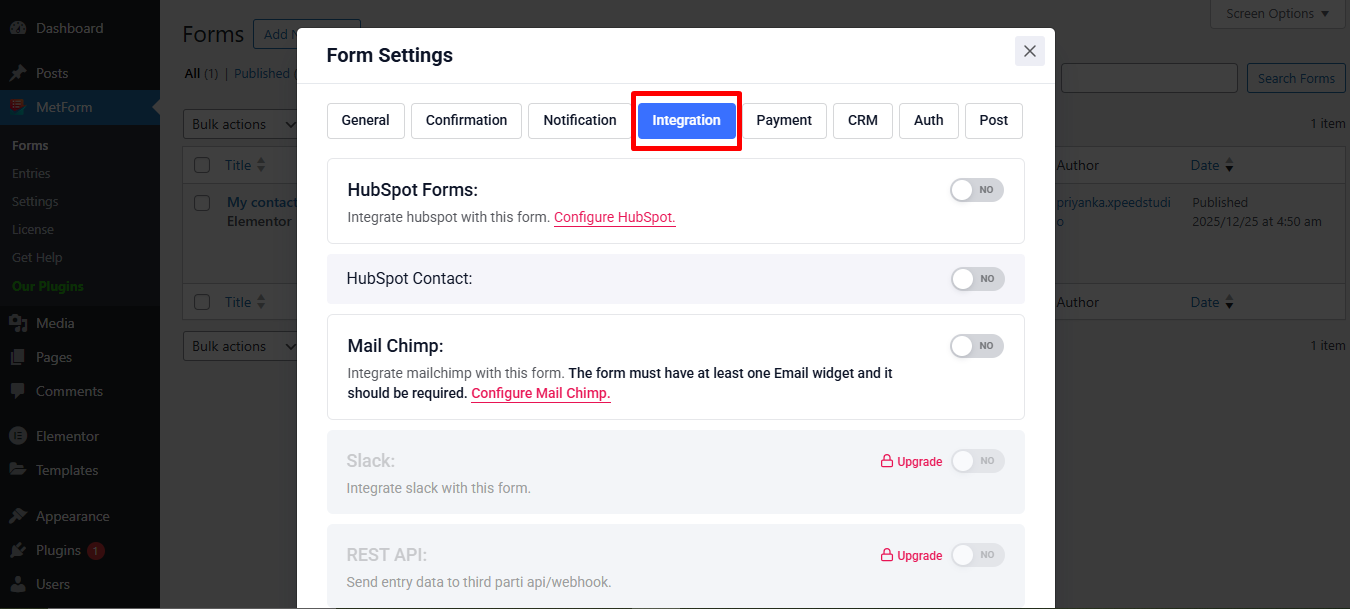
Step 1: Integrate Dropbox: Connect Dropbox from MetForm → Settings → Integrations and complete the authorization process.
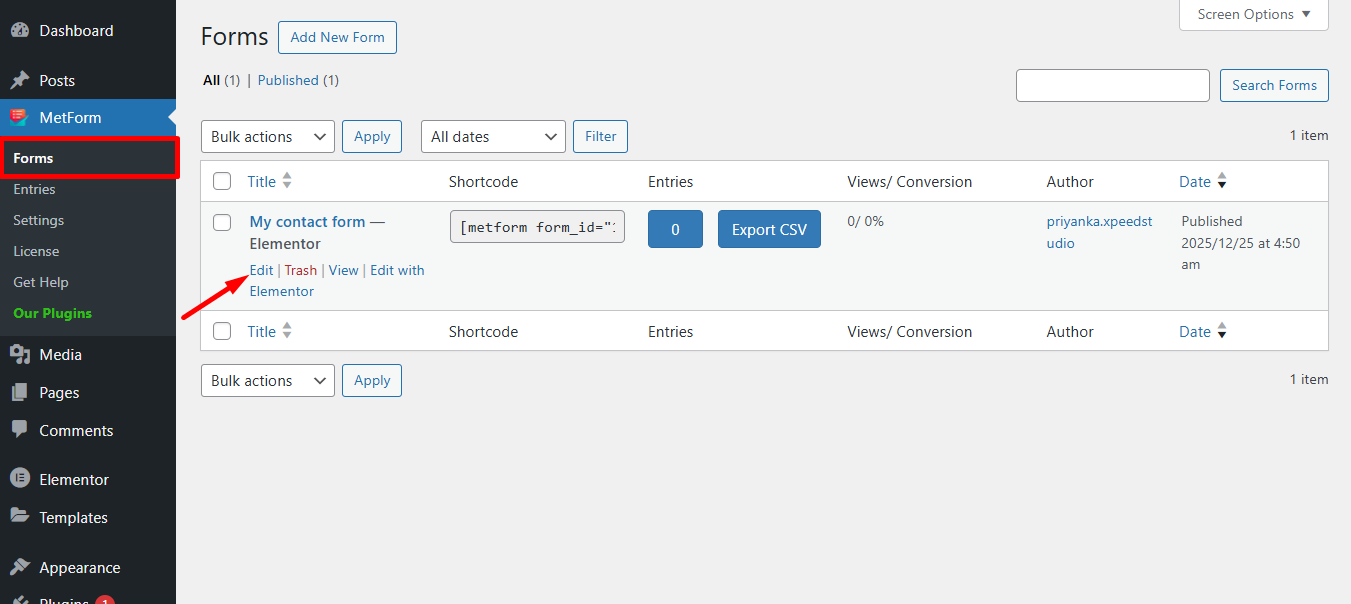
Step 2: Edit the form: 이동 MetForm → Forms, select your form, and click 편집하다.
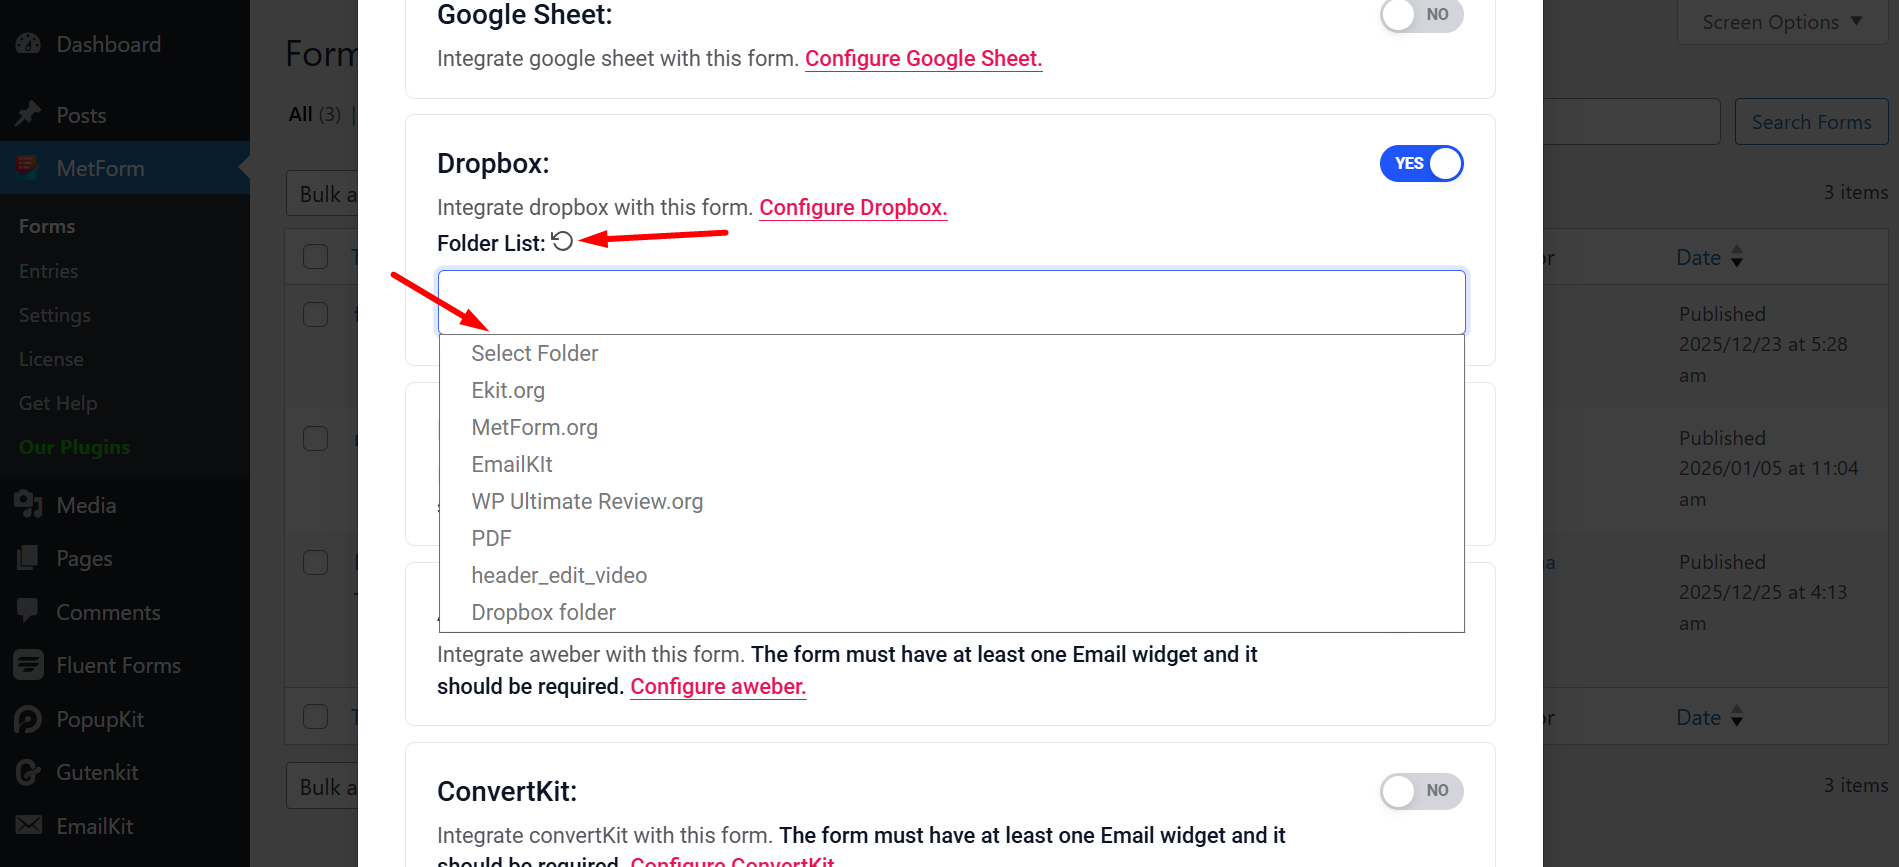
Step 3: Choose a Dropbox folder: Enable Dropbox from the 완성 tab, reload the folder list, and select a destination folder.
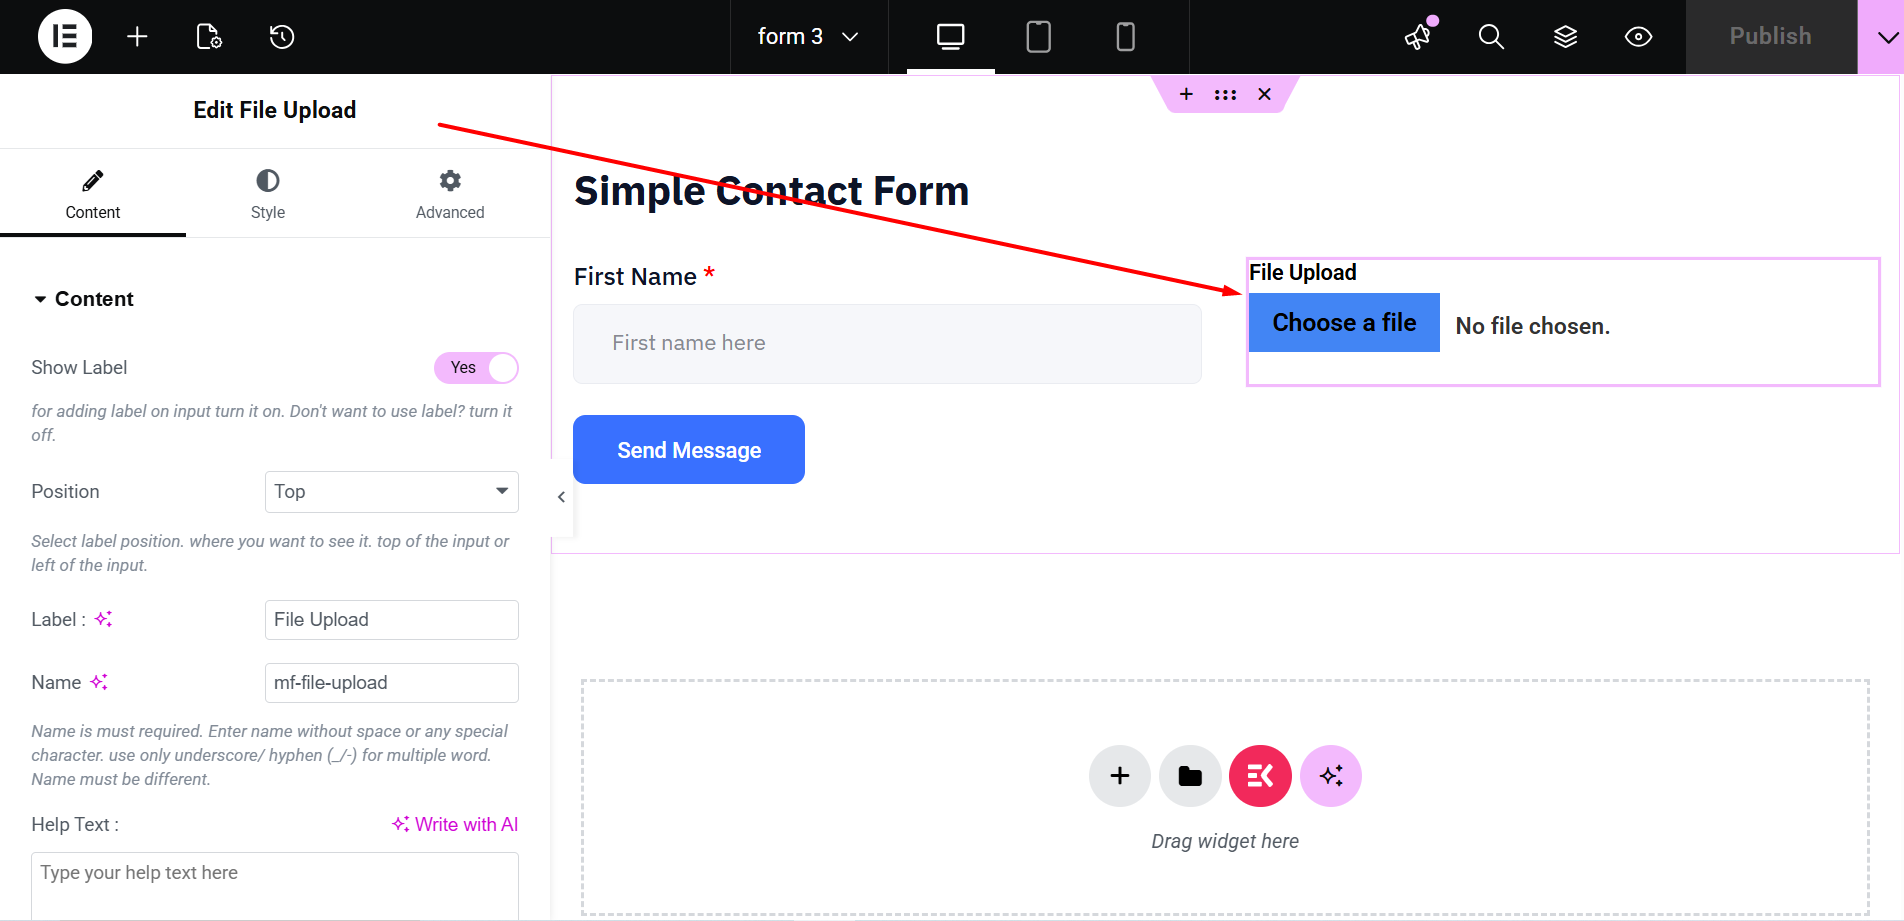
Step 4: Add the File Upload field: Drag and drop the 파일 업로드 widget into the form and configure its settings.
Step 5: Publish and test: Update or publish the form and test file uploads. All submitted files are stored in the selected Dropbox folder.
Method 2: File Upload Form with Google Drive
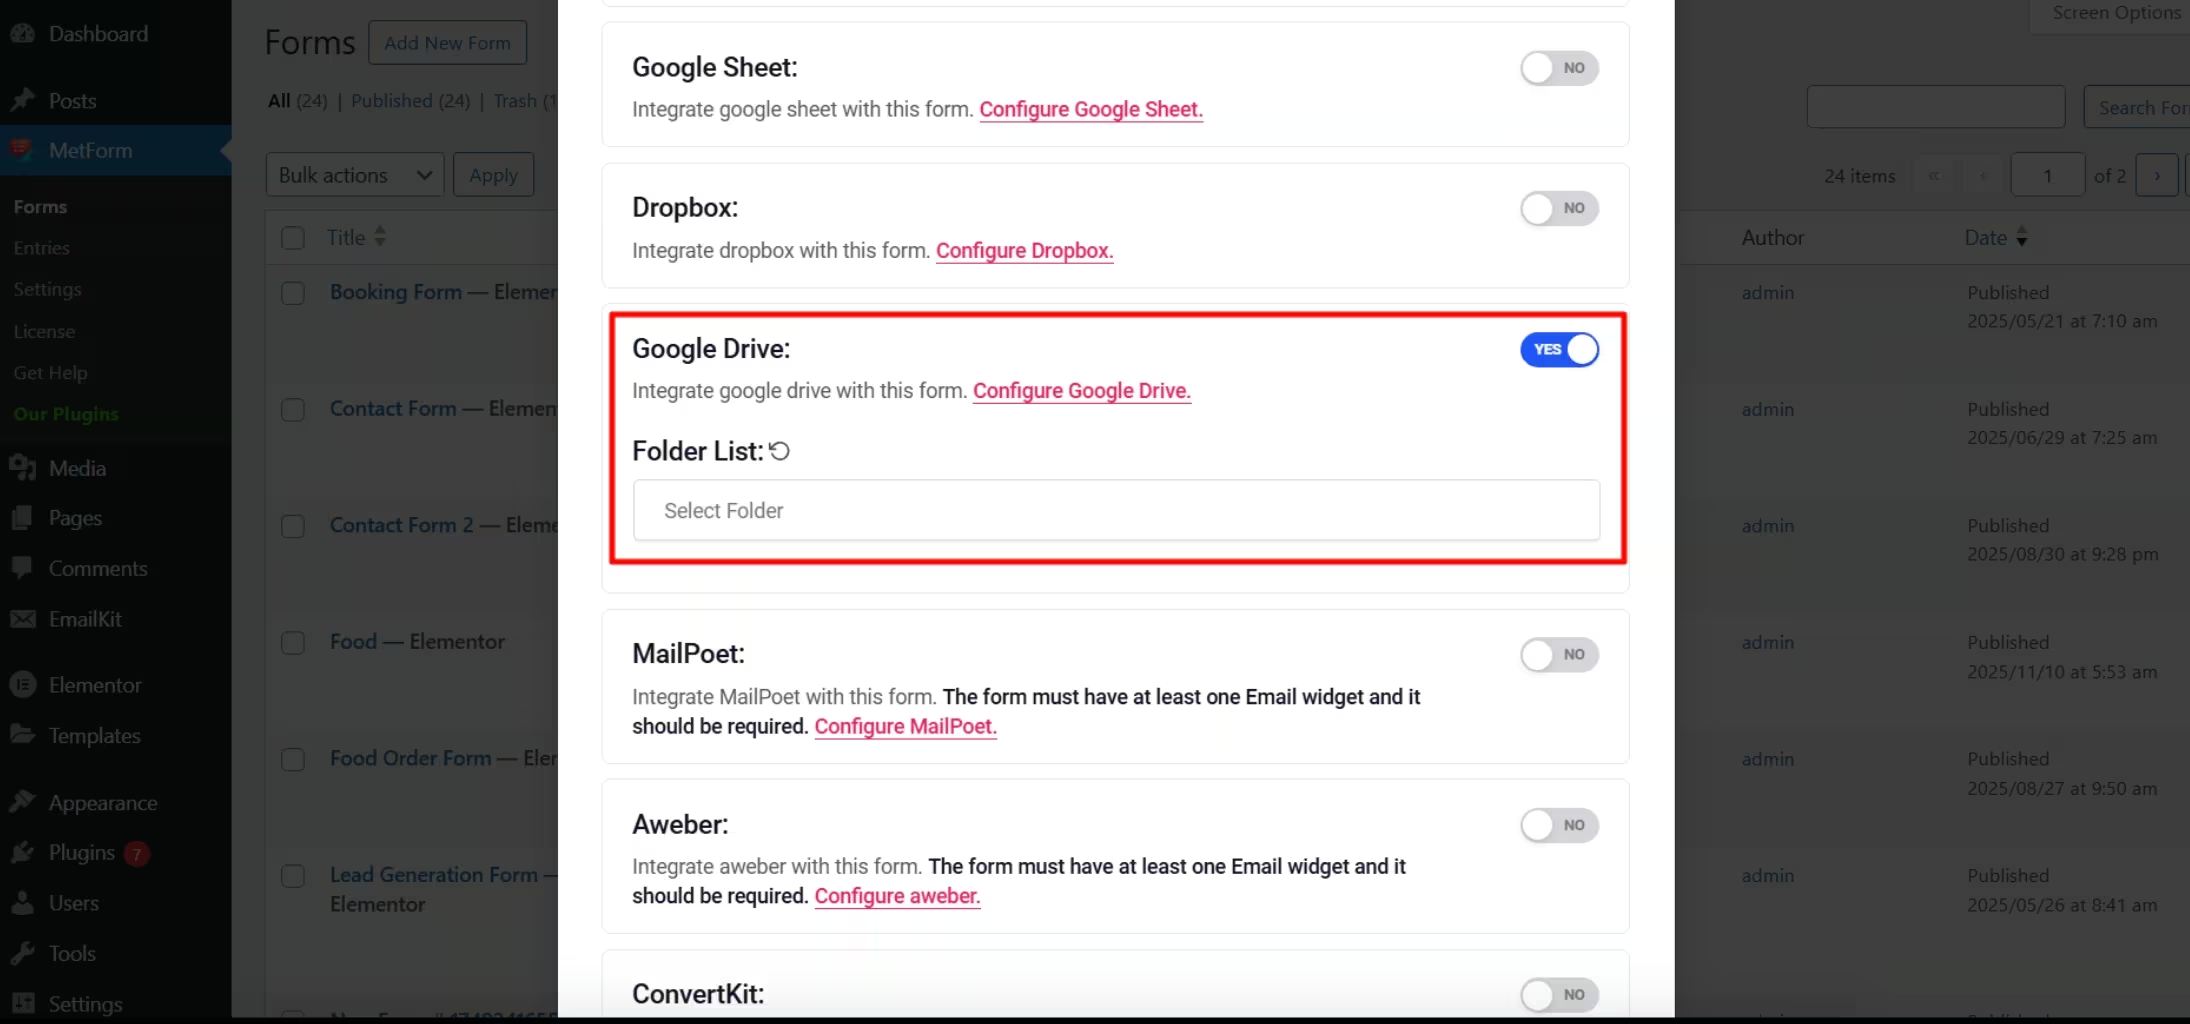
Step 1: Integrate Google Drive: Connect Google Drive from MetForm → Settings → Google Integration and complete the setup.
Step 2: Edit the form: Open the target form from MetForm → Forms to configure upload settings.
Step 3: Enable Google Drive: Click 콘텐츠 편집, turn on Google Drive, and refresh the lists to sync Drive.
Step 4: Add the File Upload field: Drag and drop the 파일 업로드 widget and customize labels and styling.
Step 5: Publish and test: Publish the form and verify that uploaded files are stored in Google Drive.
What is a WordPress file upload form?
A WordPress file upload form enables users to submit files such as documents, images, or media directly through a form on your website. Instead of sending files via email or external tools, users can upload them securely, and site owners can access those files from the WordPress dashboard.
Why need a file upload form in WordPress?
File upload forms are essential when user submissions require documents, images, or supporting files instead of text alone. They simplify file collection, keeping all submissions organized inside WordPress.
Here are the significance of integrating a file upload form in WordPress:
- Many use cases require more than text input, such as documents, images, or supporting files
- Job application forms need resumes, portfolios, or certificates from applicants
- Support and feedback forms work better with screenshots or error logs attached
- Contact and request forms may require files for reference or approval
- File upload forms store submissions centrally in WordPress, not scattered across emails
- They help avoid email attachment limits and delivery failures
- With proper settings, file upload forms enable secure and controlled file collection
How to create a WordPress form with file upload
As a prerequisite before creating a WordPress file upload form, install and activate MetForm, a WordPress 양식 작성 도구, along with Elementor. Since MetForm is an Elementor addon, the free version of Elementor needs to be installed and activated on your site to access this solution.
Here are the solutions you have to install on your WordPress site:
- 엘레멘터
- MetForm (File upload form builder)
- 메트폼 프로
After that, add a file upload form by following the steps below:
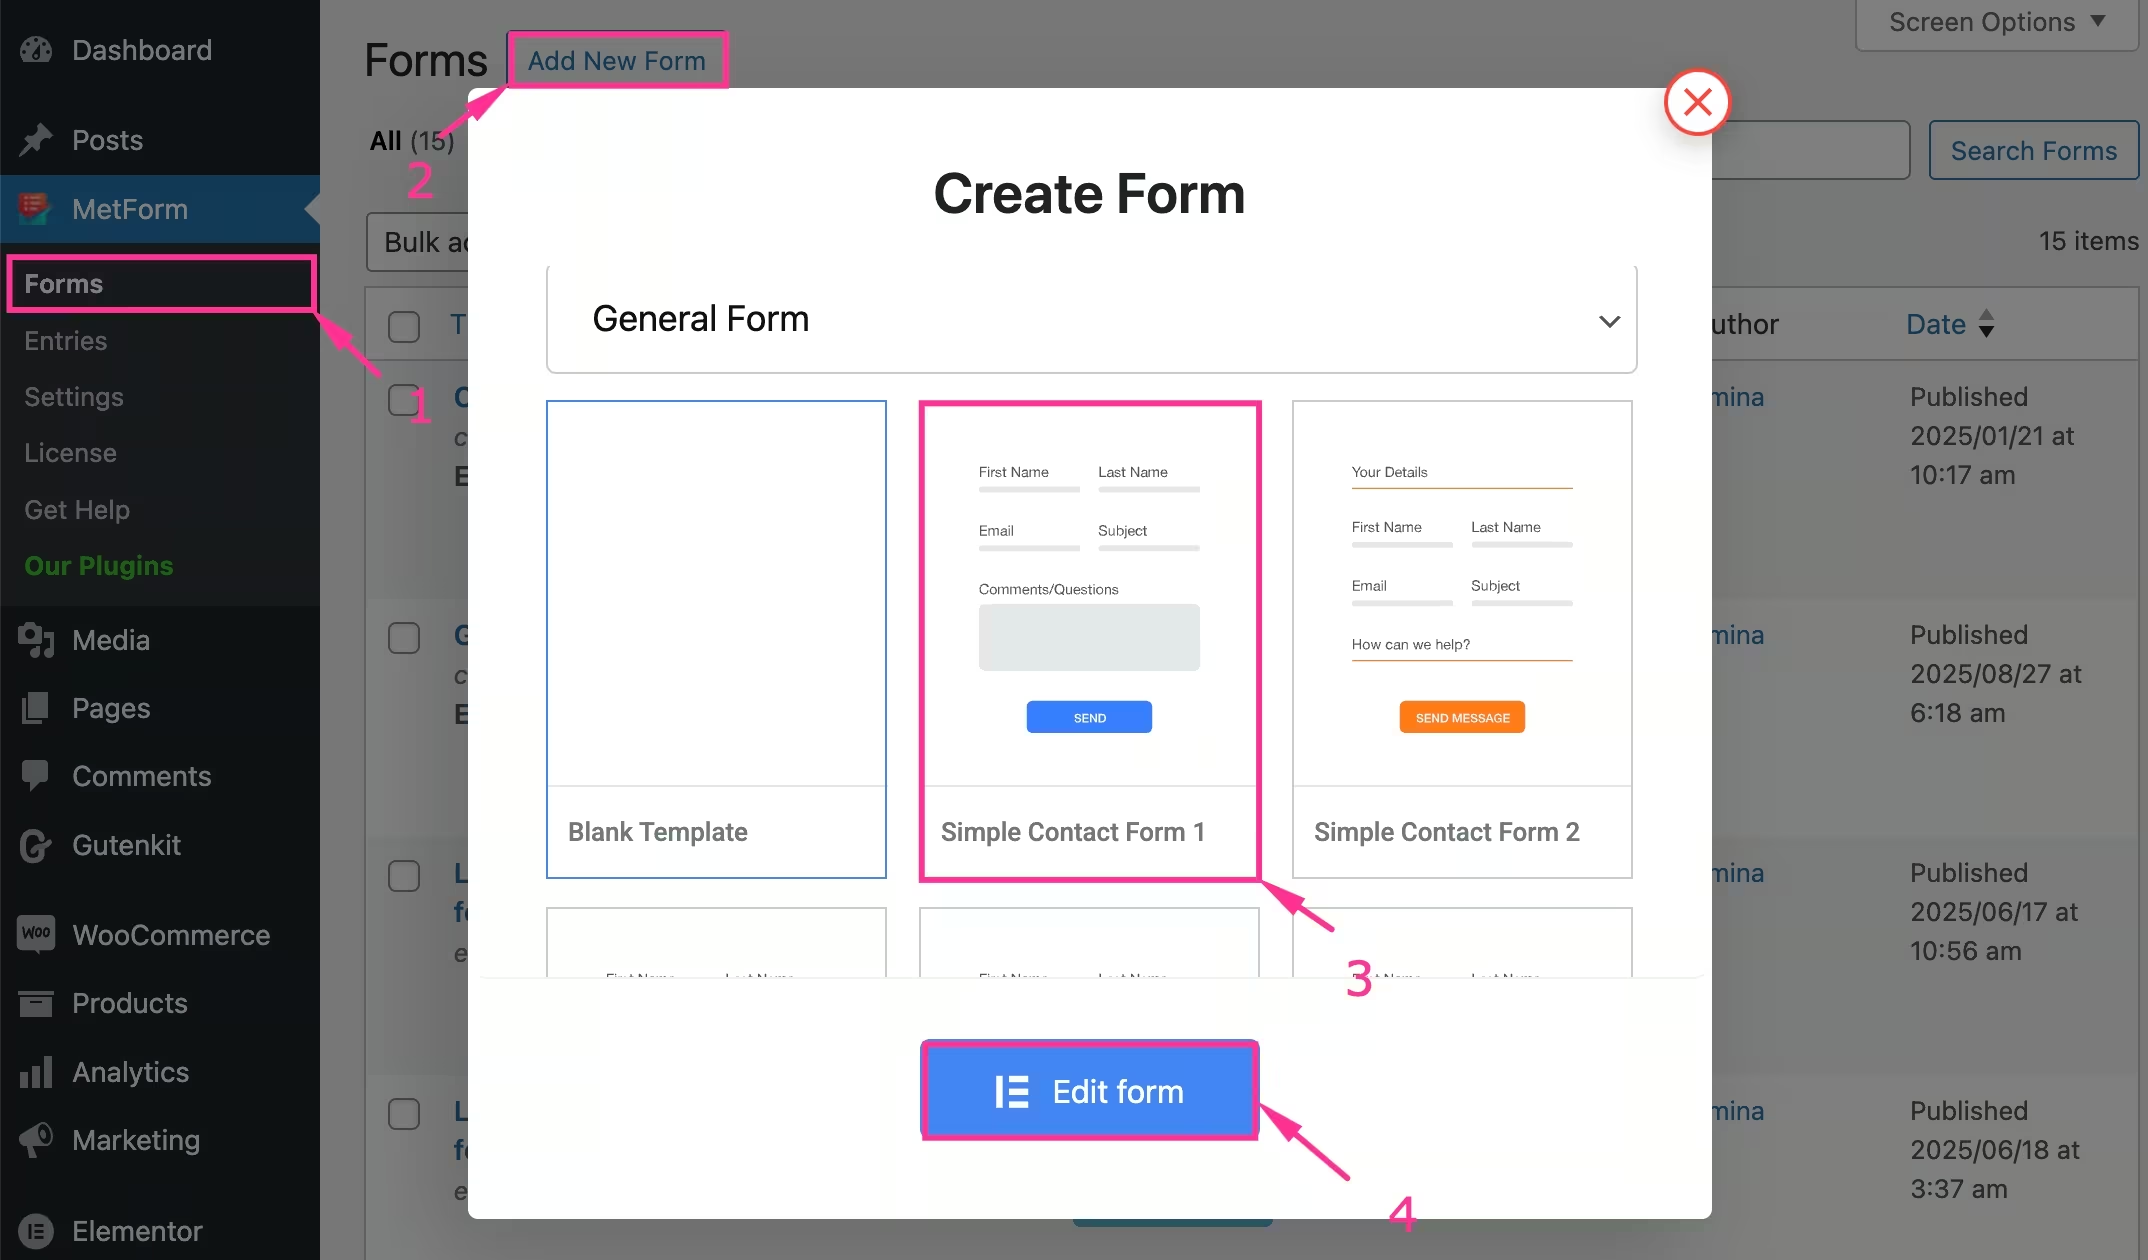
Step 1: Create a form with a template
First, you need to add a form with a pre-built template. You can also create one from scratch. For creating a form:
- 로 이동 MetForm → Forms.
- 다음을 클릭하세요. “Add New Form” 단추.
- 템플릿을 선택하세요.
- 누르세요 “양식 편집” 단추.
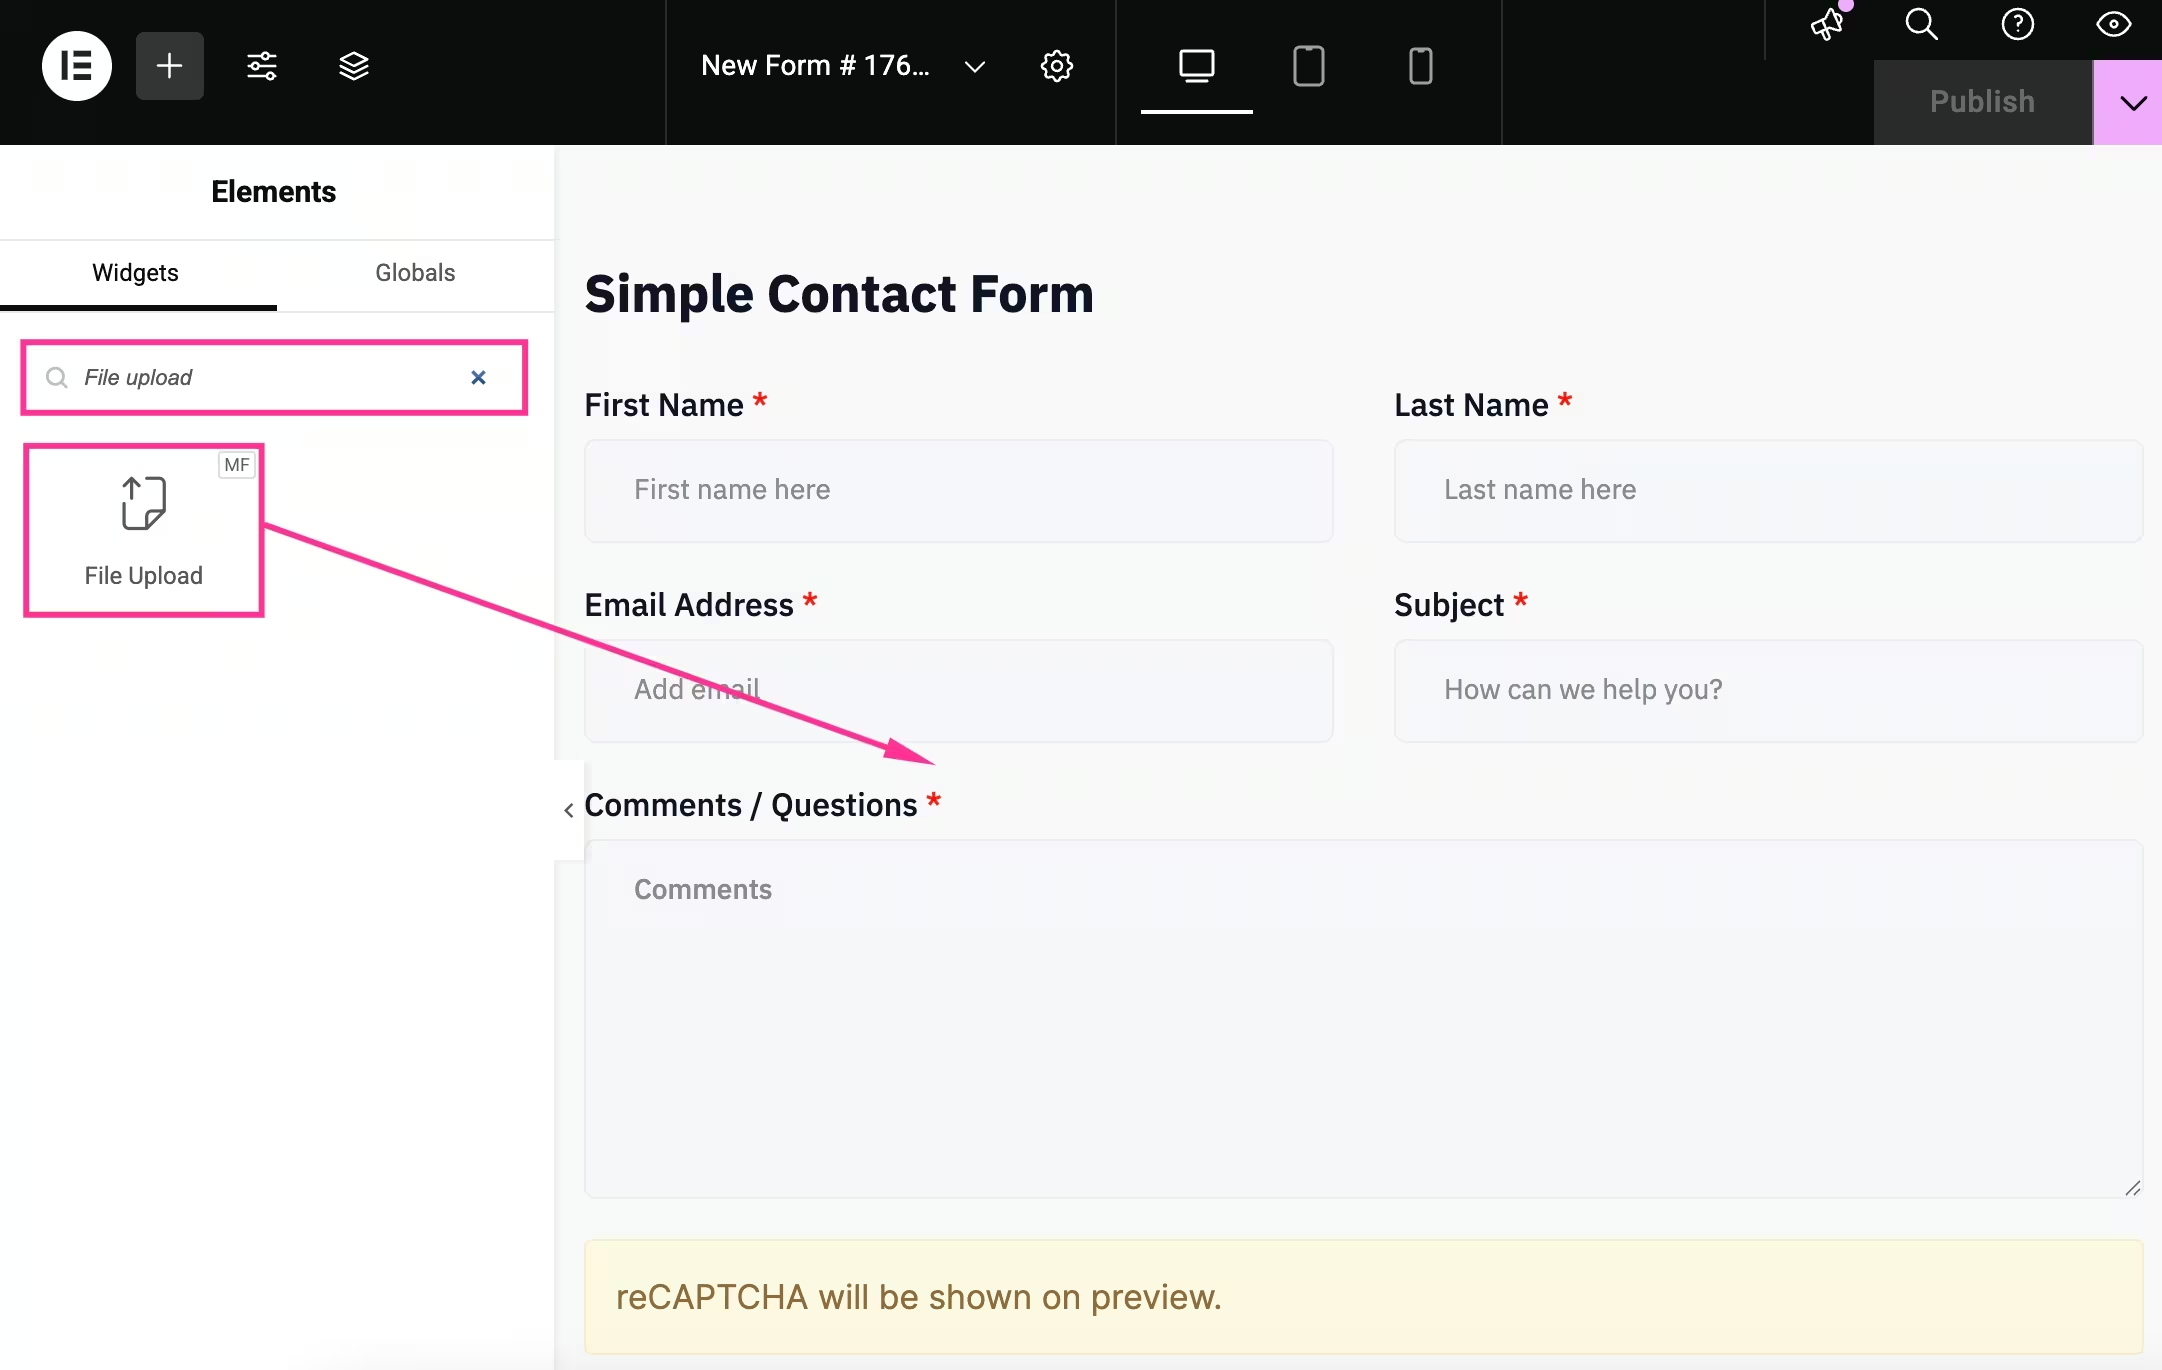
Step 2: Add file upload field
After redirecting to the Elementor editor, add a file upload field by:
- Searching for the “File upload” 필드.
- 첨가 it to the layout.
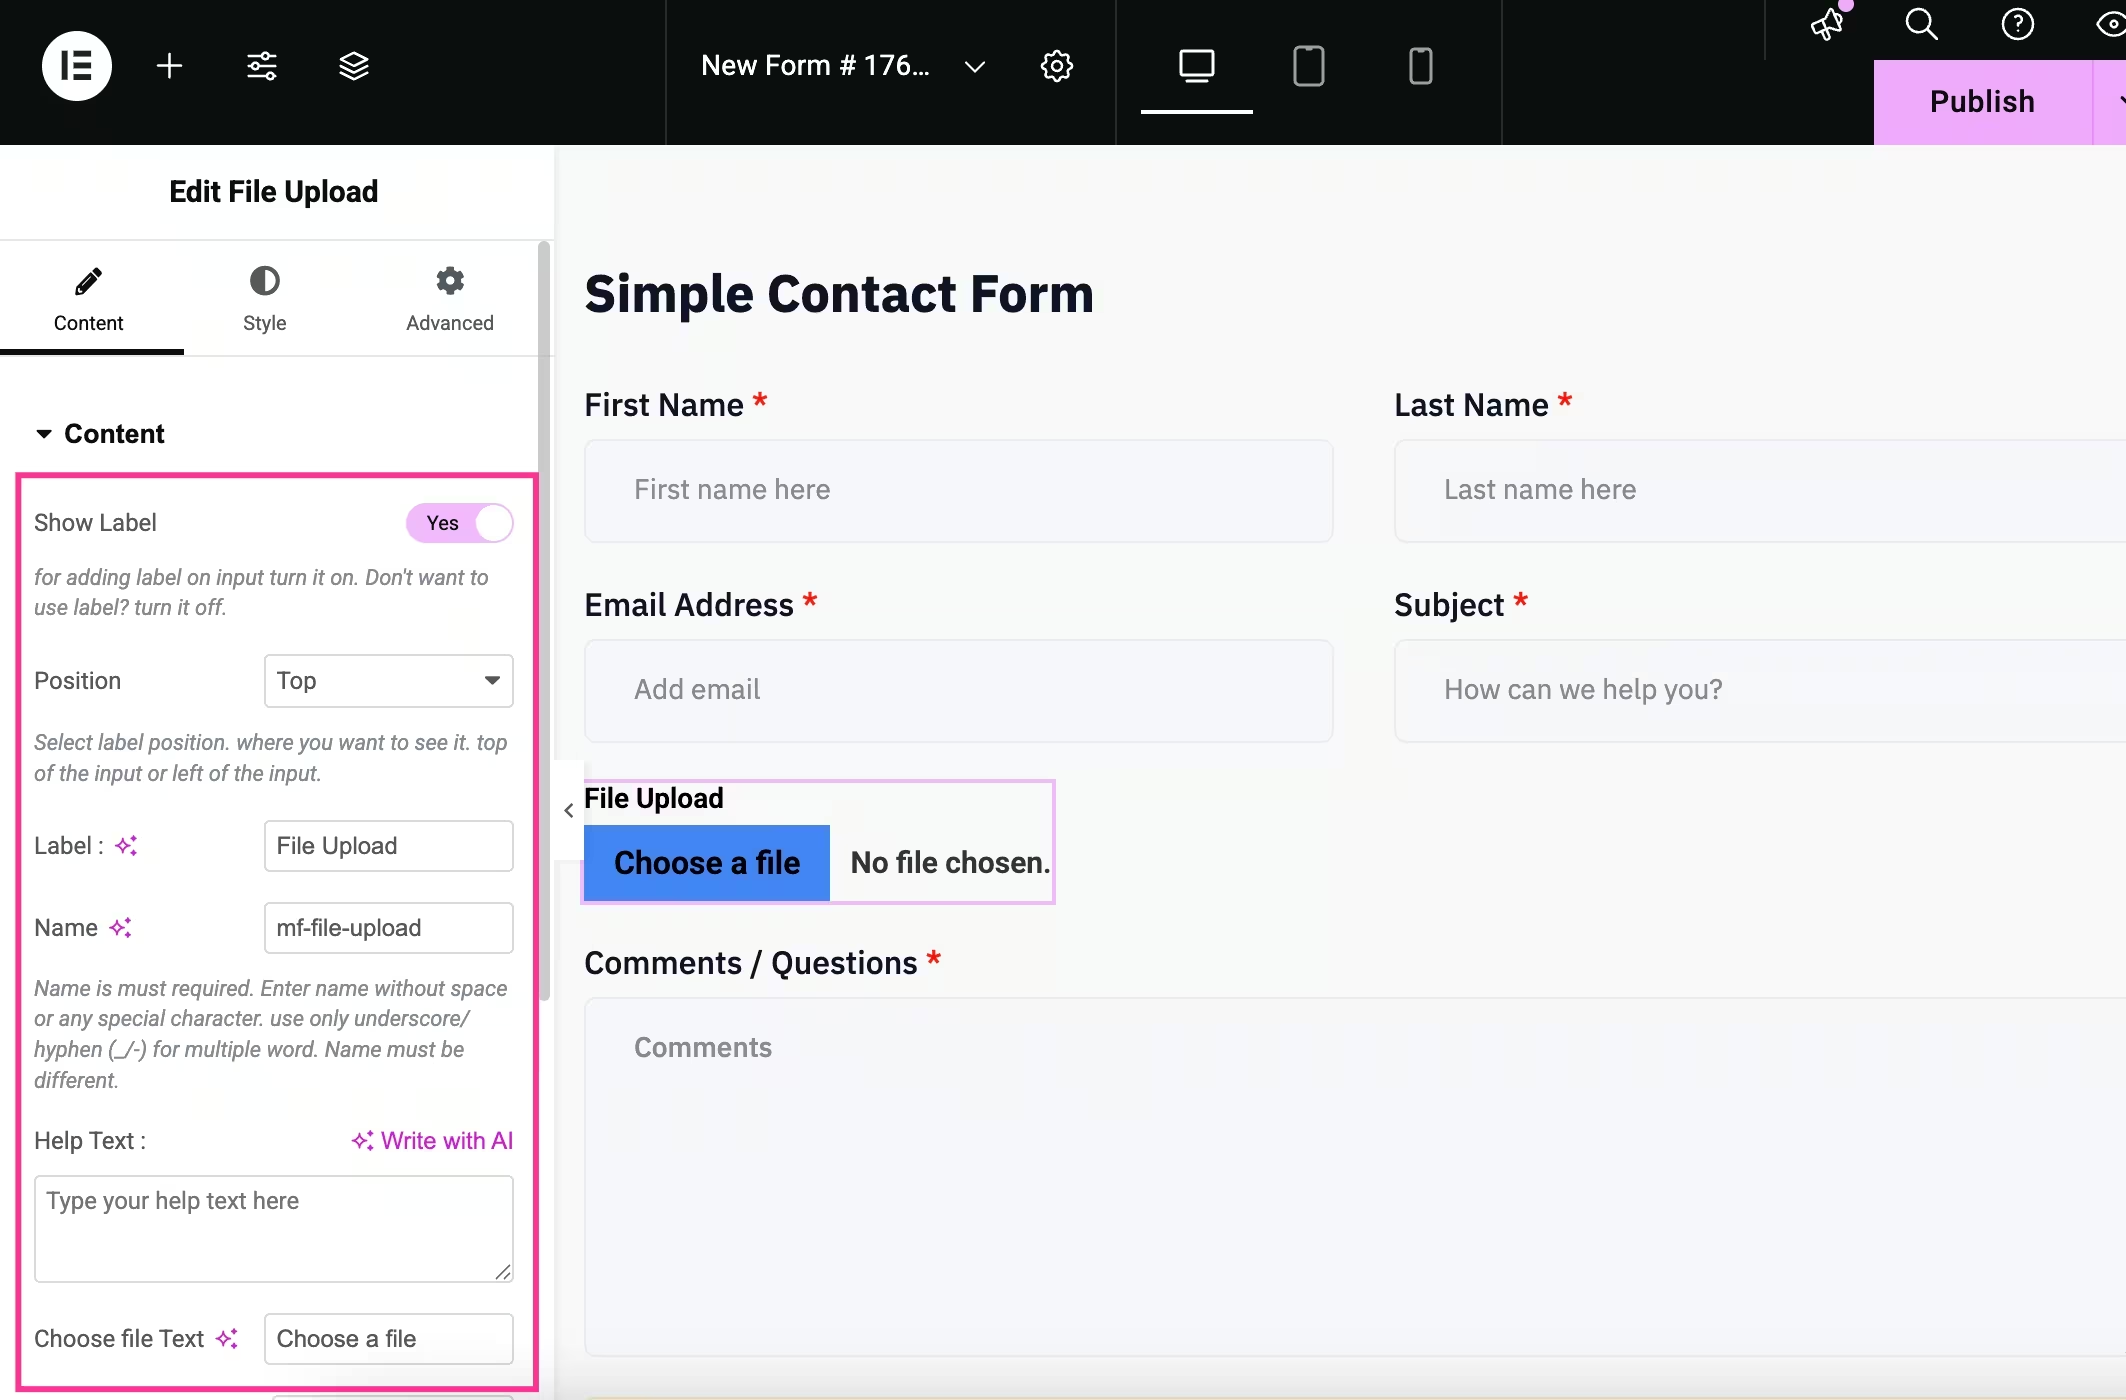
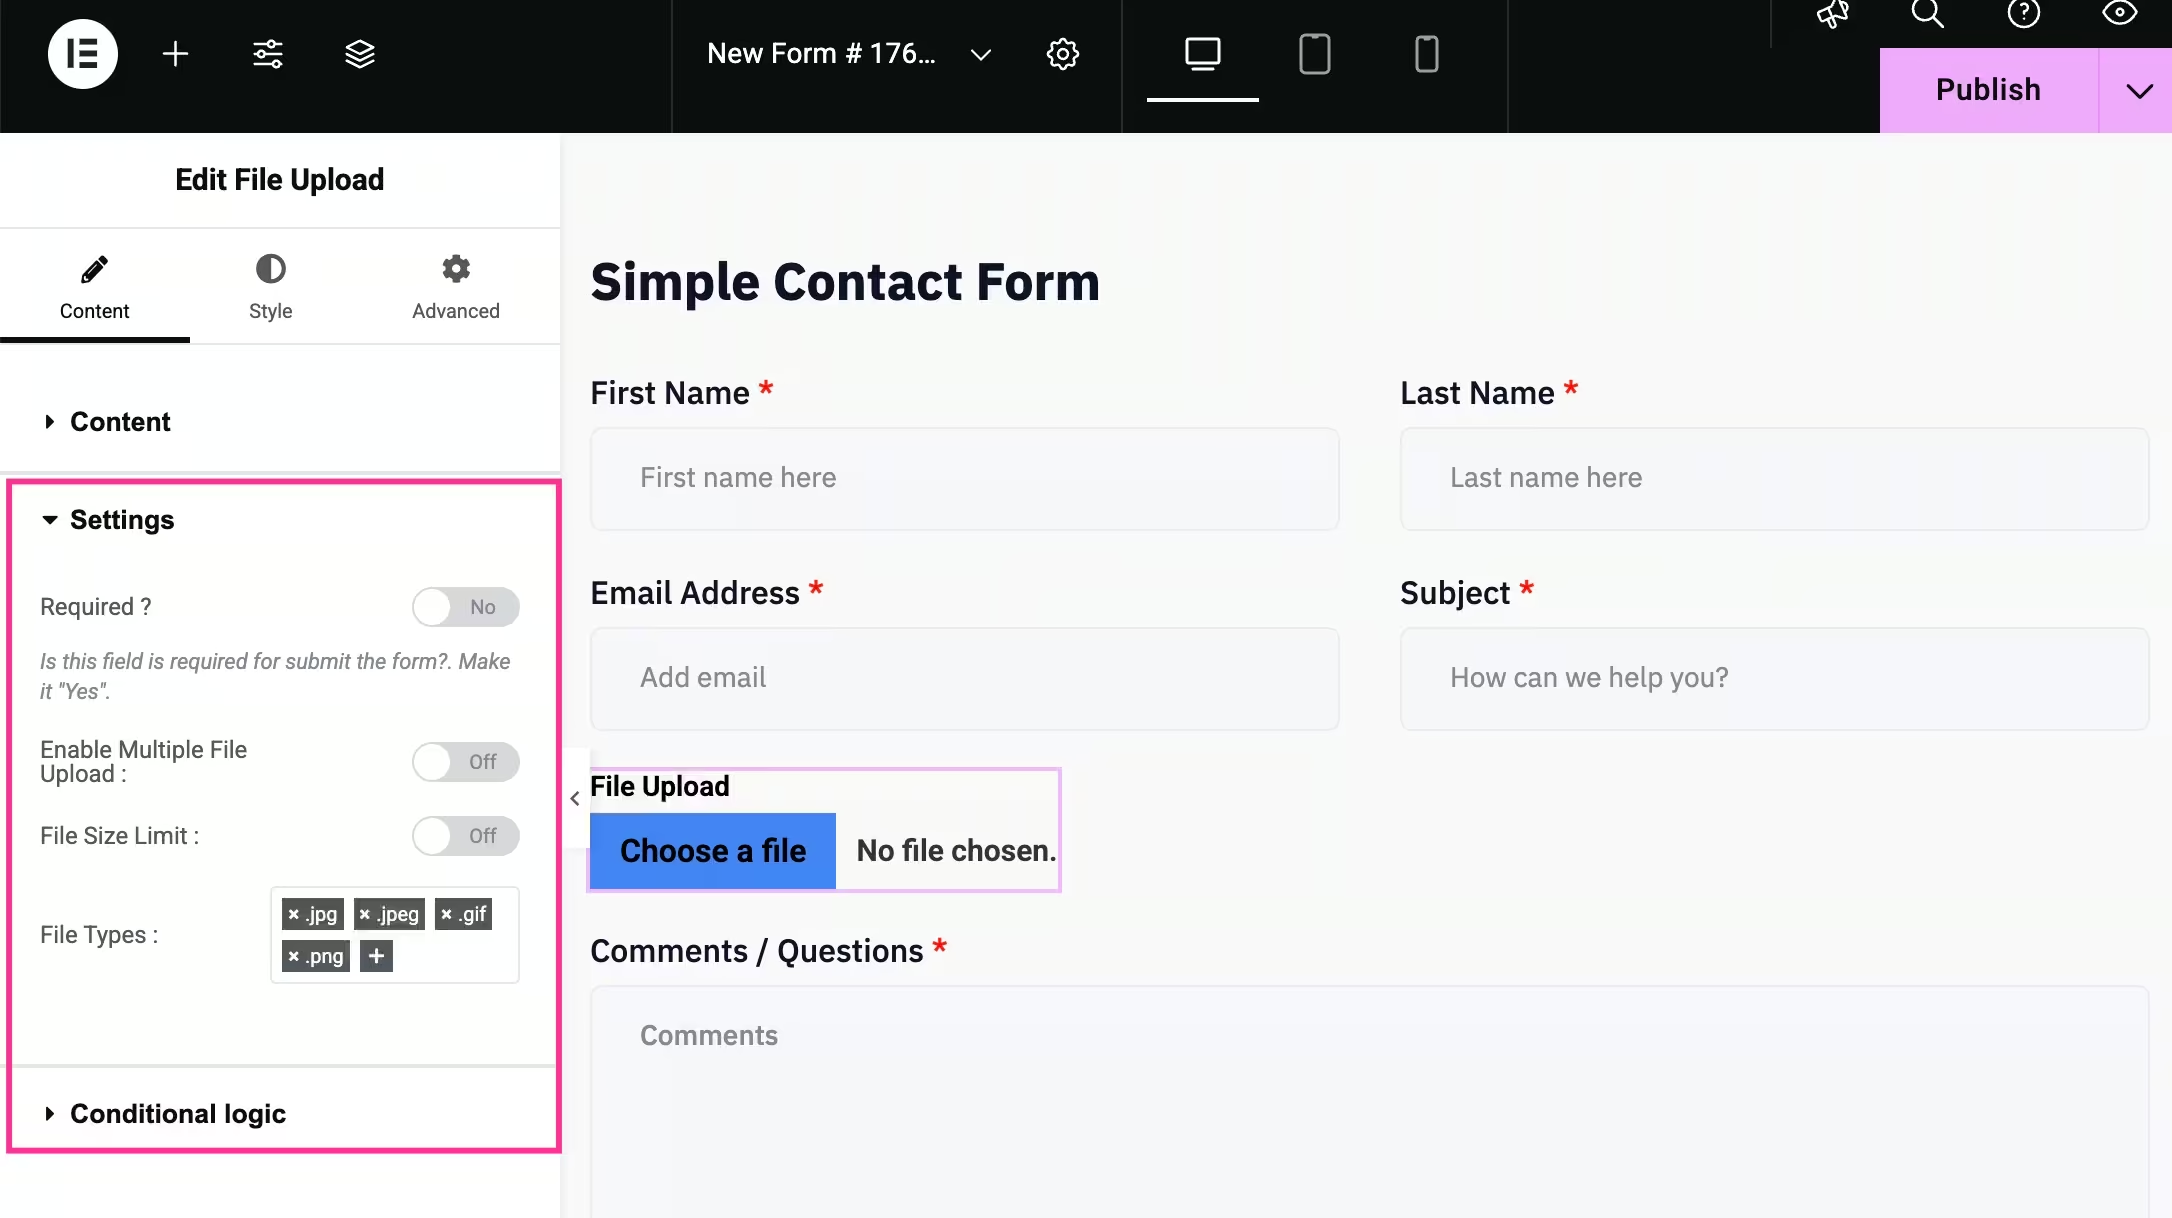
Step 3: Customize file upload form
In the third step, customize the file upload form according to your brand or desire. Here, navigate to the content tab and adjust:
- 라벨 표시: Enable it to show a label.
- 위치: Set label position.
- 상표: Enter label.
- 이름: Enter name for the label.
- 도움말 텍스트: Add help text for the file upload field.
- Choose File Text: Fill this field with file text.
- No File Chosen Text: Text for not selecting a file.
- File Upload Icon: Add an Icon for the file upload field.
Then, expand the settings tab and customize:
- 필수의: Enable making this field required.
- Enable Multiple File Upload: Turn on to let users upload multiple files.
- File Size Limit: Set file size limit.
- File Types: Enter file types that a user can upload.
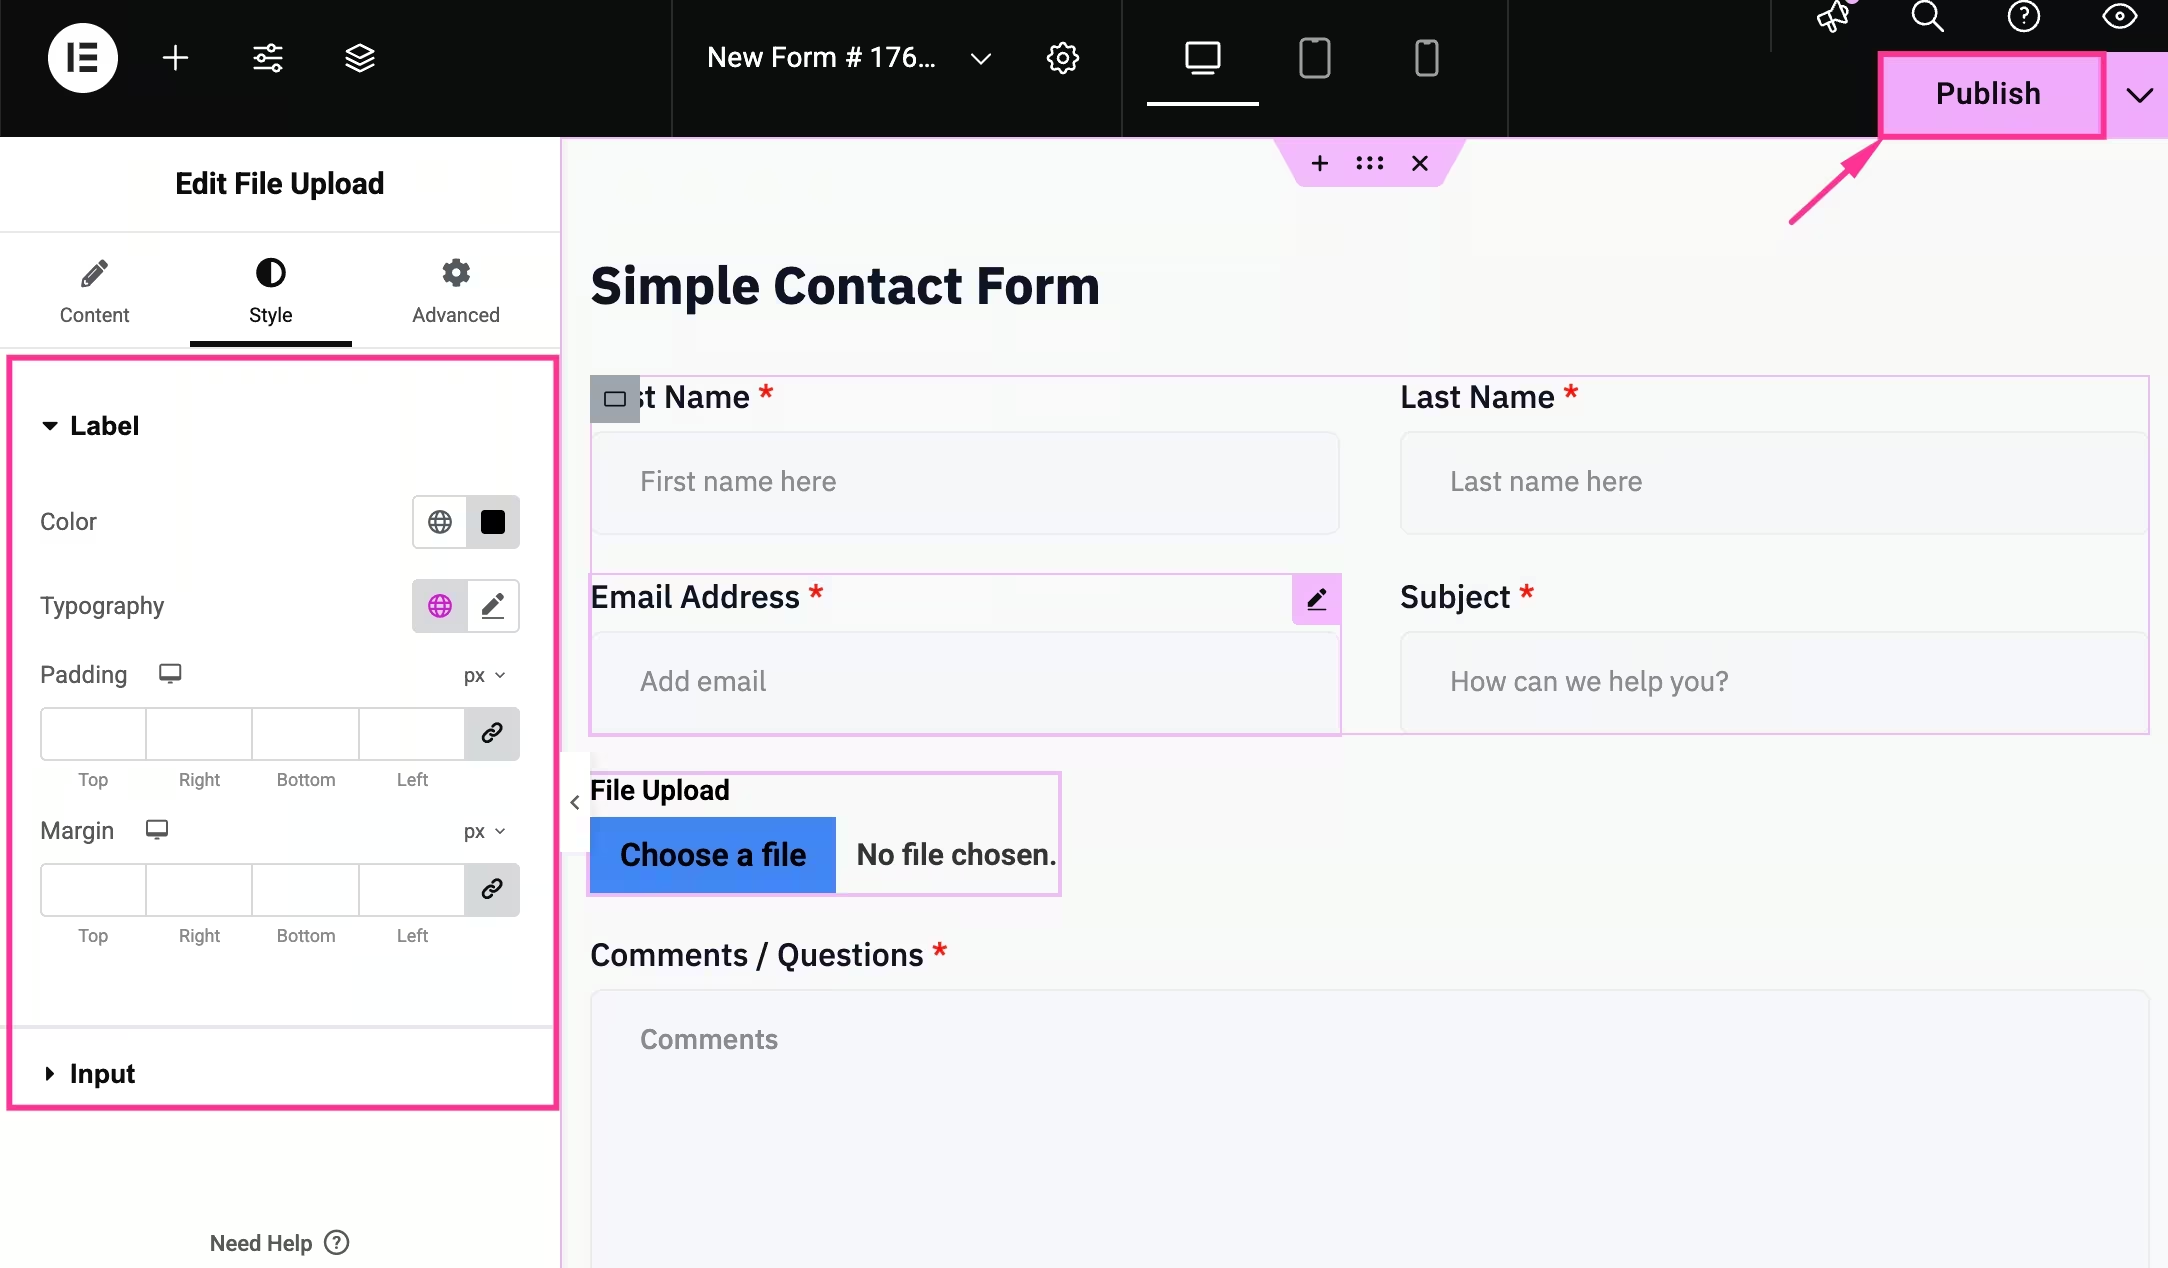
다음, 스타일 탭을 방문하세요 and adjust Color, Typography, Padding, Margin, Background Type, Border Type, Border Radius, etc. for the Label and Input fields. Also, customize other fields accordingly.
Finally, hit the “게시” button to make your file upload form live.

Share Dropbox file links directly in form
Creating a WordPress form with file upload becomes straightforward when you use a form builder that supports cloud storage integrations. In this guide, you will learn how to add a file upload option to your WordPress forms and automatically store submitted files in Dropbox or Google Drive.
Here are the steps you have to adopt to share Dropbox files in WordPress forms:
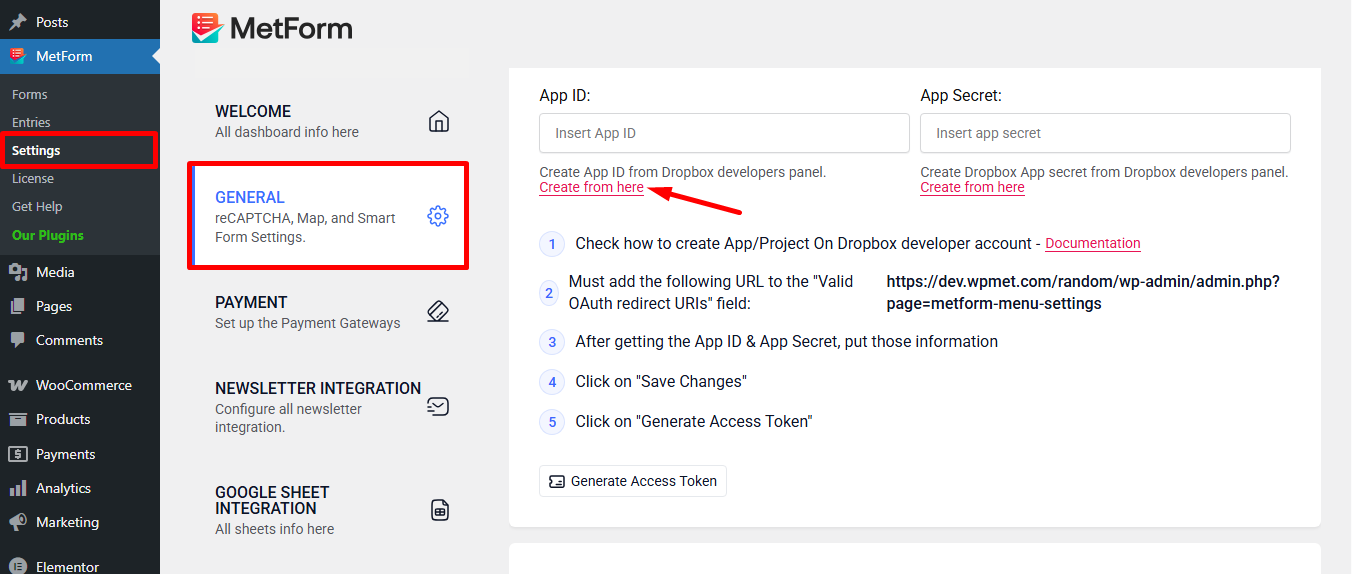
Step 1: Integrate with Dropbox
The first step you have to follow after installing and activating the WordPress file upload form builder, MetForm, is to integrate Dropbox with it. To add Dropbox to MetForm, you have to:
- 이동 MetForm → Settings → Integrations
- Connect and authorize your Dropbox account
- 완벽한 the integration setup
따라가다 Dropbox integration documentation for in-detail guide.
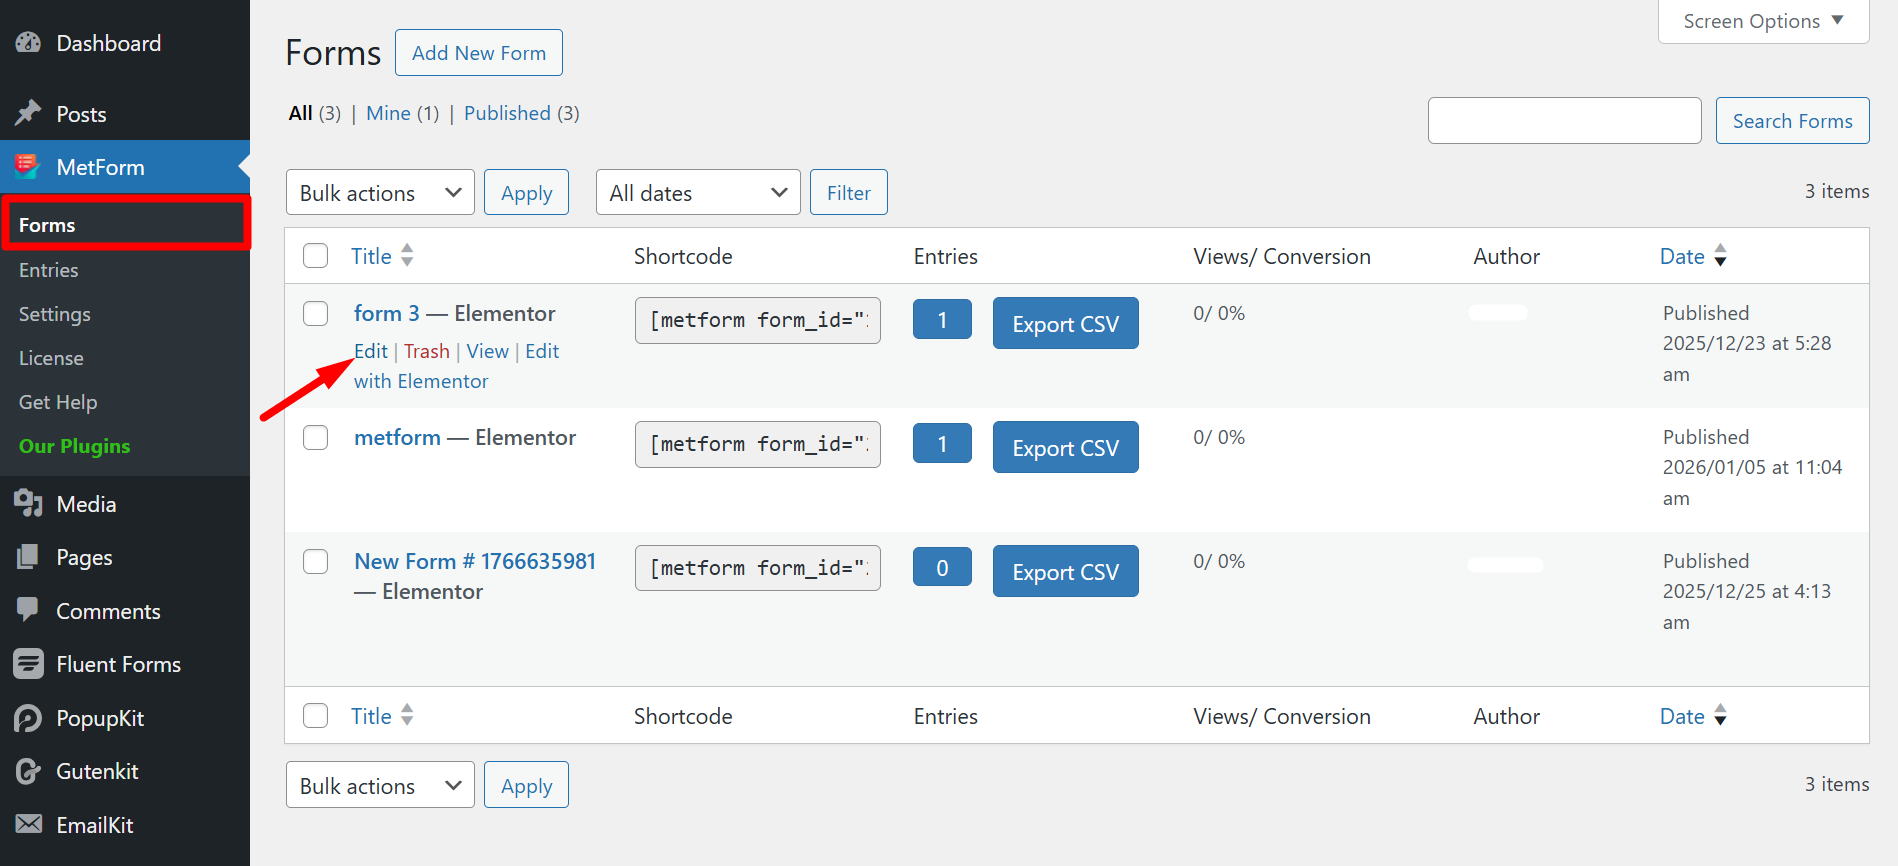
Step 2: Edit a form
Next to completing documentation, navigate to forms under MetForm and edit a form where you want to add a file upload field or option.
Step 3: Choose Dropbox folder
Now, you have to connect Dropbox by:
- Enabling the Dropbox toggle from the Integration tab.
- Reloading the Folder List.
- Selecting your desired folder from the dropdown menu.
- Scrolling down to “Edit Content”.
Step 4: Drag-and-drop file upload field
In this step, you have to drag and drop the File Upload field on the right side from the Widgets section .
마지막으로, press the “Update” or “Publish” button to integrate the file upload option in your WordPress form. Afterwards, upload to test whether the file upload form is working correctly.

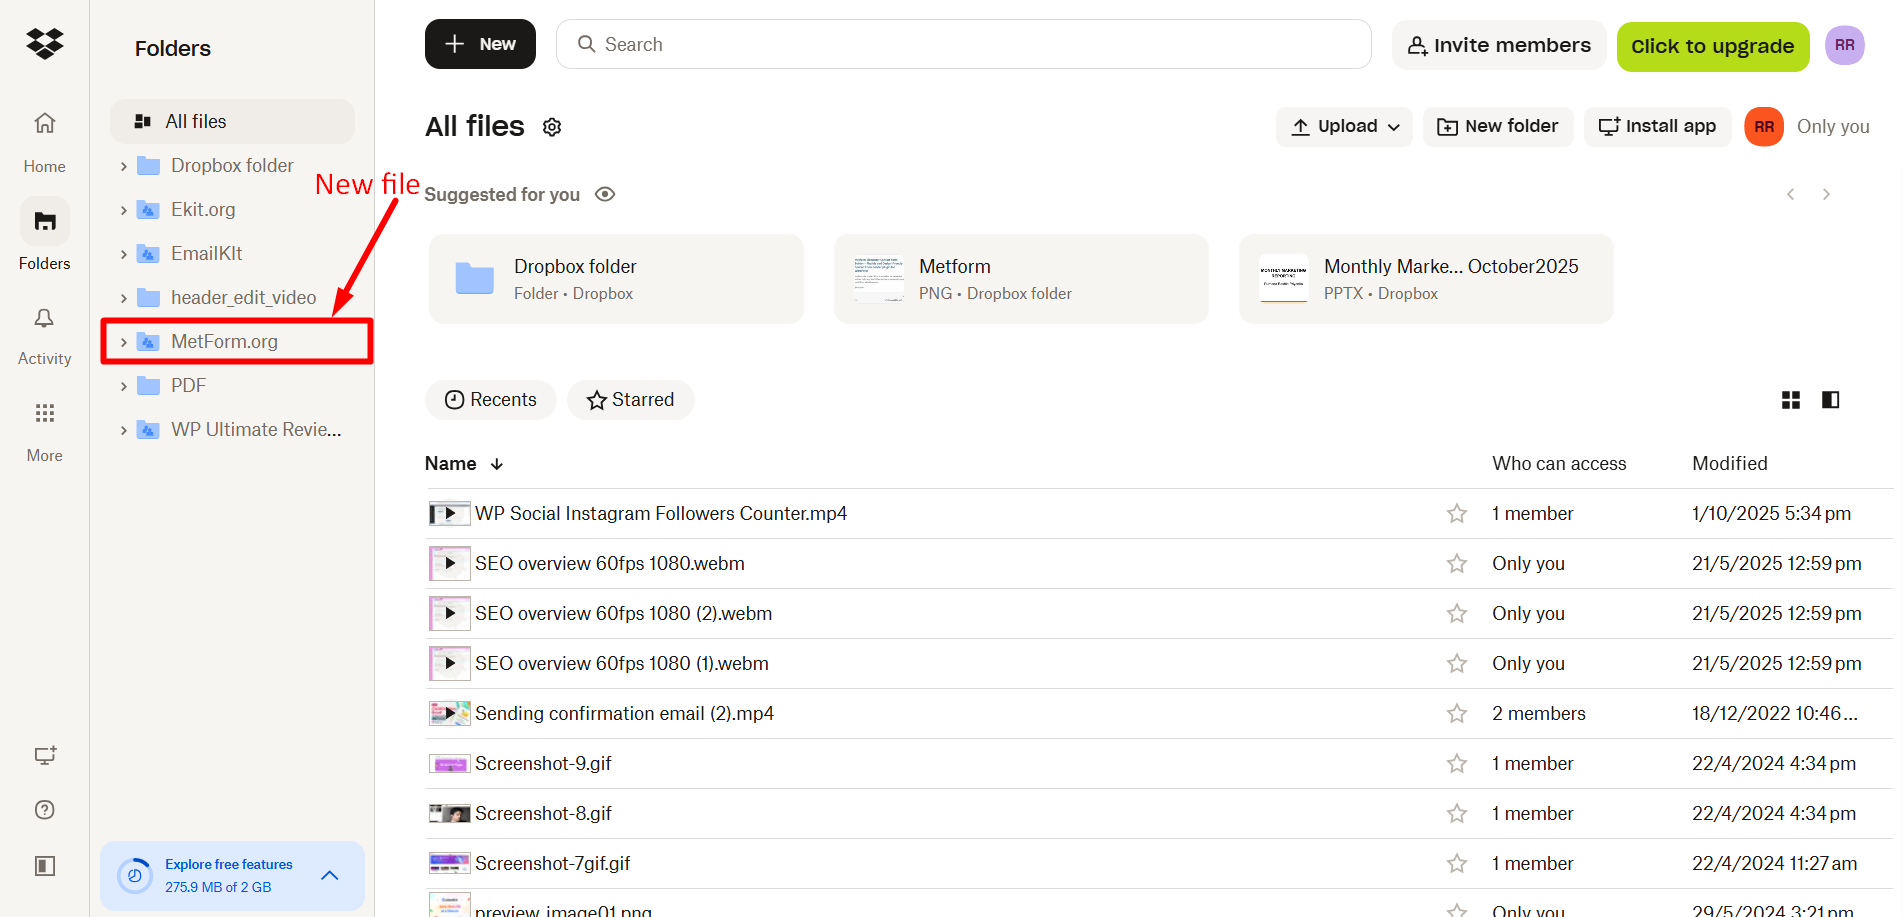
All the uploaded files will be stored in the selected folder of your Dropbox account.
File upload in WordPress forms with Google Drive
To enable file upload in WordPress forms with Google Drive, first integrate Google Drive from MetForm’s Settings, enable the Google Drive settings, and drag-and-drop the file upload field.
For a complete guide, follow the steps below to add a file upload in WordPress:
Step 1: Integrate with Google Drive
Similar to the Dropbox integration, you have to integrate Google Drive with WordPress by
- Visiting MetForm → Settings → Google Integration.
- Authenticating your Google account.
- Completing the Google Drive setup.
Follow the complete integration process from the MetForm Google Drive 선적 서류 비치.

Step 2: Edit Form
두 번째 단계에서는 다음을 수행해야 합니다. 양식을 편집하다 from the Forms tab where you want to add a file upload option. This will open up a popup from where you need to configure further settings.
Step 3: Enable Google Drive
세 번째 단계에서는, 통합 탭을 방문하세요 그리고 scroll down until you find “Google Drive”.
Then, go through the following configurations:
- Google Drive: Turn on the toggle button.
- Folder List: Reload the list.
- 이것은 업데이트 Google Drive.
- Scroll down and click the “Edit Content” 단추.
Step 4: Add file upload field
In this step, you have to add a “File Upload” field. Now, to add a file upload option:
- 찾다 for the “File Upload” widget.
- Drag-and-drop it on the right side.
- 사용자 정의 content such as Label, Position, Name, Help Text, etc.
- 조정하다 color, typography, padding, margin, etc for the Label and Input.
- Finally, hit the "업데이트" 또는 "게시" 단추.
Try adding WordPress file upload form with MetForm:
When using MetForm is the right choice (When it is not)
This is the best approach when:
- You want to collect files without stressing your server.
- You have to access files outside WordPress such as job applications, support forms, etc.
When to avoid this method:
- Setup needs real-time file processing.
- Advanced permission logic or strict compliance with local storage.
Using MetForm to upload files is more suitable and reliable than default WordPress uploads or email attachments.
What breaks after integration?
Here are the causes that fails file submission after implementation:
- Ignoring API permission can fail uploads after deployment.
- Email-based file submission works fine while testing, but breaks under the file size limit.
- Cloud storage reduces server load only when uploads bypass local media handling.
- Many users blame WordPress when the actual reason is OAuth misconfiguration.
How to secure file upload forms in WordPress
File upload forms must be secured to prevent malicious uploads, spam, and server misuse. Without proper restrictions, file uploads can become a serious security risk.
To secure file upload forms:
- Allow only specific file types (PDF, JPG, PNG, DOCX, etc.)
- 설정 maximum file size limit
- 차단하다 executable and script files
- 사용 spam protection (리캡차 또는 확인)
- Restrict who can access uploaded files
Common issues With WordPress file upload forms
Most file upload problems happen due to server limits or incorrect form settings, not WordPress itself.
Common issues include:
- File size exceeds server or PHP limits
- Upload fails without showing an error
- Files don’t appear in email notifications
- Unsupported file types are blocked automatically
- Hosting restrictions prevent uploads
In most cases, adjusting file size limits, allowed file types, or server configuration resolves the issue quickly.
자주 묻는 질문
Can users upload multiple files in one form?
Yes, users can upload multiple files in one form if the file upload field supports multi-file selection. You can enable this option and also control how many files a user is allowed to upload in a single submission.
Why does file upload work in testing but fail after live?
Due to expired token, OAuth misconfiguration, and file size limit, it can fail after going live. Because this issues won’t appear during real testing.
Should you store file upload in WordPress or cloud storage?
Uploading large files to cloud storage is more suitable than WordPress. The local storage in WordPress is appropriate for low-volume files or forms.
Are file upload forms safe?
File upload forms are safe when proper security measures are in place. Restricting file types, limiting file size, implementing anti-spam protection, and validating uploads significantly reduce risks.
What file types should be blocked?
You should always block executable and script-based files, such as .exe, .js, .php, .sh, and .bat. These file types can be used to run malicious code and should never be accepted through public forms.
Do file uploads affect site performance?
File uploads can affect site performance if large files are allowed without limits. Setting reasonable file size caps and avoiding unnecessary media uploads helps prevent storage overload and performance issues.
마무리
If your concern is securely collect files, manage submissions, reduce server load, then this guide is sufficient and you don’t need to look for another. However, this is not an optimal method if you need advanced file validation, conditional storage logic, and enterprise-level compliance control.
So, follow the method above if your goal matches the scenario. Also, apply basic security measures such as spam protection, validation, size limits to ensure safe and controlled uploads. This will help you to create reliable WordPress file upload forms with MetForm suitable for job applications, support requests, and other file-based submissions.

답글 남기기