


Managing a website often means dealing with endless repetitive tasks, but what if your site could manage itself? OpenClaw is an open-source AI agent that acts as your 24/7 autonomous assistant, executing real-world website updates through simple text commands.
In this guide, we will show you exactly how to connect OpenClaw to WordPress. Whether you prefer using a beginner-friendly MCP plugin or the native REST API, we’ll walk you through setting up your Linux server and putting your website administration completely on autopilot. Let’s dive in.
Quick Overview
Connecting OpenClaw to WordPress allows you to manage your website autonomously using an AI agent. You can establish this secure connection either through a beginner-friendly MCP plugin or directly via the native WordPress REST API.
Core Steps to Connect OpenClaw and WordPress:
✅ Server Setup – Install Node.js and the OpenClaw Gateway on a Linux VPS.
✅ Model Configuration – Connect an LLM API key (like Claude or Groq) to power the agent.
✅ Site Preparation – Generate a native Application Password or install an MCP plugin (like AI Engine) to open a secure connection.
✅ Skill Installation – Download the WordPress skill into your OpenClaw CLI (only required for the REST API route).
✅ Authentication – Provide your site credentials or MCP Bearer Token to OpenClaw to establish the link.
예: A WordPress site owner can use OpenClaw to autonomously audit outdated meta descriptions or moderate pending comments simply by sending a natural language text command.
Integrating OpenClaw with WordPress turns manual website administration into an automated, AI-driven workflow.
Prerequisites Before You Start
Before diving into the command line, make sure you have the following ready to go:
- A Linux Server (VPS): Ubuntu 22.04 or 24.04 works best for this setup.
- Administrative Access: You will need root access or a user with sudo privileges to install the necessary software.
- Server Resources: At least 2GB of RAM (though 4GB is recommended for smoother performance) and 10GB+ of available disk space.
- An Active WordPress Site: You must have Administrator access to the WordPress dashboard you want to automate. Ensure your site has “Pretty Permalinks” enabled (e.g., Post name format in Settings > Permalinks), as the API connection requires this to function.
- An LLM API Key: A free-tier API key from a provider like Google AI Studio or Groq to serve as your agent’s “brain” (we will configure this in Step 2).
How to Connect OpenClaw to WordPress
Ready to give your WordPress site an autonomous AI brain? The integration happens in two main phases: first, we give OpenClaw a place to live on a server, and second, we open a secure door to your WordPress database. Whether you prefer the native developer route or a beginner-friendly plugin, here is the complete step-by-step process.
Step 1: Set Up OpenClaw on Your Linux Server (VPS)
Before OpenClaw can manage your WordPress site, it needs a reliable home. A Linux Virtual Private Server (VPS) is the recommended environment to keep your AI agent online and executing tasks 24/7.
Here is the quick path to getting the OpenClaw Gateway running on a standard Linux environment:
- Install Node.js: Ensure your server is running Node 22 or higher, which is the officially recommended runtime for OpenClaw.
- Install OpenClaw: Run the following command in your server’s terminal to pull the latest version globally:
Bash
npm i -g openclaw@latest- Run the Onboarding Wizard: Initialize the setup and install the background daemon. This ensures OpenClaw stays awake even after you close your terminal:
Bash
openclaw onboard --install-daemon- Securely Connect to the Dashboard: For security, the OpenClaw dashboard shouldn’t be exposed to the public internet. From your local laptop (not the server), create a secure SSH tunnel:
Bash
ssh -N -L 18789:127.0.0.1:18789 your_user@your_server_ip- Log In: Open your web browser, navigate to http://127.0.0.1:18789/, and paste your gateway token to access your new OpenClaw dashboard.
메모: By using the –install-daemon flag, OpenClaw automatically sets up a systemd user service to keep the gateway running in the background.
Need a more advanced server setup? If you are configuring a shared server, want to use Docker, or need to dive deeper into custom systemd configurations, check out the full Official OpenClaw Linux Documentation.
Step 2: Configure Your AI Model and Insert Your API Key
OpenClaw is the engine, but it needs a “brain” to understand your commands. You will need to connect it to a Large Language Model (LLM). To keep this setup completely free, you have a couple of great options:
- Free-Tier APIs: Providers like Google (via Google AI Studio for the Gemini API) or Groq offer generous free tiers for developers. Simply sign up and generate an API key.
- Local Models (Ollama): If your Linux server has enough resources, you can install Ollama and run open-source models completely free and locally.
How to connect it:
- Log in to your OpenClaw dashboard (via the 127.0.0.1:18789 URL from Step 1).
- 다음으로 이동하세요. Models 또는 공급자 settings tab.
- Select your chosen provider (e.g., Google, OpenAI, Anthropic, or Local/Ollama).
- Paste your free API key into the designated field and save. Your agent is now awake and ready to process language.
Step 3: Prepare Your WordPress Site for AI Access
Now we need to open a secure door for the agent. Choose the method that best fits your comfort level.
Option 1: The Native REST API Method (Recommended).
Before OpenClaw can talk to WordPress natively, it needs a VIP pass. You should never give an AI your main admin password. Instead, WordPress has a built-in feature called Application Passwords specifically for this purpose.
- WordPress 관리자 대시보드에 로그인합니다.
- 이동 Users > Profile in the left-hand sidebar.
- Scroll down until you see the Application Passwords 부분.
- In the “New Application Password Name” field, type something recognizable, like OpenClaw Agent.
- 딸깍 하는 소리 Add New Application Password.
- WordPress will display a string of characters. Copy this password immediately and save it somewhere safe. WordPress will never show it to you again.
Option 2: The MCP Plugin Method (Beginner-Friendly)
If you prefer a visual UI to connect your site using the Model Context Protocol (MCP), you can use a free plugin.
- In your WordPress dashboard, navigate to 플러그인 > 새로 추가.
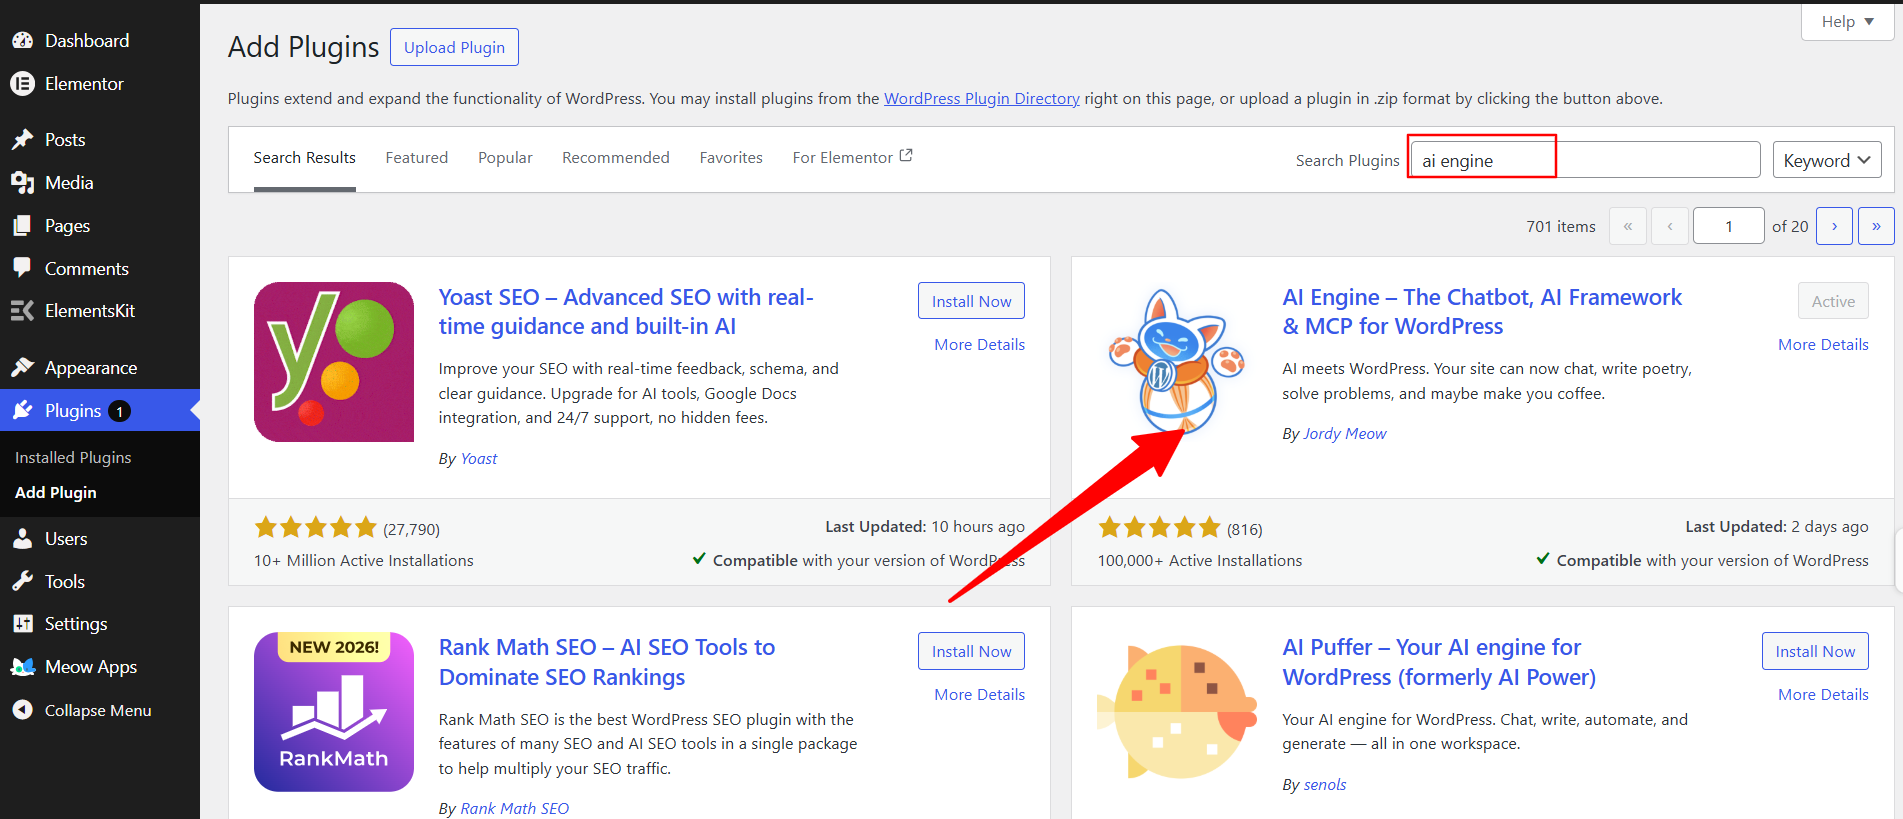
- 검색 AI 엔진 (by Jordy Meow) or download it directly from the WordPress plugin repository, then install and activate it.
- In your sidebar, go to Meow Apps > AI Engine > Settings > MCP.
- 토글 MCP Server switch to “Enabled.”
- Generate a Bearer Token. Copy both this secure token and your MCP Endpoint URL (which usually looks like https://yoursite.com/wp-json/mcp/v1/http) and save them.
Step 4: Install the WordPress Agent Skill (REST API Route Only)
If you chose Option 2 (the MCP Plugin Method) in the previous step, your plugin already handles this natively. You can skip directly to Step 5!
If you are using the native REST API (Option 1), you need to teach OpenClaw how to use WordPress by installing a “Skill.” Open your OpenClaw chat interface (WebChat, Telegram, or WhatsApp) and send this natural language command:
“Install the standard WordPress API skill from the official registry.”
Alternatively, run this in your Linux terminal:
Bash
clawhub install wordpress-api
OpenClaw will download the necessary functions to read posts, approve comments, and upload media, confirming when it is ready.
Step 5: Connect OpenClaw to Your WordPress Site & Authenticate
It is time for the final handshake. Open your OpenClaw chat interface and introduce the agent to your site based on the method you chose earlier.
If you used Option 1 (Native REST API): Send this prompt:
"I want to connect you to my WordPress site. The URL is [Insert Your Website URL]. Let's authenticate using the REST API."When OpenClaw asks for credentials, reply with:
"My username is [Your WP Username], and my application password is [Insert the Password from Step 3]."If you used Option 2 (MCP Plugin): Send this prompt:
"Add this as an MCP server with Bearer Token authentication. The URL is [Your MCP URL] and use this token: [Your Token]."The agent will securely store these credentials, run a quick ping to your site, and reply with a success message. The bridge is fully established!
Step 6: Test the Connection (Execute Your First Command)
Your autonomous WordPress assistant is officially online. To verify everything is working perfectly, let’s start with a safe, “read-only” command.
Copy and paste this prompt into your OpenClaw chat:
"Please check my WordPress site and list the titles of my 3 most recently published blog posts."If OpenClaw returns your latest posts, congratulations! You have successfully connected your AI agent to your CMS.
Once you feel comfortable, you can start handing off real administrative work. Try prompts like:
- “Check if I have any pending comments. If they appear to be spam, delete them. If they are genuine, approve them.”
- “Draft a 400-word blog post about the benefits of open-source AI, format it with H2 headings, and save it as a draft in WordPress.”
- “Review my latest published post and suggest three better SEO titles.”
Crucial WordPress Tasks You Can Automate Today with OpenClaw
Now that OpenClaw is successfully hooked up to your site, it is time to put it to work. Treating OpenClaw like a basic chatbot is a massive waste of its potential. If you set it up correctly, it operates as a full-time, autonomous content editor and site manager.
Here are some of the highest-value workflows you can hand off right now:
- The “Raw-to-Published” Content Editor: Stop writing directly in the WordPress editor. You can feed OpenClaw a rough brain-dump, a voice note transcript, or bullet points, and tell it:
"Turn this text into a properly formatted WordPress draft. Add H2 and H3 tags, fix any grammatical errors, write a 150-character meta description, and save it as a draft."- Managing Page Content & Promotional Assets: If you are managing campaigns, you can instruct OpenClaw to draft copy specifically tailored for the tools you use. For instance, you can ask it to generate high-converting copy for a new exit-intent campaign, or ask it to structure a content outline perfectly suited for your blog.
- Automated SEO Audits: Give your agent a prompt like:
"Scan my 5 most recent posts. Identify any images missing Alt text and generate descriptive Alt tags for them based on the surrounding context. Also, flag any posts where the SEO title is longer than 60 characters."Comment Moderation on Autopilot: Instead of logging into the WP dashboard daily to sift through spam, simply message your agent on Telegram or your terminal:
"Review all pending WordPress comments from the last 24 hours. Trash the obvious spam, and give me a summary of the legitimate ones so I can decide if we should approve them."Instant Content Repurposing: Maximize the lifespan of your articles by telling OpenClaw
"Read my latest published blog post, extract the three most controversial or interesting points, and format them as a thread for X (Twitter). Return the text to me here in the chat."Security Best Practices for AI-Managed WordPress
Giving an AI agent read/write access to your server requires strict security hygiene.
- Never Use Your Admin Password: Always use Application Passwords (Method 2) or Bearer Tokens (Method 1). These can be instantly revoked with one click if you suspect your OpenClaw instance has been compromised.
- Audit Third-Party Skills: Treat downloaded OpenClaw skills like untrusted code. Read the SKILL.md file before installing to ensure the agent isn’t requesting dangerous permissions.
- Isolate Your Network: Never expose your OpenClaw admin panel to the public internet. Access your OpenClaw dashboard only through an SSH tunnel or a secure VPN like Tailscale.
- Enforce HTTPS: Application Passwords rely on Basic Authentication. Ensure your WordPress site has a valid SSL certificate to prevent credentials from being intercepted in transit.
FAQs About OpenClaw and WordPress
Is OpenClaw free to use?
Do I need to know how to code to set this up?
Can OpenClaw break my website?
Which AI model works best for managing WordPress?
Can OpenClaw interact with my custom post types?
Can I manage multiple WordPress sites with one OpenClaw instance?
Is it safe to give an AI my WooCommerce data?
마무리!
Connecting OpenClaw to WordPress fundamentally changes how you interact with your website. By shifting from a manual “point-and-click” workflow to an autonomous “command-and-execute” system, you are eliminating hours of repetitive administrative drag.
Whether you chose the native REST API route for maximum control or the MCP plugin method for a visual setup, you now have a 24/7 digital assistant standing by. Use your newly freed-up time to focus on the things that actually drive revenue and elevate your brand, like crafting high-end web designs, building bespoke Gutenberg experiences, or optimizing your Elementor landing pages for maximum conversions.
The days of doing it all yourself are over. Your AI agent is online and ready for its first assignment.
답글 남기기