Gutenberg 블록 편집기로 매력적인 제목을 만들고 싶으신가요? 기본 제목 블록으로는 할 일이 많지 않습니다. 그러나 광범위한 기능을 갖춘 GutenKit 제목 블록을 사용할 수 있습니다.
자막, 제목 설명, 그림자 텍스트, 구분 기호, 초점이 맞춰진 제목을 추가할 수 있습니다. 또한 이 블록을 사용하면 사용자 지정을 완벽하게 제어할 수 있습니다.
따라서 페이지나 게시물에 대한 스타일리시한 제목을 만들게 될 것입니다. 블록 편집기 내에서 GutenKit 제목 블록을 사용하는 방법을 살펴보겠습니다.
GutenKit 헤딩 블록을 어떻게 사용하나요? #
GutenKit 제목 블록의 사용법을 알아보려면 아래 단계를 따르세요.
1단계: GutenKit 제목 블록 추가 #
- 당신은 다음을 가져야 합니다. 구텐킷 플러그인이 설치되었습니다.
- 그런 다음 페이지나 게시물을 추가하고 블록 편집기를 사용하세요.
- “를 찾으세요.+편집기 화면 상단에 있는 ”아이콘을 클릭하세요.
- 클릭하면 블록 메뉴가 나타납니다.
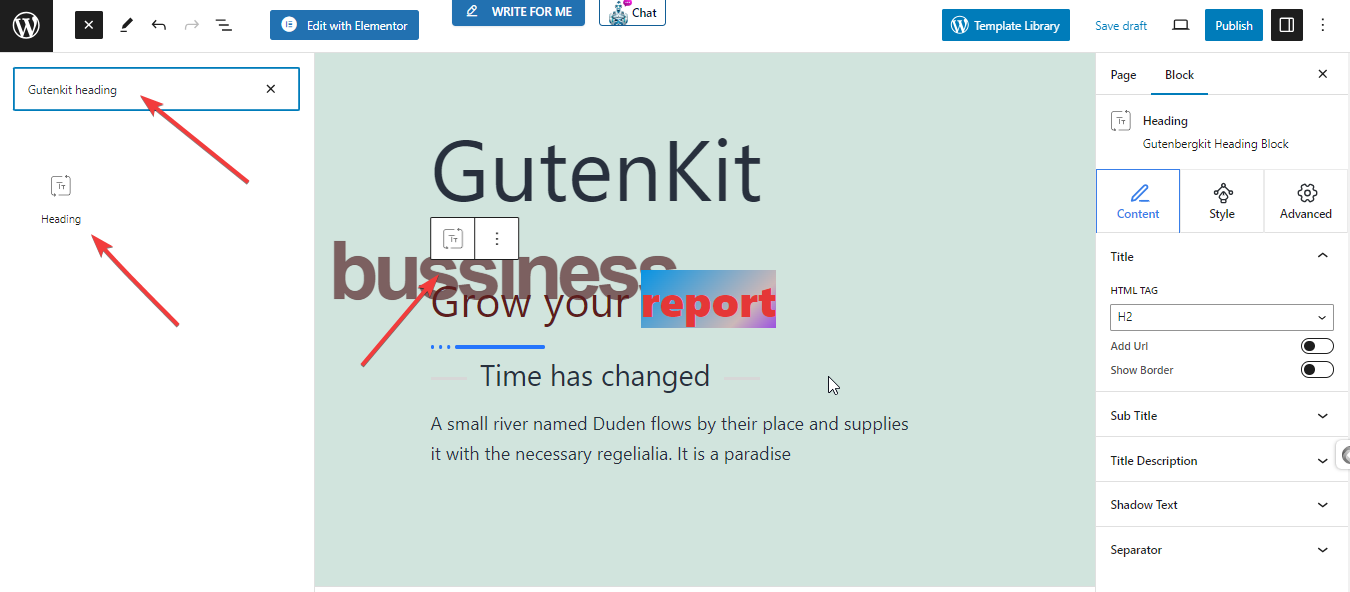
- "를 넣어GutenKit 헤딩검색창에 "를 입력하세요.
- 해당 내용을 클릭하거나 끌어서 편집기 화면으로 놓으세요.
GutenKit 제목 블록이 화면에 나타나면 클릭하세요. 블록 설정이 오른쪽 사이드바에 열리고 결합됩니다. 콘텐츠, 스타일, & 고급의 탭. 콘텐츠 탭을 사용하면 제목, 부제, 설명, 구분 기호 등을 추가하는 데 도움이 됩니다.
2단계: 제목 및 부제목 입력 #
콘텐츠 탭에서:
제목: 편집기 화면에서 제목을 직접 입력할 수 있습니다.
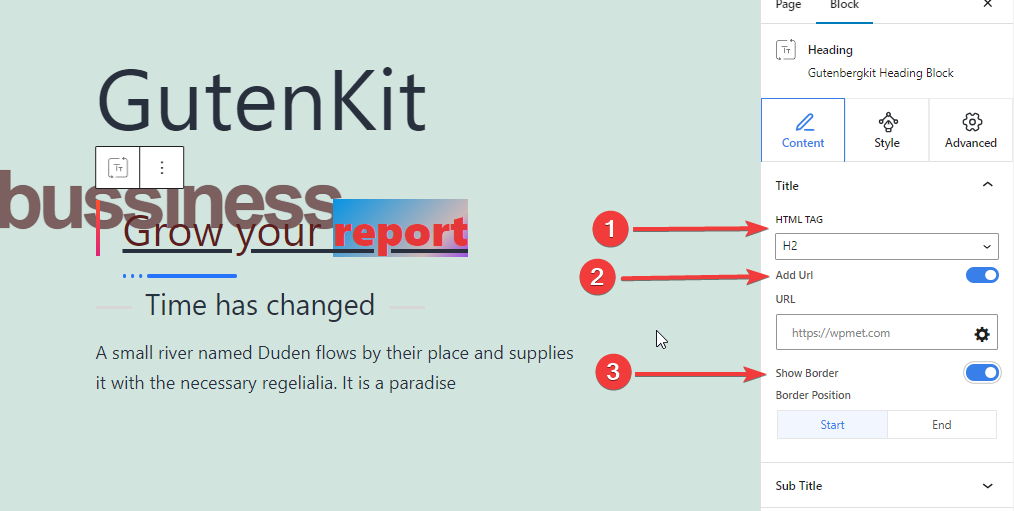
- HTML 태그: 제목의 HTML 태그를 H1- H6, Div, Span 또는 P로 정의합니다.
- URL: 이 버튼을 토글하면 제목에 링크가 추가됩니다.
- 테두리 표시: 이 버튼을 활성화하면 테두리가 표시됩니다.
- 테두리 위치: 테두리를 제목의 시작이나 끝으로 설정합니다.
부제목: 여기에서 부제를 추가합니다.
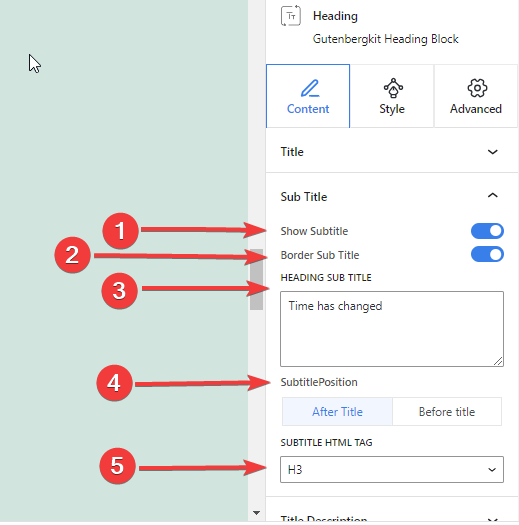
- 자막 표시: 자막을 입력하려면 토글 버튼을 클릭하세요.
- 테두리 자막: 자막에 테두리를 추가하려면 이 버튼을 토글합니다.
- 제목 부제: 이 상자에 자막을 입력하세요.
- 자막 위치: 제목 앞이나 뒤에 부제를 표시합니다.
- 자막 HTML 태그: 자막 제목의 태그를 (H1- H6, Div, Span 또는 P)로 결정합니다.
3단계: 제목 설명, 그림자 텍스트 및 구분 기호 추가 #
제목 설명: 이 기능을 사용하면 제목 설명을 추가하는 것을 제어할 수 있습니다.
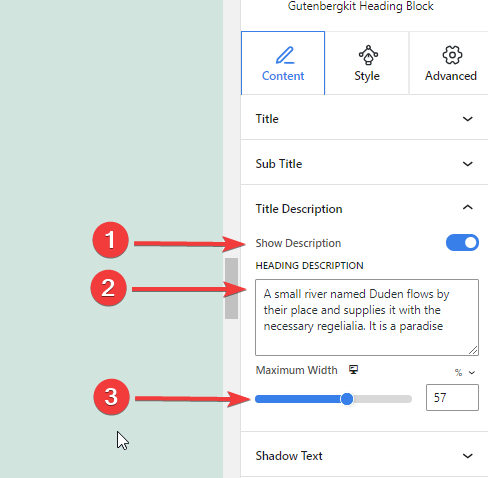
- 설명 표시: 이 버튼을 클릭하면 제목 설명을 삽입할 수 있습니다.
- 제목 설명: 여기에 제목 설명을 입력하세요.
- 최대 너비: 제목 설명의 너비를 정의합니다.
그림자 텍스트: 제목에 아름다운 텍스트 그림자를 적용하세요.
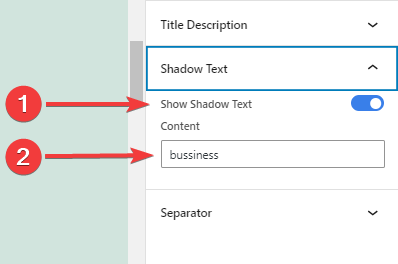
- 그림자 텍스트 표시: 이 버튼을 토글하면 그림자 텍스트 기능이 활성화됩니다.
- 콘텐츠: 그림자 텍스트로 표시하려는 콘텐츠를 추가합니다.
분리 기호:
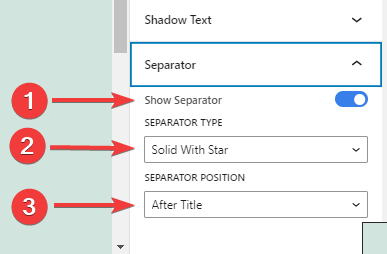
- 구분 기호 표시: 구분 기호를 추가하려면 이 버튼을 활성화하세요.
- 분리기 유형: 4가지 구분선 유형 중에서 선택하세요.
- 분리기 위치: 구분선을 넣을 위치를 선택하세요.
4단계: 제목 제목 정렬 #
로부터 스타일 탭, 아래에 오세요 일반적인 설정:
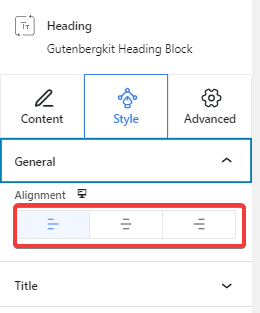
- 조정: 제목 스타일을 왼쪽, 가운데, 오른쪽으로 정렬하세요.
5단계: 제목 제목 스타일 지정 #
다음 기능은 제목의 스타일을 지정하는 데 도움이 됩니다.
제목 #
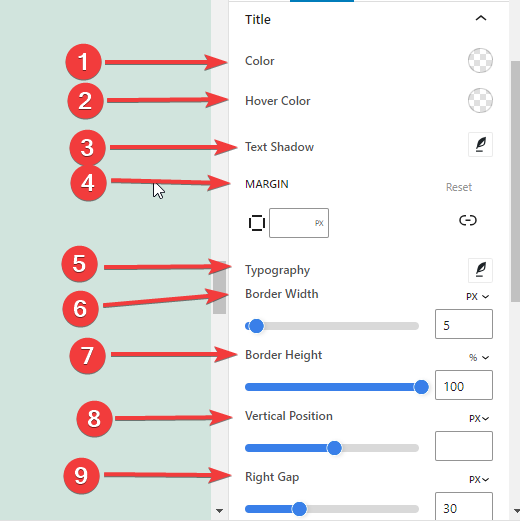
- 색상: 제목에 색상을 지정하세요.
- 호버 색상: 마우스를 올렸을 때 제목의 색상을 설정합니다.
- 텍스트 그림자: 제목 텍스트에 그림자 효과를 추가합니다.
- 여유: 제목 디자인의 여백을 조정하세요.
- 타이포그래피: 여기에서 글꼴 패밀리, 크기, 굵기, 변형, 스타일, 장식, 줄 높이, 줄 간격, 단어 간격 등 모든 인쇄 설정을 제어할 수 있습니다.
- 테두리 너비: 제목 테두리의 너비를 설정합니다.
- 테두리 높이: 제목 테두리의 높이를 입력하세요.
- 수직 위치: 테두리의 수직 위치를 조정합니다.
- 오른쪽/왼쪽 간격: 제목과 테두리 사이의 간격을 정의합니다.
*참고하세요 처음에 테두리를 표시하는 경우 오른쪽 간격을 설정해야 합니다. 그리고 끝에 테두리를 표시하는 동안 왼쪽 간격을 정의해야 합니다.
- 테두리 색상: 테두리의 색상을 선택하세요.
6단계: 포커스 제목 만들기 #
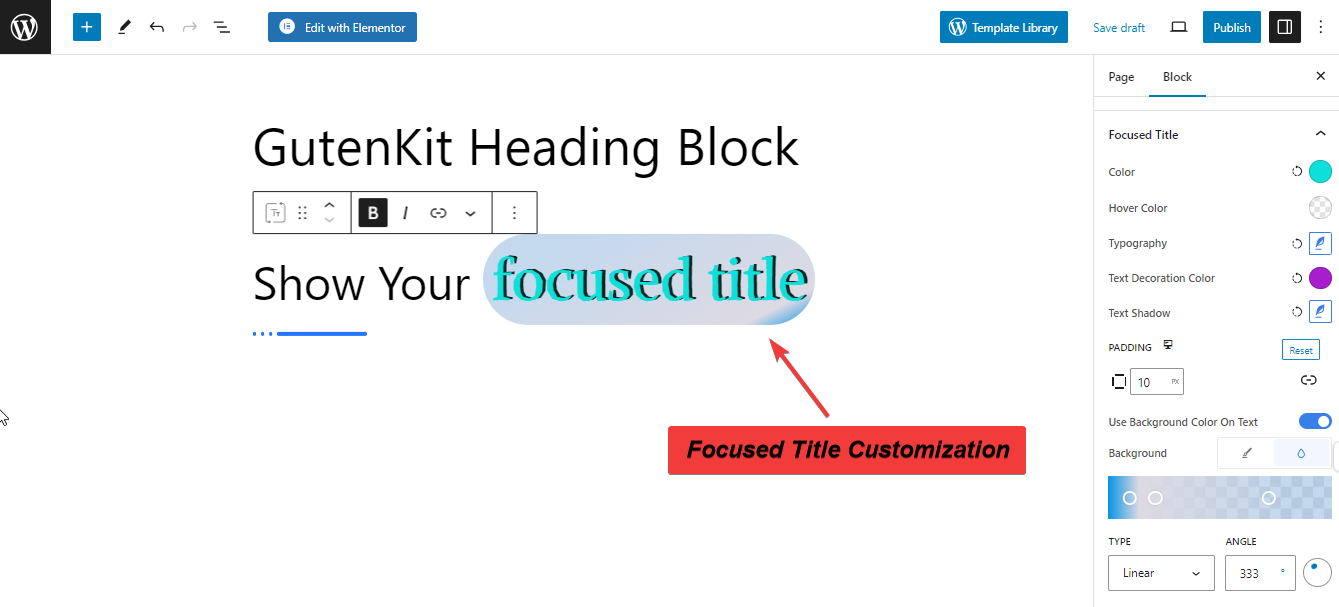
포커스 타이틀 기능은 헤딩 타이틀의 중요한 부분을 더욱 흥미롭고 눈길을 끌게 만듭니다. 단순히 타이틀에서 더 집중하고 싶은 부분을 굵게(Ctrl+B) 표시합니다.
스타일 탭에서 다음을 얻을 수 있습니다. 집중된 제목 기능. 아래 설정을 참조하세요.
집중된 제목: 제목 설정과 유사한 기능(색상, 호버 색상, 타이포그래피, 텍스트 그림자)이 표시됩니다. 다른 기능은 다음과 같습니다.
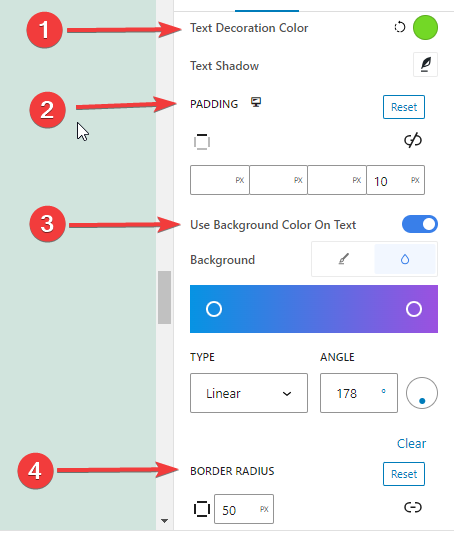
- 텍스트 장식 색상: 관심 제목의 장식 색상을 지정합니다.
- 심: 포커스된 제목 주위의 패딩을 정의합니다.
- 텍스트에 배경색 사용: 초점이 맞춰진 제목 배경에 색상을 지정합니다.
- 테두리 반경: 초점이 맞춰진 제목 테두리의 둥글기를 설정합니다.
우리가 집중적으로 다루는 제목은 다음과 같습니다.
7단계: 부제목 및 제목 설명 사용자 지정 #
이제 다음 기능이 Sub Title과 Title Description에 적용됩니다. 사용 방법을 살펴보겠습니다.
- 색상: 여기에서 색상을 선택합니다.
- 타이포그래피: 텍스트 글꼴 패밀리, 변형, 스타일, 장식 색상, 문자 간격, 단어 간격 및 줄 높이와 같은 모든 타이포그래피 관련 사용자 지정을 제어합니다.
- 여유: 텍스트 주위의 공간을 확장합니다.
- 텍스트 채우기 사용: 자막에 색상이나 이미지 배경을 지정합니다. (이 기능은 자막에만 적용됩니다.)
8단계: 구분선 및 그림자 텍스트 사용자 지정 #
이제 구분선과 텍스트 사용자 지정에 대해 알아보겠습니다.
분리 기호: #
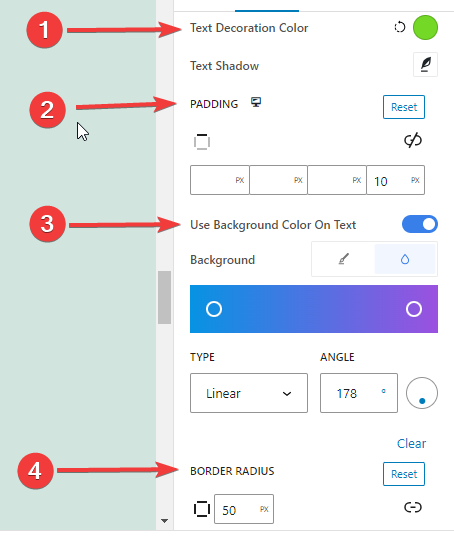
- 너비: 이 상자에 구분선 너비 값을 픽셀 단위로 입력하세요.
- 키: 구분선 높이를 정의합니다. 픽셀 단위로 값을 입력하세요.
- 여유: 디자인의 다른 요소와 공간을 설정하세요.
- 구분선 색상: 구분선의 색상을 색상 팔레트에서 선택합니다.
그림자 텍스트: #
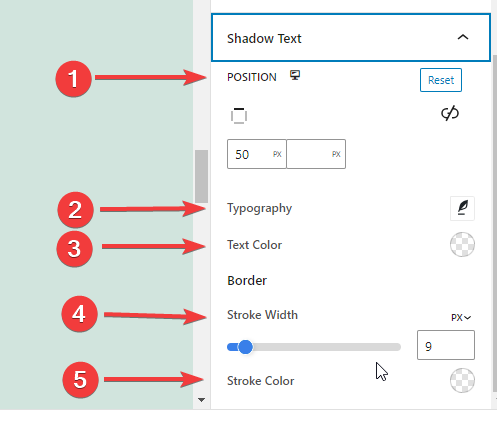
- 위치: 상단 및 왼쪽 값을 픽셀 단위로 입력하여 그림자 텍스트를 배치합니다.
- 타이포그래피: 그림자 텍스트에 대한 모든 타이포그래피 스타일 설정을 가져옵니다.
- 텍스트 색상: 그림자 텍스트에 색상을 추가합니다.
- 스트로크 폭: 그림자 텍스트를 감싸는 선 너비를 지정합니다.
- 뇌졸중 콜로r: 획의 색상을 선택하세요.
9단계: 고급 설정 #
고급 설정 탭에서 GutenKit 제목 블록 레이아웃, 배경, 테두리 스타일을 구성하고 가시성을 제어할 수 있습니다.
공들여 나열한 것, #
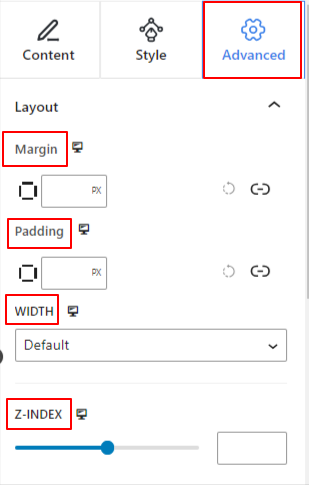
- 여유: 블록 레이아웃 주변의 공간을 정의합니다. 다른 블록 사이의 간격을 설정하는 데 도움이 됩니다.
- 심: 레이아웃 내의 블록 주변 공간을 설정하는 값을 입력합니다.
- 너비: 기본 레이아웃 너비를 유지하는 것 외에.
- 전체 넓이: 이 옵션을 선택하면 레이아웃이 화면 전체 너비에 걸쳐 적용됩니다.
- 인라인(자동): 적용하면 블록 요소와 동일한 너비를 갖게 됩니다.
- 관습: 이 옵션을 선택하면 블록 레이아웃의 수평 공간을 정의하는 슬라이더가 표시됩니다.
- Z-지수: 슬라이더를 사용하여 다른 블록과 함께 블록의 스택 순서를 지정합니다.
위치: #
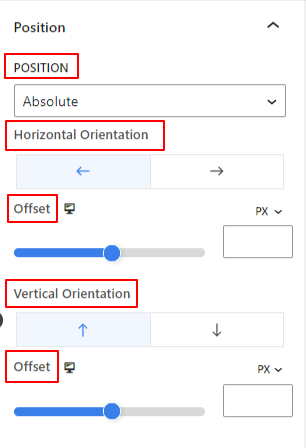
드롭다운 아래에 세 가지 옵션이 표시됩니다. 기본, 순수한, 그리고 결정된.
- 순수한: 이 옵션을 선택하면 블록의 절대 위치가 제공됩니다. 즉, 요소가 컨테이너에 맞습니다.
- 결정된: 고정 위치 옵션을 사용하면 요소가 전체 뷰포트나 화면에 맞춰집니다.
절대 및 고정 옵션 모두 아래와 같이 유사한 설정을 갖습니다.
- 수평 방향: 위치결정 방향을 왼쪽과 오른쪽 중에서 선택합니다.
- 오프셋: 슬라이더를 사용하거나 수동으로 값을 입력하여 블록의 수평 위치를 조정합니다.
- 수직 방향: 위치결정 방향을 위, 아래 중에서 선택합니다.
- 오프셋: 슬라이더를 사용하거나 수동으로 값을 입력하여 블록의 수직 위치를 조정합니다.
배경: #
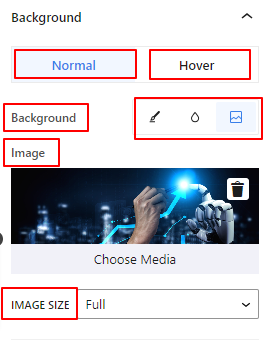
- 배경: 단색, 그라데이션, 이미지 중에서 배경 옵션을 선택합니다.
호버 옵션에서:
- 영상: 이미지 옵션을 선택하면 다음 옵션이 열립니다.
- 영상: 미디어 라이브러리에서 이미지를 선택하거나 자신의 이미지를 업로드하세요.
- 이미지 크기e: 썸네일, 중간, 크게 또는 전체 중에서 이미지 크기를 선택합니다.
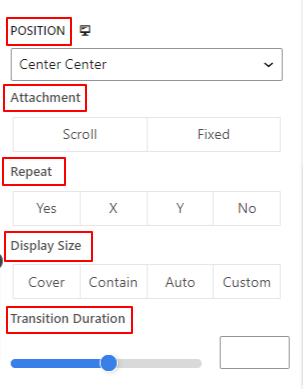
- 위치: 10가지 옵션의 위치를 선택합니다.
- 반복하다: 옵션을 선택하여 배경 이미지가 반복되는 방식을 설정합니다.
- 디스플레이 크기: 네 가지 옵션 중에서 디스플레이 크기를 선택합니다.
- 전환 기간: 슬라이더를 사용하여 배경이 일반에서 호버 상태로 전환되도록 조정합니다.
국경: #
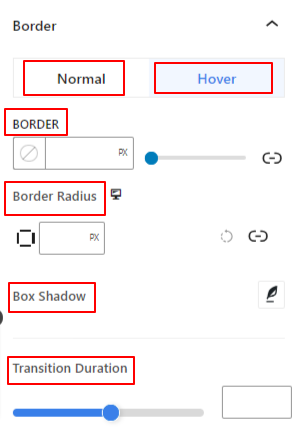
- 국경: 이 설정 옵션에는 너비, 스타일, 색상과 같은 테두리 설정 옵션이 제공됩니다.
- 테두리 반경: 값을 입력하여 테두리의 둥근 정도를 설정합니다.
- 박스 섀도우: 색상, 가로/세로, 흐림, 퍼짐 등의 모든 설정을 사용하여 테두리에 그림자 효과를 적용할 수 있습니다.
호버 옵션에서:
- 전환 기간: 수동으로 값을 추가하거나 슬라이더를 사용하여 마우스 오버 상태에서 테두리 디자인을 변경하는 시간을 설정할 수 있습니다.
시계: #
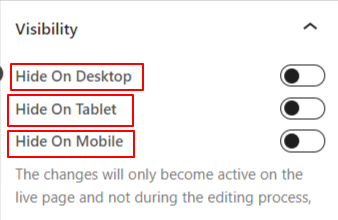
가시성 모듈을 사용하면 장치 유형에 따라 블록 디자인 표시를 제어할 수 있습니다. 토글 버튼이 있는 세 가지 장치 옵션(데스크톱, 태블릿, 모바일)이 있습니다. 해당 장치의 블록 디자인을 숨기려면 토글 버튼을 켜십시오.
그러나 편집기 보기에서는 계속 볼 수 있습니다.
고급의: #
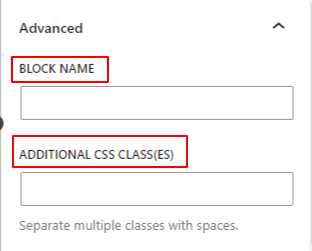
- 블록 이름: 블록 스타일을 지정하기 위해 링크하거나 스크립팅하는 동안 이 블록을 고유하게 식별할 수 있도록 이름을 지정합니다.
- HTML 앵커: 웹사이트 페이지를 링크하기 위한 URL을 추가합니다.
- 추가 CSS 클래스: 추가 CSS 클래스를 블록에 할당하면 사용자 정의 CSS를 사용하여 원하는 대로 블록 스타일을 지정할 수 있습니다.
주의: 공백을 사용하여 여러 클래스를 별도로 추가할 수 있습니다.
이 문서가 GutenKit 제목 블록을 사용하는 데 도움이 되었기를 바랍니다. 이제 이 블록을 시도하고 페이지에 멋진 제목을 만들 차례입니다.


