


開発とテストの利便性のため、開発者は WordPress サイトをローカル環境 (Xampp や Local WP など) で作業することを好みます。ただし、Web サイトを一般公開するには、ローカルの WordPress サイトをライブ サーバーに移動する必要があります。
したがって、WordPress サイトをローカル環境からライブ サーバーに移動することは、Web 開発における重要なステップです。このプロセスは一見技術的ですが、体系的にアプローチすれば効率化できます。
作業を簡単にするために、ローカルの WordPress サイトをライブ サーバーに移行する方法を、適切な手順で詳しく説明します。
大多数のユーザーにとって移行が簡単に行えるように、WordPress で最も人気のある 2 つのローカルホスト サービスについて説明します。
WordPress のローカルホストとは何ですか?
ローカルホストは、ローカルマシンまたはコンピューター上で実行される個人用サーバーと考えてください。開発者は、インターネット接続なしで WordPress ウェブサイトを非公開で構築およびテストできます。
もし、あんたが ローカルホストにWordPressをセットアップするを使用すると、ローカル環境でライブ サーバーをシミュレートして、WordPress のインストール、プラグインの追加、テーマのカスタマイズ、および必要に応じてすべての開発作業をパブリック アクセスなしで実行できます。
ローカルホストとライブサーバーの違い
主な違いは、各環境のアクセス可能性と目的にあります。ローカルホストはプライベート開発用ですが、ライブ サーバーはパブリックに利用可能にするためです。
| エリア | ローカルホスト | ライブサーバー |
|---|---|---|
| プラットフォーム | 個人のコンピューターまたはマシンを使用して Web サイトをホストします。 | パブリック サーバーまたはホスティング サービスを使用します。 |
| アクセシビリティ | プライベート、ホストコンピュータまたはマシンにアクセスできる特定の人だけがアクセス可能 | 公開されており、インターネットに接続できる人なら誰でもアクセスできます。 |
| 使用法 | 開発とテストに使用されます。 | オンラインでのプレゼンスと視聴者とのコミュニケーションのため。 |
ローカルホストから WordPress サイトを公開する方法
WordPress サイトをローカルホストからライブ サーバーに移動する前に、考慮すべき重要な手順がいくつかあります。
前提条件: ドメイン名とホスティングプランを取得する
WordPress サイトをローカルホストからライブ サーバーに移動する前に、ドメイン名とホスティング プランという 2 つの重要な要素を確保する必要があります。
✅ ホスティングサービス
ウェブ ホスティングは、基本的に、Web サイトを移行するライブ サーバーです。ホスティング サーバーは、Web サイトのすべてのリソース (ファイル、データベース、すべてのコンポーネントを含む) を保存し、インターネットからアクセスできるようにします。
クラウドホスティング、共有ホスティング、VPS、マネージドホスティングサービスなど、さまざまなタイプのホスティングが利用可能です。ホスティングサービスを選択する前に、 WordPress に最適な Web ホスティングプロバイダー 要件に一致するものを選択してください。
ホスティング プランを選択するときは、次の要素を考慮してください。
- 少なくとも99.9% 稼働時間保証
- 十分 収納スペース そして 帯域幅 トラフィックを処理するため。
- セキュリティ機能 SSL証明書、バックアップ、 そして ファイアウォール.
✅ ドメイン名
ドメイン名は、www.wpmet.com など、人々があなたのウェブサイトを見つけるアドレスです。ドメイン名を選択するときは、短くて覚えやすく、ブランドやサイトの目的に関連したものを目指してください。GoDaddy、Namecheap、Google Domains など、利用可能なドメイン名を検索して購入できるドメイン レジストラは数多くあります。
方法 1: ローカルの WordPress サイトを XAMPP からライブ サーバーに移動する方法
XAMPP は、WordPress 開発用の最も人気のあるローカルホスト環境の 1 つです。WordPress サイトを XAMPP からライブ サーバーに移動する手順は次のとおりです。
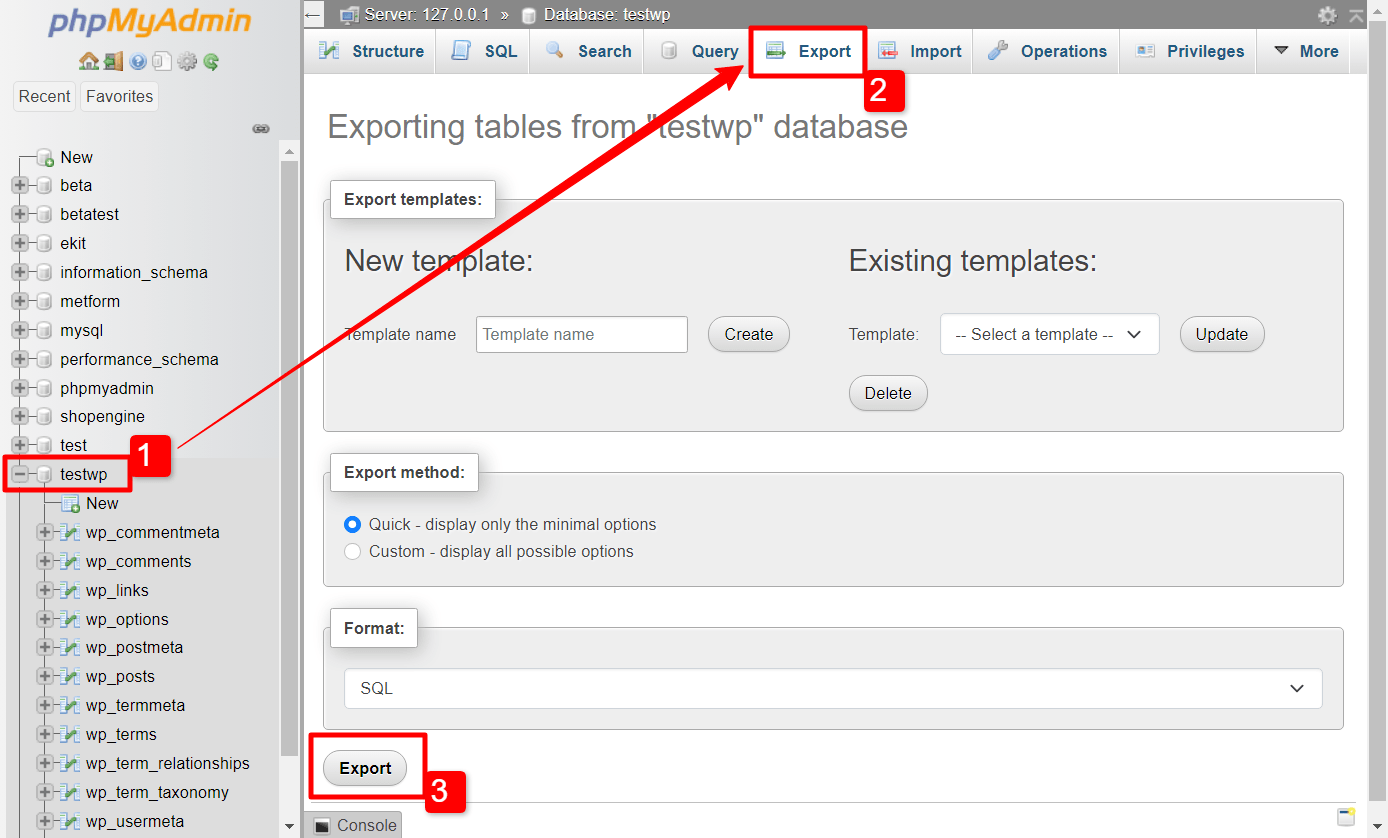
ステップ1: ローカルWordPressデータベースをエクスポートする
まず、ローカルの WordPress サイトのデータベースをエクスポートする必要があります。
- ローカルマシン (コンピューター) で Xampp を起動します。
- に行く ローカルホスト/phpmyadmin.
- WordPress データベースを選択します。
- 「エクスポート」をクリックし、SQL 形式を選択します。
- SQL ファイルをコンピューターに保存します。
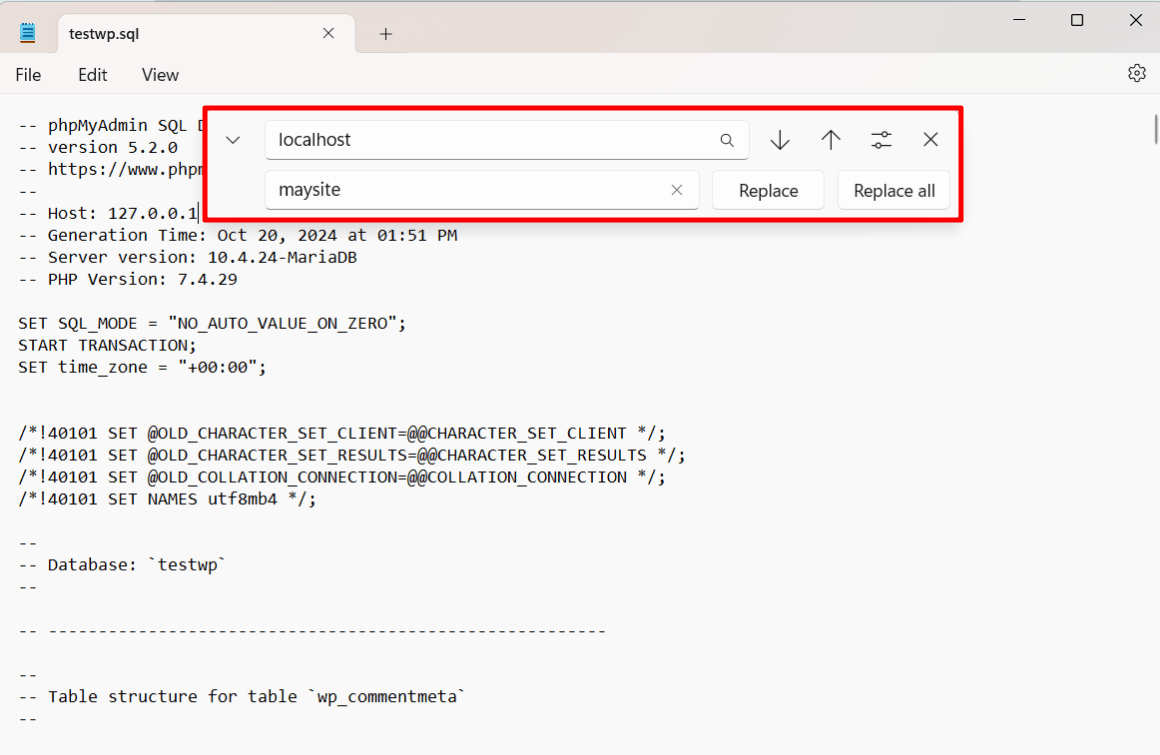
ステップ2: SQLファイルに変更を加える
その後、ローカル URL を、サイト用に選択したドメイン名に置き換える必要があります。
- メモ帳で SQL ファイルを開きます。
- 「localhost」という用語を見つけてドメイン名に置き換えます。
- 変更を保存してファイルを閉じます。
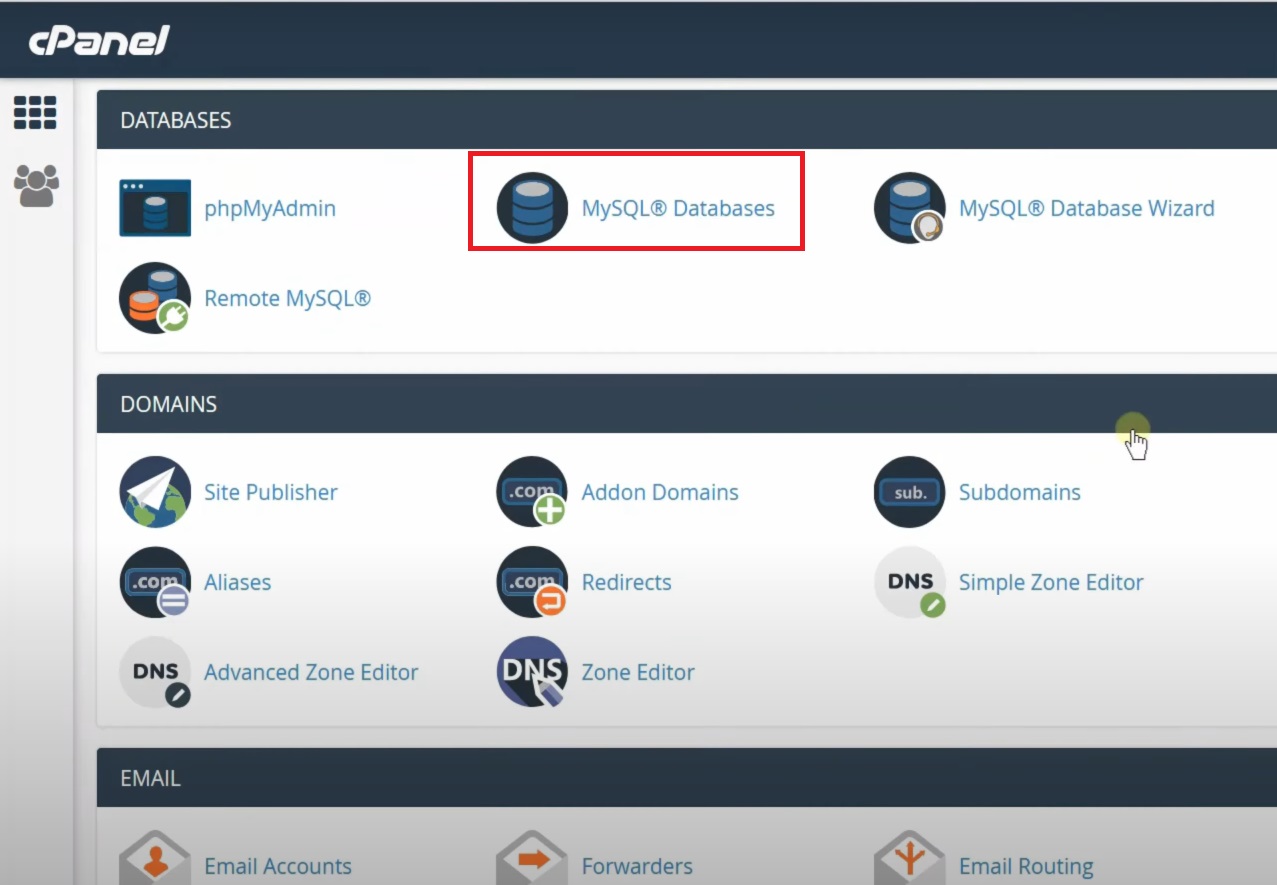
ステップ3: ライブサーバーに新しいデータベースを作成する
ホスティング サービスを利用すると、Web サイトの「cPanel」というダッシュボードにアクセスできるようになります。
- ホスティング プロバイダーの cPanel にログインします。
- 新しいデータベースを作成します (データベース名が 60 文字以内であることを確認してください)。
- 新しいデータベース ユーザー (MySQL ユーザー) を追加します。
- すべての権限を持つユーザーをデータベースに割り当てます。
ステップ4: ローカルデータベースをライブサーバーにインポートする
次に、ローカルの WordPress サイトのデータベースをライブ ホスティング サーバーにインポートする必要があります。これが、Web サイトを転送する上での核となる部分です。
- ホスティング cPanel で phpMyAdmin を開きます。
- 作成した新しいデータベースを選択し、「インポート」をクリックします。
- アップロードする .sql XAMPP からエクスポートしたファイル。
ステップ5: 更新する wp-config.php ファイル
このステップでは、wp-config.php ファイルからライブ WordPress サイトを構成します。
- FTP クライアントで、wp-config.php ファイルを見つけます。
- ライブ サーバー上の新しいデータベースと一致するように、データベース名、ユーザー、およびパスワードを更新します。
これで完了です。これで、Web サイトが Xampp ローカルホストから WordPress ライブ サーバーに正常に転送されました。
方法2: WordPressサイトをローカルWPからライブホストに移動する方法
Local WP は比較的新しいものですが、WordPress 専用にカスタマイズされたユーザーフレンドリーなローカルホスト ソリューションです。Local WP からライブ サーバーにサイトを移動する方法を次に示します。
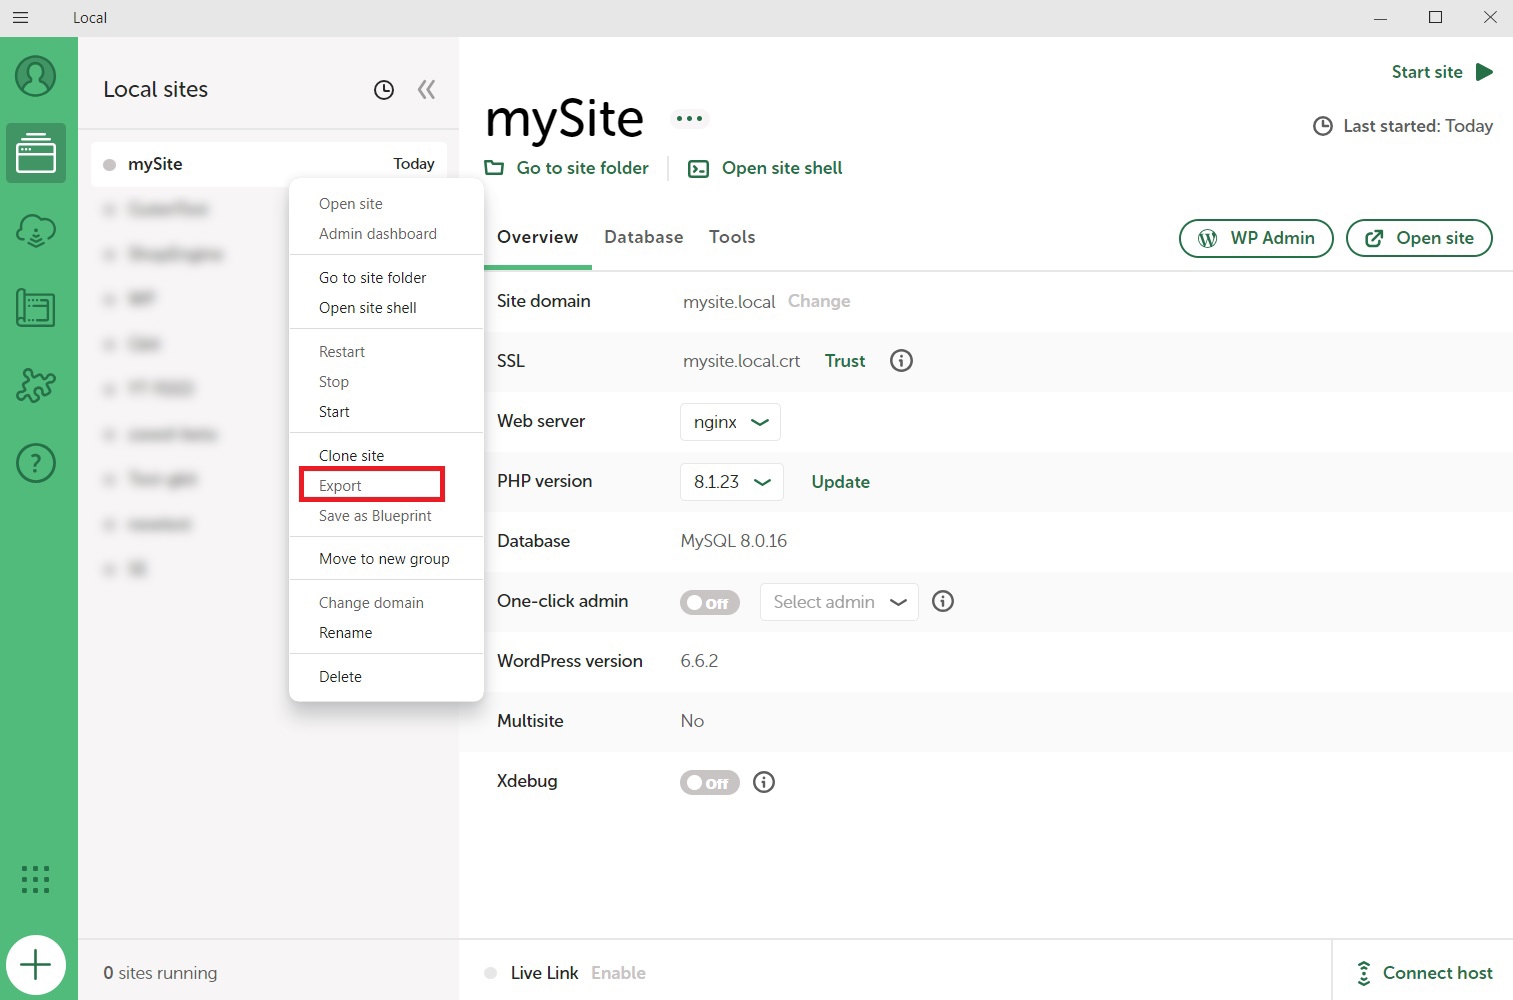
ステップ1: Local WPからファイルをエクスポートする
ローカル WP では、まずサイトのファイルをエクスポートする必要があります。
- Local WP を開き、移動するサイトに移動します。
- 「エクスポート」オプションをクリックし、サイトをエクスポートする形式を選択します。
- サイト ファイルとデータベースを .zip ファイルとしてダウンロードします。
ステップ2: ライブサーバーに新しいデータベースを作成する
ホスティング サービスを利用すると、Web サイトの「cPanel」というダッシュボードにアクセスできるようになります。
- ホスティング プロバイダーの cPanel で、新しいデータベースを作成します。
- 新しいデータベース MySQL ユーザーを追加します。
- ユーザーをデータベースに割り当て、すべての権限を付与します。
ステップ3: ファイルをアップロードし、データベースをライブサーバーにインポートする
ここで、ローカルの WordPress サイトからライブ サーバーにファイルを移動します。
- 抽出する 。ジップ ダウンロードしたファイル。
- ホスティング cPanel で phpMyAdmin を開きます。
- ローカルデータベースファイルをインポートします 。ジップ フォルダ。
ステップ4: ライブサイトドメインのウェブサイトURLを変更する
ローカル ホストの URL はライブ サイトと同じではありません。そのため、サイトのドメイン名に応じてローカル URL を置き換える必要があります。
SQL クエリを実行するか、WordPress プラグインを使用することで、URL を置き換えることができます。
ライブサイトでエラーがないかテストする
サイトをライブ サーバーに移動した後は、すべてがスムーズに実行されていることを確認するために徹底的にチェックすることが重要です。
まずはテストから始めましょう 壊れたリンク または 欠落した画像移行中にこれらを簡単に見落とす可能性があるためです。
また、次の点も確認してください すべてのURLは正しい特に、localhost アドレスを置き換える必要があった場合はそうです。
忘れずにチェックしてください プラグインとテーマは正常に動作しています また、データベース接続の問題がないことも確認してください。時間をかけてサイトをテストすることで、サイトが完全に機能し、ユーザー向けに準備されていることを確認できます。
まとめ
WordPress サイトをローカル セットアップからライブ サーバーに移行するのは、最初は少し長くて大変に感じるかもしれませんが、正しい手順を実行すれば、思ったよりもずっと簡単です。
XAMPP を使用する場合でも、Local WP を使用する場合でも、覚えておくべき最も重要なことは、サイトをバックアップし、データベースを正しく設定し、公開後に問題がないか徹底的にテストすることです。このプロセスに従うことで、WordPress サイトをすぐにスムーズに起動できるようになります。

コメントを残す