


To build your email marketing funnel in your AWeber platform, connecting to WordPress forms is the best way.
But what is the best method to connect AWeber with WordPress forms? You only need a WordPress form builder, such as MetForm, to integrate your AWeber platform.
The integration process includes:
- Installing and activating MetForm
- Creating an AWeber API app
- Authenticating the AWeber app
- Creating an AWeber list
- Adding custom fields in AWeber
- Creating a WordPress form with MetForm
- Integrating AWeber with Elementor form
- Testing the integration
So, if you are someone expanding your leads, this blog is right for you! This will teach you the easiest method to connect your AWeber platform with WordPress forms through MetForm.
Quick Overview
To integrate AWeber with WordPress forms, use a dedicated WordPress form builder like MetForm. This will automate the lead generation from the WordPress system to the AWeber platform.
The integration process includes:
1. Installing and activating MetForm
- Install MetForm in your WordPress site and activate it.
- Upgrade your MetForm to a pro version to enable the AWeber integration.
2. Creating an AWeber API app
- Log in tothe AWeber developer portal and create a new app. Sign up if you don’t have an existing account.
- Fill out the AWeber form to create a new app. Get the OAuth Redirect URL from the WordPress site under MetForm > Settings > Newsletter Integration > AWeber.
3. Authenticating the AWeber app
- Go back to your WordPress site and navigate to MetForm > Settings > Newsletter Integration > and enter the Client ID and Client Secret.
- Get the Authorization URL to allow access in AWeber.
4. Creating an AWeber list
- Go back to the AWeber app and go to the リストの管理 to create an AWeber list.
- Give a name to your list for easy identification of the leads.
5. Adding custom fields in AWeber
- This section is only optional if you want to get more information.
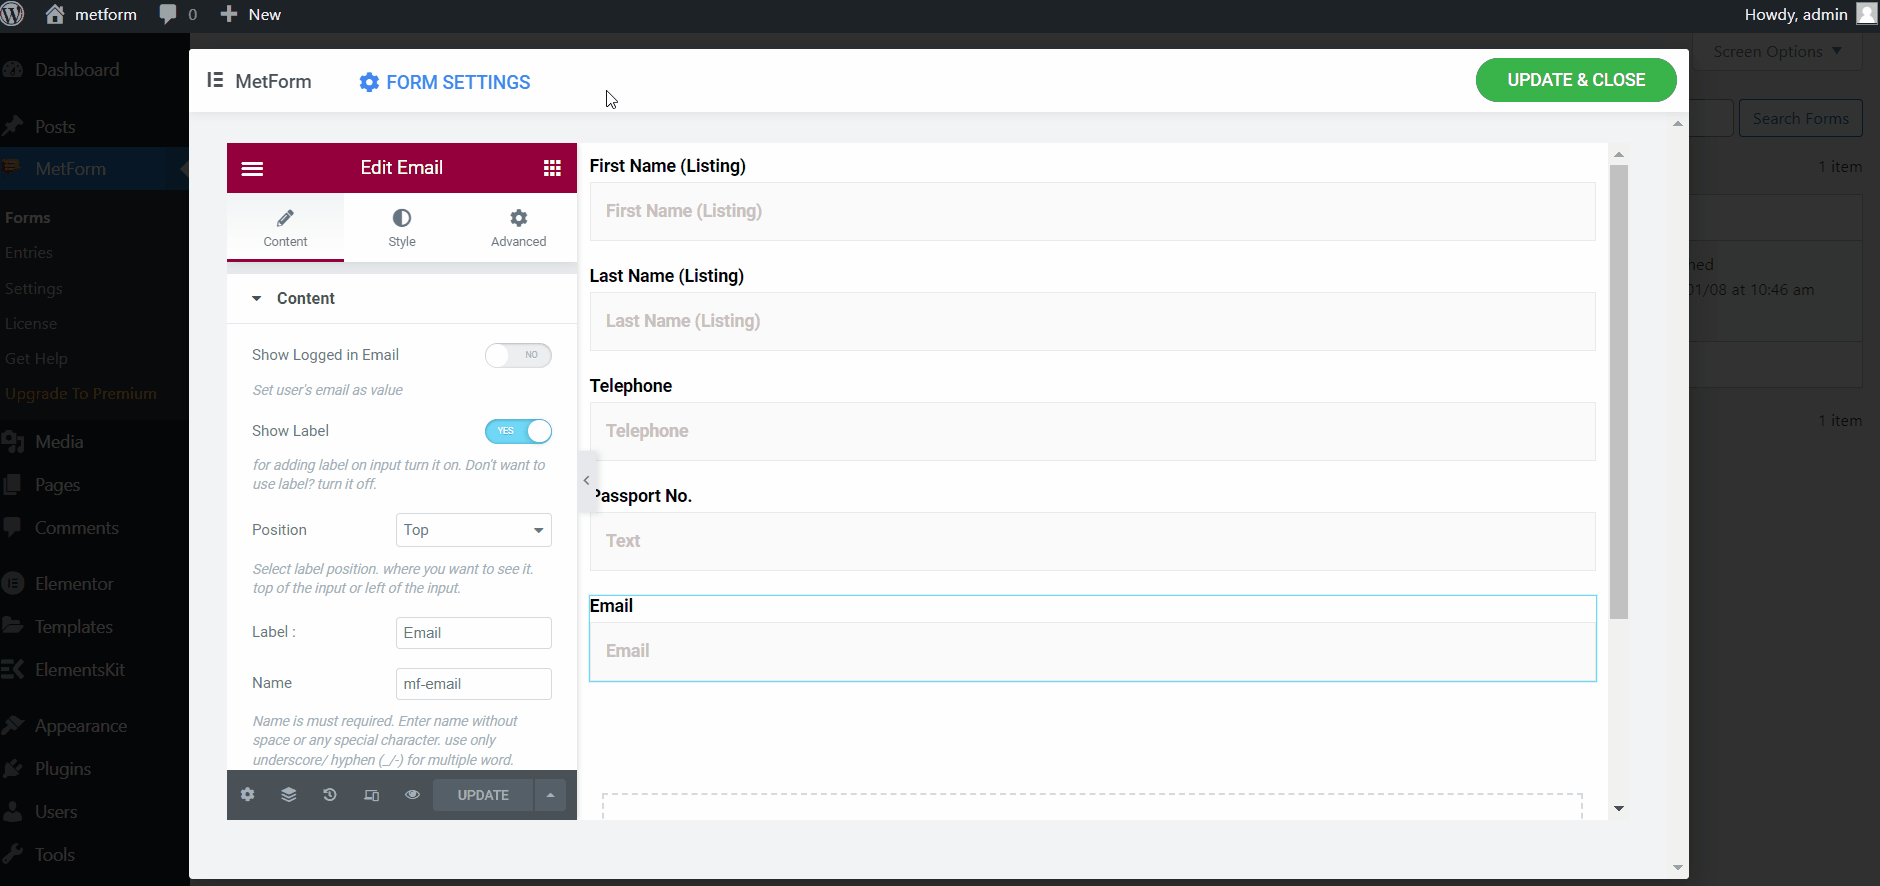
6. Creating a WordPress form with MetForm
- Create a WordPress form with MetForm.
- You can create a form from scratch or use the pre-built template.
- Include the custom fields you added in AWeber to your Elementor form.
7. Integrating AWeber with Elementor form
- Go to Form settings and enable AWeber under the integration tab.
- Select the AWeber list you created in AWeber and select the form fields.
8. Testing the integration
Test the integration between WordPress forms and AWeber. Fill out the form and check if the information synced in the AWeber list.
Brief Overview of AWeber and MetForm
Before we dive into the technical “how-to,” let’s look at the 2 major players for our integration with WordPress forms: AWeber and MetForm.
What is AWeber?
Aウェーバー is an email marketing platform designed to help small businesses, bloggers, and entrepreneurs grow and manage their audience. It allows users to create a mailing list, design professional newsletters, and automate email sequences.
メットフォームとは何ですか?
メットフォーム is an Elementor-based form builder plugin for WordPress. It’s incredibly intuitive because it works directly inside the Elementor editor. It allows users to create a simple contact form or a multi-step survey. Because it’s a drag-and-drop form builder, users of all types, like beginners or experienced, can easily navigate. It’s a perfect choice for connecting WordPress forms to AWeber.
Why Integrate AWeber with WordPress Forms?
Integrating AWeber with WordPress forms is the most effective way to automate lead generation. This integration eliminates the manual exportation of contact details from the WordPress system and importation into AWeber.
Here’s why:
1. If a visitor fills out the contact form, request a quote form, or any other forms in the WordPress site, the information is automatically sent to the AWeber list.
2. It triggers an automated welcome sequence if a visitor fills out a form from WordPress site. For example, a visitor will receive a discount code after they submit the form.
3. Instead of using the AWeber embed code, WordPress forms like MetForm have a conditional logic feature. You can add a checkbox in your form if a visitor agrees that their information will sync to AWeber to protect their confidential information.
4. Connecting AWeber with WordPress forms allows you to track the source of your leads. You will know in AWeber what type of form the visitors submitted and which specific page they found it on, like a landing page.
How to Integrate WordPress Forms with AWeber?
While it might look like many steps, it’s actually a very logical process. Here is your step-by-step guide to connecting AWeber with WordPress forms.
ステップ 1: MetForm をインストールしてアクティブ化する
The first step is to install MetForm and activate it inside your WordPress site. To do that, adopt the following:
- に行く プラグイン > 新規追加 WordPress ダッシュボードで。
- 次に、検索します メットフォーム そしてクリックしてください インストール そして 活性化 それ。
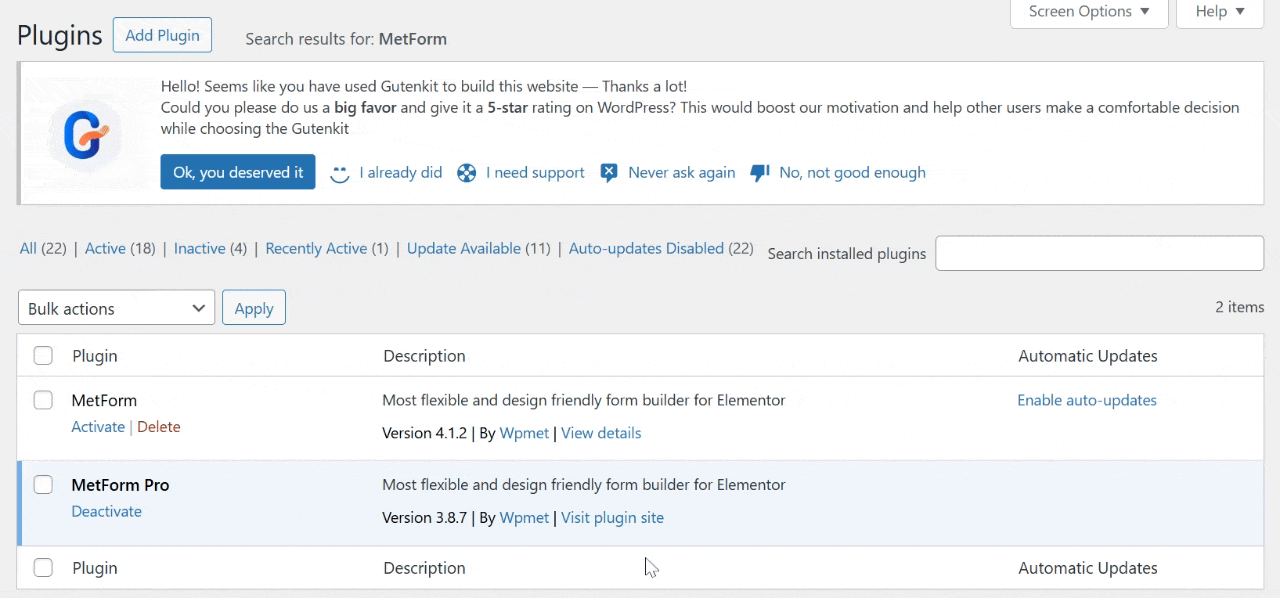
- But if you download the plugin from WordPress.org, you can easily install it by just uploading the zip file. Take note that you are required to upgrade to MetForm Pro to enable the AWeber integration.
Step 2: Create AWeber API App
After you activate the MetForm plugin and upgrade to its pro version, it’s time to connect WordPress to AWeber. To do that, you need an “API App.”
Here are the steps you will need to follow:
- Log in to the AWeber Developer Portal そしてクリックしてください Create New App. If it’s your first time, simply sign up.
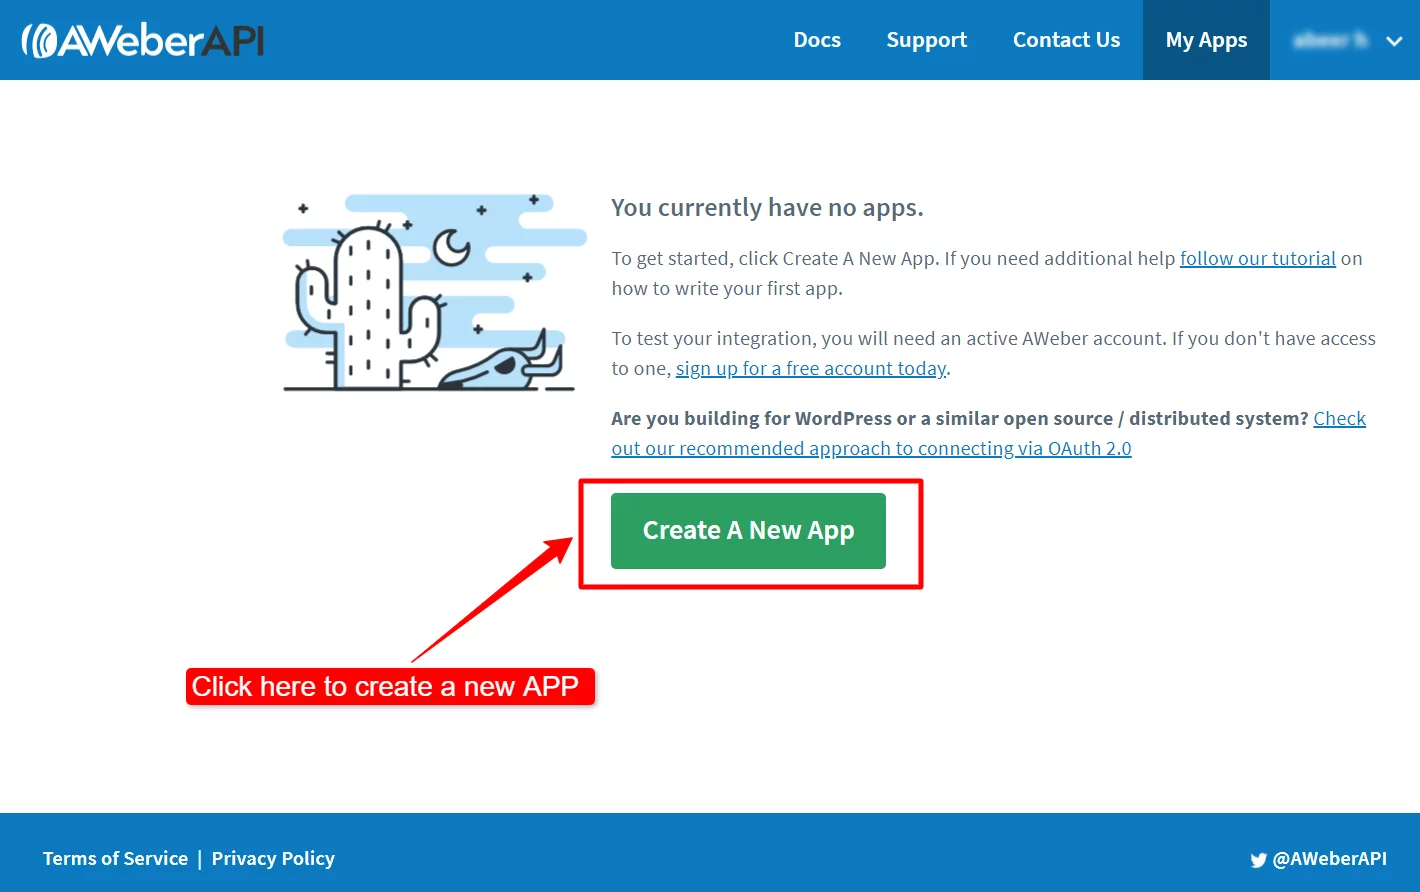
- Name your app. For example, you can name it ” My Website Form” and enter your name as the author.
- Get your website’s UL and paste it in the application website field.
- Set your client to the credential type.

- Get your OAuth Redirect URL from your WordPress dashboard under MetForm > Settings > Newsletter Integration > AWeber. Copy that URL and paste it into the AWeber app settings.
- Provide a description of the application.
- Add the app icon or logo, and your callback URL for webhook. But these are only optional.
- クリック Create New App and get the クライアントID そして クライアントシークレット for the app authentication for your website.
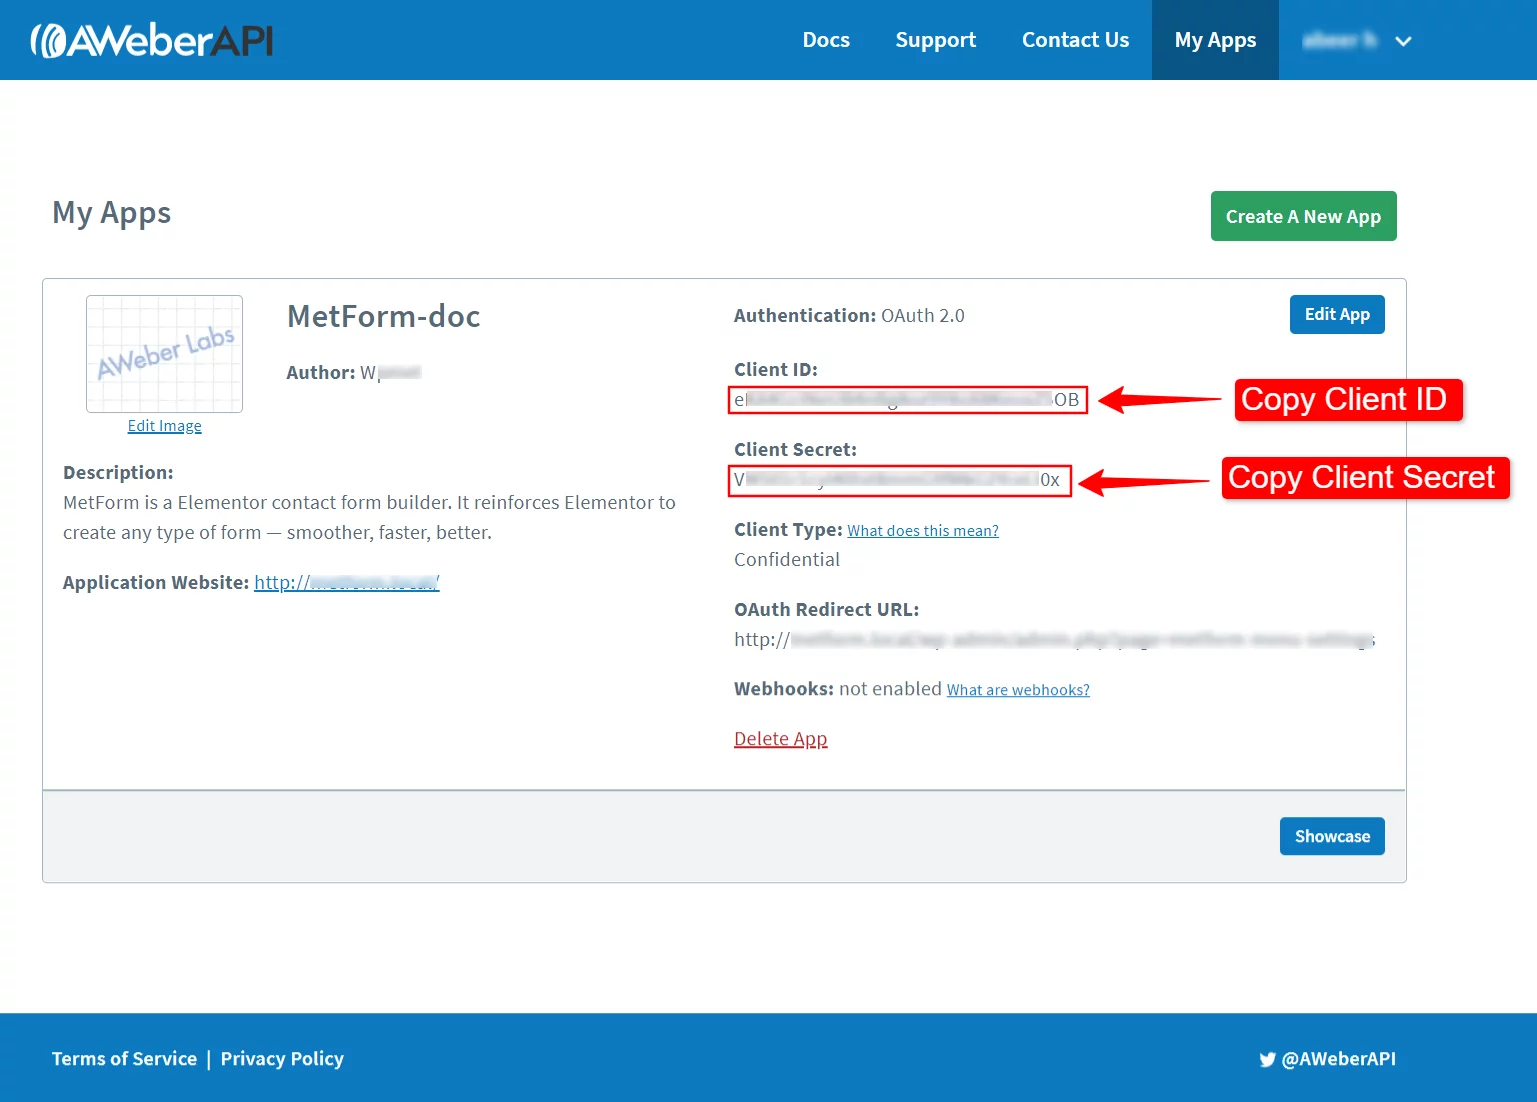
Step 3: Authenticate AWeber App
Now, let’s bridge the gap between WordPress forms and AWeber. To proceed, follow these steps:
- Go back to your WordPress site and navigate to MetForm > Settings > Newsletter Integration.
- Select AWeber and enter the Client ID and Client Secret that you just generated from the AWeber app.
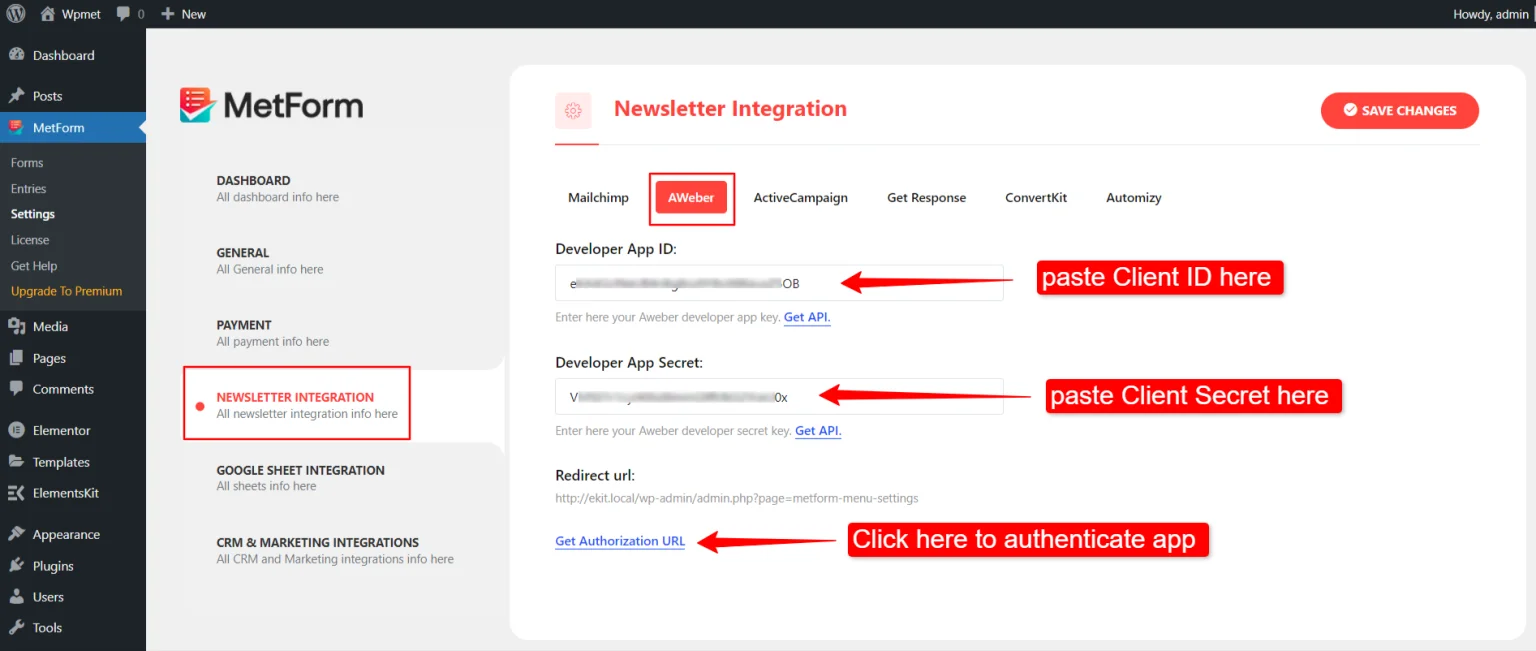
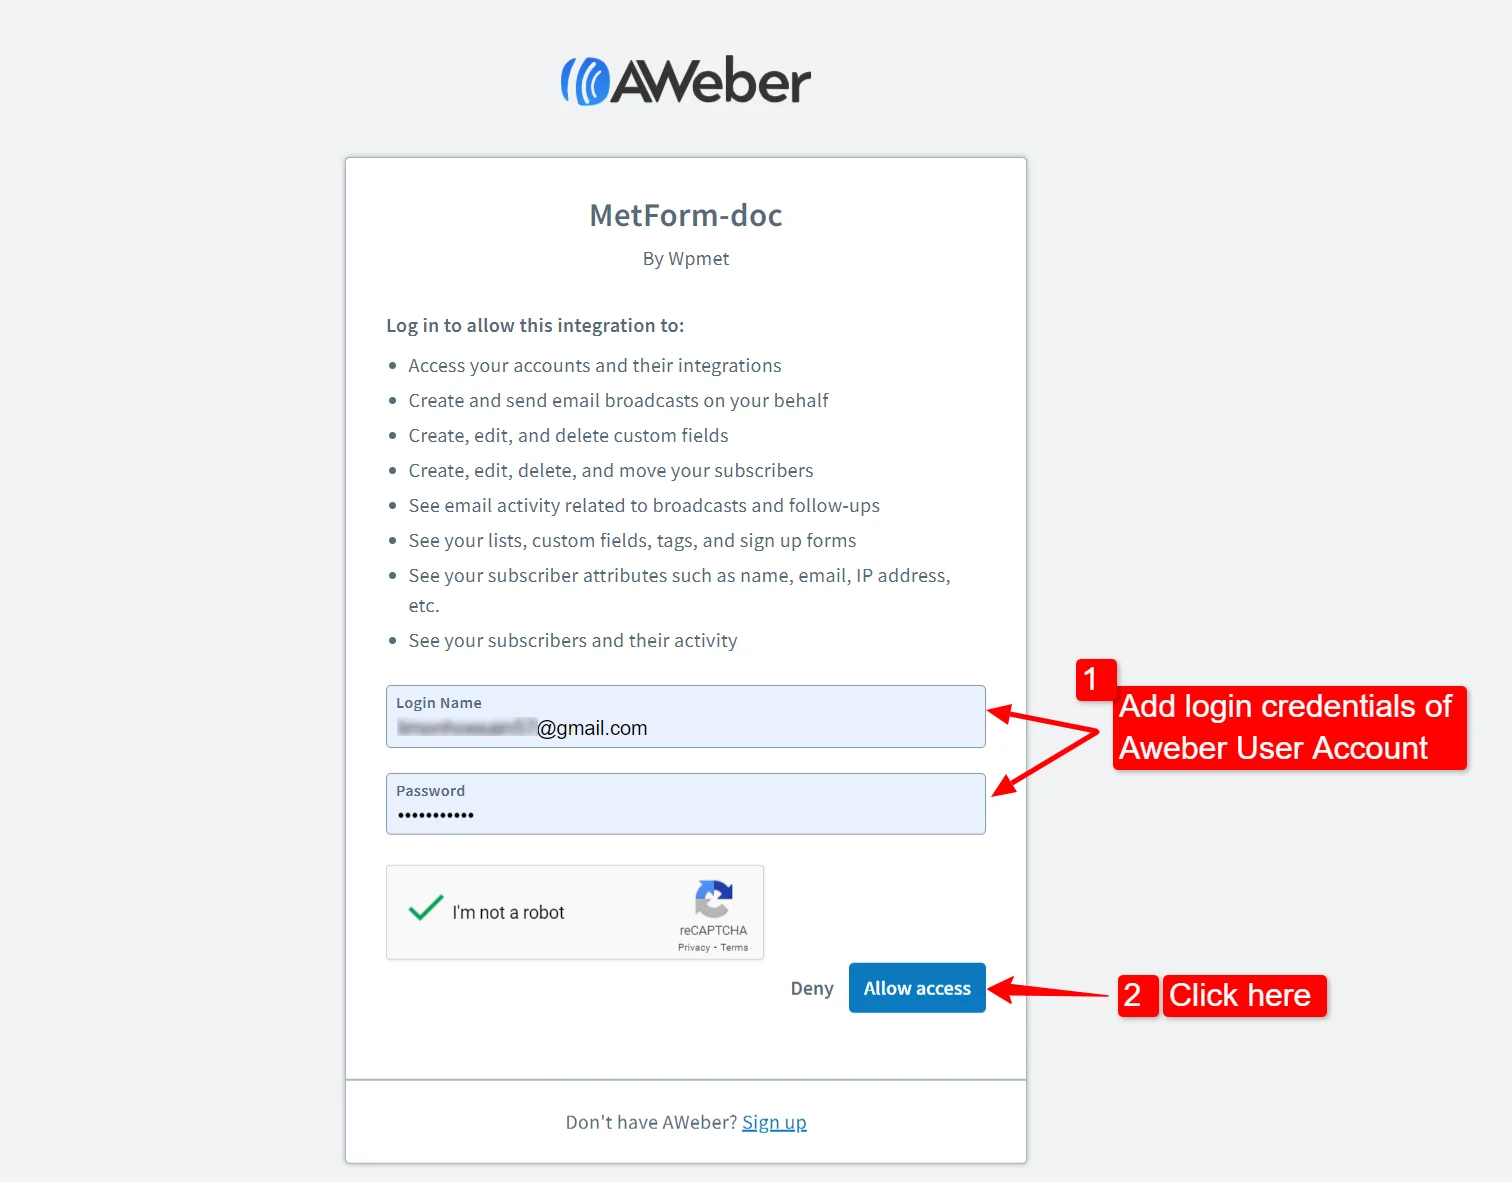
- クリック 認証URLを取得する. This will redirect you to AWeber to “Allow Access” by just providing your AWeber login credentials. Once confirmed, you’ll be sent back to WordPress, and your status should show as “Connected.”
Step 4: Create an AWeber List
To create an AWeber list, you will need to perform theses steps:
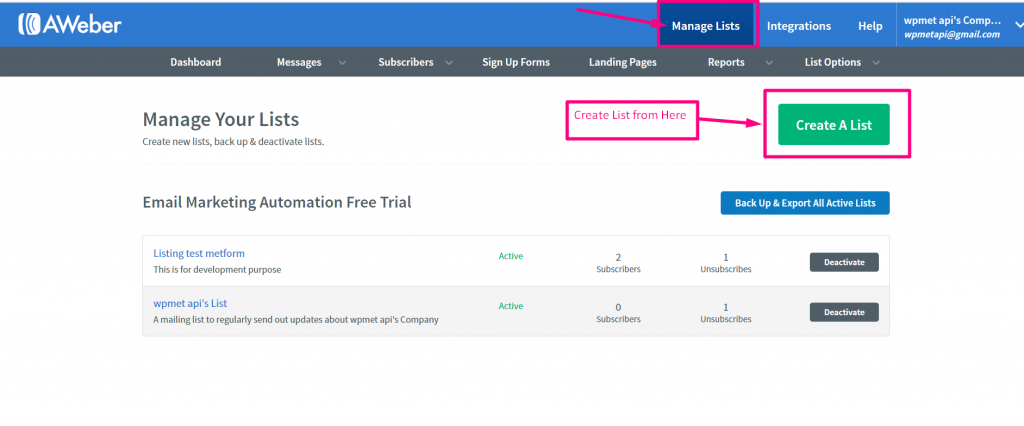
- Go back to the AWeber app and enter your login credentials again. Inside your AWeber account, ensure you have a list ready to receive these subscribers.
- Simply go to Manage Lists > Create a List. Then give it a name that helps you identify where these leads are coming from. For example, you name it as Website Contact Form.
Step 5: Add Custom Fields
If you want to collect more than just names and emails, you need custom fields in AWeber. To add custom fields, adopt the following:
- に行く リストオプション > カスタムフィールド. You can add fields like “Phone Number” or “Company Name.” Don’t forget to enable the Subscriber can update option.
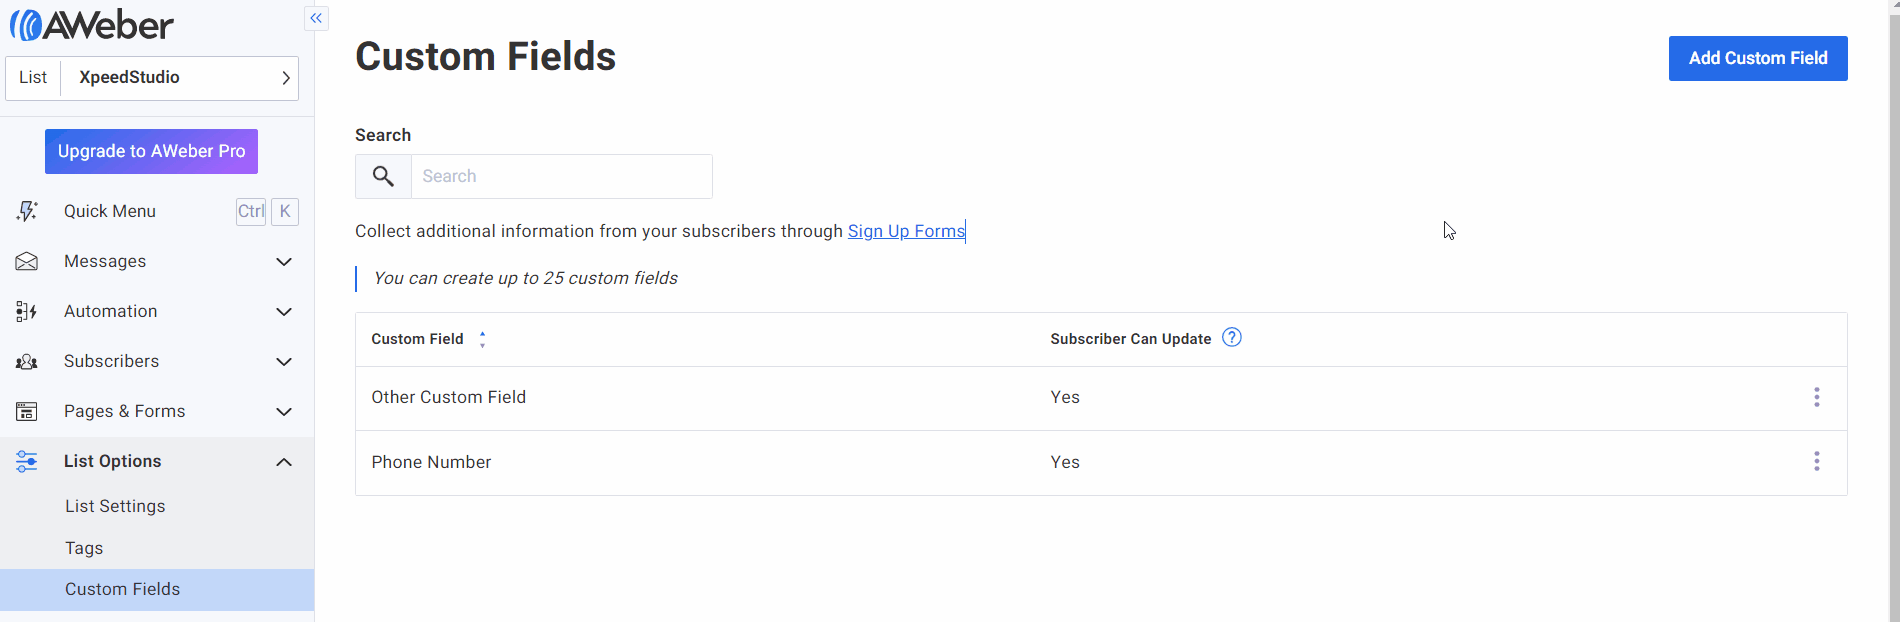
- Make sure these names match what you intend to use in your form to make syncing WordPress with AWeber lists much easier.
Step 6: Create a WordPress Form with MetForm
Now, head back to your WordPress site to create a WordPress form with MetForm and follow these steps:
- に行く MetForm > Forms > Add New.
- Select Blank Template to create from scratch or select a pre-built template to have a lesser time designing your WordPress form. For example, we’ll use a template for a お問い合わせフォーム.
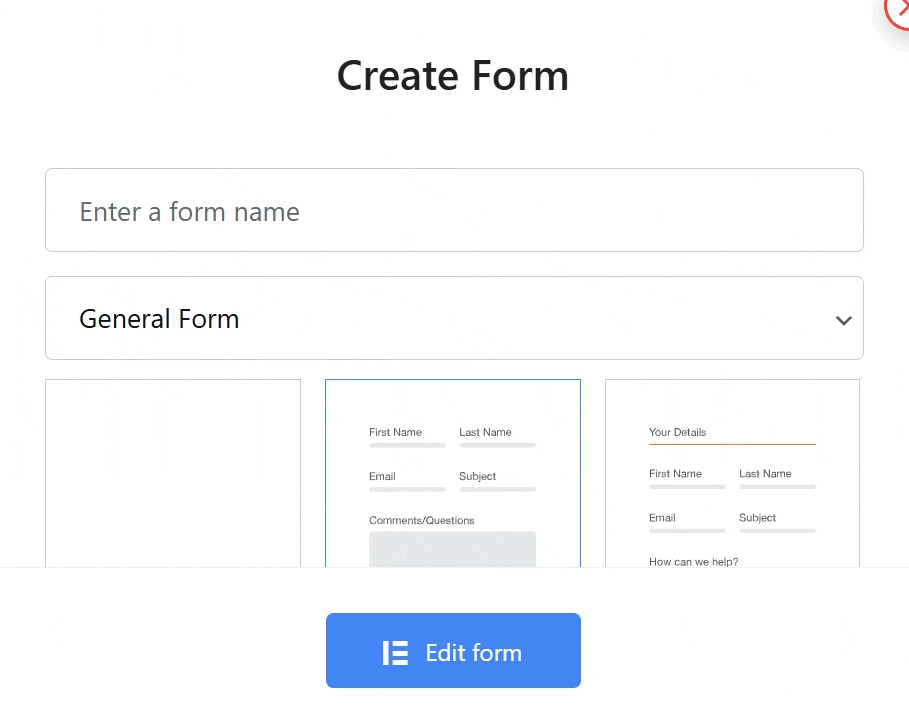
- Name your form and set it to General Form. Select a template of a contact form and click Edit form to bring it to the Elementor editor.
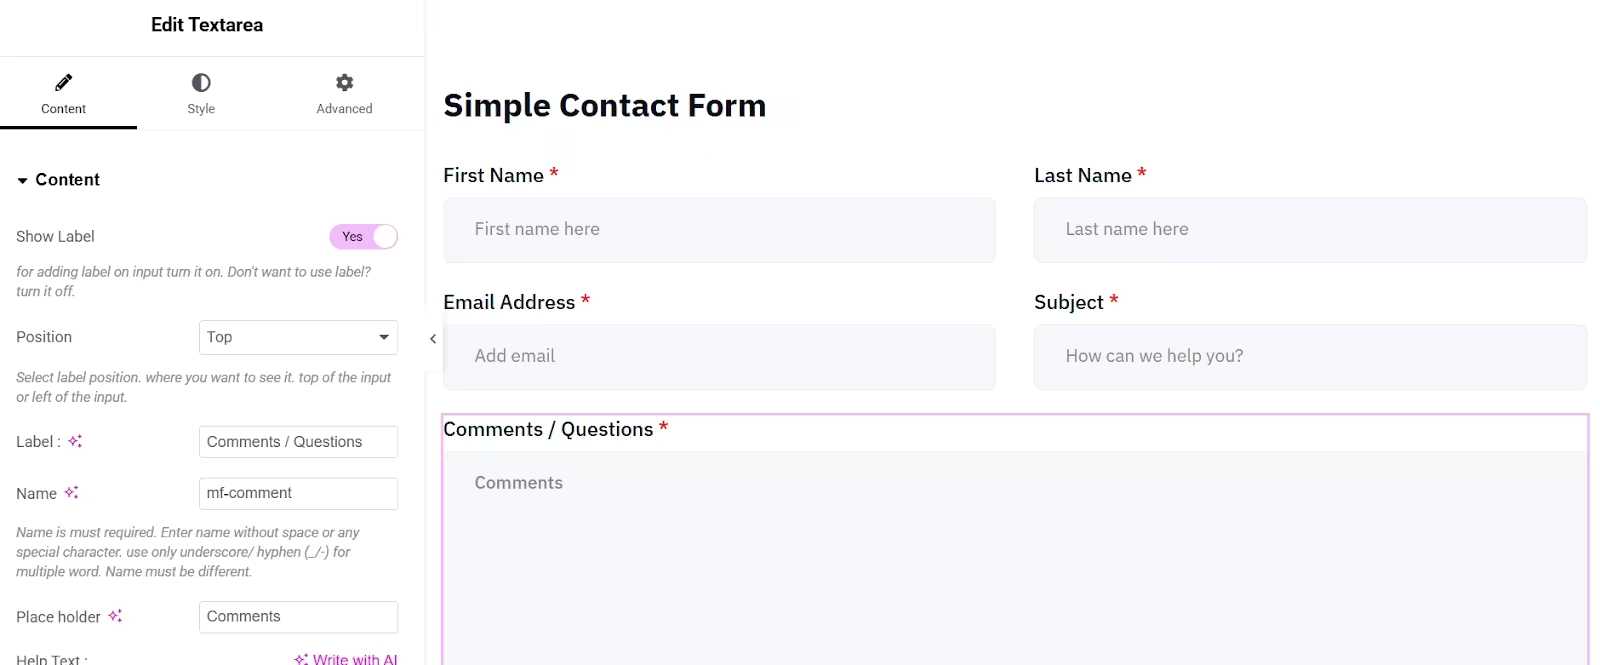
- Since custom fields were added in the AWeber account. Make sure that those fields are also present in the form. Given that the simple contact form lacks those fields, you will need to add them (Phone Number and Company Name).
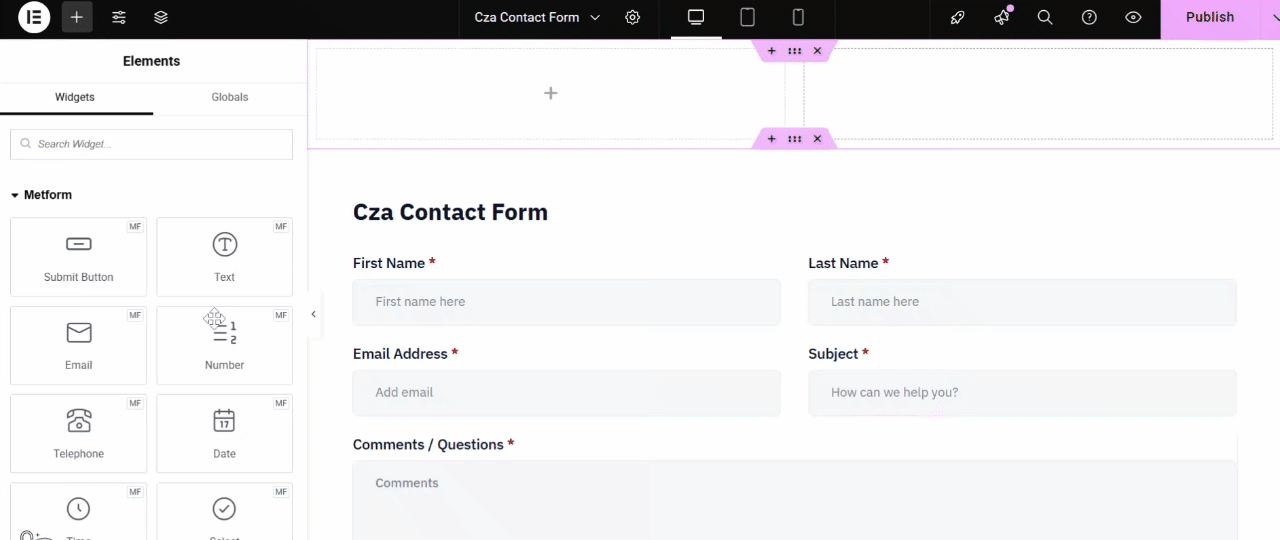
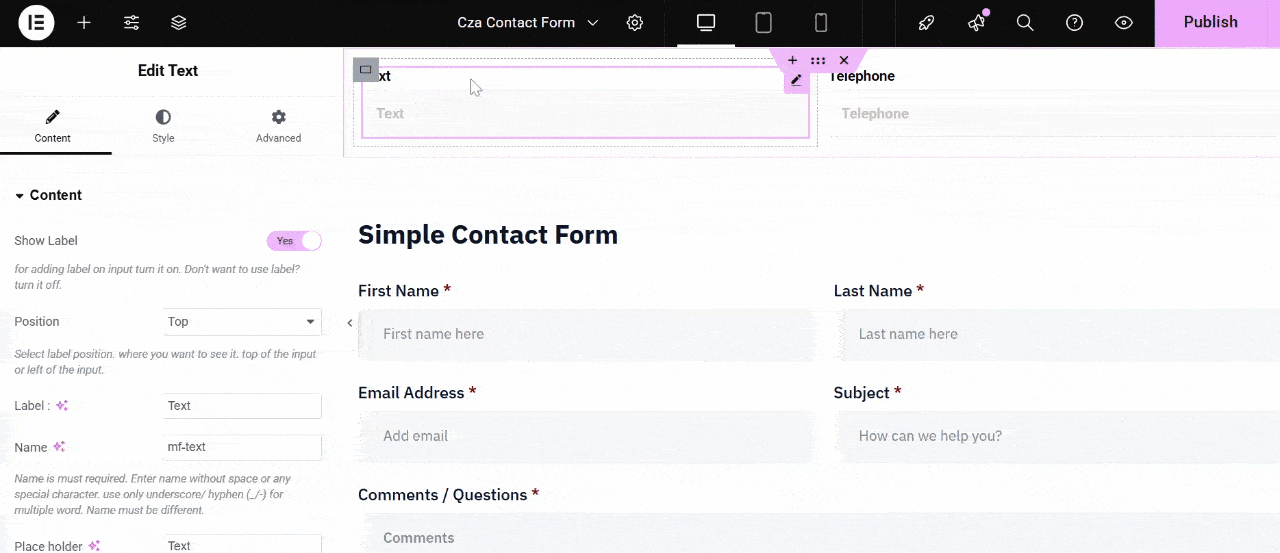
- MetForm has an intended widget for Phone Number, and you can use the text widget for the second field. Simply drag the widgets to the intended container.
- Just change the text label to match the custom fields in the AWeber account.
Step 7: Integrate AWeber with Elementor Form
Now, this is the part that we want to achieve, and that is to integrate AWeber with the WordPress form we created. To integrate, here are the steps to follow:
- While in the Elementor editor for your form, click on フォーム設定 (the gear icon).
- に行きます 統合 tab and toggle the Aウェーバー switch to “On.”
- を選択してください AWeber List ドロップダウンから選択します。
- Map your fields and ensure the “Email” field in MetForm matches the “Email” field in AWeber, and so on. If not, it will affect the exportation of form submission data to the AWeber
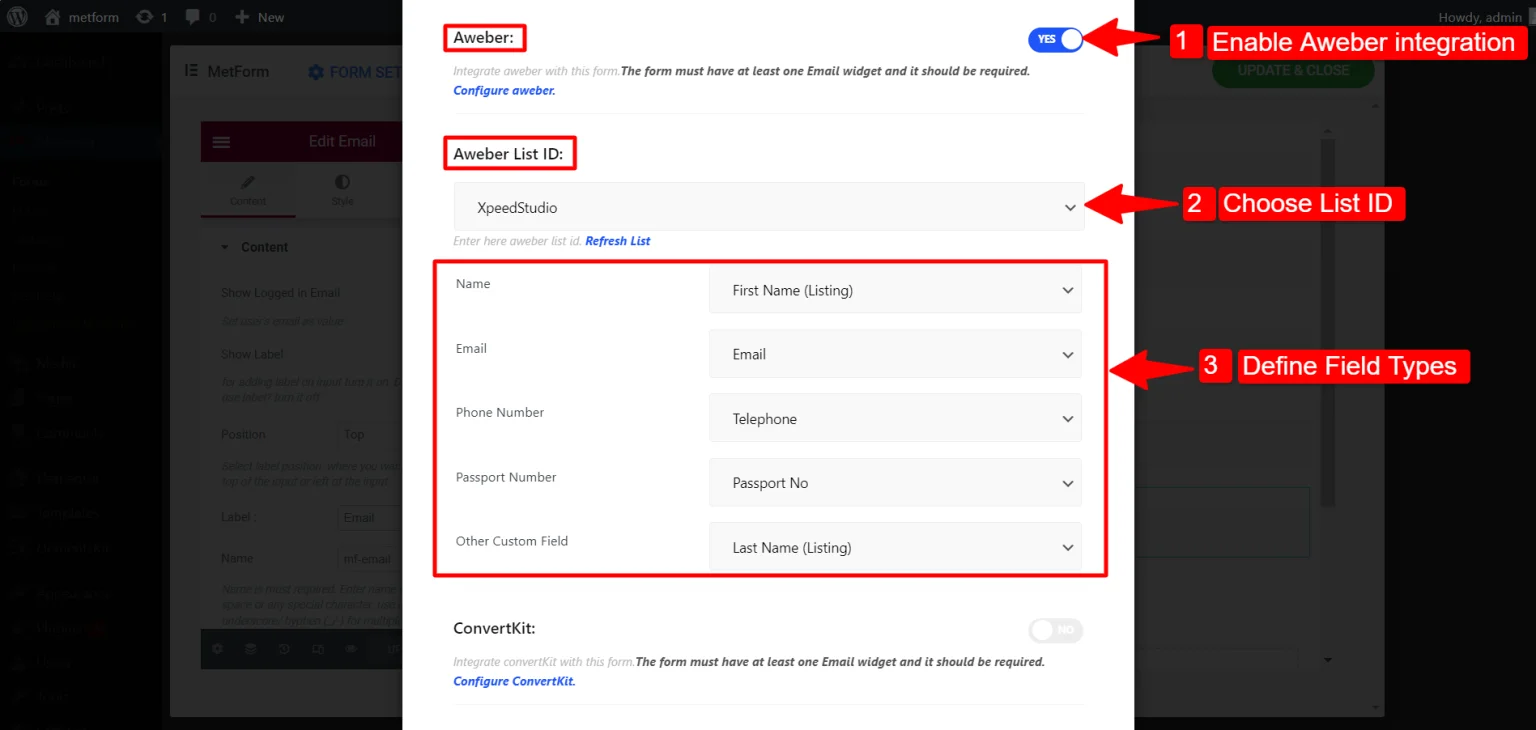
And that’s it! Your WordPress forms are now integrated with AWeber.
Step 8: Test the Integration
Never skip this step! This is so important because this step will determine the success of your integration.
To test the success:
- Open your page in a live browser and fill out the form with a test email.
- Check your AWeber Subscribers list. If the name appears there instantly, you have successfully achieved WordPress AWeber integration!

When This AWeber Integration Is the Right Choice (When Not)
You need an AWeber integration when:
- You want to automate the syncing of the contacts coming from the website, such as opt-in forms, social campaign sign-ups, etc.
- You want to segment subscribers based on behavior, trigger emails from specific actions such as form submission, and send automatic follow-up emails.
- You wish to sync user’s data like name, interest, purchase history, etc., and update information in real time.
- You are using multiple platforms such as e-commerce and CRM. For example, when someone buys a product from e-commerce, then the customer’s data pass to AWeber, and they get a welcome notification automatically.
But not all the time; you need AWeber, especially when:
- You are just starting with fewer than 100 contacts or collecting email occasionally. A simple manual CSV import is a good option.
- There’s limited tagging or segmentation.
- The platforms you are using have their own built-in email systems.
- You experience issues with the integration that require constant maintenance. These issues could be missing tags, duplicate subscribers, and syncing errors.
よくある質問
1. Do You Need a Developer Account for AWeber?
Yes, but it’s free! You just need it to generate the API keys (Client ID and Secret), so your website can securely send data to your account.
2. Can You Use the Free Version of MetForm?
The AWeber integration is a premium feature, so you will need a メットフォーム プロ license to connect WordPress forms to AWeber natively.
3. Will Your Existing Subscribers be Duplicated?
AWeber’s API generally handles this by updating existing subscribers rather than creating duplicates, provided the email address is the same.
4. What Happens if OAuth Expires?
If the OAuth URL expires during the MetForm integration with AWeber, the authorization process fails, and the connection is not completed. So, MetForm cannot send form data to AWeber until the integration is reconnected and re-authorized to generate a new OAuth URL and restore access.
5. Why are Submissions not Appearing in Awerber even though the Integration Shows Connected?
This happens for several reasons:
- If the OAuth authorization has expired or become invalid.
- The connection was not fully re-authorized after changes.
- The selected AWeber list is incorrect, required fields such as email are missing or mismatched.
- The API request is failing silently due to permission or sync errors.
To fix them:
- Disconnect AWeber from MetForm and reconnect to refresh the OAuth authorization.
- Make sure the correct list is selected in the MetForm settings.
- Ensure required fields, especially the email field, are properly mapped.
- Review MetForm logs or error messages and ensure the API connection is not blocked.
- Submit a test entry and confirm it appears in AWeber.
最終的な考え
Integrating your WordPress forms with AWeber through MetForm is a wise move to increase your leads. Though the integration is a bit of a process, still the success is 100%.
No more manual exports or missed leads. Everything stays synced and ready for your next campaign.
コメントを残す