Food business today means going beyond just serving delicious meals. You also need a smooth and hassle-free way for customers to place their orders.
Instead of relying on phone calls or handwritten notes, a food order form is an efficient way for customers to place orders directly.
With advanced features like visual food menu selection, selecting add-ons, calculation, payment options, and confirmation emails, we will demonstrate an easy way to create an online food order form in WordPress.
Quick Overview
This tutorial includes the process to create a WordPress food order form and customize it.
Tools Used: MetForm and Elementor
✔️ Process 1: Using MetForm templates.
✔️ Process 2: Build with a blank layout.
A food order form usually includes:
✅ First Name and Surname (Name fields)
✅ Contact info (Email and Telephone)
✅ Flavor add-ons (Select field)
✅ Quantity (Number field)
✅ Total Price (Calculation)
✅ Delivery option (Toggle switch)
✅ Payment option
✅ Confirmation email
Why do you need an online food order form?
In one line, an online food order form is a quick and easy option to place orders online. Customers can simply browse, pick their food item, pay instantly, and place their order without any hassle.
Here is a breakdown of how an online restaurant order form can help in your food business:
- Customers can order anytime, even outside business hours.
- You can avoid miscommunication from handwritten or verbal orders.
- It keeps things organized by providing all the information in one place.
- Payments can be collected upfront, which means fewer cancellations.
Which fields should you include in a food order form? (Planning stage)
Before jumping into tools and plugins to create the form, let’s first sort out and list down what you’ll need to include.
While planning the form fields, focus should be on keeping it simple but detailed enough to collect everything you need to fulfill an order.
For this tutorial, we have decided on the following fields for an online food order form:
✅ Customer’s contact information fields
Information like customer name and contact details is essential (kind of mandatory) for your food order form. So we are including these fields: First Name, Last Name, Email Address, そして Phone Number.

✅ Food selection fields
Here, we will add the food menu with options to select the items for the users. For this, you can use the image select field, where the user can see a visual of the food item and select their menu.
You can also use the Select field to provide the customer an option to include add-ons like cheese, extra cheese, crispy, etc.
Also, use the Number field to set the quantity of the order.
Besides, you can also show the total order amount by calculating the total price.

✅ Delivery details fields
If you have a food delivery service, add fields related to delivery, including the recipient’s 名前 and address. The address details may include a 文章 field for the primary address, a 選択する field to choose the state or division name, and a number field to enter the ZIP code.

✅ Payment options
To let the customers pay while ordering their food, you can add the 支払方法 field to the food order form.
✅ Submit / Cancel buttons
At the end, add the submit button for the users to finalize their order. Also, consider adding an option to cancel the order with another button.
How to create a food order form in WordPress with Elementor (Execution stage)
Let’s now start building the WordPress food order form. To use the advanced form fields and features, we will use MetForm, a WordPress food order form builder.
This one is an Elementor form builder, which lets you create WordPress forms in the most flexible way with features like reCAPTCHA spam protection, payment integration, CRM integrations, pre-designed templates, confirmation email, and so on.
So we will first install the plugins, then create the plugin with all the above-mentioned fields and options.
Prerequisite: Installing Required Plugins
To use the MetForm, you need to have the Elementor plugin installed on your WordPress site. After that, install the free and pro versions of the MetForm plugin.
📥 Required Plugins:
- エレメンター: プラグインのダウンロード
- MetForm Free version: プラグインのダウンロード
- MetForm Pro version: プラグインを入手する
Method 1: Use a WordPress Food Order Form Template
The biggest advantage of using MetForm is, you can use professionally designed, pre-built WordPress food order form template to quickly build the form, instead of building it from the ground up.
To create a restaurant order form in this case, you can use the MetForm’s food order form template.
- From your WordPress dashboard, go to MetForm → Forms.
- クリック 新しく追加する Form button at the top-left.
- Then a pop-up will appear to create a form. Firstly, enter the form name.
- 選ぶ 一般的な形式 as the form type.
- Browse through the templates and pick the Food Order Form テンプレート。
- 最後にクリックします フォームの編集 and start customizing.
Now you can customize the restaurant food order form template if you want, make changes to match it to your brand style, and you are ready to go.
Method 2: Create a food order form with a blank canvas in Elementor
Alternatively, start with a blank food order form template to build it from scratch.
With Elementor and MetForm, you can create a WordPress form with all the essential fields, customize the appearance, and add advanced functionalities like payment, image selection, and so on.
Step 1: Create a form with a blank food order form template
To create a form in Elementor using メットフォーム, follow the steps below:
- Log in to your WordPress dashboard and head over to MetForm → Forms.
- From there, click the Add New Form button at the top-left.
- A pop-up will appear where you can give your form a name.
- Next, set the form type to 一般的な形式.
- This time, choose the Blank Template to start from scratch.
- Then hit the フォームの編集 ボタン。
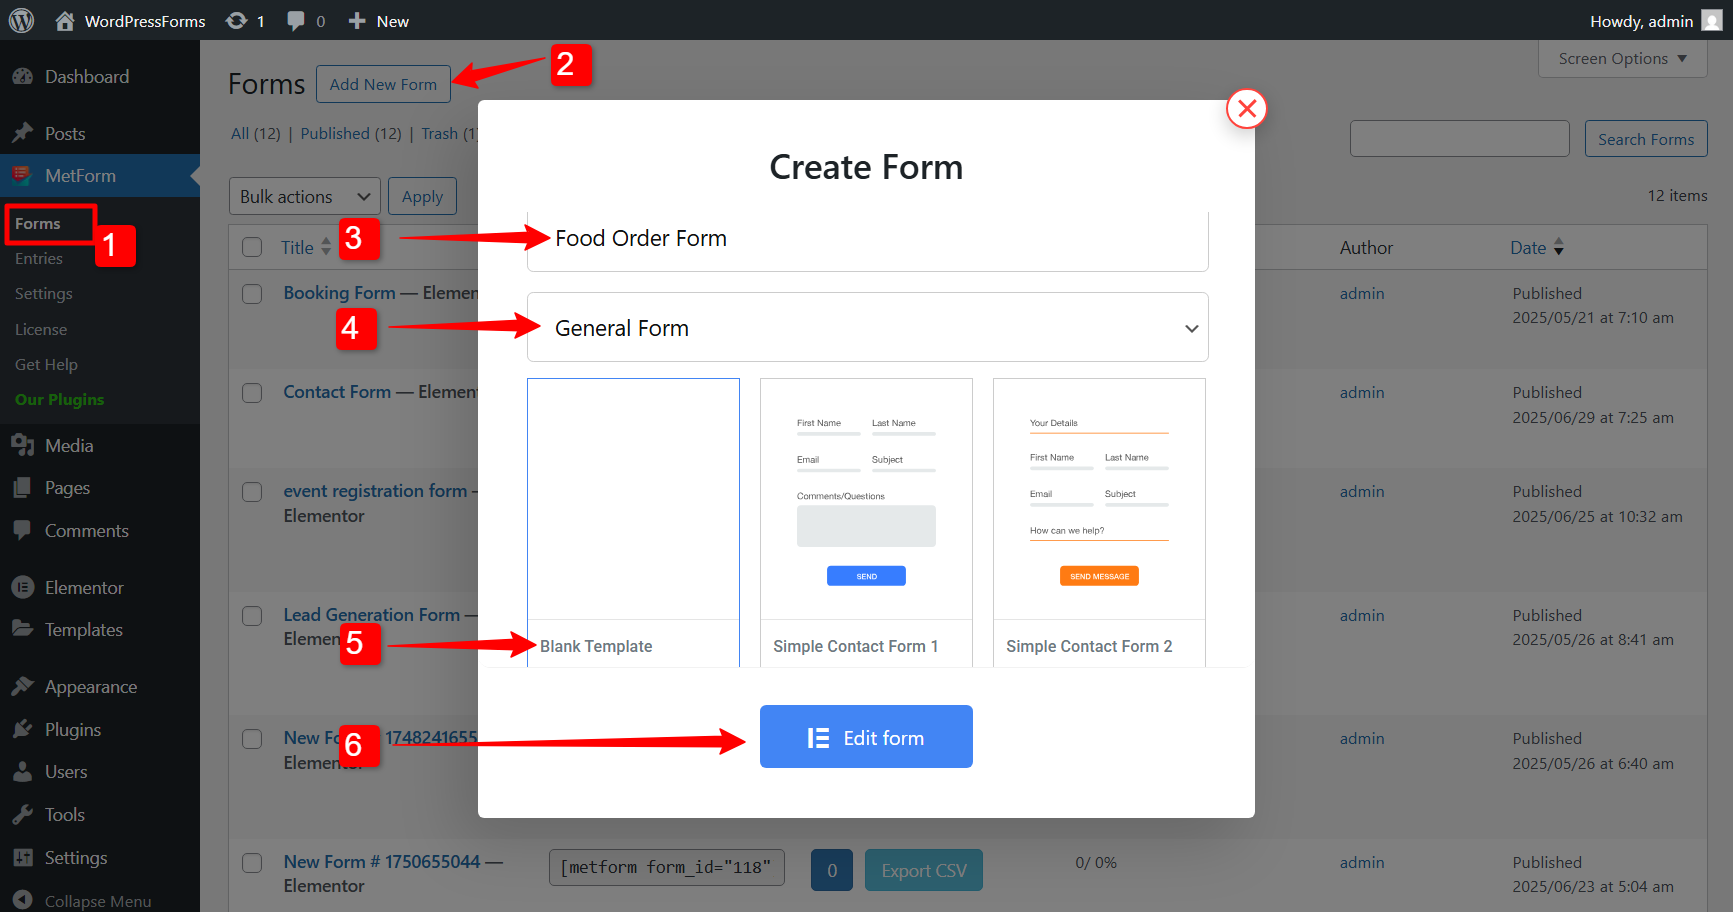
You’ll now be taken to the Elementor editor, where you can start building your form, in this case, a blank food order form template for WordPress.
Step 2: Add Customer’s Contact Information
As decided earlier, we will start by adding the Name field and contact info fields (Email and Telephone number).
☑️ Name Fields
We will use two separate form fields for ファーストネーム そして 苗字. Search for both fields in the widget search bar and add them to the food order form design.
For each name field, MetForm gives you the following options:
- ラベルを表示: Choose whether you want to display the labels (First Name / Last Name).
- Label Position: Decide if the label should appear above the field or to the left.
- ラベル: Set the text that will appear as the field’s label.
- Fixed Field Name: Assign a backend name that will be used to identify the field at the backend. (For the Name field, this value this fixed).
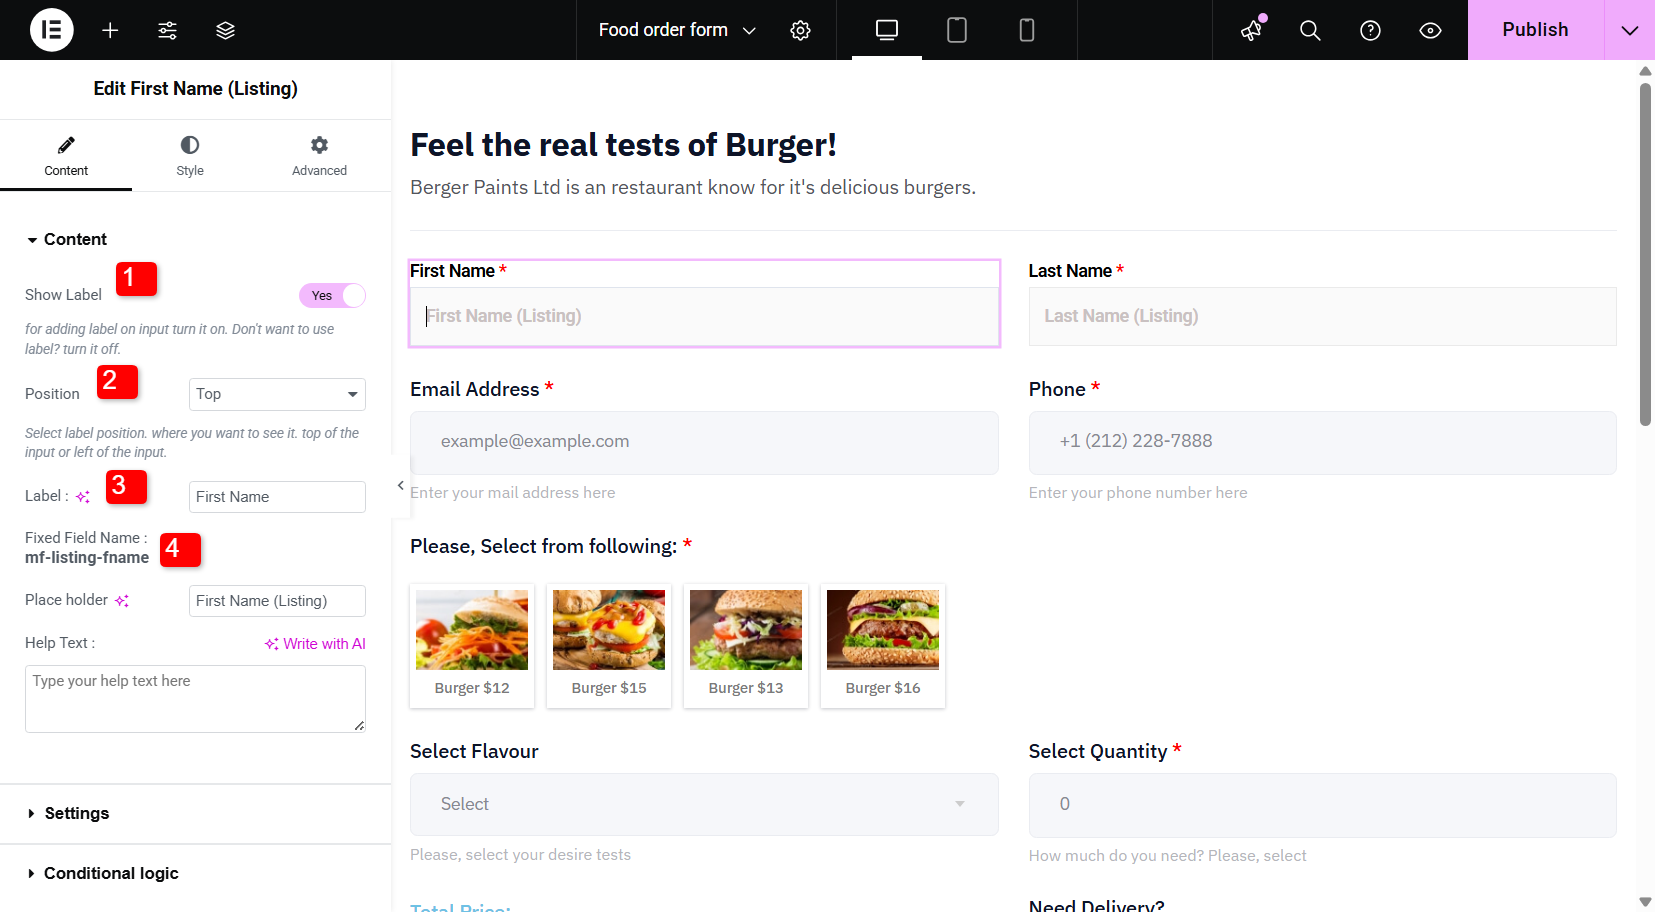
Also, you can add a プレースホルダー そして ヘルプテキスト for better user guidance.
For the customization, change the colors, typography, padding, and margin for the labels, input text, placeholder, and help text separately.
☑️ Email and Telephone Number (Contact Info)
To collect the contact information, we will use the Email and Number fields.
For the email field:
- Show Logged-in Email: If enabled, it automatically fills in the user’s email address with the ID they are logged into the browser.
- Unique Email: If you want to limit users to making only one reservation per email, enable this option.
Like the name fields, the Email and Telephone Number fields also come with customizable settings. You can show or hide the label, set its position, and define the Label, Name, Placeholder, and Help Text for each field.
Step 3: Add Food Menu and Selection option
This is the heart of the form. Here’s where customers choose what they want to order. You can use a simple select field or a radio button. However, for a smart option, you can use the Image Select field from MetForm.
✅ Image Select field
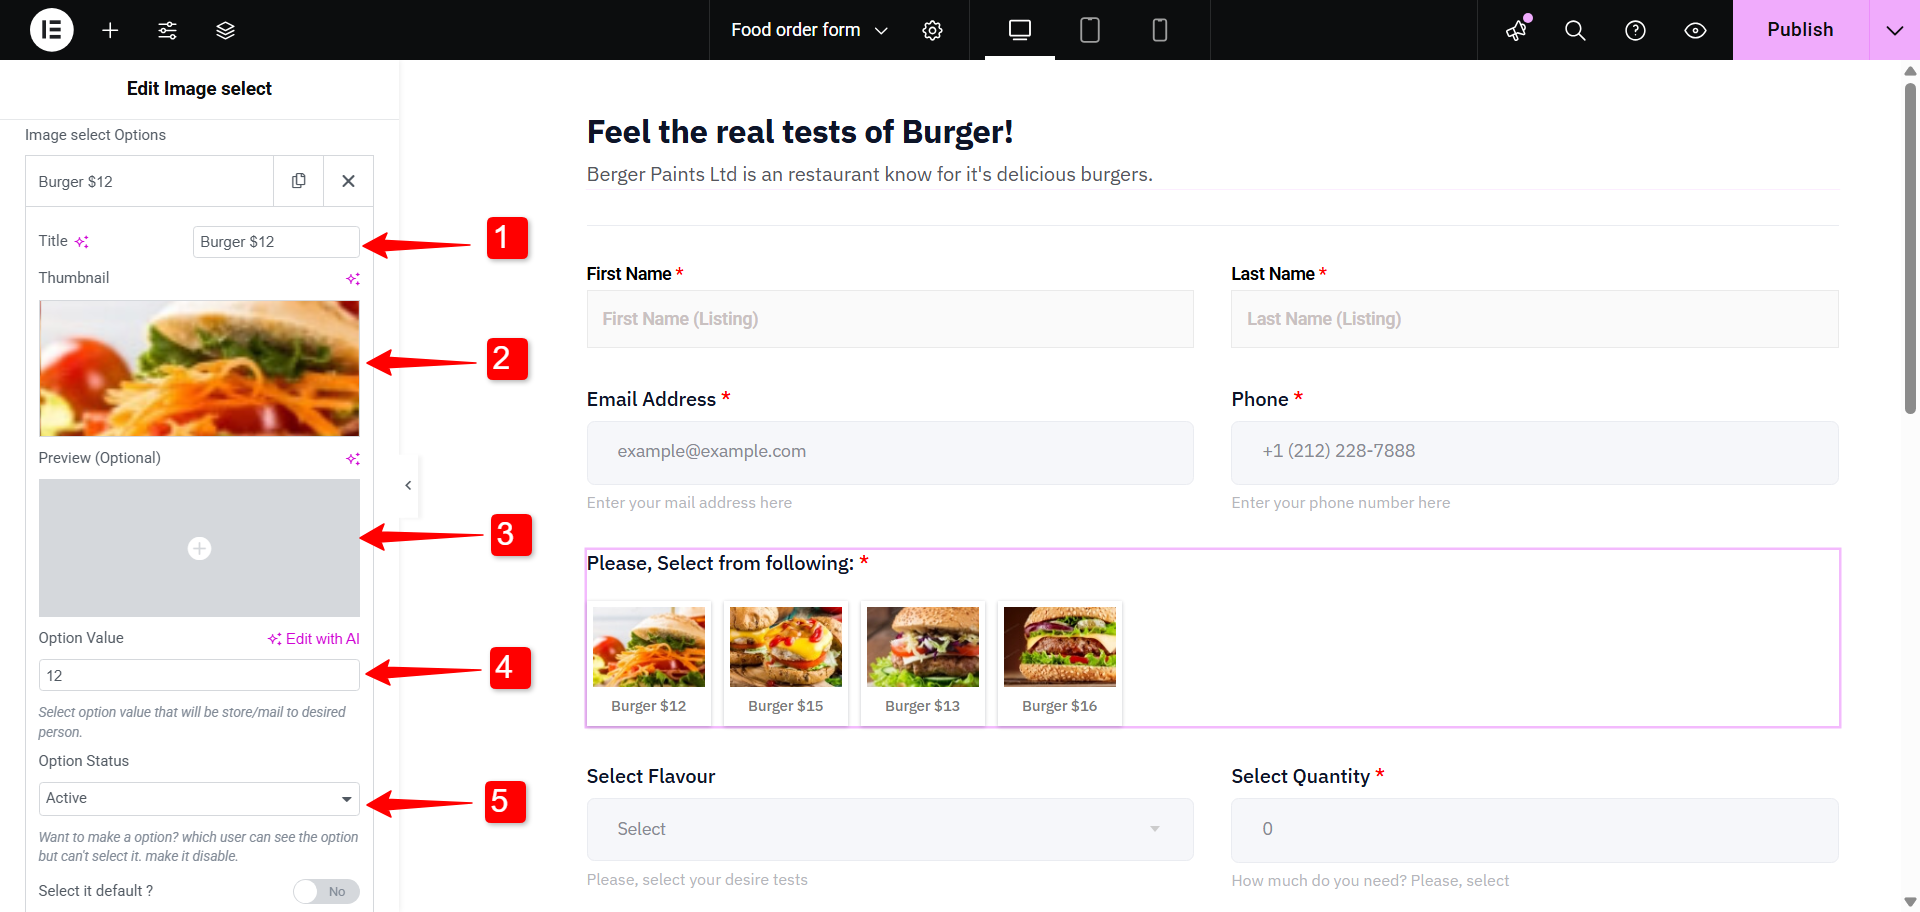
In the image select field, you can show a picture of the food item with the item’s name and price. Here are the options you have with this form field:
👉 Display Option: Set the layout orientation to 水平 または Vertical.
👉 Select Type: For the Single Select, the user can select only one item. For the Multi Select, the user can select multiple options.
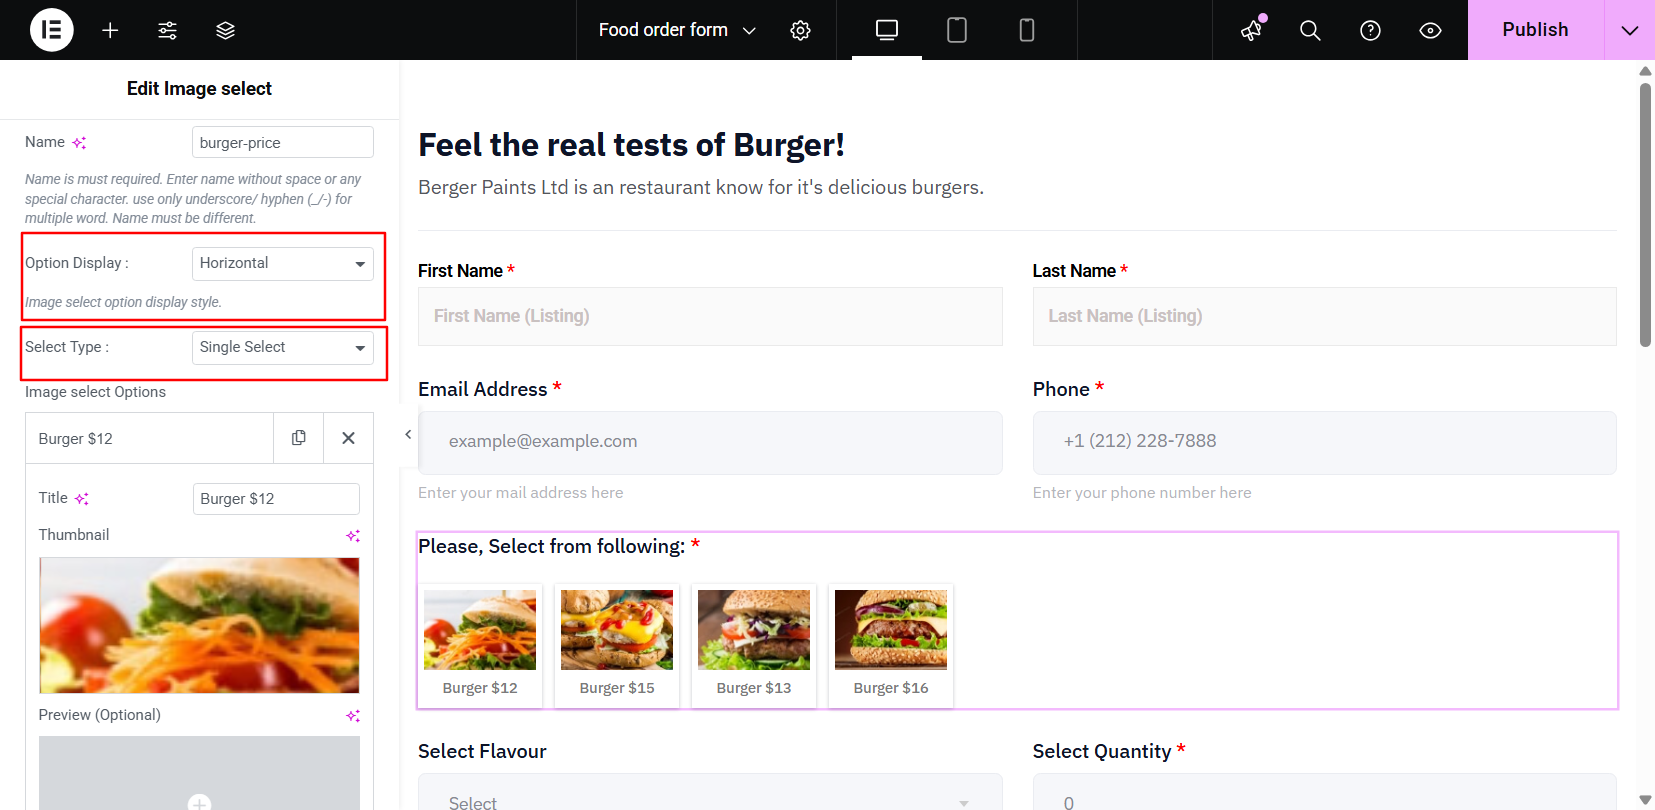
👉 Image Select Options: You can add food items and their properties, including:
- タイトル: Name of the food item. (You can also mention the price here.)
- サムネイル: Upload a thumbnail image for the item.
- プレビュー: You can also add a preview image.
- オプションの値: Add the price value, which will be stored or sent in the mail to the recipient.
- Option Status: If set to Active, the user can select the option. Otherwise, if set to Disable, the user can see the option but can’t select it.
✅ Select field (Flavor add-on)
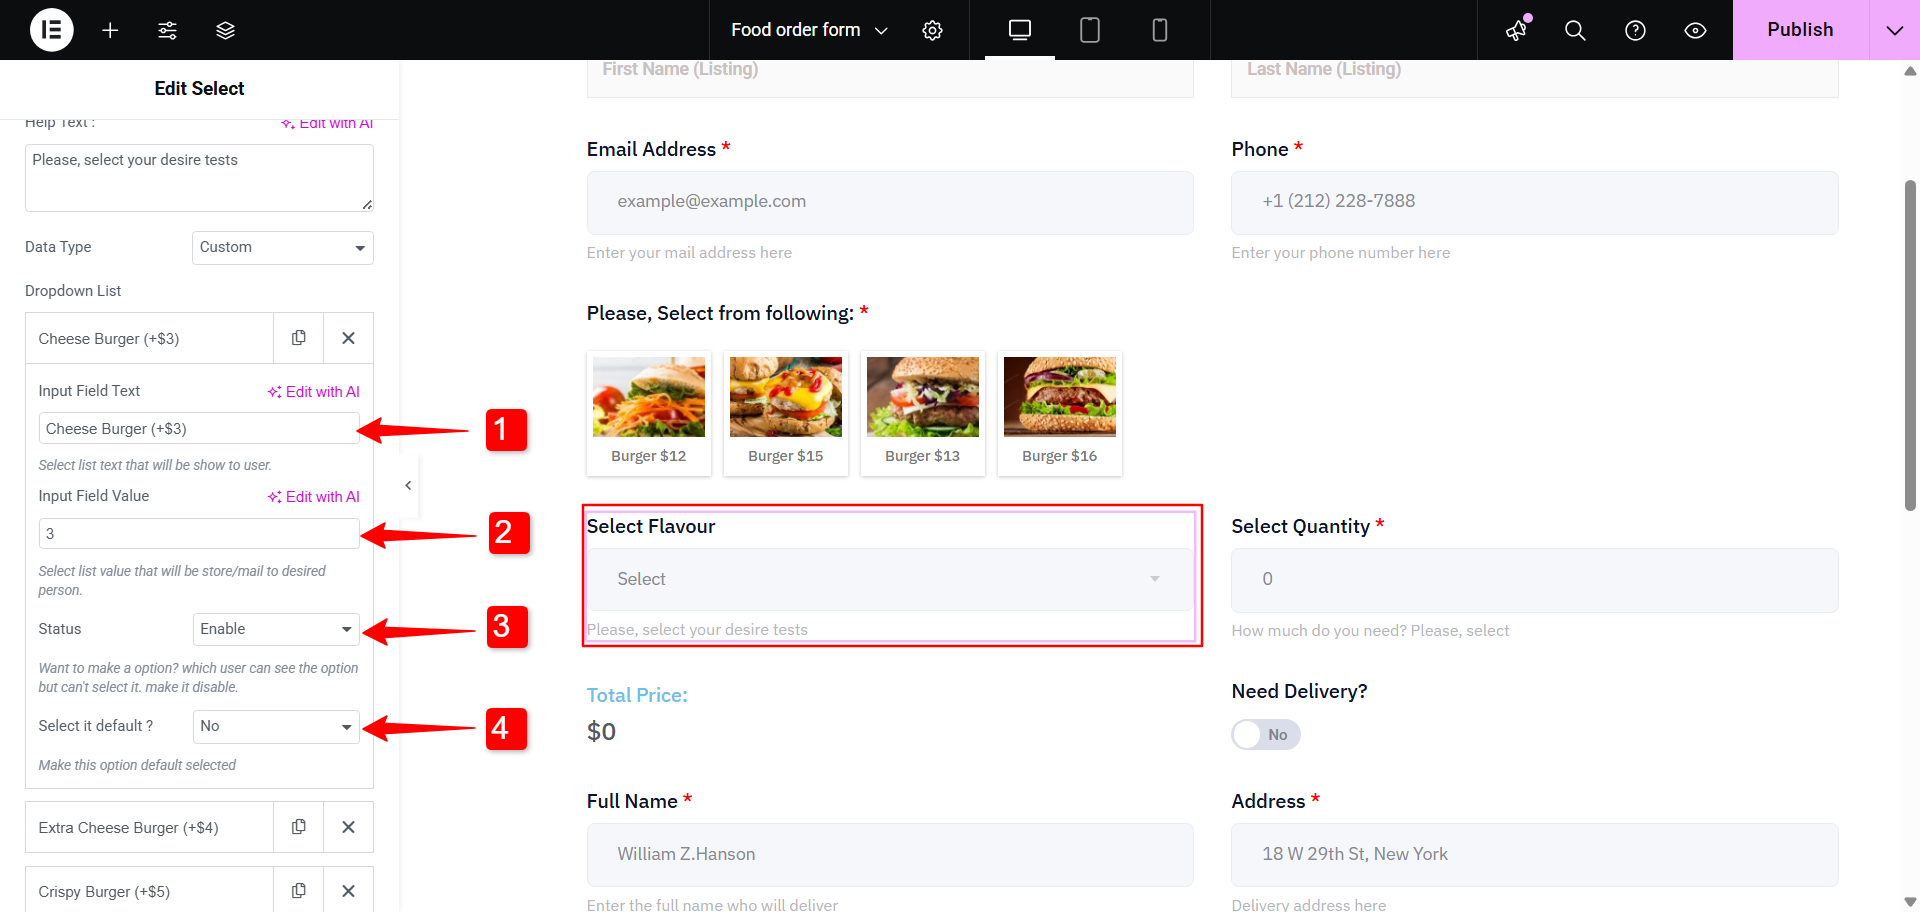
Create a dropdown list of the add-ons. For each of the dropdown items you have the following options:
- Input Field Text: Enter the name of add-on item.
- Input Field Value: Enter the price of the item.
- Status: Set it to Enable or Disable based on the availability.
- Select it default: Decide whether you want the have the item selected by default.
✅ Number field (Select Quantity)
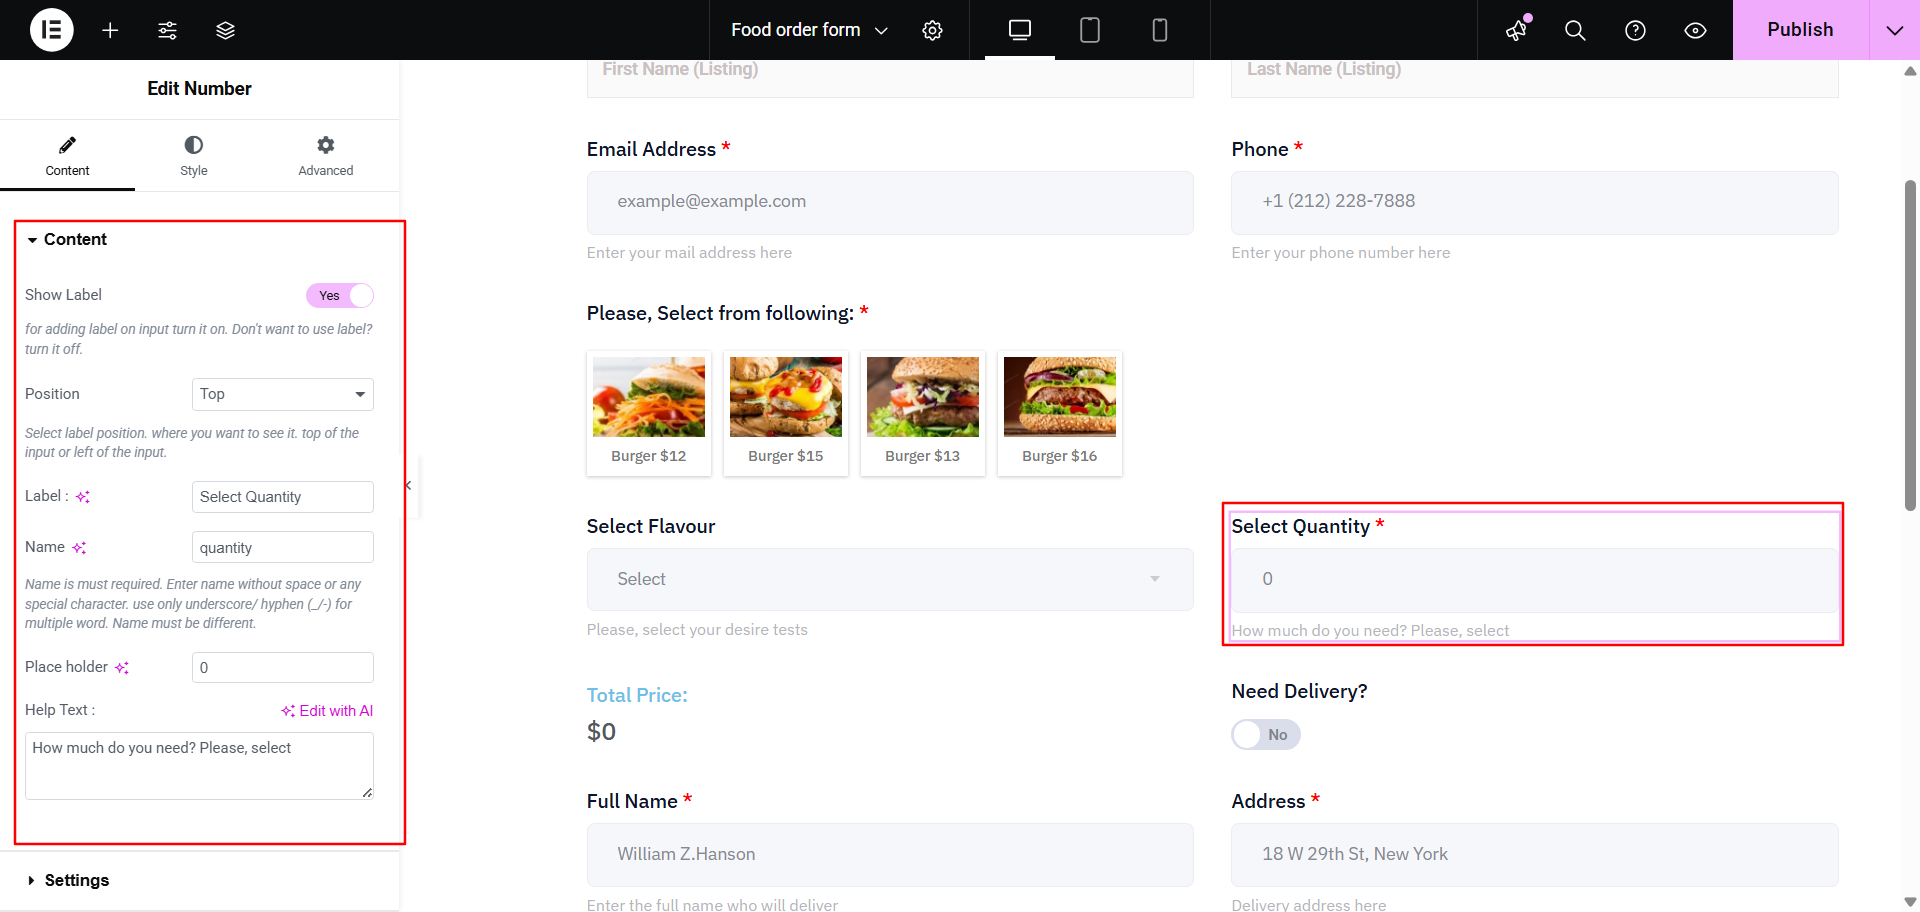
Let the customer enter the quantity of their food order. Use MetForm’s Number field widget for this. Like other form fields, you can set the position, label, name, and placeholder for the number field.
✅ Calculation (Total Price)
For a better user experience, you can calculate the total order value and show it in the form. With MetForm, you can simply use the Calculation feature and show the total amount the customer has to pay. Here, to show the total price of user’s food order, we will consider the price of the main menu, selected add-on, and the quantity of the order.
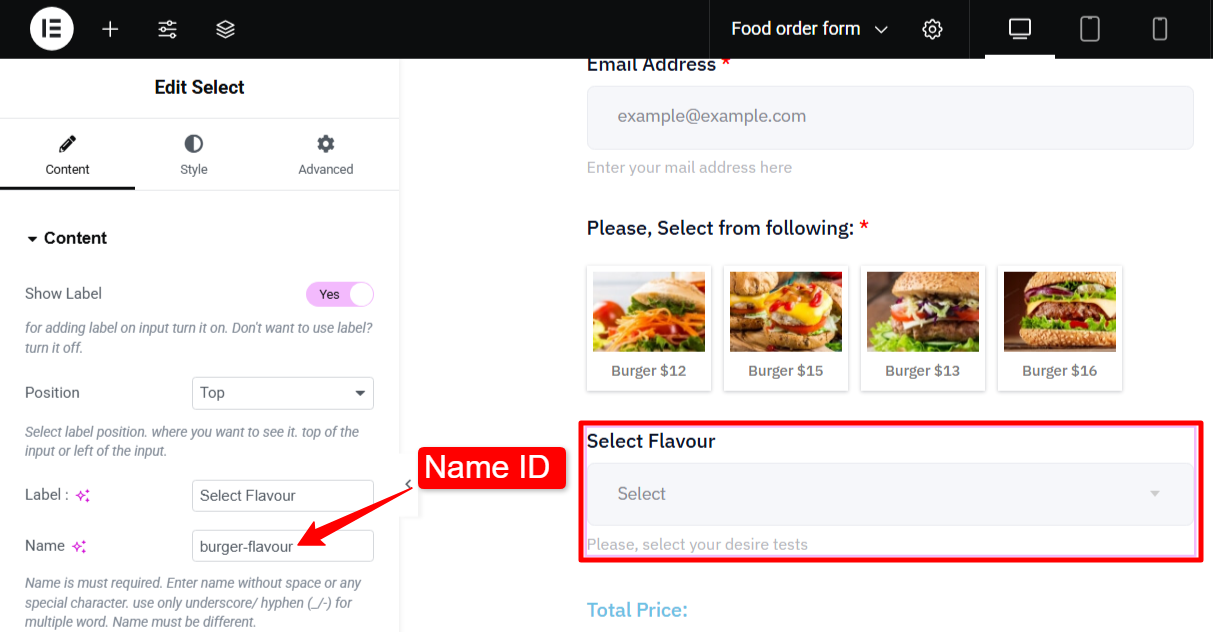
To calculate the values, copy the value names of the respective fields. For example, the name of the Image Select Field は burger-price. When use select a item, the input field value of that field (i.e. price) will be called in the calculation.
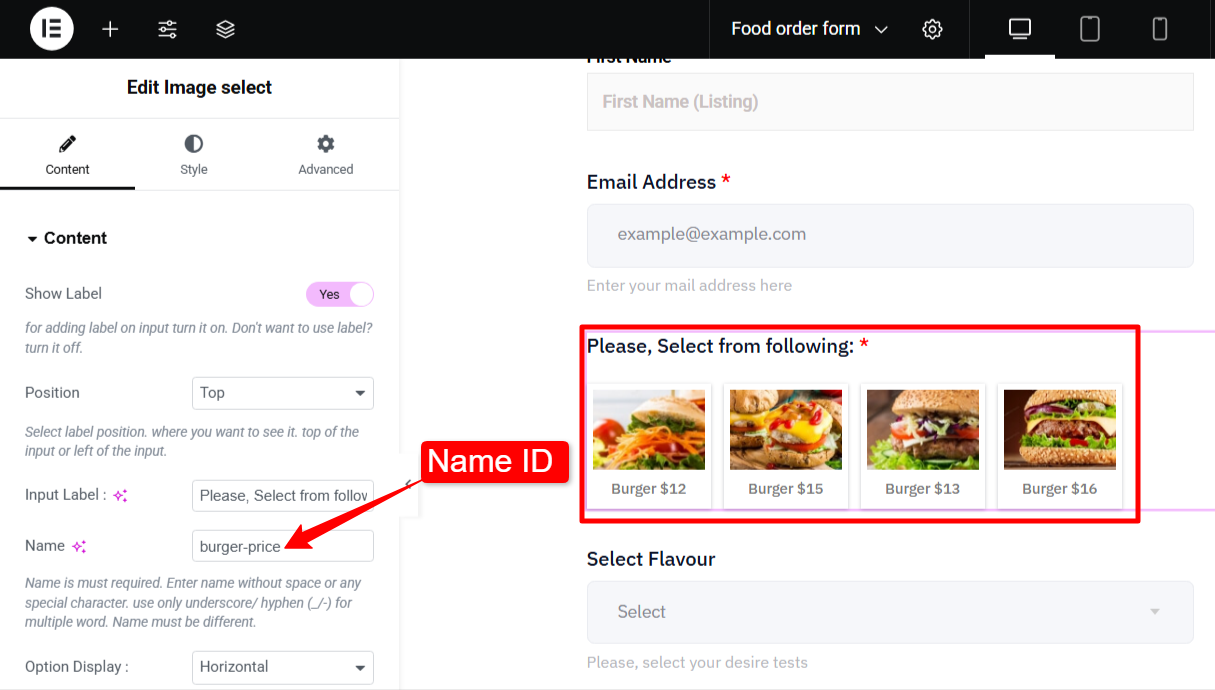
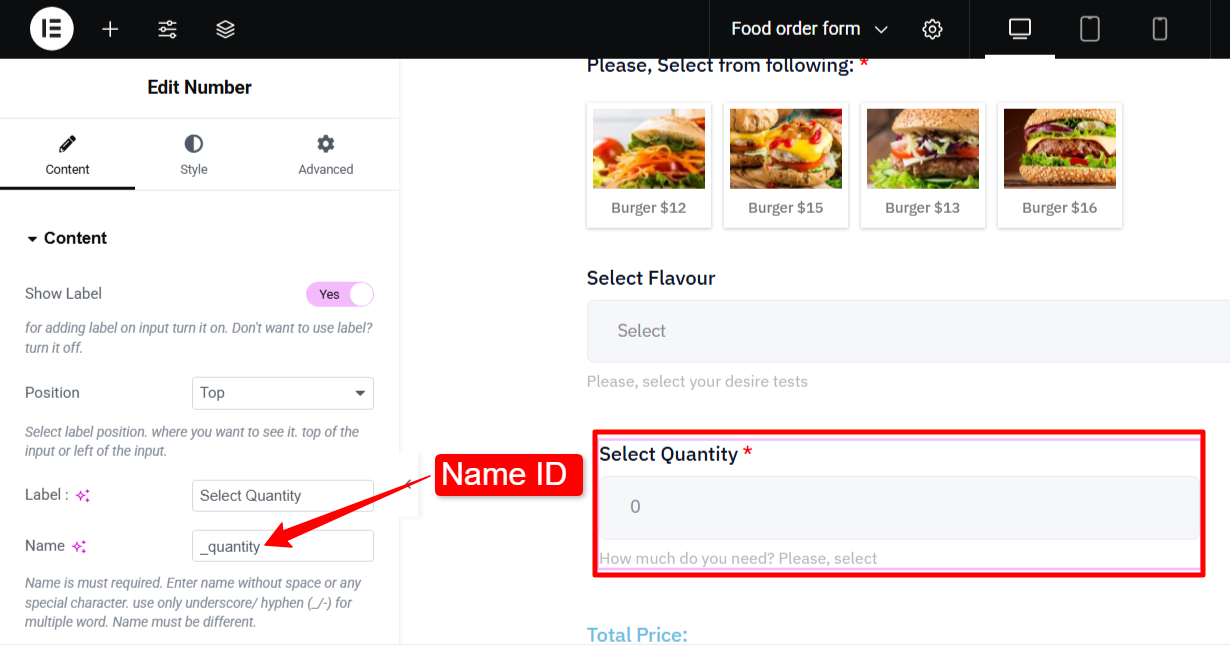
同様に、 Flavor Add-on, the name of the field is burger-flavour. When used in calculation field, the input field value of the selected dropdown item. For the Select Quantity the name ID is _quantity.
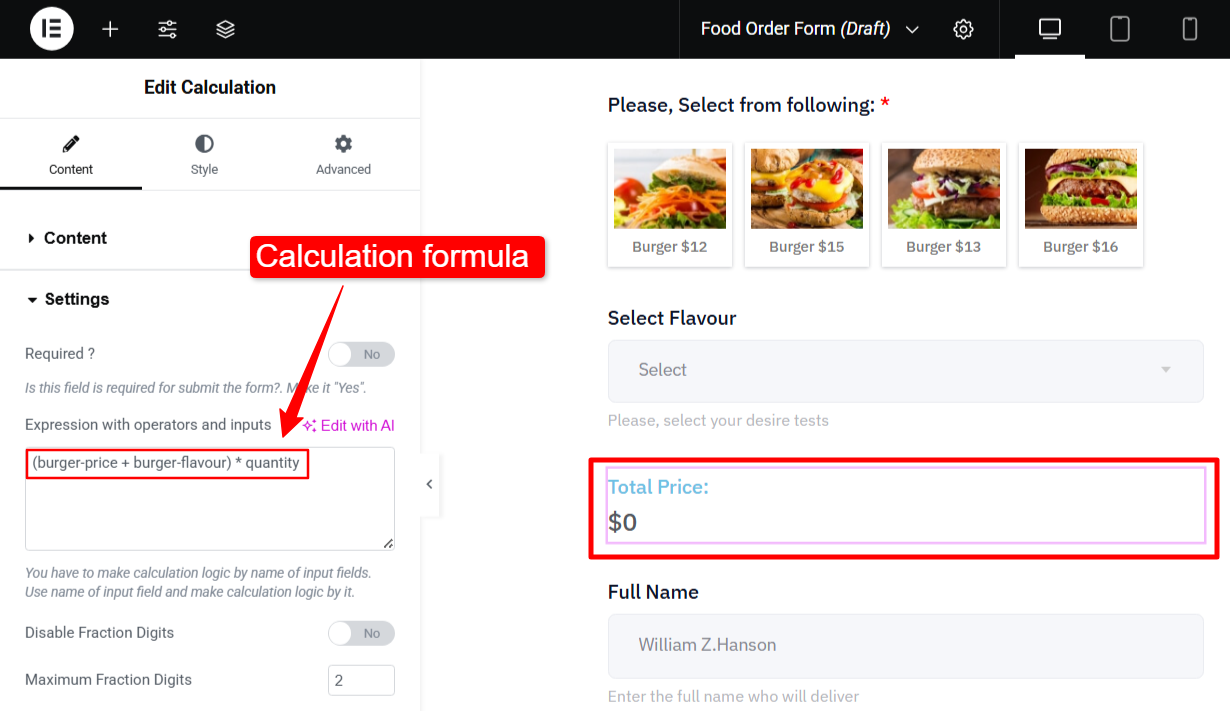
Now in the Calculation field, expand the 設定 section. There you can add 演算子と入力を使用した式. For this form, we will add the following formula: (burger-price + burger-flavour) × quantity
This means, the form will add the price of the main menu and add-ons and multiply the sum with the order quantity.
To learn how to use the MetForm Calculation field, read the documentation of this feature.
Step 4: Include Delivery Details
If you deliver the food as well, you can enable the delivery option. In this form, we have added a toggle switch with the “Need Delivery?” label.
When the customer toggles it to YES, the following feilds will appear: Full Name, Delivery Address, Select State, and Zip code.
This is basically works with the conditional logic, where the appearance of the feilds depends on the actions taken by the user.
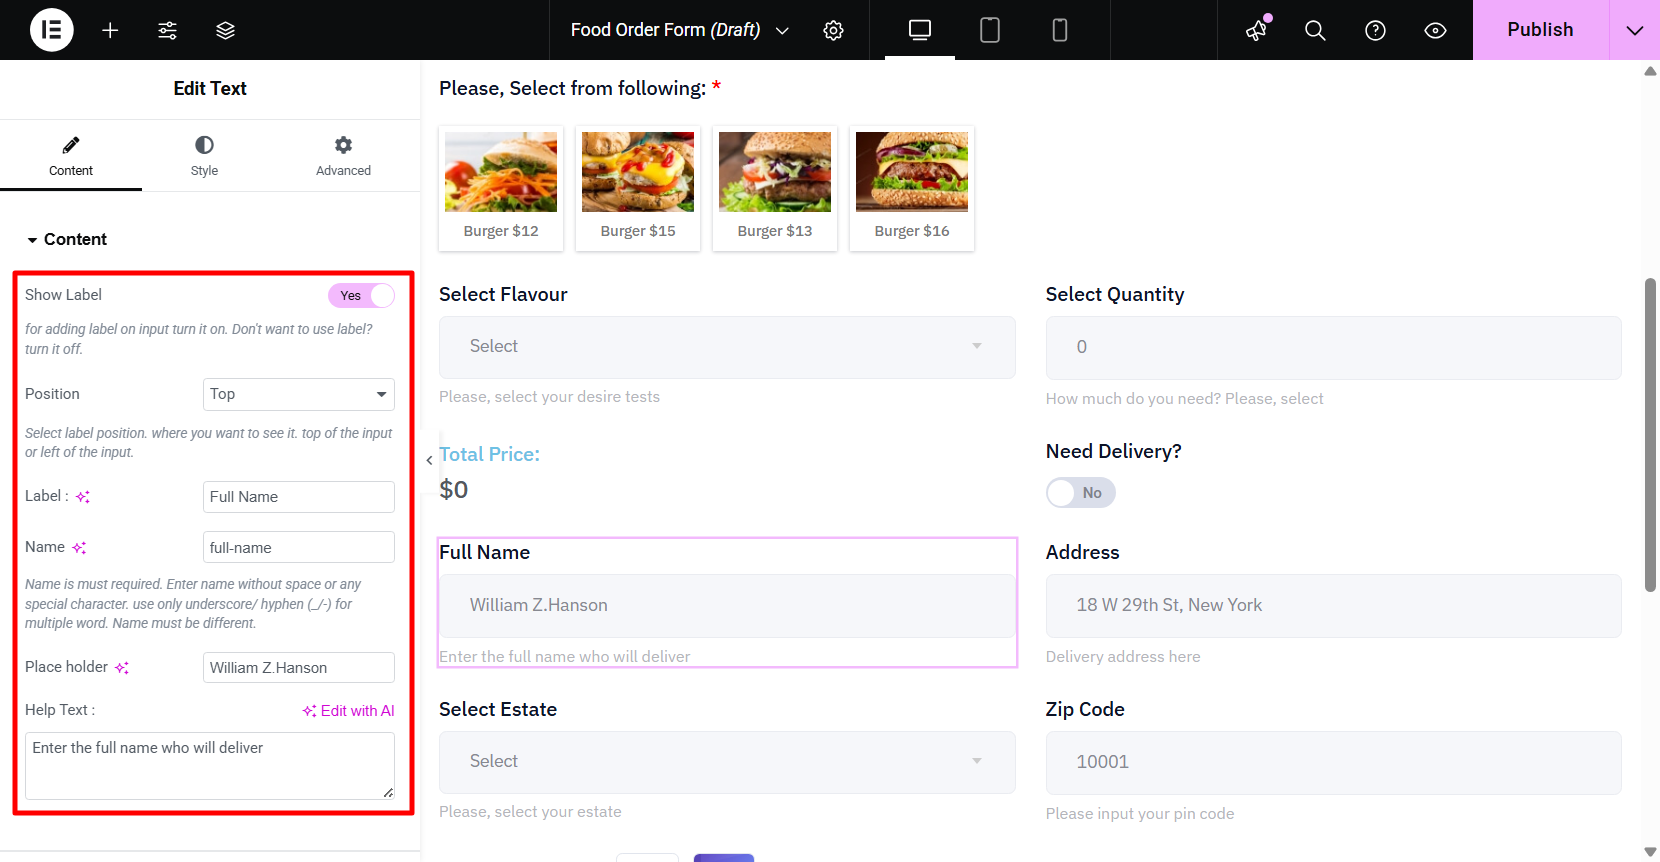
のために Full name そして 住所, we have used the Text Field. For these fields, you can:
- ラベルを表示
- をセットする 位置
- Enter the field ラベル
- Field Name
- プレースホルダー
- and Help text
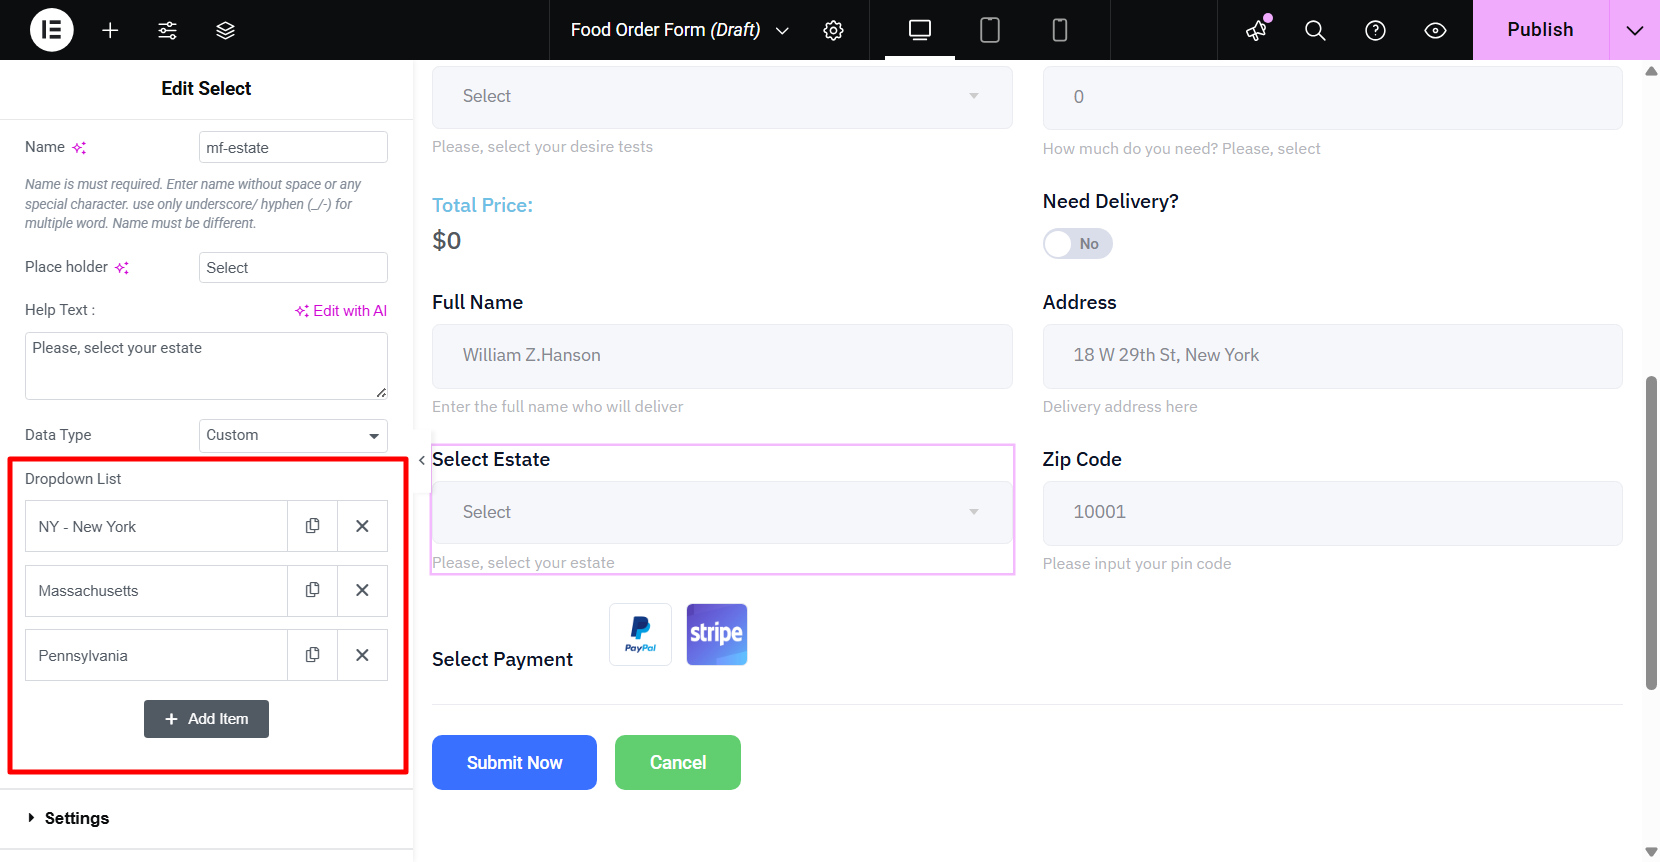
For the State, we have used a Select Field. For this field, you have the option to add a ドロップダウンリスト. For each dropdown item, you’ll need to fill in the input field text with the State name, add an input field value、 をセットする status to either enabled or disabled, and choose if it should be the default selection.
のために Zip Code, you can use the number form field.
Step 5: Add an Option for Advanced Payment
With MetForm’s payment field, you have the option to accept payment during form submission.
簡単にできます set up payment methods using gateways like Stripe or PayPal, specify payment amounts, and set conditions. For this guide, we will show you the process of adding PayPal integration to this form.
✔️ Generate PayPal Identity Token
に accept PayPal payments in WordPress forms, you need to generate an identification token:
- Log in to your PayPal account and go to 設定 > アカウント設定.
- 開ける ウェブサイトでの支払い.
- オンにする Auto Return for Website Payments and add your site URL.
- 有効にする Payment Data Transfer.
- Once enabled, your PayPal ID トークン will appear.

今、 トークンをコピーする and switch to your WordPress dashboard.
✔️ Set up PayPal integration in WordPress
Now you can connect PayPal with your WordPress site using the token.
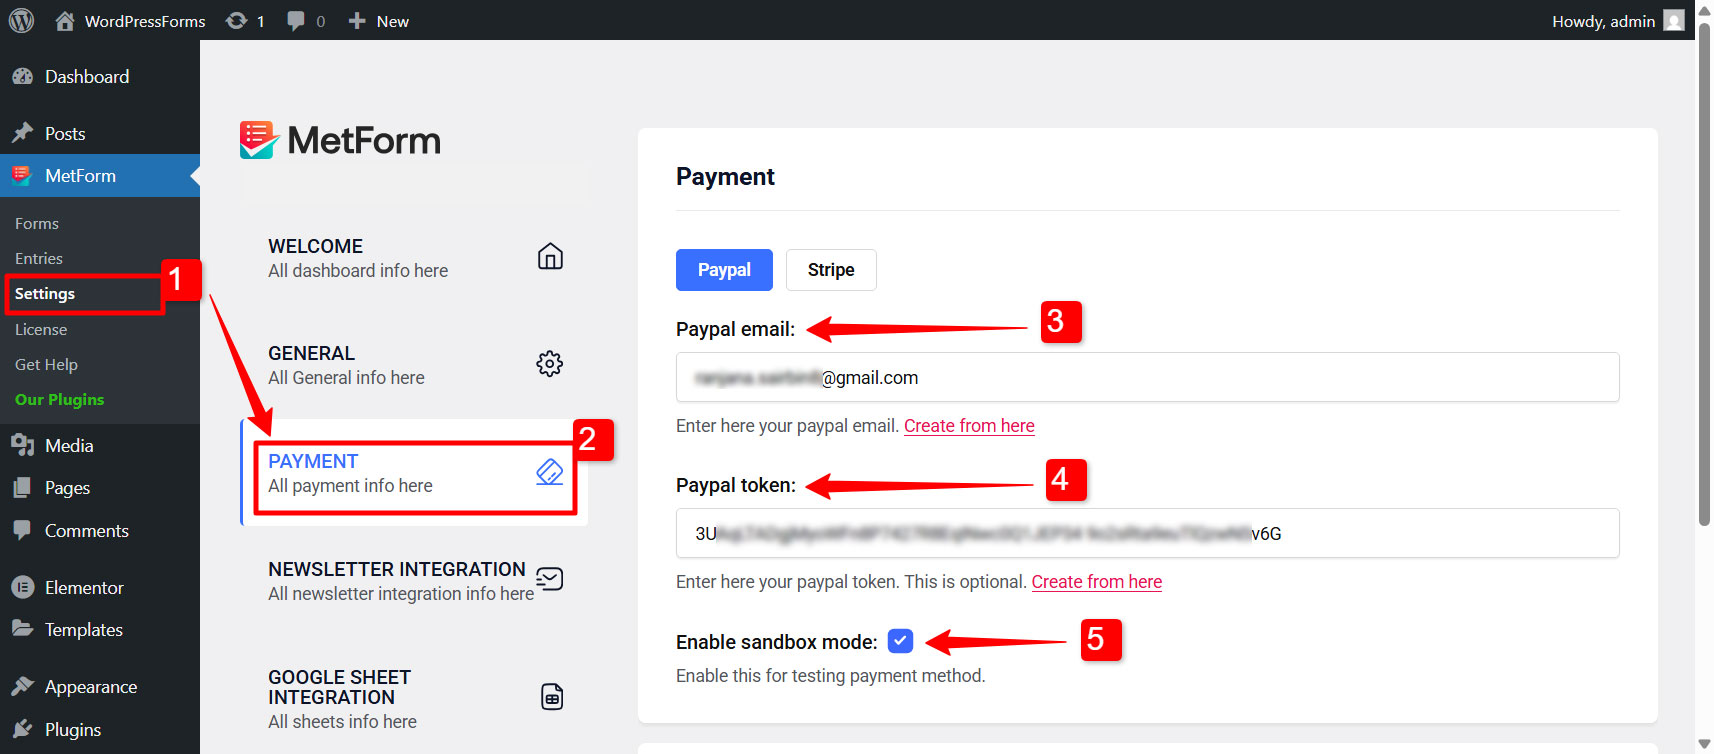
- In WordPress dashboard, go to MetForm→ Settings.
- Go to the Payment settings and switch to the ペイパル タブ。
- あなたの〜を入力してください PayPalメール that you have used for your PayPal account.
- 次に、 PayPal ID トークン that you’ve generated previously.
- Enable sandbox mode 支払い方法のテスト用。
- 最後に、 変更内容を保存 ボタン。
✔️ Enable PayPal payment for the food order form
After that, you need to enable the PayPal payment method for your WordPress food order form. For that,
- に行く MetForm → Forms in dashboard.
- クリックしてください 編集 option for the form.
- In the Form settings, switch to the 支払い タブ。
- を選択してください デフォルトの通貨 (e.g., USD).
- Turn the toggle button to の上 for PayPal.
- 次に、 変更内容を保存 ボタン。
Now you will be able to accept payments in your food order form with the PayPal gateway. To do that, you’ll need to add a PayPal payment button to the form.
Here’s how you can set it up:
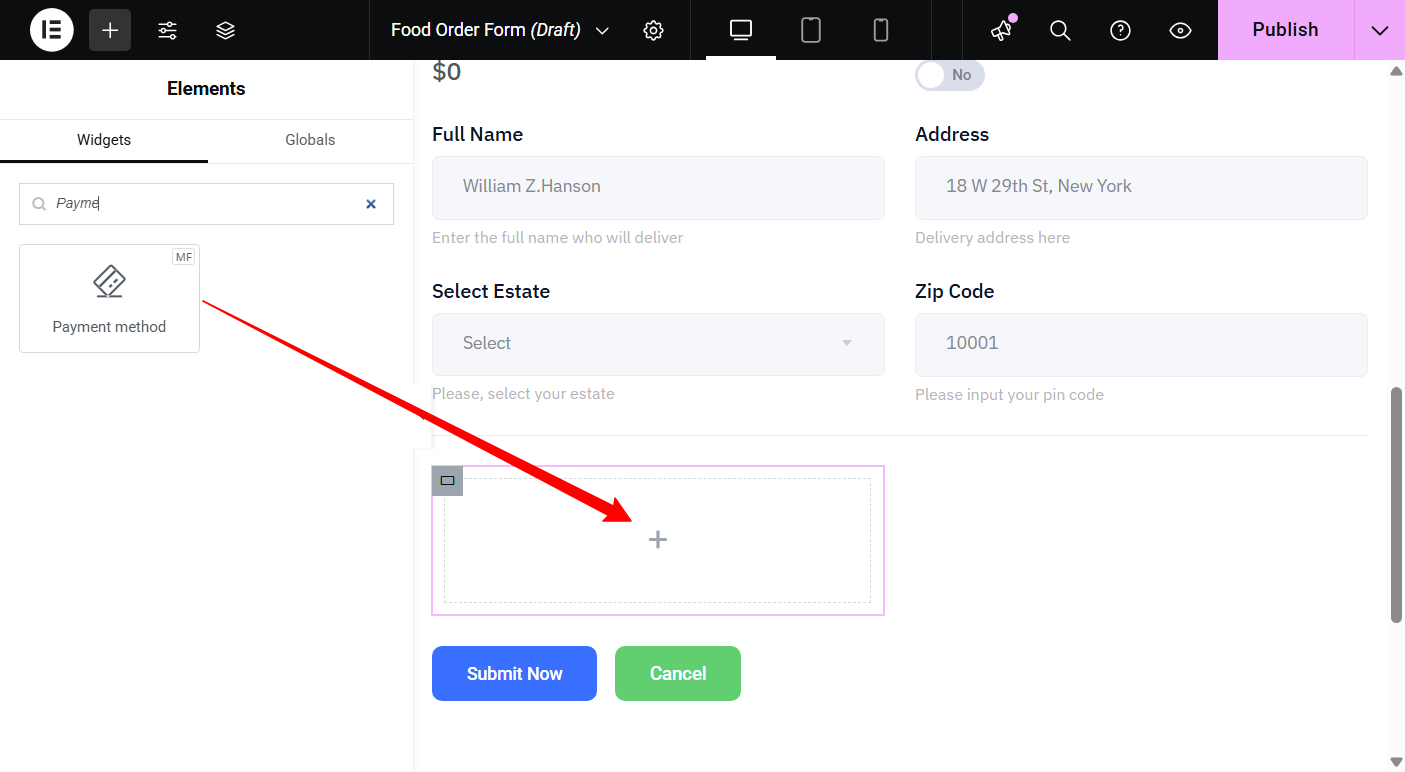
- Open the food order form in the Elementor editor.
- In the editor, search for the Payment widget.
- Drag the payment widget into the widget to design section.
- In the left-side bar for the widget, choose PayPal as the payment method.
- Finally, set PayPal as the デフォルトの支払い方法.
Now, the customers can pay in advance while making the order.
あなたもすることができます set up the Stripe payment for your WordPress food order form with MetForm.
Step 6: Submit Button for Form Submission
Simply drag the MetForm Submit Button widget into your form, then update the button text with something like Order Now or Place Order.
You can style it any way you like, using Elementor’s design options. Once clicked, this button completes the food order. If you enable the confirmation email option, an automated email will be sent to the user’s email with a copy of their form entries.
Send an order confirmation email to the customer
To give your customers a better experience, it’s a good idea to send them a confirmation email right after they submit the food order form.
You can send an automated confirmation email to the user with MetForm. For a form created with MetForm, you can enable the option from the Form settings.
- From your WordPress dashboard, go to MetForm → Form.
- クリックしてください 編集 option for the food order form. A Form Settings pop-up will open.
- Switch to the Confirmation tab and turn on the Confirmation mail to user option.
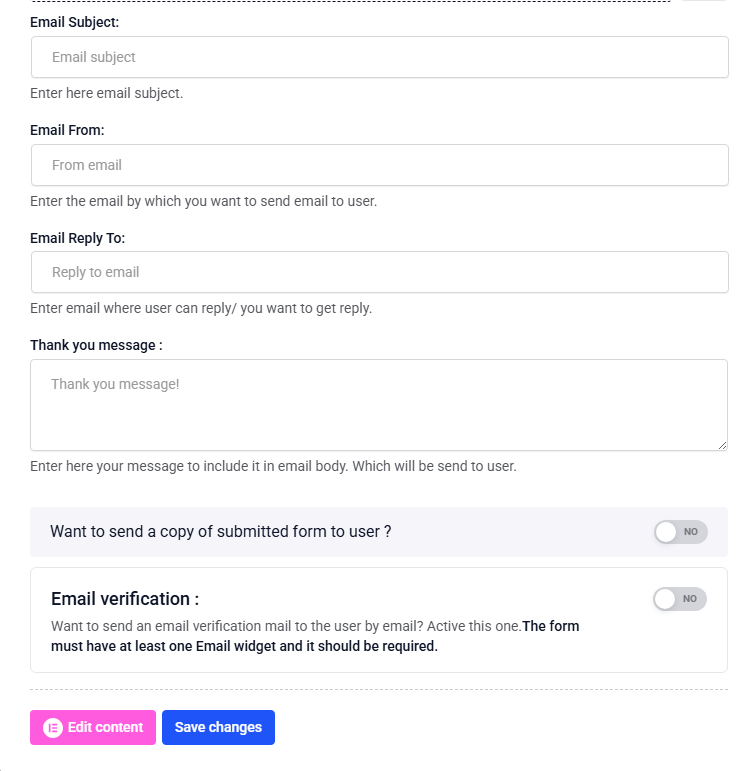
Now you can configure and set up the email.
- メールの件名: Add a clear and catchy subject line.
- メール送信者: Enter the email address that will appear as the sender.
- 電子メールの返信先: Set the email where you want customer replies to go.
- Thank you message: Write a friendly message confirming their reservation and thanking them. It helps leave a positive impression.
- Send a copy of the submitted form: Enable this if you want the customer to receive a copy of their submission for reassurance.
- 変更内容を保存: Click on this button to finalize the changes.
You can design a customized confirmation email with EmailKit. Here is how you can edit and customize MetForm’s confirmation emails.
Preview of the restaurant food order form (Final outcome)
So here is the preview of a WordPress food order form you have just created.
Once a user submits a form, you will have all the information listed in your WordPress dashboard. Just go to MetForm → Entries and access to all the data submitted by your customers.
よくある質問
Where can I view all the submitted orders?
Will this form work on mobile?
まとめ
Having a user-friendly and visually appealing food order form is kind of essential for any modern food business.
With the steps explained in this guide, creating on WordPress food order form is quite easy. While you can kick-start with sample food order form templates with MetForm, you can add advanced features like order calculation, payment gateways, and confirmation emails to the form.


コメントを残す