


Changing your website’s domain name can feel like performing an organ replacement surgery on your brand. Whether you’re rebranding or just found a better .com, the process requires precision to ensure you don’t lose your traffic, rankings, or broken images.
In this guide, we’ll walk you through the step-by-step process of migrating your WordPress site to a new domain safely.
Quick Overview
Here is a concise summary of the steps to change your WordPress domain.
✅ Backup: Create a full backup of your site and database.
✅ Domain Setup: Buy the new domain and point its Nameservers to your hosting.
✅ Hosting Link: Add the new domain to your hosting panel (cPanel) and point it to your site’s folder.
✅ Update URLs: Change the site address in Settings > General (or via wp-config.php).
✅ Database Clean-up: Use a “Search and Replace” plugin to update all internal links to the new URL.
✅ Redirects: Set up 301 Redirects from the old domain to the new one to save SEO.
Finally, update your domain info in Googleサーチコンソール to maintain ranking
How to change domain name in WordPress site
Let’s drive right away to the steps of changing the domain name of a WordPress site. We will start with the preparation stage and move forward step by step towards the entire process.
Step 0: Preparation stage
Here is the ultimate life hack for you: always secure the current version of your website before going for a major update or change. From critical plugin or theme updates to changing the domain or hosting, this is the must-have step for you.
Here are the cautions you must take before moving on to changing the domain name of a WordPress site:
Create a full backup of your site
Back up everything. That means the entire WordPress database and all site files, including themes, plugins, uploads, and configuration files. Use a reliable plugin like UpdraftPlus or your hosting provider’s backup tool (cPanel).
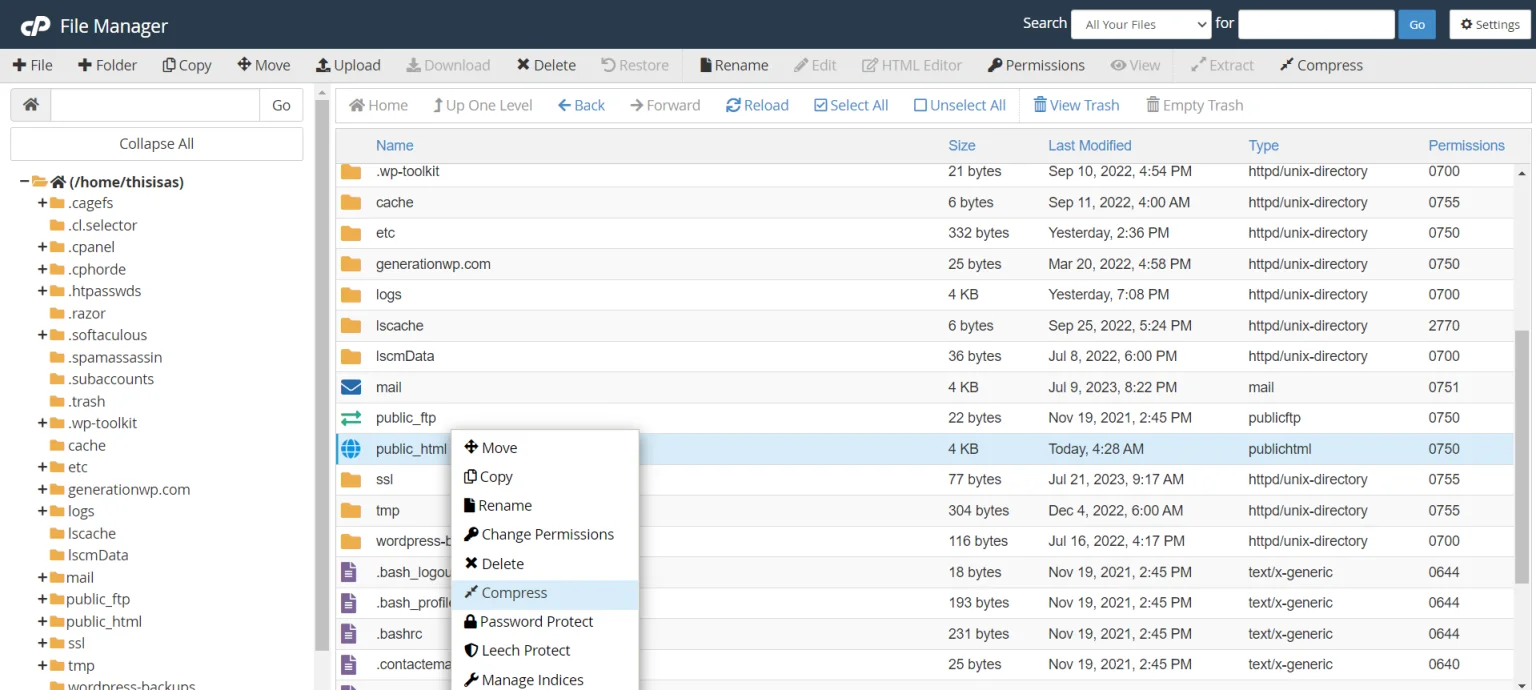
To create a back up of your WordPress site from cPanel, firstly go to your WordPress installation folder, select all WordPress files and folders. Then create a backup folder and move the selected files. After that, compress the files and download the backup. You can go through this article on how to backup a WordPress site to learn detailed process the create a full backup of your site.
This backup is your emergency reset button. If a redirect breaks, a setting goes wrong, or the site refuses to load, you can restore everything exactly as it was instead of rebuilding from memory and panic.
Audit your current SEO performance
Before moving to a new domain, document what’s already working. Use SEO tools like Google Search Consol to export a list of your top-performing pages, high-traffic URLs, and pages ranking for important keywords.
This list becomes your post-migration checklist. After the domain change, you’ll use it to verify that critical pages are redirecting correctly, still indexed, and not quietly losing traffic while you tell yourself everything is “probably fine.”

Also, this creates a baseline to monitor the transition. You can measure if the SEO performance is constant, dropped, or increased.
Step 1: Get a new domain ready for your WordPress site
First of all, you need to get a new domain if you don’t already have one. Then, before you begin the migration, your new domain must be fully functional and configured to communicate with your server.
Think of this like setting up the utilities at a new house before you actually move your furniture in; if the lights don’t turn on (DNS) and the locks aren’t installed (SSL), the move will be a disaster.
Ensuring these technical foundations are solid prevents downtime and ensures a seamless transition for both your visitors and search engine crawlers.
Purchase a new domain
Choosing a reputable registrar is key to long-term security and ease of management. Popular choices include Namecheap, Google Domains (Squarespace), or GoDaddy.
- Search for your desired name and extension (preferably .com).
- Check for Domain Privacy (WHOIS Privacy). Most registrars include this for free; it hides your personal contact information from public databases to prevent spam.
- Complete the checkout. Once purchased, you will gain access to a Domain Management Dashboard where you can control where the domain points.
Update DNS records (pointing to your host)
Your domain is just a name; DNS (Domain Name System) is the “map” that tells the internet which server holds your website files. Since you are moving a WordPress site, you want the new domain to point to your existing hosting account.
- Find your Nameservers: Log in to your WordPress hosting account. Look for a section labeled “Server Information” or “DNS Settings” to find two or more addresses that look like ns1.yourhostingprovider.com.
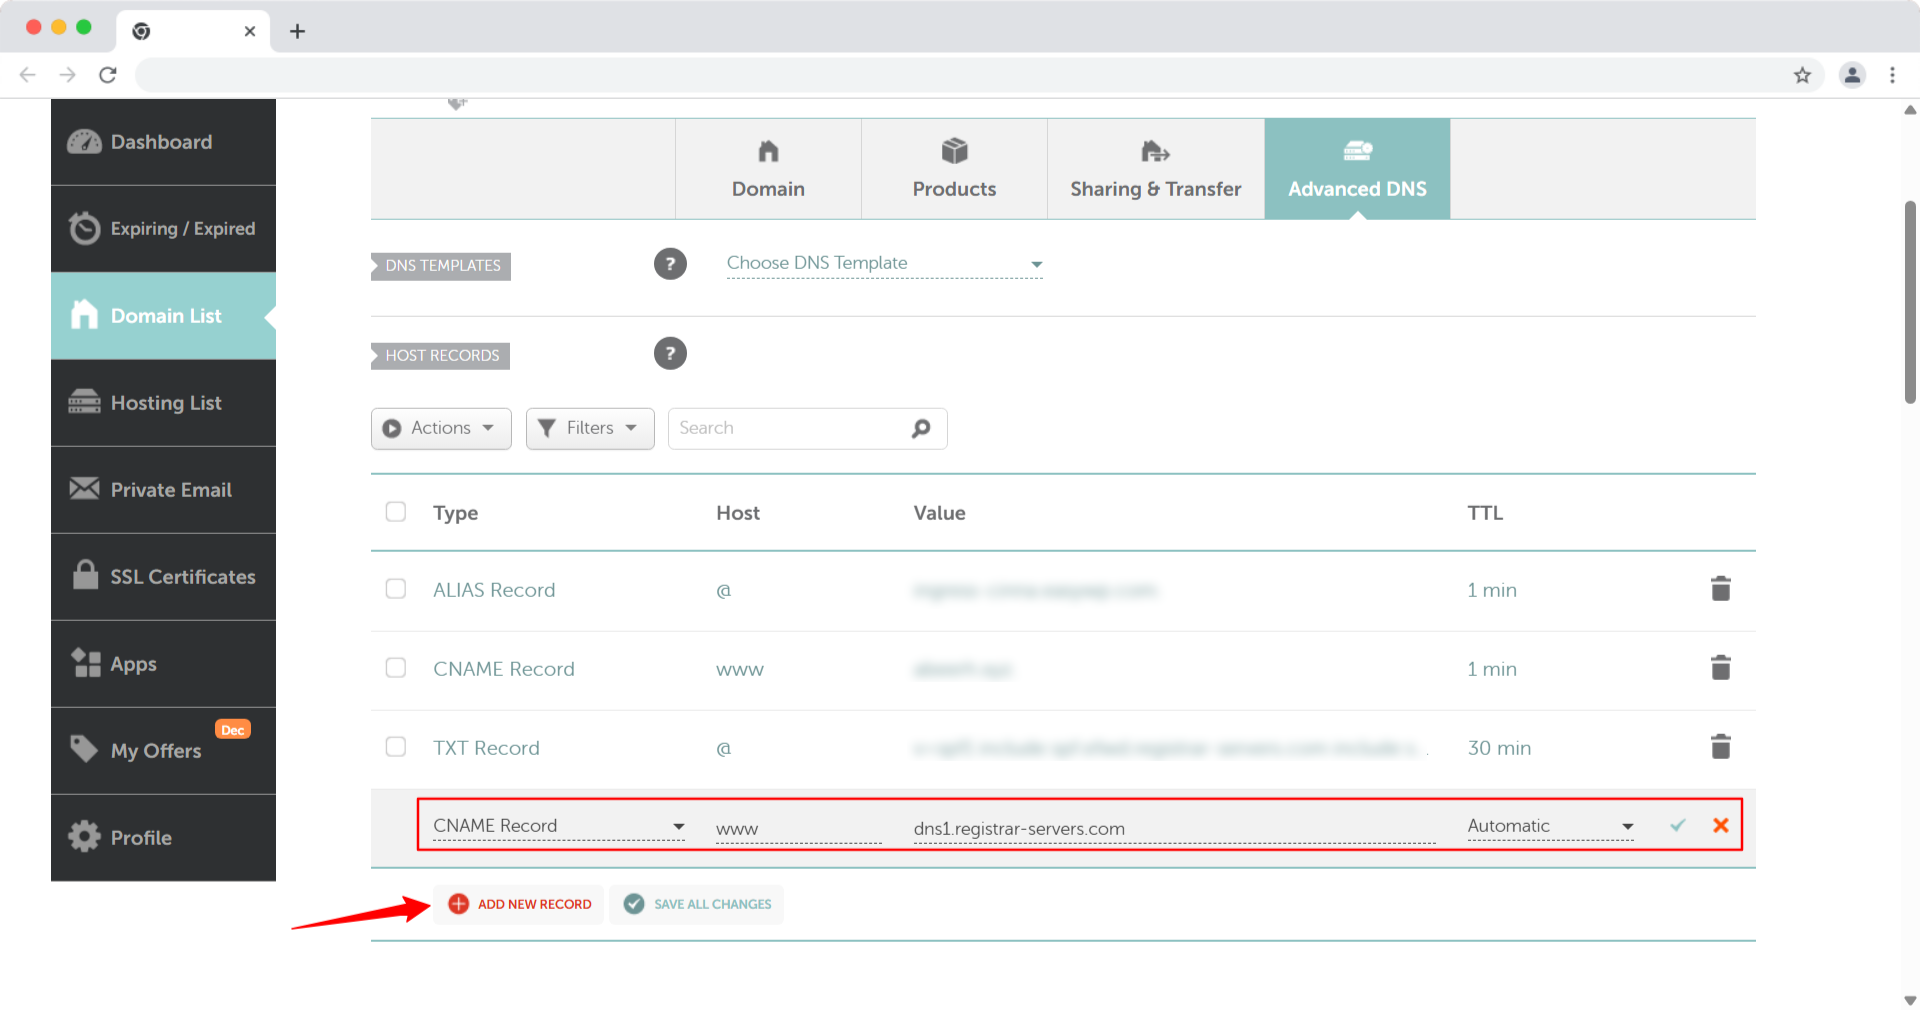
- Enter Nameservers at the Registrar: Go back to your domain registrar (where you bought the name). Find the “DNS Management” section (Advanced DNS in this case) for your new domain. Then click on “Add New Record” and enter the following: CNAME Record, Host (www), Target to add the DNS address like dns1.registrar-servers.com, as you got from hosting.
Wait for propagation: DNS changes are not instant. It can take anywhere from 1 to 24 hours for the new address to “propagate” across the globe. You can use a tool like DNSChecker.org to see when it’s ready.
Install an SSL certificate
In modern web browsing, an SSL (Secure Sockets Layer) is mandatory. It changes your URL from http:// に https://. Without it, browsers like Chrome will display a “Not Secure” warning, which kills your credibility and tanks your SEO.
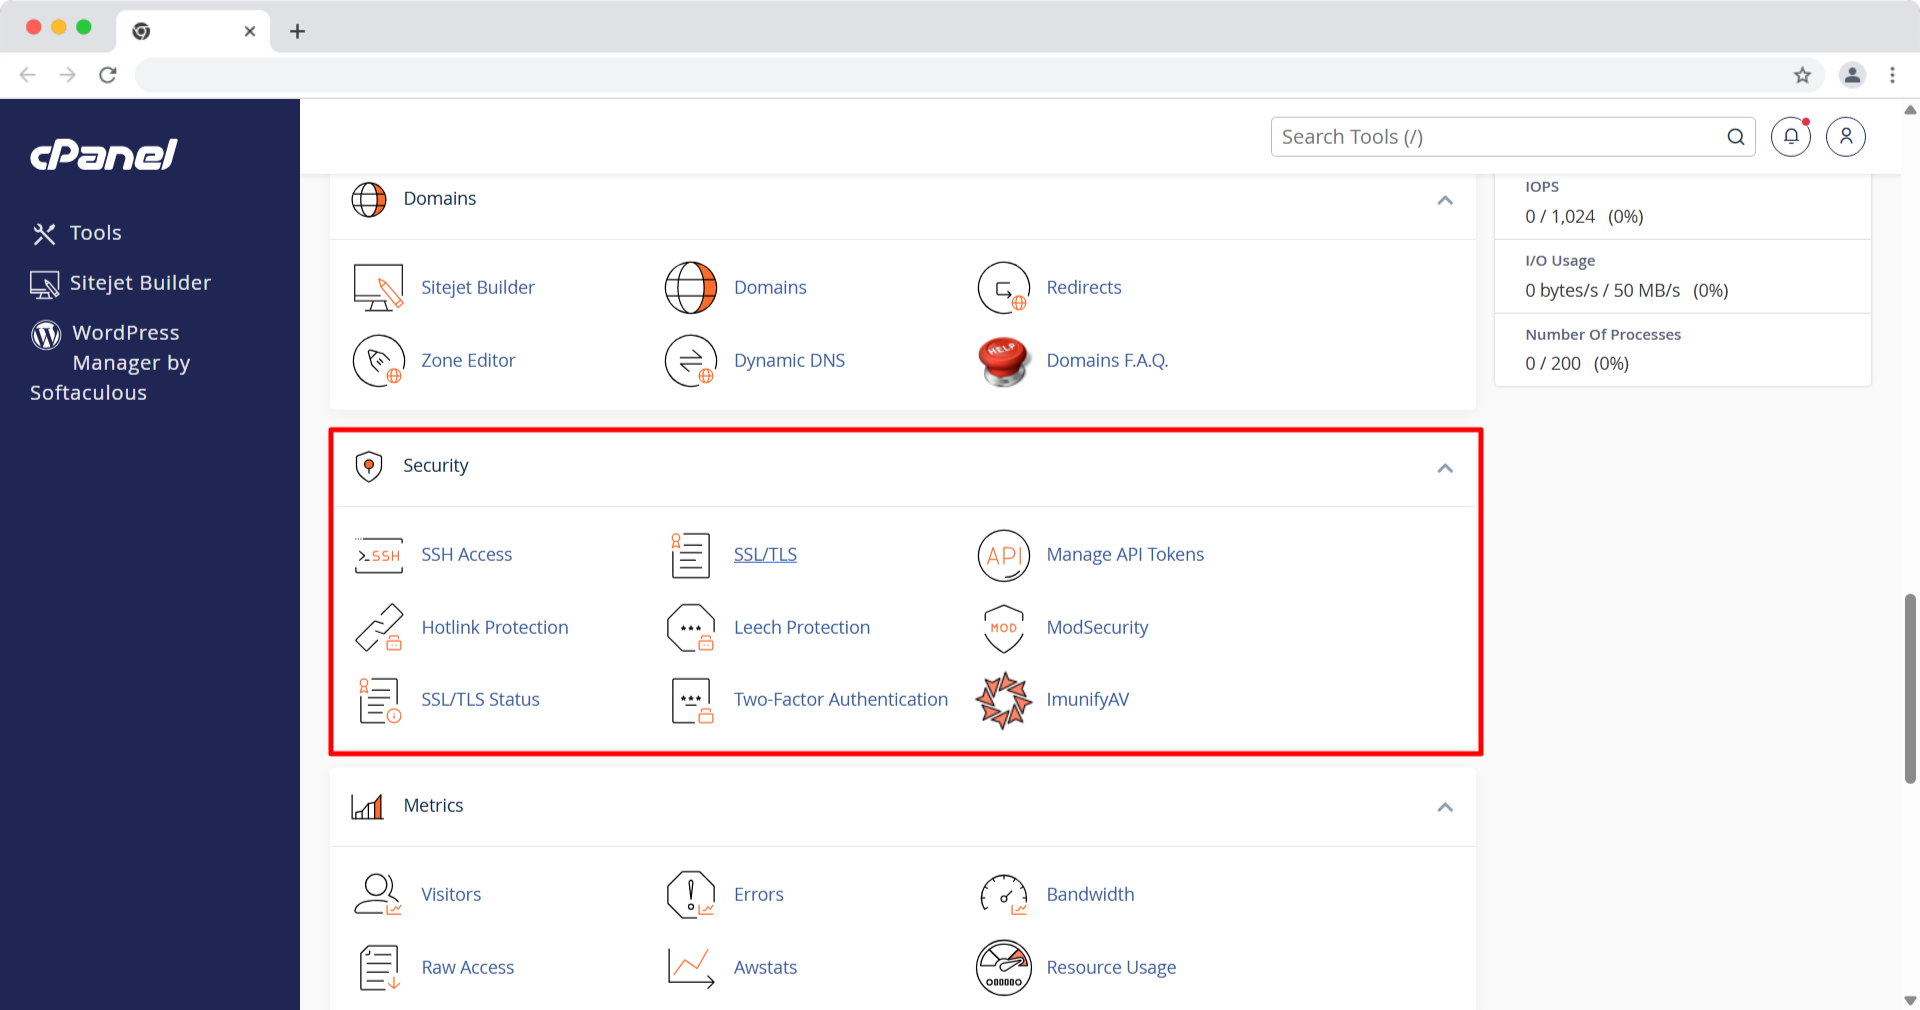
- Access your Hosting Panel: Log in to your cPanel or custom hosting dashboard.
- Locate SSL/TLS Manager: Look for “SSL/TLS Status” under the 安全 セクション。
- Issue the Certificate: Most hosts allow you to click a button that says “Issue” or “Auto-Install” for your new domain.
- Verify HTTPS: Before proceeding to Step 2 of the migration, type your new domain into a browser with https:// at the start. If you see a padlock icon and no warnings, you are cleared for takeoff.
Step 2: Add a new domain name via cPanel
Now that your domain is purchased and pointed toward your server, you need to introduce it to your hosting account.
Think of your hosting server as an apartment building; just because someone has the address (the DNS) doesn’t mean they have a key to a specific room. By adding the domain to cPanel, you are creating a “doorway” that tells the server, “When someone visits this new domain, show them the files located in this specific folder.”
This step is critical because it ensures your server is ready to accept traffic for the new URL before you flip the switch in the WordPress settings.
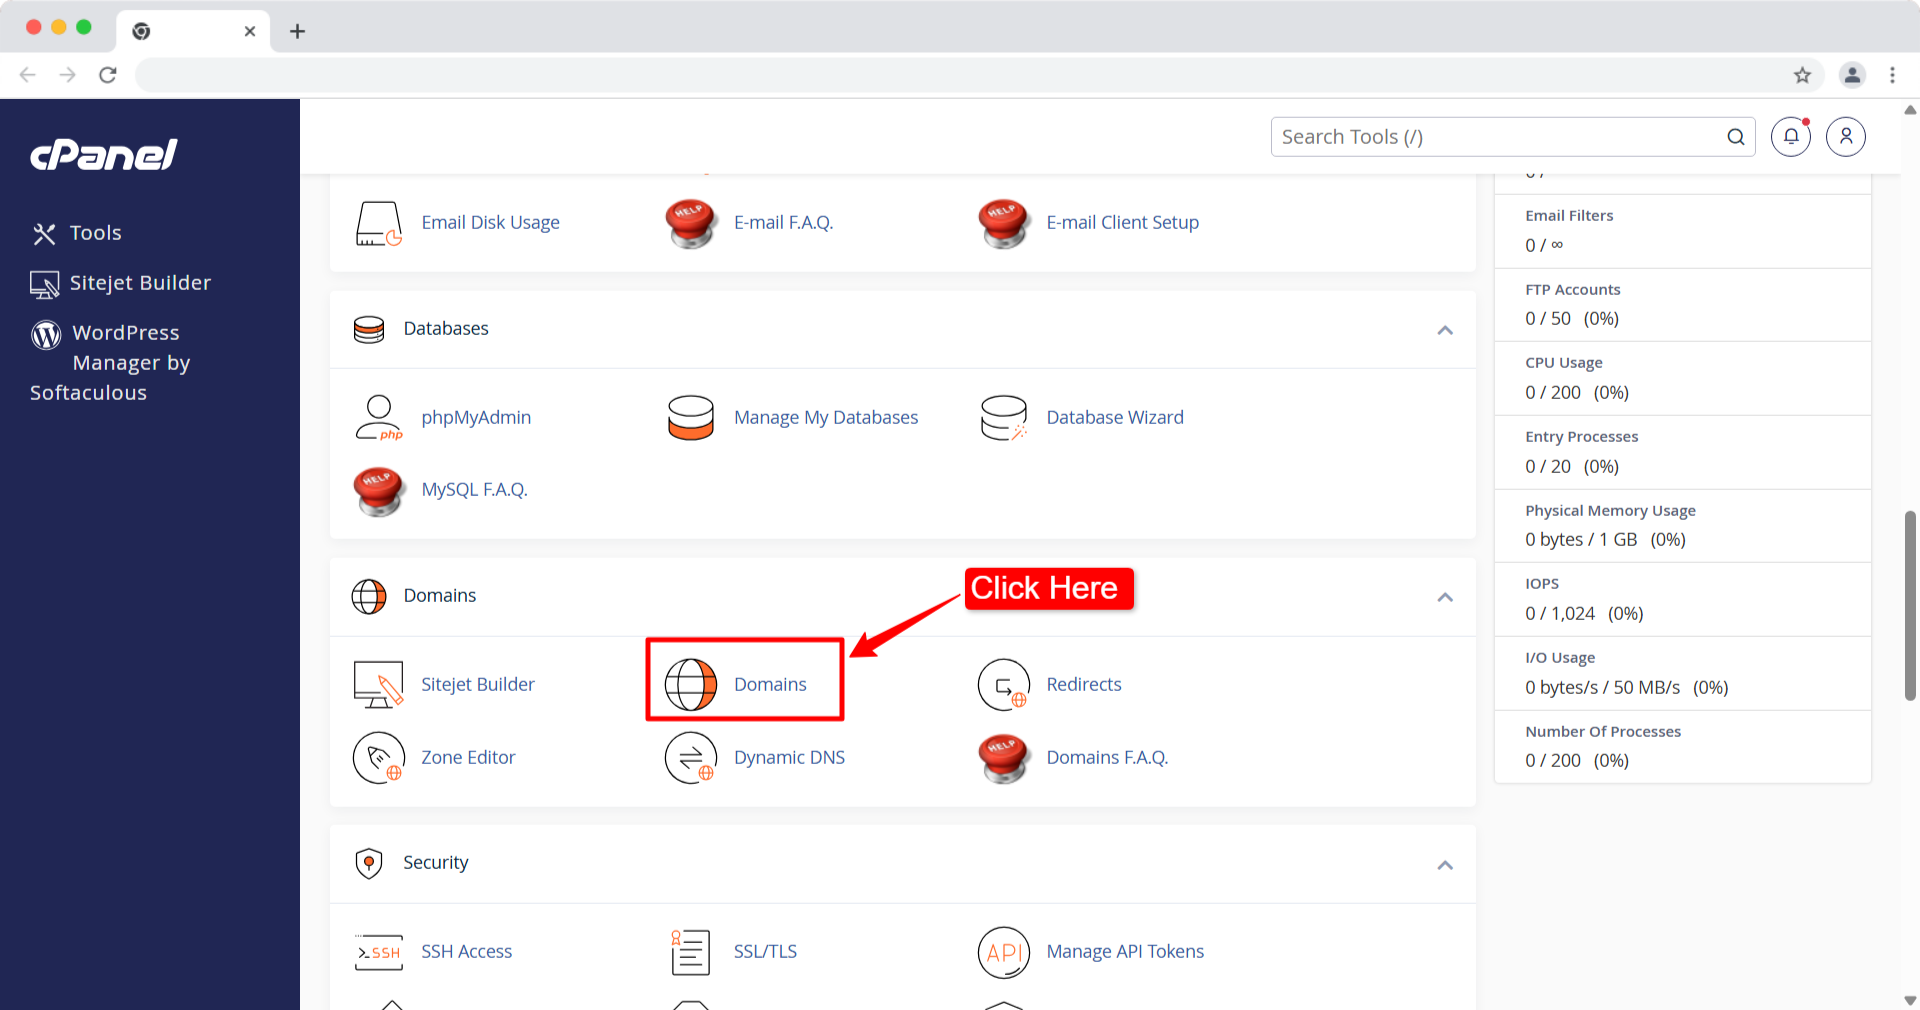
1. Locate the domains section
Log in to your web hosting account and open your cPanel dashboard. Scroll down to the “Domains” section and click on Addon Domains. (Note: In newer versions of cPanel/Jupiter theme, this may simply be labeled Domains; if so, click that and then click the “Create A New Domain” button.)
2. Enter your new domain details
You will see a form asking for the following information:
- New Domain Name: Type in your new domain (e.g., newsite.com). Do not include www or https://.
- Subdomain: cPanel will automatically fill this in. You can leave it as is; it’s an internal requirement for cPanel and won’t be seen by your visitors.
- Document Root: This is the most important field. If you want your new domain to show the exact same content as your old site, you must point it to the folder where your current WordPress files are stored. Usually, this is public_html.

Tip: If you are doing a fresh install, cPanel will suggest a new folder (e.g., public_html/newsite.com). But for a domain change on an existing site, ensure this path matches your current site’s directory.
3. Create the domain
Leave the “Create an FTP account associated with this Addon Domain” box unchecked unless you specifically need separate FTP access for this name. Click the Add Domain button.
4. Verify the connection
Once added, cPanel will perform a quick check. If your DNS (from Step 1) has propagated, you should see a green success message. You can test this by typing your new domain into a browser.
Step 3: Change WordPress URL and site address
Once your domain is connected to your server, you need to update the internal identity of WordPress. By default, WordPress stores its URL in the database to generate links for your navigation menu, CSS files, and scripts. If you don’t update this, your site will continue to look for files on the old domain, resulting in a broken layout or a “redirect loop” error.
There are three ways to do this. Let’s discuss all of the methods so that you can choose whatever is convenient for you.
Method 1: Change URLs from the WordPress dashboard
This is the easiest way. Use this method if you can still log in to your site using the old domain or a temporary URL.
- Log in to your WordPress admin area (olddomain.com/wp-admin).
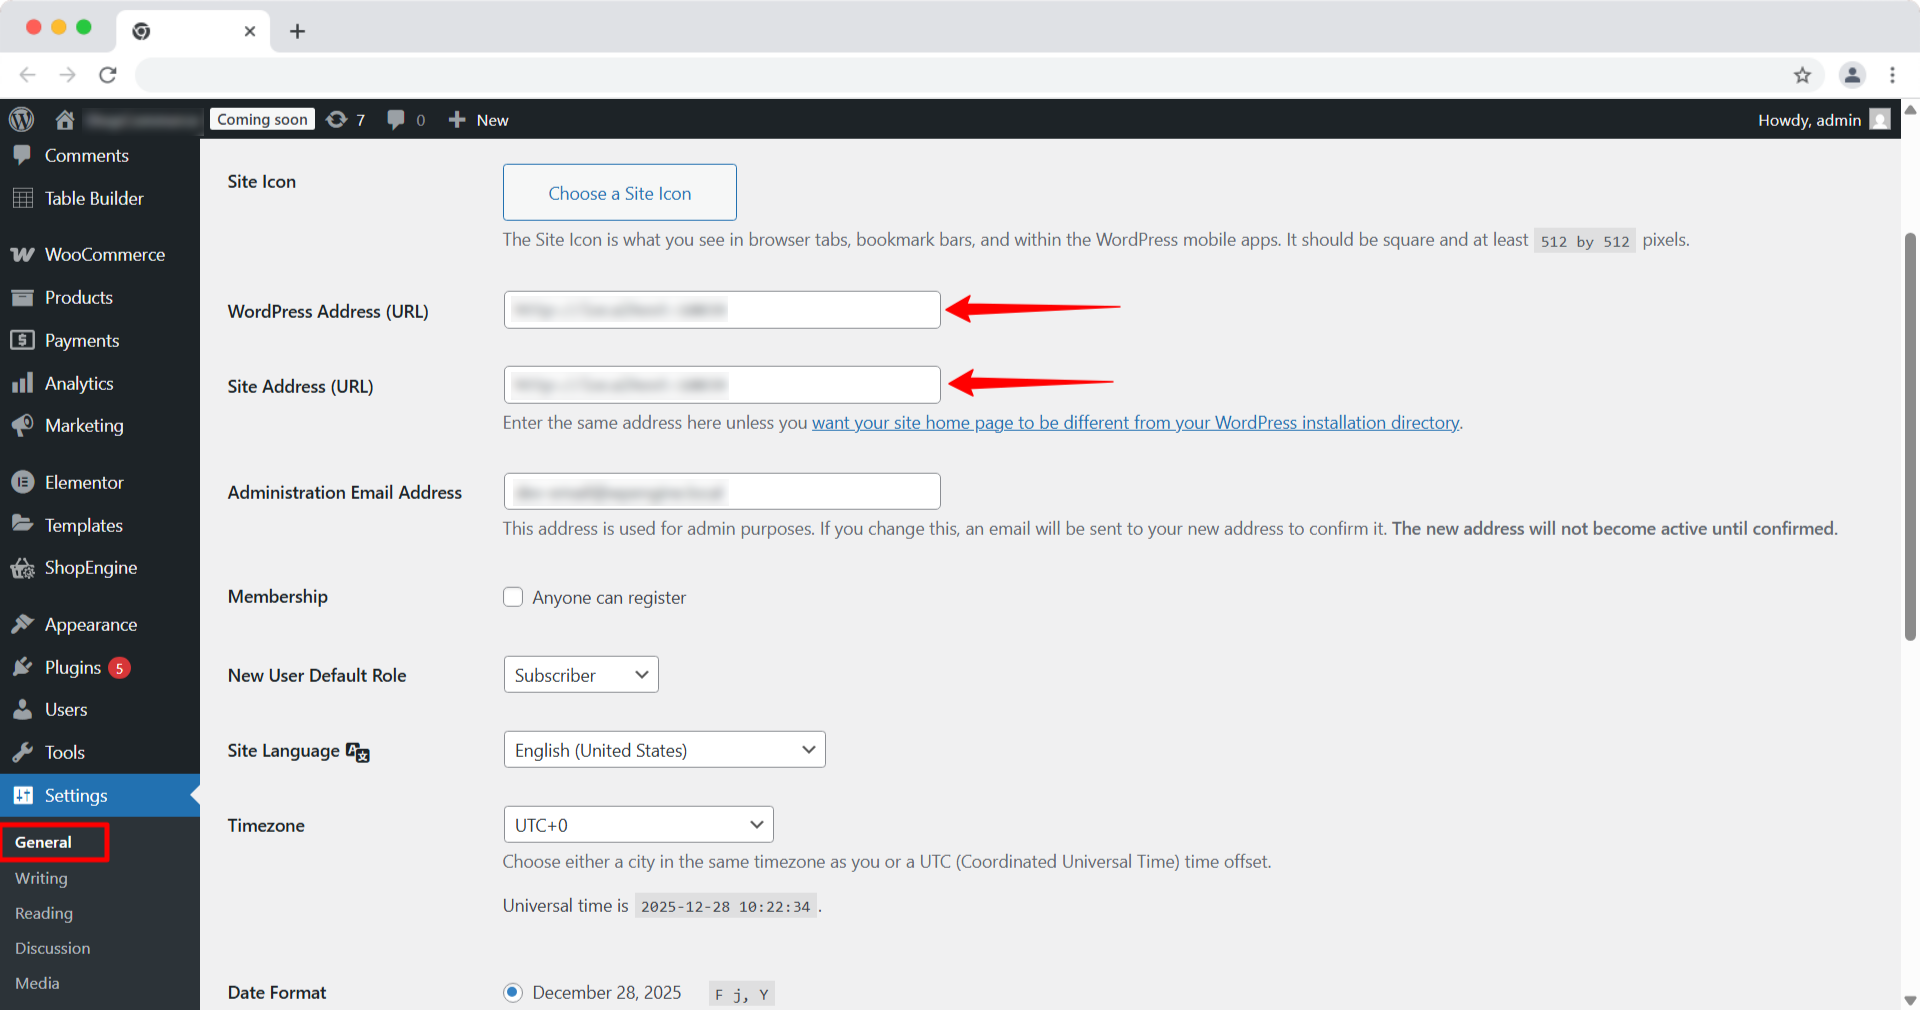
- 案内する 設定 > 一般.
- を見つけます。 WordPress Address (URL) そして Site Address (URL) 田畑。
- Delete the old URL and type in your new domain (e.g., https://newsite.com). Ensure both fields match exactly.
- Scroll to the bottom and click 変更内容を保存.
今、 you will be instantly logged out. This is expected! Your site is now trying to use the new domain. Do not try to log back in until you complete the “Search and Replace” in the next step.
Method 2: Change from the wp-config.php File
This one is the hardcore fix. If you cannot access your dashboard, you can “force” WordPress to recognize the new domain by editing the site’s configuration file.
- Log in to your cPanel and open the File Manager, or connect via FTP (like FileZilla).
- を見つけます。 wp-config.php file in your site’s root directory (public_html).
- Right-click and select 編集.
- Add the following two lines of code just above the line that says /* That’s all, stop editing! Happy publishing. */:
PHPdefine('WP_HOME','https://newdomain.com');define('WP_SITEURL','https://newdomain.com');- Save the file. This override takes precedence over the dashboard settings.
Method 3: Change via phpMyAdmin
This is the database-level fix. If the methods above don’t work, you can change the URL directly inside the “brain” of your website: the database.
- あなたのところに行ってください cパネル そしてクリックしてください phpMyAdmin.
- Select your website’s database from the left-hand sidebar.
- Look for the table named wp_options (Note: your prefix might be different).
- Find the rows labeled siteurl そして 家 (usually the first two rows).
- クリック 編集 のために siteurl row and change the option_value to your new domain. Click Go.
- Repeat the same process for the 家 row.

注記: Changing the URL via these methods only updates the primary site identity. It does not fix the links inside your blog posts or your image paths. If you stop here, your images will be broken!
Step 4: Set up 301 redirects & notify Google
This is the final “SEO safety net.” Even if you have moved everything, other websites are still linking to your old domain, and Google still has your old URLs in its search results.
A 301 Redirect acts like a “Forwarding Address” at the post office; it automatically sends users and search engine bots from the old URL to the corresponding page on the new domain.
This is how to tell Google you’ve moved so they can update their index faster and transfer your rankings.
- Ensure both your old and new domains are added as properties in Google Search Console.
- を選択してください old domain property.
- クリック 設定 in the left-hand sidebar.
- Under “General Settings,” look for Change of Address.
- Follow the prompts to select your new domain and click Confirm Move.
Your migration is now complete! Your site is officially living on its new domain. However, when someone enters the old domain, it will be redirected to the new address.
The post-migration checklist after changing a WordPress domain name
Though the migration is done, the work isn’t quite finished yet. You still need to make sure the plumbing works and the mail is being delivered correctly.
Complete these final tasks to ensure your site remains healthy, trackable, and user-friendly.
- Verify your internal links and images
Even with the “Search and Replace” completed, it’s wise to do a manual and automated sweep for any “Mixed Content” errors (where the site tries to load insecure HTTP elements) or dead links.
Use a free tool like Screaming Frog SEO Spider or a “Broken Link Checker” plugin. Scan your new domain to ensure there are no 404 errors. If you see broken images, it usually means a specific path was missed during Step 4.
- Update Google Analytics and tracking pixels
Your tracking codes (Google Analytics, Facebook Pixel, etc.) are often tied to a specific domain. If you don’t update these, you’ll see a sudden “drop” to zero traffic in your reports.
Google Analytics (GA4): Go to Admin > Data Streams. Select your website stream and update the Stream URL to your new domain.
If you use a Facebook (Meta) Pixel, you may need to go to your Events Manager and add the new domain to your “Allow List” for aggregated event measurement.
- Update social media and external profiles
You want your existing audience to find you easily. Don’t leave them clicking on old, dead links in your social bios.
Systematically visit your profiles on Instagram, X (Twitter), LinkedIn, and Facebook. Update the “Website” field in your bio.
Pro Tip: If you have an email newsletter, send out a “We’ve Moved!” announcement to your subscribers so they know to whitelist your new domain’s email address.
- Check Your Transactional Emails
If you run an E-commerce store (WooCommerce) or have contact forms (Contact Form 7/WPForms), your emails might currently be sent from [email protected]. These are likely to go to spam or fail now.
Go to your form settings and WooCommerce “Email” settings. Update the “From Address” to an email matching your new domain (e.g., [email protected]). You will likely need to set up a new email account in cPanel to match.
- Resubmit Your XML Sitemap
Help search engines map out your new territory as quickly as possible.
If you use an SEO plugin like Yoast SEO or Rank Math, it generates a sitemap (usually newsite.com/sitemap_index.xml). Go to Google Search Console, select your new domain property, click on Sitemaps, and submit the new URL.
Tips: How to choose a new domain name
If you’re still in the brainstorming phase or considering a second move, keep these “golden rules” in mind for a domain that lasts:
- Keep it Short: Ideally, under 15 characters to make it easy to type and remember.
- Stick to “.com”: It remains the most trusted extension. Users often type .com by default.
- Avoid Hyphens and Numbers: These are hard to communicate verbally and often look “spammy.”
- Check for Trademarks: Use a tool like USPTO’s TESS to ensure your new name doesn’t infringe on an existing brand, which could lead to legal trouble later.
まとめ
While the thought of changing your domain name can feel pretty nerve-wracking at first, it really just comes down to following the right sequence.
By following the Backup → Point → Update → Redirect workflow, you can move your site without losing your hard-earned traffic.
Just remember that even with the 301 redirects in place, it might take a few weeks for Google to fully “settle” into your new URL, so don’t panic if you see a little bit of flux in your traffic at first. Keep an eye on your Search Console, stay patient, and before you know it, your new brand will be standing on solid ground.
Now that the technical heavy lifting is over, you can get back to what actually matters: creating great content and growing your brand under its new name.

コメントを残す