


The default WordPress search bar isn’t satisfactory. You won’t want your visitors to play with something that throws you into a complete mess of irrelevant results. This is why you must go for something advanced.
Your search box should contain filtering parameters and navigational elements to give authentic real-time results within an easy to understand layouts. Plus, your custom search box should seamlessly align with your brand’s look and feel.
And, this is where ElementsKit comes in handy, with its Advanced Search widget that helps you create a functional and stylish search box that delivers precise results. Let’s see how to create an advanced search bar in Elementor websites.
Quick Overview
This tutorial discusses on creating an advanced search bar in Elementor websites. We are using ElemetnsKit Advanced Search widget it can add a faster and modern search box with some click works only. You can simply do this on your Elementor page builder within a drag-and-drop interface.
Tools Used: ElementsKit (Free & Pro Version) and Elementor (Free)
Here are the simple steps steps for building a powerful Elementor search bar:
✅ Activate and add ElementsKit Advanced Search Widget.
✅ Select pre-designed search box style and organized components.
✅ Apply filtearing parameters for accurate results.
✅ Customize the search bar and live result panel.
So, your custom search box for Elementor websites is now easy, no coding hassles.
Why You Should Upgrade WordPress Default Search Experience?
An advanced and modern search box is usually equipped with helpful features to help visitors get precise results.
Unlike the default WordPress search functionality, which supports a blank search box only and provides numerous irrelevant results. And when your website has a lot of content, the user experience gets worse.
However, with the right plugin, you can transform the entire website search box by adding category and tag filters, popular keyword suggestions, custom buttons, icons, and placeholder text. Plus, style the entire search panel to match your site perfectly.
In my opinion, upgrading the default search does two big things: it delivers more accurate results. Since it provides different parameters for a personalized search experience. You can let searchers pick exactly which content types they want to explore. Then, you’ll have complete control over customizing both the search panel and results layout.
And next, we’ll be showing how to create an advanced search bar for your WordPress website.
👉 Learn how to create a stylish list in WordPress.
How to Create an Advanced Search Bar in Elementor Websites?
So, let’s move to the main part. The first thing we’ll do here is go for a popular page builder, and we prefer the エレメンター page builder. Then, we will also go for an advanced Elementor Addon – ElementsKit.
Here, we would like to clarify one thing: Elementor Page Builder supports a search widget with some basic features. But, in this WordPress tutorial, we really want to create a website search panel with state-of-the-art functionalities.
So, we opt for the ElementsKit Advanced Search widget, which ships with the necessary parameters for a personalized search experience and a handful of customization options for a modern look.
With that agreed, let’s move forward by installing the free Elementor version and the ElementsKit Pro addon.
Step 1: Activate & Add ElementsKit Advanced Search Widget
Start from your WordPress dashboard and navigate to ElementsKit > ウィジェット. Look for the ElementsKit Advanced Search widget and activate it by clicking the toggle button. Then, hit the 変更内容を保存 button at the top right.
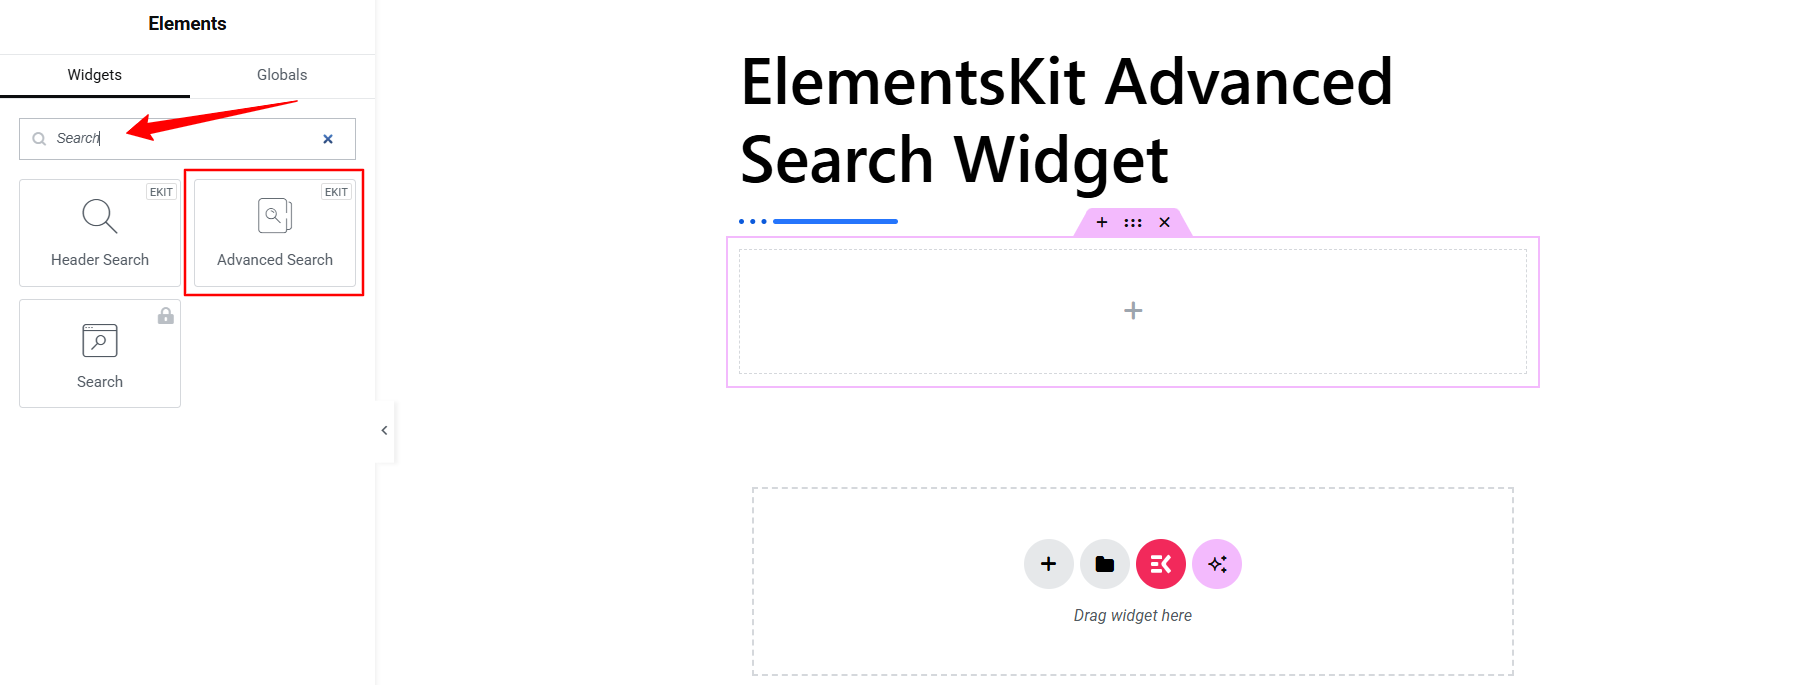
Create a new page or post, or edit an existing one, and start designing with the Elementor builder. In the Elementor interface, search for the “ElementsKit Advanced Search” widget, then drag and drop it into the editor. A search panel will instantly appear in the container.
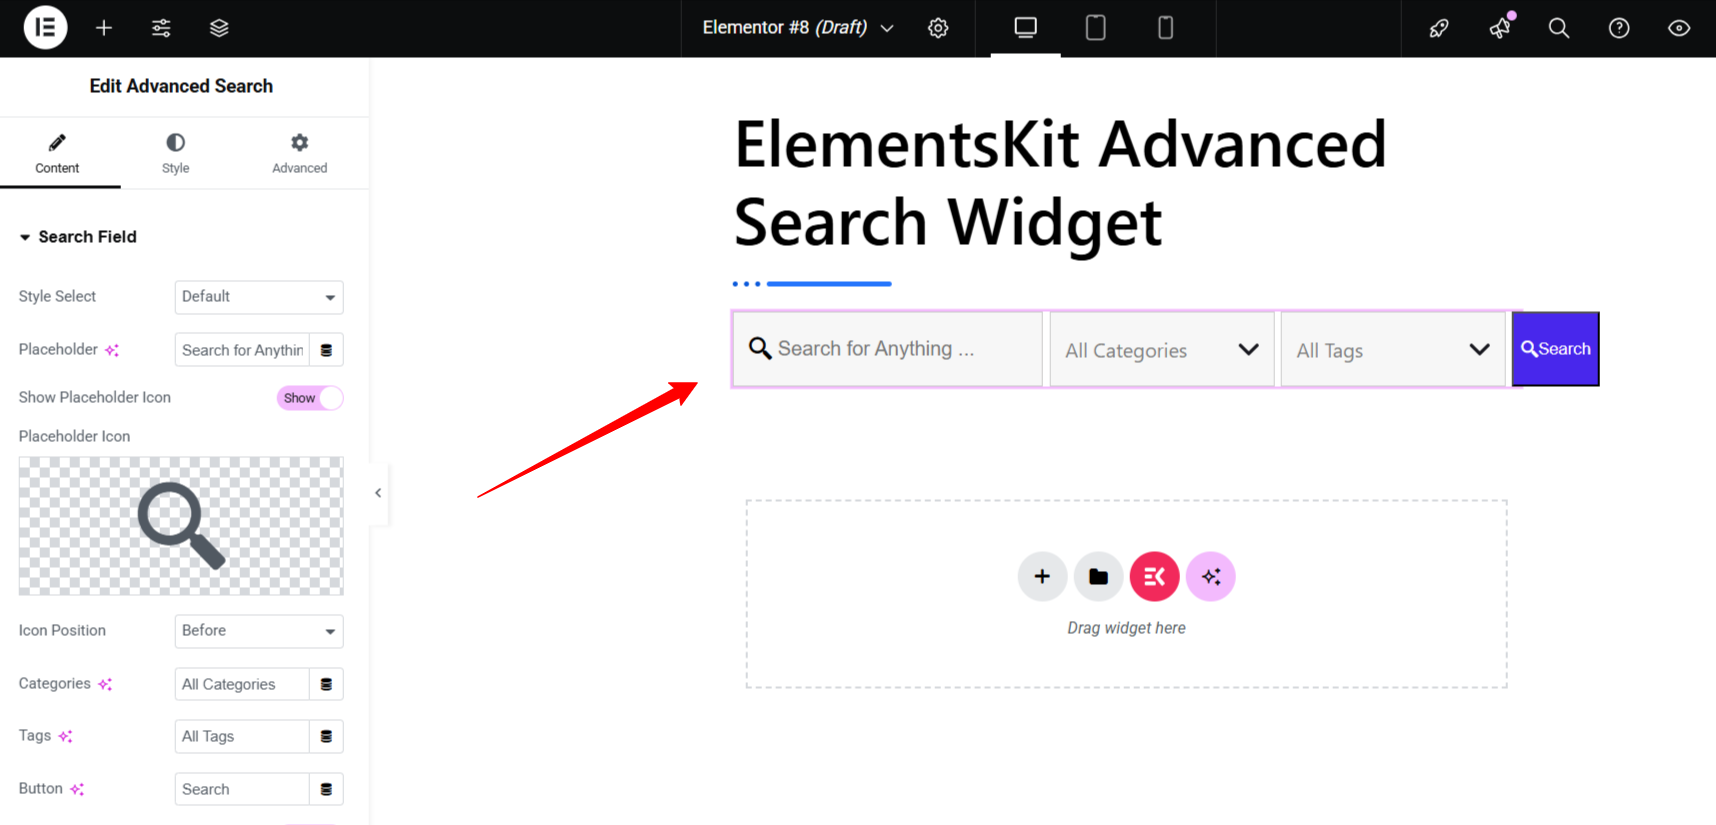
Step 2: Add & Configure Elementor Search Box Style
Now, enter the widget settings and start from the コンテンツタブ. Within this tab, you can configure how all the components of your website search box work. Let’s see it in action.
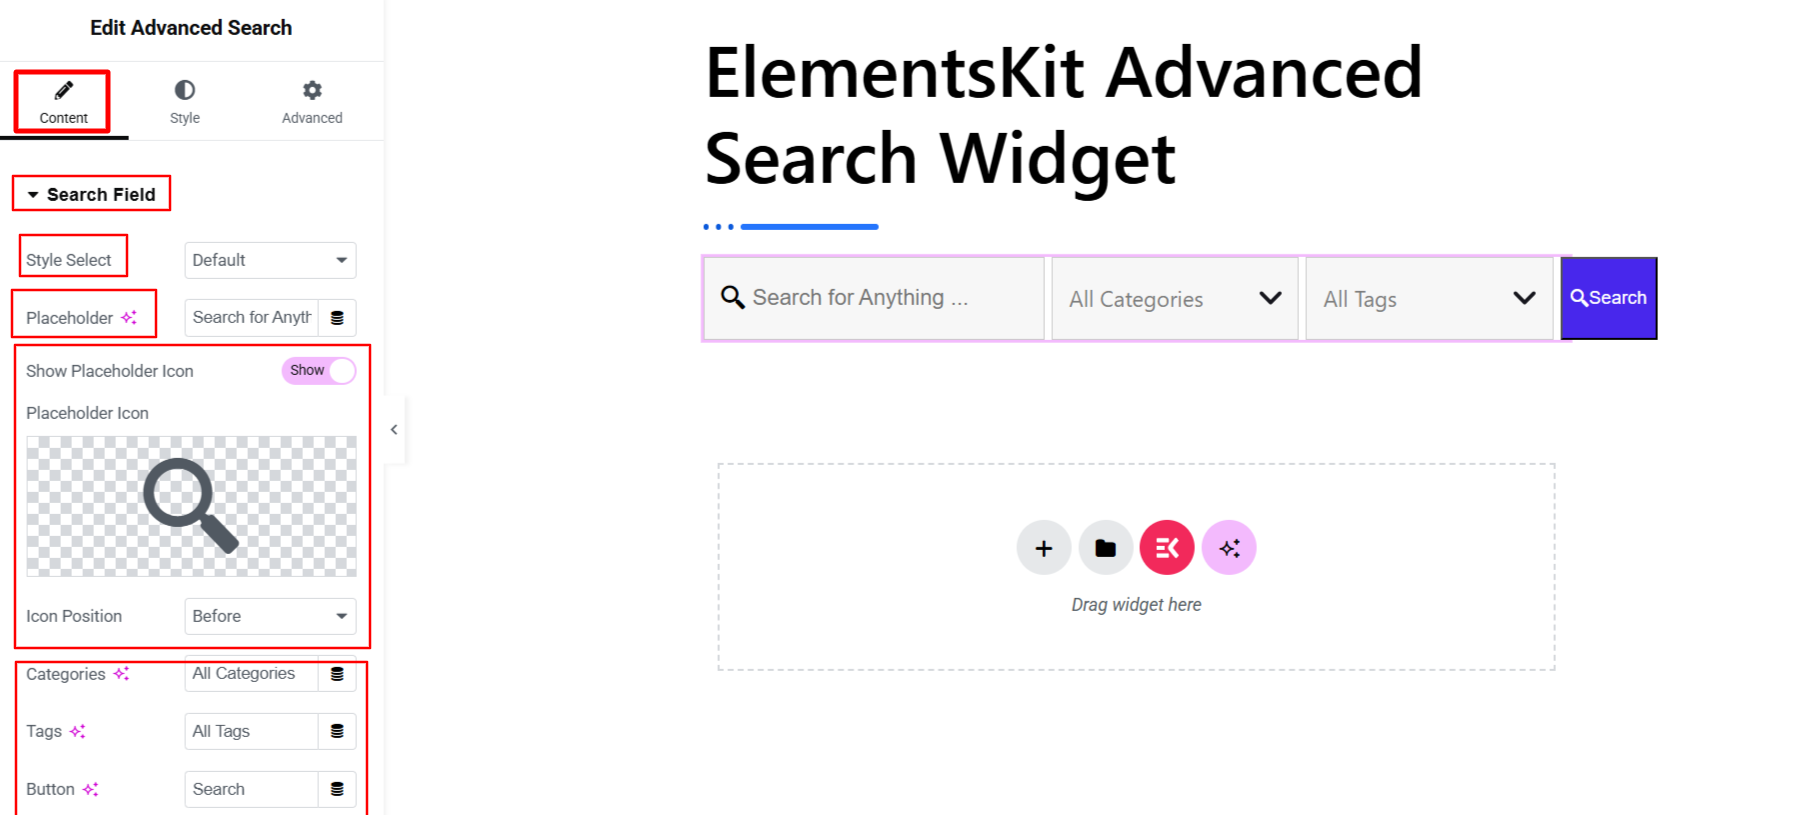
First, come under the “Search Field” option, here you can select a search box style from Default, Modern, & Click Expand.. So choose your preferred one. Then, dpending on your content type, you can write your own Placeholder Text for the search box.
Further, you can show an icon before or after the main placeholder text. You can also change the placeholder text for other components like Categories, Tags, そして ボタン. There’s an option to add & choose an icon for the button as well.
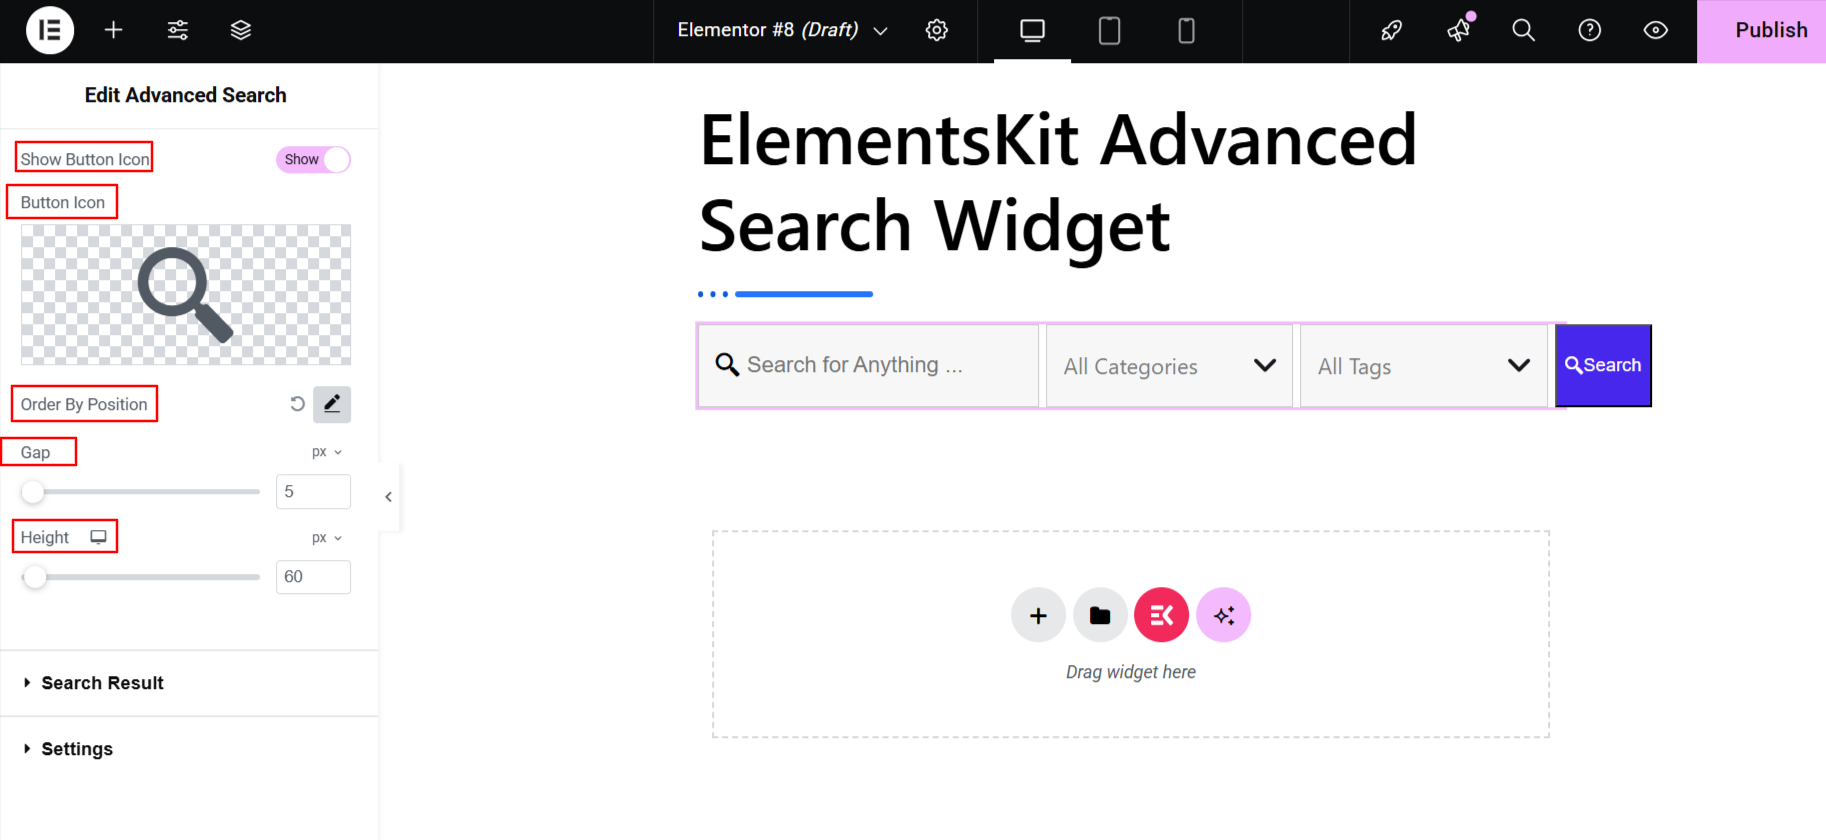
Now, one of my favorite features here is the “Order by Position” setting, which allows you to place each search box element exactly where you want it. Then, there are two different sliders to determine the gap between search box items そしてその height of the search panel.
Step 3: Add Filters For Personalized Search Results
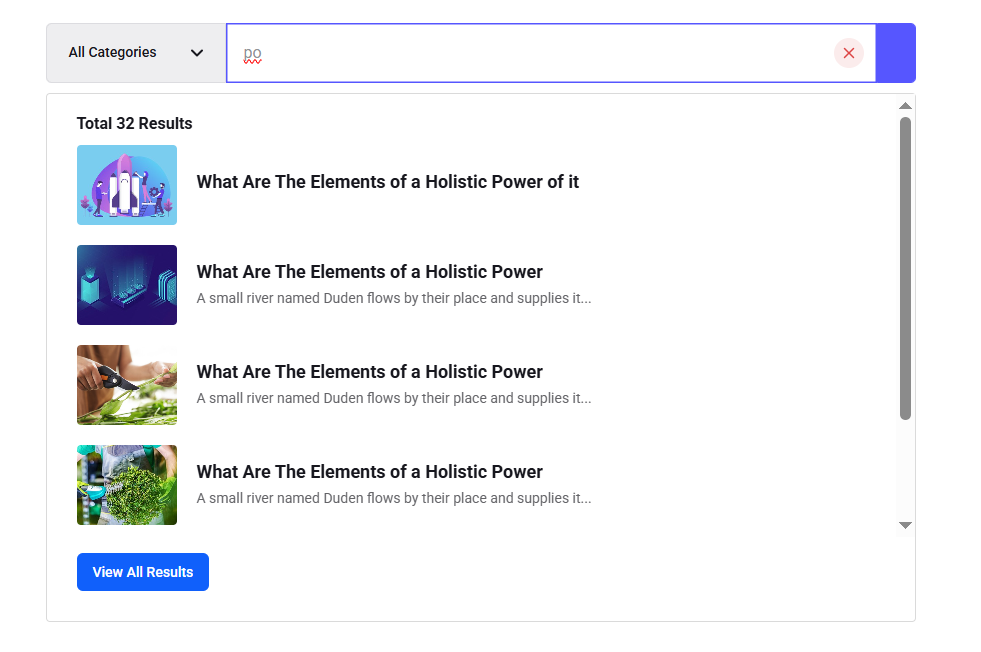
Within the Content Tab, you’ll see the 検索結果 option. From here, you can decide what to show on the live search result panel. To satisfy your visitors, ElementsKit can empower you to show a Thumbnail, Content, そして an icon. It will help searchers to get a gist about the result they are going to navigate.
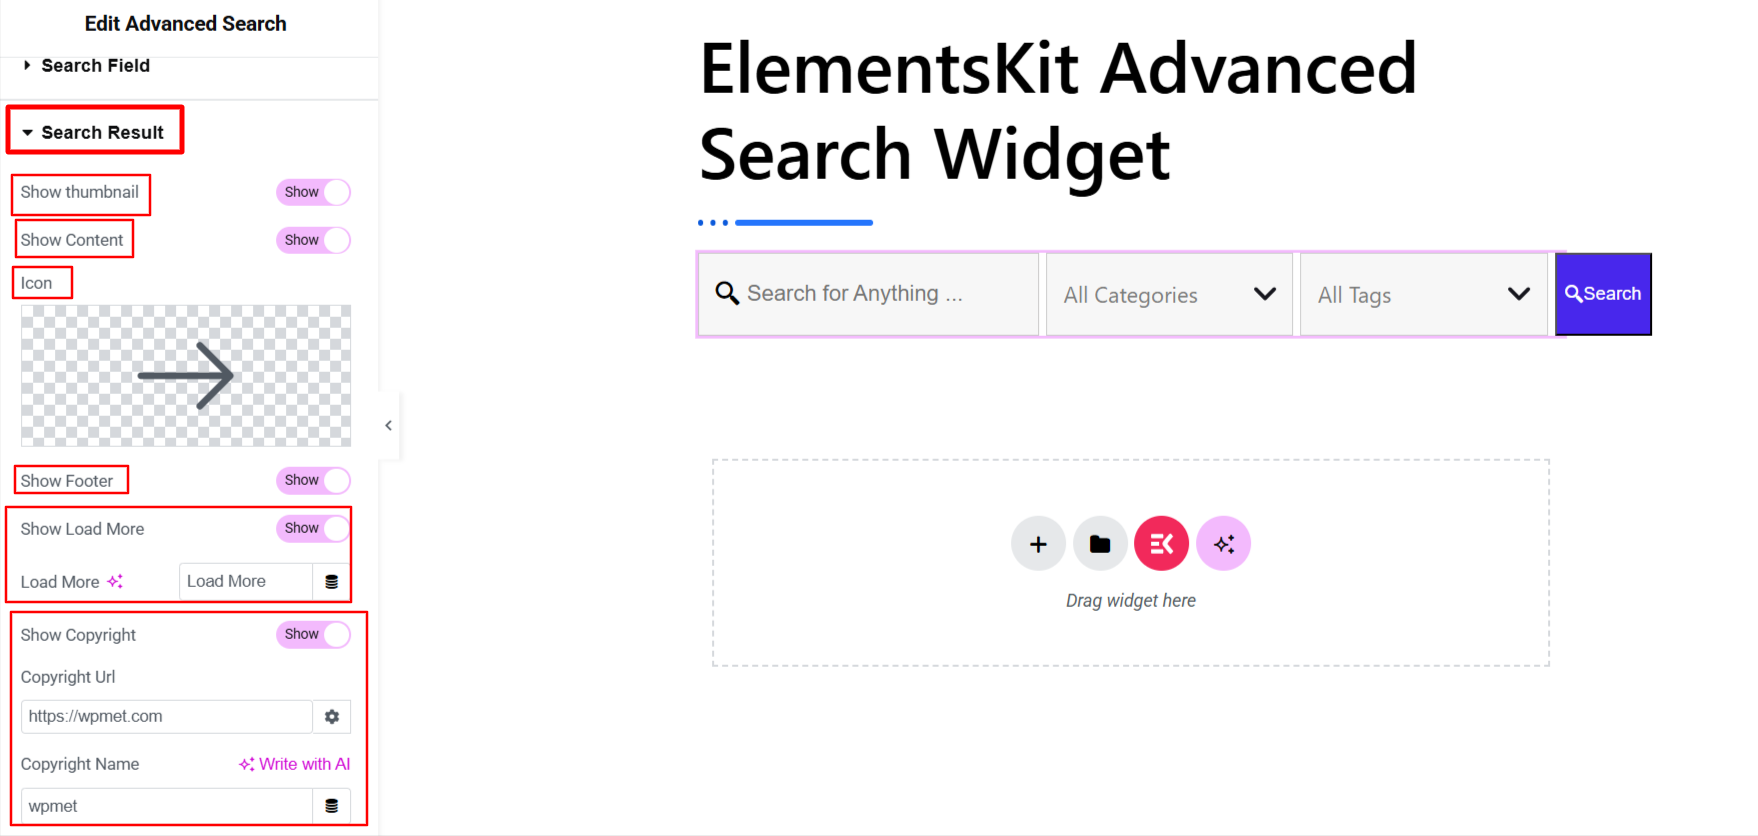
Then, you’ll also have the ability to give a professional look to the search result panel. You can show the footer, load more button, and copyright option for a better searching experience.
Configuring the search results panel components is one thing, but setting up filters for a personalized search experience is another. To do this, go under the 設定 option. Here you can set things like:
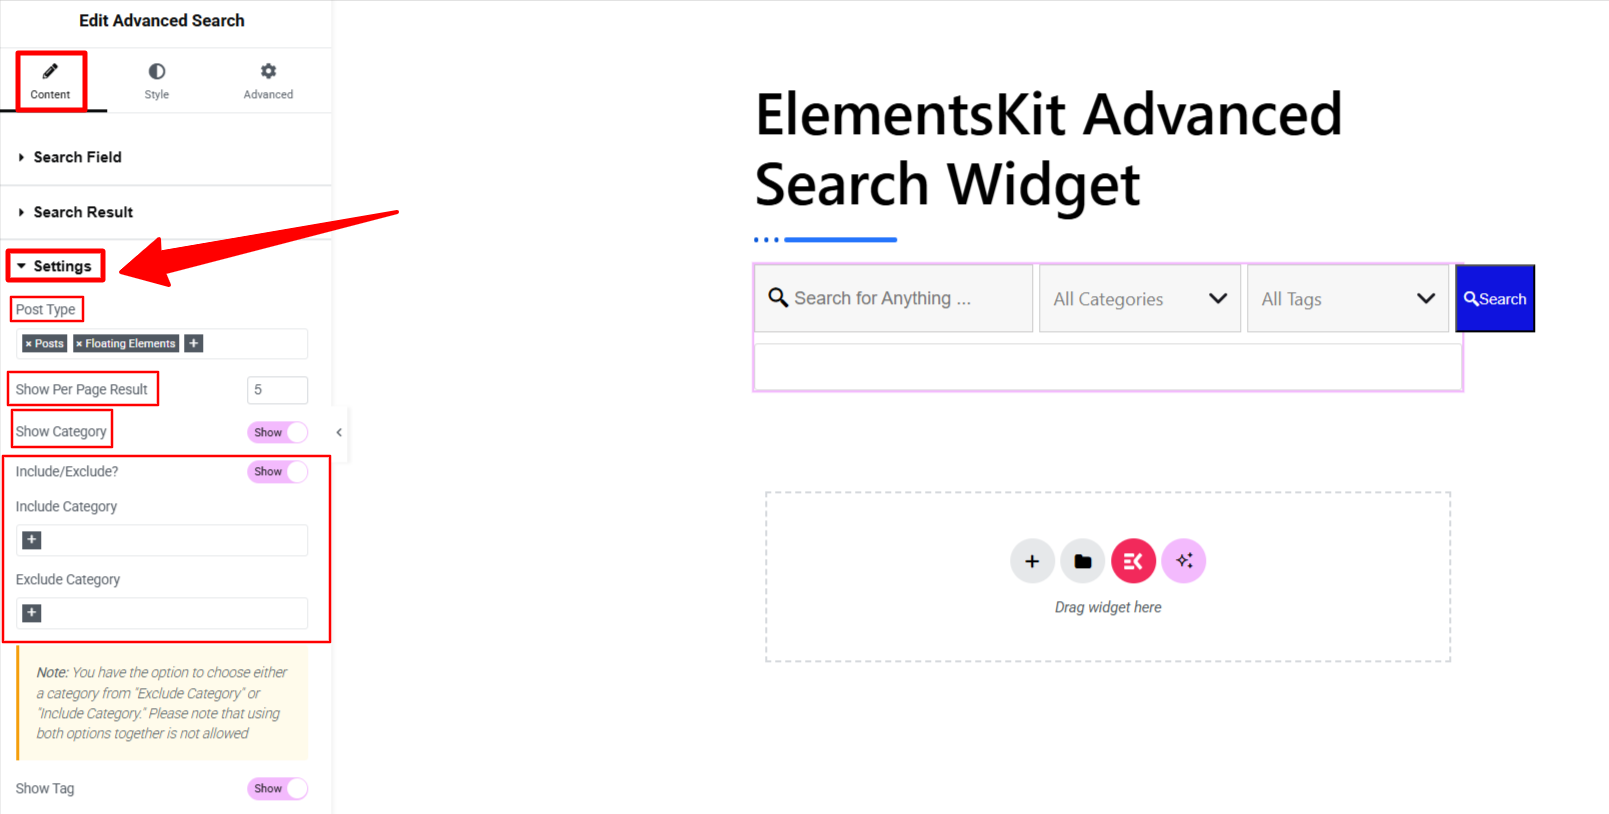
- Post Type: Determine the source for the search results. This allows you to place a search box on a specific page where you already know visitors will be looking for a particular type of content.
- Show Per Page Result: Define the number of results that will appear against a query.
- Show Category: Enable this option to let visitors choose a category and search for content within it. You can also use the include and exclude fields to display relevant categories and hide the irrelevant ones.
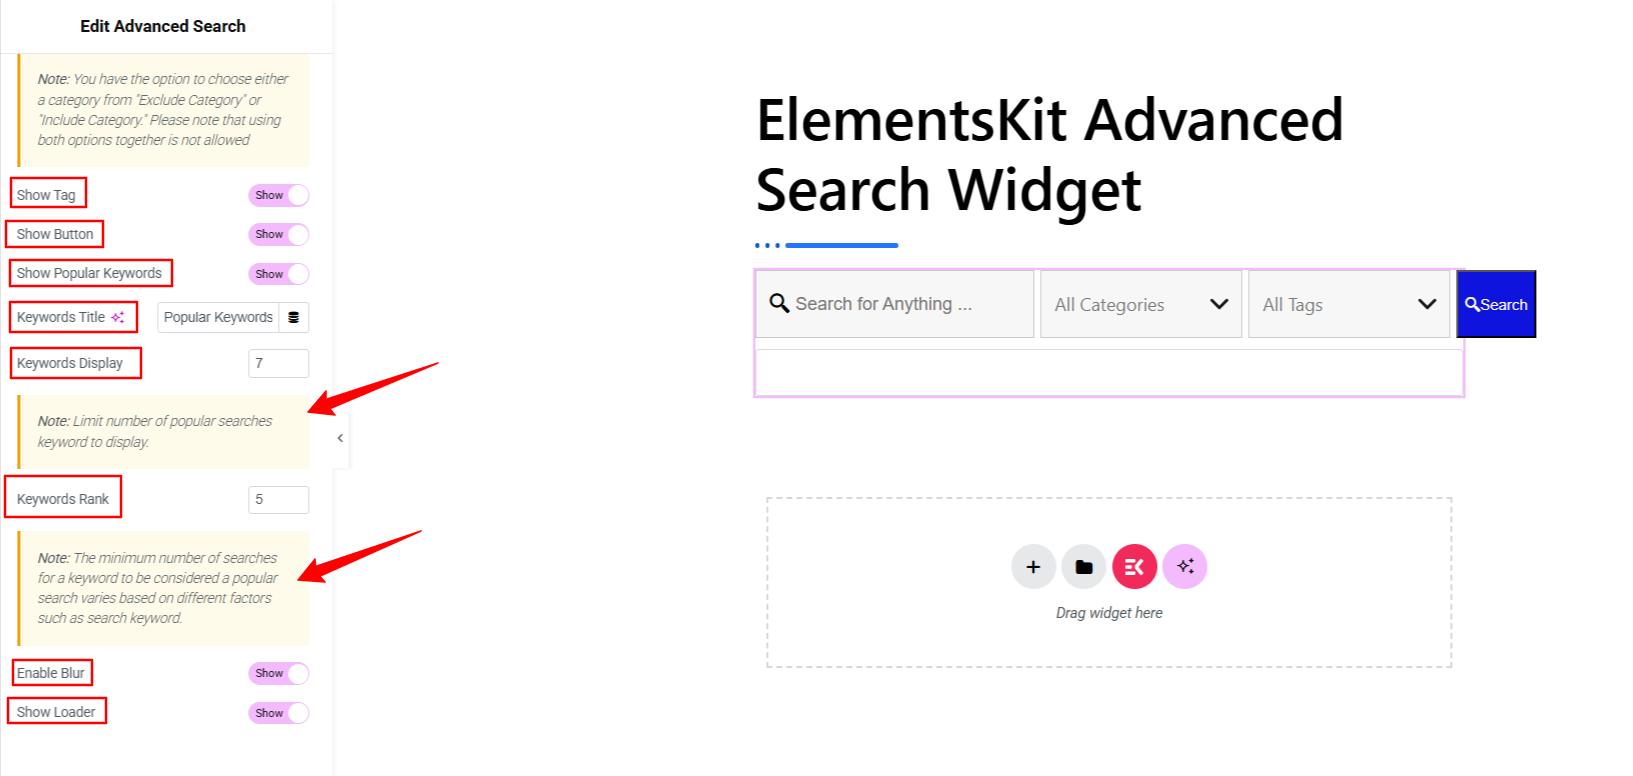
- Tag & Buttons: The next two options are to enable or disable the tag and button options.
- Popular Keywords: This option lets you take a smart move for your search box experience. From here, you can determine the number of popular keywords and how to measure a popular keyword. In the Keyword Rank option, enter a number to define a popular keyword.
- The last two settings in the widget content tab are Enable Blur そして Show Loader オプション。
Now that we’re done with the Content tab, it’s time to move on to the next step, where we’ll discuss styling the entire search box.
Step 4: Customize Search Box & Live Search Panel
With ElementsKit, every part of your Elementor website’s search box is fully customizable. Head to the スタイルタブ、 and you’ll find options tailored to each element, whether it’s the search box area, categories, tags, dropdowns, or buttons.
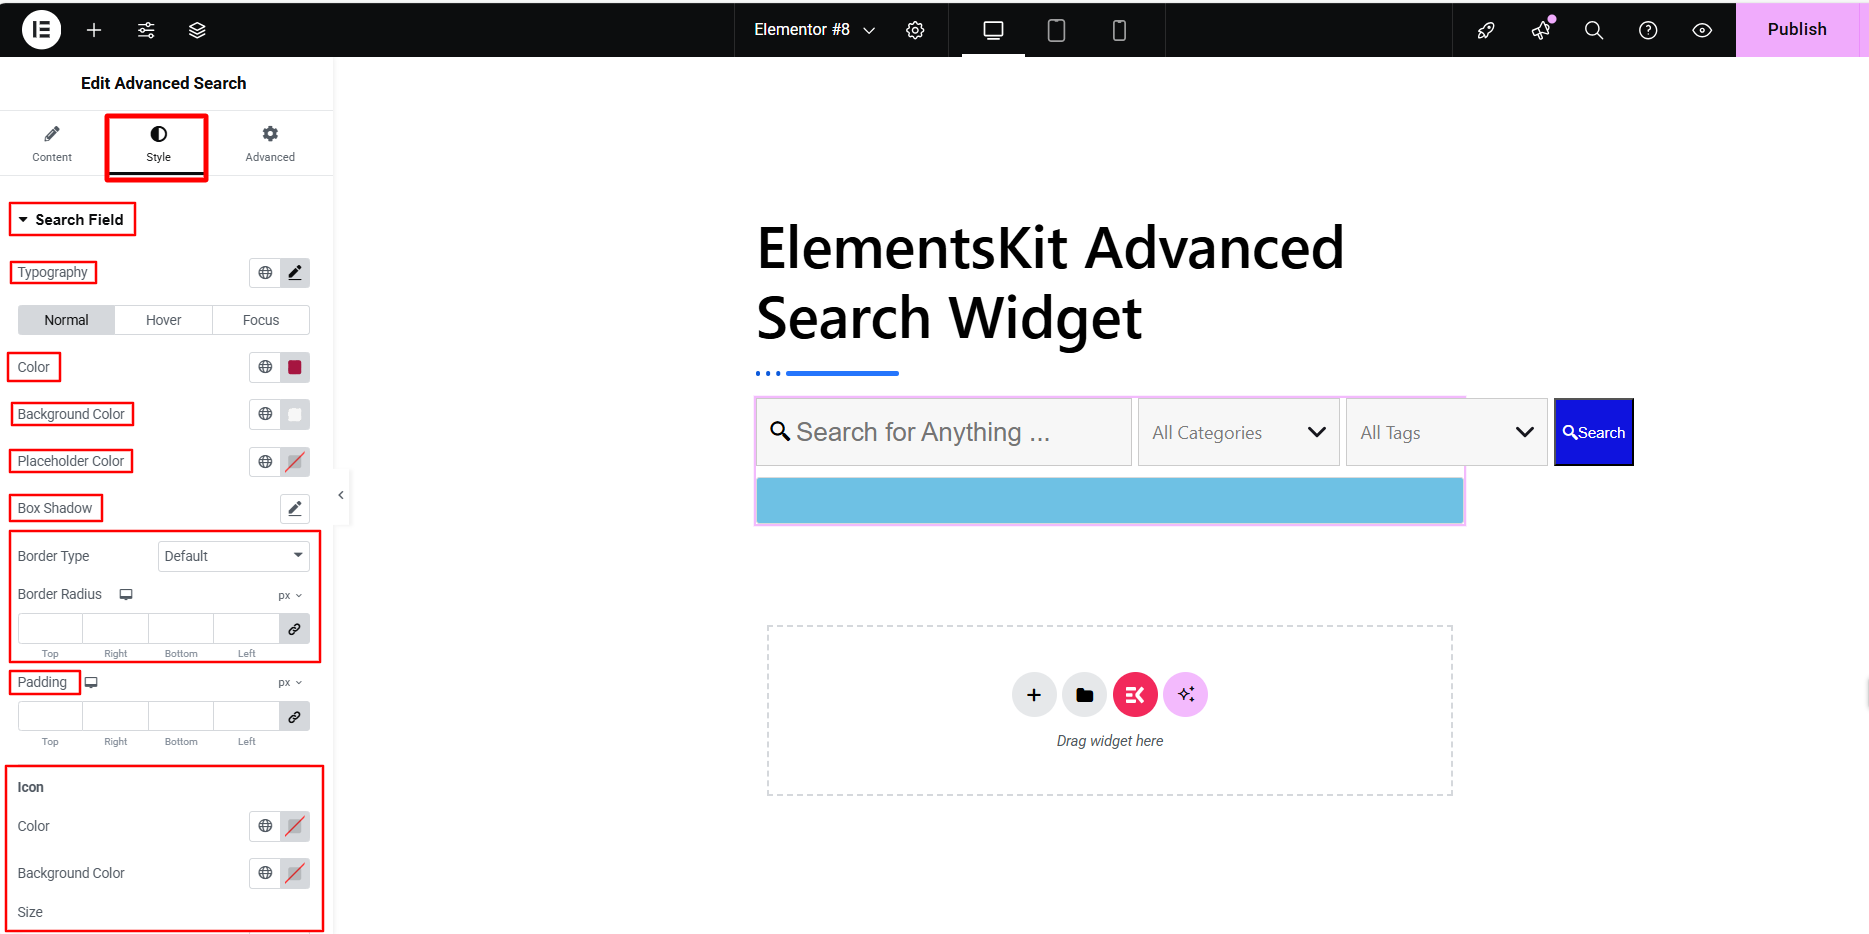
You can style typography, colors, backgrounds, borders, icons, and more, with settings for Normal, Hover、 そして 集中 states. And, when it comes to styling the result panel, the ElementsKit Advanced Search widget has you covered, too.

You can completely change its look and feel, not just the basics like background colors, borders, padding, and margins, but also finer details such as page count display, thumbnails, search result titles, and content formatting.
Step 5: Test & Troubleshoot Your Elementor Search Box
Once you’ve finished styling the search box, it’s time to test it. For best results, use incognito mode or a different device. Try a few queries and check if the search results are accurate.
If you’ve enabled categories and tags, test them as well, make sure searches within those filters work correctly, and that the popular keywords bar displays properly. If the results are relevant and meet user expectations, move on to reviewing the search results’ appearance.
Preview the results panel and ensure the layout matches your intended organization. Finally, test the search box across different devices to ensure responsiveness and in multiple browsers, to ensure consistent performance.
And, this was my tutorial on how to add an advanced search bar to Elementor websites. Now, we would like to give some industry-standard ideas that will help to make a modern and beneficial search box for your WordPress website.
Best Practices for Modern Search Box on WordPress Websites
Here are some of the best practices you can follow for making an effective search experience in Elemetnor websites.
Key Search Box Elements
Using strategic search box components like tags or buttons transforms a simple search field into an advanced, content-discovery tool. This not only makes finding information easier for users but also increases dwell time and lowers bounce rates by keeping visitors engaged and satisfied.
Popular Keywords or Search Suggestions
Display popular search terms and smart suggestions to help visitors enter the right queries and find the most relevant results, saving both their time and effort.
Show Error Message Or Page
A professional touch is to display a clear error message or a no-results page when no matches are found. Enhance it further by suggesting alternative keywords, related search terms, or directly showing relevant content.
Ensure Accessibility
Make sure that the search box is accessible to everyone. You can add audio search functionality to help visually challenged visitors. Overall, you should go for a clean and intuitive search box.
An icon is the crisp item we mostly overlook, but it can be the tiny item to indicate something without using long text. So, using icons sparingly in the search bar and results
Responsive Search Bar
It’s equally important to ensure your Elementor website’s search bar is fully responsive. In mobile view, it should neatly accommodate all search box components. If you’re on WordPress, consider using an advanced plugin like ElementsKit, which automatically optimizes your search bar for all devices.
まとめ!
Now you know how to create an advanced search bar in Elementor website and the best industry practices to follow. With ElementsKit, you get powerful features for building a search panel that delivers real-time results, without writing a single line of code. Just drag, drop, and design with its intuitive builder interface.
So, go ahead and create your own advanced search bar. And if you have any questions, feel free to reach out. We’re here to help.

コメントを残す