


Creare un sito web WordPress professionale non è mai stato così accessibile, grazie alla rivoluzione dell'editor a blocchi Gutenberg.
Se usi WordPress da un po’, ricorderete come noi (gli utenti WordPress) dovevamo dipendere interamente da altri plugin per la creazione di pagine. La maggior parte di essi con un ambiente completamente diverso rispetto al WordPress nativo.
Ora le cose sono cambiate con l'editor a blocchi. Gutenberg offre un modo flessibile e potente per progettare il tuo sito senza alcuna conoscenza di codifica.
Tuttavia, quando senti la necessità di funzionalità avanzate di modifica del sito, ci sono plug-in dell'editor a blocchi che portano le funzionalità di creazione di pagine sulla stessa interfaccia. Allo stesso tempo corrispondono anche al livello di prestazione di Gutenberg.
Quindi questa guida ti guiderà attraverso i passaggi per creare un sito Web completo utilizzando WordPress e Gutenberg, dall'acquisizione di un dominio alla creazione di layout complessi per creare un sito Web professionale.
Creazione di un sito Web professionale completo in WordPress con Gutenberg
WordPress offers a reliable foundation for building professional websites, and with the Gutenberg block editor, the process becomes even more intuitive. Whether you’re starting from scratch or customizing an existing site, using Gutenberg in WordPress makes it easy to design quickly and efficiently. Here’s a step-by-step guide to help you navigate the process.
# Passaggio 1: ottieni un dominio e un servizio di hosting
Il primo passo nella creazione di qualsiasi sito web è selezionare un nome di dominio e un servizio di hosting affidabile. Il tuo nome di dominio è l'indirizzo del tuo sito web su Internet (es wpmet.com), mentre il servizio di hosting fornisce uno spazio di archiviazione sul proprio server per archiviare i dati del tuo sito web e renderli accessibili online.
- Scegli un nome di dominio: Seleziona un nome di dominio che rifletta il tuo marchio o lo scopo del tuo sito web. Dovrebbe essere facile da ricordare, scrivere e digitare.
- Scegli un fornitore di hosting: Opt for a trusted hosting provider with good uptime, speed, and customer support. Some popular options include Bluehost, Kinsta, Hostinger, etc.
Per i siti Web WordPress, ce ne sono un buon numero provider di hosting dedicati a WordPress. Questi server di hosting sono configurati specificamente per WordPress, il che può comportare una migliore compatibilità e meno problemi tecnici. Potresti anche avere WordPress installato nel tuo sito.
# Passaggio 2: utilizza un tema a blocchi
Per utilizzare l'editor Gutenberg, devi avere un tema a blocchi installato sul tuo sito. I temi dei blocchi sono progettati per funzionare perfettamente con l'editor Gutenberg.
For any latest version of WordPress, you will have a default block theme installed on your website like Twenty Twenty Five or Ciao Blocchi theme.
Se desideri utilizzare un tema a blocchi di terze parti, ecco la procedura 👇
- Installa un tema a blocchi: Vai alla dashboard di WordPress, vai su Aspetto > Temi e cerca un tema di blocco.
- Attiva il tema: Una volta trovato un tema a blocchi adatto alle tue esigenze, installalo e attivalo.
# Passaggio 3: installa un plug-in dell'editor di blocchi
To extend the functionalities of Gutenberg, you can consider installing a block editor plugin to your WordPress site. A plugin would add more functionalities with additional blocks, patterns, and ready templates,making it easier to design your website.
Per questo tutorial, utilizzeremo il plug-in dell'editor di blocchi GutenKit. GutenKit è un potente plugin per l'editor di blocchi che aggiunge un'ampia gamma di blocchi, modelli e molte funzionalità di creazione di pagine a Gutenberg. È leggero, garantisce tempi di caricamento più rapidi ed è completamente compatibile con Full Site Editing (FSE).
# Passaggio 4: crea progetti per l'intero sito con Full Site Editor (FSE)
L'editing completo del sito in Gutenberg ti consente di progettare e personalizzare l'intero sito web, dall'intestazione agli stili e alle pagine globali.
Per accedere al sito completo di WordPress, vai a Aspetto > Editor dalla dashboard di WordPress. Quindi ti ritroverai nell'editor del sito completo WordPress.
Ora nell'editor del sito puoi creare il menu di navigazione, le pagine del sito web, i modelli personalizzati e così via.

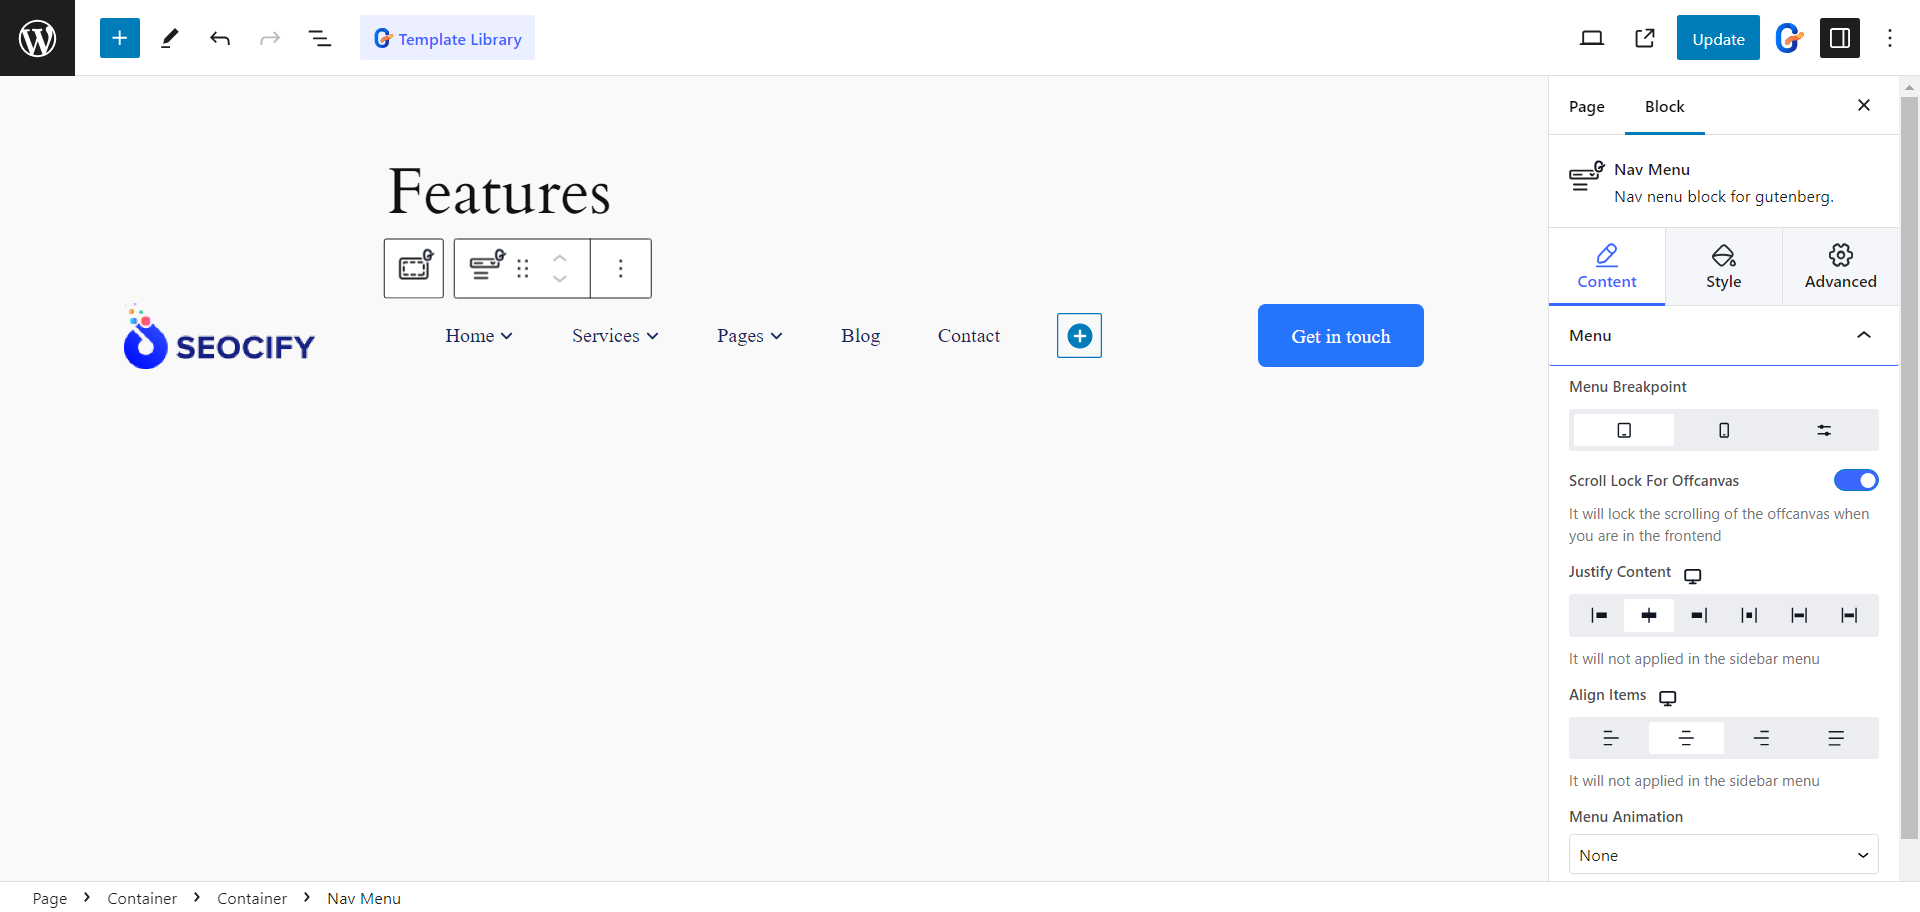
Per creare il menu di navigazione, inserire il file Navigazione dall'editor del sito completo. Quindi puoi creare il menu per il tuo sito.
Ora puoi utilizzare il blocco “Navigazione” predefinito di Gutenberg. Ma poiché desideri un menu avanzato e funzionale, potresti preferire Blocco del menu di navigazione di GutenKit. Usandolo, puoi facilmente aggiungere e personalizzare menu e voci di sottomenu.
Una volta aggiunto il blocco menu Nav nell'editor, verranno visualizzate automaticamente tutte le pagine pubblicate come voci di menu, con un'icona "+" per aggiungerne di nuove. Facendo clic su un elemento di navigazione vengono visualizzate le sue impostazioni nella barra laterale destra, offrendo più funzioni rispetto ad altri blocchi GutenKit.
Punto di interruzione del menu: Progetta un menu reattivo impostando i punti di interruzione per dispositivi mobili e tablet, nonché punti di interruzione personalizzati.
Blocco scorrimento per fuori tela: Abilita questa funzione per trasformare automaticamente il menu in un menu fuori schermo sui dispositivi più piccoli.
Giustifica contenuto e allinea elementi: Imposta l'allineamento e la giustificazione del menu.
Animazione del menu: Decidi se attivare un'animazione per il menu per renderlo più attraente.
Il blocco Menu di navigazione si estende anche alla creazione Megamenù nell'editor dei blocchi.
È necessario selezionare una voce di menu e abilitare la funzione Sottomenu per aggiungere il menu Mega. Nel sottomenu, trovi la possibilità di scegliere il tipo di sottomenu tra Dropdown o Mega Menu.
Se scegli il Mega Menu, puoi aggiungere qualsiasi blocco come voce di menu per creare un mega menu multidimensionale per il tuo sito web. Ora puoi scegliere un menu a larghezza intera o impostare la larghezza del menu su in linea o personalizzata.
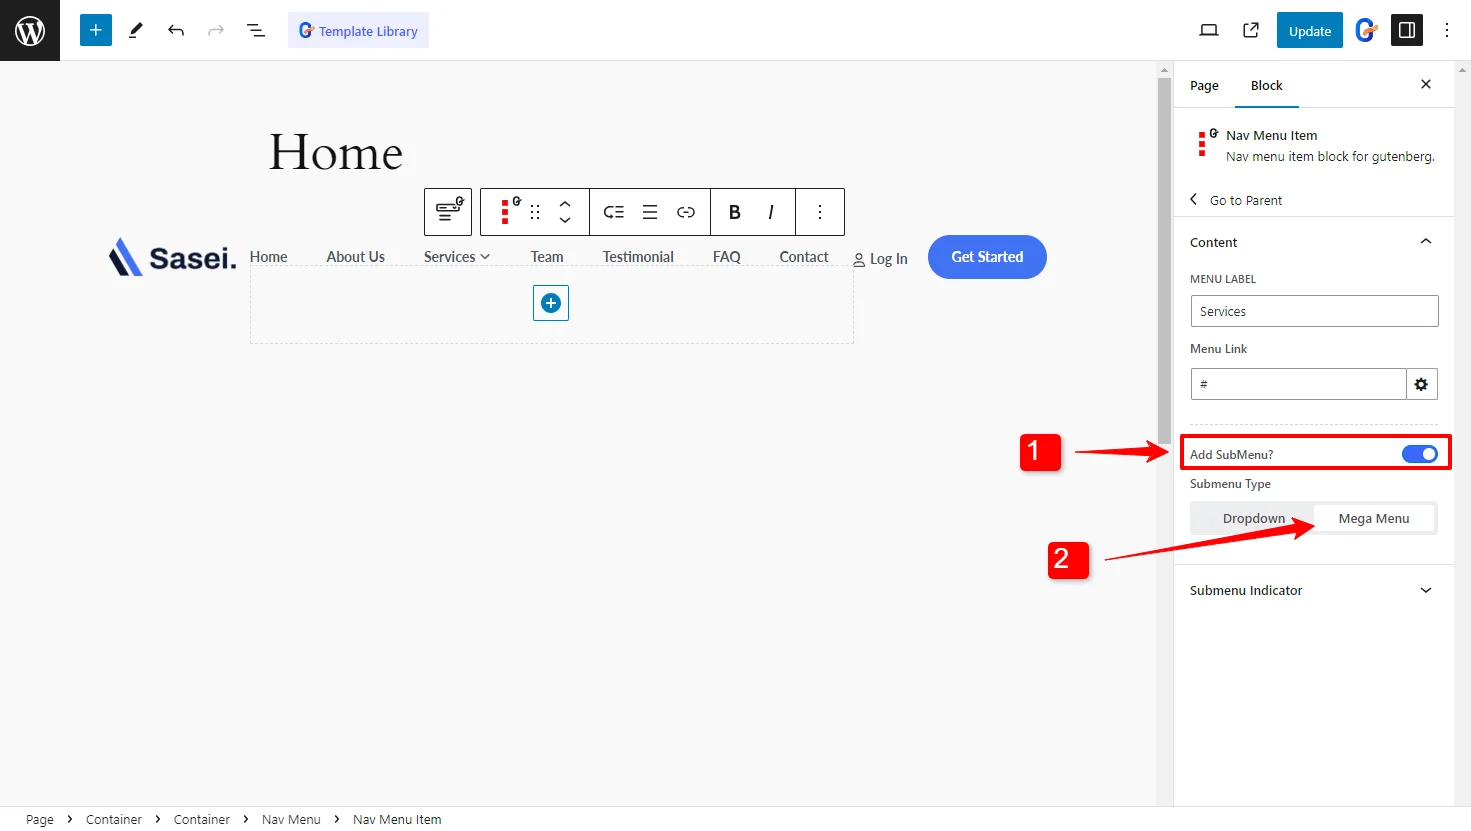
Inoltre, puoi personalizzare l'aspetto del mega menu, inclusa la regolazione della posizione a destra o a sinistra, la modifica dell'icona del sottomenu e la personalizzazione dell'aspetto del menu nel suo complesso.
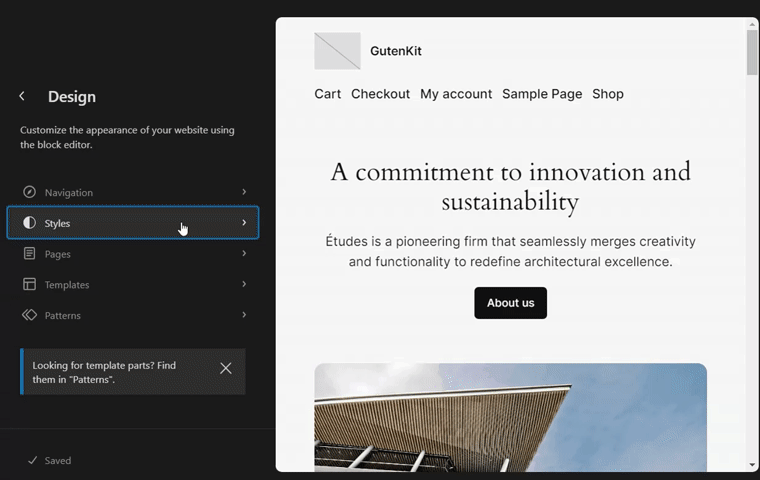
4.2: Scegli gli stili globali del tuo sito
Successivamente nell'editor del sito completo ci sono le opzioni Stili, dove puoi scegliere gli stili globali per il tuo sito.
Nella pagina degli stili troverai gli stili preimpostati. Ogni stile ha una combinazione di colori, tipografia e impostazioni di layout diverse. Puoi utilizzare queste opzioni di stile predefinite o creare uno stile personalizzato per il tuo sito.
Per creare stili personalizzati, fai clic sul pulsante Modifica ( 📝).

Tipografia: Puoi modificare i caratteri, la dimensione dei caratteri e gli elementi di testo del tuo sito, inclusi stili diversi per testo, collegamenti, intestazioni, ecc.
Disposizione: Per quanto riguarda i layout, puoi impostare la larghezza del contenuto, il riempimento e la spaziatura dei blocchi per l'intero sito.
Colori globali: Nell'editor, naviga attraverso Colori > Tavolozza. Ora aggiungi colori globali personalizzati nella sezione Personalizzato facendo clic sul pulsante + (più). Dopo aver aggiunto i colori personalizzati, fai clic sul pulsante Fine. Infine, clicca sul pulsante Salva.
Tutti i I blocchi GutenKit supportano le tavolozze di colori globali di WordPress. Quindi, puoi utilizzare le tavolozze dei colori personalizzate su qualsiasi blocco.
4.3: Personalizza le pagine WordPress con design complessi
Puoi design layouts for website pages for blogs, feature pages, and more in the site editor. Click on the “Pagina” nell'editor del sito e troverai tutte le pagine esistenti del tuo sito web.
Nell'editor completo del sito puoi personalizzare le pagine esistenti, nonché creare nuove pagine web per il tuo sito.
Con i blocchi GutenKit, puoi progettare facilmente progetti complessi in Gutenberg. GutenKit ti consente di superare i limiti di progettazione e creare layout complessi utilizzando blocchi come contenitori, schede e fisarmoniche.
GutenKit Blocco contenitore ha una funzionalità fantastica: modifica in linea con larghezza trascinabile. Puoi regolare facilmente la larghezza del contenitore trascinando il cursore del mouse verticalmente, proprio come fai nei page builder.
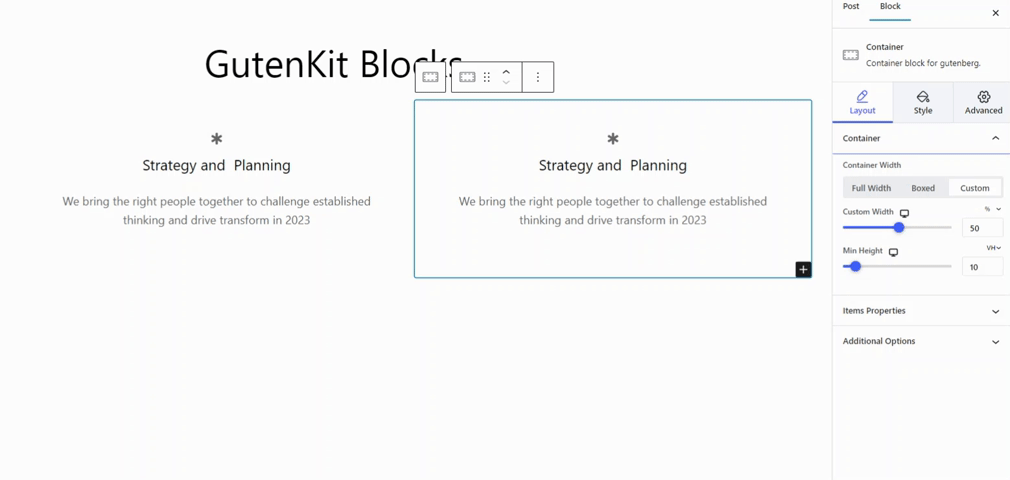
Puoi creare facilmente sezioni personalizzate e strutturare i tuoi contenuti per un design unico nell'editor Gutenberg. Con numerose opzioni di layout, puoi modificare la larghezza, lo sfondo, la spaziatura interna e altro per una personalizzazione senza interruzioni.
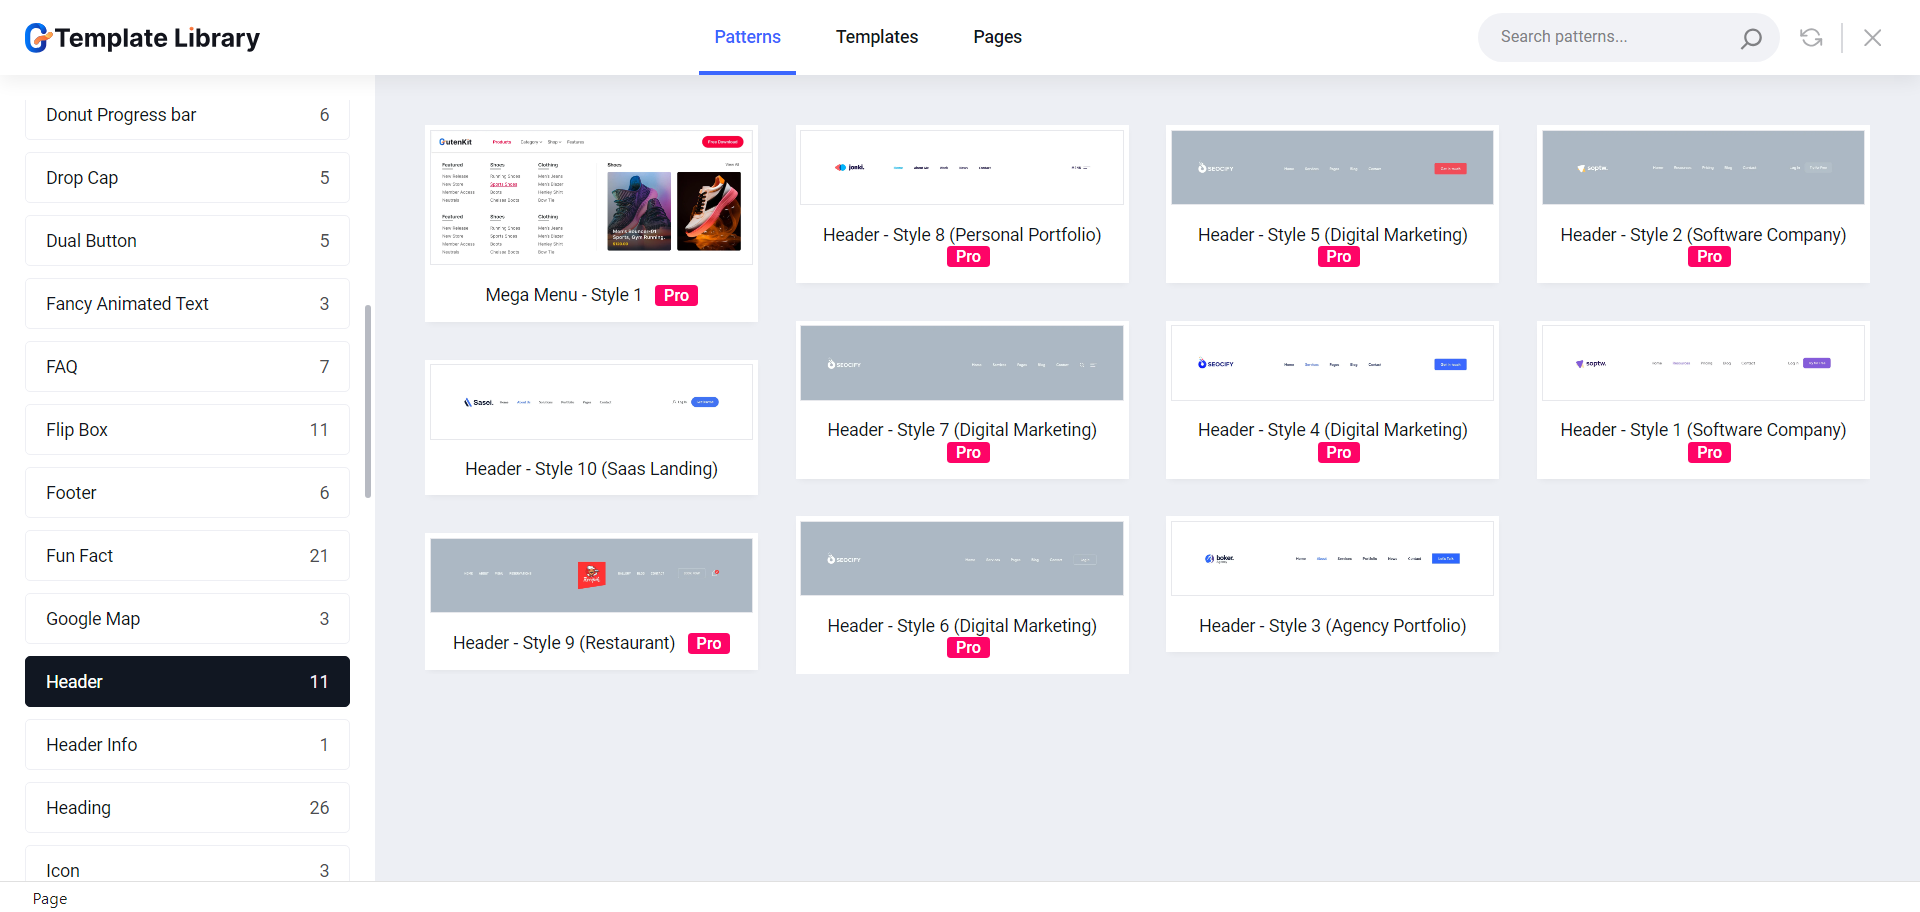
Utilizza modelli già pronti e modelli a blocchi per la creazione rapida del sito
GutenKit migliora l'esperienza di progettazione con la sua libreria di oltre 500 modelli e modelli di blocchi predefiniti. Questi modelli unici semplificano la progettazione del sito Web in WordPress.
Ad esempio, progettiamo un sito Web per un servizio di marketing digitale utilizzando la libreria di modelli di GutenKit.
se stai creando un sito Web per il tuo servizio di marketing digitale, troverai un modello con design già pronti per diverse pagine e modelli predefiniti per ogni parte del tuo sito Web.
👉 Progettazione delle pagine del sito web
Cominciamo da progettare una landing page per il tuo sito WordPress. Nella libreria dei modelli troverai tre diversi stili di landing page, ovvero la home page per il marketing digitale. Scegli uno degli stili che ti piacciono e poi personalizza il design.
Allo stesso modo, troverai design già pronti per diverse pagine del tuo sito web, tra cui la pagina dei contatti, la pagina del servizio e la pagina delle informazioni.
Durante la creazione di un sito Web, puoi progettare facilmente l'intestazione e il piè di pagina con i modelli di blocco predefiniti di GutenKit. Per le intestazioni, la libreria di modelli GutenKit ha circa una dozzina di intestazioni e una mezza dozzina di modelli di piè di pagina pronti per l'uso sui tuoi siti web.
Cosa rende il plugin dell’editor di blocchi GutenKit la scelta migliore?
Ora la domanda ovvia è, tra tutti i plugin dell’editor a blocchi, perché dovresti scegliere GutenKit? Proviamo a trovare le risposte:
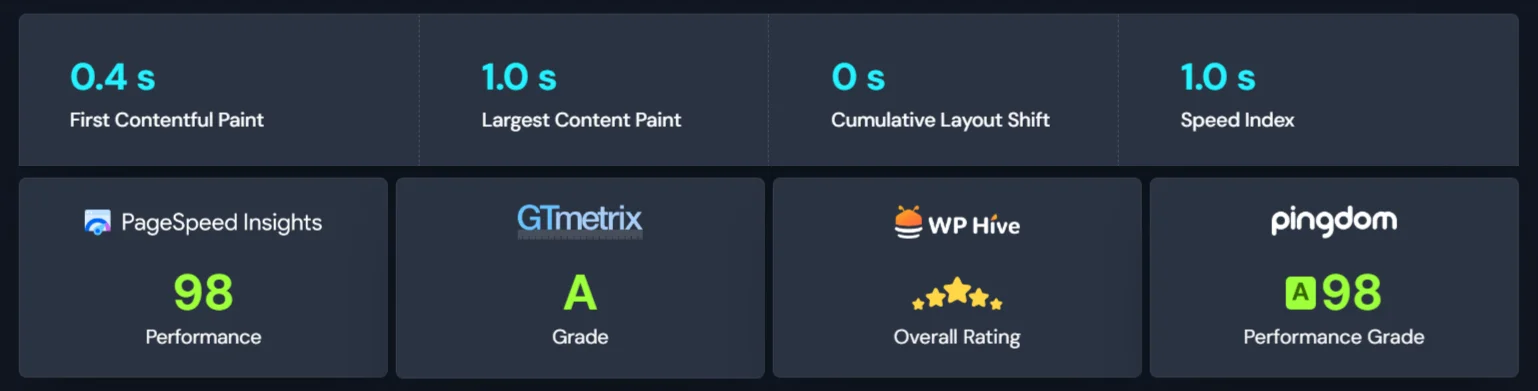
✅ Plugin di caricamento leggero e veloce
Nonostante sia un plugin ricco di funzionalità, GutenKit è comunque leggero e mantiene una valutazione più alta sia in termini di prestazioni che di SEO.
Il plug-in con codifica pulita è sviluppato con un meccanismo di caricamento delle risorse intelligente, in cui tutte le librerie e le risorse vengono caricate solo quando vengono utilizzate sul sito Web. Ciò aiuta il sito Web a ridurre le richieste del server e a caricarsi più velocemente sui browser.
✅ Tutti i blocchi e i modelli sono compatibili con FSE
If there’s a block editor plugin that is truly compatible with WordPress Full Site Editor (FSE), GutenKit is the one. All of its blocks, modules, and templates work perfectly with Modifica dell'intero sito WordPress.
Inoltre, funzionalità come il supporto della tavolozza dei colori globale e un modulo di contenuto dinamico rendono l'esperienza di modifica del sito Gutenberg ancora migliore.
✅ Porta tutte le funzionalità del generatore di pagine su Gutenberg
Se sei passato dai page builder convenzionali, GutenKit è la scelta definitiva per te. Le seguenti caratteristiche rendono GutenKit il blocco di creazione di pagine definitivo per Gutenberg.
- Megamenù
- Generatore di cicli di query
- Effetto parallasse
- Scorrimento di una pagina
- Contenuto appiccicoso
- Glassmorfismo
- Copia e incolla stili
Tutte queste funzionalità e altro ancora colmano il divario tra Gutenberg e i costruttori di pagine per offrire una vera esperienza di creazione di siti Web.
Concludendo!
In questa guida, abbiamo spiegato brevemente i modi più semplici per creare un sito Web WordPress professionale con Gutenberg.
Abbiamo esplorato l'editor completo del sito, dove puoi progettare ogni aspetto del tuo sito web utilizzando i blocchi. Inoltre, la creazione di progetti a livello di sito, inclusa la creazione di intestazioni e piè di pagina professionali, e la creazione di layout complessi sono ora semplificati con i modelli, i modelli e i moduli già pronti di GutenKit.
Se trovi utile questo articolo, lascia un commento qui sotto. E non dimenticare di provare GutenKit: i blocchi di creazione di pagine definitivi per Gutenberg.

Lascia un commento