Vous souhaitez créer un titre attrayant avec l'éditeur de blocs Gutenberg ? Le bloc de titre par défaut ne vous offre pas beaucoup de possibilités. Cependant, vous pouvez utiliser le bloc de titre GutenKit, disponible avec des fonctionnalités étendues.
Vous pouvez ajouter un sous-titre, une description du titre, un texte d'ombre, un séparateur et un titre ciblé. De plus, ce bloc vous permet d'avoir un contrôle total sur la personnalisation.
Vous finirez donc par créer un titre élégant pour votre page ou votre article. Voyons comment utiliser le bloc Titre GutenKit dans l'éditeur de blocs.
Comment utiliser le bloc d'en-tête GutenKit ? #
Suivez les étapes ci-dessous pour en savoir plus sur l’utilisation du bloc de titre GutenKit.
Étape 1 : ajouter le bloc d'en-tête GutenKit #
- Vous devez avoir le GutenKit plugin installé.
- Ensuite, ajoutez une page ou un article et entrez dans l’éditeur de blocs.
- Cherchez le "+” en haut de l’écran de l’éditeur.
- Cliquez dessus et le menu du bloc apparaîtra.
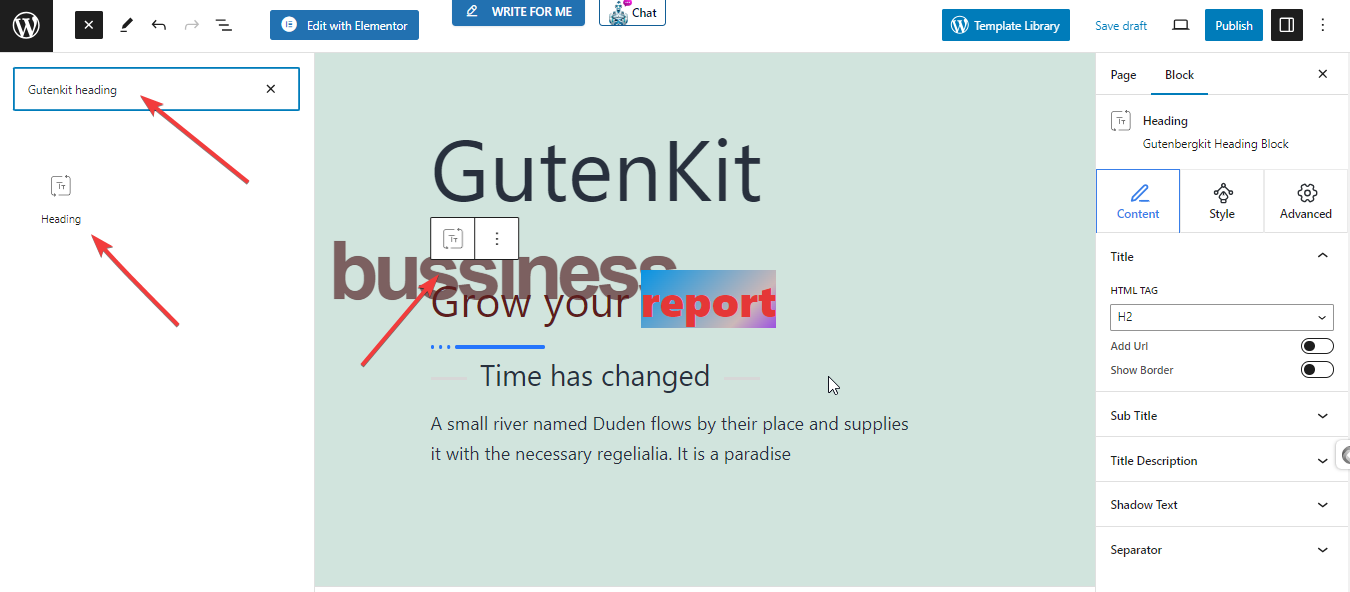
- Mettez le «GutenKit En-tête" dans la barre de recherche.
- Une fois que vous le voyez, cliquez ou faites-le glisser et déposez-le sur l'écran de l'éditeur.
Une fois que le bloc de titre GutenKit est sur votre écran, cliquez dessus. Les paramètres du bloc s'ouvriront dans la barre latérale droite, combinés en Contenu, Style, & Avancé onglets. Le Contenu L'onglet aidera à ajouter un titre, un sous-titre, une description, un séparateur, etc.
Étape 2 : saisissez le titre et le sous-titre du titre #
Sous l'onglet Contenu :
Titre:Vous pouvez taper le titre directement sur l'écran de l'éditeur.
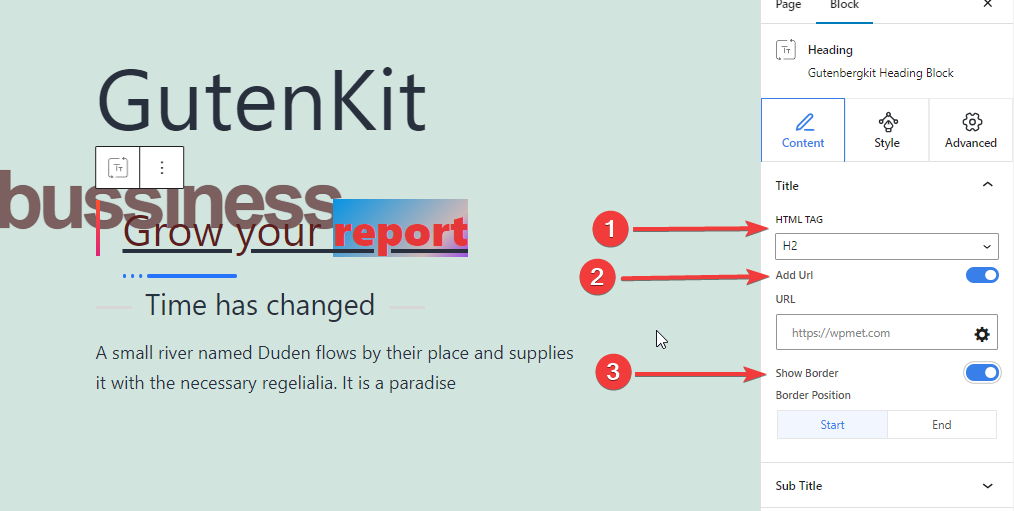
- BALISE HTML: Définissez la balise HTML du titre sur H1-H6, Div, Span ou P.
- URL: Basculez ce bouton pour ajouter un lien vers le titre.
- Afficher la bordure: Activez ce bouton pour afficher la bordure.
- Position de la bordure : définissez la bordure au début ou à la fin du titre du titre.
Sous-titre:À partir de là, vous ajouterez votre sous-titre.
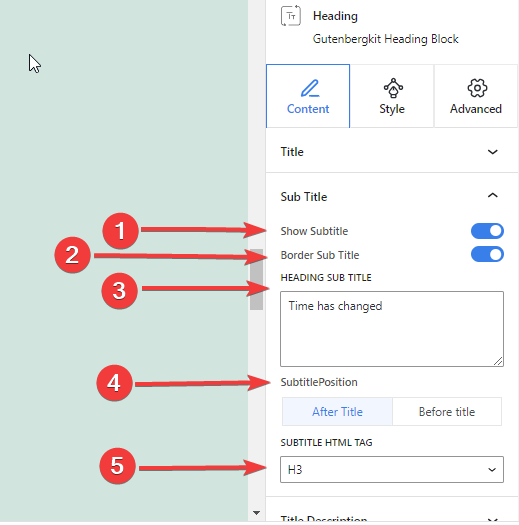
- Afficher les sous-titres:Cliquez sur le bouton bascule pour entrer le sous-titre.
- Sous-titre de la bordure: Basculez ce bouton pour ajouter une bordure avec un sous-titre.
- Titre Sous-titre:Écrivez votre sous-titre dans cette case.
- Position des sous-titres:Afficher le sous-titre avant ou après le titre du titre.
- Balise HTML de sous-titre: Déterminez la balise du titre du sous-titre (H1-H6, Div, Span ou P)
Étape 3 : ajouter un titre, une description, un texte d'ombre et un séparateur #
description du titre:Cette fonctionnalité vous donne le contrôle sur l'ajout d'une description de titre.
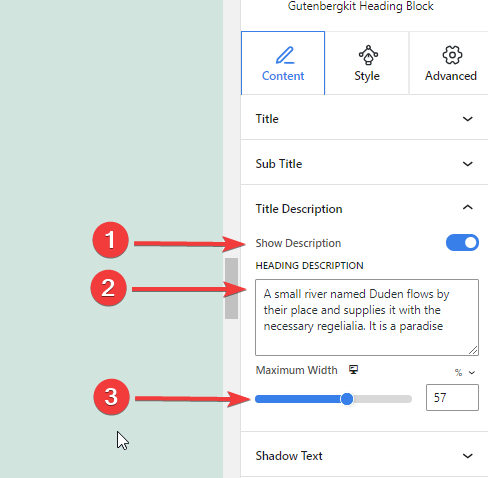
- Montrer la description:Cliquez sur ce bouton pour insérer la description du titre.
- Titre Description:Entrez ici la description de votre titre.
- Largeur maximale: Définissez la largeur de la description du titre.
Texte de l'ombre : Appliquez une belle ombre de texte à vos titres.
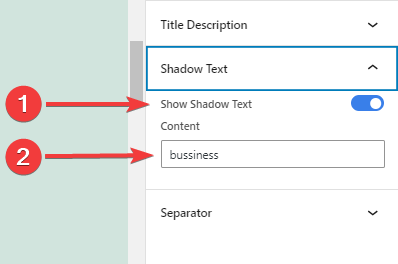
- Afficher le texte ombré: Basculez ce bouton pour activer la fonction de texte ombré.
- Contenu:Ajoutez le contenu que vous souhaitez afficher sous forme de texte ombré.
Séparateur:
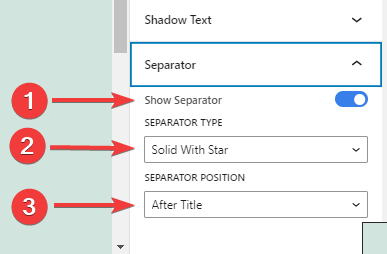
- Afficher le séparateur:Activez ce bouton pour ajouter un séparateur.
- Type de séparateur:Choisissez parmi quatre types de séparateurs différents.
- Position du séparateur:Choisissez où placer le séparateur.
Étape 4 : Aligner le titre de l'en-tête #
Du Style onglet, venez sous le Général paramètres:
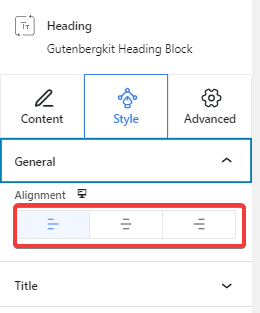
- Alignement:Alignez votre style de titre à gauche, au centre ou à droite.
Étape 5 : Style du titre de l'en-tête #
Les fonctionnalités suivantes vous aideront à styliser le titre de votre titre :
Titre #
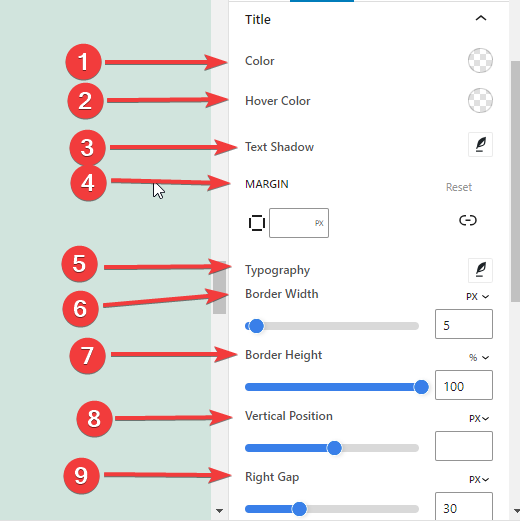
- Couleur: Donnez une couleur à votre titre.
- Couleur du survol : Définissez la couleur de votre titre au survol.
- Ombre de texte: Ajoutez des effets d’ombre à votre texte de titre.
- Marge: Ajustez la marge pour la conception de votre titre.
- Typographie: À partir de là, vous contrôlerez tous les paramètres typographiques tels que la famille de polices, la taille, le poids, la transformation, le style, la décoration, la hauteur de ligne, l'espacement des lignes, l'espacement des mots, etc.
- Largeur de la bordure: Définissez la largeur de la bordure du titre.
- Hauteur de la bordure: Entrez la hauteur de la bordure du titre.
- Position verticale: Ajustez le placement vertical de la bordure.
- Espace droite/gauche:Définissez l’espace entre le titre et la bordure.
*Noter que Si vous affichez la bordure au début, vous devrez définir l'espacement à droite. Et, tout en affichant la bordure à la fin, vous devez définir l'espacement à gauche.
- Couleur de la bordure:Sélectionnez la couleur de la bordure.
Étape 6 : Créer un titre de focus #
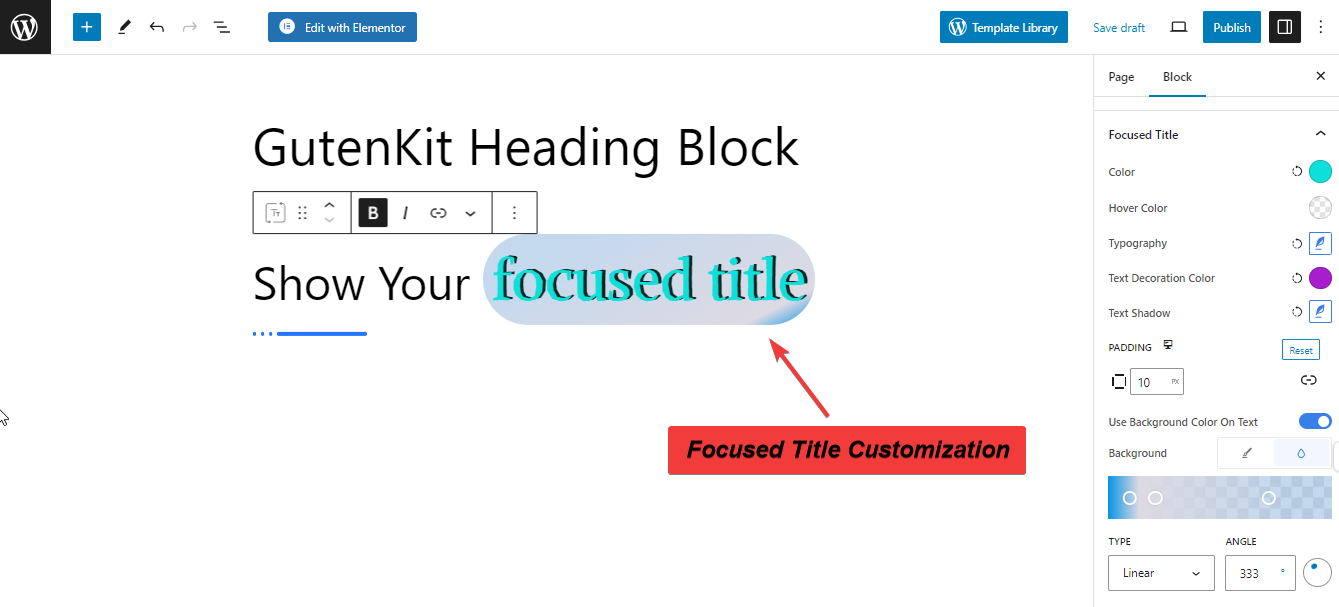
La fonction de titre principal rend une partie importante de votre titre plus intéressante et accrocheuse. Mettez simplement en gras (Ctrl+B) la partie de votre titre sur laquelle vous souhaitez mettre davantage l'accent.
Sous l'onglet style, vous obtiendrez le Titre ciblé fonctionnalité. Voir son réglage ci-dessous.
Titre ciblé : Vous verrez quelques fonctionnalités similaires (couleur, couleur de survol, typographie, ombre du texte) au paramètre Titre. Les autres fonctionnalités sont :
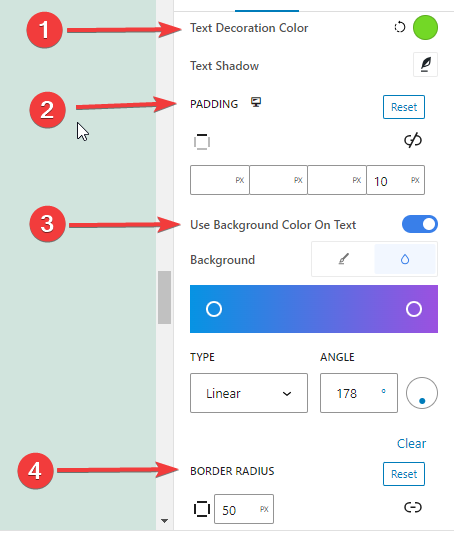
- Couleur de décoration du texte:Spécifiez la couleur de la décoration pour le titre focalisé.
- Rembourrage: Définissez le remplissage autour du titre focalisé.
- Utiliser la couleur d'arrière-plan sur le texte:Donner de la couleur à l'arrière-plan du titre focalisé.
- Rayon de frontière: Définissez la rondeur de la bordure de votre titre focalisé.
Voici notre titre ciblé :
Étape 7 : Personnaliser le sous-titre et la description du titre, #
Désormais, les fonctionnalités suivantes s'appliquent au sous-titre et à la description du titre. Voyons comment les utiliser :
- Couleur:À partir de là, vous choisirez la couleur.
- Typographie:Contrôlez toutes les personnalisations liées à la typographie comme la famille de polices de texte, la transformation, le style, la couleur de décoration, l'espacement des lettres, l'espacement des mots et la hauteur de ligne.
- Marge:Agrandissez l'espace autour du texte.
- Utiliser le remplissage de texte: Donnez une couleur ou une image d'arrière-plan à votre sous-titre. (Cette fonctionnalité s'applique uniquement aux sous-titres.)
Étape 8 : Personnaliser le texte de séparation et d'ombre #
Maintenant, nous allons découvrir le séparateur et la personnalisation du texte.
Séparateur: #
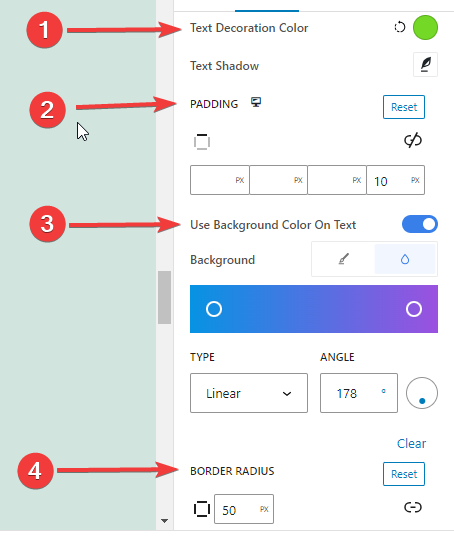
- Largeur:Entrez la valeur de la largeur du séparateur dans cette case en pixels.
- Hauteur: Définissez la hauteur du séparateur. Entrez une valeur en pixels.
- Marge:Définissez de l'espace avec d'autres éléments dans votre conception.
- Couleur du séparateur:Choisissez une couleur dans la palette de couleurs pour le séparateur.
Texte de l'ombre : #
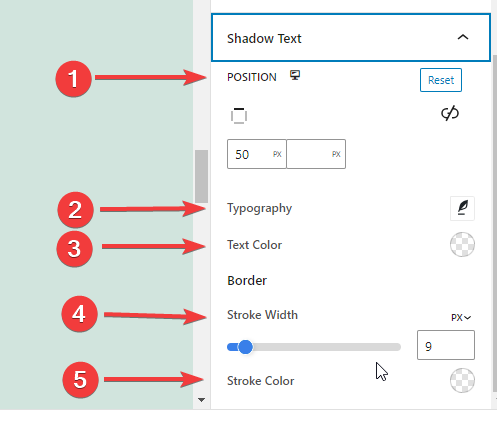
- Position: Placez le texte de l'ombre en saisissant les valeurs en haut et à gauche en pixels.
- Typographie:Obtenez tous les paramètres de style typographique pour le texte ombré.
- Couleur du texte:Ajoutez de la couleur pour le texte de l'ombre.
- Largeur de trait:Spécifiez la largeur de ligne qui entoure le texte de l'ombre.
- AVC Color : Choisissez une couleur pour le trait.
Étape 9 : Paramètres avancés #
Depuis l'onglet Paramètres avancés, vous pouvez configurer la mise en page du bloc d'en-tête GutenKit, l'arrière-plan, les styles de bordure et contrôler sa visibilité.
Mise en page, #
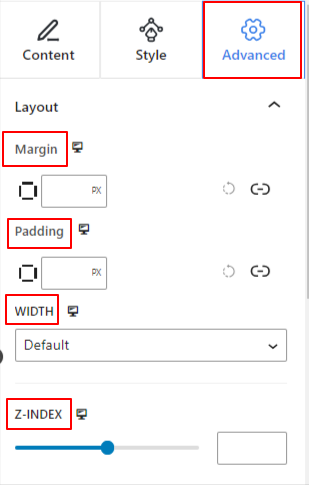
- Marge: Définissez l'espace autour de la disposition des blocs. Cela aide à définir l’écart entre un autre bloc.
- Rembourrage: saisissez une valeur pour définir l'espace autour du bloc dans sa disposition.
- Largeur: En plus de conserver la largeur de mise en page par défaut.
- Pleine largeur: En sélectionnant cette option, la mise en page s'étendra sur toute la largeur de l'écran.
- En ligne (auto): Son application aura la même largeur que l'élément de bloc.
- Coutume: Choisir cette option fera apparaître un curseur pour définir l'espace horizontal de la disposition des blocs.
- Indice Z: utilisez le curseur pour spécifier l'ordre de pile du bloc avec d'autres blocs.
Position: #
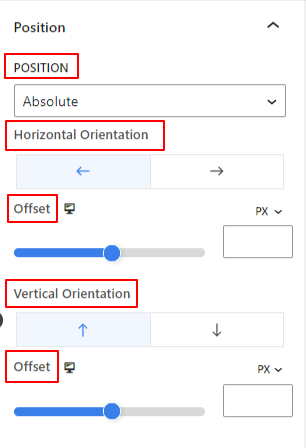
Sous la liste déroulante, vous verrez trois options : Défaut, Absolu, et Fixé.
- Absolu: La sélection de cette option vous donnera une position absolue du bloc, ce qui signifie que les éléments rentreront dans leur conteneur.
- Fixé: L'option Position fixe permettra à l'élément de s'adapter à la totalité de la fenêtre ou de l'écran.
Les options Absolue et Fixe ont des paramètres similaires comme ci-dessous :
- Orientation horizontale: Choisissez la direction de positionnement entre gauche et droite.
- Compenser: Utilisez le curseur ou mettez une valeur manuellement pour ajuster le positionnement horizontal du bloc.
- Orientation verticale: Sélectionnez la direction de positionnement entre le haut et le bas.
- Compenser: Utilisez le curseur ou mettez une valeur manuellement pour ajuster le positionnement vertical du bloc.
Arrière-plan: #
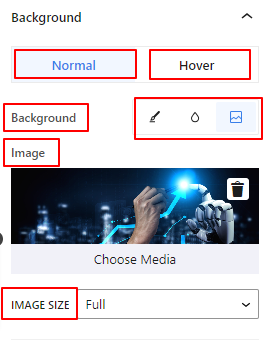
- Arrière-plan : choisissez une option d'arrière-plan entre une couleur unie, un dégradé ou une image.
Sous l'option Survol :
- Image: Si vous choisissez l'option image, les options suivantes s'ouvriront :
- Image: Choisissez une image dans la médiathèque ou téléchargez la vôtre.
- Taille de l'imagee : Sélectionnez la taille de l'image entre Vignette, Moyenne, Grande ou Complète.
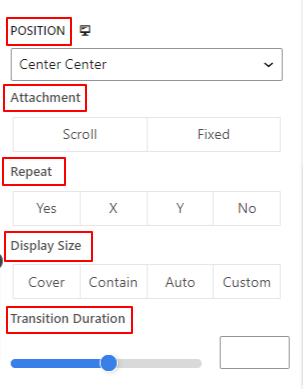
- Position: Sélectionnez la position des 10 options différentes.
- Répéter: sélectionnez une option pour définir la manière dont les images d'arrière-plan sont répétées.
- Taille d'affichage: Sélectionnez une taille d’affichage parmi quatre options différentes.
- Durée de la transition: Utilisez le curseur pour ajuster la transition de l'arrière-plan de l'état Normal à l'état de survol.
Frontière: #
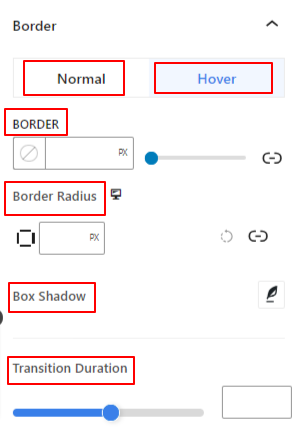
- Frontière: Sous cette option de configuration, vous obtiendrez des options de configuration des bordures telles que la largeur, le style et la couleur.
- Rayon de frontière: Définissez la rondeur de la bordure en saisissant une valeur.
- Boîte ombre: obtenez tous les paramètres tels que la couleur, l'horizontal/vertical, le flou, la répartition, etc. pour donner des effets d'ombre à la bordure.
Sous l'option de survol :
- Durée de la transition: Vous pouvez ajouter une valeur manuellement ou utiliser le curseur pour définir l'heure de modification du motif de la bordure en survol.
Visibilité: #
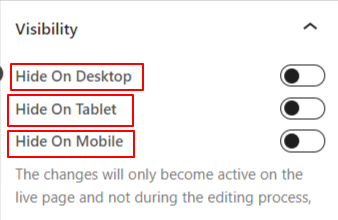
Le module de visibilité vous permet de contrôler l'affichage des conceptions de blocs en fonction du type d'appareil. Il y aura trois options d'appareil (ordinateur de bureau, tablette, mobile) avec un bouton bascule. Activez le bouton bascule pour masquer la conception de bloc de cet appareil.
Cependant, vous pouvez toujours le voir dans la vue de l'éditeur.
Avancé: #
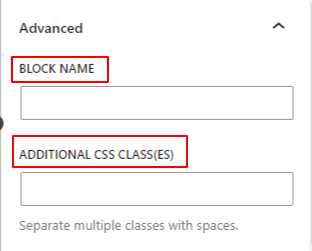
- Nom du bloc: donnez un nom pour identifier ce bloc de manière unique lors de la création de liens ou de scripts pour styliser le bloc.
- Ancre HTML: Ajoutez une URL pour lier une page de site Web.
- Classes CSS supplémentaires: Attribuez des classes CSS supplémentaires au bloc qui vous permettront de styliser le bloc comme vous le souhaitez avec du CSS personnalisé.
N.-B.: Vous pouvez ajouter plusieurs classes séparément avec des espaces.
Nous espérons que ce document vous a aidé à utiliser le bloc Titre GutenKit. C'est maintenant à votre tour d'essayer ce bloc et de créer des titres époustouflants pour vos pages.


