


What’s the final push that convinces visitors to become paying customers?
It’s genuine testimonials – real feedback from real people.
Often, your happy customers share their experiences on third-party platforms like Yelp, Google, Facebook, or Trustpilot. These platforms carry huge credibility, and showcasing those reviews directly on your website can instantly boost trust, impress first-time visitors, and increase conversions.
Imagine a glowing Yelp review about your service displayed right on your homepage; that’s powerful social proof you don’t want to miss!
The good news is, embedding Yelp reviews on your WordPress site is easier than you think. In this step-by-step tutorial, you’ll learn exactly how to add a Yelp review section to your WordPress website, no coding required.
Quick Overview
This tutorial discusses on adding Yelp Reviews in WordPress website.
Tools Used: ElementsKit, Elementor (Free version is enough)
The plugin method how to guide include below steps:
✅ Installing & activating a Yelp Review pluign.
✅ Embed Yelp review feed in WordPress website.
✅ Creating Yelp Review section layout.
✅ Customizing the Yelp review section.
This is no-code way to Yelp reviews on your website matching brand style.
How Does Adding Yelp Review Sections Help WordPress Websites?
You already have some ideas on the benefits of adding an appealing Yelp Review section on your site. And, you should, because whenever visitors land on your business or service web page, your first goal should be to earn their trust. Credibility isn’t built just by showcasing features attractively. Yes, that plays a big role too.
However, what truly convinces potential customers, as well as first-time visitors, is showing authentic feedback from real users. Reviews from existing clients or users act as proof that your product or service delivers on its promises.

Yelp is a prominent platform where people submit their feedback on their use of products or services. And most importantly, there is a wide acceptance of this platform in the web world. Therefore, displaying Yelp reviews as testimonials can help visitors make a decision quickly.
Additionally, positive reviews of your business can help boost your online visibility. Particularly, Yelp reviews can improve local search rankings. Google Maps or Apple Maps may consider showing companies and services at the top that have more positive reviews from social and trusted platforms, such as Yelp.
Therefore, you can understand the importance of these types of reviews for your business. Now, let’s know the easiest way to add & show Yelp reviews to your WordPress websites.
How to Embed Yelp Review Section in WordPress (Step-by-Step)
Before going to the step-by-step process of adding Yelp reviews on WordPress websites, you need to do a couple of things. First, you need to install & activate a plugin that allows you to embed Yelp review sections without any coding efforts.
Our top recommendation is the ElementsKit Elementor Addon, which makes it effortless to display Yelp reviews on your WordPress website. Beyond just embedding reviews, it offers extensive customization options so you can style them beautifully and maintain a professional, on-brand look.
- You can customize the entire Yelp review layout and content within it with the ElementsKit plugin.
- Directly display start and number rating from Yelp and customize their look.
- You can show only positive Yelp reviews on your website and hide lower-rated Yelp reviews.
- You can even present the reviews in an engaging slideshow format to make your testimonials stand out.
Another requirement is installing and activating the Elementor page builder plugin (the free version is enough), since ElementsKit is an Elementor addon. Once you’re done, get started with the following steps:
Step 1: Install & Activate Yelp Review Widget
Start by activating the ElementsKit Yelp widget. For this:
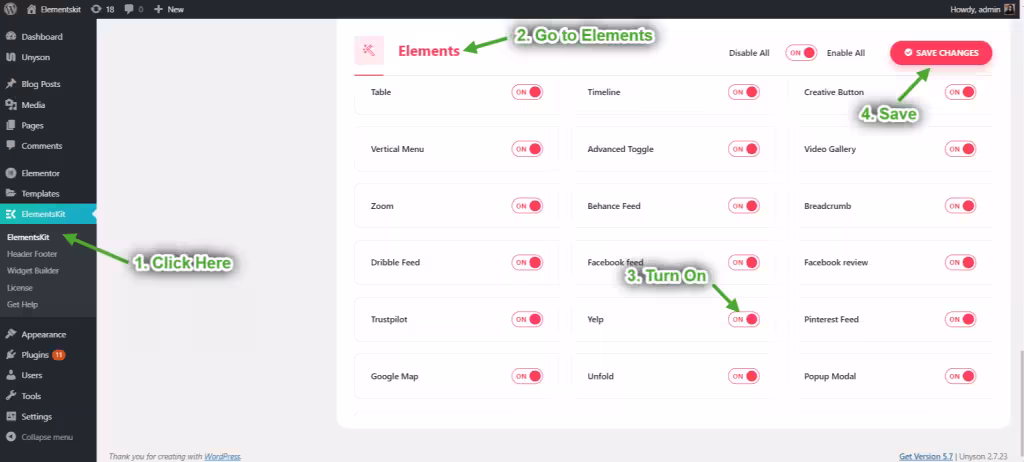
- Navegar a ElementosKit > Widgets
Toggle on the button with the ElementsKit Yelp Widget - Golpea el Guardar cambios botón.
Step 2: Get Your Yelp Page Link/ Get Yelp API Key
Visit (yelp.com) and search for your business name + location.
Go to your business’s Yelp listing.
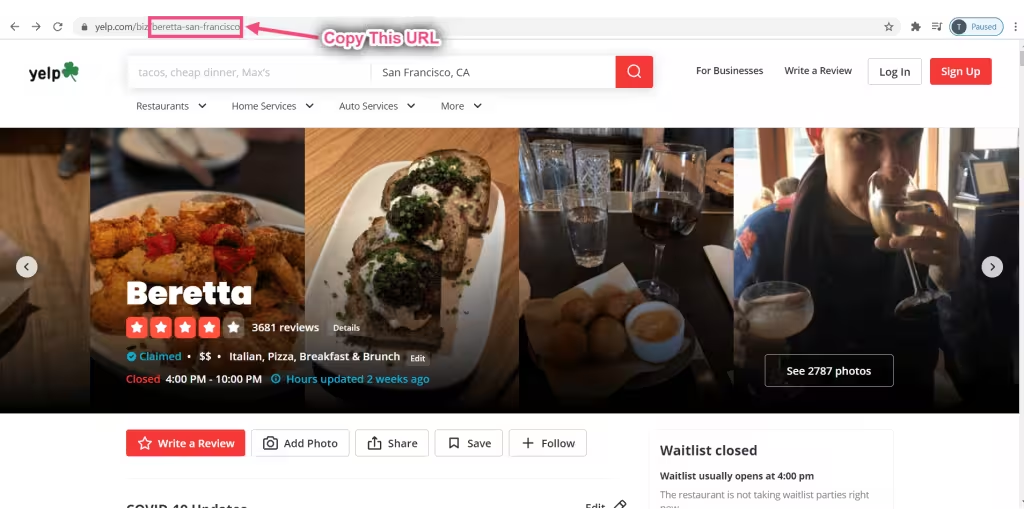
Then, copy the URL from your browser’s address bar (e.g., https://www.yelp.com/biz/your-business-name).
This URL is needed so the ElementsKit Yelp widget knows which Yelp page to fetch reviews from.
The good thing is that you don’t need to generate any Yelp API key with the ElementsKit Yelp widget
And another thing to remember: ElementsKit Yelp widget relies on Yelp Fusion API, which typically generates up to 3 reviews.
Step 3: Configure the Yelp Page Link with ElementsKit
To integrate the Yelp platform with WordPress websites, you need to configure the Yelp page link of your business or services with ElementsKit.
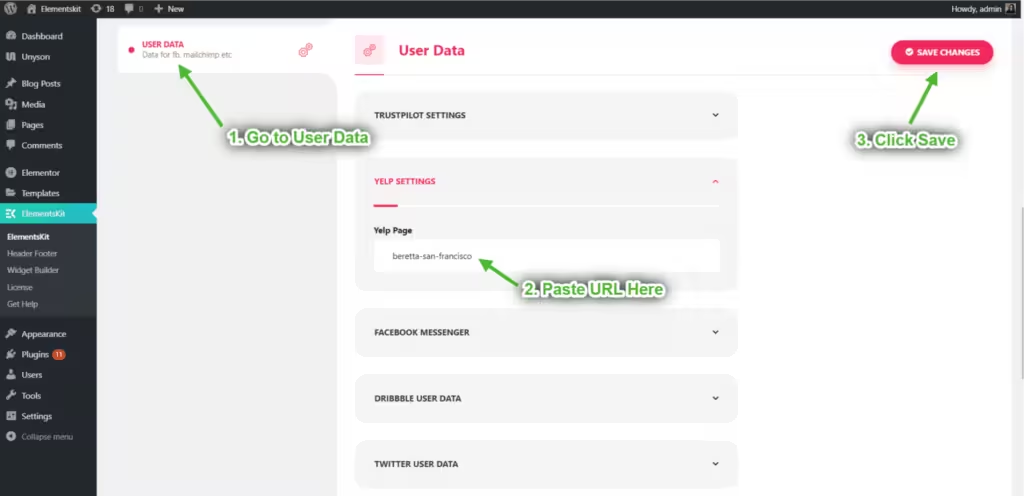
For this, log in to WordPress admin, navigate to ElementsKit > User Data > Yelp. Paste your Yelp business URL into the designated field. Then, click Save Changes.
That’s it! As we said before, you don’t need to generate and enter any Yelp API key to add Yelp reviews to WordPress websites with ElementsKit.
Step 4: Add Yelp Section to Elementor Page
Now, start editing the page or post with Elementor page builder where you want the Yelp review section to appear.
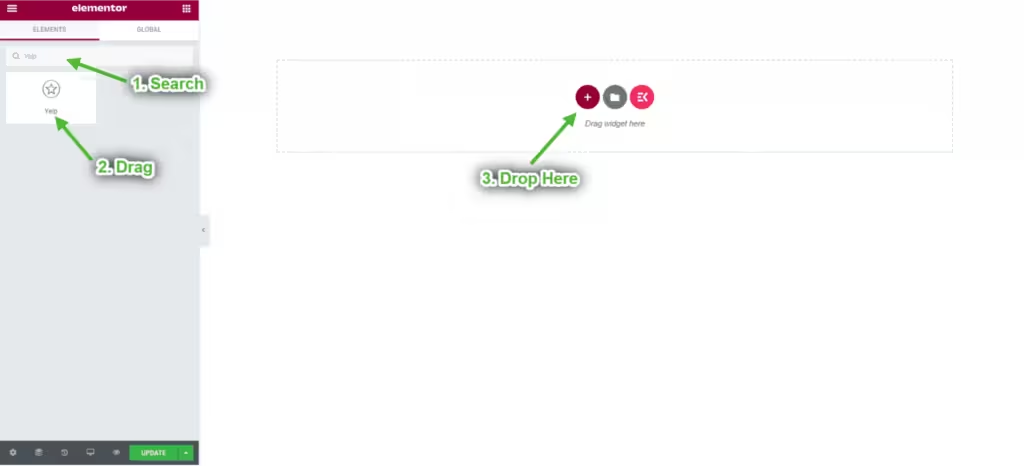
Within the Elementor dashboard, search for the ElementsKit Yelp widget and drag and drop it into the section or column you want to display reviews.
Adding this widget will load a Yelp review section to your editor screen. First, go to the Widget settings and enter the Content Tab. Here, come under the Layout setting:
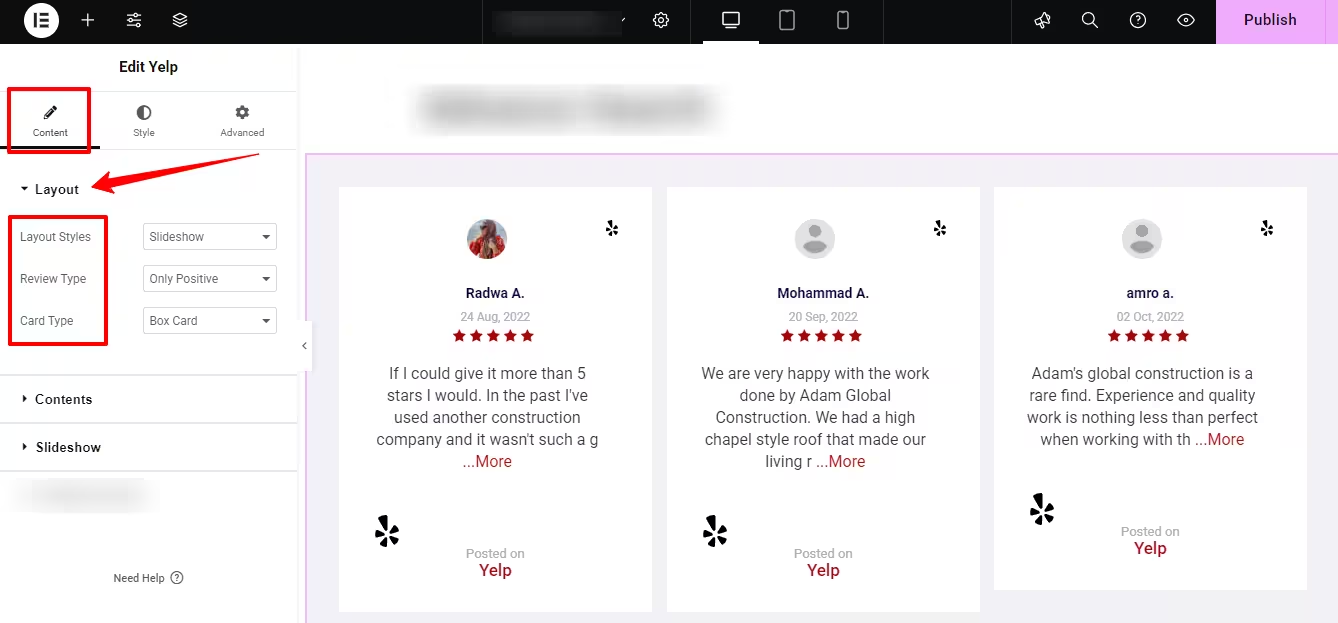
- Layout Styles: Select a layout type between Diapositivas o With Reviews.
- Review Type: Choose to show only positive Yelp reviews or both negative and positive.
- Card Type: From the dropdown, decide to showcase Yelp reviews with the Box Card or Bubble card style.
Next, adjust the Contenido setting option:
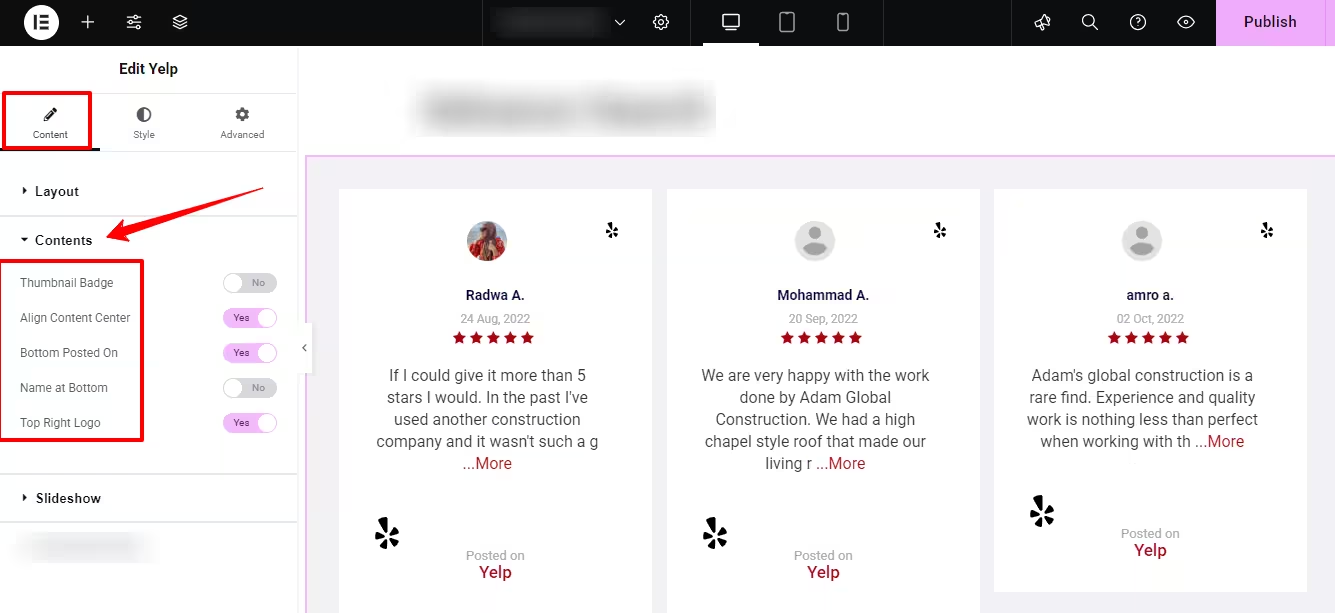
- Thumbnail Badge: Enable this option to add the Yelp badge with the reviewer’s image.
- Align Content Center: Make the content within a Yelp review section center-aligned.
- Bottom Posted on: Create more credibility by showing “Posted on Yelp” text in the review card.
- Name at Bottom: Activate this option to show the reviewer’s name at the bottom of the card.
- Top Right Logo: Toggle this option if you want to add a Yelp logo with review cards.
Step 5: Configure Yelp Review Slideshow
If you prefer reviews to appear in a carousel/slider format, you can do it with ElementsKit. But note that you have to choose the Diapositivas opción bajo el Disposición settings in the previous step. Otherwise, the Diapositivas settings area won’t appear in the widget settings.
Here you can configure the following slideshow settings:
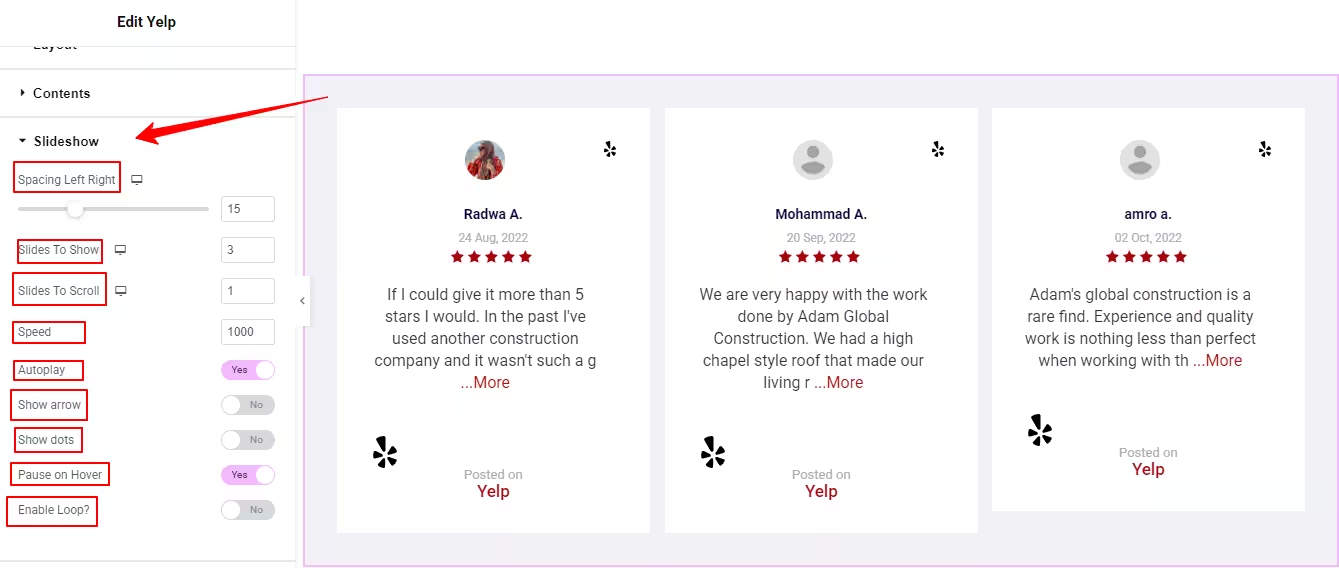
- Spacing Left Right: Use this slider to define the gap between Yelp review cards.
- Slide to Show: Define how many Yelp reviews are shown per slide.
- Set Slides per Scroll,
- Velocidad: Set the speed of the slide when scrolling.
- Auto-reproducción: Activate this option to show slides on autoplay.
- Show Arrows & Show Dots: Enabling these options allows to pupt arrow and dot navigation in the slideshow.
- Pausa al pasar el mouse: Stops the Yelp Review slide on hover.
- Habilitar bucle: Showcase Yelp review slide on loop.
- Arrow Icons: Select from the library or upload your own icons for the left & right arrow.
Step 6 Style Yelp Review Section
Now, let’s start the customization part for the Yelp Review section. For this, come to the Pestaña Estilo.
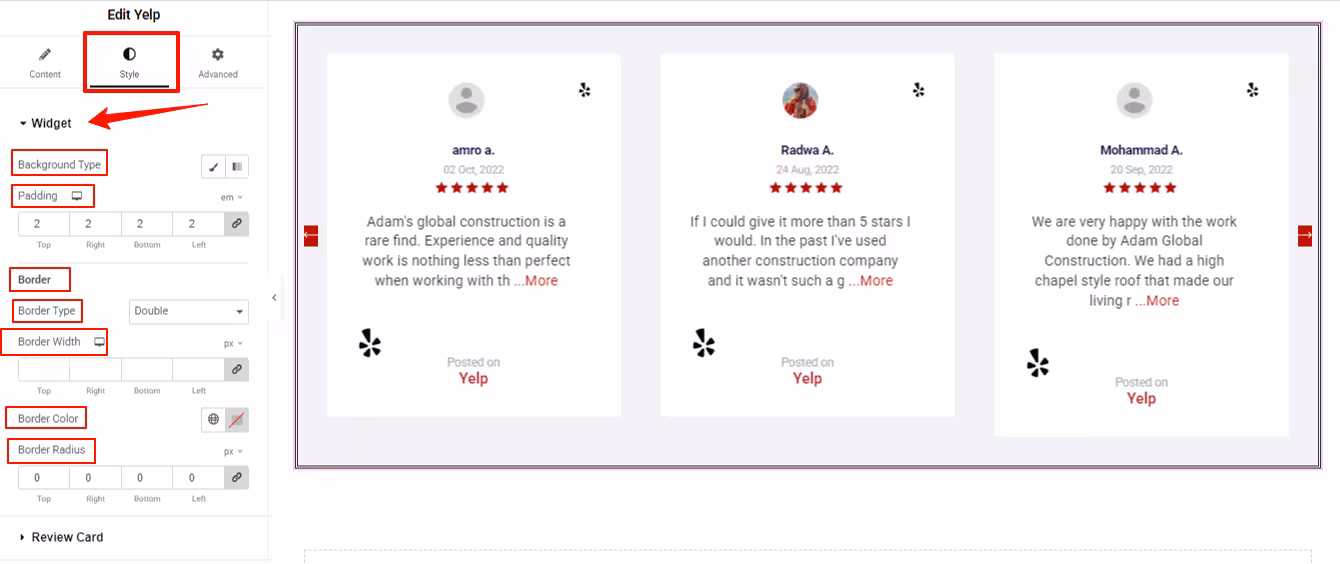
Widget: Under this option, you can style the entire Yelp review container. You can change the background color, set padding, and get settings border styling like border type, width, color, and radius.
Review Card: Within this option, you can style the review card by changing its background color, image, box shadow effects, padding, and border styling.
Review Thumbnail: Set the size of the review thumbnail, margin height, and border roundness.
Reviewer Name & Date: Customize the review name by styling its typography, text color, and padding.
Review Starts & Feedback: Style the feedback and star of the Yelp Review section.
You can also style the Yelp logo, posted on text, and the navigation arrow. These settings are very beneficial to personalize the Yelp review section and match your brand vibe.
Step 7: Preview Yelp Section & Publish
After completing your styling part of the Yelp review section, use Elementor’s preview mode to see how the Yelp review section appears on desktop, tablet, and mobile viewports. Test the slideshow (if used), check for alignment, spacing, and look & feel.
Once you’re satisfied, publish or update the page.
Visit the live frontend page to confirm the reviews are loading correctly.
¡Envolver!
So, this was our comprehensive no-code guide on how to embed the Yelp Review section in WordPress. And, now you can imagine showcasing this testimonial is effortless while you use a drag-and-drop Yelp integration tool like ElementsKit.
And, when you’re showing some real feedback from satisfied clients, you can turn visitors into customers. Elementskit Yelp widget is effective to turn customer feedback into a conversion-driving feature right on your site.
So, from now on, you can show and utilize the third-party testimonial and enhance your brand image. And then watch your conversion grow.

Deja una respuesta