


Badges are a simple yet powerful way to draw attention to important content on your WordPress website. Whether it’s highlighting discounts, marking featured posts, showing content status, or adding trust signals, badges help guide visitors and improve engagement without overwhelming your design.
In this guide, you’ll learn how to add badges to your WordPress website, no matter the use case. From eCommerce and blogs to SaaS and directories, we’ll walk through practical methods to create, customize, and display badges exactly where you need them, without touching a single line of code.
Quick Overview
Add WordPress badges easily using plugins to highlight products, achievements, trust signals, or custom visuals with full flexibility.
Following Plugin Method (Recommended)
Follow the below steps to add custom badges to your WordPress websites, using ElemetnsKit:
✅ Activate the Module: Go to ElementsKit > Modules in your dashboard and toggle the Global Badge ON.
✅ Enable on Widget: Open Elementor, select your widget, and toggle on the ElementsKit Badge in the Advanced Tab.
✅ Select a Preset: Choose from over 20 professional badge styles like ribbons, flags, or strips.
✅ Customize Content: Add your custom text or include dynamic Lottie animations to make the badge pop.
✅ Adjust Positioning: Use the horizontal, vertical, and rotation sliders to place the badge exactly where you want it.
Types of Badge Plugins: Product Badges, Gamification/User Badges, Trust Badges, E-commerce Badges, Highlight Features Badges, Show Progress Badges, Indicate Status Badges.
Common Types of Website Badges
Badges highlight key information and guide user actions. The right badge depends on your website’s goal and audience. Here are some examples:
1. E-commerce (Drive Sales)
- Urgency: Limited Edition, Only 2 Left, Flash Sale
- Status: New Arrival, Best Seller, Back in Stock
- Descuento: 50% Off, Save $20, Clearance
- Trust: Free Shipping, Organic, Eco-Friendly
2. SaaS & Tech (Highlight Features)
- Precios: Most Popular, Best Value
- Product Status: Beta, New Feature, Updated
- Plans: Pro, Enterprise, Trial
- Seguridad: Verified, Secure
3. Education & LMS (Show Progress)
- Level: Beginner, Intermediate, Expert
- Achievement: Certified, Course Completed
- Course Status: New, Updated, Free
4. Blogs & News (Guide Readers)
- Popularidad: Trending, Most Read
- Exclusivity: Premium, Editor’s Choice
- Tipo de contenido: Video, Case Study, 5-Min Read
5. Real Estate & Directories (Indicate Status)
- Availability: For Sale, Sold, Rented
- Promotion: Price Drop, Newly Listed
- Trust: Verified Listing, Trusted Agent
How to Add Badges to WordPress Websites?
So, let’s discover the easiest way to add badges. As you know, these are small but important graphical elements that trigger your audience by showing them offers, validation, rewards, recognition, and more. You should go for the right tool type to meet your needs.
And, my pick is the ElementsKit Global Badges module for Elementor allows you to add and customize badges to your WordPress website.
It lets you show badges anywhere on your Elementor websites, including widgets, sections, columns, etc. You will have access to the largest library of badge presets, meaning you can create badges without any coding.
So, let’s get into the main part:
Requisitos previos:
- Elementor Free Version
- ElementosKit Gratis
- ElementosKit Pro
Now, go through this step-by-step guide on how to add badges to WordPress websites. The first thing you need to do is activate the ElementsKit Global Badge module.
Step 1: Activate the ElementsKit Badge Module
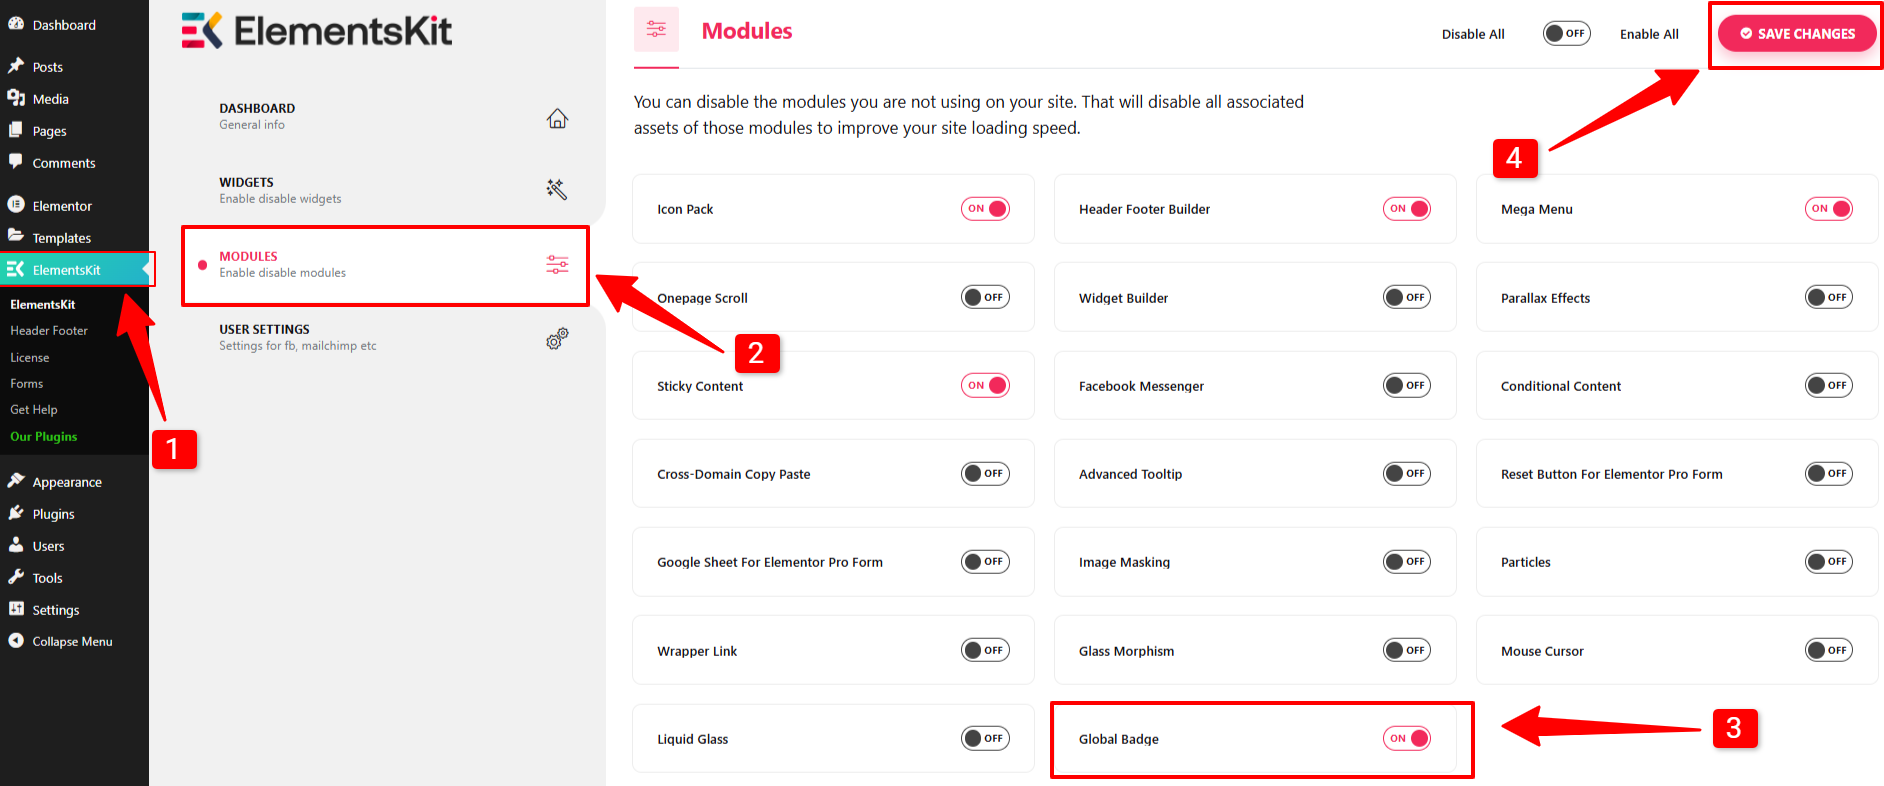
In your WordPress dashboard, navigate to ElementsKit > Modules > Global Badge, then activate the toggle. Next, click the Guardar cambios button. Doing this will enable you to apply a badge to any Elementor design.
Create a new page, post, or log in to an existing one. Then, open the Elementor builder to begin editing. Once you are in the Elementor editor, design your desired layout where you want to add the badge.
Here’s our design where I want to add some offer-related badges:

Let’s see the procedure for adding global badges to your Elementor websites. Before that, I would like to inform you that I’ve added the ElementsKit Icon Box widget to this section for showcasing service types.
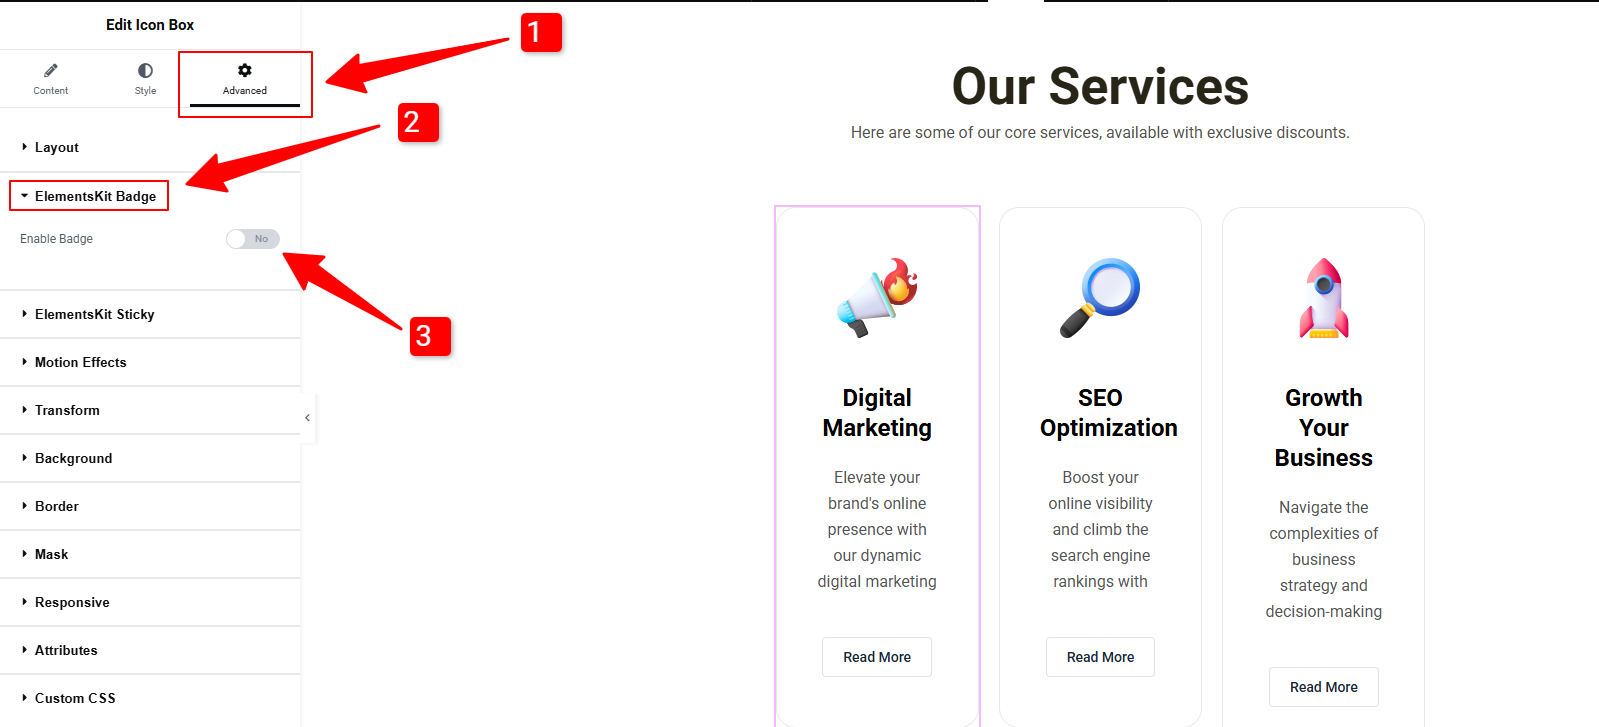
Here, we just need to access the widget’s settings and navigate to the Advanced Tab. And, activate the ElementsKit Badge toggle button.
Then, you’ll see two options: Contenido & Estilo.
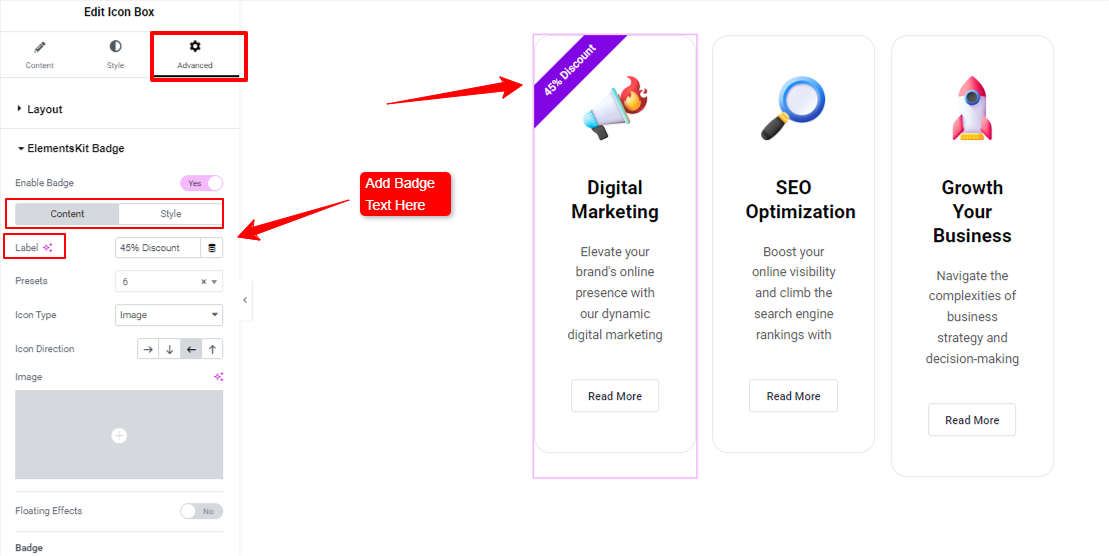
Within these options, you’ll find all the crucial settings to add content and do customization.
Primero, ve al Contenido tab and write the text of the badge in the Etiqueta caja.
Step 2: Select a Badge Preset
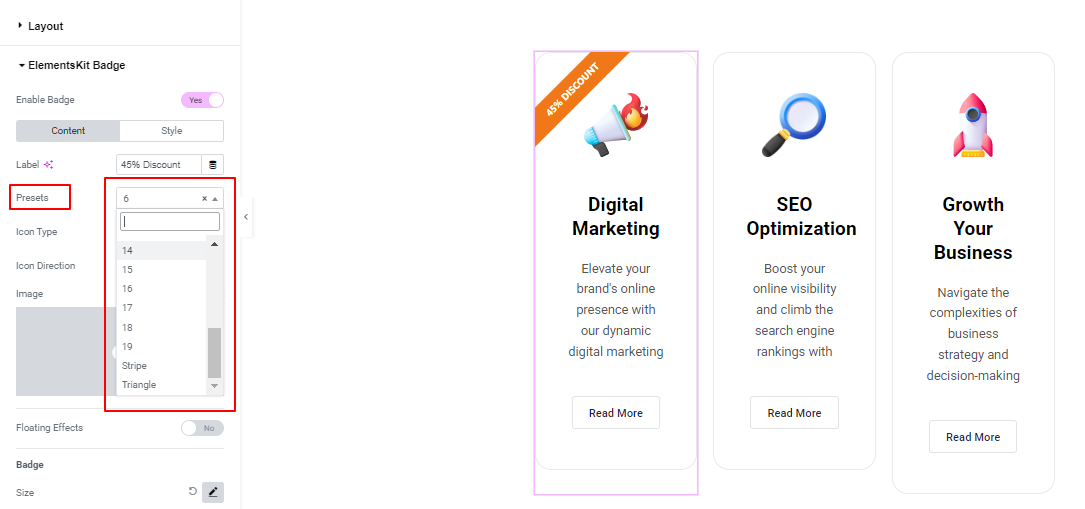
You can simply add a badge design using pre-designed presets. And, ElementsKit ships with 20 different badge preset styles, including Strip, Flag, Triangle, Circle, Bookmark, and many more. So, you’ll have a variety of options to match your design needs. For example, you can use badges to show status, notifications, profile or product categorizations, or new features.
For our design, we opt for the number 6 to showcase our service discounts attractively.
Step 3: Configure Badge Styling Options
To make the badge more interactive, you can use more elements like an icon, image, and Lottie. To do this, go to the dropdown of the Tipo de icono option. Here you will see options like:
Icono: Upload an icon from the library or upload an SVG icon. And, where to place the icon.
Imagen: From the media file uploading option, insert an image.
Lottie: Selecting this icon type will reveal two new options called “Source y Loop”.
- Fuente: In its dropdown menu, you can upload a media file or attach an external URL to display Lottie’s design.
- Bucle: Enable it to make the Lottie animation repeat continuously instead of stopping at the end. And, if you want the animation to play backward after completing a forward play, activate the Reverse opción también.
Icon Direction: Set where you want to place the icon, image, or Lottile file around the badge text.
Floating Effects: Make your badge appear as if it’s hovering, drifting, or gently moving in space. After activating this feature, you’ll see these options:
- Opacidad: Controls how transparent the badge appears.
- Difuminar: Adds a soft blur to the badge to make it look slightly out of focus.
- Escala de grises: Removes color and converts the badge to black, white, and gray tones.
Insignia: Under this setting, you’ll get the chance to play with some crucial controls to set the badge’s appearance. Here they are:
- Tamaño: Define the height & width of your badge.
- Posición: Use horizontal & vertical offset bars to move the badge up, down, left, or right.
- Girar: Using this option, you can change the angle or orientation of the edge design.
- Ribbon: This slider bar allows you to fold the badge design.
Etiqueta: Use the Position & Rotate options to define the position of the badge’s text.
Unest Overflow: Allowing the badge to be fully visible even if it extends beyond the container’s bounds. This ensures that the badge is not clipped or hidden when using techniques like clipping or positioning outside the parent element.
Step 4: Customize Badge Style
Inside the Estilo tab of ElementsKit Badge settings, you will find various options to customize your badge design, change the Typography, Color, Background, Border Radius, Padding, y Z-index.
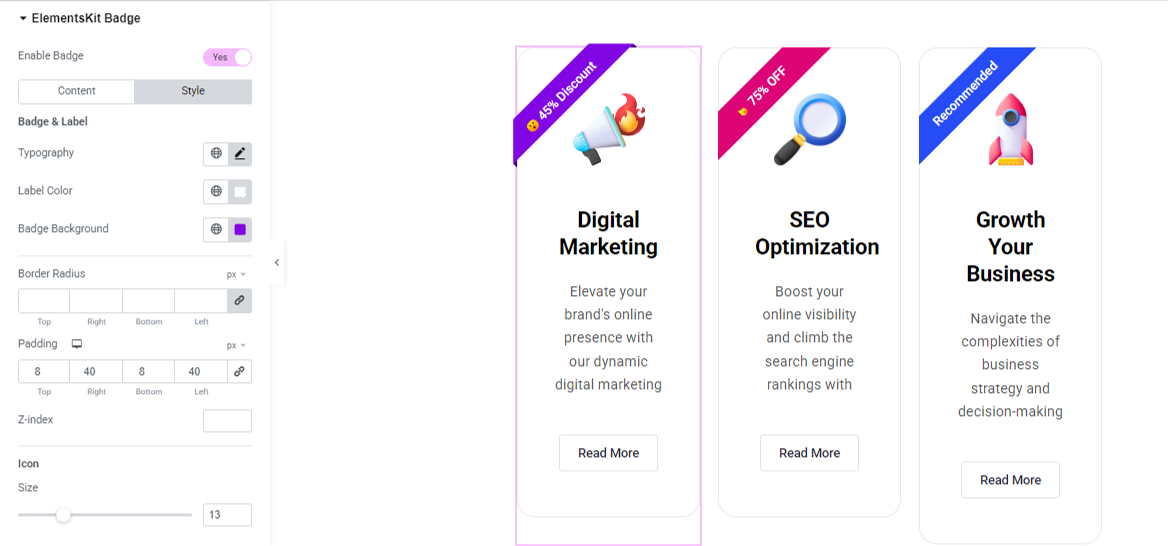
Plus, if you’ve used an icon in the Contenido tab settings, then you will see a slider to change the size of your badge icon.
Step 5: Preview & Publish Your Design
Once you’re done with adding & customizing your badge, preview it and hit the Ahorrar button if there are no issues. Here’s a badge added to our design in an Elementor website.

Now, you know how to add a badge to any Elementor widgets and containers. It doesn’t take any expertise with the ElementsKit Global Badge Module.
Why Badges Matter for Website Owners
Badges may be small, but they have a big impact on how users see and interact with your site. When used strategically, they guide attention, improve clarity, and drive better results.
- Guide Visual Attention. Badges act as visual anchors, leading visitors straight to key elements like offers or new items, without guesswork.
- Boost Conversions. Scarcity and urgency badges (e.g., Sale, Only 2 Left) encourage faster decisions and increase click-through rates.
- Deliver Instant Clarity. Status badges (Sold Out, Hacer un pedido, Updated) communicate information at a glance, reducing confusion and bounce rates.
- Build Trust & Credibility. Trust badges (Secure Checkout, Verified, Award-Winning) reassure users and help reduce cart abandonment.
- Highlight Best Choices. Badges like Most Popular o Best Value simplify decisions and speed up checkouts.
- Keep Content Fresh. Labels such as Nuevo, Updated, o Trending signal ongoing activity and encourage repeat visits.
Pro tip: Use badges selectively. Highlighting 15–20% of key items keeps them effective and avoids visual clutter.
FAQs on Badge Design
Do I need to know how to code to add badges to my website?
Can I add badges to any Elementor widget?
Will adding badges slow down my WordPress site?
What is the difference between a static badge and a Lottie badge?
Can I Design Mobile-responsive Badges with ElementsKit?
¡Envolver!
Badges are a simple yet highly effective way to improve how users interact with your WordPress website. From guiding attention and improving clarity to boosting conversions and building trust, the right badges can make your content more engaging and easier to navigate.
Now that you know how to add badges to your WordPress site, start using them strategically, highlight what matters most, simplify decisions, and keep your site feeling fresh. When used thoughtfully, badges don’t just decorate your pages; they help your website perform better.

Deja una respuesta