


This guide shows you how to add a table in WordPress using TableKit. You’ll learn how to create, structure, and customize tables directly in the block editor, without code or shortcodes.
How to Add A Table in WordPress with Gutenberg #
To create an advanced responsive table in Gutenberg, you need to have the TableKit plugin installed on your WordPress site.
Also, ensure that a block theme is installed and activated on your site.
Required plugin and theme:
- TableKit: Holen Sie sich das Plugin
- Thema: Any block theme. e.g., Hallo Blöcke or Twenty Twenty-Five theme.
Step 1: Insert a Table into WordPress #
To add a table in WordPress, firstly, open an existing page or create a new page on the Gutenberg block editor.
Now, on the block editor, follow the procedure:
- Open the block inserter, and search for the Tabellengenerator Block.
- Drag and drop the block into the edit section.
Then choose how you want start building your table.
- Start Blank: To start building the table from scratch.
- Vorlage: To import a ready-made template.
After that, set the following:
- Show Header: Enable toggle to include table header.
- Show Footer: Enable toggle to add a table footer.
- Spaltenanzahl: Set the number of columns you want in the table.
- Row Count: Set the number of rows you want in the table.
- Klicken Sie abschließend auf Create Table button to get the table ready for you.

Once the table is ready, you can add content, configure settings, and customize the table styles.
Step 2: Add Content to Table in Block Editor #
With TableKit, you have the highest flexibility to add table content.
This WordPress table builder supports any Gutenberg blocks. That means you can add simple text, headings, images, and buttons to each cell of the table.
For example, let’s add an image to the table.
To add a Gutenberg block to a table cell,
- Upload or pick an image from the media library.
- Select the target cell and click on the ➕ on the cell.
- Pick a block. For this instance, select the image block.
Step 3: Configure WordPress Table Settings in Gutenberg #
You can configure the following settings for your WordPress table:
1. Enable Header: To show or hide the table header.
2. Enable Footer: To show or hide the table footer.
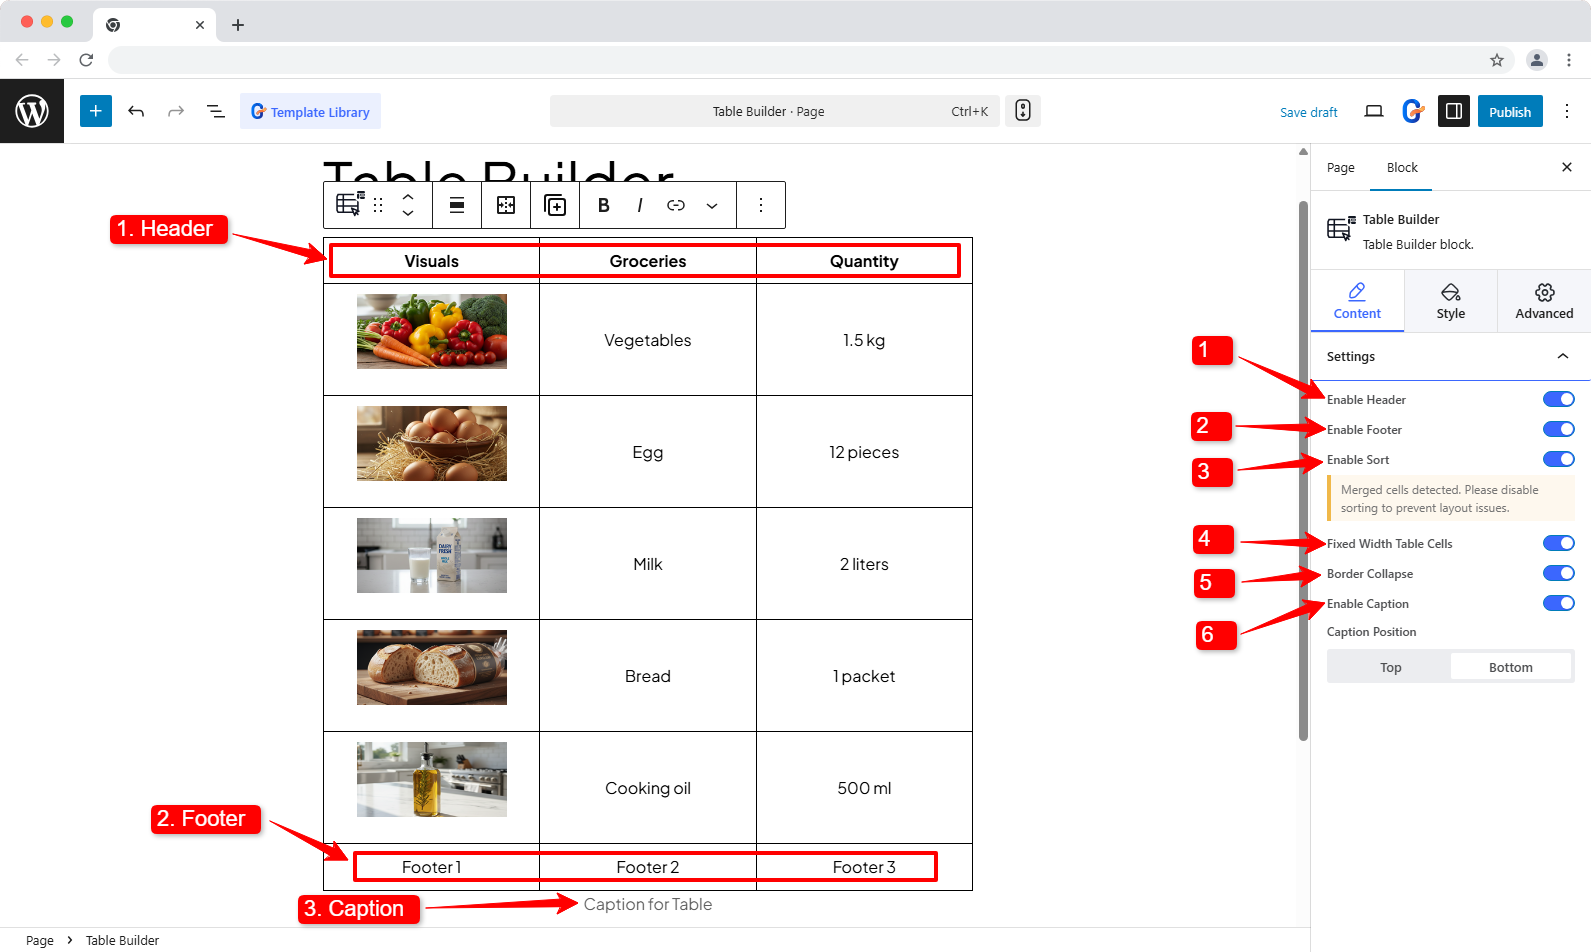
3. Enable Sort: To let the user sort the table content (column-wise).
4. Fixed-width table cells: You keep the cell width fixed by enabling this option.
5. Border Collapse: Enable this option to keep a zero gap between cells or manually adjust the spacing between rows and columns.
- Vertical Spacing: To adjust the space between rows.
- Horizontal Spacing: To adjust the space between columns.
6. Enable Caption: You can enable caption for the table. If you enable caption, choose whether to place the caption at the top of the table or at the bottom of it.
WordPress Table Style customization #
Table styling controls how your data is read, not just how it looks. Here’s how to style your WordPress tables so they match your layout and stay easy to scan.
Unter dem Registerkarte „Stil“. in the block sidebar, you can customize table header, footer, cell, columns, and caption styles.
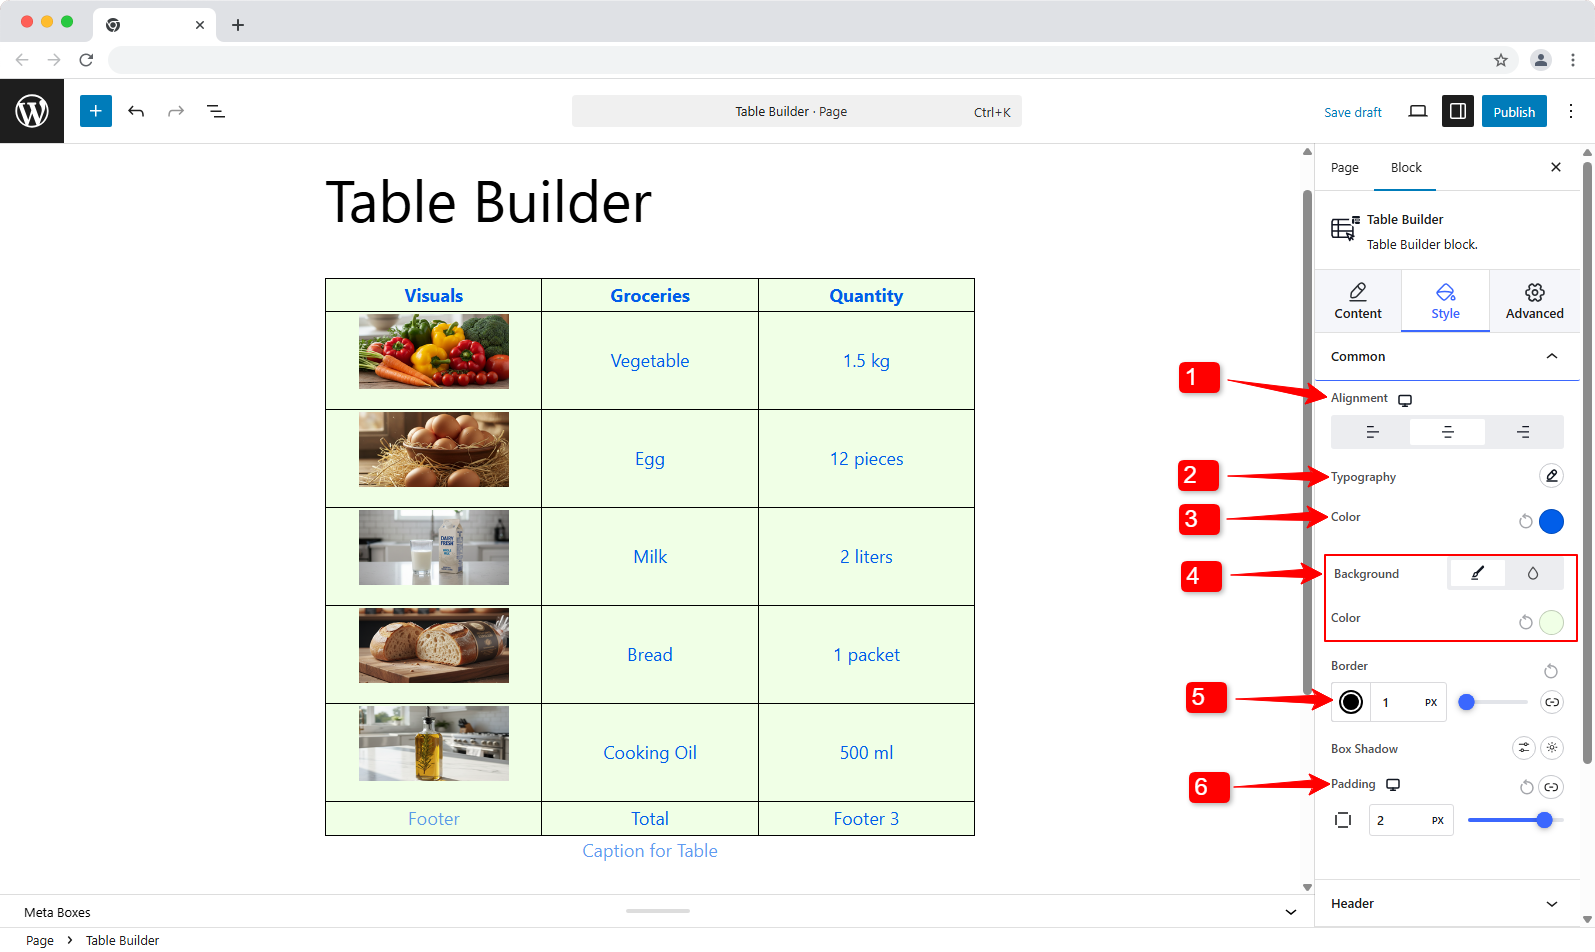
Step 4: Common Styles (for entire table) #
For every cell in the table, you can control the following settings under the Common section under the Style tab:
- Ausrichtung: Set the text alignment to left, right, or center.
- Typografie: Font, Weight, Size, Line Height, Word Spacing, Capitalization, and Text Styles.
- Color (text): Set the color for the text in the table.
- Hintergrund: Choose the background type to be static or a gradient color. Then choose a background color.
- Grenze: Border styles including border color, width, and border radius.
- Polsterung: Adjust the padding of the cells.
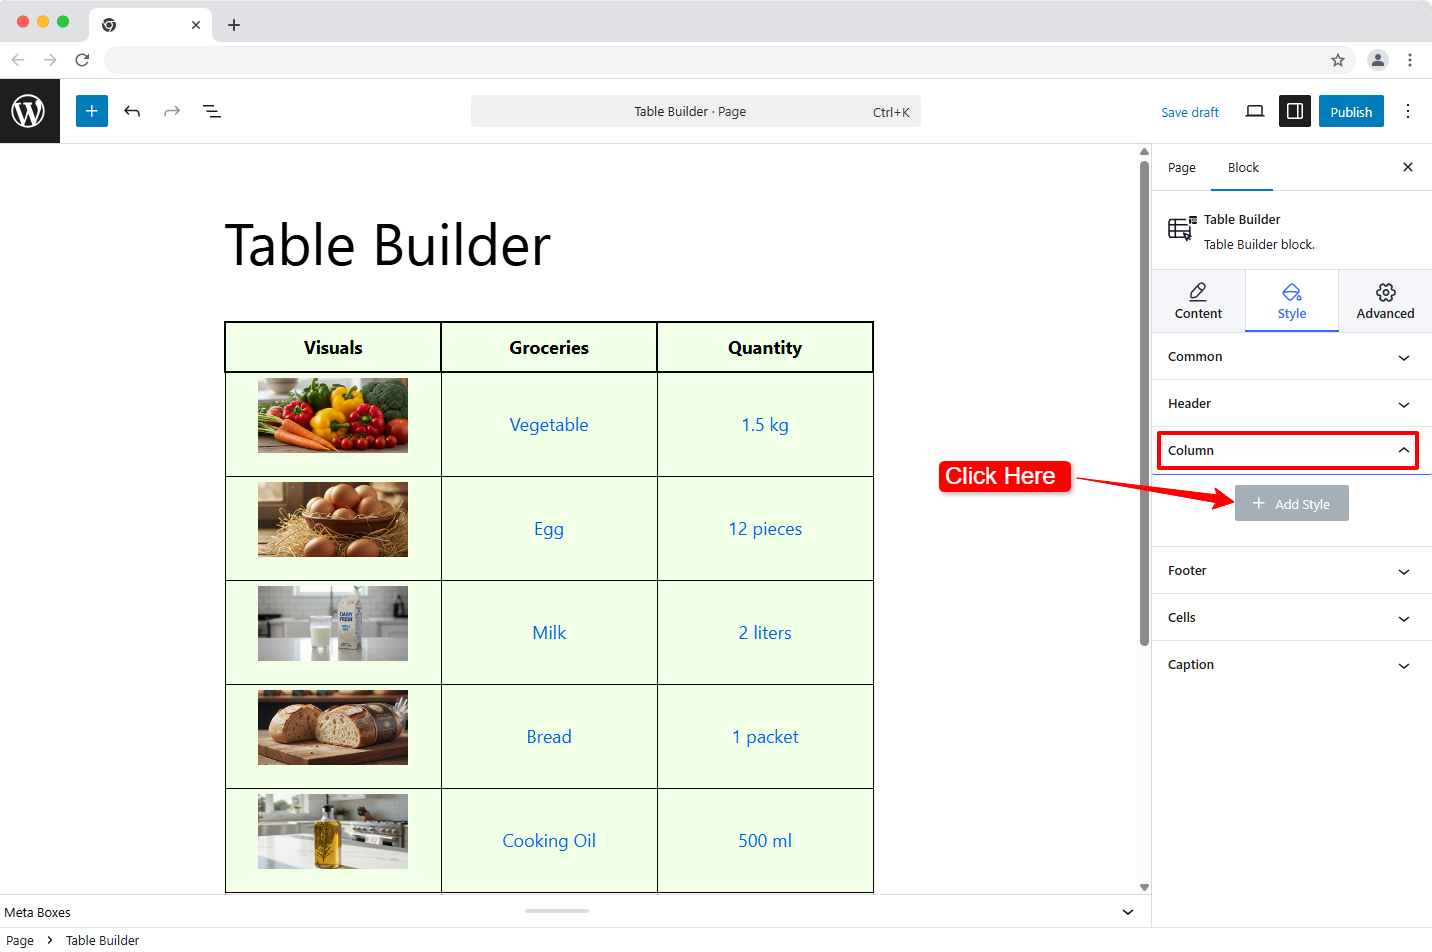
Step 5: Column wise Customize #
With TableKit, you can customize each column individually for your WordPress table. To customize a column, go to Style → Column in the block editor.
There, click on the “+ Add Style” button to choose a column to customize. Once you click, an ‘item’ will be added where you can configure the styles.
Then, to customize an individual column, expand the ‘item’ you just added just now.
- Wählen Sie Spalte aus you want to customize separately.
- Wählen Sie das Textfarbe for the content in the selected column.
- Stellen Sie die ein Hintergrund style to static or gradient color and pick a color accordingly.
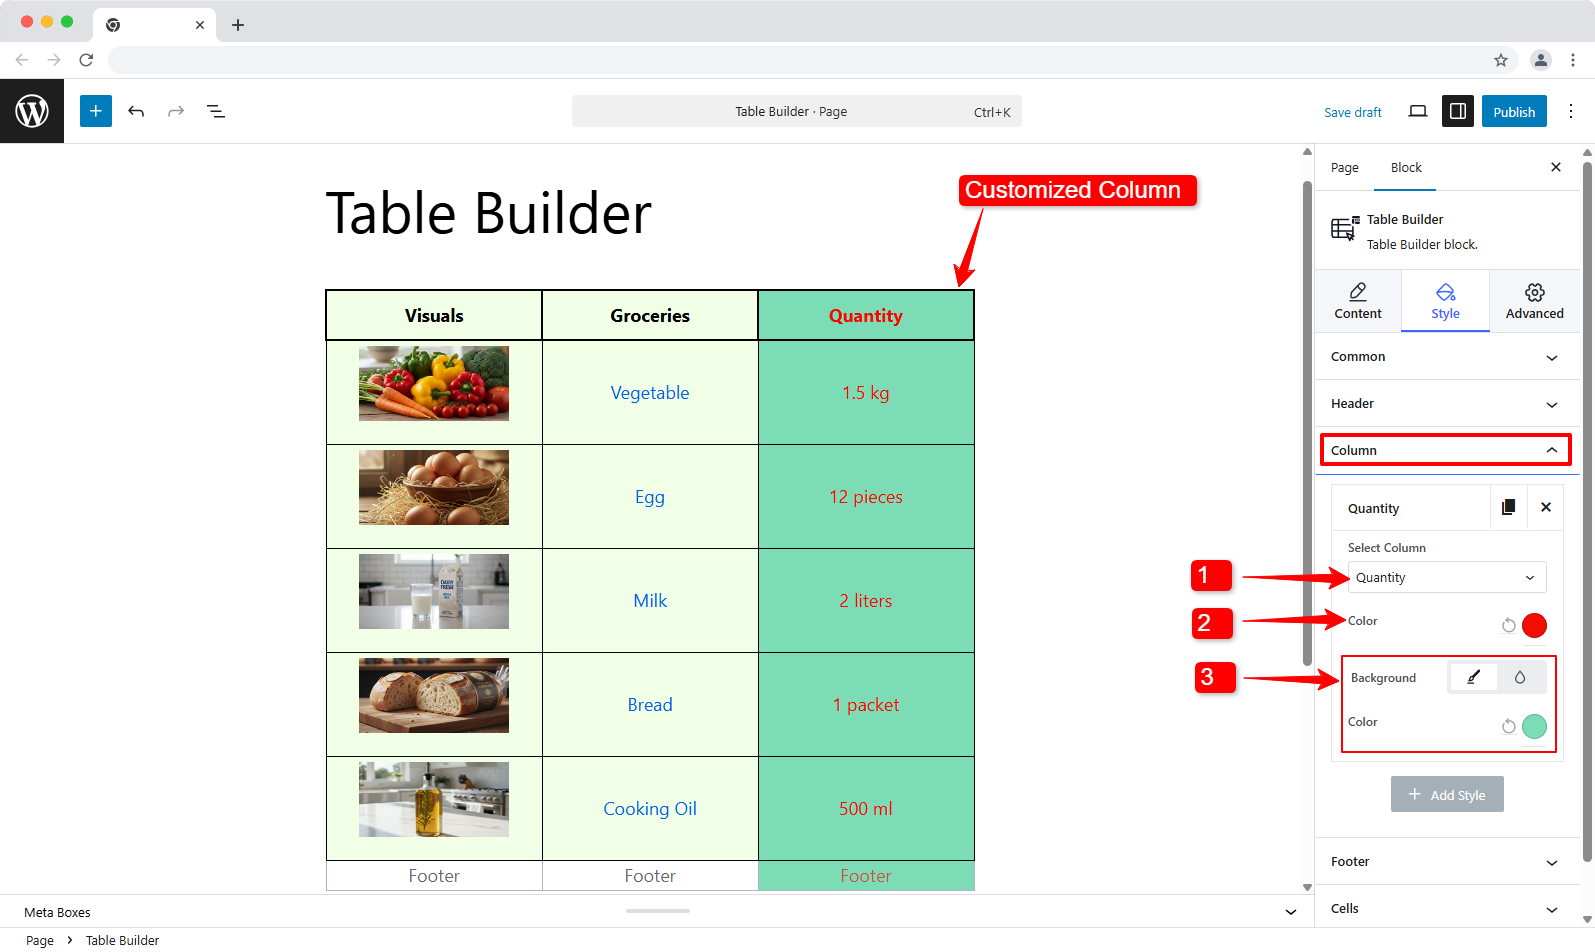
You can also customize other columns similarly by adding different columns by clicking on the “Add Style” button.
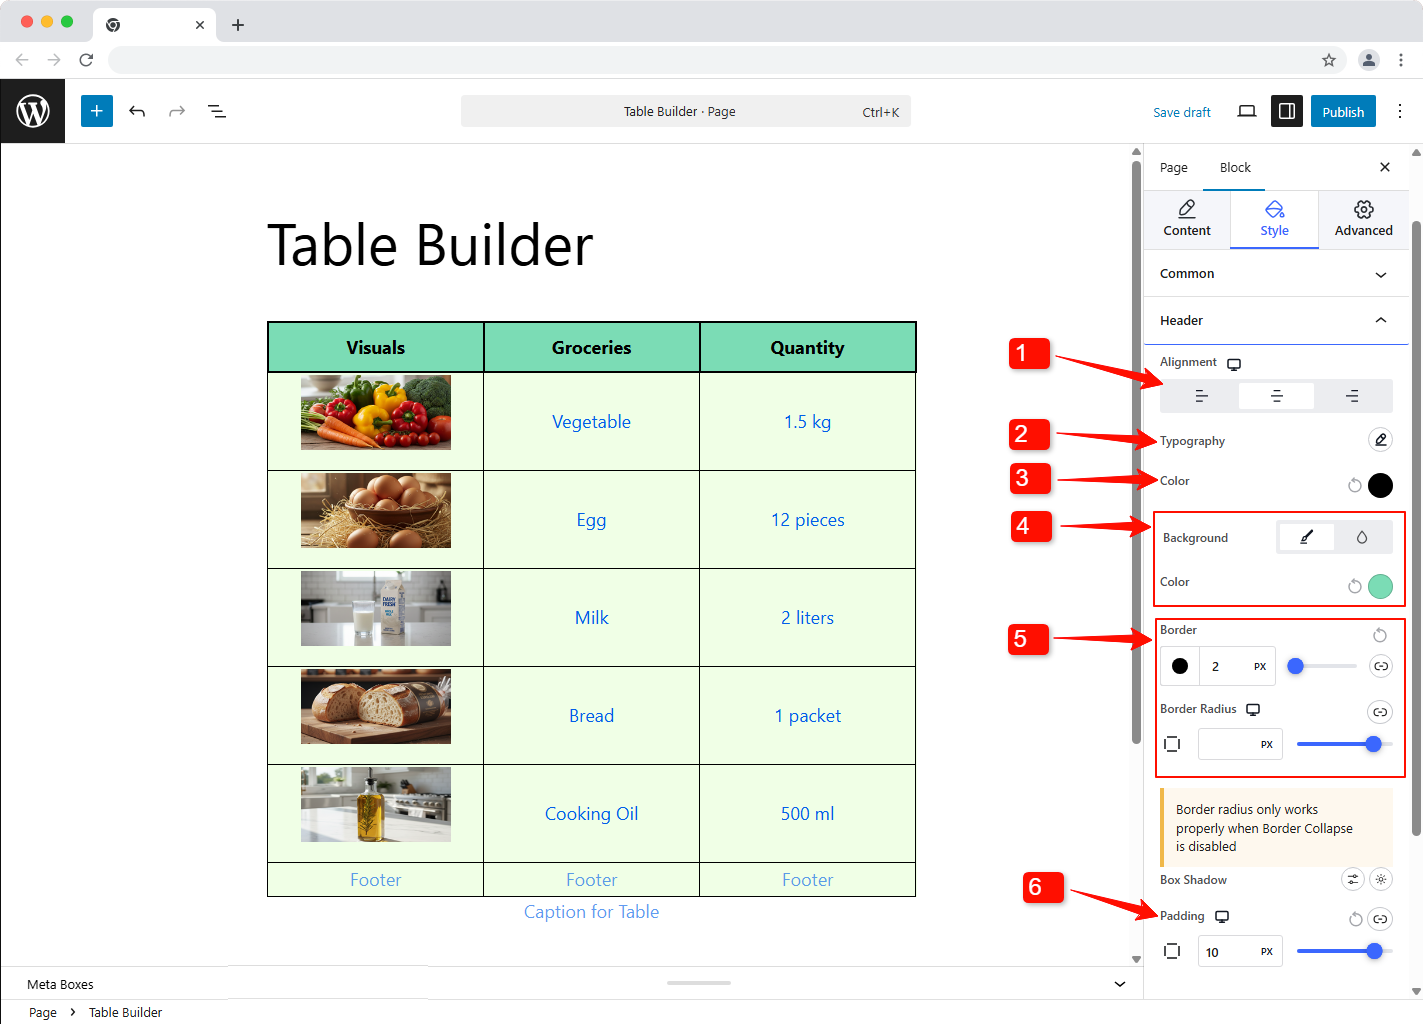
Step 6: Header Customization #
For the table header, you can control the following settings from Style → Header:
- Ausrichtung: Set header content alignment to left, right, or center.
- Typografie: Adjust font family, weight, size, line height, word spacing, capitalization, and text styling.
- Color (text): Set a distinct text color for headers’ content
- Hintergrund: For the header, apply a solid or gradient background and choose a color.
- Grenze: Customize border color, width, and radius to frame header cells cleanly.
- Polsterung: Control padding to keep headers readable without wasting vertical space.
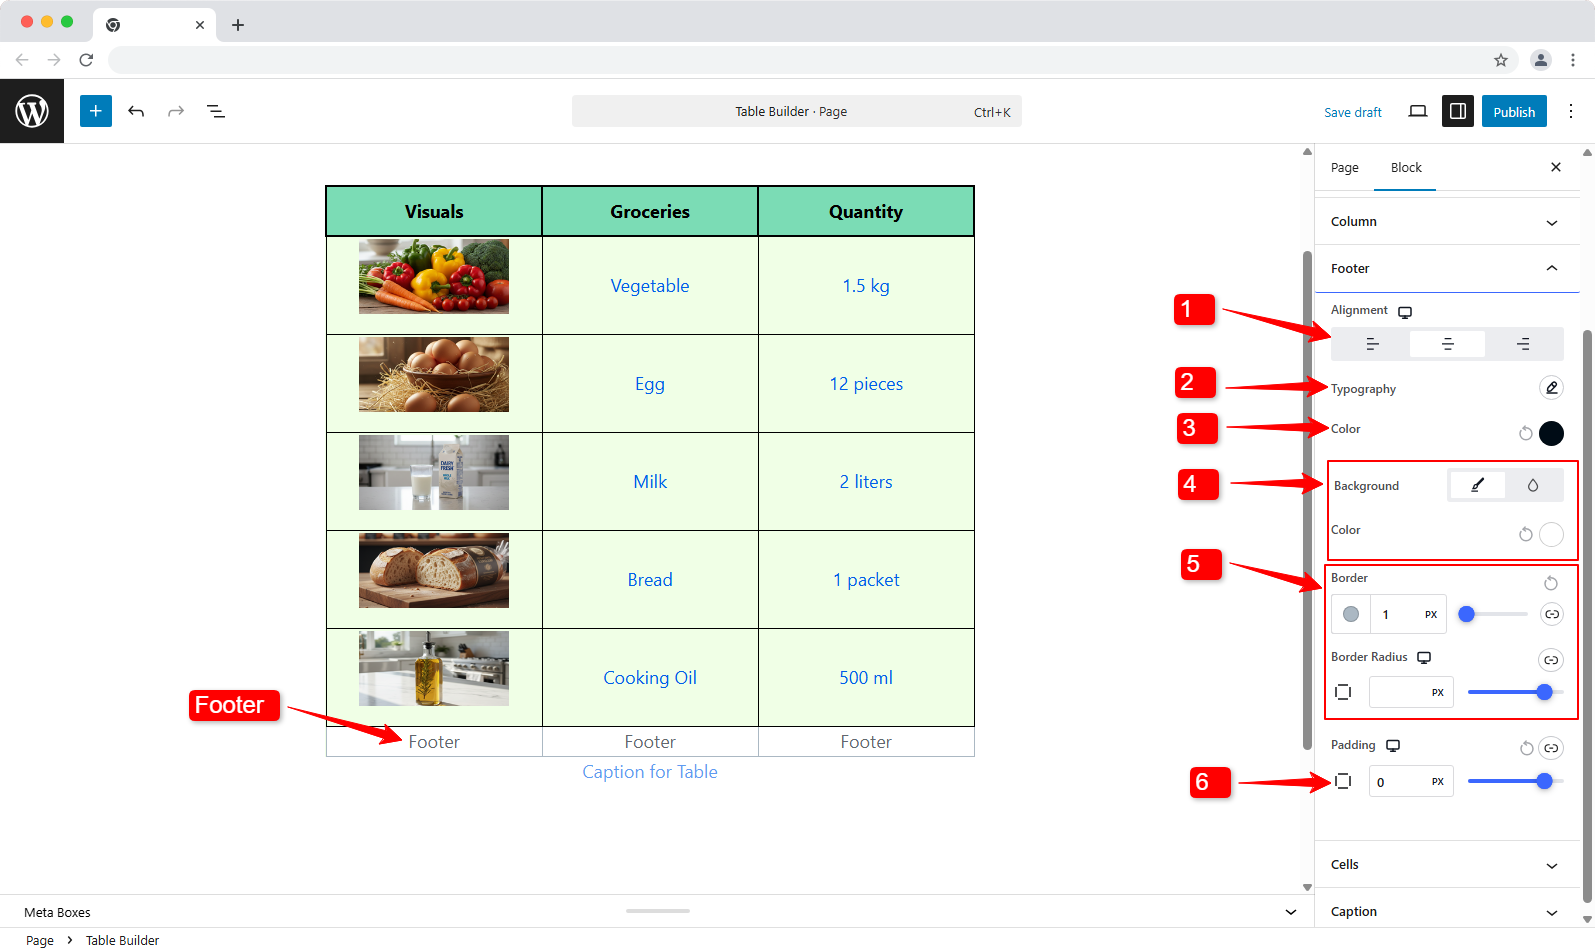
Step 7: Footer Customization #
For the table footer, you can control the following settings from Style → Footer:
- Ausrichtung: Align footer content to left, right, or center.
- Typografie: Set the Font, Weight, Size, Line Height, Word Spacing, Capitalization, and Text Styles.
- Color (text): Choose a color for footer text content.
- Hintergrund: Apply a solid or gradient background color for the footer and choose a color accordingly.
- Grenze: Customize border color, width, and radius to frame header cells cleanly.
- Polsterung: Control padding to keep the footer content compact and clean.
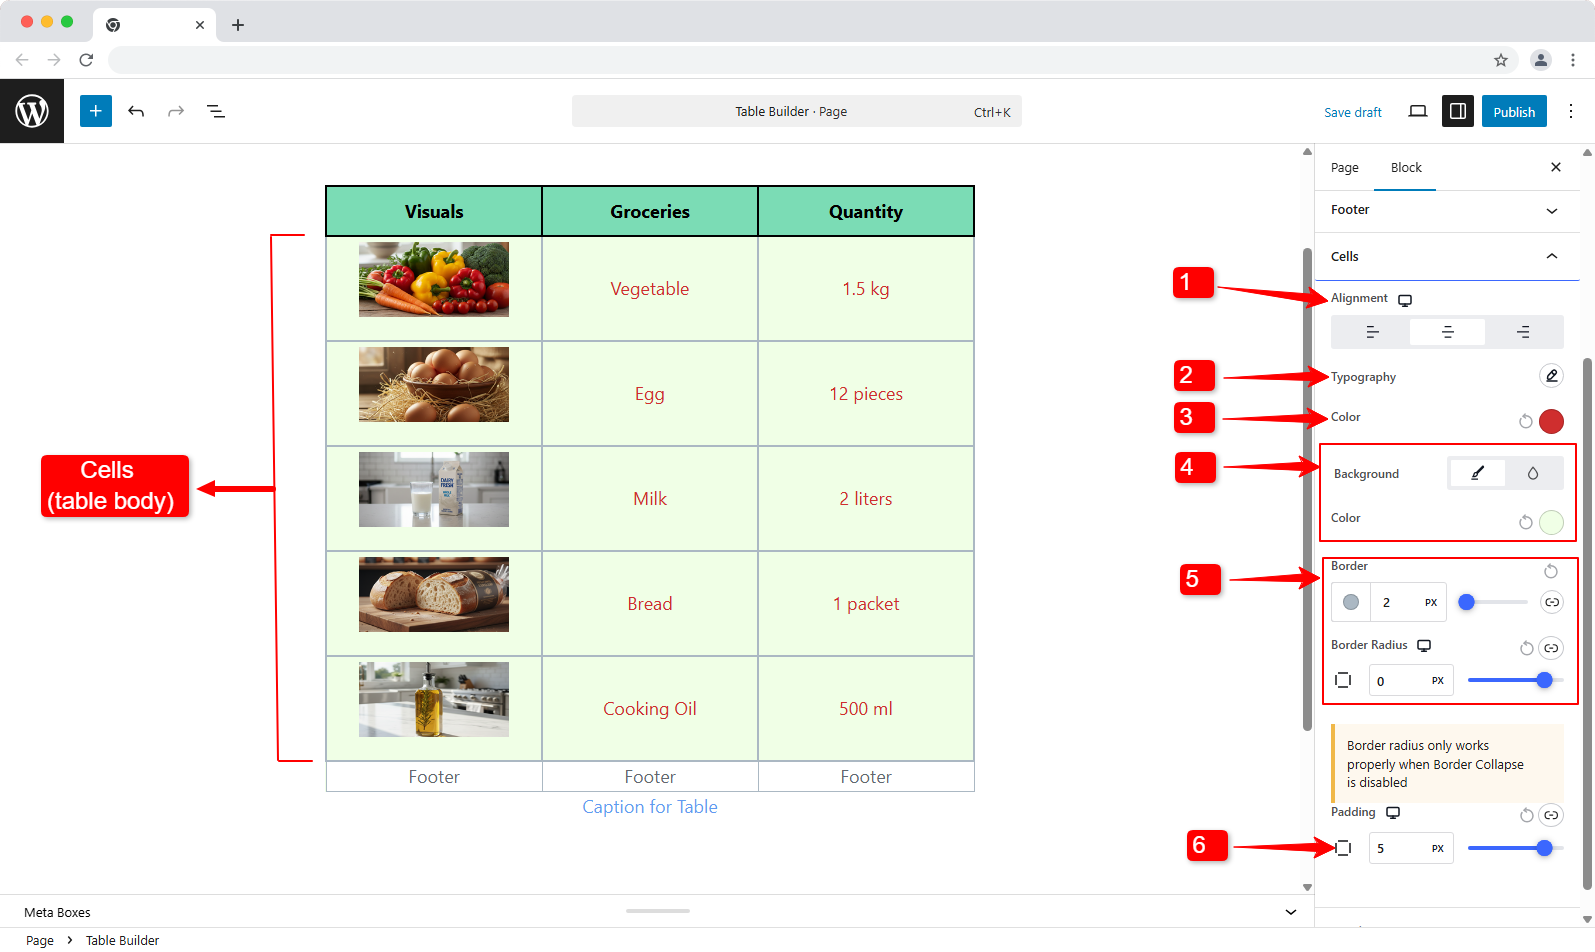
Step 8: Cell Customization (table body) #
Here you can customize the body of the table. That basically means everything expect from header, footer, and captions.
- Ausrichtung: Set the alignment to left, right, or center.
- Typografie: Font, Weight, Size, Line Height, Word Spacing, Capitalization, and Text Styles.
- Color (text): Choose the color for the text in the table body.
- Hintergrund: Use a solid or gradient background color and choose a color accordingly.
- Grenze: Border styles including border color, width, and border radius.
- Polsterung: Adjust the padding of the footers.
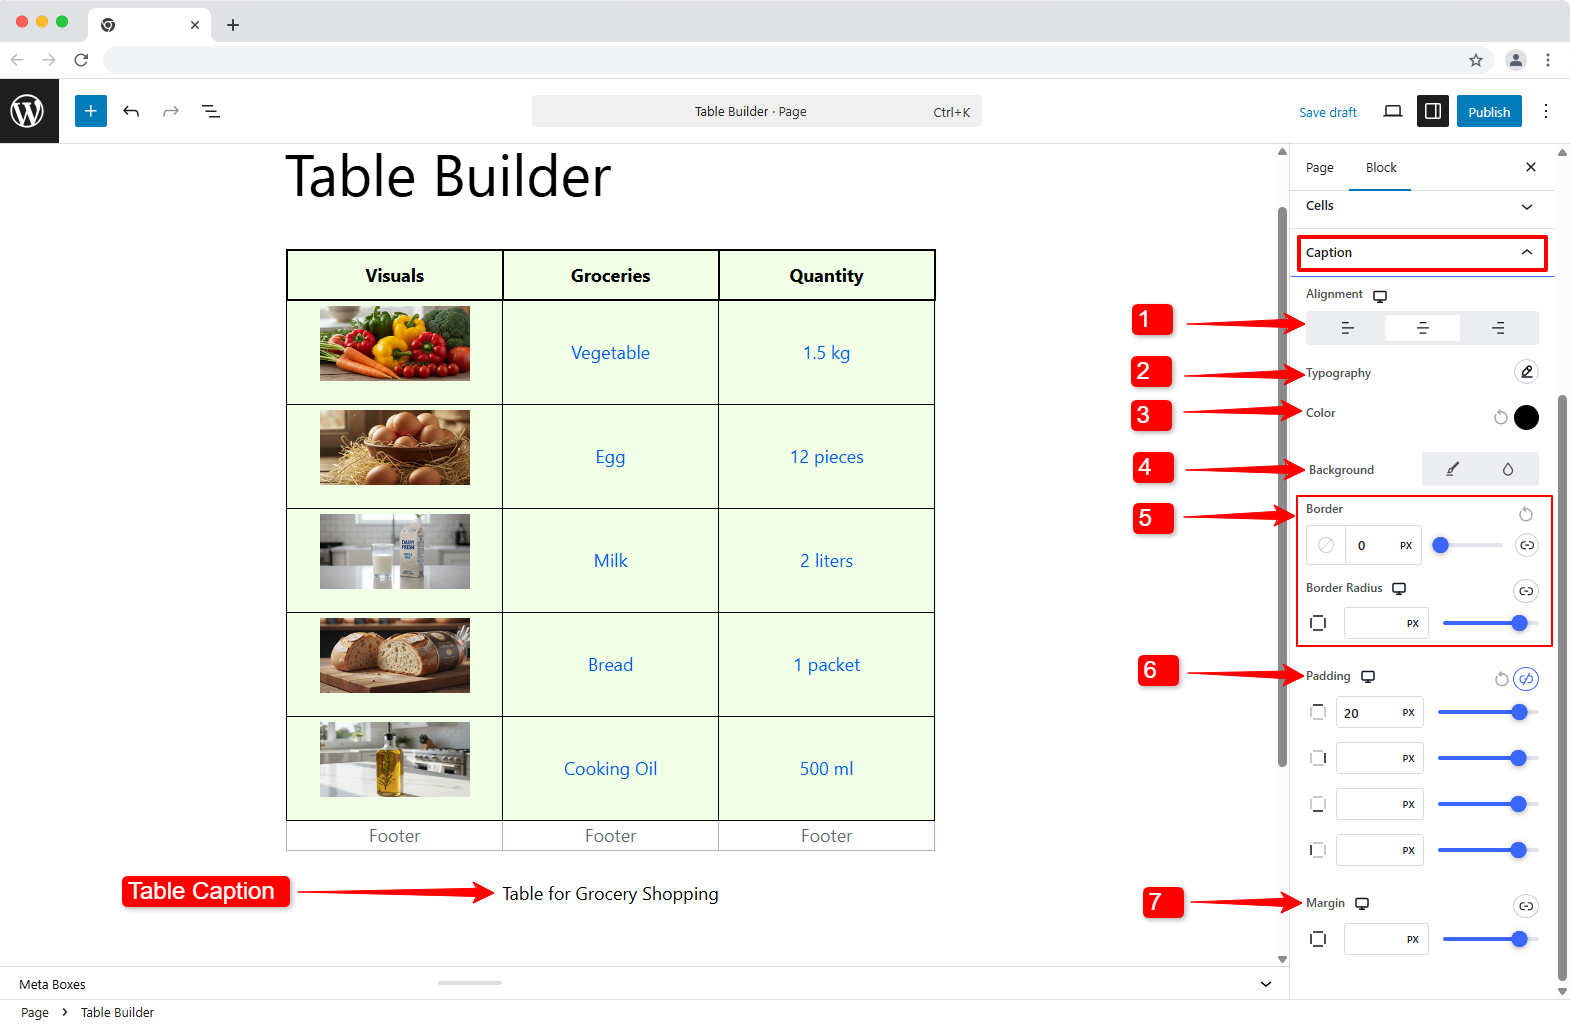
Step 9: Customize Table Caption #
You also have the option to customize the look and style of the caption.
- Ausrichtung: Align the caption text to the left, center, or right based on your layout.
- Typografie: Adjust font family, weight, size, line height, spacing, and text styles to make the caption readable.
- Color (text): Set the color for the caption text.
- Hintergrund: You can also change the background for the caption.
- Grenze: Customize border color, width, and radius to frame the caption cleanly.
- Polsterung: Control padding (inner spacing) for comfortable readability.
- Marge: Adjust the margin (outer spacing) to control the distance between the caption and the table.
That’s it. You’ve created a table in the Gutenberg block editor and customized every part of it to fit your content.
And this is only the starting point. TableKit comes with a wide range of advanced features designed to handle more complex table needs in WordPress. Explore them to build tables that go beyond simple layouts and scale with your content.


