A great customer support starts with transparent and prompt communication, and the very first step toward achieving that is adding a well-designed support form. But, do you know how to create a support ticket form in WordPress?
No need to worry. This guide will answer all your queries related to integrating a support form in WordPress by following a user-friendly manner with the best form solution.
Besides, you will also learn to create a support ticket form with a template or from scratch by diving into this tutorial. So, let’s jump in to build smooth customer support…
Quick Overview
In this tutorial, you will get to know in-depth regarding creating a support ticket form in WordPress. The tools used in this guide support drag-and-drop interface. This means you won’t need any technical expertise. To avail this opportunity, you need to first install and activate Elementor and MetForm.
Plugins Used: Elementor and MetForm.
MetForm will allow you to add support ticket form both from scratch and with pre-built templates. This guide will present both methods along with the brief intro and necessity of WordPress support ticket form.
What is a support request form?
A support request form is an easy way for users to claim support or assistance for products or services by filling out the form. The purpose of attaching a support ticket form is to help users get over difficulties that they come across while using the products.
Why is adding a support ticket form to your WordPress site a must?
Using a support request form on your WordPress site is beneficial for building brand trust, credibility, and higher customer satisfaction. Here are more reasons to incorporate a support ticket form on your WordPress site:
- Better customer support: Customers can seek support in an organized way and get quick solutions to their problems.
- Efficient ticket tracking: Collecting customers’ queries through support forms is efficient for tracking, managing, and resolving their problems.
- Seamless communication: A support ticket form ensures you don’t miss any customer query and resolve their hurdles as soon as possible.
- Automated workflow: Some companies automate their customer support by transferring and assigning customer queries to the right team.
- Brand credibility: It lets you build a credible brand through faster resolution and support.
- Product improvement: A support request form offers you an easy way to address recurring issues and improve products or services accordingly to avoid such problems.
Steps to create a support ticket form in WordPress with templates
Here we’ll highlight the step-by-step process on how to create a support ticket form on the WP site with a pre-built ticket request form template provided by the best WordPress form builder:
Step 1: Install a WordPress support form builder.
First, you need to install a WordPress support form builder that offers drag-and-drop form creation capabilities. As MetForm is an Elementor form builder, we’ll use this tool for adding support form to your WordPress site.
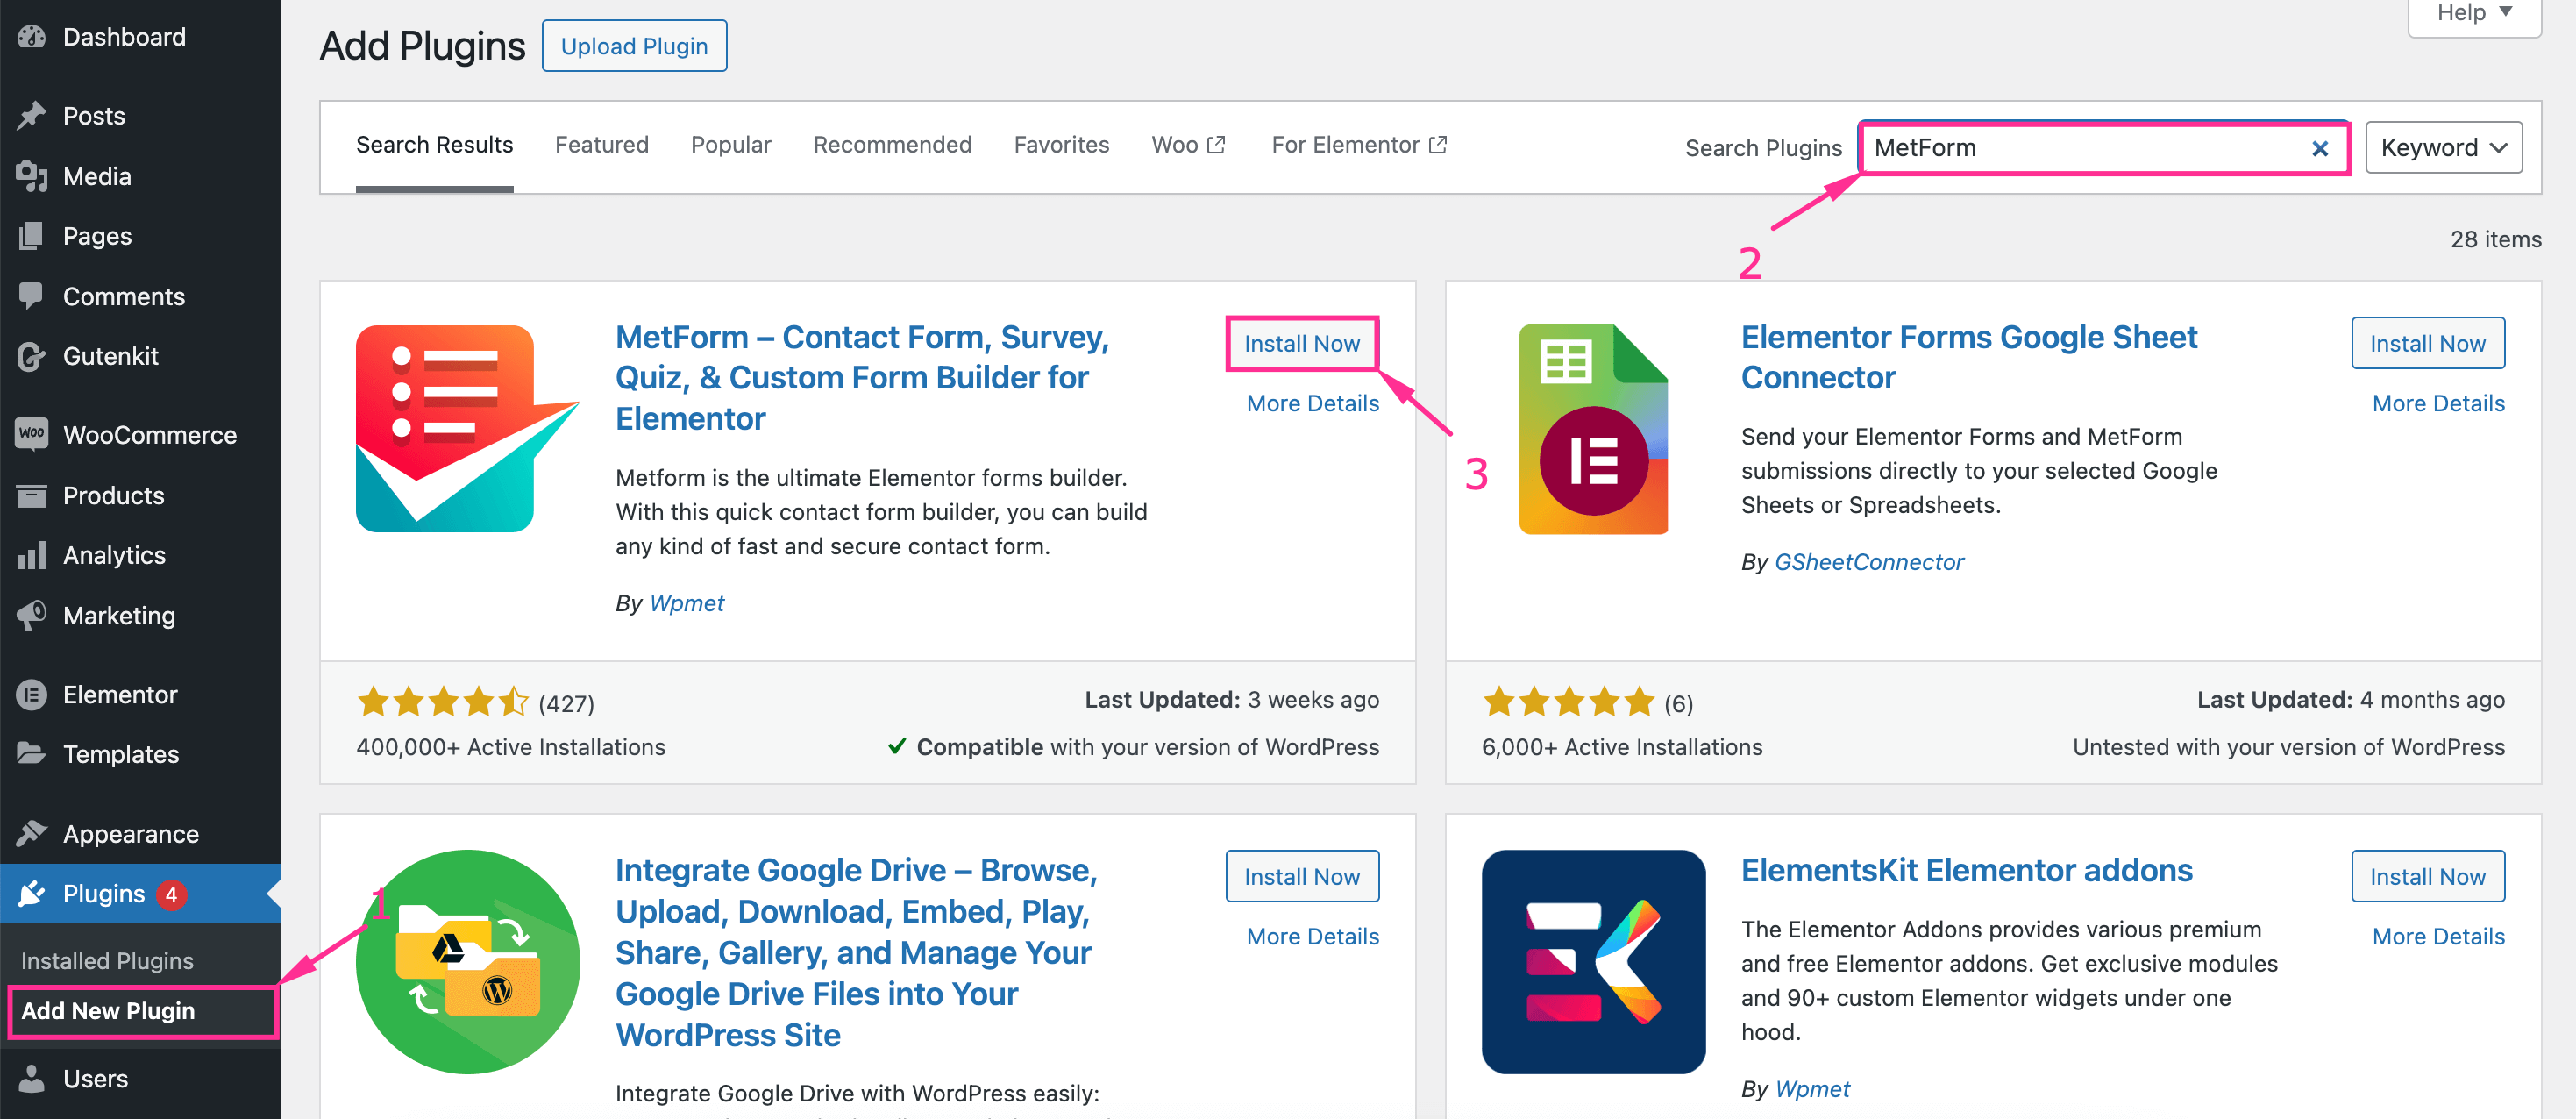
For that, install MetForm by navigating to Plugin >> Add New Plugin og pressing the “Add New” knap. Derefter, Search for MetForm in the Search tab and tryk på "Installer nu" button. After that, activate MetForm.

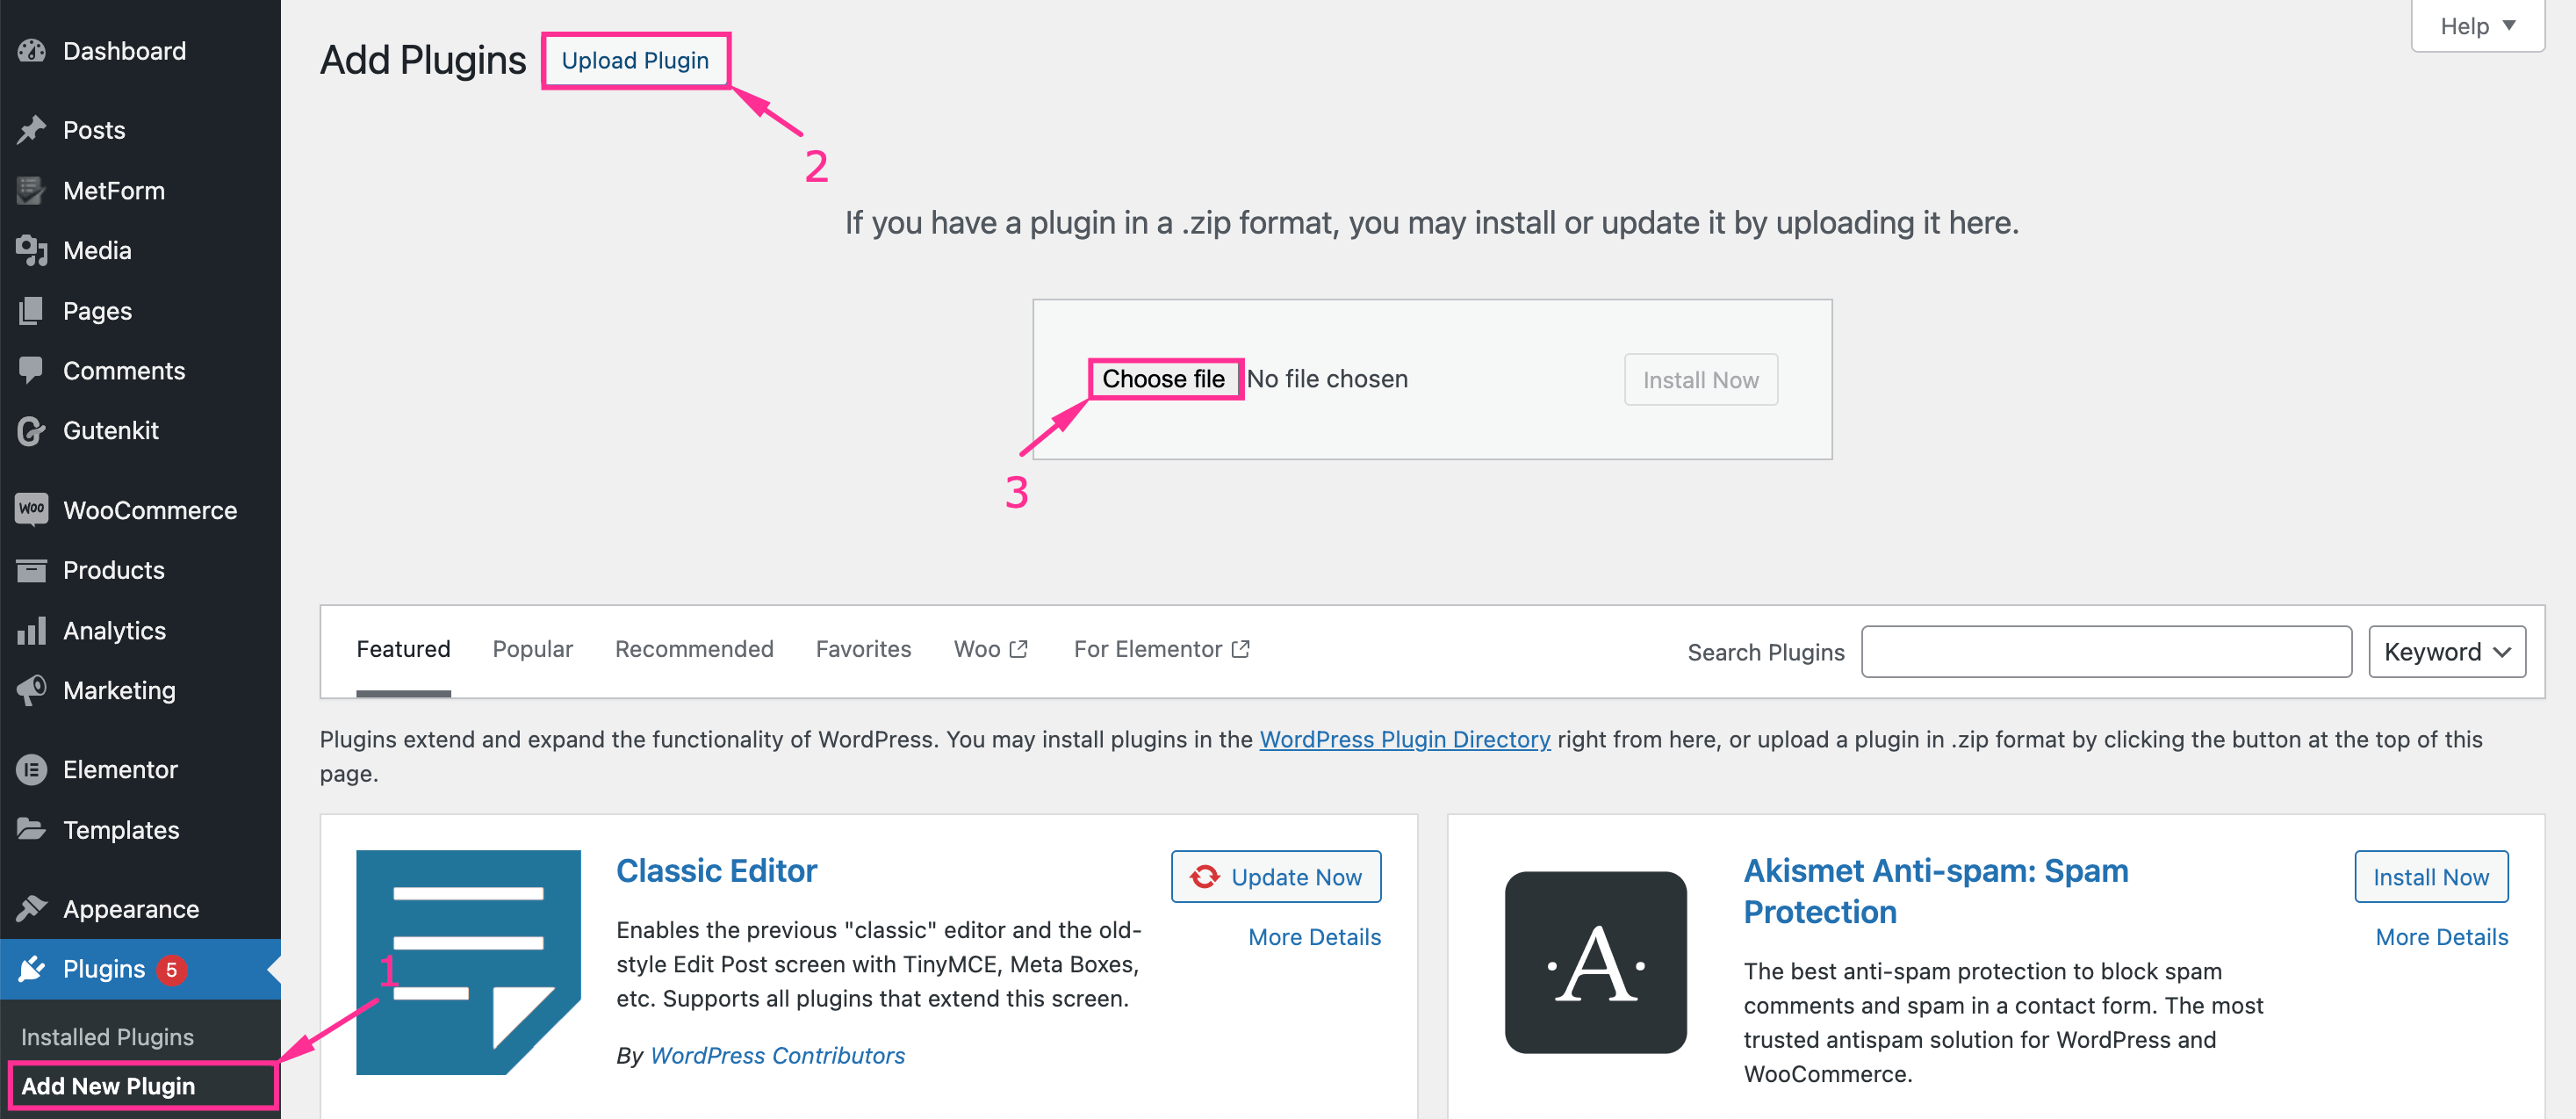
Also, you need to upload MetForm Pro by pressing the “Upload Plugin” button after navigating to Plugin >> Add New Plugin. Then, enter the zip file of MeForm Pro from your media library by pressing the “Choose file” option. After that, installere og aktivere the WordPress form plugin.

⭐️ Påkrævet plugin: As MetForm is an Elementor addon, you must ensure Elementor is installed and activated on your site. Otherwise, MetForm won’t work and you can’t explore the form creation opportunities.
Step 2: Pick a support form template.
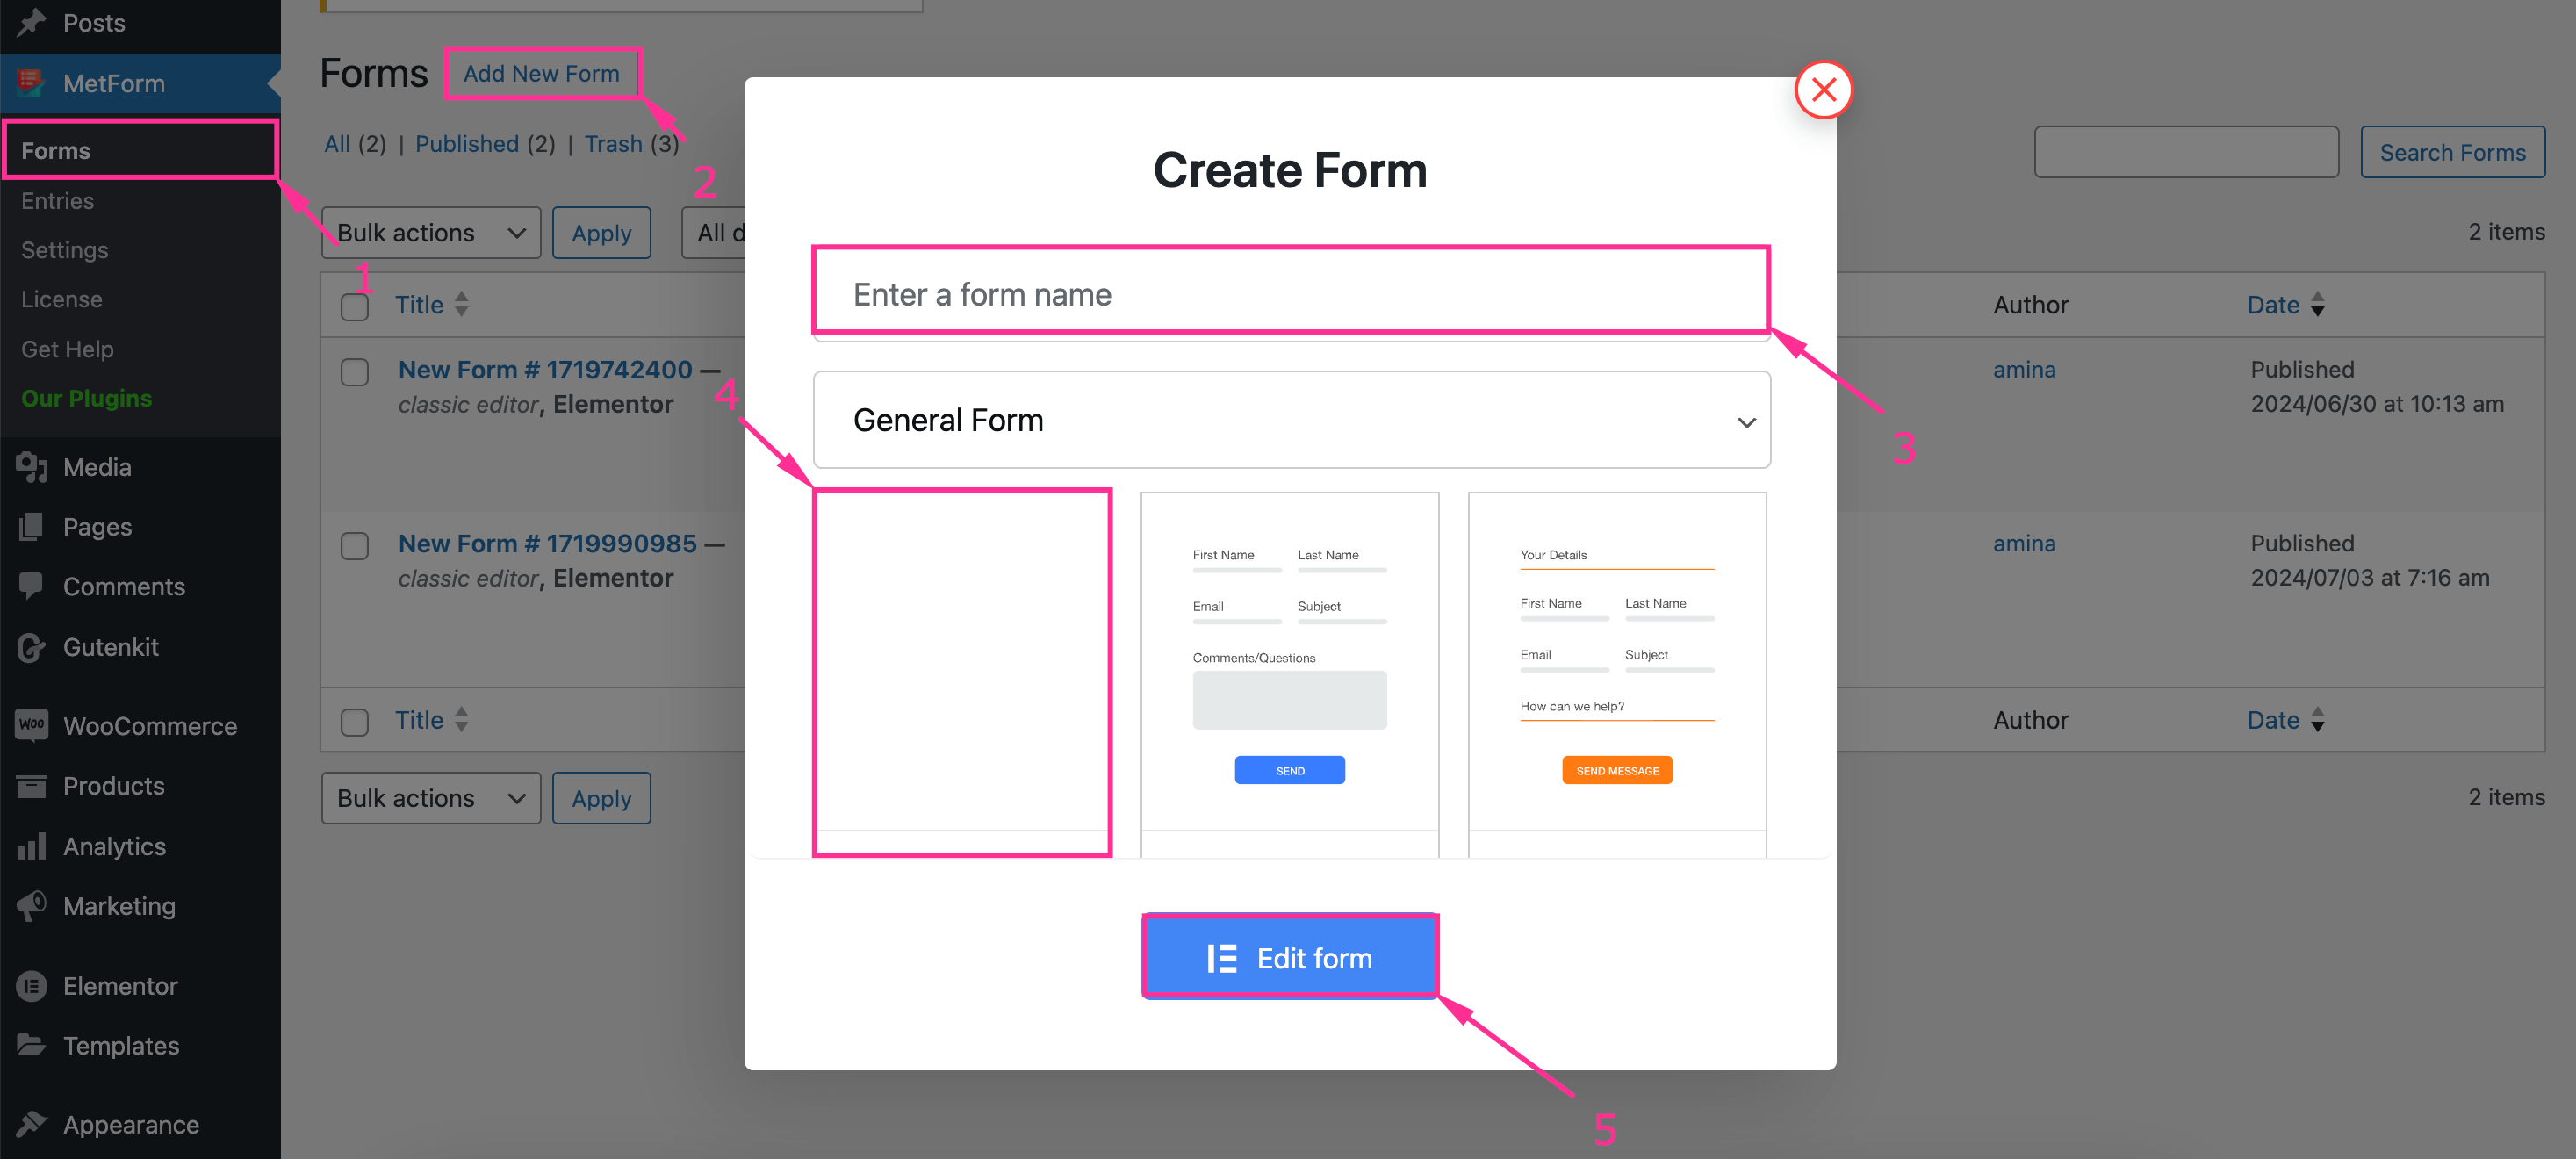
In the next step, you need to add a new form by picking a support form template. For that, hit the Forms tab under MetForm and press the “Add New Form” knap.
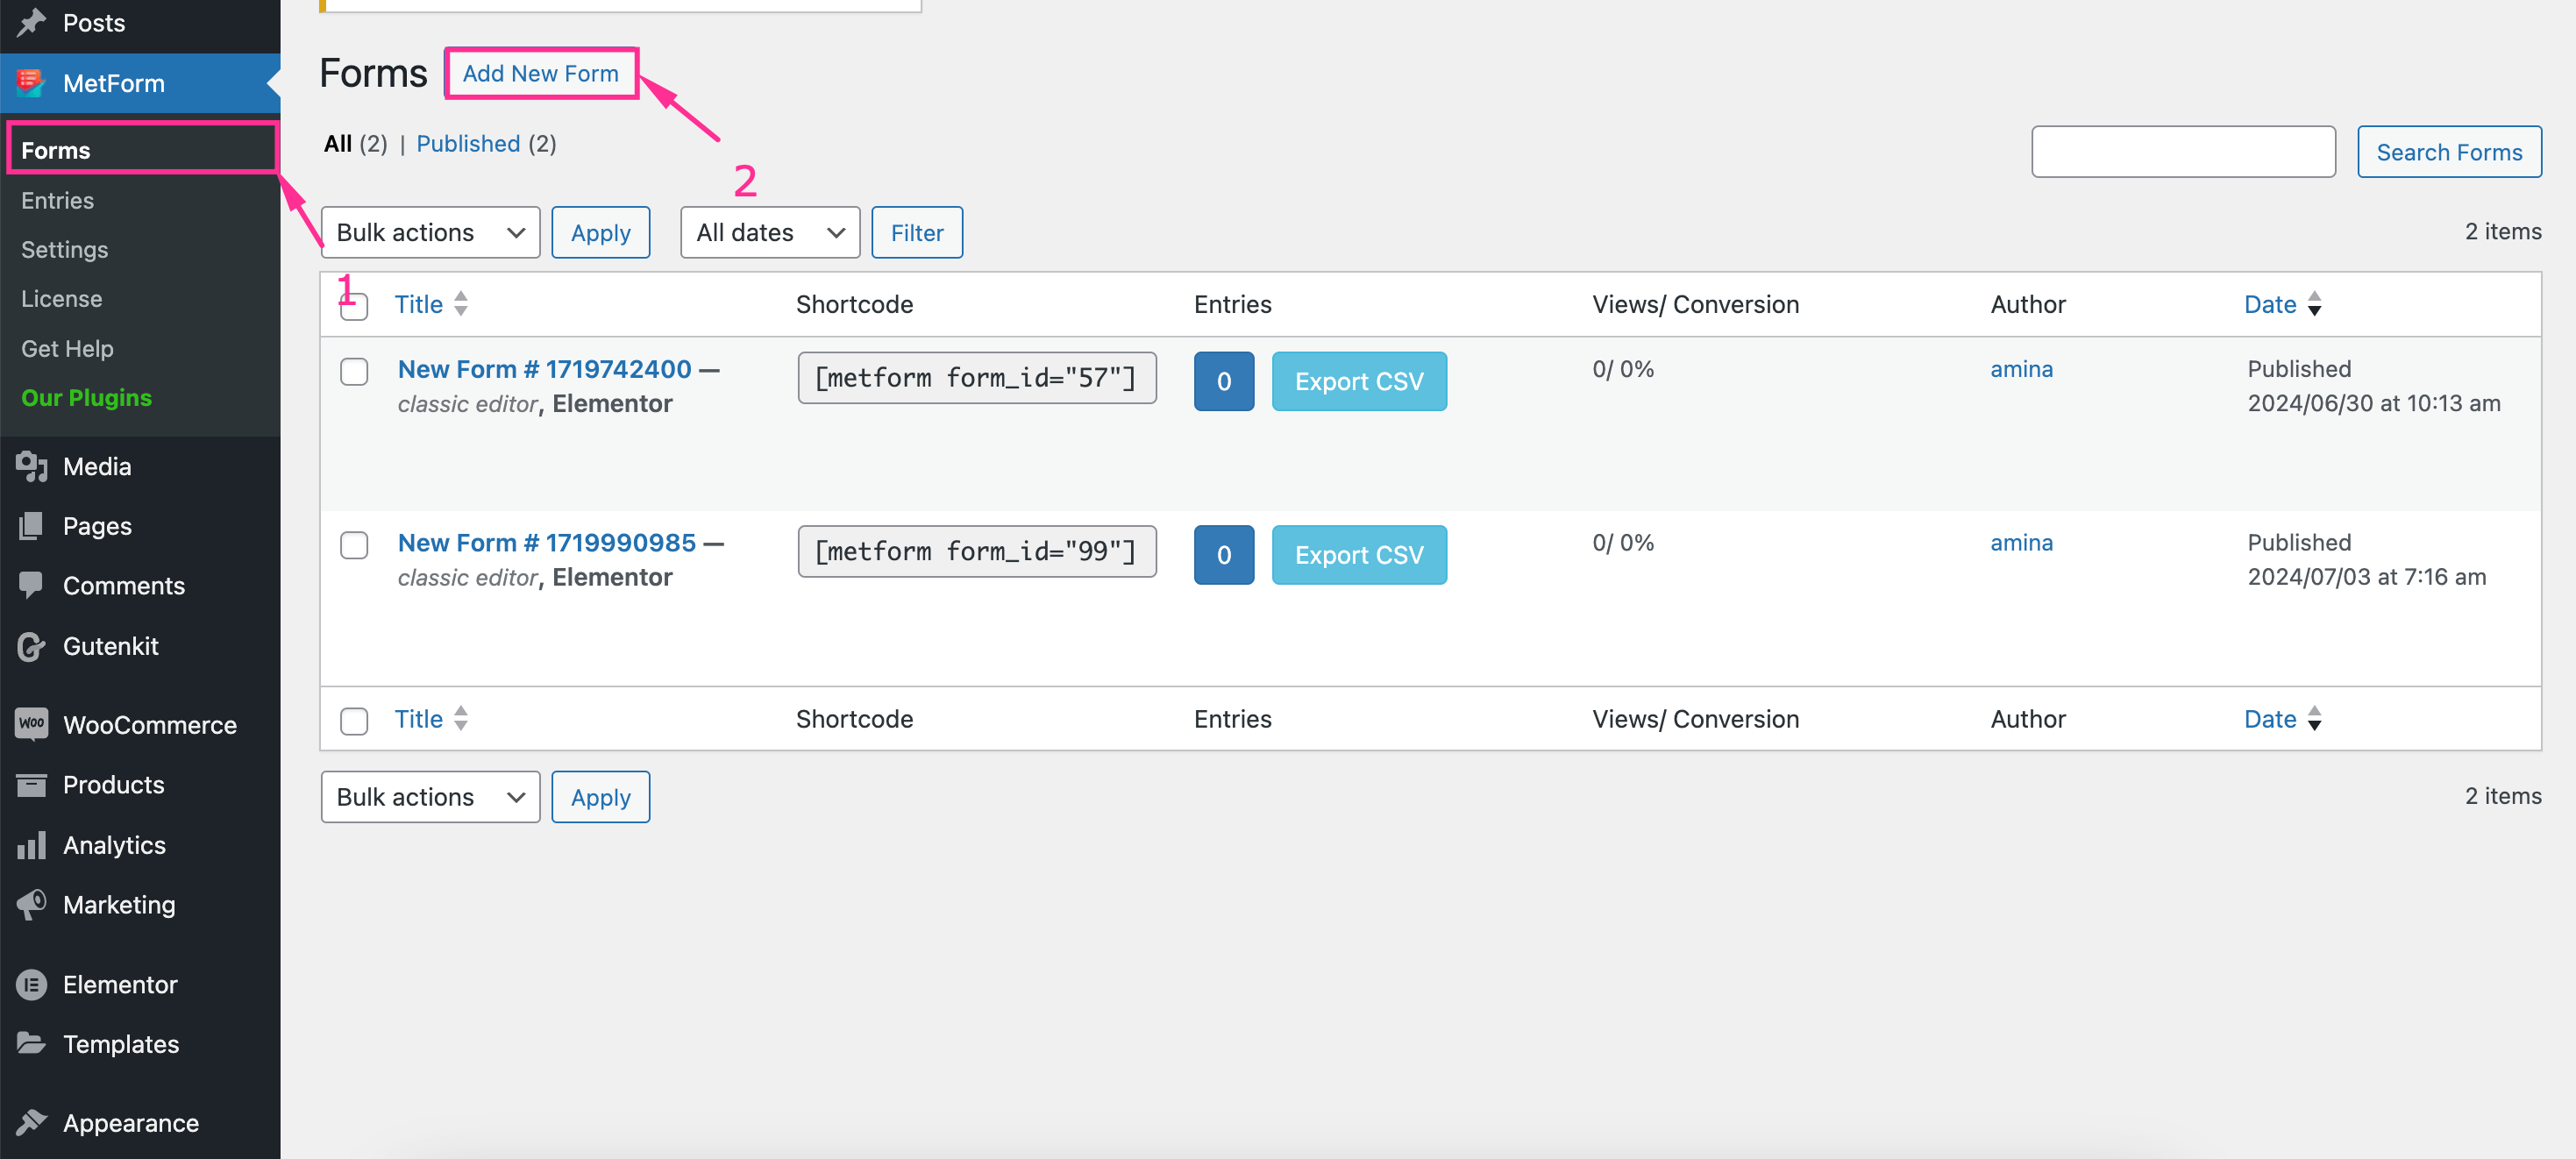

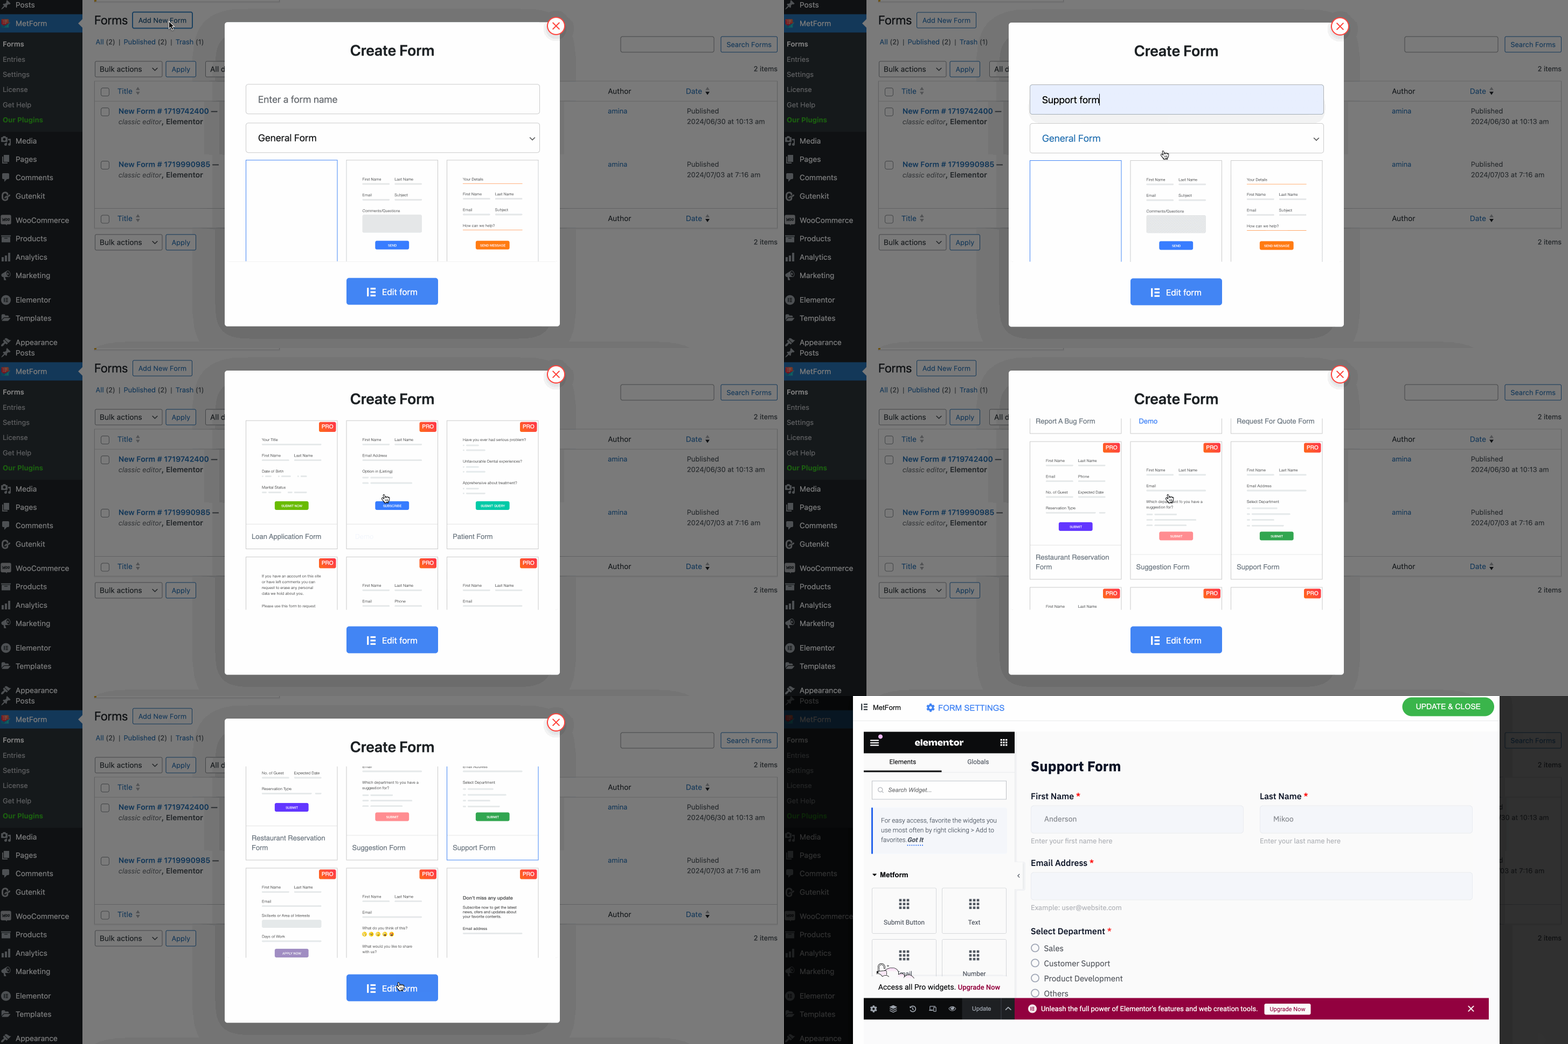
After pressing the “Add New Form” button, you will get to see a create form popup from where you need to work on the følgende felter or areas:
- Form name: Type the name of your form.
- Form Type: Enter form type.
- Skabelon: Scroll down and select a suitable support ticket form template.
Næste, hit the “Edit Form” button to customize this form template in an Elementor intuitive drag-and-drop interface.

Step 3: Customize form fields.
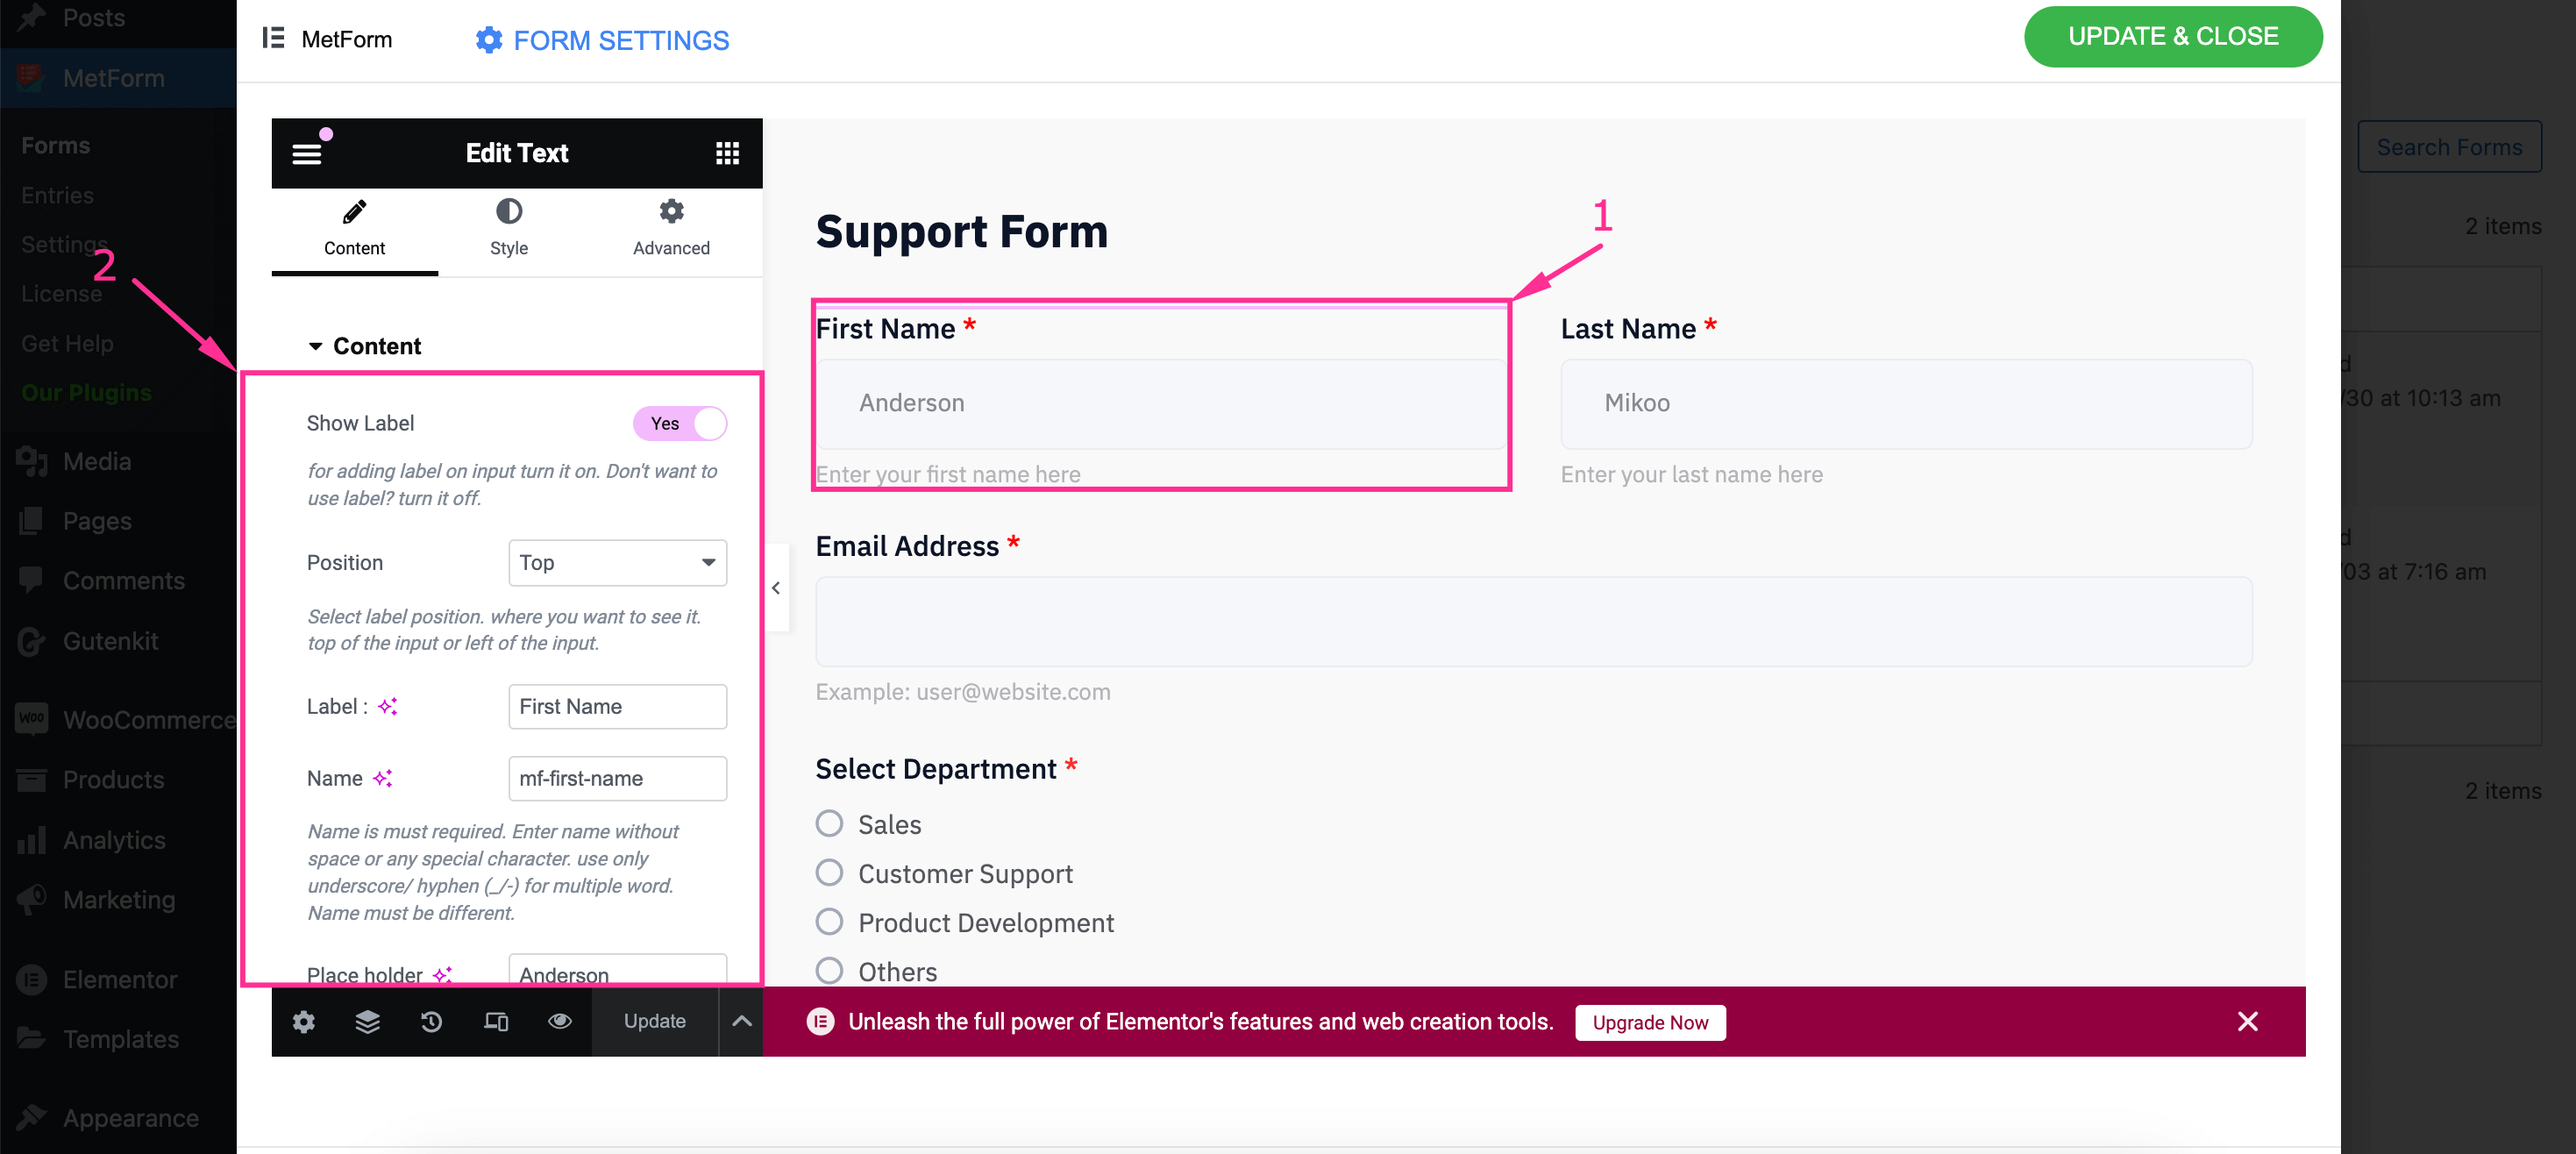
In this step, you need to add and customize form fields after getting redirected to Elementor editor. To customize form fields, hit the “First Name” field, and there on the left side, all the customization options for the respected field will be visible.
First, comes the content customization of the selected “First Name” field. Expand the Content tab og adjust the following areas:
- Vis etiket: Turn on this toggle button to add a label.
- Position: Select the position of your label.
- Etiket: Enter a label for this First Name field.
- Navn: Fill the name field with underscore/hyphen (_/-) for multiple words.
- Pladsholder: Enter the placeholder text as a reference.
- Help text: Give an help text for filling out this field.

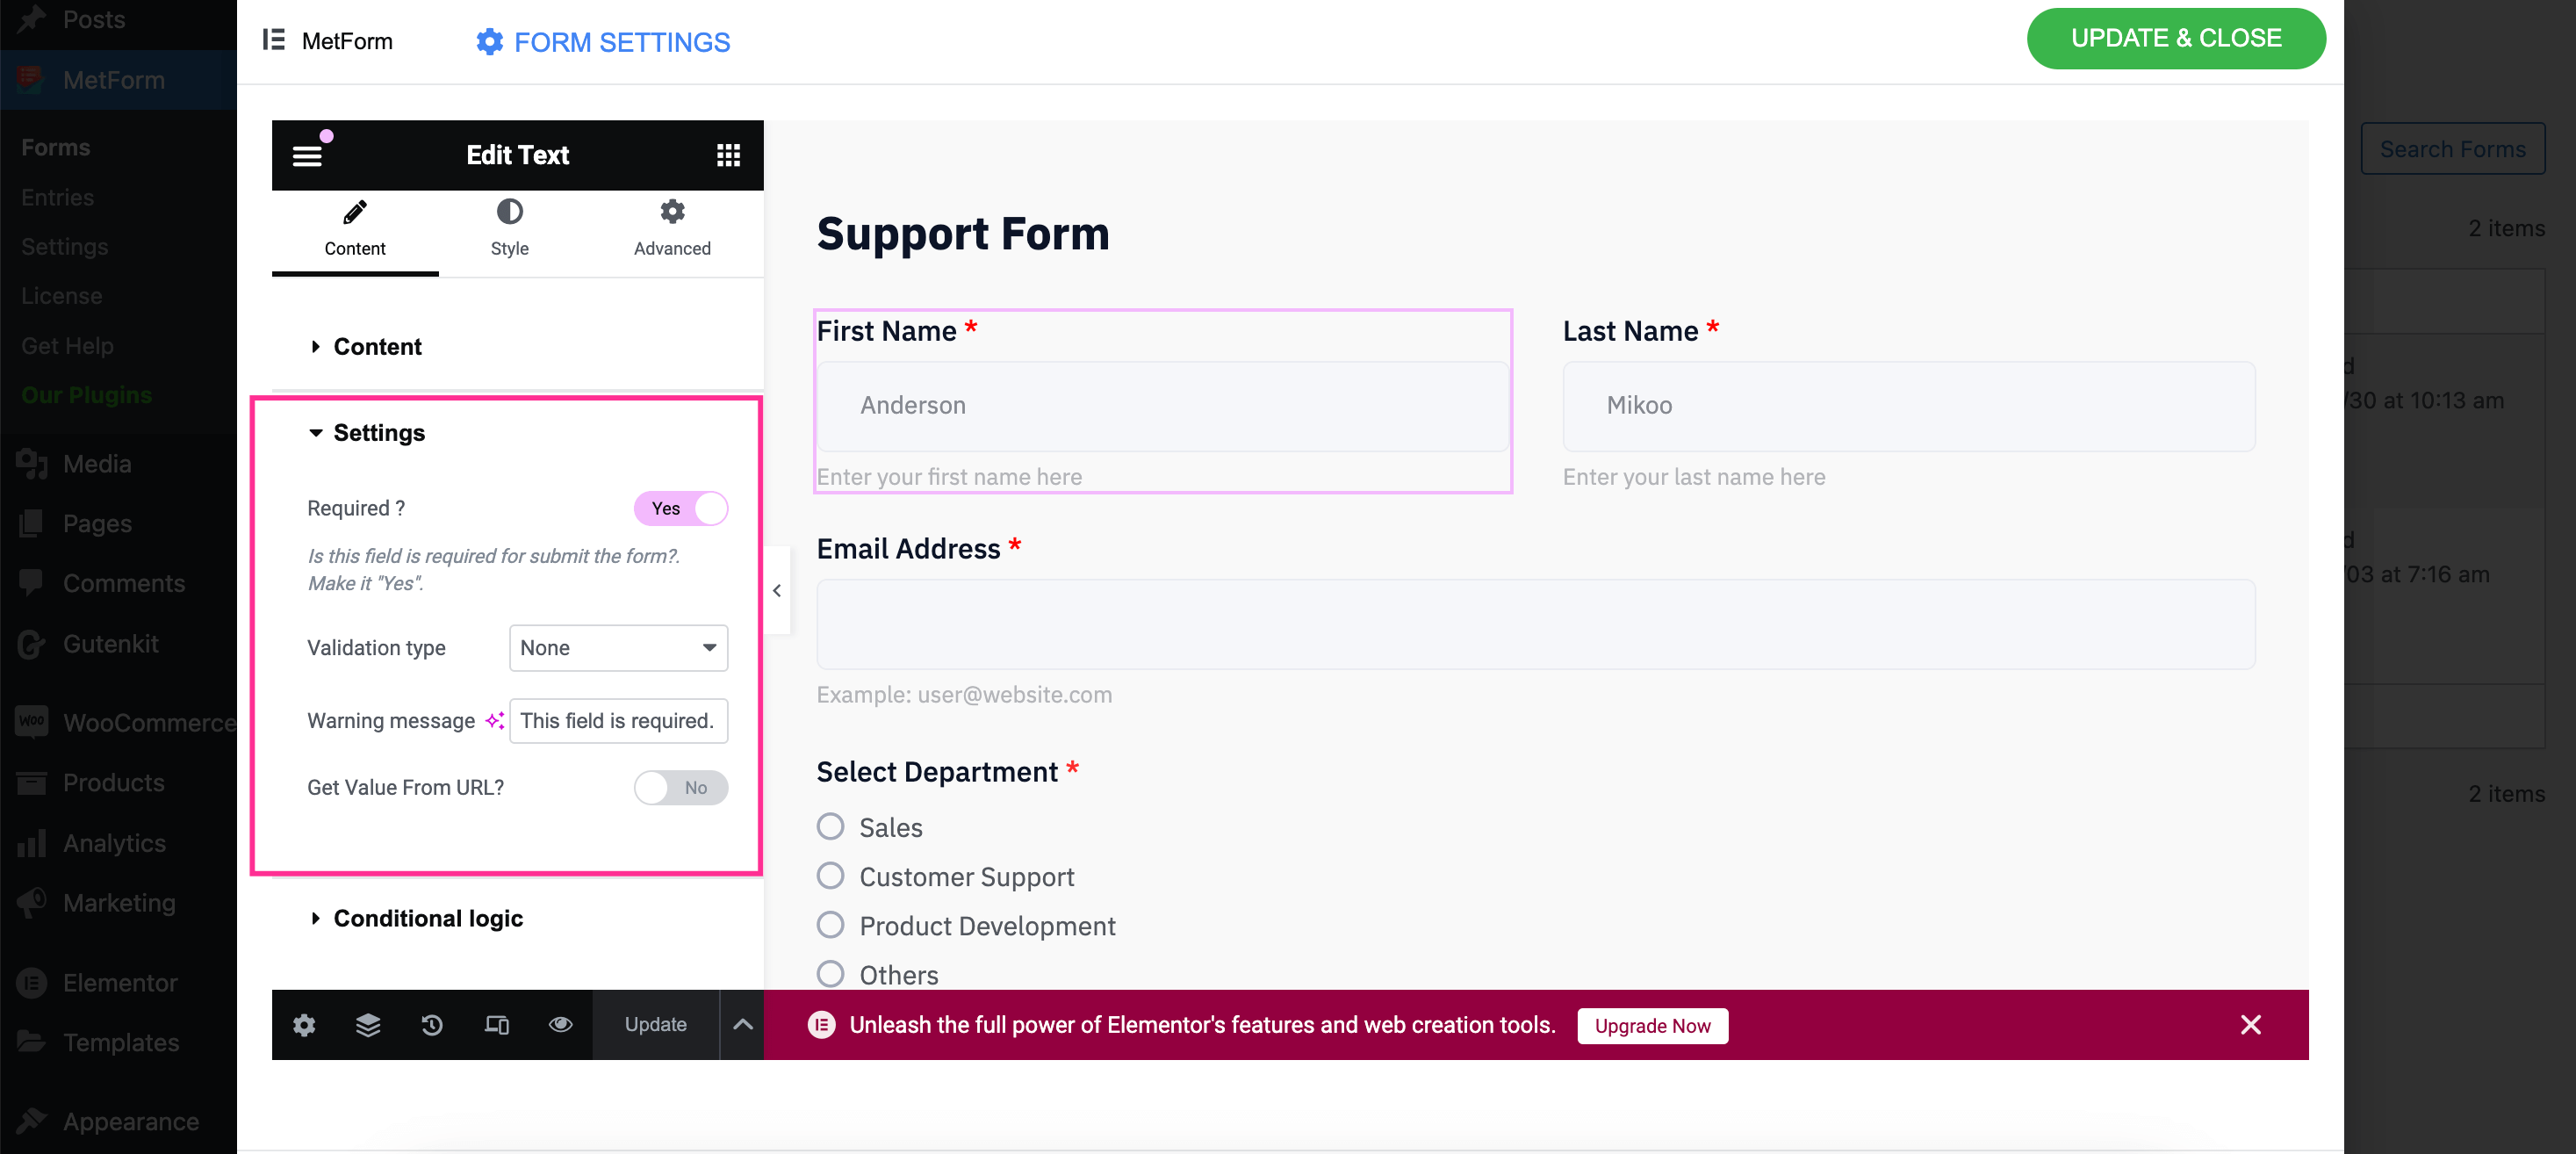
Derefter, expand the “Settings” tab and customize the following areas:
- Required?: Enable this option to make this field required while filling out the form.
- Valideringstype: Select the validation type from the drop-and-down menu. For example, if you select validation type as “By character length”, you can set min and max character length for this field.
- Advarselsmeddelelse: Enter the warning message for this field like “This field is required”.
- Get Value From URL: Enable this option to get value from the URL.

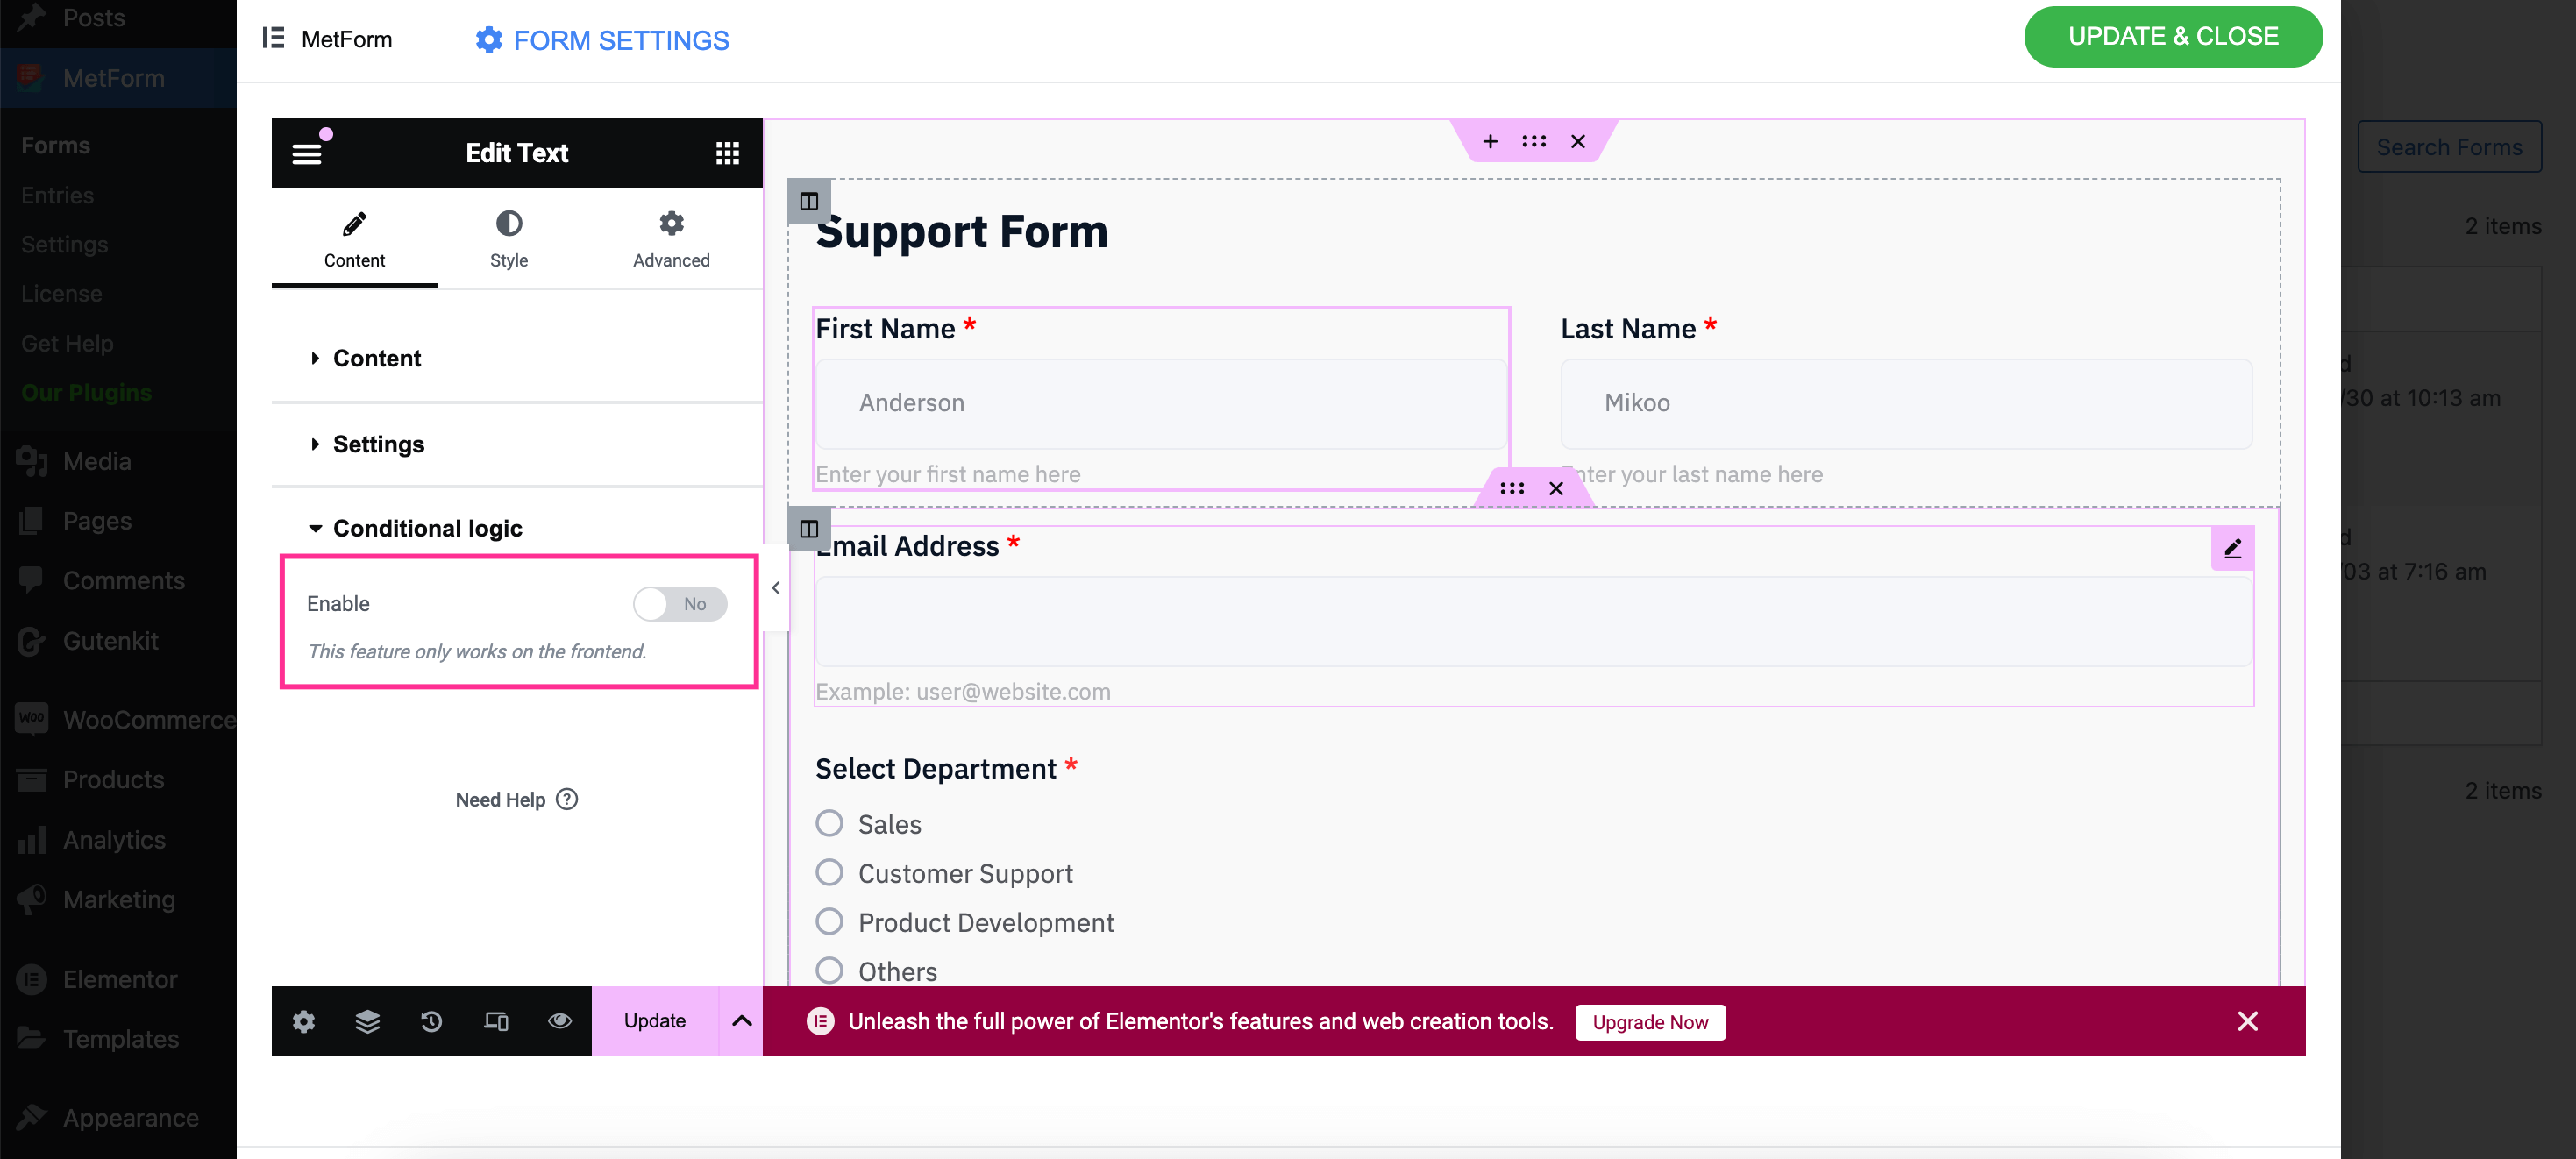
Further, you can sæt Elementor conditional logic for this field by extending the Conditional logic tab and enabling the toggle button.

Step 4: Add new fields to the support form.
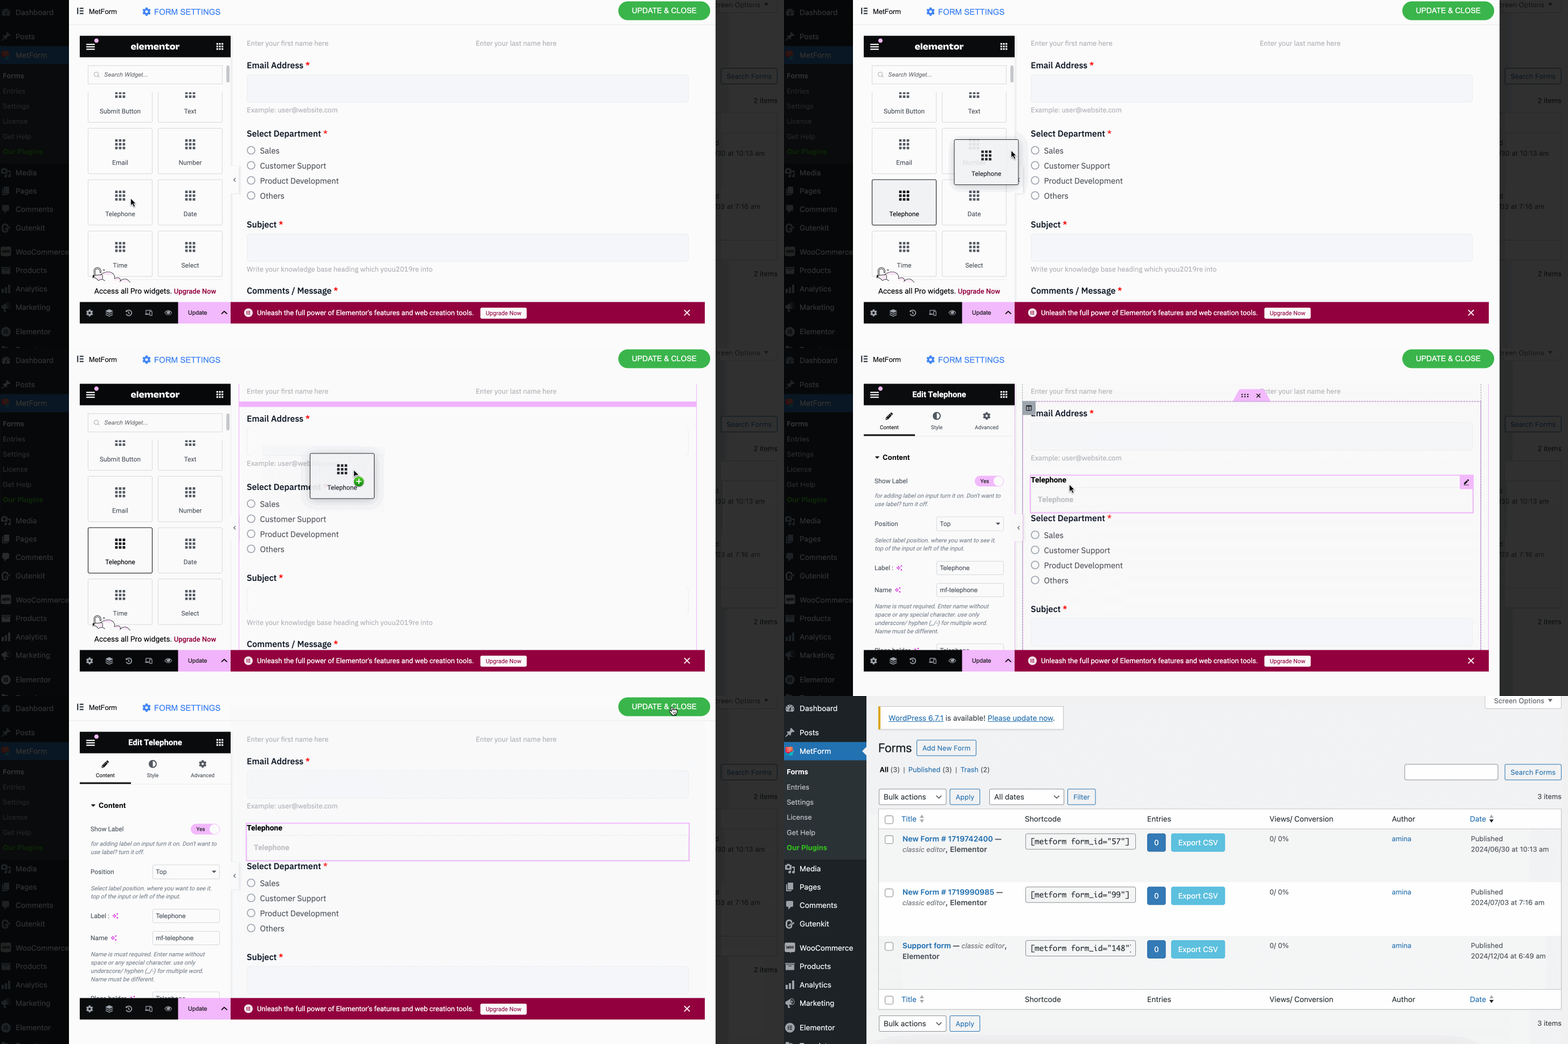
If your support form requires more fields then, drag-and-drop the fields to the place where you would like to add those. Follow the previous process to customize those newly added fields.
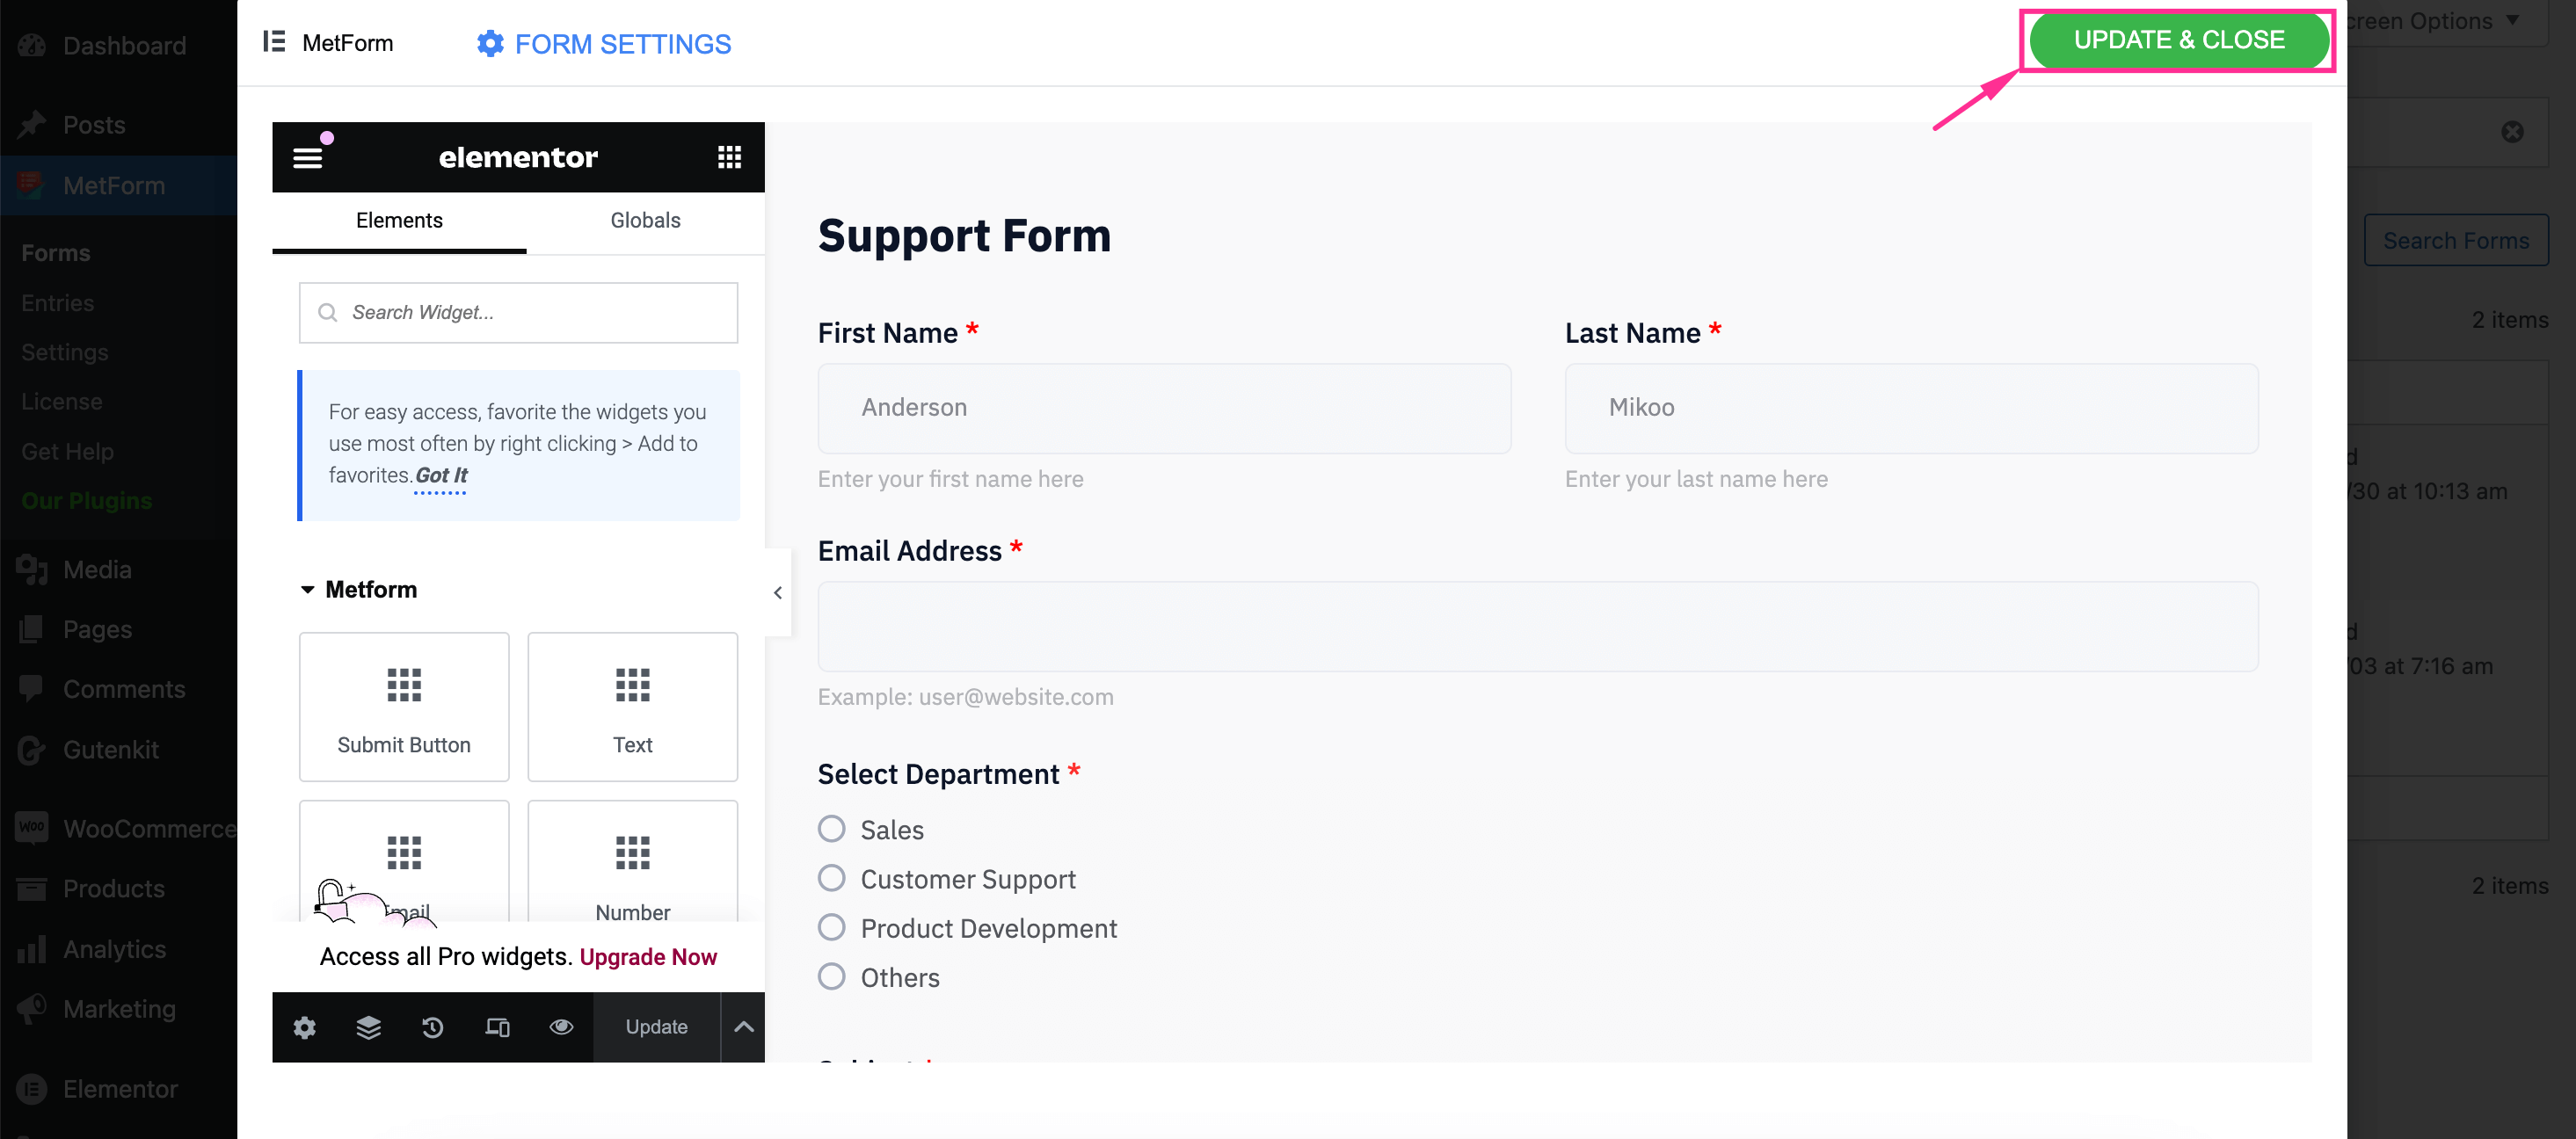
After adjusting every form field, hit the “Update & Close” button to make your support request form live.

How to create a support ticket form in WordPress from scratch
MetForm not only provides templates for form creation but also offers 38+ fully customizable form fields that you can insert by enjoying the drag-and-drop interface of Elementor. Further, it has 18+ integrations to boost your form-building opportunities.
Let’s dive into an in-depth guide on how to create a support ticket form in WordPress from scratch using the Elementor form builder, MetForm:
Step 1: Add a blank template.
The process of creating a support ticket form from scratch is similar to the previous method. Just you need to pick a blank template following the same process.
To add a blank template, navigate to MetForm >> Formularer og click the “Add New Form” button. Then, enter a form navn og type sammen med selecting a blank template. Next, hit the “Edit form”-knappen.

Step 2: Add the required fields to the support ticket form.
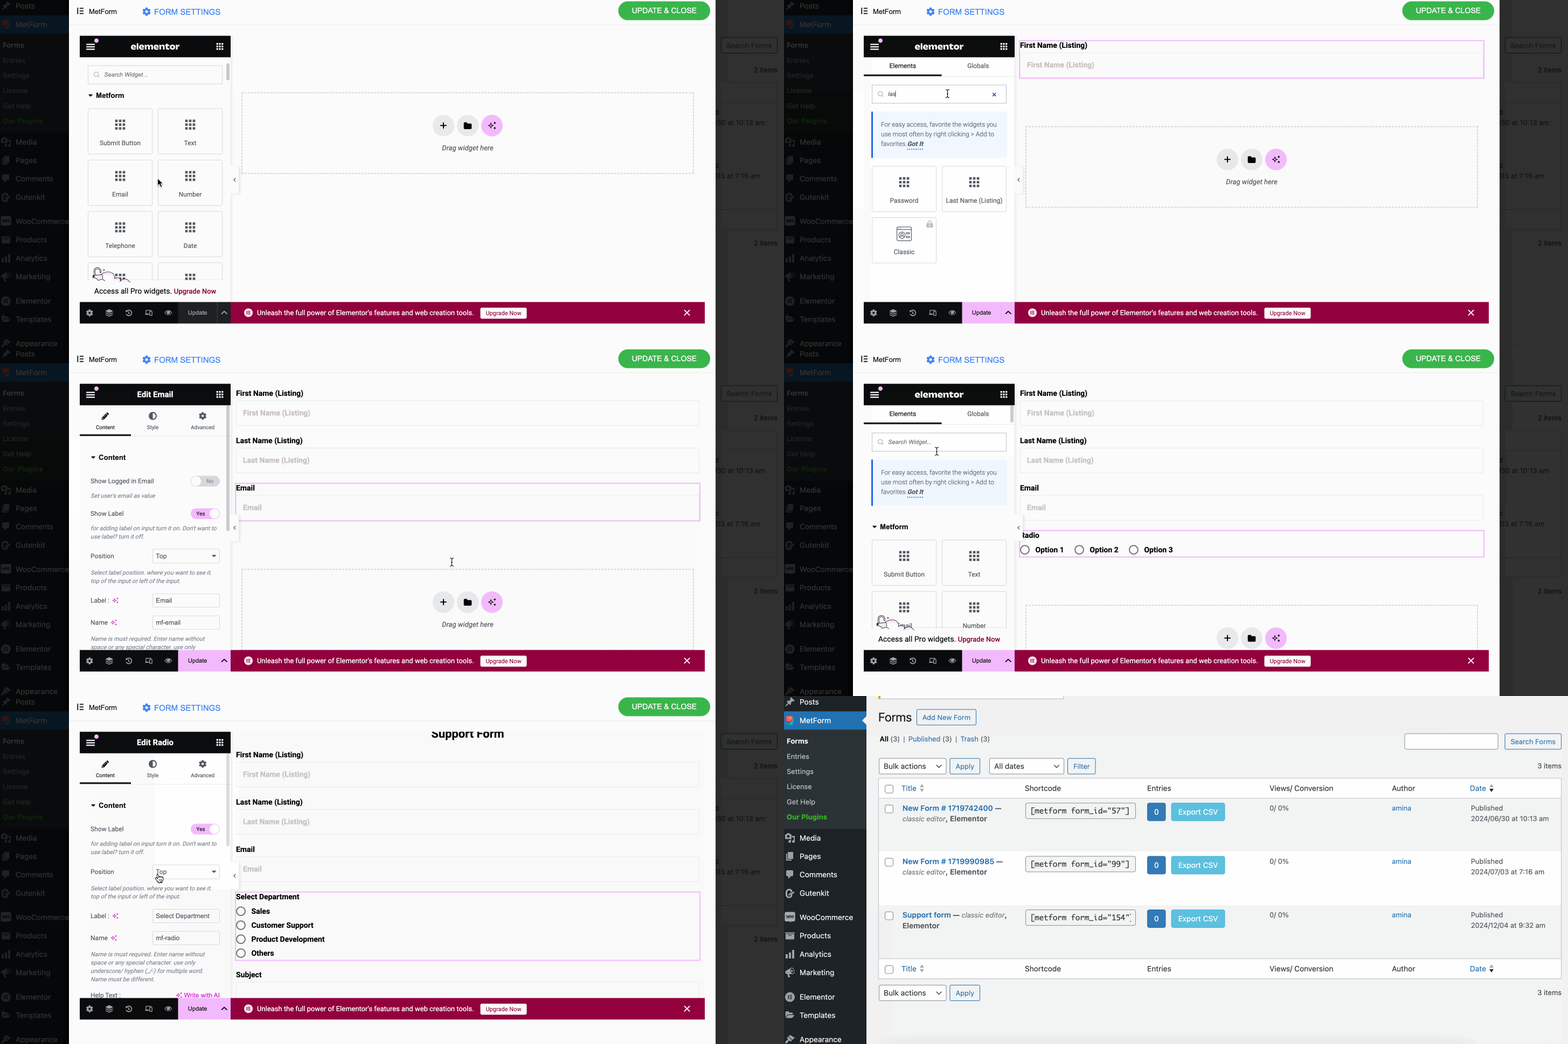
In this step, you have to add different fields to your support request form by dragging-and-dropping. To do that, search for First Name field, og Træk og slip it on the plus “+” icon like the below GIF. Following the similar way, one-by-one add Last Name, Email, Text, Textarea, submit button, and other necessary fields to your support ticket form.

Step 3: Live your created support ticket form.
Endelig, hit the “Update & Close” button to live your customized support ticket form.

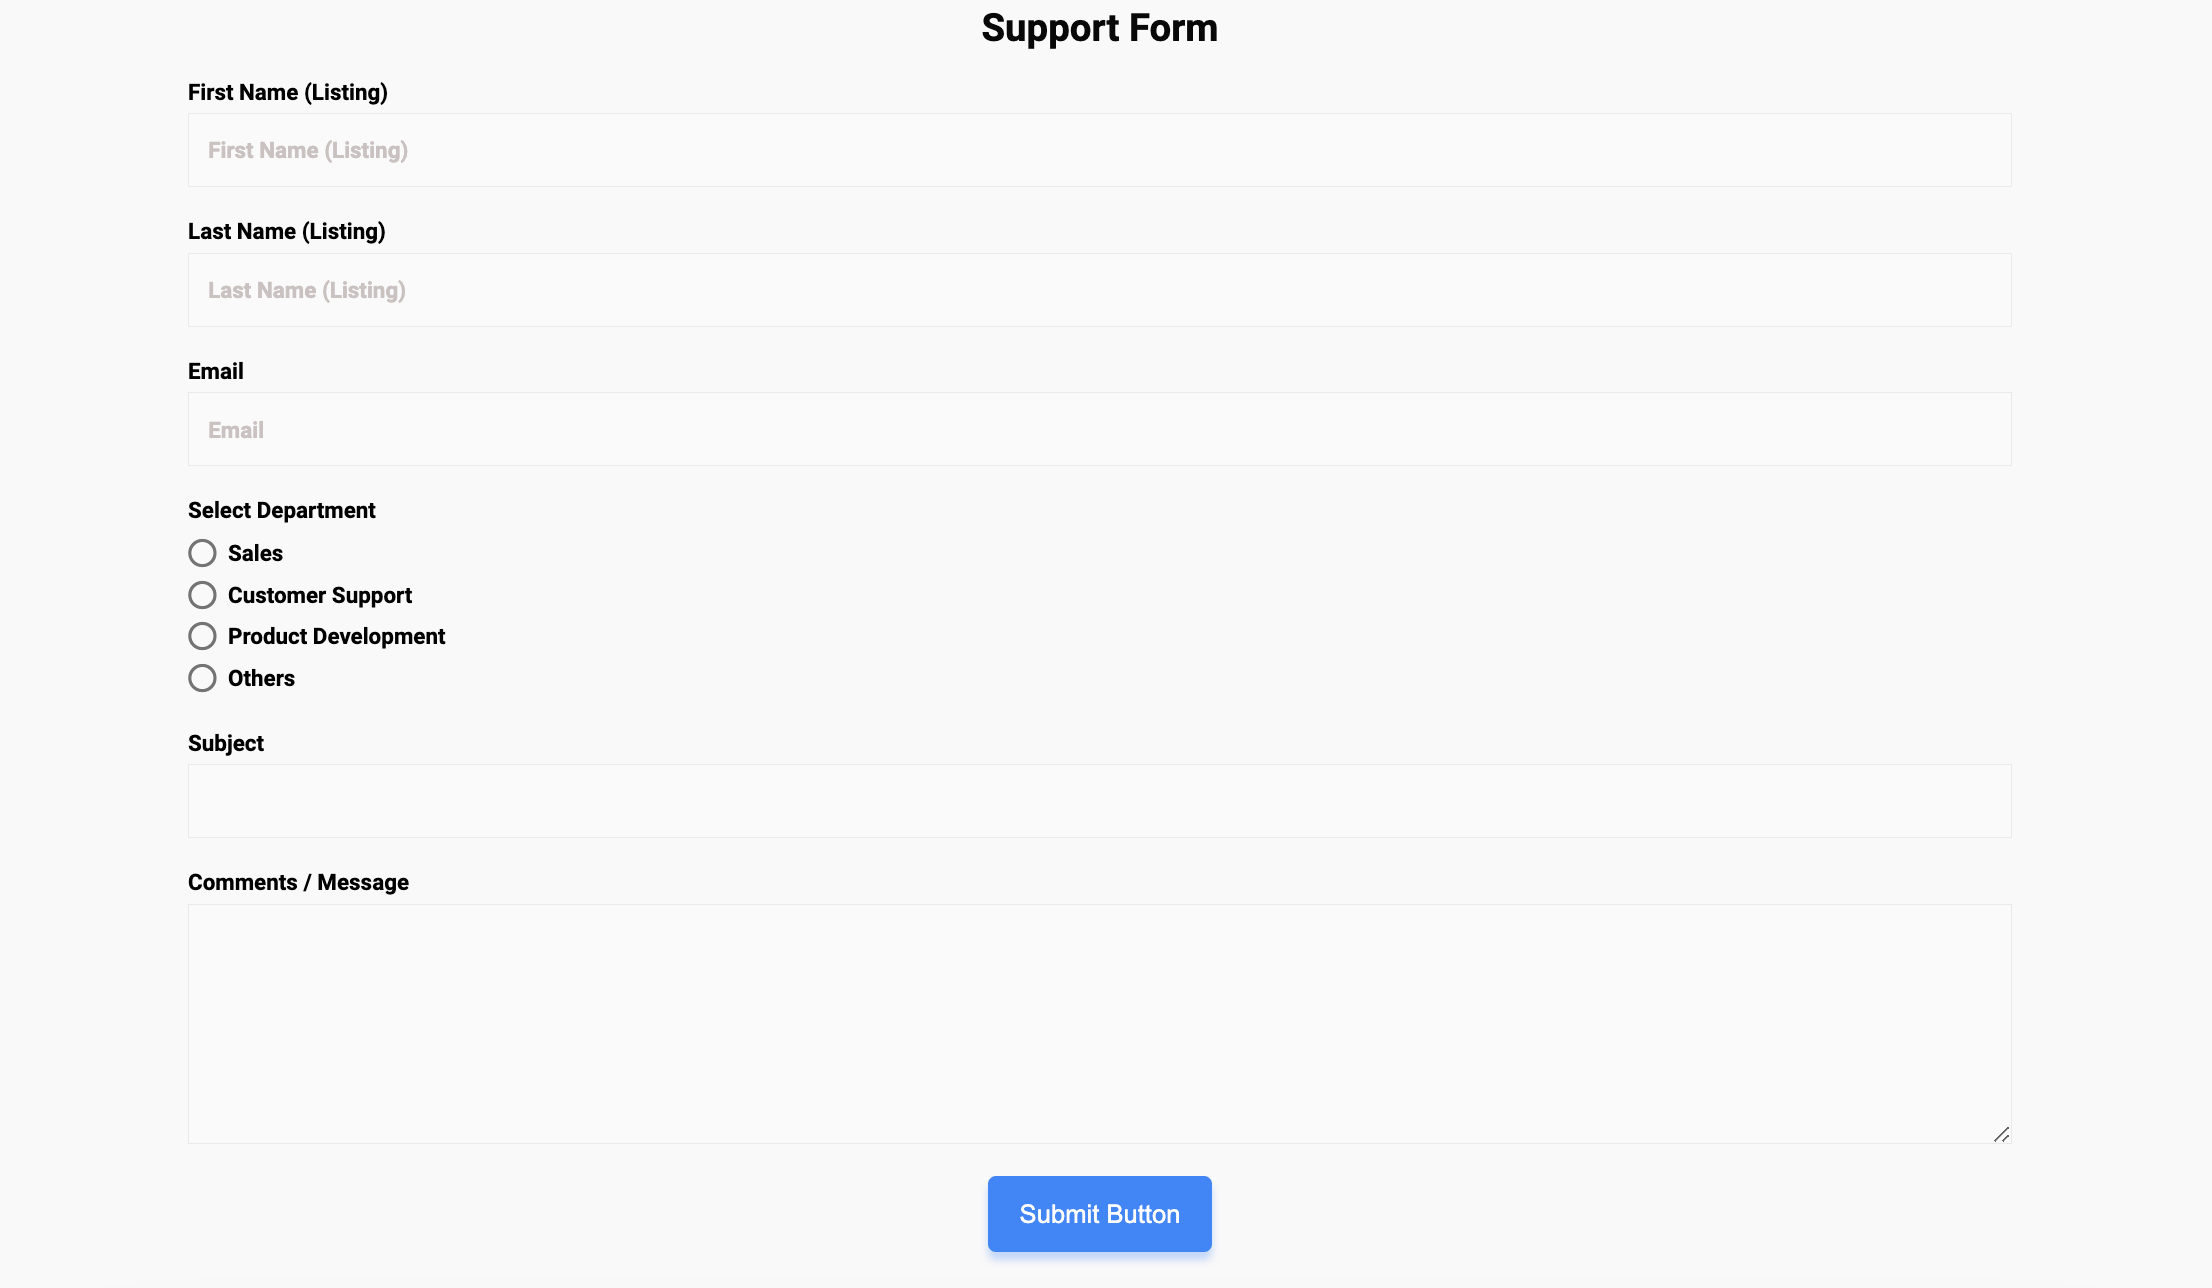
Now, here is the final look of your custom support form built with MetForm:

Step 4: Add support to pages or posts with shortcodes.
After creating your custom support form, you can also add support form to individual pages and posts with shortcodes. All your created forms will be stored on the Forms tab under MetForm.
Now, to access this shortcode, go to MetForm >> Formularer og copy the Shortcode beside support form.
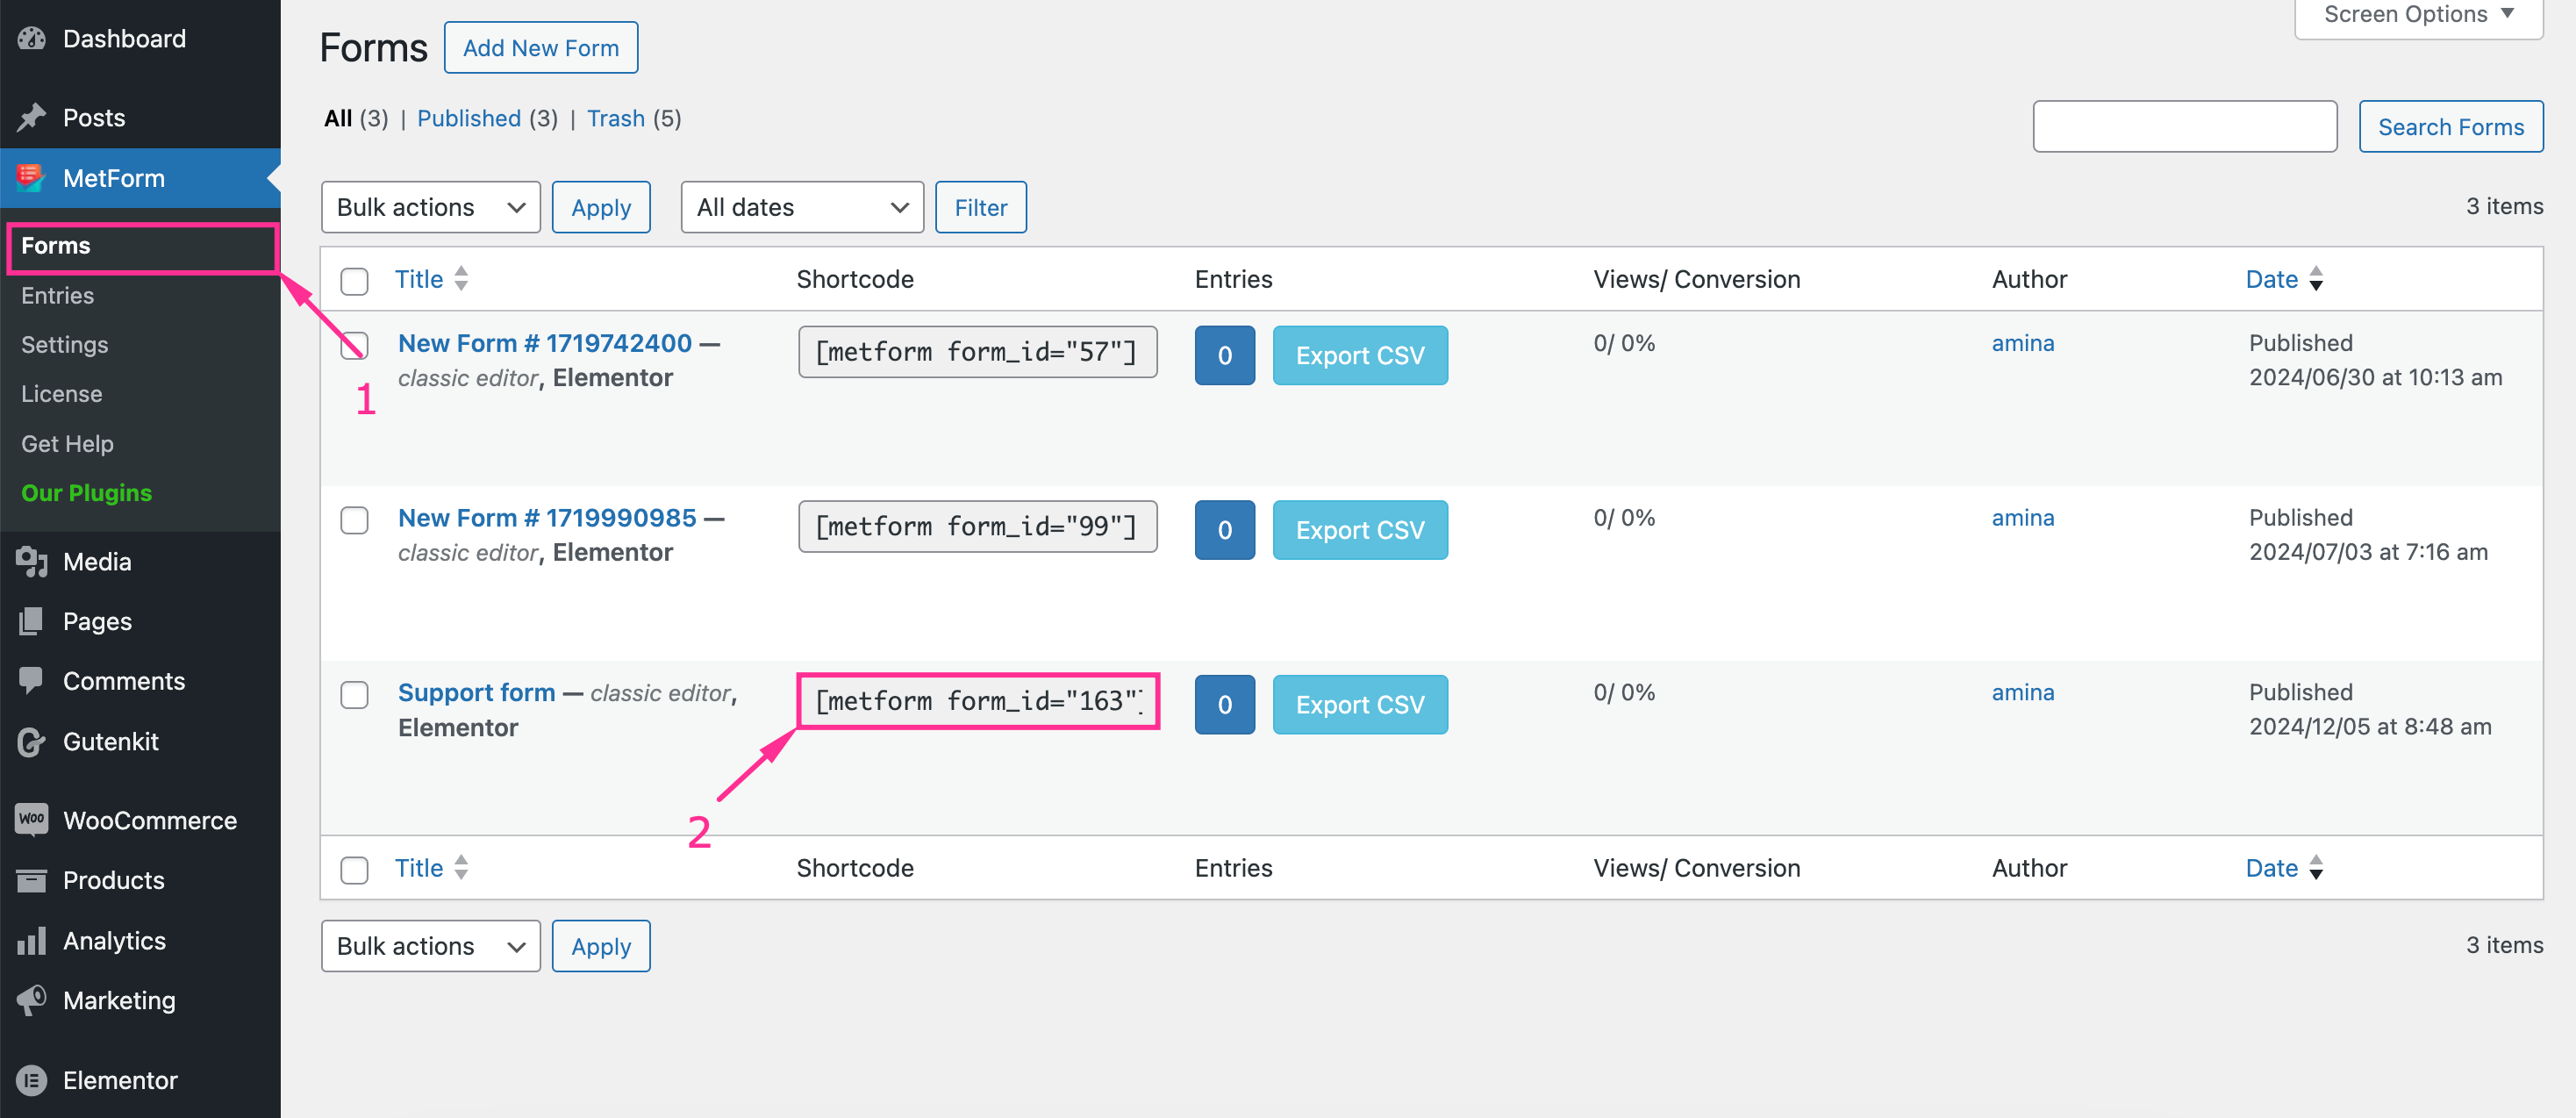

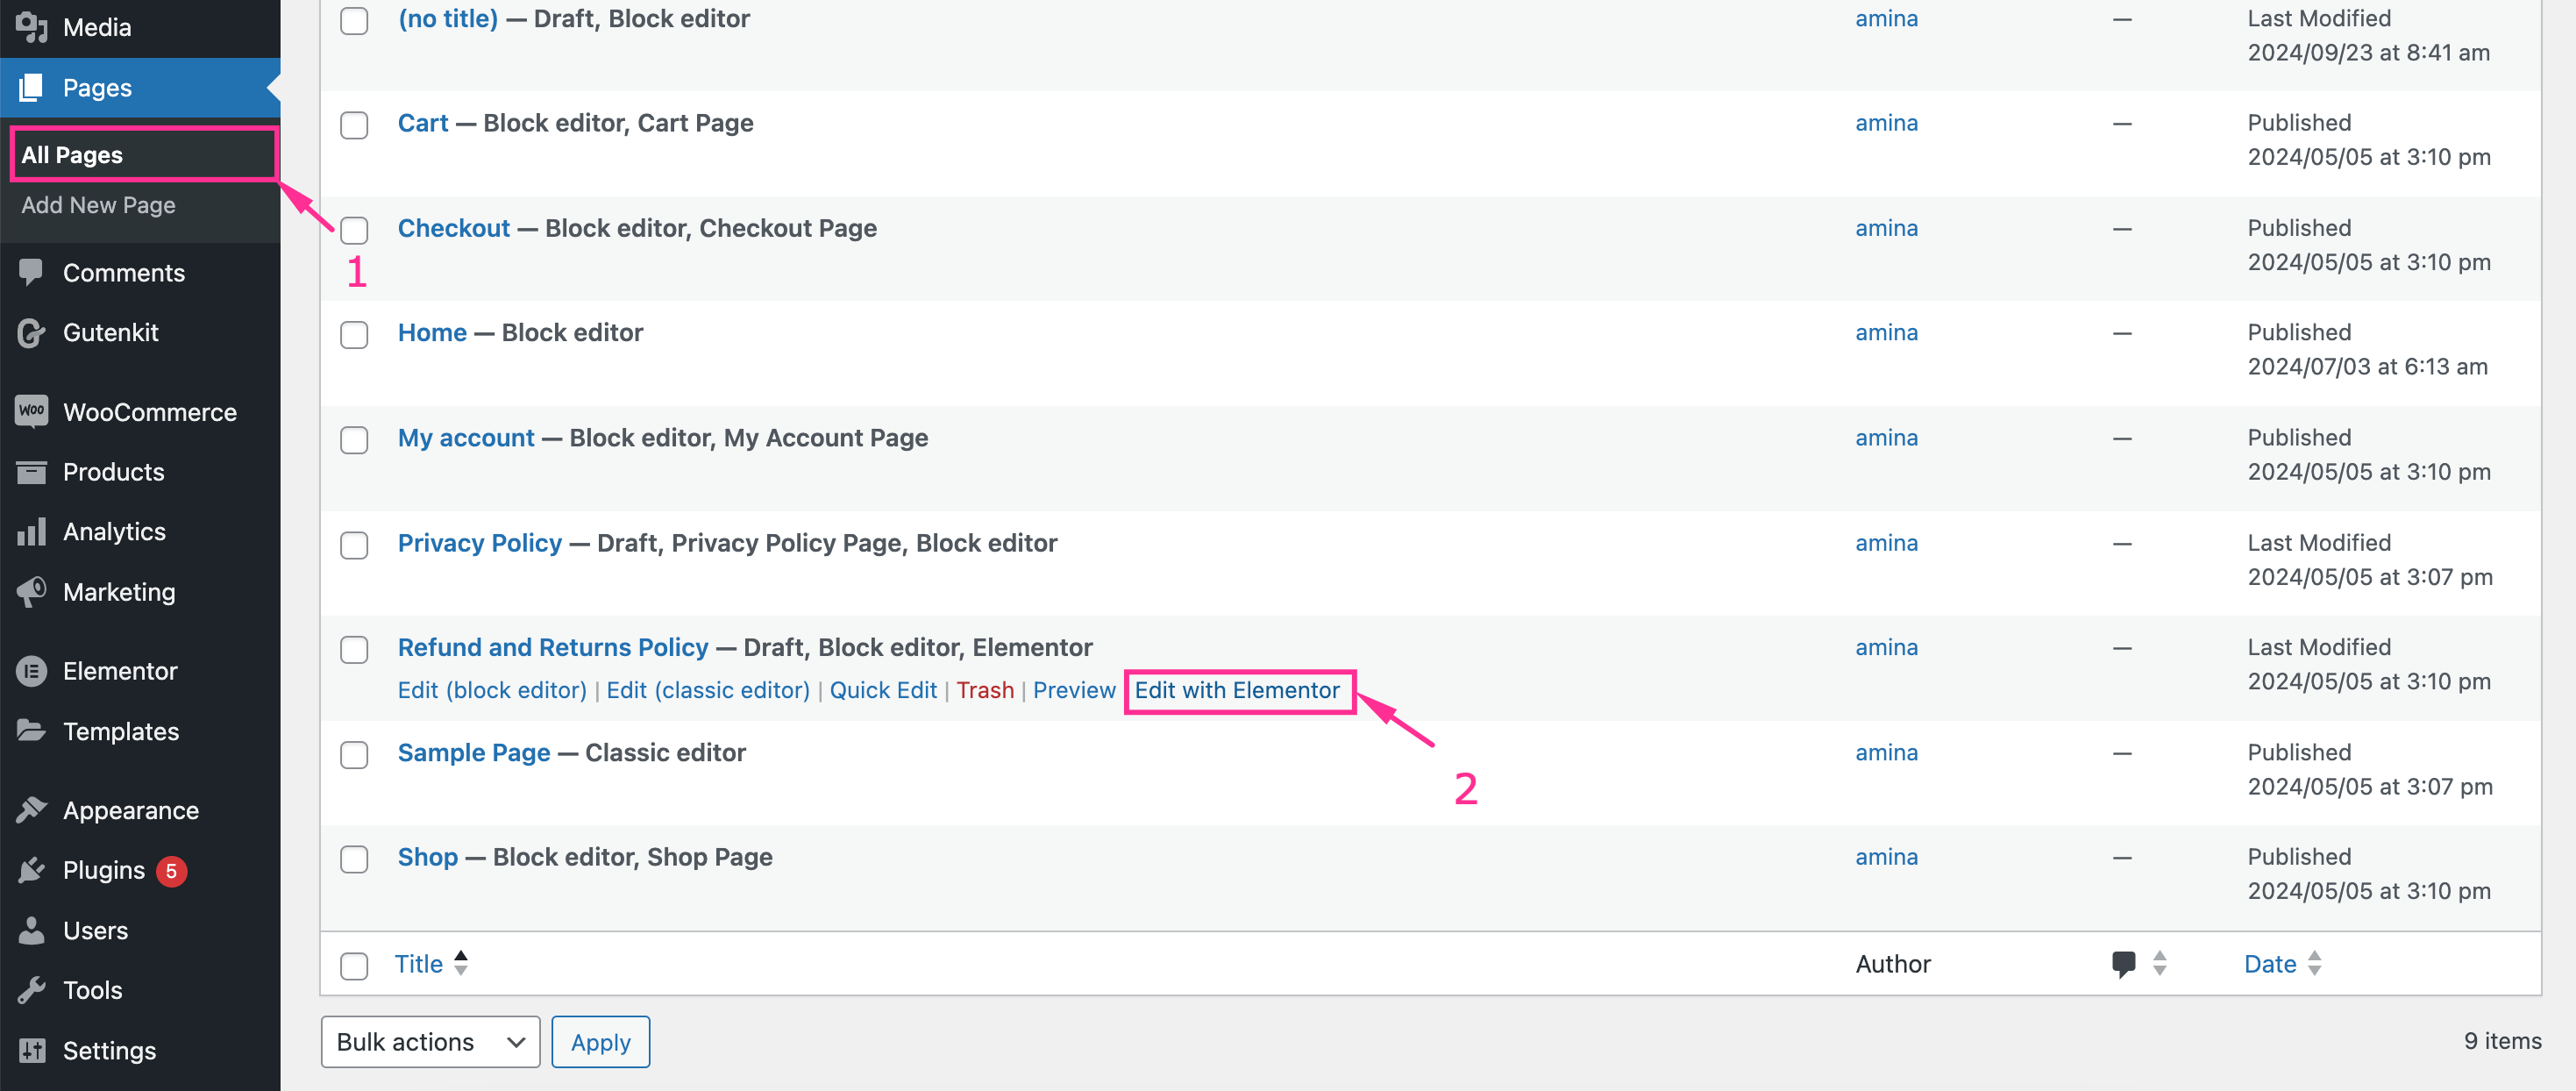
After that, navigate to Sider >> Alle sider og select the “Edit with Elementor” option for the page where you want to add support form with shortcode.

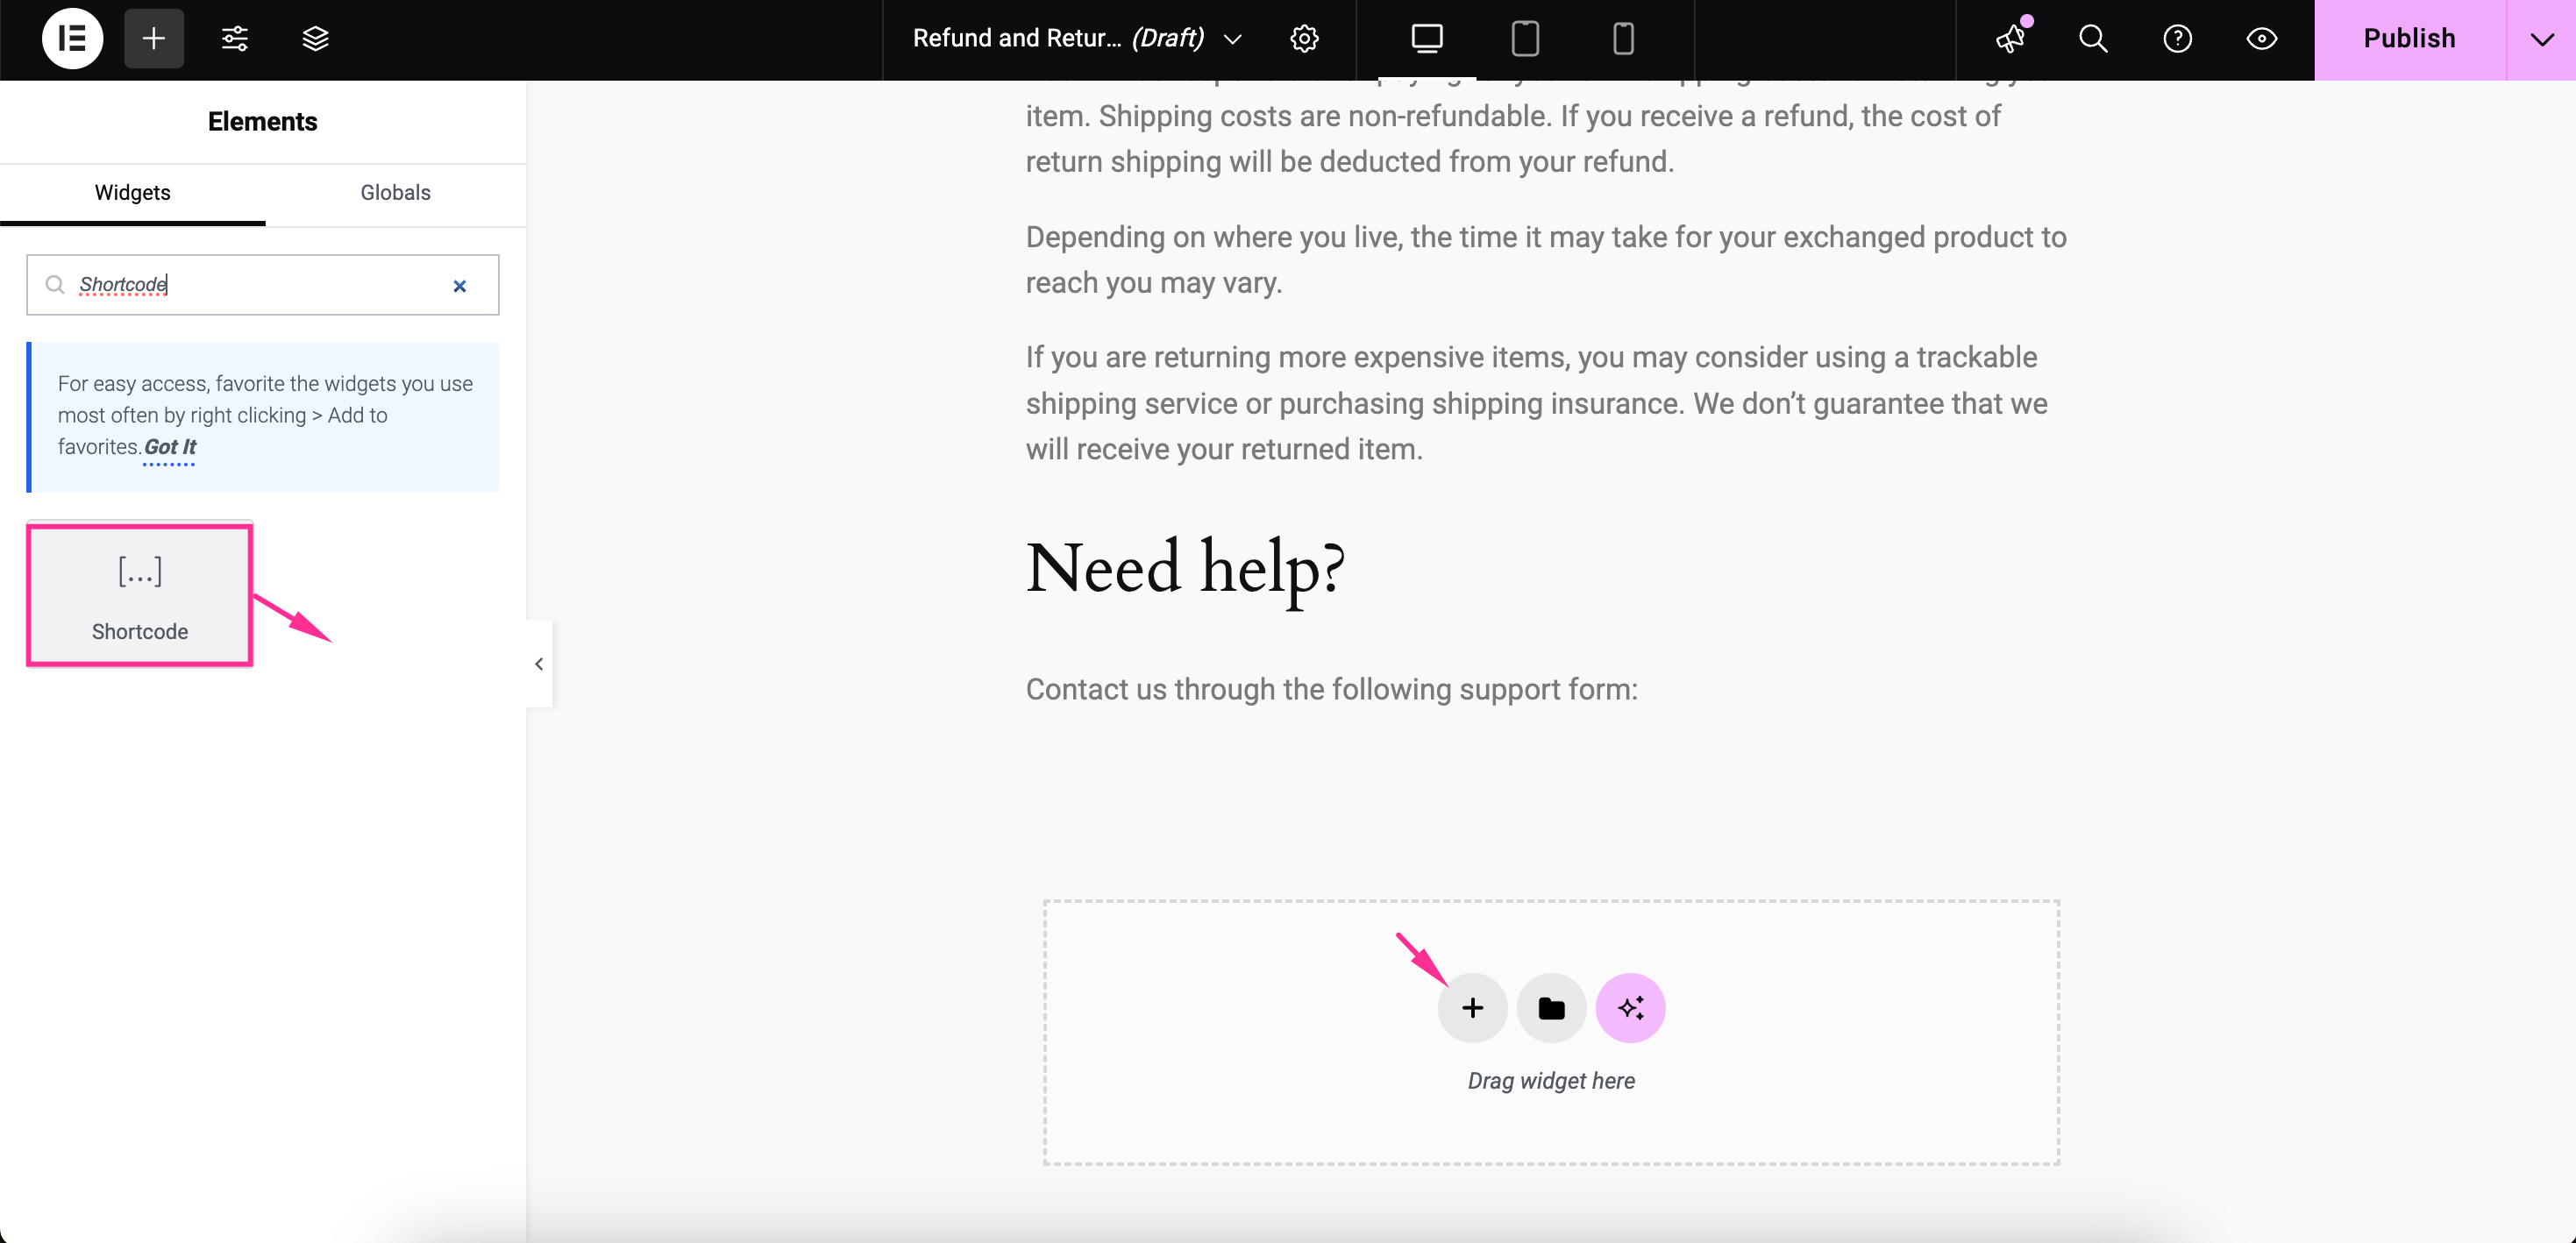
Next, you will be redirected to the Elementor editor from where you have to search for the shortcode widget og Træk og slip it to the plus icon.

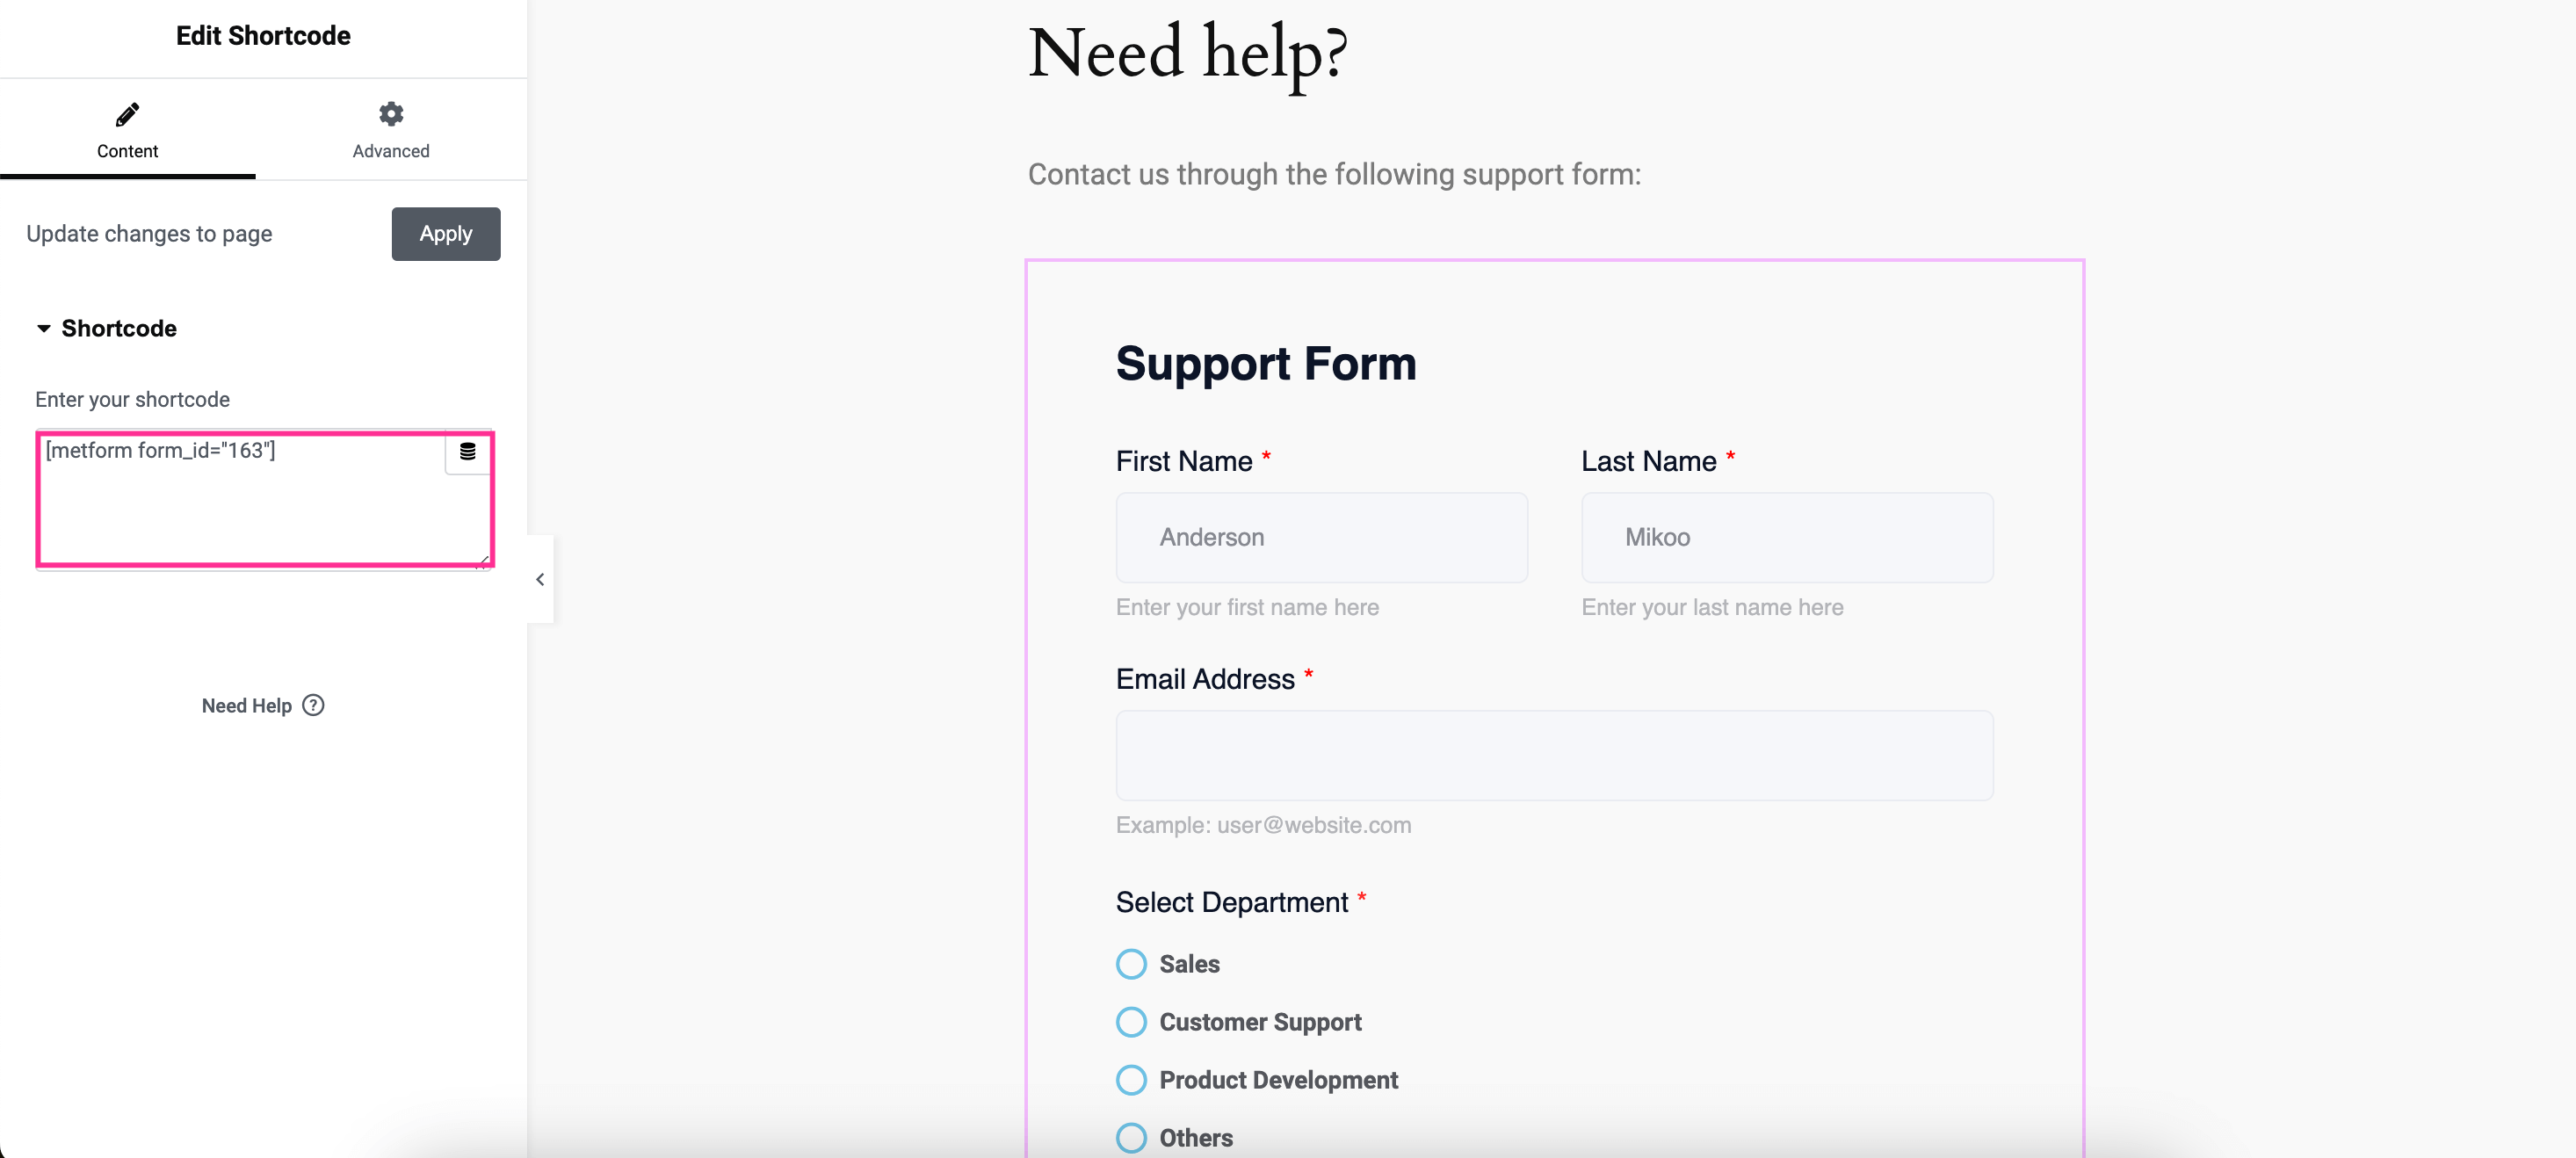
Til sidst, indsæt kortkoden in the “Shortcode” tab and your support form will be added to that page. Here is the final look of your added support ticket form using Shortcode:

FAQ
Can you integrate the support ticket form with Google Sheets?
Yes, you can integrate WordPress support form with Google Sheets. But you need to ensure your form builder has that option. MetForm has integration with Google Sheets that allows you to collect, manage, and store all form entries in Google Sheets. Check out how to connect WordPress forms with Google Sheets for an in-depth guide.
Can you add support ticket forms to pages with shortcodes?
Yes, Form builder like MetForm lets you add support ticket form to pages or posts with Shortcodes. For example, MetForm displays shortcodes with all the created forms. Just you need to copy that shortcode and add it to pages or posts by adding shortcode widget and pasting shortcode into that widget.
Opsummering
So, now you know that creating a support ticket form is not difficult anymore in WordPress using the right form builder. And, here we guided you on how to create a support ticket form in WordPress with MetForm’s template and without the template using 38+ widgets from scratch.
Now, it’s your turn to follow the guide and adopt a suitable method to design your support form that not only simplifies issue tracking but also lets you provide exceptional customer service. So, take the initiative to set up a support form for smoother query resolution and improved customer satisfaction with MetForm, a free WordPress support form builder.


Skriv et svar