


Most visitors to a service website are not ready to book on their first visit. Some have questions, and some leave halfway through the form. This guide shows you how to build a booking website that turns every kind of visitor into a booking or a lead, using Rox Appointment Booking, MetForm, et Kit de pop-up.
Here is the full process:
Étape 1: Plan your lead paths: book now, ask first, or leaving
Étape 2: Install the plugins
Étape 3: Set up Rox Appointment Booking
Étape 4: Add the Rox Appointment Booking Panel to your page
Étape 5 : Add an “Ask a question” form with MetForm
Étape 6 : Catch leaving visitors with a PopupKit popup
Étape 7 : Show reviews near your booking button
Step 8: Set up your follow-up emails
Step 9: Test every path and launch
How to Build a Booking Website
Get the required tools and start to build your desired booking website.
Get the Tools
If you want everything working together in one place, the AIO Bundle is a complete ecosystem. This bundle includes Rox Appointment Booking, MetForm, Kit de pop-up, and more, for $799 lifetime, with unlimited sites and a 14-day money-back guarantee. A yearly plan is also available. See the current prices on the Wpmet deals page.
Necessary plugins to build a booking website:
✓ Rox Appointment Booking
✓ MetForm
✓ Kit de pop-up
Mais to add more values, you can install Examen ultime de WP for reviews and Kit de courrier électronique to design your emails. The Wpmet AIO Bundle includes all of these plugins.
Step 1: Plan Your Lead Paths
A booking page only helps visitors who are ready to book. Before you build, decide what the others will do.
Every visitor takes one of three paths:
- Ready to book: Users use the Rox Appointment Booking Panel
- Has a question or wants a quote: They fill in a short MetForm form
- About to leave: Users see a PopupKit offer and share their email
Which path comes first depends on your service. For clear, low-stakes services, like a haircut or a class, lead with the booking panel. For custom or high-value services, like consulting or a project, lead with the form, and offer booking after you have replied.
Step 2: Install the Plugins
You need all four plugins on your site before you start. Each one handles one path.
- Aller à Plugins > Ajouter un nouveau and install Élémentor.
- Search for and install Rox Appointment Booking, MetForm, et Kit de pop-up. Click Activer after each one.
- Get the AIO Bundle, add the Pro versions from your Wpmet account and activate your license.

Step 3: Set Up Rox Appointment Booking
Visitors book through the Rox Appointment Booking Panel, which you will add to your page in Step 4. First, set up the services, staff, and hours it will show.
Go to the Appointment Booking plugin. Find Services, from here you can add your services and categories.

Now, you have to add agents. An agent is a staff member or service provider on your booking website, such as a doctor, stylist, consultant, or trainer. Customers choose an agent when they book an appointment, and the working hours you set for each agent decide which time slots are available. This keeps bookings accurate, prevents double booking, and lets you manage each person’s schedule separately.
Go to Agents tab
- Provide the required details
- Set their working hours and create an agent

Vous pouvez aussi allow agents to access the WordPress dashboard using their own login credentials and give permissions accordingly.

Suivant go to Settings tab. Here, in the Payments tab, set up how you take payment, such as Stripe, Mollie, Razorpay or Pay Later.

Custom fields are the input boxes customers fill out on your booking form. The form already has First Name, Last Name, Email, Phone Number, and Comments, and you can toggle them on or off, make them required, and set their width.
- To collect extra details, click Les champs personnalisés in the left menu
- Scroll to Your own fields, and click Add Custom field

Conseil: Keep the booking form short, about three to five required fields. A long form is one of the most common reasons visitors give up before they book. Collect anything extra in a follow-up email after the booking.
For the full setup, see the complete guide to appointment booking for WordPress.
Step 4: Add the Rox Appointment Booking Panel to Your Page
Now put the booking panel on a page where visitors can use it. You have three ways to do it.
Method 1: Block Editor
Best if you build your pages with the default WordPress editor. Search for the Rox Appointment Booking Panel block and insert it.

Open the block’s settings panel to configure what the form shows. Explore the available controls, and use the style options to adjust colors, fonts, spacing, and buttons so the form matches your website’s branding.

Method 2: Elementor
Ideal if you design your site with Elementor. Search for the Rox Appointment Booking Panel widget and drag and drop it onto the editor.

Select the ROX Appointment Booking Panel widget in Elementor to open its controls in the left sidebar and decide what the booking form shows. Go through the available options in the Onglet Contenu, then switch to the Onglet Style to refine the colors, fonts, spacing, and buttons so the form blends seamlessly with your site’s design.

After customization, click Publier ou Mise à jour when you are done.
Method 3: Shortcode
This is the quickest way to place the booking form anywhere on your site. Copy the shortcode from the plugin and paste it into a Petit code bloc.
[rox_appointment_booking]

Step 5: Add an “Ask a Question” Form With MetForm
Visitors who are not ready to book still show interest. A short form lets them reach you, and gives you their details.
- Aller à MetForm > Formulaires et cliquez Ajouter un nouveau.
- Pick the Formulaire de contact template, or start blank.

- Enter a form name and edit with Élémentor.
- Cliquez sur Modifier avec Elementor and trim the form to what you need, such as name, email, phone, and a message/question.

Following that, open the page where you want the form, click Modifier avec Elementor, drag in the MetForm widget.

Cliquez sur Modifier le formulaire to pick your form.

In the form’s settings, turn on Entrées du magasin, so every submission is saved under MetForm > Entries.

Also, set up the E-mail de notification, so you get an email for each submission. You can place the form below the booking panel, with a line like “Not sure yet? Ask us anything.”

See the guides to creating forms with MetForm et MetForm form settings.
Step 6: Catch Leaving Visitors With a PopupKit Popup
Some visitors will leave without booking or asking. A well-timed popup gives them one more reason to stay in touch.
Aller à PopupKit > Templates, pick an exit-intent template with an email field, and click Use Template. Write an offer that fits your business. A free checklist, a discount on the first booking, or a reminder to book later all work.

In the editor, open the campaign settings from the PopupKit logo in the top right. Under Open Event, choose On Page Exit-Intent.
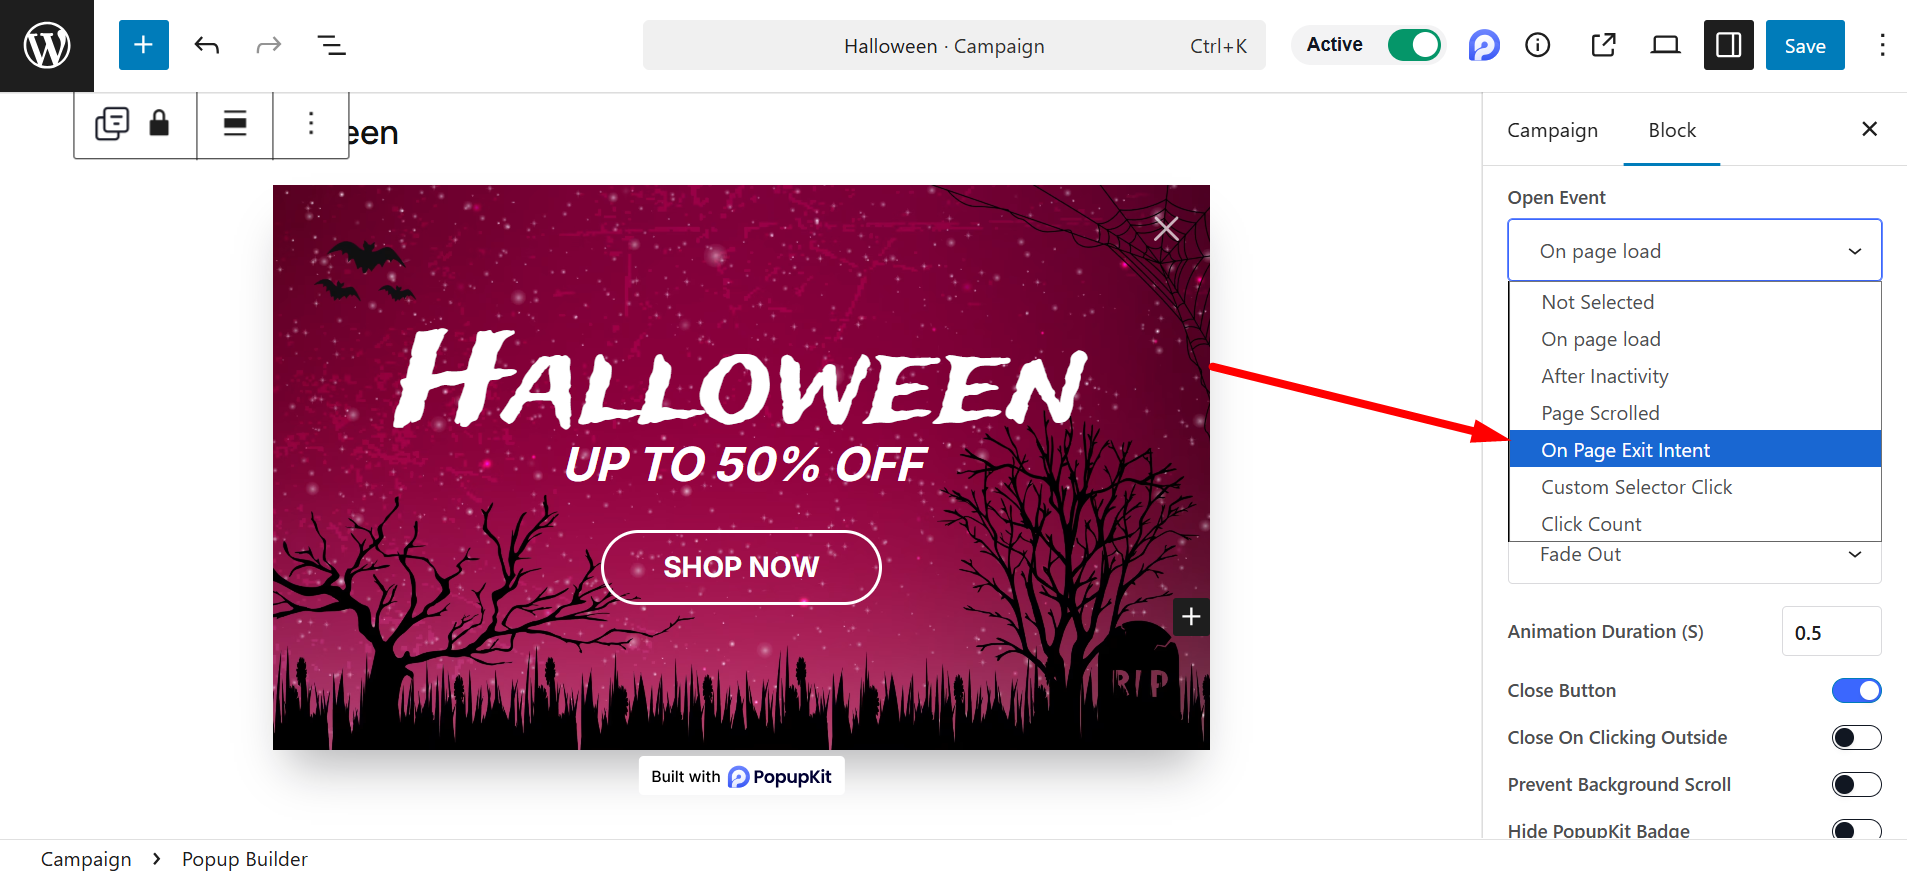
Set the display conditions so the popup shows on your service and booking pages. Click Publier.
To send the emails to your email marketing account, connect it in PopupKit. For example, the Mailchimp integration (Pro feature).
- Aller à PopupKit > Integration et trouve MailChimp.
- Enter your account name and API key, then click Connect Mailchimp Integration.
- Connect the integration to your campaign. The popup needs at least one form field for this to work.
- Submit a test email, and check that it appears in your Mailchimp audience.

Voir le exit-intent popup guid and how to automate email marketing with PopupKit.

Step 7: Show Reviews Near Your Booking Button
Visitors want proof that others had a good experience before they book. Place reviews close to the action, so they see them at the moment they decide.
Examen ultime de WP lets you show a styled rating summary and a review list. Place them on your service page, just above the booking panel. You can limit reviews by browser, IP, or email to keep fake reviews out.

This step is optional. See the Examen ultime de WP page for setup.
Step 8: Set Up Your Follow-Up Emails
A lead is only useful if you follow up fast. Set up an automatic reply for each path.
- Bookings: Rox Appointment Booking sends confirmations and reminders to customers and staff. Edit the email templates so they match your brand.
- Form submissions: In your MetForm form settings, open the Confirmation Email tab and set the subject, the sender, and a thank-you message. You can design this email with EmailKit.
- Popup emails: Create a short welcome email in your email marketing tool, so new subscribers hear from you right away.
Step 9: Test Every Path and Launch
Before you go live, try each path like a visitor would.
- Make a test booking, and check that the confirmation email arrives.
- Submit your MetForm form, and check MetForm > Entries and your notification email.
- Move your mouse out of the page to trigger the popup, and submit a test email.
- Check all three paths on mobile.
- Check that each lead shows up where you expect: Bookings in Rox Appointment Booking, form entries in MetForm, and emails in your email marketing account.
Once everything works, publish your page.

A Few Best Practices
✓ Keep every form short. Ask only for what you need right now.
✓ Offer more than one path. Not everyone wants to book on the first visit.
✓ Do not overuse popups. Show one, on exit, on your key pages.
✓ Add a consent checkbox when you collect emails, if your region requires it.
✓ Reply fast. A quick, friendly reply turns a question into a booking.
Here’s a helpful read: Best WordPress Booking Plugin for Consultants and Coaches
What the Bundle Does Not Cover
Plan for these separately:
- An email marketing account, such as Mailchimp
- A payment gateway account, such as Stripe
- SMS reminders, if you want them
Questions fréquemment posées
Use both. A booking calendar suits clear, low-stakes services. A contact form suits custom or high-value services, where you want to reply before you offer a time.
Three to five required fields is enough for most service businesses. In Rox Appointment Booking, you can turn optional fields on or off.
Add a short MetForm form for questions, and a PopupKit exit-intent popup that collects an email address.
Yes. Rox Appointment Booking can show the booking panel on the page, or as a button that opens it in a popup.
MetForm needs Elementor. Rox works with the block editor, Elementor, and shortcodes.
Yes. Rox Appointment Booking has a capable free version. Deposits and some payment options need Pro.
Conclure
A booking page only helps the visitors who are ready to book. Add a short form for people with questions, and a popup for people who are leaving, and every visit has a chance to become a lead.
Set up Rox Appointment Booking, add your form and popup, and test all three paths before you launch. For the current prices and plans, see the Wpmet deals page.


Laisser un commentaire